Hold onto your hats, folks! It's time to delve into the world of Valorant's most treasured map - Ascent! This baby has been around since the beginning of the game, so most of you already know it like the back of your hand. But even the most seasoned Ascent player can learn a thing or two from this guide.
Ascent is unique in that it offers a well-balanced attacking and defending side compared to other maps. But let's be real, defending is still a little bit easier than attacking, especially if you're facing off against a team of skilled players. Don't worry, though - with the right map knowledge and team play, you can win on any side.
That's where we come in. We'll be sharing all the juicy strategies and agent synergies that you need to know to dominate on Ascent. By the time you finish reading this guide, you'll be an Ascent expert, ready to take on any opponent that comes your way. So, get your game faces on, folks - it's time to learn how to play Ascent the right way.

Check out our complete maps overview here: https://boosting-ground.com/Valorant/guides/maps
General Information About Valorant Ascent Map
Alright, let's break down Ascent, the pride and joy of Valorant. This map has been around since the beginning, and most players know it like the back of their hand.
With a well-balanced attacking and defending side, Ascent is one of the few maps where you can't really blame the map for your losses. But it still slightly favors the defending side more on equal skill levels. So, how do you tip the scales in your favor?
Well, let's talk about the mid-area. Ascent has a wide one that can access both A and B sites. But gaining mid-control to push B Markets requires you to commit deep into the defender’s territory. It's like trying to steal cookies from the cookie jar without your mom noticing.
The map isn't as wide as other maps, so defenders and attackers can rotate fast. If you walk through B Link to A Tree as an attacker, you won't make any sounds. And since the defending play is always defending deep in B Market, rotating from mid is a piece of cake. But be careful not to choke on the frosting.
Now, if you really want to throw the defenders for a loop, smoke mid. This will confuse them and delay their rotations until your team arrives.
The map is simple because you only need to control a few areas as a defender. Both sites have door switches that can close entries from attackers or suffocate the defenders by closing an angle for defending. But the latter is more beneficial, so defenders try to turn the switch on and destroy the door immediately before the push comes.
For example, if attackers push A Site, you want to close the door in A Tree. You don’t want to push A Main while getting shot from A Tree, A Site, A Rafters, and even the triple box on the right. The door shuts one of the angles down and gives you a fighting chance.
The map is balanced for both attackers and defenders. But some team compositions would even favor the attacking team. However, if you're in a mirror match, defenders would have a slight advantage. So, practice your team play, map knowledge, and agent synergies to master Ascent and become a cookie-stealing ninja.
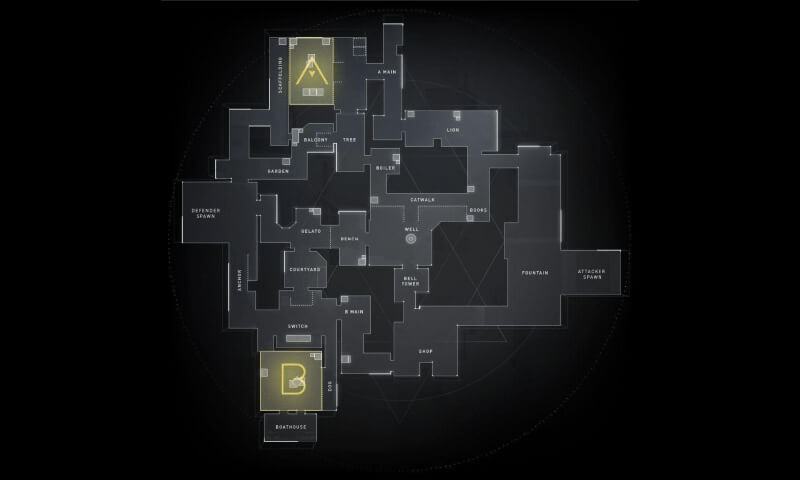
Callout Information
Welcome to the world of callouts in Ascent! Here, we'll take a look at the different callouts and terms that you'll encounter in the game, and hopefully make it a little less daunting.
Starting on the attacking side, we have A Lobby and A Main, which lead to A Wine and eventually A Site. Watch out for defenders lurking in A Rafters (also known as A Heaven), A Tree, and A Garden. Keep an eye on A Window and be ready to fight for mid control in Mid Cubby, Mid Catwalk, and Mid Top.
On the defensive side, B Lobby and B Main lead to B Site and B Boat House (also known as B Back Site). Keep an eye on the sneaky spot called Subroza below Mid Top, and keep defenders at bay with Wood (Logs) outside B Market. B Speedway (Lanes) is the shortest path from B Main to B Site, and B Defender Spawn (B CT) is directly across B Main. Defenders can also use B Stairs to guard B Site or A Generator (Genny) in A Site.
Finally, don't forget about the other callouts that refer to specific spots, like the double boxes in the middle of A Site. With these callouts in your arsenal, you'll be able to communicate more effectively with your team and take on Ascent with confidence.
Offensive Strategies
Listen up, agents, because I've got some tips to help you dominate on the map of Ascent.
Let's start with B Site. We all know it's tough to push, but with some coordination and quick action, it's not impossible. First things first, if you can catch the defenders off guard and get them to commit more to A Site, B will be much easier to push. So, coordinate with your team and make sure they're all on board.
Once you're ready to push B Main, be prepared for a lot of angles to check. And let's be real, smoking B Defender Spawn and B Market is non-negotiable. But even after that, you still need to clear B Stairs, Logs, Lanes, and B Switch before taking B Site and B Boat House. The key here is to coordinate your utilities like flashes, stuns, and recons and push the site fast. You don't want to be stuck checking angles for too long.
Now, onto A Site. One important tip is to spread out and leave at least one or two players going for the switch. Don't all clump up in one area or you'll be an easy target for the defenders. Instead, have your duelists clear the site. Use Jett's smoke and dash or Raze's nade to take out the generators and gain an advantage. And while smoking A Tree might seem like a good idea, keep in mind that the defenders can still shoot through the smoke.
For mid control, slow and steady wins the race. Play around and gather information on the enemy's positions. Avoid the sentinels and try to take more space in mid. Smoke Mid Bottom or Mid Cubby and clear the un-smoked area to take control. You can even rotate your team and go for a two-pronged attack on A Site by taking control of A Tree while attacking in A Main.
Last but not least, force the enemy team to use their utilities before making your push. Threaten to push any site and watch as the defenders panic and use up their flashes, mollys, and stuns. Your goal is to bait out more utilities than your team uses. That way, when it's time to make your move, you'll have more utilities ready to go.
So there you have it, agents. Follow these tips and dominate on Ascent. And don't forget to have a little fun while you're at it.
Defensive Strategies
Welcome to the world of VALORANT, where the battle for supremacy never ends! As a player, you're constantly strategizing and coordinating with your team to outsmart the enemy and come out victorious. And what better way to do that than by mastering the art of defense?
First things first, if you hear the sound of enemies doing a fast push, don't panic! Instead, use a utility to delay them and buy yourself some time. But if you want to take it up a notch, go ahead and shoot down those doors! Switch on the switch, destroy the gate as it closes, and watch as a new angle in A Tree opens up for the attackers to cover. Even if it's smoked, they'll feel the pressure from A Tree because defenders can still peek out.
Speaking of defenders, don't forget that you can throw utilities from A Tree with the gate opened. But for the perfect defense, coordinate with your Initiator. And when the attackers push out, have a Recon agent like Fade or Sova on hand to scan the site. Even if it's smoked out, you can still shoot through it once your teammates have scanned the enemies.
If you're playing defense from B Stairs, make sure to position yourself where you can hear enemy rotations. But be careful not to overextend, or you might get stuck in Mid Bottom. Luckily, agents like Chamber or Omen can overextend and still back out safely. And whatever you do, don't waste a smoke in Mid Bottom to help a teammate get back.
Now, let's talk Sentinels. When you have a strong defending Sentinel like Killjoy or Cypher, you can adjust your defense to 3-1-1 occasionally. Most enemies will try to avoid pushing a site with a lot of traps, which means they'll be fighting against three players anchoring if they push the other site. Traps can also give you a lot of time for rotations, and if the enemies push through them, they'll be fighting at a disadvantage against your team's Sentinel.
But what do you do when you're down players? Losing players is inevitable, but that doesn't mean you should give up. When you're in a 3v4 situation and you're down one player while defending, defend deep by just guarding the sites. Leave the middle open, but always take angles where you're only open to one area. And if you have two defenders covering one site, you can just save if your other teammate fails to pick off one or two players.
So, there you have it - some tips and tricks to help you defend like a pro in VALORANT. Remember, defense wins championships!
Agent Tips
Welcome to the world of Valorant, where maps and agents play a crucial role in determining the outcome of a match.
Let's start with Killjoy, a master of defensive utilities, and Ascent, one of her best maps. With her kit, B Site becomes impenetrable due to the narrow pathways, making it difficult for the enemy to clear all her utilities while also clearing angles when entering the site. Even if she plays on A Site, her traps can force enemies to fight at a disadvantage.
Next up is Sova, who shines on Ascent. A well-placed Recon Bolt can scan the big open spaces in both A and B Sites, and his Hunter's Fury can be used on a fast A Main push. His Owl Drones can also scout ahead or go with the push, making him a great asset to any team.
Moving on to the controllers, Omen, Brimstone, and Astra. Omen can smoke both sites from almost anywhere on the map and throw flashes to support from random angles. Brimstone's stim can be used for quick rotations, and his ultimate can clear one part of a site, destroy KJ ultimates, or play for post-plant situations. Astra has no problems with smoking and has great utilities to support the team from anywhere. Her ultimate can cut the A Site in half, making it easier to play for a post-plant from A Main.
Jett, a dangerous duelist, can enter at will with her Cloudburst and dash in. Her kit makes her an excellent Operator user, and she can play aggressively and back out if needed. She also has a ton of good attacking plays that only she can do, such as dashing to B Site or using her smokes if the controller is down.
Lastly, let's talk about Fade, one of the strongest initiators out there. Her ability to recon a site and throw Prowlers to clear corners makes her a valuable asset to any team. Timing her Prowlers with a teammate's push can be very effective, and her Haunts can recon enemies while a push is happening at the same time. The perfect play is throwing the Haunt while a Jett Cloudbursts and dashes in, pressuring the defenders and preventing the Haunt from being destroyed immediately. Her Seize can also delay or stop fast pushes if needed.
So there you have it, a rundown of some of the best agents and strategies for Ascent in Valorant. Happy gaming!
Boosting Ground Services
Here at the site we offer various leveling, ranking, farm, and grind services that will help your character progress faster than ever! Apart from Valorant Boosting Services, we also offer WoW boosting, Destiny 2, Overwatch and many other games! With our team of skilled pro boosters, you’ll blaze through the competition and get that high-end rank in no time! Our prices are cheap and affordable for every gamer. We also offer a unique discount system here, where you level up and get rewards and discounts when you’ve purchased certain things. Check us out and you won’t regret it!