
Introduction: The Methane Depths of Titan Await
The Ghosts of the Deep dungeon beckons Guardians to the abyssal methane oceans of Titan, a celestial body scarred by the Hive and now the stage for a perilous new threat. Within the submerged ruins of the New Pacific Arcology, the Lucent Brood, Savathûn's Light-infused Hive, are engaged in a dark ritual. Their objective is chilling: the resurrection of Oryx, the Taken King, whose colossal corpse has drifted from the rings of Saturn to settle in Titan's crushing depths. This guide provides a comprehensive walkthrough of the Ghosts of the Deep dungeon, detailing strategies for each encounter, uncovering hidden secrets, and optimizing loadouts to conquer the challenges that lie beneath.

Access to this endgame activity requires the Lightfall Dungeon Key, purchasable for 2,000 Silver, or ownership of the Lightfall Deluxe Edition. For Normal difficulty, a Power Level of 1945 is recommended, while Master difficulty demands a formidable 2000 Power Level. Guardians must pick up the "Rise" quest from Hawthorne at the Tower to initiate their descent.
Key Concepts and Fundamentals
Successfully navigating the Ghosts of the Deep dungeon necessitates a firm understanding of its narrative underpinnings, unique gameplay mechanics, and environmental interactions. These elements are interwoven, creating a cohesive and challenging experience.
Narrative & Thematic Elements
The central plot revolves around the Lucent Brood's audacious attempt to resurrect Oryx, the Taken King, utilizing his physical remains discovered in the methane sea of Titan. Commander Sloane, now partially Taken but an ally, detects massive energy surges and anomalous Hive activity, dispatching Guardians to investigate and intervene. The narrative unfolds as players delve deeper, disrupting Hive rituals and confronting powerful Lightbearing Hive who serve this new, ominous purpose.
Underwater Mechanics & Movement
A significant portion of Ghosts of the Deep takes place in submerged environments, introducing specific mechanics that players must master:
- Pressure Gauge: During certain underwater sequences, particularly when hunted by the boss Ecthar in "The Deep Methane" section, players will find their Pressure Resistance gauge rapidly depleting from his attacks rather than direct health damage. This creates a critical time-sensitive element, forcing swift action or evasion.
- Oxygen/Air Bubbles: Survival in the underwater sections is contingent on replenishing the pressurized suit by moving through air bubbles. Crucially, these bubbles are a shared resource among fireteam members. One Guardian consuming a bubble means it is unavailable to others for a short period. This design necessitates careful coordination and communication, especially for less experienced teams or during high-pressure moments, to ensure no one succumbs to the crushing depths due to a lack of foresight or teamwork.
- Movement: Underwater movement is inherently slower and more fluid than on land, requiring players to adapt their traversal strategies. Environmental features such as turbines create strong upward currents that must be navigated, sometimes to escape threats or reach new areas.
Unique Environmental Interactions
The dungeon employs several distinct mechanics that are integral to overcoming its challenges:
- Deepsight: This recurring ability, often activated via orbs or nodes, reveals hidden environmental elements crucial for progression. It is used to uncover Hive runes on statues in the first encounter, symbols on walls during the Ecthar fight, and ritualistic connections to Oryx's body parts in the final encounter. Deepsight acts as a key to unlock the next step in many of the dungeon's puzzles.
- Vestige of Light: This is a timed buff typically acquired by defeating specific powerful Hive, particularly Lightbearers, and crushing their Ghosts. The Vestige must then be carried and deposited into corresponding Hive statues or ritual sites, often matching symbols revealed by Deepsight. The timer associated with the Vestige (usually 1 minute and 20 seconds) introduces a significant pressure element to these mechanical phases.
- Hive Runes: These ancient symbols are central to the dungeon's puzzles. Players will need to memorize rune sequences, match runes from defeated enemies to environmental locations, or align runes through perspective-based puzzles. Incorrect interactions with these runes often result in immediate death.
- Piercing Light: This potent buff is essential for initiating damage phases against the dungeon's bosses. In the Ecthar encounter, it is obtained by defeating Wellkeeper Knights and stepping into the pool of energy they leave behind. In the Šimmumah encounter, it is granted by completing the ritual involving Vestige deposits at Oryx's body parts. The Piercing Light buff allows Guardians to break through the bosses' seemingly impenetrable shields, making them vulnerable to damage. This mechanic dictates a critical target priority during encounters.
Recommended Loadouts & Builds
Optimizing loadouts is crucial for tackling the varied challenges within Ghosts of the Deep. A high Resilience stat (aiming for 100) paired with chest armor Damage Resistance mods is a foundational recommendation for enhancing survivability across all encounters. The current meta emphasizes flexibility and specific weapon archetypes for distinct roles.
Class-Specific Build Examples
Nightstalker: Utilizing Gyrfalcon's Hauberk with Void weapons provides excellent add clear and survivability through invisibility. Deadfall or Moebius Quiver tethers offer valuable debuffs for boss damage.
Arcstrider: Assassin's Cowl paired with Combination Blow offers potent melee damage and survivability through healing and invisibility on melee kills, effective for both add clear and aggressive boss damage phases.
Sunbreaker: Sol Invictus provides strong survivability through Sunspots. A "Bonk Hammer" build (Throwing Hammer) can sustain healing and deal considerable damage, especially against Ecthar.
Sentinel: Ward of Dawn (Bubble) remains a crucial tool for providing Weapons of Light during DPS phases.
Strand (Banner of War): This aspect offers exceptional team survivability and melee damage enhancement, making it a strong choice for all encounters.
Dawnblade: Well of Radiance is almost indispensable for creating safe zones and providing damage buffs during boss DPS phases. Starfire Protocol or Sunbracers can enhance add clear with Solar grenades.
Voidwalker: Nova Bomb (Cataclysm or Vortex) offers significant burst damage.
Stormcaller: Chaos Reach with Geomag Stabilizers can provide sustained ranged damage, while Arc Souls add passive damage.
Break the Ritual
The first major challenge in Ghosts of the Deep, "Break the Ritual," takes place in an open expanse outside the New Pacific Arcology, centered around a prominent Hive ritual site. This encounter serves to introduce Guardians to the core mechanics of Deepsight and Vestige of Light manipulation. The objective is to imbue four specific Hive statues with Vestiges of Light, thereby disrupting the Lucent Brood's activities and opening the way forward.
- Initiate the Path: Upon entering the area, locate and defeat a Soulfire Ogre (often referred to as a Soulfire Binder). Its defeat will cause a trail of green, smoggy energy to appear, indicating the direction to proceed.
- Follow the Trail: Mount your Sparrow (highly recommended for speed) and follow the energy trail. This path will lead to a group of Hive enemies, including more Soulfire Binders. As you clear these enemy packs, the trail will extend. After clearing approximately three such groups, the final group will include a Lucent Lightbearer (Knight or Wizard). Crucially, take note of the large Hive symbol floating above this Lightbearer before engaging or after defeating it.
- Acquire Vestige of Light: Defeat the Lucent Lightbearer and promptly crush its Ghost. The Guardian who crushes the Ghost will receive the Vestige of Light buff, which is timed (typically 1 minute and 20 seconds). If the timer expires, the holder dies, and the process to obtain that Vestige may need to be restarted.
- Return to the Ritual Site & Activate Deepsight: With the Vestige of Light secured, return to the central Hive ritual site. Here, more Hive will have spawned, including a yellow-bar Veilweaver Wizard. Defeat this Veilweaver Wizard, and it will drop a Deepsight Orb.
- Reveal Statue Symbols: Interact with the Deepsight Orb to activate Deepsight for all fireteam members. This will reveal previously hidden Hive symbols on the various Thrall-like statues surrounding the ritual site.
- Imbue the Correct Statue: The Guardian holding the Vestige of Light must now locate the statue whose Deepsight-revealed symbol matches the symbol that was noted above the defeated Lightbearer. Approach the correct statue and interact to imbue it with the Vestige.
- Repeat for All Statues: The entire process must be repeated until four statues in total have been correctly imbued. Each successful imbument will cause a ritual statue to manifest more fully. Once all four are complete, the ritual will unravel, and the way into the Arcology will open.
Navigating to Ecthar
With the initial ritual disrupted, the path into the depths of Titan's Arcology opens, leading Guardians on a perilous journey towards the first major boss, Ecthar, the Shield of Savathûn. This traversal is a multi-stage descent involving platforming, underwater navigation, and minor enemy encounters.
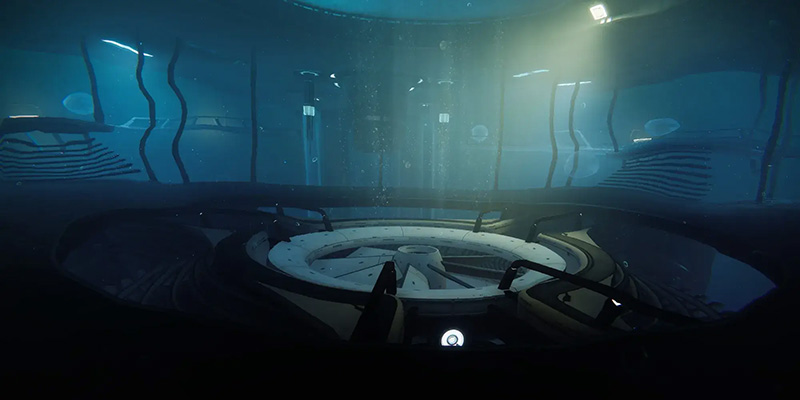
The journey begins by entering the now-accessible Arcology interior, progressing through areas like a drilling site. Eventually, Guardians will encounter a massive glass column and must drop down it, transitioning into the first significant underwater section where pressurized suits become active.
Underwater Traversal
The primary objective during these segments is to descend. Survival hinges on periodically entering air bubbles to repressurize suits and reset the pressure gauge. As previously noted, these air bubbles are a shared, non-instanced resource. If one player uses a bubble, it becomes temporarily unavailable for others. This mechanic underscores the need for fireteam coordination, especially in ensuring all members can reach bubbles before their pressure resistance fails.
Fan Mechanics
At certain points, the descent will appear to dead-end. Players must look for large fans or turbines. Jumping onto these will propel Guardians upwards, often back into pressurized sections of the Arcology or into new pathways. These fans act as environmental transitions and navigational aids.
Ocean Floor & Wreckage
After navigating a series of these underwater descents and fan-propelled ascents, Guardians will reach the ocean floor. This area is characterized by a more linear path. Players should look for barriers of water; passing through these indicates entry into a non-flooded room or cave where weapons can be used and movement is normalized. The ultimate destination is the wreckage of a Lucent Hive ship, where Ecthar awaits.
Secrets Between Encounters (Part 1)
The lengthy and intricate pathways of Ghosts of the Deep conceal numerous secrets, including hidden chests and collectible "Memories of Darkness." These reward diligent exploration and offer additional loot or lore insights.
Hidden Chest #1 Location
The first hidden chest is found during the platforming and traversal section on the ocean floor, specifically within the series of pressurized Hive caves that players navigate before reaching Ecthar's arena.
Memories of Darkness (Collectibles - Part 1)
Twelve "Memories of Darkness" are scattered throughout the dungeon, contributing to the "In Memoriam" Triumph. The first six are found en route to Ecthar:
| Memory # | General Area | Detailed Location Description |
|---|---|---|
| 1 | Spawn / Ritual Area | Under broken trees near rock pit, right of path; end of red-lit corridor, by bench. |
| 2 | Post-Ritual Descent | Before circular corridor, left platform, jump up cubes on wall to upper red-lit room. |
| 3 | Drilling Platform (Pre-Dive) | Pink-lit room before diving encounter; jump on central tubes, then to left platform. |
| 4 | Rotating Platforms Section | After pink-lit room, drop down; on central pillar of rotating platform assembly. |
| 5 | First Underwater Room | Inside half-open elevator door, on ground with 3 air bubbles. |
| 6 | Underwater Descent (Near 1st Fan) | Near first fan; go left of fan, up stairs, then left again to ledge. |
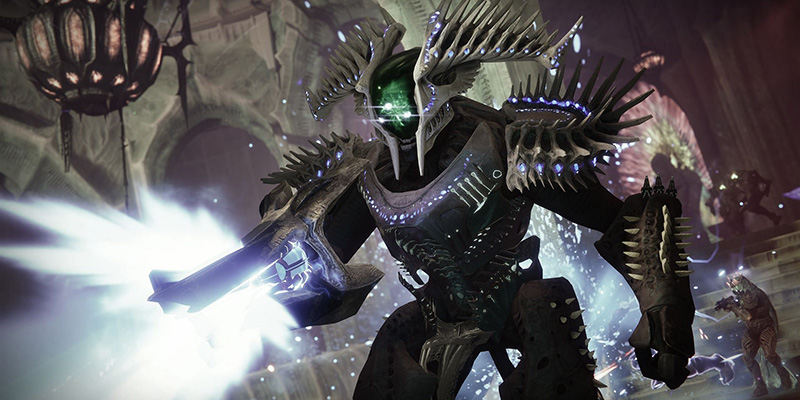
Ecthar, the Shield of Savathûn
The first true boss of Ghosts of the Deep is Ecthar, the Shield of Savathûn, a colossal Lightbearer Knight encountered within the wreckage of the Lucent Hive ship. The encounter unfolds across two distinct environments: The Mausoleum, an upper, pressurized area, and The Deep, a lower, treacherous underwater methane cave system. Defeating Ecthar requires mastery of mechanics in both zones while under constant pressure from the boss himself.
Step-by-Step Breakdown (Standard Strategy)
- Initiate & Clear Initial Threats: Upon entering The Mausoleum, players will typically first defeat kneeling Acolytes or proceed directly to engage three yellow-bar Blistered Knights. These Knights spawn in the upper portion of The Mausoleum: one often on the left staircase, one on the right staircase, and one on the central platform at the far end. Ecthar himself is present in the room from the start (or shortly after initial Acolytes are cleared), actively chasing players, but he is immune to all damage at this stage. Eliminating the three Blistered Knights will cause a Keeper of the Deep Ogre to spawn, usually at the top of the central stairs or on the far platform.
- Activate Deepsight for Symbols: Defeat the Keeper of the Deep Ogre. This action will spawn a Deepsight Orb in the center of The Mausoleum, often near the rally banner location or a central soulfire pit. One player must activate this Deepsight Orb.
- Identify Hive Symbols (Above Water): With Deepsight active, players must scan the walls and hanging chains or plates along the sides of The Mausoleum. Three distinct Hive Symbols will be highlighted and visible. The entire fireteam should memorize these three symbols and their appearance.
- Dive into The Deep (Underwater Rune Activation): Players must now descend into the underwater methane cave system known as "The Deep." Access points are several holes in the floor of The Mausoleum, typically located near the center.
- Within The Deep, players must locate and interact with (activate) three Hive runes etched onto rocks or walls. These runes must match the three symbols previously memorized from The Mausoleum. Air bubbles are scattered throughout The Deep and must be utilized to refresh the Pressure Resistance timer, allowing more time to search.
- Spawn and Defeat Lightbearer Wizards: Each correctly activated underwater rune will cause a Lightbearer Hive Wizard to spawn back up in The Mausoleum. After all three correct runes are activated, three Lightbearer Wizards will be present. The fireteam must defeat all three of these Wizards.
- Acquire Vestiges of Light: Once a Lightbearer Wizard is defeated, its Ghost will appear. Crush the Ghosts of all three defeated Wizards to obtain three individual Vestiges of Light. Each Vestige is a timed buff.
- Imbue Statues: The players holding the Vestiges of Light must then deposit them into three Thrall-like Hive statues located within The Mausoleum. One statue is typically found at the front/top of the stairs (where the Ogre spawned), with the other two located near the side staircases or platforms.
- Spawn and Defeat Wellkeeper Knight: After all three statues have been successfully imbued with Vestiges of Light, one or more (usually one) Wellkeeper Knights (yellow-bar) will spawn. This Knight typically appears at the back or bottom of The Mausoleum, often near where the rally banner can be placed. The fireteam must quickly defeat this Wellkeeper Knight.
- Gain Piercing Light: The defeated Wellkeeper Knight will drop a conspicuous pool of green light or well on the ground. Players must step into this pool to acquire the Piercing Light buff. This buff is temporary, lasting approximately five seconds.
- Damage Phase (DPS): While the Piercing Light buff is active, players can damage Ecthar's shield. This shield must be broken quickly, as the time taken to do so counts towards the overall damage phase window. Arbalest, when combined with Piercing Light, is exceptionally effective and can often one-shot the shield, making it a highly recommended tool for this moment.
Optimal DPS Strategy
Use Arbalest with Piercing Light to one-shot the shield, then unleash close-range weapons like Lament or Legend of Acrius. A Well of Radiance is strongly advised for survivability.
Ecthar's Behavior & Attacks
- Constant Pressure (Mausoleum): During the mechanic phases in The Mausoleum, Ecthar actively patrols the area and will chase down players, attempting to engage them with his cleaver (standard Knight melee attacks). He may also deploy Hive Knight Barricades.
- Underwater Menace (The Deep): While players are searching for runes underwater, Ecthar relentlessly hunts them. He does not appear to use ranged attacks here; instead, his physical presence and slam attacks are the primary threat, significantly draining the Pressure Resistance of any Guardian he hits.
- DPS Phase Aggression: Ecthar is extremely mobile and aggressive during the damage phase. He will frequently rush the fireteam, making it difficult to maintain sustained damage from a single position without crowd control effects or the protection of a Well of Radiance. Some reports also indicate the use of Suppression Grenades during this phase, which can interrupt Supers and abilities, posing a significant threat.
Into the Wreckage: Secrets Between Encounters (Part 2)
Following the defeat of Ecthar, Guardians must venture even deeper into the decaying Lucent Hive shipwreck and surrounding structures, navigating treacherous paths towards the final confrontation with Šimmumah ur-Nokru.
Hidden Chest #2 Location
The second hidden chest is found just before the final encounter with Šimmumah ur-Nokru, within the large chamber where a powerful yellow-bar Ogre is fought beneath a gazebo-like Hive structure.
Memories of Darkness (Collectibles - Part 2)
| Memory # | General Area | Detailed Location Description |
|---|---|---|
| 7 | Post-Ecthar, underwater fan area | Near large slow fan, in small passage/hole in wall, not up the main fan. |
| 8 | Post-Ecthar, chasm/jumping puzzle | On a beam/platform off to the side, requires careful jumps. |
| 9 | Post-Ecthar, Shrieker Room | On a ledge/platform to the side, before final Ogre. |
| 10 | Post-Ecthar, Shrieker Room Path / Ogre Area | Near Ogre under gazebo or side alcove along the path. |
| 11 | Šimmumah Encounter Area (Approach/Side Tunnels) | Typically in underwater tunnels to side rooms or approach pathways to final arena. |
| 12 | Šimmumah Encounter Area (Arena Periphery) | Often near final arena entrance or in a less obvious spot within it. |
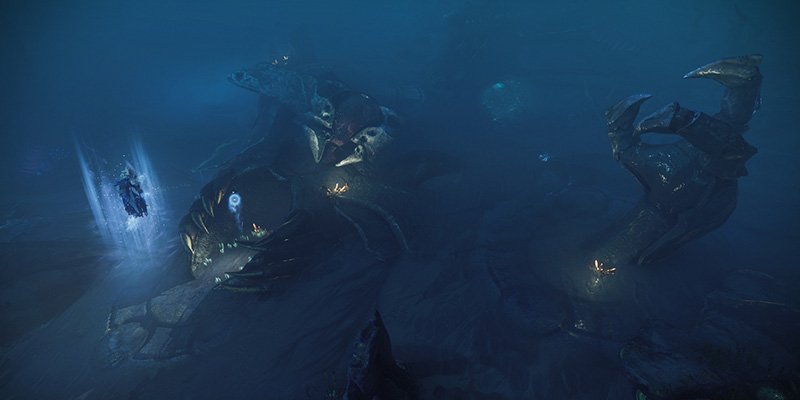
Šimmumah ur-Nokru, Lucent Necromancer
The final confrontation of Ghosts of the Deep takes place in a vast, multi-level cavern dominated by the colossal, inert corpse of Oryx, the Taken King. Sections of this arena are submerged, providing underwater access to crucial side chambers. Here, Guardians must face Šimmumah ur-Nokru, a potent Lucent Hive Wizard, and disrupt her intricate ritual to prevent the resurrection of Oryx. This encounter is a complex, multi-stage battle demanding precise execution of mechanics, robust add control, and sustained damage.
Step-by-Step Breakdown (Standard Strategy)
- Initiate Encounter: The fight begins when a Guardian performs a finisher on the Hive Ghost located near Oryx's head (or simply destroys it).
- Deepsight and Ritual Site Identification: Upon initiation, a Deepsight Orb will spawn, typically in the center of the main arena, alongside numerous enemies. Activating this Deepsight will highlight three of Oryx's six visible major body parts (e.g., Head, Chest, Left Hand, Right Hand, Left Foot, Right Foot) in a distinct green glow. Standing in close proximity to one of these highlighted body parts will grant the player the "Ritual Conductor" buff.
- Defeat Vorlog, Risen In Heresy: A formidable Hive Knight named Vorlog, Risen In Heresy, will spawn in the arena. To progress the mechanic for a specific highlighted body part, a player must have the Ritual Conductor buff from that particular active (green-glowing) body part when Vorlog is defeated. This action effectively "attunes" that body part for the next step.
- Reveal Hive Symbol (Symbol Alignment Puzzle): Once Vorlog is defeated while a player is attuned to a specific Oryx body part (via Ritual Conductor), two new visual elements will appear in the air, usually positioned between the attuned body part and the center of the arena: a green, ethereal ring or circle, and a Taken King (Oryx head) icon. To reveal the required Hive Rune, a player must position themselves so that they are looking through the green circle directly at the Taken King icon. Correct alignment will cause a specific Hive Rune/Symbol to become visible, floating above the Oryx body part that was just attuned. Players must memorize this symbol and associate it with that specific body part (e.g., "Oryx Head has the Cross symbol").
- Repeat for Three Symbols: The process detailed in Steps 2-4 must be repeated for the other two Deepsight-highlighted Oryx body parts. Each will have Vorlog spawn (or respawn), require the Ritual Conductor buff from that new part for Vorlog's defeat, and reveal a unique Hive symbol via the alignment puzzle. This will result in three distinct Oryx body parts each having an associated, revealed Hive symbol.
- Access Side Rooms & Collect Vestiges of Light: Located around the periphery of the main arena are water barriers that lead to three separate underwater side rooms or caves. Each of these three side rooms contains a group of Hive enemies, a Lucent Lightbearer (this can be a Knight, Wizard, or Acolyte), and, crucially, a floating Hive symbol that will match one of the three symbols previously revealed above Oryx's body parts. Players (typically one per Vestige, or one player cycling) must enter a side room, identify the Hive symbol present within it, and then defeat the Lucent Lightbearer in that room. It is vital to note the symbol in the room before finishing the Lightbearer's Ghost, as the symbol may vanish after the Ghost is crushed. After defeating the Lightbearer, crush its Ghost to pick up its Vestige (e.g., "Vestige of a Knight," "Vestige of a Wizard," or "Vestige of an Acolyte"). This Vestige is timed, typically for 1 minute and 20 seconds.
- Return to Main Arena and Deposit Vestiges: With a Vestige of Light secured, the player must return to the main arena. Crucial Step: Activate Deepsight again from an available Deepsight Orb in the main arena. Deepsight must be active for the Vestige to be deposited. The player must then approach the Oryx body part whose revealed symbol (from Step 4) matches the symbol that was present in the side room where that specific Vestige was obtained. Interact with this correct Oryx body part to deposit the Vestige.
- Repeat for all Three Vestiges: This process of entering a side room, noting its symbol, obtaining the corresponding Vestige, returning, activating Deepsight, and depositing at the correctly matched Oryx body part must be completed for all three distinct symbols/Vestiges.
- Gain Piercing Light: Once all three correct Vestiges have been successfully deposited, pools of green light will appear at each of the three attuned Oryx body parts where the Vestiges were dunked. Standing in one of these pools grants the fireteam the Piercing Light buff.
- Damage Phase (DPS): While the Piercing Light buff is active, players can damage Šimmumah's shield. This shield must be broken to make her vulnerable. A message will typically appear on screen (e.g., "Šimmumah is vulnerable!") once the shield is down. Arbalest is highly effective for quickly breaking her shield when empowered by Piercing Light. Once her shield is broken, Šimmumah becomes vulnerable to direct health damage. She is known to teleport frequently around the arena and primarily attacks with powerful Arc projectiles from a distance. Players should utilize their most effective long-range damage weapons (Linear Fusion Rifles, Leviathan's Breath, etc.). A Well of Radiance is highly beneficial for survivability and damage amplification during this phase.
- Repeat Cycle: When Šimmumah becomes immune again (or after a set duration), the damage phase ends. The entire process, starting from activating Deepsight to identify ritual sites (Step 2), must be repeated until Šimmumah's health is fully depleted.
- Finish the Ghost: After Šimmumah's main health bar is empty, her Hive Ghost will appear. A Guardian must perform a finisher on this Ghost to permanently defeat her and successfully complete the Ghosts of the Deep dungeon.
Šimmumah's Behavior & Attacks
- Frequent Teleportation: Šimmumah is a highly mobile boss, constantly teleporting to different locations around the expansive arena. She often positions herself above Oryx's body parts or along the arena's edges, making her a challenging target to track and hit consistently.
- Arc Projectiles: Her primary form of attack consists of volleys of damaging Arc projectiles. These can hit hard, making Arc Resistance mods on chest armor highly recommended for all fireteam members.
- Lucent Moths: As mentioned, Šimmumah will summon swarms of seeking Lucent Moths, typically when Vorlog spawns or is defeated. These Moths are a primary cause of wipes if not dealt with immediately and effectively.
- Summoned Adds: In addition to Moths and Vorlog, standard Hive Acolytes and Thrall will also spawn throughout the encounter, adding to the pressure.
- Oryx's head
- His left arm
- His left foot
- Better cover and stable lines of sight
- Oryx's chest/heart cavity
- Very exposed to fire from multiple angles
- Limited escape routes
- Poor cover from Arc projectiles
Loot Compendium
The Ghosts of the Deep dungeon offers a unique suite of Legendary weapons and armor, themed after the iconic "Taken King" era, as well as a powerful Exotic Trace Rifle, The Navigator. Understanding the loot table and desirable perk combinations ("god rolls") is essential for targeted farming.
Definitive Ghosts of the Deep Loot Table
| Encounter | Weapon Drops | Armor Drops | Notes |
|---|---|---|---|
| Break the Ritual | New Pacific Epitaph (Stasis GL), No Survivors (Solar SMG), Cold Comfort (Stasis RL) | Arms, Legs, Helm | Consistent across all sources |
| Ecthar | No Survivors (Solar SMG), Cold Comfort (Stasis RL), Greasy Luck (Solar Glaive) | Chest, Class Item, Arms, Legs | Shield of Savathûn themed |
| Šimmumah | The Navigator (Strand Exotic), Any previous weapons | Any previous armor pieces | Exotic exclusive to final encounter |
Weapon Deep Dive: God Rolls
All Legendary weapons from Ghosts of the Deep feature the Origin Trait: Restoration Ritual. Its effect is: "Reviving allies or performing Finishers prepares an Emergency Reload. Emergency Reload refills the Magazine from reserves the next time it is emptied." This trait provides both immediate utility and a safety net for ammunition management.
Envious Assassin (overflows magazine) + Bait and Switch (damage bonus after using all three weapons). Other strong perks include Chill Clip for crowd control and Explosive Light for Orb synergy.
Demolitionist (grenade energy on kills) + Incandescent (spreads Scorch to nearby targets). This combination excels at add clear and ability regeneration, synergizing perfectly with Solar subclasses.
The Navigator (Exotic Strand Trace Rifle)
Weft Cutter: Sustained damage severs targets, reducing their outgoing damage. Protective Weave: Firing at allies grants both user and target Woven Mail for damage reduction.
The Navigator's Catalyst Quest
Once Guardians have acquired The Navigator Exotic Trace Rifle, a hidden quest becomes available within the Ghosts of the Deep dungeon to unlock its Catalyst. This quest involves locating and activating three clandestine Hive Statues by depositing Vestiges of Light obtained from specific piles of "deceased Ghosts." Completing this multi-stage task also requires confronting and defeating a secret boss, Thul-Ar, Acolyte of Nokris, multiple times.
Step-by-Step Activation & Boss Fight
- Statue #1 & Thul-Ar (Part 1 - Ritual Site Vicinity): Very early in the dungeon, near the initial spawn point (Break the Ritual encounter area). Search for a cluster of fallen trees that conceal a hidden entrance to an Arcology section. Descend through the opening and follow the hallway until you find a heap of deceased Ghosts. Interact with this pile to obtain a Vestige of Light. This Vestige is timed, lasting 1 minute and 20 seconds. From the dungeon spawn, follow the main dirt road. The statue is located atop a large rock formation to the right of the path, often near the first prominent rock encountered. Players may need to jump onto rocks above a glass-covered hole or structure to reach it. Deposit the Vestige of Light into the Hive Statue. This will summon Thul-Ar, Acolyte of Nokris, a Lightbearer Acolyte.
- Thul-Ar Mechanics (Phase 1): Thul-Ar will initially be immune to damage. Observe the Hive symbol floating above him. Concurrently, three Runebound Visage Wizards will spawn in the vicinity. The fireteam must identify and defeat the specific Wizard that has the same Hive symbol as the one above Thul-Ar. Defeating the correct Wizard grants the Piercing Light buff. Use this buff to break Thul-Ar's shield, making him vulnerable to damage. After sustaining sufficient damage, Thul-Ar will despawn, completing the first part of this secret encounter.
- Statue #2 & Thul-Ar (Part 2 - Underwater Section Post-Ecthar): This pile is found in an underwater cave system after the Ecthar encounter, during the traversal to the next major area. It is often located within an air bubble. The area may require defeating several Revenant Acolytes and two Blistered Knights to safely access or interact with the pile of dead Ghosts to obtain the Vestige. The second Hive Statue is also located within these underwater caves, typically near the Ghost pile. Deposit the Vestige into the statue. Thul-Ar will spawn again. The mechanics are similar to the first encounter with him, but this time, players must defeat Runebound Visage Acolytes (instead of Wizards) that match his symbol to gain Piercing Light. Damage Thul-Ar until he despawns.
- Statue #3 & Thul-Ar (Part 3 - Final - Pre-Šimmumah Traverse): This pile is found after defeating Ecthar, within the large traversing area featuring multiple platforms and Shriekers (the room titled "Ghosts of the Deep" on screen, leading towards Šimmumah's arena). Look near the entrance of this large room, often by a right-hand tower structure with a fallen lantern, to find the pile of dead Ghosts. Players must navigate across the platforms of this large room to reach the main or central platform structure. The third Hive Statue is located here. Deposit the final Vestige. Thul-Ar will spawn for the last time. The mechanics remain consistent, but now players must defeat Runebound Visage Knights that match his symbol to obtain Piercing Light. This time, Thul-Ar must be fully defeated.
Catalyst Reward
Upon successfully defeating Thul-Ar for the third and final time, a chest will appear (often behind the location of the third Hive Statue). Looting this chest will award Guardians with The Navigator Exotic Catalyst.
Advanced Tactics & Community Insights
Beyond the standard strategies, a wealth of advanced tactics, solo approaches, and community-developed efficiencies have emerged for Ghosts of the Deep. Understanding these can enhance clear times, aid in challenging Triumphs, and provide solutions for specific difficulties.
Solo Strategies
Successfully completing Ghosts of the Deep solo, especially for the "Alone In The Deep" Triumph, is a significant undertaking that demands patience, optimized builds, and flawless mechanical execution.
Survivability Builds
- Solar Titan: Builds utilizing Loreley Splendor Helm (for emergency healing) or a traditional "Bonk Hammer" setup with Sol Invictus for constant restoration are highly effective.
- Arc Hunter: Assassin's Cowl provides healing and invisibility on powered melee kills or finishers, crucial for repositioning, surviving intense add pressure, or safely initiating DPS. Liar's Handshake can also be used for aggressive melee DPS against Ecthar.
- Void subclasses: Access to Devour or invisibility makes them strong contenders for solo play.
Moth Management (Šimmumah Solo)
Lucent Moths are arguably the biggest threat in a solo Šimmumah attempt. They must be dealt with immediately upon spawning. Invisibility can cause Moths to lose aggro and attempt to shield other enemies instead, effectively neutralizing them if managed correctly.
Common Callouts for Hive Symbols
Clear and consistent communication is vital for the Šimmumah encounter, particularly for the symbol mechanics. Some common, easily understandable callouts for the Hive symbols include:
| Symbol Visual Description | Common Callout(s) |
|---|---|
| Five horizontal lines | "Lines," "Equals," "Division" |
| Table-like shape with legs | "Table," "Spider-Man," "Mando" |
| X-like shape with a dot/circle | "Bug," "Pointy Dick," "Star" |
| X-like shape, more open | "X," "Cross," "Samurai" |
| Table-like shape with three dots | "Dots," "Stool," "Pizza Table" |
| C-shape or U-shape with an opening | "C," "U," "Turret," "Crab" |
| Circular shape, like a burger | "Burger," "Oreo," "Pokeball" |
| Cone or V-shape, like pizza slice | "Pizza," "Ice Cream," "Vex Eye" |
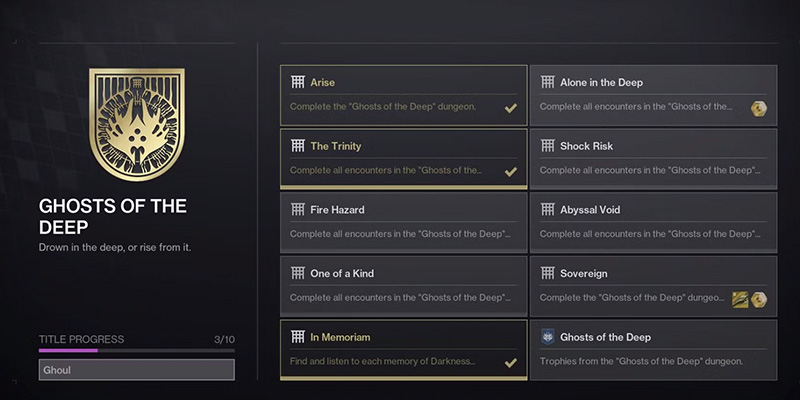
Challenge Completion Techniques (Triumphs for "Ghoul" Title)
The "Ghoul" title requires completing several challenging Triumphs:
- "Alone In The Deep": Complete the entire dungeon solo, without leaving the activity at any point.
- "The Trinity": Complete all encounters in the dungeon with a full fireteam composed entirely of clan members.
- "One Of A Kind": Complete all encounters with a full fireteam where all three members are of the same class (e.g., three Warlocks, three Titans, or three Hunters).
- Elemental Subclass Triumphs ("Shock Risk," "Fire Hazard," "Abyssal Void"): Complete all encounters with a full fireteam where all members are using the specified elemental subclass (Arc, Solar, or Void, respectively).
- "Sovereign": Complete the entire dungeon on Master difficulty. This also awards the Recalcitrant Host Exotic Sparrow upon first Master completion.
- "In Memoriam": Find and listen to all 12 Memories of Darkness collectibles scattered throughout the dungeon.
Conclusion: Conquering the Ghosts of the Deep
The Ghosts of the Deep dungeon presents a formidable and atmospheric journey into the methane-laden abyss of Titan. It challenges Guardians with intricate underwater mechanics, complex multi-phase boss encounters that demand precise execution, and relentless waves of Lucent Hive, including the ever-threatening Lucent Moths in the final battle. Ecthar's encounter uniquely tests adaptability by forcing transitions between standard combat and hostile underwater puzzle-solving, both under direct threat from the boss. Šimmumah ur-Nokru's confrontation is an endurance trial of ritualistic precision, target prioritization, and sustained DPS against a mobile and dangerous foe.
Success in these depths hinges on meticulous preparation, including optimized loadouts tailored to each encounter's specific demands—from close-quarters burst damage against Ecthar to long-range precision for Šimmumah. Clear communication, especially for symbol callouts and coordinating shared resources like air bubbles, is paramount for fireteam cohesion. Above all, a thorough understanding and mastery of the core mechanics—Deepsight activation, Vestige of Light management, Hive rune interpretation, and the strategic use of Piercing Light—are the keys to unraveling the Lucent Brood's plot.
Thematically, Ghosts of the Deep resonates with Destiny's grander narrative, drawing players into a confrontation with the echoes of the past as they strive to prevent the resurrection of Oryx, one of the universe's most iconic antagonists. The journey through decaying, colossal Hive structures and the oppressive underwater environments effectively conveys the sense of delving into a forbidden, haunted domain in pursuit of powerful artifacts and the truth behind the Lucent Hive's machinations.
Whether seeking exclusive Taken King-themed armor, the potent Restoration Ritual weapons, the unique Navigator Exotic and its powerful catalyst, or the prestige of the "Ghoul" title, Guardians who brave these abyssal challenges will find a rich and rewarding endgame experience. The ghosts of the past are stirring, but with skill, strategy, and perseverance, they can be laid to rest once more.