
Mission Overview
Operatives, this is Control. Your primary objective is Operation: Seraph's Shield, a high-stakes infiltration of the Braytech orbital platform, Seraph Station. The core task is to upload a viral payload into the station's network, a critical step to allow the Warmind Rasputin to bypass its formidable security architecture. This is not a simple smash-and-grab; enemy factions, specifically House Salvation led by Eramis and the insidious forces of Xivu Arath, are also maneuvering to seize control of this pivotal Warmind asset. The consequences of failure are dire, as the Hive God of War would turn Rasputin's weaponized satellite network against the Last City.

This mission is widely regarded as a masterclass in environmental storytelling and engaging gameplay, drawing parallels to highly acclaimed operations like Presage. The design philosophy here leans heavily into the espionage thriller genre. The very act of "uploading a virus" rather than outright destruction, coupled with your designation as a "Seraph" – an elite covert agent of the Vanguard – underscores the clandestine nature of this undertaking. You are not merely a soldier; you are a saboteur, an infiltrator.
Understanding Augment Protocols
Success within Seraph Station hinges on the mastery of three distinct Augment Protocols, repurposed from the Deep Stone Crypt. Consider this mission an advanced field test for these systems.
Core Augment Protocols


- Scanner Protocol (Yellow Designator): When an operative acquires the Scanner buff – typically from a designated Fallen Vandal marked with a yellow symbol – their optical systems are enhanced. This allows the viewing of otherwise hidden scannable objects, the identification of correct terminals in a required sequence, or the revelation of concealed pathways and critical elements necessary for progression. It's rarely about just one object; often, the Scanner reveals a sequence or highlights specific items amidst a field of decoys.
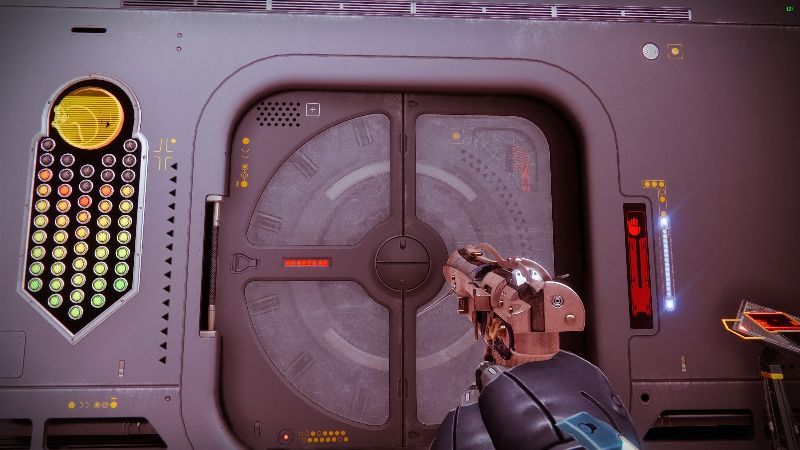
- Operator Protocol (Red Designator): The Operator buff empowers an operative to interact with specific Braytech systems by discharging their weapon at glowing red control panels. This action can open sealed doors, activate dormant mechanisms, or disable energy barriers. Line-of-sight is paramount; operatives will often need to identify unconventional firing angles, sometimes requiring shots through ventilation shafts or narrow slits in fortifications.
- Suppressor Protocol (Blue Designator): This protocol is primarily for targeted enemy incapacitation. To employ it, an operative must acquire the Suppressor buff and then, while positioned directly beneath one of three designated glowing energy orbs, discharge their weapon at a specifically shielded enemy, such as heavily armored Servitors or the primary target, Praksis. This stuns the target, often making them vulnerable or disrupting a critical function.
- Augmentation Terminals: These interface points are strategically placed throughout the station. They allow an operative to deposit a currently held Augment Protocol, freeing them to acquire a different one. This juggling of buffs is critical for solving more complex puzzles that may require the sequential or simultaneous application of different protocols, especially for solo operatives.
Mastering these augments within Seraph's Shield provides a direct transfer of skills, significantly enhancing an operative's preparedness for the even more intricate challenges of the Deep Stone Crypt raid itself.
Recommended Loadouts
Operatives will face a diverse array of threats: swarms of infantry, heavily shielded combatants, resilient major targets like Brigs and Hive Knights, and bosses demanding sustained, high-impact damage. Versatility in your chosen arsenal is non-negotiable. The mission's structure, featuring "plenty of puzzles, platforming sections, and some intense combat encounters" against "hordes of challenging enemies", demands a toolkit approach.
| Role/Purpose | Weapon Slot | Recommended Weapons | Key Perks/Catalyst | Notes/Best Use Case |
|---|---|---|---|---|
| Primary Ad Clear | Kinetic/Energy | IKELOS_SMG v1.0.3, Osteo Striga, Quicksilver Storm, Trinity Ghoul | Voltshot, Necrotic Grip synergy, Exotic Perks | Essential for all encounters, especially high-density areas |
| Utility/Crowd Control | Energy | Witherhoard, Wilderflight (Special GL) | Exotic Perk, Blinding Grenades | Crucial for Legend difficulty, managing large groups |
| Major/Champion Takedown | Energy/Heavy | Conditional Finality, Fusion Rifle (Vorpal), Witherhoard | Exotic Perks, Vorpal Weapon | Efficiently neutralizing high-threat targets like Knights, Captains |
| Brig Damage | Heavy | Rocket Launchers (Gjallarhorn, Cold Comfort, Two-Tailed Fox) | Bait and Switch, Clown Cartridge, Exotic Perks | Brigs are highly resistant to LFR criticals until heavily damaged |
| Praksis DPS | Heavy/Energy | Rocket Launchers, Linear Fusion Rifles (Taipan-4fr), Witherhoard | Vorpal Weapon, Bait and Switch, Firing Line | Sustained damage during vulnerability phases |
Primary Slot (Kinetic/Elemental): Ad-Clear & Sustained Fire
- Submachine Guns: The IKELOS_SMG v1.0.3, particularly with the Voltshot perk, is a consistently strong performer for rapid ad-clear. For operatives utilizing Necrotic Grip gauntlets, Osteo Striga offers devastating poison proliferation.
- Auto Rifles: Quicksilver Storm provides excellent ballistic output supplemented by grenade utility. Legendary options like Krait are also reliable.
- Pulse Rifles: The mission's namesake, Revision Zero, once acquired, serves well in long-range engagements such as the spacewalk section. Outbreak Perfected remains a solid choice for its SIVA nanite swarms that decimate groups.
Special Slot (Energy): Utility & Major Damage
- Witherhoard: This Exotic Grenade Launcher is a cornerstone for many encounters, providing exceptional area denial, passive damage-over-time on resilient targets, and ad control.
- Blinding Grenade Launchers: A Special Grenade Launcher with Blinding Grenades (e.g., Wilderflight) is invaluable for crowd control, especially on Legend difficulty where enemy density and lethality are amplified.
- Fusion Rifles/Shotguns: For close-range burst damage against majors, if Witherhoard is not equipped. Conditional Finality, if accessible, is a top-tier option.
Heavy Slot: Boss Damage & Emergency Ad Clear
- Rocket Launchers: For fireteams, Gjallarhorn provides a significant damage buff to legendary rockets. Two-Tailed Fox offers both high damage and useful debuffs with its catalyst. Top-tier legendary rockets like Cold Comfort with Envious Assassin and Bait and Switch are meta-defining. Rockets are particularly effective against Brigs.
- Linear Fusion Rifles: While previously dominant, LFRs like Taipan-4fr are less effective against Brigs due to difficulties scoring critical hits until their health is significantly depleted. They remain viable for Praksis if clear shots can be maintained.
- Machine Guns: Retrofit Escapade, particularly for Void-centric builds leveraging Volatile Rounds, excels at clearing groups and dealing with Void-shielded threats like Scorn Chieftains. Trinity Ghoul, despite using Special ammo, functions as a phenomenal primary ad-clear weapon due to its chain lightning.
Subclass Synergies & Armor Mods
Survivability and ability uptime are paramount for this operation.
- Arcstrider: Paired with Assassin's Cowl, provides healing and invisibility on powered melee kills, offering excellent sustain.
- Gunslinger: Can access Restoration effects via Healing Grenades for on-demand recovery.
- Nightstalker (Void): Invisibility offers unparalleled survivability, crucial for rezzing teammates or disengaging under pressure.
- Voidwalker: The Devour effect grants constant healing upon kills and is described as "absurdly strong" for this mission.
- Dawnblade (Solar): Well of Radiance is indispensable for boss damage phases and creating safe zones. Access to Restoration provides strong survivability.
- Shadebinder (Stasis): Bleak Watcher turrets offer potent crowd control, freezing and slowing advancing enemies.
- Sunbreaker (Solar): Sunspots generated by abilities provide Restoration and faster ability regeneration, creating a powerful feedback loop of healing and damage.
- Sentinel (Void): Provides access to overshields and strong defensive Supers like Ward of Dawn.
- Striker (Arc): With Cuirass of the Falling Star, Thundercrash can instantly eliminate a Brig, a significant tactical advantage.
- Resilience: A stat of 100 is highly recommended for maximum damage reduction, critical on Legend difficulty.
- Recovery & Discipline: Also valuable for health regeneration and grenade uptime, respectively.
- Armor Mods: Focus on Orb generation mods to fuel abilities and armor charges. Ammo finder and scavenger mods for your chosen weapons are essential. For Void builds, Repulsor Brace grants an overshield on Void-debuffed target kills, enhancing survivability.
Breaching the Braytech Facility
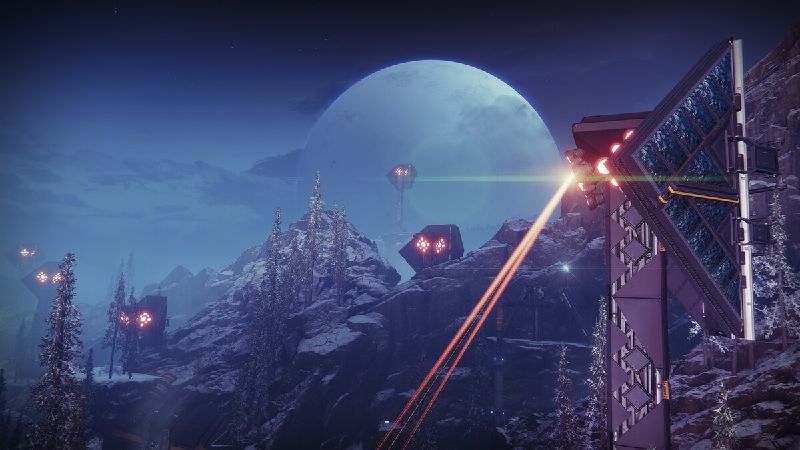
Initial Incursion: Evading Seraph Towers
The operation commences with a covert approach across a snow-swept expanse, leading to the primary launch facility. This area is under surveillance by automated Seraph Towers. Operatives must utilize available cover – rocks, trees, and terrain undulations – to break line-of-sight with these towers. Exposure to a tower's targeting array will apply a rapidly stacking debuff; if this debuff reaches its maximum threshold (approximately 15 seconds of continuous exposure), the operative will be immediately neutralized.
Gaining Entry: First Encounters & Scanner Protocol Introduction
Upon breaching the facility's perimeter, operatives will encounter the first contingents of House Salvation Fallen. It is here that the Scanner Protocol is introduced. A specific Fallen Vandal, clearly marked by a distinct yellow oval symbol, carries the Scanner buff. Neutralize this target to acquire the protocol.
The first major puzzle involves using the Scanner buff to identify and activate three specific terminals in the correct sequence. This will initiate the launch sequence for the space pods destined for Seraph Station. The terminals are located as follows:
- At the front-left of the pod array.
- Towards the back of the room, facing the rear wall.
- At the front-right of the pod array.
Navigating the initial interior sections also involves bypassing laser grids. These can be circumvented by precisely timed jumps, crouches, or slides. It is critical to note that, due to the (lore-implied) absence of active Seraph Station upgrades, these lasers are instantly lethal upon contact.
Securing Seraph Station
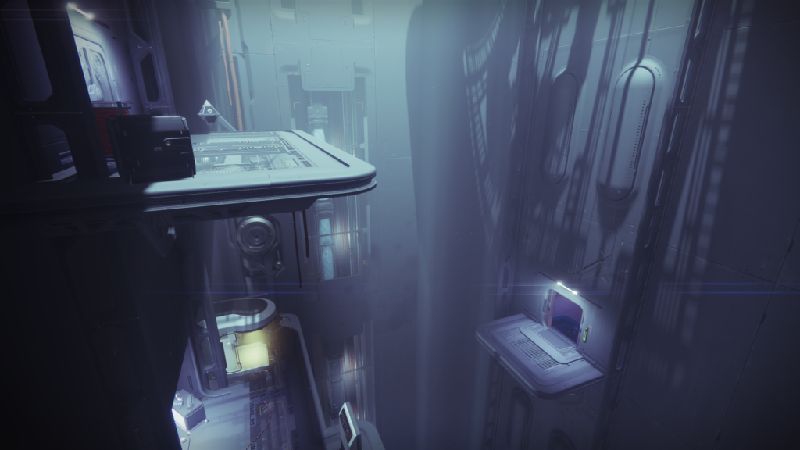
Navigating the Labyrinth: Vents, Terminals, and Laser Grids
Arrival at Seraph Station plunges operatives into a labyrinth of interconnected chambers, demanding adept manipulation of Scanner and Operator protocols. Solutions frequently involve navigating cramped ventilation shafts and evading more of the aforementioned lethal laser grids. The puzzle design here increasingly demands acute spatial reasoning and interaction with the environment – shooting vent covers, identifying small openings for Operator shots – moving beyond simple "find and activate" mechanics.
Scanner Puzzle 2 (Decontamination Chamber)
After banking the initial Scanner buff to open the way, operatives must clear the room of Fallen and reacquire the Scanner protocol from a defeated enemy. Three terminals must then be activated:
- Near the entry door to this chamber.
- Behind an observation window. Access is gained by shooting open a vent cover on the left side of the room (when facing from the entrance) and crawling through.
- Positioned next to the door operatives are attempting to open. Expect Shank reinforcements upon interacting with previous terminals.
Scanner Puzzle 3 (Security Sector)
An Augmentation Terminal will be blocked by a Servitor; eliminate it and bank the Scanner buff. Proceed into a larger room, clear Fallen forces, and again acquire the Scanner protocol. Three more terminals require activation:
- To the left upon entering, near a pillar and facing the wall.
- Directly opposite the first terminal, on the right-side wall. Access is via a ventilation shaft, requiring navigation through more lasers.
- Misleading Console Puzzle: This is a common point of failure. Near an Augmentation Terminal, four distinct terminals are visible. The Scanner buff will highlight one of these four. The operative must memorize which one is glowing (e.g., far left, second from right). Then, deposit the Scanner buff at the Augmentation Terminal to open an adjacent room. Inside this new room, on an upper level, are four consoles arranged in the exact same configuration as the terminals outside. The operative must activate the console that corresponds to the position of the previously glowing terminal.
Operator Protocol Introduction & Puzzle
Following the console puzzle, a designated enemy will drop the Operator buff. This protocol is used to shoot red keypads:
- Keypad 1: Directly ahead after acquiring the buff.
- Keypad 2: Enter a red-lit room to the left (often containing Cursed Thralls). The panel is behind a glass slit, mounted on a pillar.
- Keypad 3: Exit the red room and turn left. Clear Hive combatants. Access a ventilation shaft on the right wall. From within the vent, shoot the glowing panel visible in an adjacent, inaccessible room.
- Keypad 4: Return to the main room where the Operator buff was first acquired. From the initial entry point to this larger area, turn right. A ventilation shaft is hidden behind a pillar. Slide through, clear the small room, and shoot the final panel through a narrow slit in a window.
The Infamous Floor Plate Puzzle (Heat Room)
This chamber is a notorious crucible for many fireteams, featuring a floor grid where incorrect steps lead to instant incineration. Mastery requires the Scanner buff to discern both the safe traversal path and the currently active terminals.
Mechanics: Defeat a designated enemy to acquire the Scanner Protocol. Two observation windows overlook the puzzle room:
- Upper Window: Viewed with the Scanner buff, this window reveals which of the several terminals within the grid must be activated. Crucially, the specific terminals required will change with each mission instance.
- Lower Window: Viewed with the Scanner buff, this window displays the safe path across the floor plates. This path is always the same for every run of the mission.
| Step | Action | Notes |
|---|---|---|
| 1 | From entry, move FORWARD onto the first safe tile. | Usually central or slightly offset. |
| 2 | Turn LEFT, move FORWARD along the edge. | Typically 2-3 tiles. |
| 3 | Turn RIGHT (towards center), move FORWARD a short distance. | Often 2 tiles. |
| 4 | Turn LEFT, move FORWARD. | Often 2 tiles. |
| 5 | Turn RIGHT, move FORWARD. | Often 2 tiles. |
| 6 | Turn RIGHT (towards an edge), move FORWARD. | Often 2 tiles. |
| 7 | Turn LEFT, move FORWARD a short distance. | Often 1 tile. |
| 8 | Turn RIGHT, move FORWARD towards the exit side of the room. | Often 2 tiles. |
| 9 | Turn RIGHT (if needed), move FORWARD to final console area(s). | The last few tiles near the exit-side consoles are generally safe. |
Suppressor Protocol Introduction
After utilizing the teleporter, a shielded Servitor will block the path. Neutralize it and bank any current Augment protocol. The next chamber serves as the introduction to the Suppressor protocol. Acquire the blue Suppressor buff from a designated Fallen Vandal.
- Three glowing white energy orbs will be visible in the room. The operative, while holding the Suppressor buff, must position themselves directly under each orb, one at a time, and shoot the shielded Servitor from that position.
- Successfully suppressing the Servitor from all three orb locations will open a previously sealed door on the left side of the room. Inside, a glowing red shield drone will be revealed. Destroy this drone.
- With its shield drone destroyed, the Servitor becomes vulnerable. Eliminate it.
- To open the final door leading to the Praksis encounter, deposit the Suppressor buff at the Augmentation Terminal located next to the doorway.
The Unexpected Detour
Ambush & Imprisonment: The Fallen Ketch
Following the first confrontation with Haroktha and the subsequent Brig engagement, operatives will proceed through a newly opened door at the rear of the arena. This leads directly into an ambush. Operatives will be compelled to surrender their weapons to House Salvation forces and will then be teleported into a holding cell aboard a Fallen Ketch. This capture sequence serves as a significant narrative pivot, abruptly shifting the operative from a position of control to one of temporary vulnerability.

Breaking Free & The Spacewalk
The operative's captivity is short-lived. A weapon transmat reactivates their arsenal, allowing them to break free from the cell. The immediate objective is to fight through the Ketch's interior, eliminating any Fallen resistance. Along the way, two ship access terminals can be found in a hallway where Fallen reinforcements spawn; activating these will free captive robots, a minor objective that adds to the narrative immersion.
This marks the beginning of the mission's primary jumping puzzle section. Operatives must carefully navigate from the derelict Ketch onto the intricate machinery and superstructures of the station. This hazardous environment requires precise platforming while contending with:
- Moving obstacles and rotating components.
- Strategically placed Fallen explosive mines.
- Hostile Hive Knights and deadly sniper Shanks engaging from distant platforms. A long-range weapon like Revision Zero or a scout rifle is highly advantageous here to deal with these distant threats.
Target Neutralization
Encounter 1: Haroktha & The Three Brigs
The first significant boss engagement pits operatives against Haroktha, Scourge of the Helium Drinkers, and a subsequent onslaught by House Salvation forces.
Initiation: The encounter begins when operatives shoot a cluster of explosive barrels situated in the center of a large arena. This summons Haroktha, a massive Hive Knight.
Phase 1 - Haroktha: Initially, Haroktha remains relatively passive, typically staying on a central platform where he can be damaged. Inflict enough damage, and he will retreat from the engagement.
Phase 2 - The Brigs: This is the core challenge of the encounter. Once Haroktha flees, the arena is flooded with House Salvation Fallen, spearheaded by three heavily armed and armored Brigs.

- Priorities: The sheer number of enemies can be overwhelming. The primary focus should be on controlling the population of lesser Fallen (Dregs, Vandals, and especially sniper Shanks) to create breathing room, then systematically eliminating the Brigs.
- Weapons: Rockets are highly effective against Brigs; if in a fireteam, one operative using Gjallarhorn can significantly boost the team's damage output. Linear Fusion Rifles are generally less effective until a Brig's armor is critically damaged and its health bar is low.
- Positioning: A common tactic is to stick to the outer ring of the arena, slowly rotating to manage enemy spawns and focus down Brigs one by one.
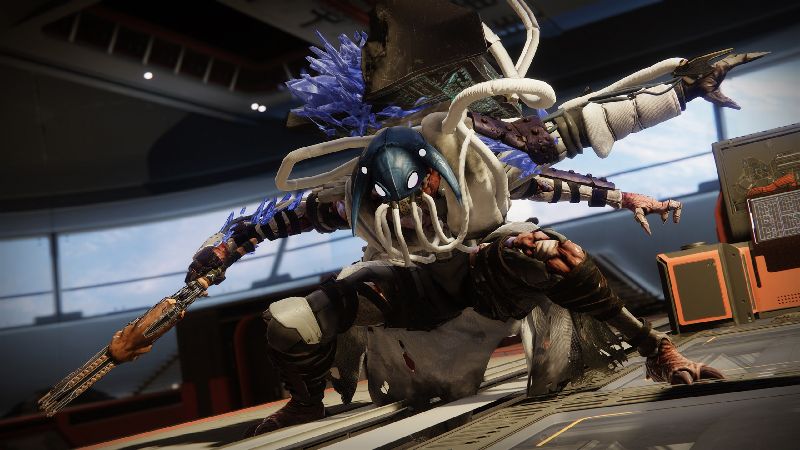
Final Encounter: Praksis, The Defiled
The final confrontation is against Praksis, The Defiled, a formidable Scorn chieftain. This battle unfolds in a large, multi-tiered arena that bears a striking resemblance to the final boss chamber of the Deep Stone Crypt raid.
Initial Damage Phase: Upon Praksis spawning, operatives can immediately inflict significant damage, typically removing about one-third of his total health before he activates an immunity shield. Unleash Supers and heavy weapons during this initial window.
Immunity Phase & Suppressor Mechanic: Once immune, Praksis can only be made vulnerable by correctly utilizing the Suppressor protocol. This cycle must be repeated:
- Acquire Suppressor: Locate and defeat a Fallen Vandal (usually found on the upper walkways or catwalks of the arena) that drops the Suppressor buff.
- Suppress Praksis: With the Suppressor buff active, three glowing white energy orbs will manifest in the arena – typically one on the left, one in the middle, and one on the right side. The operative must stand directly beneath each of these orbs, one at a time, and shoot Praksis once from each position.
- Destroy Shield Drones: Successfully suppressing Praksis from all three orb locations will cause three previously sealed doors around the arena to open. Each open door will reveal a glowing red shield drone. All three drones must be destroyed.
- Damage Phase: With all three shield drones eliminated, Praksis's immunity shield will drop, making him vulnerable to damage once more.
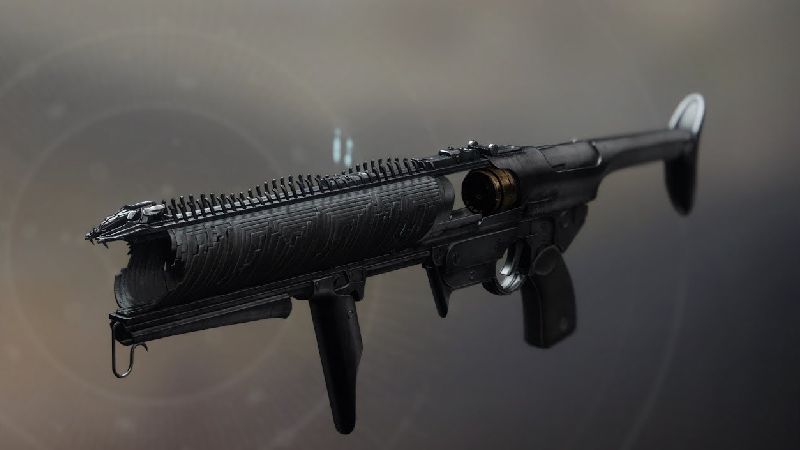
Securing Revision Zero
Claiming Your Prize
Upon the defeat of Praksis, The Defiled, a new pathway will open, typically to the left side of the arena. However, the mission is not yet complete. Operatives MUST proceed to a designated console and interact with it to "upload the virus." This action fulfills the primary mission objective and is the trigger for spawning the final rewards, including the coveted Revision Zero Exotic Pulse Rifle.
Hold reload to swap between pulse rifle and sniper rifle modes. Enhanced target acquisition and increased damage against vehicles, turrets, and Stasis crystals.
Revision Zero is guaranteed upon the first successful completion of Operation: Seraph's Shield. Beyond the Exotic, the mission is a valuable source for other gear. Operatives will also be rewarded with Seraph-themed weapons, reprised IKELOS 1.0.3 weapons, and pieces from the Warmind's Avatar armor sets. Significantly, many of these legendary weapons, such as Fire and Forget, the IKELOS SMG, and Retrofit Escapade, are craftable, allowing for the acquisition of their patterns and the creation of personalized god rolls.
Upgrading the Asset: Finding All Four Catalyst Schematics
The Revision Zero Exotic Pulse Rifle features four distinct catalysts, each bestowing a unique perk that further enhances its capabilities. These catalysts are unlocked by progressing and completing the "Should You Choose To Accept It" questline, which consists of four parts (Part I, Part II, Part III, Part IV), obtained from the Exo Frame located in the H.E.L.M..
| Catalyst Perk | Quest Name | Dead Drop Planet & Lost Sector | In-Mission Schematic Location | Notes |
|---|---|---|---|---|
| Feeding Frenzy | Should You Choose To Accept It, Part I | Europa - Perdition Lost Sector | Floor Plate Puzzle (Heat Room) Exit | General utility, faster reloads after kills |
| Under Pressure | Should You Choose To Accept It, Part II | Moon - K1 Logistics Lost Sector | Operator Puzzle Vents (Officer's Lounge Access) | Enhances stability/accuracy for alt-fire sniper mode |
| Outlaw | Should You Choose To Accept It, Part III | EDZ - Terminus East Lost Sector | Haroktha Arena (Post-Brigs) | Faster reloads after precision kills |
| Fourth Time's the Charm | Should You Choose To Accept It, Part IV | Cosmodrome - Exodus Garden 2A Lost Sector | Fallen Ketch Escape | Returns two rounds to magazine after 4 precision hits |
Legend Difficulty
Attempting Operation: Seraph's Shield on Legend difficulty transforms the experience into a significantly more demanding and perilous undertaking. Operatives must be prepared for a substantial increase in challenge.
Advanced Threats & Modifiers
Several key factors differentiate Legend difficulty:
- Instantly Lethal Lasers: As previously noted, the absence of Seraph Station upgrades means all laser grids and beams encountered throughout the mission will instantly kill any operative upon contact. This fundamentally changes navigation through many sections, requiring flawless execution of jumps, slides, and crouches.
- Chaff Modifier: During certain encounters, most notably the Haroktha and Three Brigs fight, the Chaff modifier is active, completely disabling operative radar. This makes tracking enemy positions and avoiding flanking maneuvers far more difficult.
- Increased Enemy Potency: Standard Legend modifiers apply, meaning all hostile forces will have significantly increased health, deal more damage, and exhibit more aggressive behavior.
- Darkness Zones & No Checkpoints: The two primary boss encounters (Haroktha/Brigs and Praksis) are designated Darkness Zones. If an entire fireteam is downed in these zones, and not revived within the 30-second window, the mission will end, forcing a complete restart from the very beginning.
- Patience and Deliberation: There is no time limit for this mission. Rushing is a recipe for disaster. Proceed cautiously, clear areas thoroughly, and prioritize survival above all else.
- Maximum Resilience: Equipping armor that achieves 100 Resilience is essential for the significant damage reduction it provides.
- Healing and Invisibility: Subclass choices and Exotics that grant on-demand healing or invisibility are invaluable for mitigating damage and recovering from mistakes.
- Crowd Control: Weapons with Blinding Grenades are exceptionally powerful on Legend, allowing operatives to neutralize large groups of enemies temporarily.
Advanced Tactics & Hidden Intel
Known Shortcuts & Efficiency Tips
While Operation: Seraph's Shield doesn't feature many true sequence-breaking skips, several tactics and knowledge points can significantly improve efficiency and reduce risk:
- Floor Plate Puzzle Mastery: The single most significant "shortcut" is knowing the fixed safe path across the floor plates. This eliminates trial-and-error. Some skilled operatives using Blink have reported being able to bypass portions of the path to reach terminals more directly, though this carries risk.
- Optimized Catalyst Acquisition: By progressing all four "Should You Choose To Accept It" questlines to their final in-mission step, operatives can collect all four Revision Zero catalyst schematics in a single Legend difficulty run.
- Advanced Movement Techniques: For operatives proficient in advanced movement, traversal through the station's corridors can be expedited. Swords with the Eager Edge perk can also provide substantial momentum for skipping across gaps or covering ground quickly, but this must be balanced against the risk of instantly lethal lasers.
Locating Archie (Man's Best Friend in Space)
A beloved Easter egg, Archie the dog, is confirmed to still be present within Operation: Seraph's Shield, even after the removal of other hidden elements like weekly chests. Historically, during Season of the Seraph, finding Archie was tied to a significant undertaking: operatives needed to locate and destroy 50 hidden security drones scattered throughout the entire mission. Successfully destroying all drones would unlock a specific, previously inaccessible door, behind which Archie could be found.
Final Tips for a Flawless Operation
To execute Operation: Seraph's Shield with flawless precision, especially on Legend difficulty, internalize these final directives:
- Patience is paramount - this is a marathon, not a sprint
- Master the Augment Protocols - fluency is mandatory
- Communicate effectively with your fireteam
- Prioritize survivability for Legend difficulty
- Rushing through puzzle sections
- Ignoring environmental hazards
- Poor positioning during boss fights
- Forgetting the no-checkpoint rule
The Seraph's Legacy
Operation: Seraph's Shield stands as a testament to intricate mission design, blending engaging narrative with complex puzzle-solving and intense combat encounters. It is a true "heist," demanding more than just firepower; it requires intellect, precision, and adaptability from every operative who dares to breach the Braytech orbital platform.
Successful infiltration and completion, especially on the formidable Legend difficulty, hinge on thorough preparation – from meticulously crafted loadouts that balance ad clear, single-target damage, and survivability, to a comprehensive understanding of the crucial Scanner, Operator, and Suppressor augment protocols. The experience varies drastically between Normal and Legend modes, with the latter transforming the station into a high-lethality gauntlet where every laser grid is a death trap and every enemy encounter demands respect.
The rewards, however, are commensurate with the challenge. Beyond the unique Exotic Pulse Rifle, Revision Zero, and its suite of powerful catalysts, Seraph's Shield offers a direct pathway to a host of coveted and craftable Seraph and IKELOS weaponry. This ensures its relevance long after the initial clear, providing a rewarding gameplay loop for dedicated operatives.
Whether tackling this mission solo or as part of a coordinated fireteam, the principles of patience, meticulous execution, and strategic adaptation are paramount. By internalizing the intel within this briefing, operatives will be well-equipped to navigate the Seraph Station's treacherous depths, overcome House Salvation's interference, neutralize Praksis, and ultimately, secure Rasputin's future.
The virus is uploaded. The asset is secured. Operation: Seraph's Shield is complete. Well done, Guardian. Control out.