
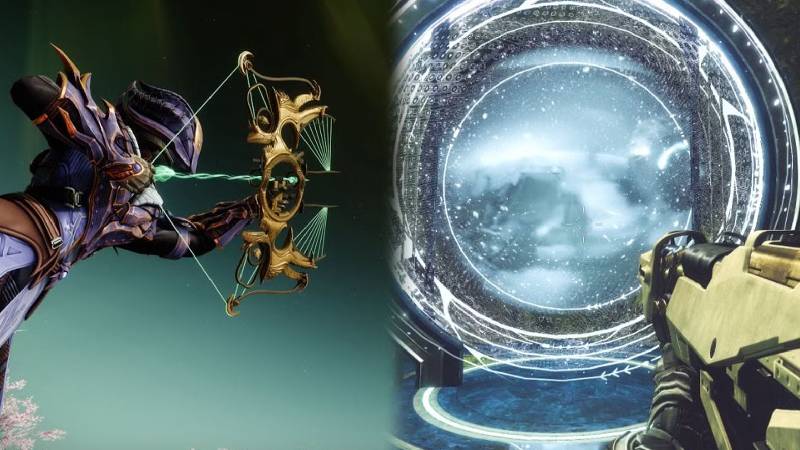
The journey to claim Wish-Keeper, a powerful new Strand bow, begins in one of Destiny's most mystical locales: The Dreaming City. This secret Awoken stronghold, hidden on the asteroid Vesta, is a spiritual refuge woven with ancient magic – a place literally built by Queen Mara Sov with the help of the Wish-Dragon Riven. Shimmering spires rise above a sea of mist, and the air hums with the whispers of Ahamkara wishes and secrets. Guardians venturing here can feel the weight of destiny and curse in equal measure – it's a realm of both wondrous beauty and lurking danger.
In Episode: Heresy, tensions run high. Xivu Arath's shadow looms and Savathûn's tricks persist, all while the Dreaming City's own curse thrums in the background. Amidst this chaos, a desperate situation unfolds: one of Riven's precious eggs has been stolen from Riven's Lair beneath the Dreaming City. The tech-witches and Awoken scribes are alarmed – an Ahamkara egg holds untold wishcraft energy. If the Vex corrupt it, they could harness wish-magic for themselves. Acting quickly, Crow dispatches you on an urgent quest. Traces of Vex energy lead to an ancient portal… one that opens into the mysterious Black Garden.
Thus, our adventure "Starcrossed" begins. You must chase the Vex into a surreal landscape where the Garden of Salvation once lay in ruin, uncover Ahamkara remains deep within, and secure the Wish-Keeper bow before the Vex twist its fate. Steel yourself, Guardian – the path ahead promises spectacle and peril in equal measure, blending the Dreaming City's enchantment with the Black Garden's lurking horrors.
Unlocking the Starcrossed Mission
Before you can embark on the Starcrossed exotic mission, you'll need to unlock it through the seasonal story. Here's how to get started:
- Complete the "Wishing All The Best" Quest: Progress the Episode/Season story up to Week 4 of Season of the Wish. In particular, finish the "Apophasis" mission, during which you witness the Vex of the Sol Divisive abscond with Riven's egg from the Dreaming City.
- Report to Crow: After Apophasis, return to the HELM and speak with Crow. He confirms the Vex fled with the Ahamkara egg into the Black Garden, triggering the next step. At this point the Exotic quest "Starcrossed" will appear on your Star Chart (Director) in the HELM.
- Access Starcrossed: Launch the mission via the HELM map. Be ready for a fight – the recommended Power is high (around Level 1800+), and you'll face scaling difficulty whether solo or in a fireteam.
Finally, ensure you have the Lightfall expansion or appropriate season access, as Starcrossed requires those to play. Once you're set, gather your fireteam (or prepare to solo – we'll cover strategies for both) and dive in via the HELM launch node. Your mythic journey into the Black Garden awaits!
Into the Garden: Opening Platforming Challenge
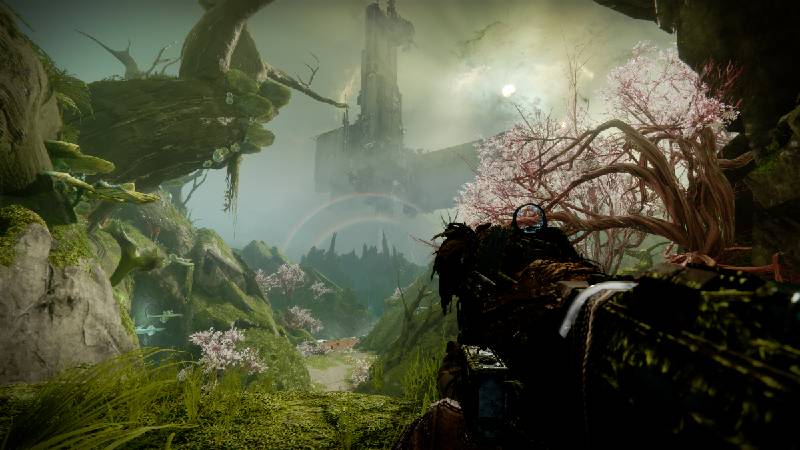
You materialize in a dim cavern suffused with an eerie green glow – the outer fringe of the Black Garden. Almost immediately, you're greeted by a gaping chasm lined with bioluminescent plants. High above, alien foliage dangles giant budding flowers that sway gently. This is your first platforming challenge.
- Lily Pad Platforms: Take aim at the large flower buds hanging in the air. Shooting a bud causes it to bloom into a glowing platform for a short time. Hop onto these summoned "lily pads" quickly, then chain your jumps by shooting the next bud. In this initial cavern, the path forward is fairly linear – if a jump looks too far, scan for a bud to shoot and create a mid-air stepping stone.
- Mind the Gaps: Missing a jump will drop you into the abyss. Don't panic – you'll respawn at the last solid ground. Use double-jumps, glides, or lifts wisely. Strand grapple (if equipped) can be a lifesaver here: grapple points aren't obvious, but you can grapple onto the environment itself if needed to recover from a fall or reach an out-of-the-way ledge.
As you progress, soak in the atmosphere. The cave is reminiscent of areas from the Garden of Salvation raid – twisted roots and Vex architecture fused together. About halfway through, you'll squeeze through a massive split tree trunk lit by an orange glow – a marker that you're nearing the cave's end. But wait! There's a secret nearby…
Exiting the cavern, you'll emerge into the open air of the Black Garden. Alien sky stretches above, and ahead stands a grand Vex-built gateway flanked by gnarled trees. This is the start of the first major combat encounter.
Sire's Obligation & the Obdurate Phalanx Puzzle
As you step into the first outdoor arena, you'll notice a sealed gate blocking further progress. The gate is marked by three glowing symbols. Scattered around the area are enemies and a peculiar luminous blue pool on the ground. This introduces one of Starcrossed's core mechanics: buff wells.
Now, upon taking Sire's Obligation, you'll see that a heavy-shielded Taken Phalanx (named Obdurate Phalanx) is guarding the area. It glows with a blue sheen, indicating you need the buff to harm it. Here's how to solve the symbol puzzle to unlock the gate:
- Observe the Symbols: Check the locked gate – three symbols are displayed above it in a vertical sequence (top, middle, bottom). These correspond to three Obdurate Phalanx enemies in the area.
- Eliminate Phalanxes in Order: With the buff active, hunt down the Obdurate Phalanxes one by one. Kill them in the exact order shown on the gate (top symbol first, then middle, then bottom). Each Phalanx you engage will have a symbol floating above its head – match it to the gate sequence.
- Gate Unlocked: Upon defeating the phalanxes in the correct order, the sealed gate will power down. The path forward opens, with Vex architecture rearranging to grant you access deeper into the complex.
The Roost: Dam's Gift & Gatekeeper Wyverns
Passing through the gate transports you into "The Roost", a new area of the Garden. Here the sky is tinged orange and the air itself is toxic with an Unwelcome mist that clings to the ground. Venturing unprotected into this reddish mist causes continuous damage over time. Immediately, you'll see a glowing red pool ahead – this is the source of Dam's Gift, the second crucial buff.
As you explore the Roost, you trigger the second encounter: Gatekeeper Wyverns. Your task is to hunt down and destroy three powerful Vex Wyverns hidden in the misty areas, in order to activate a transit mechanism (teleporter) to the next zone.
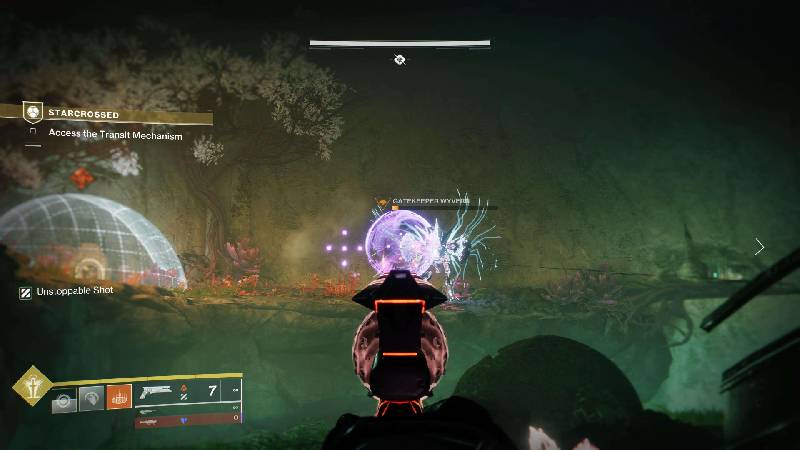
- Find and Defeat Gatekeeper Wyverns: Use Dam's Gift to move through the orange fog safely. In three distinct side areas (typically alcoves or platforms shrouded in mist), a Gatekeeper Wyvern awaits. These Wyverns hit hard with their torch-like blasts, so engage from a safe distance or with cover.
- Activate Vex Nodes: Near each Wyvern's location is usually a Vex sync plate or node. After killing a Wyvern, look for a glowing conflux or object nearby and interact with or stand on it – doing so "activates" that node.
During these battles, regular Vex goblins and hobgoblins will be harassing you. Clear them out as needed – especially snipers – but remember the mist will force you to manage your time. Play it safe: fight near the edges of safe zones and always have an escape route to a red pool.
Mid-Boss: Ixion, Covetous Mind
After slaying the three Gatekeeper Wyverns and activating their nodes, a fierce Vex Hydra named Ixion, Covetous Mind spawns near the exit portal. This mid-boss has a rotating shield and pumps out void blasts. Fortunately, Dam's Gift buff is no longer needed to fight Ixion (the area around the teleporter should be clear of mist once the nodes are done). Use the central pillars for cover and pummel Ixion with heavy fire. Keep moving to avoid its tracking shots. Upon defeat, the path forward opens – a Vex portal will activate, leading you onward.
Step into the shining Vex gate to teleport onwards. The world swirls – and you arrive at a precarious location that truly tests your jumping skills.
Shattered Path: The Moving Stones Jumping Puzzle
Emerging from the teleporter, you find yourself in a surreal platforming section. Huge stone slabs and platforms are drifting in mid-air, shifting in and out as if testing your resolve. Below lies endless abyss. You're not under threat from enemies here – the challenge is traversal. This is the infamous moving rock puzzle.
- Timing and Patience: Observe the pattern of the moving rocks. Some float horizontally across gaps; others rotate or tilt. Time your jumps so that you land on a stable surface. Often you'll need to ride a moving slab partway, then leap to a stable ledge or the next slab when it comes within range.
- Use Grapple If Needed: If you're running a Strand subclass, the grapple ability can be extremely useful here. Even without explicit grapple points, you can often latch onto the geometry of a moving rock or an outcrop ahead to pull yourself to safety.
- Watch for Vex Hazards: In some cases, tiny Vex hydra-like turrets might spawn on distant ledges and shoot at you during jumps (depending on difficulty). If they appear, take cover and snipe them before attempting a tricky sequence.
Navigate carefully and you'll eventually land on solid ground again, marked by lush green grass and trees – a sign you're near the final encounter area.
With all chests collected and puzzles overcome, it's time for the climax. Gather your strength, reload your weapons, and place a Rally Banner at the flag (if available) before dropping down. Beyond the threshold lies the lair of the final boss.
Final Showdown: Akardon, the Pitiless Mind
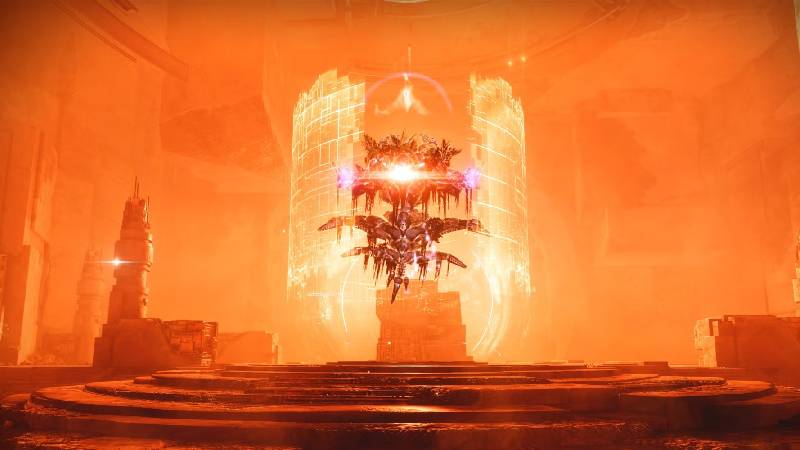
You push through a shimmering barrier and drop into a vast circular arena. Vex architecture and organic growth blend in a wide coliseum-like bowl. The air is thick with swirling orange mist (dubbed "Unwelcome Mist"), and at the center floats a gigantic Vex Hydra with an ominous blue glow – Akardon, Pitiless Mind has arrived to contest your prize. This final boss battle can be intense, especially solo, but with the right tactics you'll prevail.
Boss Arena Layout
The area is circular with a few levels of platforms and stairs around the edges, offering cover spots. Akardon starts in the middle. Notably, two Taken Phalanx adds called Pitiless Attendants stand on opposite sides of the arena. These are similar to the earlier Obdurate Phalanxes (in fact, they're Taken variants) and they serve an important role: as long as they live, Akardon has a massive rotating shield that greatly reduces incoming damage. So, your first priority is dealing with these attendants.
Phase 1 – Remove Akardon's Shield
Immediately upon dropping in, grab the Crowned by Dragons buff at the entrance wells and take cover. You'll want to eliminate the two Taken Phalanx Attendants quickly. They usually hang back on ledges to the far left and far right of the room. Use the nearby stairs and pillars for cover to peek and shoot at them safely. They are durable, but primarily try to blast you with their physics-push shield — if you keep cover between you and them, they often can't hit you well. Methodically put them down one by one. The moment both Attendants die, Akardon's spinning shield will shatter. The Hydra is now fully vulnerable to damage.
Phase 2 – DPS Akardon & Survive the Onslaught
With its shield down, Akardon will aggressively engage. It fires typical Hydra barrages – circular bursts of Void bolts. The boss will also periodically summon small Vex drones (Supplicants) that rush you and attempt to detain you in bubble shields, similar to how some Vex in raids behave. If you get detained, quickly shoot the containment bubble or have a teammate free you, as Akardon can punish a trapped Guardian. Additionally, Taken Goblins will spawn in waves – these will project immunity shields on Akardon or other enemies if not promptly dispatched.
When the coast is relatively clear, lay into Akardon with your best damage. Heavy weapons shine here – you want to chunk the Hydra's health as much as possible between add spawns and buff refreshes. Because you can't stand in the open too long (and definitely can't risk losing your buff mid-DPS), burst damage is ideal. Many Guardians favor rocket launchers for this fight – notably, the Dragon's Breath Exotic rocket has proven extremely potent, as it lets you blanket the boss area in fire while you dip back into cover, dealing damage over time safely.
With perseverance, Akardon's health will dwindle. Unlike some raid bosses, there are no multiple damage phases or puzzles here – it's a straight slugfest once the shield is down. Continue the cycle of buff → cover → clear adds → DPS. Eventually, the Pitiless Mind falls in a thunderous collapse. Akardon is dead. The swirling mist dissipates and silence returns to the arena.
Take a moment to revel in your victory, then proceed through the round doorway that was behind where the Hydra hovered. In the next chamber, you'll find the final reward chest – and notably, the skeletal remains of an Ahamkara nearby, confirming the Vex had dragged one of Riven's eggs here. Open the chest, and claim your prize: Wish-Keeper, the Exotic Strand Bow. Congratulations, Guardian – you have completed Starcrossed and earned the Wish-Keeper!
Wish-Keeper Exotic Bow – Rewards and Earning It
Earning Wish-Keeper is straightforward: complete the Starcrossed mission (on any difficulty) and you will receive the bow from the final chest. Your first drop is a red-bordered (Deepsight) Wish-Keeper, meaning you can extract its Pattern for crafting. In fact, Wish-Keeper is craftable, similar to past exotic missions' weapons like Revision Zero or Vexcalibur. Make sure to extract the Pattern from the red-border or just head to The Enclave – you'll find Wish-Keeper in the Exotic section ready to Shape once unlocked.
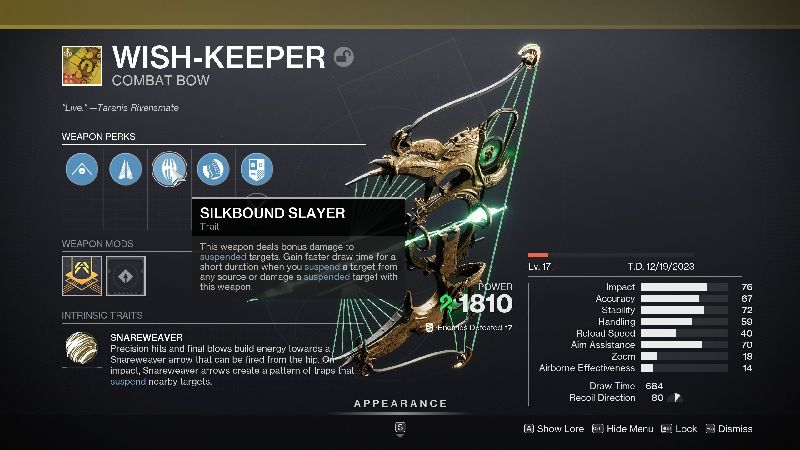
Weapon Overview
Wish-Keeper is a Strand element combat bow (primary ammo). Its intrinsic trait Snareweaver allows precision hits and final blows to charge up a special Snareweaver arrow that can be fired from the hip to create suspending traps. Essentially, it weaves a web of Strand on impact, suspending nearby enemies (an effect similar to the Strand subclass abilities). It also has a perk Silkbound Slayer, granting bonus damage to suspended targets and a short period of faster draw speed whenever you suspend a target by any means. This makes Wish-Keeper a crowd-control and debuff tool – great for PvE to ensnare groups of enemies or even lock down a beefy target.
Wish-Keeper in Action
In PvE, suspending enemies with the bow's trap can trivialize difficult foes (even if Suspend got toned down since Strand's release, it's still very powerful in endgame PvE). The bow rewards precision play: headshots build energy faster, and once your trap arrow is ready, a quick hip-fire launches a pattern of green Strand threads onto the ground. Enemies that cross these threads are suspended in mid-air, completely helpless. While an enemy is suspended (whether by Wish-Keeper or any source), Wish-Keeper deals bonus damage to them, allowing you to quickly finish off caught targets.
Wish-Keeper Catalysts and Intrinsic Upgrades
Upon completing Starcrossed and claiming Wish-Keeper, head back to the HELM. You should speak to Mara Sov (or check the quest archive at the HELM) to receive a set of quests named "Constellation" quests. These correspond to four catalysts for Wish-Keeper. Each Constellation quest will hint at a location (some are inside the Starcrossed mission on Legend difficulty, others might be in related locations) where a cosmic constellation of stars can be found and shot with Wish-Keeper to collect.
Each week, one new catalyst quest becomes available (mirroring how Revision Zero's catalysts worked). So you can't get all four at once; you'll need to run the mission in subsequent weeks as catalysts unlock.
The four Wish-Keeper catalysts (called "Refits") and their effects are:
- Enduring Snare Refit: Increases the duration of the Snareweaver traps (suspension field lasts longer).
- Multi-Threaded Snare Refit: Each Snareweaver trap can suspend more targets at once (likely a larger radius or more robust suspending effect).
- Vorpal Weapon Refit: Grants the Vorpal Weapon perk, boosting Wish-Keeper's damage against bosses, vehicles, and Guardians in super.
- Hatchling Refit: Adds the Hatchling perk – precision or rapid kills spawn a Threadling (a little Strand creature) that attacks foes.
By customizing Wish-Keeper with these catalysts and the intrinsic upgrades from secret chests, you can truly tailor the bow to your playstyle – whether you want longer crowd control, add-clear with Threadlings, or straight boss DPS boosts.
Solo Strategies and Tips
Undertaking Starcrossed solo turns the mission into a true test of skill and endurance. Every encounter can be done alone, but you'll need to play cautiously and make the most of your subclass toolkit. Here are key solo tips:
- Complete control over pacing
- No dependency on teammates
- Personal challenge and achievement
- Full loot allocation
- Higher difficulty curve
- No revive assistance
- Longer encounter times
- Limited damage output
- Take It Slow: There's no timer, so pace yourself. Clear minor enemies methodically before attempting puzzle objectives. For example, in the boss fight, don't rush to damage Akardon with adds up – thin the herd first so you aren't overwhelmed.
- Maximize Survivability: A good solo build prioritizes staying alive over raw damage. Healing and damage resistance are your best friends. If you're a Warlock, consider running Well of Radiance (Solar) for a clutch heal/damage resist super.
- Use Cover and High Ground: Starcrossed's arenas all have nooks and crannies you can hide in. On solo, learn the "safe spots." For instance, in the boss room, the far right corner behind a pillar is extremely safe – you can break line-of-sight to almost everything.
- Ammo Management: Solo, you are solely responsible for your ammo economy. Equip ammo finder mods for your heavy and special weapons. Don't waste heavy on easy kills; save it for majors, Wyverns, and bosses.
Fireteam Strategies and Team Play Tips
Bringing a fireteam (up to 3 players total) can make Starcrossed significantly easier – or at least faster – as you can coordinate roles and damage. Here's how to optimize your team play:
- Divide and Conquer (Objectives): Many mechanics can be split among teammates. In the symbol Phalanx encounter, one player can read the symbols and call out the kill order while others quickly locate and weaken the corresponding phalanxes.
- Support Each Other: Take advantage of team-focused subclasses. A Well of Radiance Warlock is nearly a must-have for a comfy clear – dropping a Well in the boss fight or during a tough Wyvern duel can enable aggressive play without fear of death.
- Team Shooting: Focus fire is extremely powerful. Three players dumping damage on one target will melt it before it can threaten you. This is especially useful for tough targets like the Gatekeeper Wyverns or Pitiless Attendant phalanxes.
- Communication: Use voice chat or text to communicate mechanics. Call out "Refreshing buff!" when you're going to hit a pool so others near you might do the same. Call symbols in order for example.
Loadout Recommendations
Whether solo or in a team, having the right gear makes a big difference. Below we've compiled some recommended loadouts and setups for both solo players and fireteams.
| Scenario | Subclass & Role | Recommended Weapons | Notable Mods/Exotics |
|---|---|---|---|
| Solo Play (safe & steady) | Void Hunter (Nightstalker) – invisibility support for survivability | Primary: Any Scout Rifle or Bow || Special: Wave-Frame GL || Heavy: Rocket Launcher | Exotic Armor: Omnioculus || Mods: Reaper + Orb generation mods |
| Solo Play (aggressive sustain) | Solar Warlock (Well of Radiance) – self-heal and high damage | Primary: Hand Cannon or Pulse Rifle || Special: Trace Rifle || Heavy: Linear Fusion Rifle | Exotic Armor: Starfire Protocol || Mods: Font of Endurance + Armor Charge |
| Fireteam (high DPS strat) | Combo of Well + Tether + DPS Super | Primary: Auto Rifle or SMG || Special: Blinding GL || Heavy: Mixed rockets and linears | Coordinate exotics like Luna Faction Boots, Cuirass of the Falling Star |
Conclusion
In the end, the Starcrossed exotic mission is more than just a quest for a bow – it's a journey that encapsulates the magic of Destiny's universe. From the mystic Dreaming City where the plot is set in motion, to the wilderness of the Black Garden where ancient Vex architecture and Ahamkara bones intermingle, every step feels like walking through a living myth. The mission designed to evoke the feel of a mini-dungeon mixed with a story quest, and it shows. The platforming segments make you pause to admire (and curse) the environment, the puzzles make you think, and the combat set-pieces test your mettle.
By following this guide, you should now have a clear path through Starcrossed: you know how to activate the Sire's Obligation and Dam's Gift buffs to outsmart the Vex, you've located the secret chests and secured the Wish-Keeper's full potential, and you've triumphed over Akardon, the Pitiless Mind, using strategy and perhaps a bit of fireteam synergy. In your hands is the Wish-Keeper bow, a trophy from this epic quest, and a weapon that carries the whisper of the Dreaming City's wishes into every battle you face.
As you head back to the Tower or soar off to your next adventure, take pride in what you accomplished. Not every Guardian braves the depths of an Exotic mission, after all. Wear your new Wish-Keeper with pride – maybe give Zavala a demonstration of its snareweaving power, or show Petra Venj that the wishes of the Awoken won't fall into the wrong hands. And should darkness encroach again (as it always does), remember the lessons of this mission: stay curious, stay courageous, and never ignore the call of a new adventure.
Now go forth, Wish-Keeper. The stars themselves cross in your favor. Good hunting, Guardian!