
What Are Armor Set Effects?
Edge of Fate brought something Destiny 2 players have been asking for years: real armor set bonuses. Instead of just stat tweaks, you get powerful effects that change how you play. Your armor finally matters for more than just fashion.
Each armor set has two bonus tiers that kick in when you wear multiple pieces. You'll get a two-piece bonus for wearing any two pieces from the same set, plus a four-piece bonus if you commit to wearing four pieces. The effects stay active as long as you're wearing the required pieces, though some need specific actions to trigger.
How Set Bonuses Work
Two-Piece vs Four-Piece Effects
Two-piece bonuses are your entry point into set effects. They provide solid benefits without forcing you to dedicate your entire build to one set. Perfect when you want to experiment or need flexibility for different activities.
Four-piece bonuses are where things get interesting. These effects are significantly more powerful and often work together with the two-piece bonus to create satisfying gameplay loops. You'll be locked into that set's playstyle and can only use one exotic armor piece, but the power boost is usually worth it.
Activation Requirements
Most set effects are passive - just wear the pieces and they work. But several sets require you to do specific things before you'll see any benefit. Some trigger from weapon kills, others activate when you take damage or get hit with status effects.
Every Armor Set Breakdown
Your kinetic weapons absolutely demolish shields, overshields, vehicles, and constructs like barricades, turrets, and stasis crystals. We're talking about a massive damage boost that makes shield-breaking trivial.
Four-Piece - Concussive Rounds:When you kill powerful enemies or break shields with kinetic damage, you create a disorienting shockwave that messes up nearby enemies. It's crowd control and damage rolled into one satisfying package.
Kill something with a grenade launcher or rocket launcher, then sprint briefly to get a speed boost. Simple but effective for aggressive heavy weapon users.
Four-Piece - Reactive Booster:Once per Force Converter trigger, you can get an instant speed boost by sprinting while you're almost dead, suspended, or slowed by stasis. It's a panic button that can save your life in tight spots.
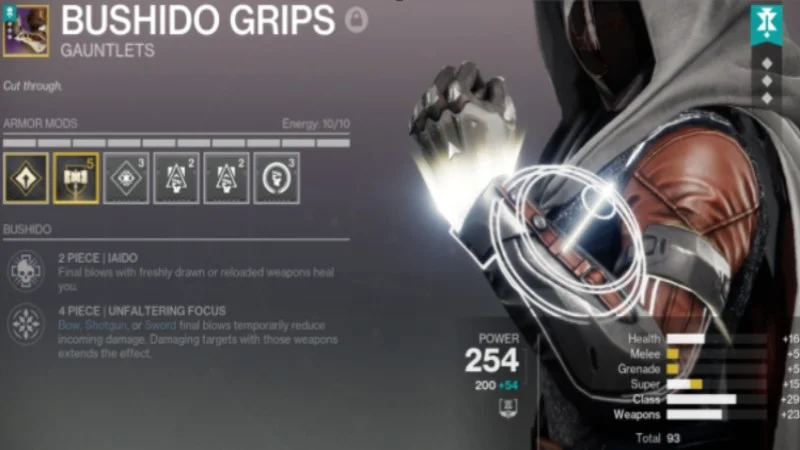
Fresh weapons heal you. Every time you draw a weapon or finish reloading, final blows give you health back. Rewards good weapon management and encourages swapping between different tools.
Four-Piece - Unfaltering Focus:Kills with bows, shotguns, or swords give you damage resistance. Hit enemies with those weapons to keep the effect going. Creates a defensive loop that rewards staying aggressive with specific weapon types.
Primary weapon kills make those weapons reload faster temporarily. Straightforward but effective for maintaining DPS with your main weapons.
Four-Piece - Power Loader:Orbs of Power give you special ammo. Not a full reload, but progress toward your next clip. Helps you maintain special weapon uptime in longer fights.
Grenade launcher and rocket launcher kills reduce incoming area damage temporarily. Protection against splash damage and environmental hazards.
Four-Piece - Reactive Shock:When Force Absorption is active and you take melee damage, you emit a disorienting burst once per activation. Punishes enemies who try to rush you while you're using explosives.
Ammo bricks heal you. Simple sustain tied to something you're already doing. More ammo spawns in competitive modes mean more healing opportunities.
Four-Piece - Gift of Sight:Primary weapon kills boost your radar resolution briefly. You'll see enemy positions more clearly, which is huge in competitive play where information wins fights.
Picking up ammo gives you stacking weapon swap and stow speed bonuses that last until you die. Rewards active ammo management while making weapon switching feel more responsive.
Four-Piece - Doppler Effect:Your suspend, unravel, and sever effects on enemies last longer. Same goes for radiant and restoration effects on you. Massive value for Strand builds and anyone using buff/debuff strategies.
When you get healed, your solar weapons gain better flinch resistance, handling, and reload speed temporarily. Links healing mechanics with improved weapon performance.
Four-Piece - Cauterize:Rapid solar weapon kills heal you. Creates a healing loop that rewards aggressive solar weapon use and keeps you healthy during combat.
Where to Farm Each Set
Portal Activities
The Portal organizes activities into different categories, each tied to specific armor sets:
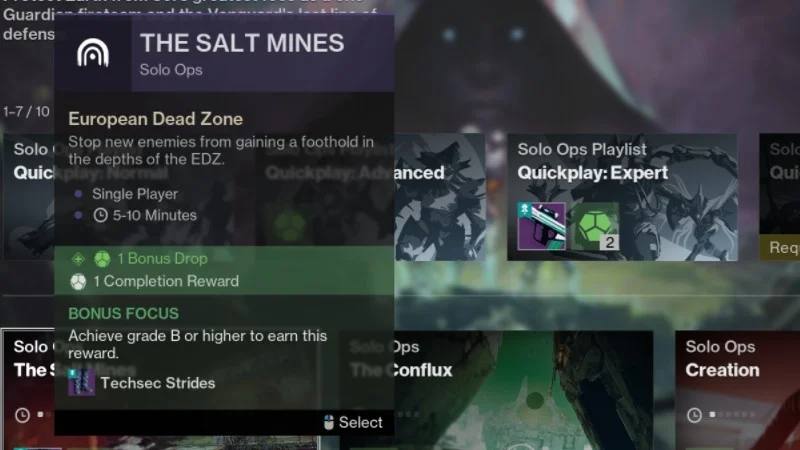
Fireteam Ops include Strikes, basic Onslaught, and The Coil. These are your go-to activities for Techsec pieces. They're generally accessible and can be farmed relatively quickly.
Pinnacle Ops cover dungeons, exotic missions, and full-length Onslaught. These more challenging activities reward Bushido armor. Expect to invest more time but get better rewards overall.
Kepler Activities are the new content type that drops both Aion Renewal and Aion Adapter pieces. You'll need to engage with various Kepler content to build complete sets from either family.
PvP Sources
Regular Crucible matches drop Last Discipline pieces. Any game mode works, so play what you enjoy most. The drop rates are reasonable for casual PvP players.
Trials of Osiris provides Twofold Crown armor. You'll need to participate in weekend Trials cards and hit various victory milestones. The competitive nature means fewer players will have access to complete sets.
Special Content
Solstice Events offer Lustrous armor pieces during the annual summer celebration. These pieces are time-limited, so grab them when the event is active.
The Desert Perpetual Raid drops Collective Psyche armor with powerful Strand synergies. Raid armor typically has the best stats, so these pieces are worth the effort for serious players.
Building Around Set Bonuses
Single Set Strategies
Going all-in on one set gives you the most cohesive gameplay experience. You get both bonus tiers working together, creating powerful synergies that define your playstyle.
When choosing a single set, match it to your preferred activities and weapons. Techsec dominates shield-heavy PvE content, while Two-Fold Crown excels in competitive PvP. Don't force a set that doesn't match how you play.
Mixing Two Sets
Using two pieces from different sets lets you combine their two-piece bonuses while keeping exotic flexibility. This approach requires more careful planning but offers unique combinations you can't get any other way.
Look for sets with complementary effects. Aion Renewal's mobility pairs well with Bushido's weapon swapping benefits. Last Discipline's primary weapon focus works great with Twofold Crown's sustain mechanics.
The key is finding synergies between different set bonuses rather than just picking two random effects. Some combinations create gameplay loops that are stronger than either set alone.
Exotic Integration
Your exotic armor choice becomes more important with set bonuses. Since exotics don't count toward set requirements, you need to decide which armor slot to dedicate to exotic effects.
Some exotics synergize perfectly with certain set bonuses. Others provide effects that are powerful enough to justify losing a set piece. Consider how your exotic complements your chosen set effects rather than just looking at raw power.
Don't forget that you can swap exotics more easily than farming entire new armor sets. Test different combinations to find what works best for your playstyle.
Activity-Specific Recommendations
General PvE Content
Techsec handles most PvE scenarios thanks to its shield-breaking power. You'll tear through content that normally requires careful loadout planning. Bushido provides excellent survivability when you can't rely on safe positioning.
For explosive weapon fans, the Aion sets offer different approaches. Renewal focuses on mobility and aggression, while Adapter provides defensive utility. Choose based on whether you prefer hit-and-run tactics or standing your ground.
Competitive PvP
Twofold Crown is built for Trials and competitive Crucible. The healing keeps you in fights while the radar boost gives you better information than your opponents. Both effects can swing close matches in your favor.
Last Discipline works in any PvP mode where primary weapons matter. The reload speed boost helps with consistency, while the special ammo progress keeps your secondary weapons fed.
High-End Content
Difficult content often has specific requirements that favor certain sets. Bushido's defensive bonuses help in encounters where you can't avoid damage. Collective Psyche's status effect extensions can trivialize encounters built around debuffs and buffs.
Match your set choice to the encounter mechanics rather than just picking the highest damage option. Sometimes utility and survivability matter more than raw power.
Build Variants
| Content Type | Best Sets | Why It Works | Alternative Options |
|---|---|---|---|
| Strikes & Nightfalls | Techsec, Bushido | Shield breaking, survivability | Aion Renewal for speed |
| Trials of Osiris | Twofold Crown | Sustain and information | Last Discipline for primaries |
| Raids | Collective Psyche, Bushido | Team support, defense | Activity-specific choices |
| Solo Content | Bushido, Lustrous | Self-sustaining builds | Techsec for damage |
Making the Most of Set Bonuses
The armor set system adds a new layer to Destiny 2's buildcrafting that goes beyond just chasing the highest stats. These effects can change how activities feel and open up new strategies that weren't viable before.
Don't get caught up in the gear tier system early on. Focus on understanding how different sets work and which ones match your playstyle. You can always upgrade to higher tier pieces later, but learning the mechanics is more valuable than perfect rolls.
Experiment with different combinations and don't be afraid to switch sets based on what you're doing. The system is designed to reward adaptation and thoughtful buildcrafting rather than just finding one perfect setup.