
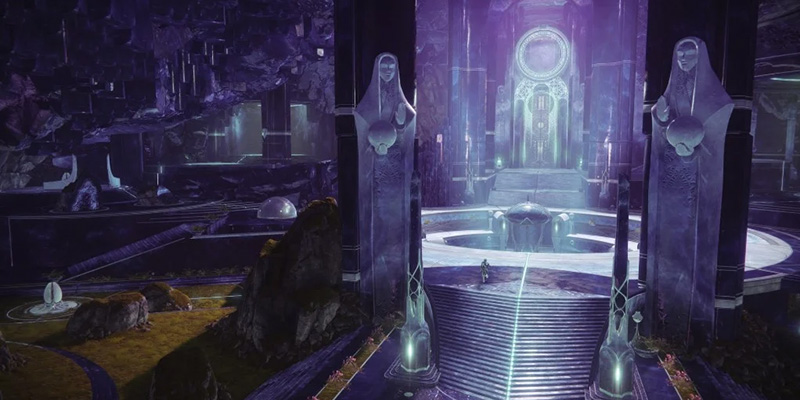
Deep within the heart of the Dreaming City, nestled amidst crystalline structures and bathed in an ethereal glow, lies the Font of Starlight—better known to Guardians as the Blind Well. It is more than a mere arena; it is a place of profound Awoken significance, a conduit of paracausal energies, and a battleground where Light clashes endlessly against the encroaching shadows. Its towering central pillar hums with contained power, the air thick with the mysteries of a civilization caught between dimensions.
Whispers from the Well: An Introduction
Echoes of the Awoken Past
The Blind Well is an ancient Awoken construct, a dimensional rift generator meticulously calibrated during the Taken War. Its purpose was twofold: to harness vast quantities of Light and other paracausal forces, and to forge pathways through the Ascendant Plane. It was instrumental in the creation of Queen Mara Sov's throne world, Eleusinia, a feat achieved through Awoken ingenuity and esoteric understanding.
After Mara's apparent demise and the subsequent invasion of the Dreaming City, the Well's intended destination became obscured, its power a tempting prize for those who sought to control the Ley Lines. Guardians reactivated this potent device, despite Techeun warnings, initially to combat the Scorn, Hive, and Taken infestation. Later, the Techeun Coven utilized its energies to locate their lost Queen within the Ascendant Realm, and it served as a crucial nexus point for aligning pathways for pivotal events, such as the exorcism of Savathûn, the Witch Queen. The Blind Well stands as a testament to Awoken power, a place where the veil between realities thins, now perpetually contested by forces seeking to exploit its energies.
Why the Well Still Calls
Though seasons turn and threats evolve, the Blind Well retains its potent draw for Guardians. It echoes the frantic defense of past arenas like the Court of Oryx and Escalation Protocol, offering a familiar yet distinct horde mode experience. Its relevance surged anew during the Season of the Wish, becoming a mandatory step in the seasonal narrative as Guardians sought Riven's aid.
This renewed focus was a direct effort to revitalize the activity after a period of diminished importance, partly due to gear sunsetting and the ever-climbing power curve that left older content behind. Bungie acknowledged that requiring players to return was a point of friction but aimed to highlight its updated challenges and, crucially, its refreshed rewards.
Furthermore, it remains a consistent source for weekly powerful gear drops and progress on Petra Venj's vital bounties, ensuring its place in the efficient Guardian's routine.
Crossing the Threshold: Accessing the Blind Well
Finding the Font of Starlight
To partake in the Blind Well's trials, one must first reach its sanctuary within the Dreaming City.
Your journey begins in the Divalian Mists, the Dreaming City's initial landing zone. From the spawn point, look towards the towering cliffs ahead; a massive, ornate doorway beckons. Proceed through this entrance, navigating the crystalline hallways and ascending the staircases within. These passages act as a transition, leading you eventually into the large, circular chamber known as the Font of Starlight—the arena of the Blind Well.
Charges of Light: Keys to the Well
Initiating the Blind Well requires a specific offering: a Charge of Light. These consumable items come in three primary tiers (Tier I, Tier II, Tier III), corresponding to the desired difficulty level of the encounter. An additional, more potent charge, the Unstable Charge of Light, is required to activate the Heroic Tier IV challenge.
Acquiring the Charges
Guardians have several avenues to obtain these essential keys:
- Dreaming City Activities: Charges can manifest as rewards from various activities within the Dreaming City itself. Completing Public Events, opening chests (including Ascendant Chests), finishing Patrols, clearing Lost Sectors, and even successfully completing Blind Well runs can yield Charges of Light.
- Petra Venj's Inventory: The Awoken Corsair Petra Venj, the Dreaming City's vendor, offers Charges of Light for purchase. Historically, these required Dark Fragments, a currency earned through city activities. However, as of Season of the Wish, Petra accepts Glimmer for these charges.
| Charge Type | Current Cost |
|---|---|
| Charge of Light - Tier I | 2,500 Glimmer |
| Charge of Light - Tier II | 5,000 Glimmer |
| Charge of Light - Tier III | 7,500 Glimmer |
| Unstable Charge of Light (Tier IV) | 10,000 Glimmer |
- Ahamkara Skull Bargain: Deep within the Harbinger's Seclude, past treacherous drops and hidden pathways, lie two enigmatic Ahamkara skulls. These entities offer trades, including Tier II Charges of Light in exchange for Baryon Boughs, the Dreaming City's planetary material (25 Boughs per Tier II charge). This provides an alternative for Guardians flush with materials but low on Glimmer.
Igniting the Well
With a Charge of Light in hand, approach the towering central pillar within the Font of Starlight. Around its base are three distinct receptacles, each marked subtly to correspond with Tier I, Tier II, or Tier III. Interact with the receptacle matching the Tier of the Charge you wish to offer. Occasionally, the interaction prompt may be finicky; re-approaching the pillar or adjusting your angle might be necessary to initiate the offering. Be aware that there is a brief cooldown period (approximately 60 seconds) after an event concludes before a new Charge can be offered.
Navigating the Mists: Core Mechanics & Tiers (Tier I-III)
The Cycle of Defense
Once a Charge of Light is accepted, the Blind Well springs to life, initiating a challenging cycle of defense against waves of invaders.
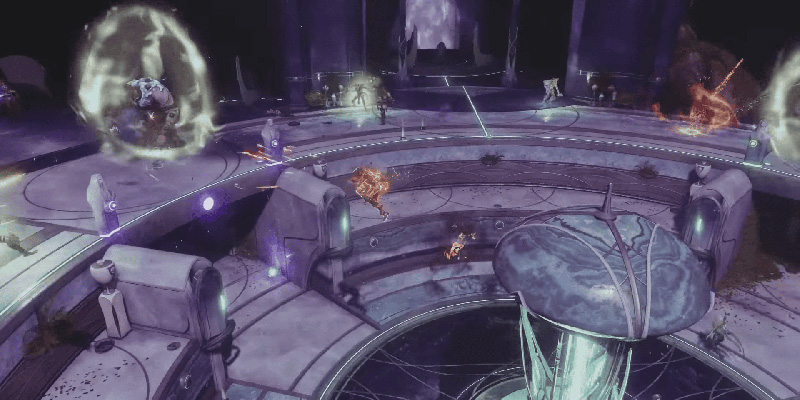
The fundamental structure of a Blind Well encounter (Tiers I-III) consists of five distinct waves. The first four waves follow a similar pattern: Guardians must defend a designated location within the arena, marked by a protective bubble, often referred to as a "Well". Defeating enemies within or near this bubble causes them to drop motes of Light, which automatically deposit into the Well, charging its progress.
Each wave operates under a time limit (initial reports suggested 2 minutes and 30 seconds per wave, though timers can feel dynamic, especially during boss phases). Successfully charging a Well location completes the wave, causing the protective bubble to shift to a new location for the subsequent wave. The fifth and final wave transitions into a boss encounter.
Sanctuary Amidst Chaos: The Bubbles
During the first four waves, the active Well location is enveloped in a large, shimmering bubble of Light.
- "Touch of the Sky" Buff: Standing within this protective sphere grants Guardians the "Touch of the Sky" buff. This vital boon provides immunity to the hazardous environmental effect permeating the arena outside the bubble.
- Lingering Protection: Upon exiting the bubble, the "Touch of the Sky" buff lingers for a brief period—approximately 5 seconds—allowing for quick excursions to engage enemies or collect ammo before the danger sets in.
The Encroaching Dark: Environmental Hazard
Outside the sanctuary of the active Well bubble, a heavy, toxic mist blankets the arena during waves 1 through 4. This environment is inherently hostile to Guardians.
- "Touch of the Deep" Debuff: Once the lingering "Touch of the Sky" buff expires after leaving a bubble, Guardians are afflicted with the "Touch of the Deep" debuff. This debuff inflicts steady, continuous damage over time. Lingering in the mist for too long under this effect is lethal and will inevitably lead to death. Returning to the active bubble immediately removes the debuff and halts the damage.
Tier Differences (I, II, III)
The primary distinctions between Tier I, Tier II, and Tier III lie in their escalating difficulty and the complexity of the final boss wave.
The most accessible level. Recommended Power Level was historically around 520. Features tougher enemies than standard patrols but manageable for smaller groups or less optimized loadouts. The final wave presents a single Herald of the Plague boss.
A noticeable step up in challenge. Historically recommended for PL 520+ and ideally requires a larger group (5-6 players suggested). Enemies are more resilient. The final wave features two Herald of the Plague bosses that must be defeated simultaneously or sequentially.
The highest non-Heroic difficulty. Recommended Power was significantly higher (PL 560 mentioned historically). Demands a well-coordinated team or a large number of participants. Enemies are considerably tougher. The final wave culminates in a challenging battle against three Herald of the Plague bosses.
- Week 1 (Weakest Curse): Petra is located in The Strand. The Blind Well is primarily populated by Scorn. Expect aggressive melee units, Ravagers, Lurkers, and the volatile Screebs.
- Week 2 (Growing Curse): Petra is located in Divalian Mists. The Blind Well is predominantly occupied by Hive. Prepare for Acolytes, Knights with Arc shields or Boomers, and dangerous Wizards.
- Week 3 (Strongest Curse): Petra is located in Rheasilvia. The Blind Well faces an onslaught of Taken. Encounter Taken Psions multiplying, shielding Goblins, Phalanx shield walls, and teleporting Captains.
While the core mechanics of defending Wells and utilizing Harmony remain constant, the weekly enemy rotation subtly alters the rhythm and specific threats within each wave. Scorn weeks demand vigilance against suicidal Screebs and overwhelming numbers. Hive weeks require managing powerful Knights and airborne Wizards. Taken weeks test players' ability to handle Psion duplication, disruptive abilities like Captain darkness bolts, and Phalanx pushes. Minor tactical adjustments or loadout considerations based on the week's faction can improve survivability and efficiency.
The Harmony Attunement: Mastering the Crucial Buff
Success in the Blind Well, particularly against its more formidable guardians, hinges on understanding and mastering the Harmony buff. This fleeting empowerment is the key to overcoming otherwise insurmountable defenses.
Seeking the Anathema
The source of the Harmony buff lies with a specific enemy type: The Anathema. These adversaries begin appearing from the second wave onwards.
Bathing in Light: The Harmony Orb & Buff
Upon defeat, an Anathema drops a large, conspicuous orb of light—often described as purple or simply a glowing sphere. Running over this orb instantly grants the Harmony buff to the Guardian who collected it, and potentially nearby allies.
- Buff Duration: The Harmony buff persists for 15 seconds. (Note: Some older sources mention 10 seconds, but 15 seconds is the widely accepted and observed duration).
- Harmony Effects: This potent buff confers several powerful advantages:
- Shield Piercing: This is the buff's most critical function. While Harmony is active, a Guardian's attacks can damage the shimmering white immunity shields protecting Servants of the Plague and the Herald of the Plague bosses. Without Harmony, these shields are completely impervious to all forms of damage.
- Accelerated Abilities: Harmony dramatically increases the recharge rate of the Guardian's Super, Grenade, and Melee abilities. This allows for rapid deployment of powerful abilities, significantly boosting damage output and utility.
- Mist Immunity: Guardians under the effect of Harmony are immune to the damaging "Touch of the Deep" debuff, enabling safe traversal and combat outside the protective bubbles.
- Clearer Vision: The buff pierces the obscuring mist, granting clear visibility across the arena.
Breaking the Unbreakable: Servants of the Plague
Appearing alongside Anathemas from Wave 2 onwards are the Servants of the Plague. These are formidable major enemies encased in the aforementioned white immunity shields.
- The Harmony Requirement: It cannot be overstated: only Guardians currently empowered by the Harmony buff can damage and break these shields. Any attacks from unbuffed players will register as "Immune."
- Post-Shield Vulnerability: Once a Servant's shield is shattered by Harmony-infused attacks, the enemy becomes vulnerable to damage from all players, regardless of whether they possess the Harmony buff.
- Bonus Orbs: Defeated Servants of the Plague often drop additional Harmony orbs, providing further opportunities for the fireteam to gain the buff.
The frequent community discussions and in-game observations about players misunderstanding this core mechanic underscore its importance. Newcomers and even some veterans may waste valuable time and ammunition firing futilely at immune shields or fail to prioritize Anathemas when Harmony is needed. Clarity on this interaction is paramount for successful Blind Well runs, especially in matchmade groups. The dual nature of the buff—providing both the necessary shield-breaking capability and a potent ability regeneration bonus—encourages players to actively seek out Anathemas and utilize the Harmony orbs not just as keys, but as moments of significant power surge, driving a dynamic gameplay loop of empowerment and destruction.
Heralds of the Plague: Tier I-III Boss Encounters
The culmination of a Tier I, II, or III Blind Well run is the fifth and final wave, where the environmental hazards recede and the true commanders of the invading force reveal themselves.
Confronting the Heralds
As Wave 5 commences, the damaging mist dissipates, granting Guardians freedom of movement throughout the entire arena. In place of the mist, formidable bosses known as Heralds of the Plague spawn, accompanied by numerous lesser enemies.
- Number of Bosses: The quantity of Heralds directly corresponds to the Tier initiated:
- Tier I: One Herald of the Plague.
- Tier II: Two Heralds of the Plague.
- Tier III: Three Heralds of the Plague.
- Boss Types: Heralds are powerful major enemies, often taking the form of large, imposing units like Scorn Abominations, Hive Ogres, or other elite combatants representative of the week's dominant enemy faction.
The Harmony Key
Just like the Servants of the Plague encountered in earlier waves, these Herald bosses are protected by the same impenetrable white immunity shields. The method for breaking these shields remains consistent:
- Locate Anathemas: Glowing Anathema enemies will spawn continuously throughout the boss wave, often appearing near the Heralds themselves.
- Defeat Anathemas: Eliminate these glowing targets swiftly.
- Acquire Harmony: Collect the Harmony orb dropped by the defeated Anathema to gain the 15-second Harmony buff.
- Break the Shield: While buffed with Harmony, focus fire on a Herald's shield to break it. It may require sustained fire or Harmony buffs from multiple players to fully deplete a Herald's shield.
Coordinated Assault
Defeating the Heralds, especially in Tiers II and III where multiple bosses are present, demands teamwork and focused effort. The combination of multiple high-health targets and the mandatory shield-breaking mechanic makes uncoordinated approaches highly inefficient and likely to fail against the clock.
- Focus Fire: The most effective strategy is to designate one Herald as the primary target. The entire fireteam, particularly those with the Harmony buff, should concentrate on breaking that specific Herald's shield first.
- Maximize Vulnerability: Once a Herald's shield is down, it becomes vulnerable to all damage sources. This is the window to unleash high-damage Supers (like Golden Gun, Nova Bomb, Thundercrash) and Heavy weapons (Linear Fusion Rifles, Rocket Launchers, Swords if safe). Coordinate damage buffs (Well of Radiance, Tether, Hammer Strike) for maximum effect.
- Manage the Clock: Keep an eye on the timer. Successfully defeating a Herald often adds time back to the clock, providing breathing room to engage the next target. Prioritizing targets ensures steady progress before time expires.
- Maintain Harmony: Continue defeating Anathemas throughout the fight to maintain Harmony uptime for shield breaking and the valuable ability regeneration.
Overcharging the Well: Activating and Conquering Tier IV (Heroic)
Beyond the trials of Tier III lies a greater challenge, accessible only through a deliberate act of overcharging the Blind Well's delicate mechanisms. This unlocks the Heroic encounter, pitting Guardians against the formidable Plagues of the Well.
The Unstable Charge: The Heroic Key
Activating the Tier IV Heroic mode requires a special consumable: the Unstable Charge of Light.
- Acquisition: This potent charge can be reliably purchased from Petra Venj for 10,000 Glimmer. It may also occasionally drop as a reward from Blind Well completions, particularly from Tier III or Tier IV chests. (Historically, it cost 35 Dark Fragments).
The Heroic Trigger
Unlocking the Tier IV encounter follows a precise sequence of events:
- Complete Tier III: First, your fireteam must successfully defeat all three Herald of the Plague bosses in a standard Tier III Blind Well run.
- Heed the Ghost's Warning: Immediately following the defeat of the final Tier III Herald, your Ghost will deliver an audio cue, warning that the Well is becoming unstable, overclocking, or growing voracious. This signals the activation window.
- Act Swiftly: There is only a very brief window—mere seconds—after the Ghost's line and before the Tier III reward chest fully manifests, to initiate the Heroic mode.
- Offer the Unstable Charge: During this short window, rush back to the central pillar where Charges are normally deposited. A prompt will appear allowing a player holding an Unstable Charge of Light to interact and offer it to the Well.
The Plagues of the Well
Successfully offering the Unstable Charge transforms the arena, initiating the Tier IV Heroic encounter against a powerful, unique boss known as a Plague of the Well.
- Heroic Difficulty: Tier IV represents a significant leap in difficulty. Enemies are much tougher, hitting harder and possessing more health. The recommended Power Level was historically 580, and while current scaling adjusts this, the encounter remains a true Heroic challenge. Expect higher-ranked enemies and potentially active modifiers like Shielded Foes, requiring appropriate elemental damage types.
- Weekly Rotation: The specific Plague of the Well boss encountered changes each week, rotating in sync with the Dreaming City's three-week curse cycle and the corresponding dominant enemy faction (Scorn, Hive, Taken). Each Plague brings its own unique mechanics that must be mastered.
Facing the Plagues: Heroic Boss Strategies (Tier IV)
Conquering the Tier IV Heroic Blind Well demands mastery of three distinct encounters, each tied to the weekly curse cycle. General preparedness involves high survivability, strong boss damage loadouts, and clear team communication.
Cycle: Weakest Curse | Enemies: Scorn | Petra: The Strand.
The Encounter:
Two powerful Scorn bosses, resembling Abominations or Chieftains, named Sikariis and Varkuuriis, spawn simultaneously. They will frequently afflict players with disruptive blue tether debuffs.
Core Mechanic: Screeb Demolition
Both bosses possess immunity shields impervious to conventional damage. The key to breaking these shields lies with the numerous explosive Screebs that constantly spawn, particularly near the bosses' feet. Detonating these Screebs (either by shooting them or luring them close to the bosses) damages and eventually shatters the shields.
Strategy:
- Focus Fire: Concentrate all efforts on bringing down one boss at a time.
- Range is Key: Utilize long-range weapons (Scout Rifles, Sniper Rifles, Linear Fusion Rifles, stable Machine Guns) to safely detonate Screebs from a distance and engage the bosses.
- Role Assignment: Designate specific team members for Screeb detonation duty, while others focus on boss DPS (once vulnerable) and eliminating the troublesome Void Captains.
- Positioning: Consider using the elevated rock platforms near the arena entrance. These offer better sightlines for spotting Screebs and Captains, and provide some safety from ground-based threats.
Cycle: Growing Curse | Enemies: Hive | Petra: Divalian Mists.
The Encounter:
A single, colossal Hive Ogre named Cragur serves as the Plague of the Well.
Core Mechanic: Relic Orbs
Cragur begins the fight shielded and immune to all damage. To break this shield, players must defeat specific yellow-bar major enemies that spawn sequentially in pairs around the arena (typically starting with Wizards on one side, followed by Ogres on the opposite, then Knights near the entrance). Each of these defeated majors drops a glowing Relic Orb.
Shield Breaking Options:
- Standard Method: Picking up a Relic Orb allows a Guardian to throw it at Cragur. Direct hits damage his shield. It typically takes three uncharged Relic throws to break the shield completely.
- Charged Method (Recommended): A more efficient method involves charging the Relic Orb. Before throwing it at Cragur, pass the orb to another teammate (like catching and throwing a ball). The orb will visibly charge (sparkle). A single throw of a charged Relic Orb is powerful enough to instantly break Cragur's shield.
Strategy:
- Coordination: Communication is key for the charged orb method. Designate who picks up, who catches, and who throws the charged orb at Cragur.
- Prioritize Majors: Quickly eliminate the pairs of Relic-carrying majors as they appear.
- Maximize DPS: Once the shield drops, unleash maximum damage. Aim for Cragur's large critical spot (his eye/head). High-impact weapons like Rocket Launchers, Linear Fusion Rifles, or powerful Supers are ideal.
Cycle: Strongest Curse | Enemies: Taken | Petra: Rheasilvia. The portal to the Queen's Court is accessible this week via the Oracle Offering.
The Encounter:
The final Plague is Inomina, a massive Taken Chimera (often nicknamed "Meatball").
Core Mechanic: Blight Destruction
Inomina protects itself with an immunity shield generated by several large Taken Blights dispersed throughout the arena. These are not the small projectiles fired by standard Chimeras, but the larger, stationary Blights that typically create damaging fields.
Shield Breaking:
Each active Blight powering the shield is connected to Inomina by a visible tendril or line of Darkness energy. Guardians must follow these lines to locate the source Blights. Unlike typical Taken Blights, these specific ones do not damage players standing inside their protective sphere. Players must enter the Blight's sphere and destroy the central core within. Destroying all connected Blights will dissipate Inomina's immunity shield.
Strategy:
- Locate and Destroy: Quickly identify the energy lines leading from Inomina and follow them to the Blights. Spread out to cover the arena and destroy them efficiently.
- Close-Range for Blights: Weapons effective at close range, such as Fusion Rifles or Shotguns, are excellent for quickly destroying the Blight cores once inside their shields.
- Ranged DPS for Boss: Once Inomina's shield is down, switch to high-damage, precision-based ranged weapons (Rocket Launchers, Linear Fusion Rifles, Sniper Rifles) or Supers, targeting its large central eye.
- Awareness: Stay mobile and be mindful of Inomina's powerful Void Eversion blasts and its ability to teleport around the arena. Clear out accompanying Taken adds as needed.
"The Blind Well is not simply a means to power our weapons or sharpen our skills. It is a testament to what the Awoken have achieved by standing between Light and Dark, a bridge between realities that even the Hive would envy. That such power can be wielded by mortal hands should give us all pause."
Gearing for the Depths: Optimal Loadouts & Builds
Entering the Blind Well prepared requires not just skill, but the right tools for the task. Loadouts should prioritize add clear, survivability, and burst damage, adapting slightly for the specific challenges of lower tiers versus the unique mechanics of Tier IV.
Weapons of Light - General Recommendations
A well-rounded loadout typically includes options for different engagement scenarios:
Add Clear (Waves 1-4 & T4 Adds)
The Well throws dense waves of enemies. Efficient add clear is paramount.
- Grenade Launchers: Wave Frame Grenade Launchers (like Forbearance or the Arc Undercurrent) excel at clearing lines of ground enemies. Special ammo GLs with Blinding Grenades can offer valuable control.
- SMGs & Auto Rifles: High fire rate weapons like the reprised Arc SMG Subjunctive or the Void Auto Rifle Ros Arago IV are effective. The reprised Kinetic Auto Rifle Tigerspite is also a solid choice. Perks like Voltshot, Destabilizing Rounds, or Incandescent enhance clearing potential. Graviton Lance is mentioned as a strong Void option, especially for Titans.
- Exotic Utility: Telesto, while its infamous exploit is long gone, remains a decent add-clear weapon with its delayed explosions. Riskrunner can be potent during Arc-heavy weeks or if taking Arc damage. Trinity Ghoul remains a top-tier add clear exotic.
Major/Shield Damage (Tiers I-III - Harmony Buff)
During Harmony, ability spam is key, but weapons still play a role.
- Fusion Rifles: Rapid-Fire Fusions like Scatter Signal or specials like Telesto can deal good burst damage during the buff window.
- Shotguns: Particularly those with synergistic perks like One-Two Punch or Trench Barrel, can pair effectively with melee-focused builds amplified by Harmony's recharge rate.
Boss DPS (Tier I-IV)
Essential for quickly dispatching Heralds and Plagues during vulnerability phases.
- Linear Fusion Rifles: Strong sustained precision damage. The seasonal Doomed Petitioner is a relevant option.
- Rocket Launchers: Excellent burst damage. The reprised Arc Sleepless or the world drop Crux Termination IV are possibilities. Pair with Gjallarhorn for team support.
- Heavy Machine Guns: Good for sustained damage and add control during DPS. The seasonal Marcato-45 is a Strand option.
- Sniper Rifles: Precision damage dealers. The reprised Solar Twilight Oath or the Nightfall weapon Uzume RR4 fit this role. Whisper of the Worm was historically a top choice for its damage potential.
- Swords: High risk, high reward. Lament offers healing and shield-piercing, while others like Falling Guillotine provide strong burst. Caster Frames like the ritual weapon Chivalric Fire offer ranged utility. Best used with Well of Radiance or other defensive buffs.
- Exotic Heavy: Sleeper Simulant, Xenophage, Leviathan's Breath can all be effective depending on the encounter and range.
Seasonal Standouts (Season of the Wish & Reprised)
Season of the Wish brought new and reprised weapons relevant to the Blind Well's updated loot pool:
- Season of the Wish Weapons: Supercluster (Strand Slug Shotgun), Scatter Signal (Strand Rapid-Fire Fusion), Appetence (Stasis Trace Rifle), Scalar Potential (Arc Rapid-Fire Pulse), Lethophobia (Void Lightweight Bow), Doomed Petitioner (Void Linear Fusion Rifle). All are craftable and feature the Dragon's Vengeance Origin Trait (refills magazine and grants bonuses on critical health or ally death).
- Dreaming City Reprised Weapons: Tigerspite (Kinetic Precision AR), Waking Vigil (Arc Adaptive HC), Sleepless (Arc High-Impact RL), Vouchsafe (Void Lightweight Scout), Retold Tale (Void Precision Shotgun), Twilight Oath (Solar Rapid-Fire Sniper), Abide the Return (Solar Adaptive Sword). These feature updated perk pools and the Advanced Reflexes Origin Trait (bonuses after aiming down sights, taking damage, or using abilities).
- Season of Undying Reprised Weapons: Optative (Void Precision HC), Adhortative (Solar Adaptive Pulse), Imperative (Kinetic High-Impact Scout), Subjunctive (Arc Lightweight SMG). These are craftable and possess the Nano-Munitions Origin Trait (slowly builds emergency ammo refill near allies).
- Ritual Weapon: Chivalric Fire (Void Caster Frame Sword) with options like Repulsor Brace and Destabilizing Rounds.
Armor & Mods
Optimizing your Guardian's armor is crucial for survival and efficiency:
- Stats: Prioritize reaching 100 Resilience for maximum damage resistance in PvE. After Resilience, focus on Discipline for grenade uptime (synergizes well with Harmony) and Recovery for health regeneration. Mobility, Strength, and Intellect are generally lower priority unless specifically required by an exotic or build strategy.
Essential Mods
- Ammo Economy: Heavy Ammo Finder, Heavy Ammo Scout (if coordinating). Special Ammo Finder can also be useful. Scavenger mods for your primary Special/Heavy weapon types.
- Orb Generation: Siphon mods matching your primary weapon element (Kinetic, Solar, Arc, Void, Stasis, Strand) are vital for fueling armor charge mods and generating Super energy. Heavy Handed (Melee Kills), Firepower (Grenade Kills) can supplement orb generation.
- Damage & Abilities: Weapon Surge mods matching your main DPS weapon element provide a significant damage boost. Consider mods like Grenade Kickstart, Melee Kickstart, or Utility Kickstart to further reduce cooldowns, especially potent during Harmony. Ashes to Assets (Grenade Kills grant Super) and Hands On (Melee Kills grant Super) are also strong choices.
- Survivability: Concussive Dampener, elemental resistance mods (Arc/Solar/Void Resist) tailored to the weekly enemy faction or specific boss attacks. Recuperation or Better Already for health on orb pickup.
Exotic Armor
Synergistic exotics significantly enhance performance. Key examples include:
- Orpheus Rig (Tether uptime)
- Celestial Nighthawk (Golden Gun damage)
- Omnioculus/Gyrfalcon's Hauberk/Graviton Forfeit (Void utility/invis/damage)
- Gwisin Vest (Spectral Blades utility)
- Lucky Pants (Hand Cannon DPS)
- Liar's Handshake/Assassin's Cowl (Arc melee)
- Phoenix Protocol (Well uptime)
- Lunafaction Boots (Well reload/range)
- Crown of Tempests (Arc ability spam)
- Vesper of Radius (Arc Rift utility)
- Contraverse Hold/Nezarec's Sin (Void ability uptime)
- Hallowfire Heart (Solar ability regen)
- Cuirass of the Falling Star (Thundercrash damage)
- Helm of Saint-14 (Ward of Dawn utility)
- Ursa Furiosa (Banner Shield utility)
- Heart of Inmost Light (General ability spam)
- Synthoceps/Wormgod Caress (Melee damage)
Harmony Synergy
Design builds specifically to exploit the Harmony buff's 15 seconds of rapid ability regeneration. Subclasses built around grenade spam (like Starfire Protocol Warlocks historically, or Voidwalkers with Contraverse Hold), melee loops (Arcstrider, some Titan builds), or frequent Super usage (Nightstalker with Orpheus Rig, Dawnblade with Phoenix Protocol) become exceptionally powerful during Harmony phases. Combine these subclass choices with armor mods that generate Orbs of Power from ability kills (Heavy Handed, Firepower) and mods that grant Super energy from those orbs or kills (Ashes to Assets, Hands On, Innervation, Absolution). This creates a potent feedback loop where Harmony fuels abilities, abilities generate orbs, and orbs fuel more abilities and Supers, maximizing uptime and impact during the buff window.
Class Aptitude: Excelling with Your Guardian
While any Guardian can contribute to conquering the Blind Well, certain subclasses and strategies naturally align better with its challenges, particularly when coordinating within a team.
Hunter Strategies
Hunters bring agility, burst damage, and valuable debuffs or crowd control to the Well.
Often considered a top-tier choice. Shadowshot (especially Moebius Quiver for multiple shots and orb generation) provides a powerful weaken debuff (30%) and excellent crowd control. Orpheus Rig, even after adjustments, can still provide significant Super energy return in the target-rich environment, especially from tethering majors. Trapper's Ambush grants invisibility on demand for safe revives or repositioning. Access to Devour (via Fragments) enhances survivability. Stylish Executioner builds offer alternative invisibility loops. Pairs well with Void weapons benefiting from Volatile Rounds (via Fragments or perks like Destabilizing Rounds) and Repulsor Brace for overshields. Exotics like Omnioculus (team invisibility, damage resistance), Gyrfalcon's Hauberk (Volatile Rounds on invis exit), or Graviton Forfeit (longer invis/ability regen) are strong alternatives.
Excels at single-target burst damage, crucial for burning down Heralds or Plagues during vulnerability phases. Golden Gun with Celestial Nighthawk delivers massive precision damage. Blade Barrage offers good AoE clear and decent boss damage. Provides Radiant buff for increased weapon damage for the fireteam. Knock 'Em Down aspect enhances Super damage and duration.
High potential for add clear and melee-focused damage, especially when amplified by the Harmony buff. Combination Blow builds using Liar's Handshake or Assassin's Cowl can output significant damage but require aggressive, close-range play, which can be risky. Gathering Storm Super provides excellent AoE damage over time. Lethal Current aspect adds Jolt to dodges and melees. Historically viewed as riskier due to the need to be in melee range.
Offers unparalleled crowd control. Duskfield Grenades can lock down large groups of enemies, creating safe zones or controlling chokepoints. Silence & Squall Super provides large-area denial and damage. Useful for managing overwhelming add density, particularly in higher tiers or with less coordinated teams.
Warlock Strategies
Warlocks are often the cornerstone of a successful Blind Well team, providing essential support and potent damage.
Well of Radiance is arguably the single most impactful Super for Blind Well, providing substantial healing and a significant damage buff (25%) within its radius. It creates a safe haven during chaotic waves and maximizes DPS during boss phases. Phoenix Protocol exotic armor is exceptional, refunding large amounts of Super energy based on kills and assists within the Well, often allowing for near-constant uptime in target-rich environments. Lunafaction Boots grant increased reload speed and weapon range while in the Well, further boosting DPS. Daybreak Super offers good roaming add clear if needed.
A powerhouse for add clear. Crown of Tempests exotic synergizes incredibly well with the Harmony buff, leading to extremely fast ability regeneration and extended Super duration (Stormtrance). Chaos Reach Super offers high, sustained single-target damage for bosses. Builds using Vesper of Radius can turn Rifts into Arc shockwaves, providing area control and Blind effects. Electrostatic Mind aspect generates Ionic Traces on ability kills, fueling further ability use.
Offers strong survivability through the Devour buff (triggered by ability kills or orb pickups via Fragments), allowing for aggressive play. Nova Bomb (either Cataclysm for tracking/clusters or Vortex for area denial) provides significant burst damage or add clear. Child of the Old Gods aspect provides a mobile source of weakening and ability regeneration. Contraverse Hold exotic enhances Vortex Grenades for sustained damage and energy return.
Master of crowd control. Bleak Watcher aspect allows the creation of Stasis turrets that freeze enemies, effectively locking down sections of the arena. Useful for managing dense waves or protecting objectives, especially valuable in higher Tiers or Heroic mode.
Titan Strategies
Titans provide crucial buffs, debuffs, defensive capabilities, and raw stopping power.
Highly versatile. Hammer of Sol Super offers excellent roaming add clear and solid boss damage. The main draw is often the Hammer Strike melee ability (shoulder charge), which applies a 30% weaken debuff (historically called Melting Point) crucial for maximizing boss DPS phases. Hallowfire Heart exotic enhances ability regeneration while Super is charged. Consecration aspect builds can provide strong AoE burst damage. Sol Invictus aspect creates Sunspots for healing and ability regeneration.
Offers powerful defensive options. Ward of Dawn (Bubble) creates an indestructible dome providing a 35% Weapons of Light damage buff to allies passing through it. Banner Shield Super allows the Titan to block incoming damage while granting Weapons of Light (40%) to allies shooting through the shield. (Note: Placing Banner Shield inside a Well of Radiance can sometimes cause issues or cancel the Super). Controlled Demolition aspect makes Void ability kills cause enemies to explode and grant Volatile Rounds, excellent for add clear. Pairs well with Graviton Lance or weapons with Repulsor Brace. Ursa Furiosa exotic refunds Super energy based on damage absorbed by Banner Shield. Helm of Saint-14 blinds enemies entering Ward of Dawn.
Focuses on aggressive close-quarters combat and burst damage. Thundercrash Super, especially when paired with the Cuirass of the Falling Star exotic, delivers massive single-target impact damage, ideal for boss phases. Pulse Grenades remain a strong option for area damage. Knockout aspect enhances melee damage and range after breaking shields or critically wounding targets, granting Amplified and health regeneration. Touch of Thunder aspect enhances grenade effects.
Provides area denial and control through Stasis crystals. Glacial Quake Super offers roaming add clear and crystal generation. Howl of the Storm aspect creates a wave of crystals with a slide-melee. Diamond Lances can be created and thrown for freezing attacks. Effective at controlling enemy flow and managing large groups.
Spoils of the Well: Rewards and Loot
The Blind Well offers a variety of rewards, ranging from basic currencies to powerful gear, with specific drops tied to the difficulty Tier completed and associated bounties.
Core Drops (Tiers I-III Completion Chest)
Successfully completing a Tier I, II, or III encounter spawns a chest in the center of the arena yielding basic rewards:
- Glimmer: A standard currency drop.
- Dark Fragments: Historically used to buy charges, now primarily used for purchasing Petra Venj's bounties. Tier IV consistently dropped 10 Dark Fragments after the first weekly clear.
- Charges of Light: A chance to receive Charges of Light (Tier 1, 2, or 3) to fuel future runs.
- Enhancement Cores: Mentioned as a common drop, valuable for upgrading gear.
- Blue (Rare) Gear: Can occasionally drop, primarily useful for infusion or Glimmer.
Dreaming City Gear (All Tiers, Farmable)
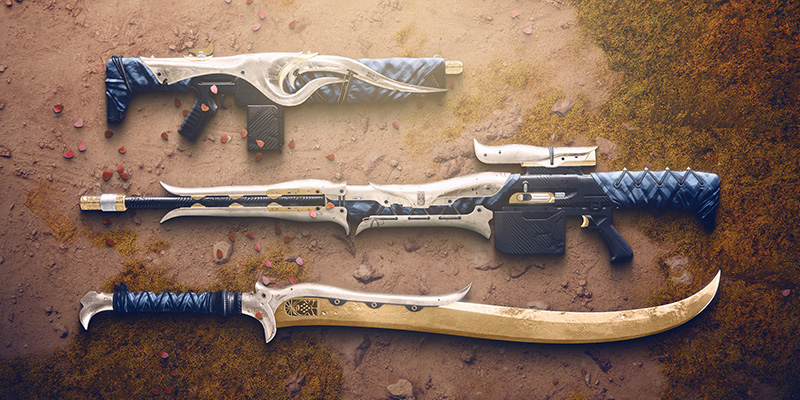
The Blind Well is a core activity for acquiring the Reverie Dawn armor set and the reprised Dreaming City weapons (Tigerspite, Waking Vigil, Sleepless, Vouchsafe, Retold Tale, Twilight Oath, Abide the Return). These items can drop from completion chests at any Tier and have been farmable since an update in late 2021.

Seasonal Loot (Season of the Wish Update)
With Season of the Wish, the Blind Well's loot pool was significantly expanded to include gear from recent seasons:
- Season of the Wish Weapons/Armor: The six seasonal weapons (Supercluster, Scatter Signal, etc.) and the seasonal armor set can drop from Blind Well completions.
- Season of Defiance Weapons: Weapons from Season of Defiance (like the Regnant Grenade Launcher) are also reported to be part of the loot pool.
- Season of Undying Reprised Weapons: The four reprised, craftable weapons from Season of Undying (Optative, Adhortative, etc.) can also drop here.
Powerful & Weekly Rewards
Specific completions and bounties offer weekly powerful rewards:
- Tier IV Heroic Completion: The first successful Tier IV (Heroic) completion on each character per week guarantees a Powerful Gear drop. Subsequent Tier IV clears on the same character that week yield only basic rewards like Glimmer and Dark Fragments.
- "Well Wishes" Seasonal Upgrade: During Season of the Wish, unlocking the "Well Wishes" vendor upgrade modified the reward structure. After completing this challenge (requiring a T4 clear), the first Tier 3 completion each week per character granted either a Wish Engram, a Season of the Wish weapon, or a piece of high-stat seasonal armor.
- "Gateway Between Worlds" Bounty & Oracle Offering: This weekly bounty from Petra Venj requires completing Blind Well activities (T1=10%, T2=20%, T3=30%, T4=50% progress). Completing it rewards an Offering to the Oracle. Taking this Offering to the Oracle Engine device in the Spine of Keres region spawns a chest containing:
- A piece of Dreaming City Legendary Gear.
- A Queen's Bounty. Completing this bounty (which requires specific actions while Ascendant) grants a Transcendent Blessing armor mod. This mod negates the negative effects of the Riven's Curse mod found on Reverie Dawn armor, providing a damage bonus in the Dreaming City without the increased damage taken. (Note: Its applicability to newer armor may be limited).
Blind Well Loot Table Summary (Season of the Wish Context)
| Item Type | Item Name(s) | Source / Tier | Notes |
|---|---|---|---|
| Armor | Reverie Dawn Set | All Tiers (Completion Chest) | Dreaming City Legendary Armor |
| Armor | Season of the Wish Armor Set | All Tiers (Completion Chest) | Seasonal Legendary Armor |
| Weapon | Dreaming City Weapons (Tigerspite, Waking Vigil, Sleepless, etc.) | All Tiers (Completion Chest) | Reprised Legendary Weapons |
| Weapon | Season of the Wish Weapons (Supercluster, Scatter Signal, etc.) | All Tiers (Completion Chest) | Seasonal Legendary Weapons |
| Weapon | Season of Defiance Weapons (e.g., Regnant GL) | All Tiers (Completion Chest) | Previous Season Legendary Weapons |
| Weapon | Season of Undying Weapons (Optative, Adhortative, etc.) | All Tiers (Completion Chest) | Reprised Legendary Weapons |
| Gear (Powerful) | Powerful Gear Drop | Tier IV (First weekly clear) | Grants high-level gear once per character per week |
| Gear (Seasonal) | Wish Engram / Wish Weapon / High-Stat Wish Armor | Tier III (First weekly clear) | Requires "Well Wishes" Vendor Upgrade unlocked |
| Gear (Legendary) | Dreaming City Legendary Gear | Oracle Offering Chest | Reward for turning in Offering from "Gateway Between Worlds" bounty |
| Consumable | Charge of Light (Tier I, II, III) | All Tiers (Completion Chest) | Chance to drop, fuels future runs |
| Consumable | Unstable Charge of Light | Tier III / IV (Completion Chest) | Chance to drop, needed for Tier IV activation |
| Consumable | Offering to the Oracle | "Gateway Between Worlds" Bounty | Weekly bounty reward from Petra Venj |
| Material | Dark Fragments | All Tiers (Completion Chest) | Currency for Petra's bounties |
| Material | Glimmer | All Tiers (Completion Chest) | Standard currency |
| Material | Enhancement Core | All Tiers (Completion Chest) | Common upgrade material |
| Mod | Transcendent Blessing | Queen's Bounty | Reward for completing bounty obtained from Oracle Offering |
| Cosmetic | Secret Victories Emblem | All Tiers (Completion Chest) | Random drop |
Etched in Starlight: Associated Triumphs

Participation in the Blind Well contributes to several Triumphs, particularly those associated with the Dreaming City destination and the prestigious Cursebreaker Seal.
Core Blind Well Triumphs
These track basic engagement with the activity:
- Charging the Well: Requires completing any Blind Well encounter (any Tier). This is typically one of the first Triumphs players unlock related to the activity.
- Golden Ticket: Requires acquiring any Charge of Light (Tier I, II, or III). This is achieved through drops or purchases from Petra Venj.
Heroic Boss Champion Triumphs (Cursebreaker Seal)
These three Triumphs are essential for earning the Cursebreaker title and require defeating the specific Tier IV Plague of the Well boss associated with each week of the curse cycle:
- The Scorn Champion: Defeat Sikariis and Varkuuriis, Plagues of the Well. This requires activating and completing the Tier IV Heroic encounter during Week 1 (Weakest Curse/Scorn Week).
- The Hive Champion: Defeat Cragur, Plague of the Well. This requires activating and completing the Tier IV Heroic encounter during Week 2 (Growing Curse/Hive Week).
- The Taken Champion: Defeat Inomina, Plague of the Well. This requires activating and completing the Tier IV Heroic encounter during Week 3 (Strongest Curse/Taken Week).
Purification Rituals
These Triumphs or bounty steps often involve defeating specific enemies or completing activities while under the Ascendant buff (granted by consuming a Tincture of Queensfoil):
- Plague of the Well Purification Ritual: Defeat any Tier IV Plague of the Well boss (Sikariis/Varkuuriis, Cragur, or Inomina) while Ascendant. This specific objective is often tied to the Queen's Bounties received after turning in an Offering to the Oracle, rewarding the Transcendent Blessing mod upon completion.
- Other Rituals: While not completed in the Blind Well, other Purification Rituals exist that require actions in Ascendant Challenges, The Corrupted Strike, or The Shattered Throne while Ascendant.
Other Related Triumphs
- Dreaming City Destination Triumphs: General completion of Blind Well activities contributes progress towards broader Dreaming City Triumphs.
- Event Triumphs: Occasionally, seasonal events like Guardian Games may include Triumphs that require completing activities like Blind Well (e.g., "Worlds Championship Tour").
- Secret Summoning Triumph: Interacting simultaneously with specific glowing rock circles near the Blind Well entrance (when active) summons two unique high-value targets. Defeating them grants a secret Triumph.
Blind Well Triumph Summary
| Triumph Name | Requirement | Associated Seal / Category | Notes |
|---|---|---|---|
| Charging the Well | Complete any Blind Well encounter. | Dreaming City | Basic completion Triumph. |
| Golden Ticket | Acquire a Charge of Light (Tier I, II, or III). | Dreaming City | Obtained via drops or purchase. |
| The Scorn Champion | Defeat Sikariis & Varkuuriis (Tier IV Heroic Boss). | Cursebreaker | Only available during Week 1 (Scorn Week). |
| The Hive Champion | Defeat Cragur (Tier IV Heroic Boss). | Cursebreaker | Only available during Week 2 (Hive Week). |
| The Taken Champion | Defeat Inomina (Tier IV Heroic Boss). | Cursebreaker | Only available during Week 3 (Taken Week). |
| Plague of the Well (Purification) | Defeat any Tier IV Plague of the Well boss while Ascendant. | Dreaming City / Bounties | Often required for Queen's Bounties from Oracle Offering. |
| (Secret Triumph) | Activate hidden HVT encounter near Blind Well entrance (glowing rocks). | Dreaming City | Requires specific timing/conditions. |
The Dreaming City's Rhythm: Integration and Farming
The Blind Well is interwoven with the weekly rhythms and reward structures of the Dreaming City. Understanding how to integrate it into your routine and farm it efficiently is key to maximizing its benefits.
Weekly Rituals & Bounties
Petra Venj's Offerings
Make visiting Petra Venj a weekly priority. Always acquire her two primary weekly bounties:
- "Gateway Between Worlds": This bounty is central to the Blind Well loop. It requires accumulating percentage progress by completing Blind Well tiers (Tier I: 10%, Tier II: 20%, Tier III: 30%, Tier IV: 50%). Completion rewards the essential Offering to the Oracle.
- "Ascendant Challenge": While not directly involving Blind Well, this bounty tasks you with completing the week's Ascendant Challenge and often rewards Powerful Gear.
- Daily Bounties: Petra also offers five daily bounties that reward XP, Glimmer, and Dark Fragments, with some potentially offering Legendary Gear. Completing eight daily bounties over the week often fulfills another weekly challenge from Petra.
Strategic Tier Selection
Plan your Blind Well runs based on the "Gateway Between Worlds" bounty progress needed. Two Tier IV (Heroic) runs (50% each) or a combination like one Tier IV and two Tier III runs (50% + 30% + 30% > 100%) can complete the bounty efficiently. Lower tiers require significantly more runs (e.g., ten Tier I runs).
Efficient Farming Methods
While Blind Well offers a broad loot pool, optimizing your farming strategy depends on your goals:
Targeting Specific Rewards (The Coil Conflict)
If your primary goal is farming specific Dreaming City or Season of the Wish weapon rolls, the Blind Well is a source. However, the Season of the Wish activity, The Coil, is often considered a more efficient farm for these items. The Coil offers multiple chests per run, escalating rewards based on score (Platinum rank yields significant loot), and potentially targeted focusing opportunities via Lair Keys and vendor upgrades. Blind Well's strengths lie in its guaranteed weekly Powerful Gear from Tier IV, progress towards the Offering to the Oracle, and completion of specific bounties/Triumphs. Players seeking pure weapon/armor volume might find The Coil more rewarding, while those needing the weekly powerful drop or bounty completion must engage with Blind Well. This overlap, introduced in the same season, presents a strategic choice for players managing their time.
Charge Management
Don't rely solely on random Charge drops. Purchase Charges of Light (Tiers I-III and Unstable) directly from Petra Venj using Glimmer for consistent access to the activity. Keep a healthy stock of Glimmer if planning multiple runs.
Team Efficiency
Running Blind Well with a pre-made, coordinated fireteam is significantly faster and more reliable than relying on random matchmaking. A coordinated team can execute mechanics flawlessly, stack buffs/debuffs effectively, and burn down bosses much quicker. Utilize voice communication or established strategies.
Time Investment & Player Sentiment
Be aware that farming for specific rewards, especially god-roll weapons, can be time-consuming due to RNG. Some players find repetitive Blind Well runs, particularly when mandated by quests, to feel like a chore. Set realistic goals and mix up activities to avoid burnout.
Team Coordination vs. Solo Approaches
Finding Players (Instance Matching)
The Blind Well uses instance-based matchmaking similar to patrol zones, not dedicated queues. If you enter the arena and find it empty:
- Retreat back through the entrance corridor towards the Divalian Mists load zone.
- Turn around and walk slowly (do not sprint or use your Sparrow) back into the Blind Well arena. This slower approach can sometimes encourage the matchmaking system to place you into a more populated instance.
- Alternatively, use external Looking For Group (LFG) tools or Destiny 2's Fireteam Finder feature to assemble a dedicated team.
Coordinated Team Strategy
- Communication: Use voice chat for callouts regarding Anathema spawns, players with Harmony, shield status, boss locations, T4 mechanic cues (Relic spawns, Blight locations, Screeb management), and Super coordination.
- Role Designation: Assign roles based on loadouts and subclasses: who prioritizes Harmony orbs, who focuses on breaking shields, dedicated add clear, primary boss DPS, support (Well/Bubble), debuff application (Tether/Hammer Strike).
- Execution: Practice efficient execution of mechanics, especially the time-sensitive Heroic activation and the specific T4 boss strategies.
Matchmade / Random Player Strategy
- Assume Minimal Coordination: Operate under the assumption that communication will be limited or non-existent.
- Focus on Fundamentals: Execute your own role effectively. If you see an Anathema and a shield needs breaking, prioritize getting Harmony and damaging the shield. Clear adds efficiently. Deal damage when bosses are vulnerable.
- Self-Sufficiency: Use builds that provide good survivability (e.g., Devour, Restoration, Woven Mail, high Resilience) and consistent output without relying heavily on team buffs.
- Prioritize Survival: Staying alive is more valuable than risky plays in an uncoordinated group. Revive teammates promptly.
- Be Prepared for Failure: Understand that if key mechanics (especially Harmony or T4 specifics) are misunderstood by a significant portion of the random players, the attempt may fail. Don't get discouraged; sometimes finding a better instance or forming a group is necessary.
Echoes Across Time: Broader Connections
The Blind Well does not exist in isolation; it is intrinsically linked to the wider mysteries and activities of the Dreaming City, forming part of a complex, interconnected endgame ecosystem.
The Curse Cycle
The three-week curse that plagues the Dreaming City governs not only the enemy types and Tier IV boss within the Blind Well but also dictates the active Ascendant Challenge, the availability of certain Ahamkara Bones and Corrupted Eggs, the weekly story mission offered by Petra Venj, and the accessibility of the Queen's Court (only during the strongest curse week). Engaging with the Blind Well often means being aware of the current state of the curse to understand associated challenges and opportunities elsewhere in the City.
Shared Loot Pool
The reprised Dreaming City weapons and Reverie Dawn armor obtainable from the Blind Well can also be acquired from other Dreaming City sources, including Ascendant Challenge chests, the Shattered Throne dungeon, Petra's weekly mission and bounties, and even hidden chests or cat statues (requiring Small Gifts, another Dreaming City drop). This interconnected loot pool encourages participation across various activities.
Bounties and Offerings
The "Gateway Between Worlds" bounty directly links Blind Well completion to the Oracle Engine in the Spine of Keres. The Offering obtained from this bounty is the key to receiving loot from the Oracle and obtaining Queen's Bounties, which in turn reward Transcendent Blessing mods designed for use within Dreaming City content, including the Last Wish raid and Shattered Throne dungeon.
Lore and Triumphs
Completing Blind Well Triumphs, particularly the Tier IV Champion kills, is necessary for the Cursebreaker Seal. The activity itself is deeply tied into the lore surrounding Mara Sov, the Techeuns, the creation of Eleusinia, and the ongoing struggle against the forces corrupting the city. Understanding the Blind Well enriches the narrative context of the entire destination.
Ascendant Plane Connection
Both the Blind Well and Ascendant Challenges require interaction with the Ascendant Plane, often necessitating the use of Tinctures of Queensfoil (obtainable from Blind Well and other city activities) to perceive hidden paths or complete specific objectives like Purification Rituals.
A Guardian's Weekly Concordat: Checklist for the Well
To effectively integrate the Blind Well into your weekly Destiny 2 ritual and maximize its rewards, consider the following checklist:
- Check the Curse Week & Petra's Location: Determine the current week of the Dreaming City curse cycle (Weak/Scorn, Growing/Hive, Strong/Taken) by checking Petra Venj's location on the Director. This informs the enemy types and Tier IV boss you'll face.
- Visit Petra Venj: - Acquire the "Gateway Between Worlds" weekly bounty (requires Blind Well completions). - Acquire the "Ascendant Challenge" weekly bounty. - Acquire any relevant Daily Bounties that reward gear or align with your objectives. - Purchase necessary Charges of Light (Tier I-III) and at least one Unstable Charge of Light (Tier IV) with Glimmer if you plan on running Heroic.
- Run Blind Well: - Complete enough Blind Well tiers to finish the "Gateway Between Worlds" bounty (aim for Tier III/IV for efficiency). - If aiming for the weekly Powerful Gear drop and the relevant Champion Triumph, successfully activate and complete a Tier IV Heroic run. Remember the specific mechanics for the week's boss.
- Claim Bounty & Visit Oracle: - Turn in the completed "Gateway Between Worlds" bounty to receive the Offering to the Oracle. - Travel to the Spine of Keres and present the Offering to the Oracle Engine device. - Open the reward chest for Dreaming City loot and a Queen's Bounty.
- (Optional) Complete Queen's Bounty: If desired, complete the objective on the Queen's Bounty (often requires actions while Ascendant, potentially including a T4 Blind Well clear) to earn a Transcendent Blessing mod. Remember to use a Tincture of Queensfoil if Ascendance is required.
- Check Triumphs: Review your progress on Blind Well related Triumphs, especially the weekly rotating Champion Triumphs for the Cursebreaker Seal.
- Repeat on Other Characters: If seeking maximum rewards, repeat steps 2-6 on your alternate characters, as the Powerful Gear drop from Tier IV and the Oracle Offering reward are typically once per character per week.
The Wellspring Endures
The Blind Well stands as a unique pillar within Destiny 2's content landscape. It is a bridge between the game's past horde modes and its evolving seasonal narratives, a place steeped in the enigmatic lore of the Awoken, and a proving ground that continues to test Guardians' coordination and adaptability. While its position in the farming hierarchy may fluctuate with seasonal additions like The Coil, its direct integration with Dreaming City bounties, weekly powerful rewards, unique Triumphs, and its role in the overarching narrative of the curse cycle ensure its enduring relevance. Whether delving into its depths for the first time, seeking the spoils of its updated loot pool, or mastering the intricacies of its Heroic Plagues, the Font of Starlight remains a potent and rewarding destination for those willing to brave the mists and harness the volatile energies within. The Well calls, Guardian. Answer.
"A bridge between realities. A doorway from the mundane to the arcane. In the Blind Well, we harness chaos to maintain order."