
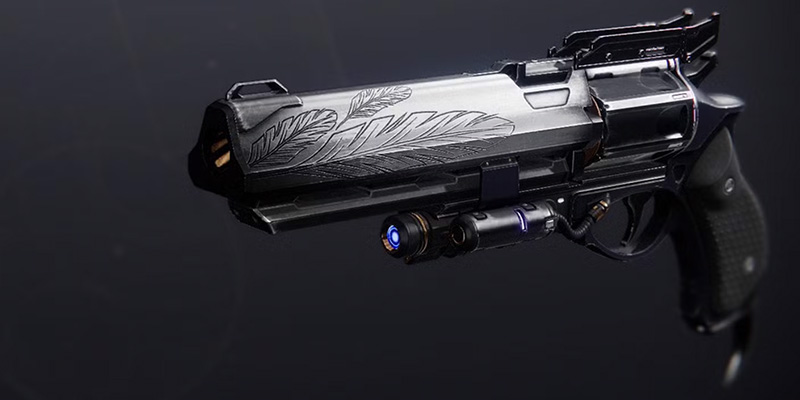
Alright, Guardian, let's talk about a legend. Remember Hawkmoon? Not just the iconic hand cannon from Destiny 1, but its Destiny 2 incarnation – a weapon unique in its time for being the only Exotic that dropped with random perks. That thrilling chase for the perfect roll is exactly what made its companion quest, the Harbinger mission, such a standout experience.
Launched back in Season of the Hunt, Harbinger wasn't just another mission; it was a true test of skill. It presented a formidable blend of tricky jumping puzzles that demanded precision and intense combat encounters against powerful Taken forces. This was the path Guardians had to tread to unlock Hawkmoon's full potential: its Exotic Catalyst and, crucially, those farmable random perk rolls that made every completion exciting.
So, if you're looking to get your hands on Hawkmoon today, you won't find this mission on the map. Your best bet is to pay a visit to Xûr, Agent of the Nine, when he sets up shop on weekends. He now sells Hawkmoon (and Dead Man's Tale) directly from his inventory.
Think of this guide, then, as a detailed historical record – a tribute to a challenging and rewarding piece of Destiny 2 content. It's for those curious about the game's past, lore hunters, and maybe even a little preparation in case Bungie decides to unvault Harbinger, perhaps adding it to the Exotic Mission Rotator playlist. The community certainly hasn't forgotten it, and many hope to see it return someday.
Now, with that important context set, let's explore the challenges and secrets Harbinger once held.
Gearing Up: Your Harbinger Toolkit
Harbinger demanded flexibility and preparation. It wasn't a mission you could just breeze through without considering your loadout, especially if you were brave enough to tackle it solo. The key challenges came from two main modifiers: Match Game, meaning you absolutely needed Arc, Solar, and Void damage to efficiently break enemy shields, and the presence of tough Unstoppable Champions. Thankfully, your equipment wasn't locked, allowing you to swap weapons mid-mission if needed – a feature many players utilized, especially to adapt to different encounters or boss weeks. However, starting with a versatile and survivable build was crucial.
Weapon Recommendations (Covering Your Bases):
- Shield Breakers (The Match Game Problem): Dealing with Arc, Solar, and Void shields efficiently was non-negotiable.
- The Game Changer - Arbalest: This Linear Fusion Rifle became a superstar for Harbinger runs, particularly solo attempts. Why? Because its intrinsic perk allowed it to one-shot any elemental shield, completely bypassing the Match Game restriction. This freed up your other weapon slots significantly, offering immense flexibility. Before a buff made this explicit, players discovered its effectiveness, highlighting how certain Exotics can fundamentally change the approach to core mechanics. If you didn't have Arbalest, you'd need to juggle weapons like Hard Light or Borealis, or dedicate your Energy and Heavy slots to covering all three elements.
- Unstoppable Solution: You needed a reliable way to stagger Unstoppable Champions. This meant equipping the appropriate Unstoppable mod from the seasonal Artifact onto a compatible weapon (like Hand Cannons, Pulse Rifles, etc., depending on the season). Certain Exotics could also fill this role, like the trusty Lament sword (which also provided healing and burst damage) or Malfeasance hand cannon.
- Primary Power: Given the sheer volume of Taken Acolytes sporting Void shields, especially in the final boss room, running a reliable Void primary weapon was highly recommended. Options like Gnawing Hunger, the IKELOS Hand Cannon, Last Perdition, or Royal Chase were popular choices.
- Heavy Artillery: Your heavy weapon needed to pull double duty: clearing tough enemies and damaging bosses.
- Xenophage: This Exotic Machine Gun was a frequent recommendation due to its excellent long-range damage, making it perfect for taking out dangerous majors like Knights or distant snipers quickly.
- Anarchy: This Exotic Grenade Launcher excelled at applying damage over time, letting you focus on staying alive while the lightning traps did their work. Fantastic for solo play or hectic encounters.
- Lament: Mentioned earlier for Unstoppables, its aggressive frame and healing made it great for close-quarters burst damage, though risky in some encounters.
- Swords: Legendary swords like Falling Guillotine were also used for boss DPS phases.
- Linear Fusion Rifles: A viable option for ranged damage.
- Utility Tools: Don't underestimate support weapons! Blinding Grenade Launchers (like Truthteller) were incredibly effective for controlling crowds, especially in the chaotic final room. Having a good long-range weapon (Sniper Rifle, Scout Rifle) was vital for dealing with the numerous and deadly Taken Hobgoblin and Vandal snipers perched throughout the mission.
Subclass Synergies & Exotic Armor:
Your choice of subclass and Exotic armor could significantly impact your success, especially when attempting the mission solo.
Survival: Top-tree Nightstalker (Way of the Trapper) was a go-to for solo flawless runs, providing invisibility for safe revives, repositioning, or escaping danger. Pairing this with The Sixth Coyote chest for a second Dodge charge amplified this strategy.
Mobility: ST0MP-EE5 leg armor was a huge help for navigating the tricky jumping sections.
Damage/Control: Golden Gun with Celestial Nighthawk offered massive boss burst damage. Middle-tree Arcstrider provided good add clear and damage. Stasis subclasses offered valuable crowd control, particularly noted as helpful during the intense third wave of the "Survive" encounter.
Add Control & Sustain: Top-tree Voidwalker (Attunement of Chaos) combined with Contraverse Hold gauntlets was an incredibly potent combination, offering near-constant uptime on powerful charged Void grenades for add clear and self-healing via Devour.
Support & Damage: Well of Radiance (Attunement of Grace) was invaluable for team play, providing healing and a damage buff. Its ability to let shots pierce Taken Goblin immunity shields was also a significant advantage in the final room. Phoenix Protocol could help regain Super energy quickly.
Mobility/Survival: Bottom-tree Dawnblade offered good aerial movement and survivability options. Middle-tree Stormcaller with Geomags could be used for super damage. Necrotic Grips were also mentioned as a potential option.
Survival: Bottom-tree Sunbreaker (Code of the Siegebreaker) was exceptional for survivability, creating Sunspots that healed you and recharged abilities upon kills. Dunemarchers paired well for add clear.
Support/Damage: Middle-tree Sentinel (Code of the Commander) with Ursa Furiosa or Doom Fang Pauldron offered team support or add clear. Thundercrash (Code of the Missile) provided high burst damage.
Utility: Some resourceful Titans even used Salvation's Grip to create Stasis platforms, making certain jumps easier.
Essential Mods:
Beyond weapons and subclasses, your armor mods played a critical role.
- Combat Style Mods:
- Charged with Light: Protective Light was arguably the single most valuable mod for solo or difficult runs, granting significant damage resistance when your shields broke, often preventing one-shots. You'd pair this with ways to get Charged with Light, like Taking Charge (picking up Orbs of Power, synergizing with masterworked weapons) or Shield Break Charge.
- Warmind Cells: Builds utilizing Global Reach, Wrath of Rasputin (Solar splash damage creates Cells), and Rage of the Warmind (Cells cause Solar explosions) were effective for clearing large groups of adds.
- Armor Mods:
- Ammo Economy: Ammo Finder and Ammo Scavenger mods for your key weapons (especially Heavy like Xenophage or Anarchy, or Special weapons if running double special) were vital to avoid running dry during long encounters. Players often reported ammo issues without them, particularly in solo runs.
- Damage Resistance: Stacking Concussive Dampener (reduces AoE damage) and relevant Elemental Resistance mods on your chest piece was crucial. Solar Resist was generally recommended due to the prevalence of damaging Solar attacks from Vandals and Knights. However, for the Week 2 and Week 3 final bosses (Captain and Centurions), Arc Resist was more beneficial due to their Arc-based attacks.
- Damage Boost: The Taken Spec mod (obtainable from the Last Wish raid) provided a free 10% damage increase against all Taken enemies in the mission.
The Trailhead: Accessing the Harbinger Mission
Getting into Harbinger wasn't as simple as clicking a node on the Director map, at least not initially. It was designed as a secret mission, requiring specific prerequisites and a bit of exploration.
(Historical) The Prerequisites:
Before you could even think about tackling Harbinger, you needed to have already completed the questline to obtain the Hawkmoon exotic hand cannon itself. This initial quest also required ownership of Season of the Hunt (Season 12) or the Beyond Light Deluxe Edition which included it.
(Historical) Picking Up the "Bird of Prey" Quest:
Your journey truly began with a visit to The Crow. During Season of the Hunt and for a time after, he was located alongside Spider in the Thieves' Landing area of the Tangled Shore (a destination now vaulted). You needed to interact with him and pick up the "Bird of Prey" Exotic Quest from the bottom of his vendor screen. This quest initially guided you through collecting Paracausal Feathers to earn the base Hawkmoon. Only after obtaining Hawkmoon did the quest update to point you towards the Harbinger mission itself. Some Guardians reported issues accessing Harbinger if they hadn't fully completed the original Hawkmoon acquisition steps ("Let Loose Thy Talons") or if they abandoned the quest midway. If you ran into trouble, checking the Quest Archive Kiosk in the Tower was sometimes necessary.
Finding the Hidden Entrance in the EDZ:
The "Bird of Prey" quest would direct you to the European Dead Zone (EDZ), but crucially, it wouldn't place a waypoint on your map. You had to find the entrance yourself:
- Destination Trostland: Load into the EDZ via the Trostland fast travel point, near Devrim Kay's perch in the church.
- Equip Hawkmoon: Make absolutely sure you have your Hawkmoon hand cannon equipped! This was essential for the next step.
- Locate the Building: Head directly east from the spawn point, moving past the front of the church. You're looking for a specific ruined building located on the right side of the path that leads out of Trostland towards the Maevic Square area. A helpful visual cue was often a projection of a golden hawk perched on some debris outside this building.
- Ascend to the Second Floor: Jump or climb up to the second floor of this dilapidated building.
- The Fireplace Panel: Once on the second floor, look around for a damaged wooden fireplace panel set into one of the walls (often described as the northern wall).
- Break On Through: Aim your Hawkmoon at the fireplace panel and shoot it repeatedly. The panel will eventually shatter, revealing a hidden crawlspace or tunnel behind it. If the panel was already broken when you arrived, it just meant another Guardian had recently opened the way.
- Launch the Mission: Head into the newly revealed passage. Immediately look to your left. You'll see a sparking electrical box or fusebox mounted on the wall. Interact with this box (it would have a "Start Mission" prompt) to officially launch the Harbinger activity.
Across the Dam: Navigating the First Jumping Puzzle
Once you activated the mission, the first major hurdle was a significant jumping puzzle taking you from the initial hidden passage across to the massive dam structure that dominates the EDZ skyline – the same one featured in the Lake of Shadows strike. This required careful platforming and awareness of your surroundings.
Step-by-Step Route Across the Chasm:
- Clear the Sniper: As soon as you emerge outside from the initial passage, your immediate priority should be the Taken Hobgoblin sniper perched on a rocky ledge ahead of you. Take it out quickly; its shots hit incredibly hard.
- Hop to the Ledge: Jump across the gap to land on the platform where the sniper was positioned.
- Spot the Branch: From this ledge, carefully look down towards the dam. You're searching for a distinctive, long, grey fallen tree branch or trunk that juts out from the cliff face, pointing towards the dam structure. This jump could feel a bit awkward or slippery.
- Land on the Branch: Make the jump down onto this branch. Try for a gentle landing.
- The Big Leap: Now, from the end of the branch, you need to make a significant leap across the chasm to the base of the dam wall itself. Aim for the narrow concrete ledge or lip that runs horizontally along the dam, just below the large water pipes or conduits.
- Traverse the Ledge: Once you land on the narrow ledge, carefully walk along it, heading towards the center section of the dam.
- Ascend the Dam: As you approach the middle, look upwards along the dam's face. You'll see a series of small concrete lips, ledges, or rusty metal platforms that you can use to climb higher. One commonly mentioned landmark is a prominent rusty metal plank or platform sticking out partway up.
- Find the Entrance: Jump up these ledges, ascending the dam wall. Your goal is a small opening or tunnel entrance located underneath one of these higher platforms, typically near the dam's center. Once you spot it, jump inside to enter the next section of the mission.
- No Rush: Remember, Harbinger had no timer, unlike Whisper or Zero Hour. Take your time, line up your jumps, and don't feel pressured.
- Mobility Aids: Using Exotic armor pieces that enhance mobility, like ST0MP-EE5 for Hunters, Lion Rampant for Titans, or Transversive Steps for Warlocks, could make these jumps significantly less daunting. Subclasses with enhanced aerial control, such as top-tree Dawnblade for Warlocks, were also beneficial.
- Sword Saves: Equipping a sword could sometimes save you from a fall if you reacted quickly enough with an aerial heavy attack lunge.
Hunt the Emissaries: Stalking Savathûn's Agents
Emerging from the dam's hidden entrance, you'd find yourself inside a vast, multi-level chamber filled with large turbines and industrial machinery. This area, known as the Reservoir, served as the arena for the first major combat phase: Hunt the Emissaries.
The Targets:
Your objective was to track down and eliminate three powerful Taken champions acting as Savathûn's agents. Each Emissary presented a unique challenge with a specific elemental shield that required matching damage types due to the Match Game modifier:
- Taken Wizard Emissary: Protected by a Void shield.
- Taken Centurion Emissary: Protected by an Arc shield.
- Taken Captain Emissary: Protected by a Solar shield (Note: Sometimes referred to as a Knight, but most sources identify it as a Captain with a Solar shield).
The Hunt Mechanics:
The process for dealing with each Emissary followed a specific loop:
- Engage and Damage: Locate an Emissary within the main Reservoir chamber or its connecting corridors. Start damaging it. Before focusing on the boss, it was wise to clear out supporting enemies, especially Taken Goblins (who could shield allies) and high-damage Taken Vandals (often sniping from elevated positions).
- Immunity and Retreat: After taking a significant amount of damage (usually around half health), the Emissary would become immune and teleport away, fleeing deeper into the Reservoir complex.
- Find the Blighted Doorway: Scan the main chamber and its offshoots for a doorway blocked by a swirling mass of Taken energy – often called a Taken Blight or "wibbly blight". These blockades usually featured a distinct, damageable black orb floating in the center.
- Break the Seal: Shoot the Taken Blight or its central orb until it dissipates, clearing the path forward.
- Pursue and Eliminate: Follow the now-open passage into a smaller side room or area where the Emissary has taken refuge. Finish off the Emissary here. Be prepared for more adds and potentially hazardous environments like narrow corridors or rooms with damaging effects.
- Repeat for All Three: You needed to complete this cycle for all three Emissaries to progress the mission.
This wasn't just a random detail; it provided a layer of strategic depth. By choosing your kill order, you could dictate which enemy combinations appeared when, allowing you to face the tougher combinations (like Vandals or Captains paired with Unstoppable Champions) earlier or later depending on your preference and loadout.
Many players, particularly those attempting solo flawless runs, developed a preferred order: Centurion (Arc) -> Captain (Solar) -> Wizard (Void). The reasoning was sound:
- Killing the Centurion first meant dealing with the dangerous Vandal sniper wave early on, getting them out of the way before things got more complex.
- Killing the Wizard last meant the final wave of the Survive encounter (which included two Unstoppable Champions) would be paired with Taken Thrall. Thrall are significantly easier to manage under pressure compared to Vandals or Goblins, giving you more breathing room to focus on the Champions.
Shifting Sands: Understanding Weekly Rotations
Harbinger wasn't a mission you could master once and be done with, at least not if you were chasing Triumphs or the Radiant Accipiter ship. The mission's layout, challenges, and collectibles changed each week, operating on a repeating three-week cycle. This dynamic nature kept things fresh but also required players to adapt their strategies and knowledge week to week.
What Changed Each Week?
- Emissary Paths and Rooms: As mentioned, the specific side rooms the Emissaries retreated into during the "Hunt the Emissaries" phase would shift. This meant the path through the Reservoir area wasn't always the same. Maps created by the community were invaluable for navigating these weekly changes.
- Paracausal Feather Locations: The five hidden collectible feathers required for the "Bird of Prey" quest were found in entirely different locations each week.
- "Survive" Encounter Wave Order: While the types of enemy waves (Wizards/Thrall, Centurions/Vandals, Captains/Goblins + Unstoppables) remained consistent, the order in which these waves appeared was determined by the sequence in which you killed the Emissaries earlier in the mission.
- Final Boss Encounter: This was the most dramatic weekly change. The final boss (or bosses) waiting in the Traveler Shard room rotated each week, bringing different mechanics, enemy support, and overall difficulty.
The Three Weekly Configurations (Defined by Final Boss):
The community generally referred to the weeks based on the final boss encounter:
| Week | Boss(es) | Difficulty | Key Mechanics |
|---|---|---|---|
| Week 1 ("Knight Week") | Akorith, Lightdrinker of Savathûn (Single Taken Knight) | Often considered the baseline or easiest week, particularly for solo attempts. | Focused on dealing with waves of Void-shielded Acolytes whose spawns were tied to killing Solar-shielded Taken Knights. |
| Week 2 ("Captain Week") | Ishrasek, Lightbinder of Savathûn (Single Taken Captain). This boss also appeared during the final step of the Radiant Accipiter ship quest. | A noticeable step up from Week 1. The primary challenge came from waves of constantly spawning, hard-hitting Major Hobgoblin snipers covering the arena. | Boss had an Arc shield and was highly mobile. Required strong long-range capabilities and constant sniper management. |
| Week 3 ("Centurion Week") | Korusk, Lighteater of Savathûn & Tarask, Lighteater of Savathûn (Two Taken Centurions) | Widely regarded as the most difficult configuration, especially for solo players. | Two very tanky bosses, both with Arc shields, relentlessly spamming tracking Arc projectiles. Add waves included infinitely spawning Hobgoblin snipers and Thrall. Killing one Centurion made the other significantly more aggressive. Demanded excellent add control, survivability, and burst damage. |
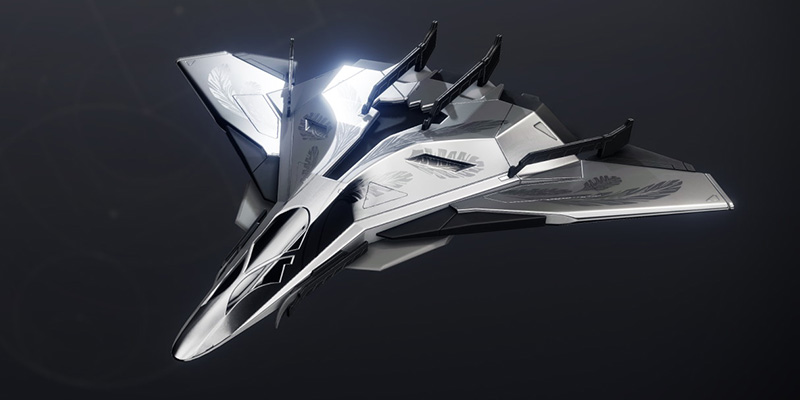
Paracausal Feathers: Forging the Radiant Accipiter
Beyond getting the Hawkmoon Catalyst and random rolls, Harbinger offered another unique chase: the Radiant Accipiter Exotic ship. This sleek, feather-adorned vessel was tied to the "Bird of Prey" quest, which required you to collect a total of 100 Paracausal Feathers within the Harbinger mission.
How to Collect Feathers:
There were two primary ways to gather these feathers:
- Encounter Chest Rewards: You automatically received a bundle of feathers upon opening the chest after the "Survive" encounter and the final boss chest. Reports suggest you could get around 10-17 feathers per character per week just from these two chests.
- Hidden Collectibles: Scattered throughout the mission's environments each week were five hidden Paracausal Feathers. Actively seeking these out was the key to completing the 100-feather requirement much faster.
Weekly Rotation and Time-Gating:
The hunt for feathers was designed as a multi-week endeavor. The locations of the five hidden feathers changed each week, cycling through three distinct sets of locations alongside the mission's other weekly variations. To earn associated Triumphs like "Lightseeker," you needed to find all 15 unique feather locations across the full three-week rotation.
Because the number of feathers obtainable per character per week was capped (roughly 10-17 from chests + 5 hidden = ~15-17 total), reaching the 100-feather goal typically required running the mission for at least two weeks (if playing on all three characters) or three weeks (if playing on only one character). This system encouraged players to return to Harbinger weekly, keeping the mission relevant beyond just farming Hawkmoon rolls.
Paracausal Feather Locations by Week:
Finding all 15 hidden feathers required diligence and knowing where to look each week. Here's a breakdown based on the weekly boss rotation:
| Week | Location Area | Description/Directions | Associated Encounter/Notes |
|---|---|---|---|
| 1 | Centurion Emissary Room | In the large, blue-lit room where the Centurion is fought, check the central catwalk running through the middle of the room. | Hunt the Emissaries |
| 1 | Captain Emissary Area | In the tall, cylindrical room with rusted platforms near the Captain's final area, climb all the way to the uppermost platform/catwalk. The feather is on a crate/box. | Hunt the Emissaries |
| 1 | Wizard Emissary Path | In the room just before the Wizard's final combat room, look for a rusty chain-link cage in a corner. Find and press the nearby panel/button on the wall (often red light) to open the cage. | Hunt the Emissaries |
| 1 | Hallowed Grove Path | After the "Survive" encounter, during the second jumping puzzle. Find the area with a pipe embedded in the ground and a rusted walkway above. The feather is on a rock underneath this platform. | Reach the Shard (Jumping Puzzle 2) |
| 1 | Outside Final Boss Arena | Just before the energy field blocking the final boss room (where the Unstoppable Champion is), look for a narrow cliff edge leading off to the right. Follow it around the corner to a dead end. | Reach the Shard (End of Jumping Puzzle 2) |
| 2 | Reservoir (Behind Bars) | Visible behind some bars early in the Emissary section. To reach it, defeat the Emissary in the large red turbine room (often Centurion). Go through the doorway on the far side of that room and follow the path to a dead end where the feather waits. | Hunt the Emissaries |
| 2 | Emissary Side Room | In one of the side rooms branching off the tall circular room (where you fight an Emissary), look for a central ledge with two crates. The feather is on top of one of these crates. | Hunt the Emissaries |
| 2 | Centurion Emissary Room | In the Centurion's isolated combat room. As you enter, look immediately to your left; the feather is resting on a power box. | Hunt the Emissaries |
| 2 | Hallowed Grove Start | At the very beginning of the Hallowed Grove jumping puzzle (after "Survive"). Jump up to the right, onto the ledge where a Hobgoblin sniper typically spawns. | Reach the Shard (Start of Jumping Puzzle 2) (Note: This feather was reported as potentially bugged/missing) |
| 2 | Final Boss Arena | Inside the final boss room itself. Head towards the back of the arena near the waterfall. The feather is located at the very end of the map by the waterfall. | Drive Savathûn Out |
| 3 | Wizard Emissary Path | In the blue-tinted room where you fight the Wizard, take the upper exit leading into a dark corridor. Follow this corridor all the way to the dead end. (Alternatively described as turning left instead of right in the first corridor towards the Wizard). | Hunt the Emissaries |
| 3 | Crow's Room (Captain Area) | Defeat the Emissary in the large red 'rusted' room (often Captain or Knight). From this room, platform up to the top floor. Shoot the Taken Blight blocking a doorway. Go through, turn right down the corridor, find Crow's hidden nest room. Feather is on a table. | Hunt the Emissaries |
| 3 | Centurion Emissary Room | In the Centurion's final combat room (the one adjacent to the Week 1 cage room). The feather is located on a crate within the same room as the Centurion Emissary. | Hunt the Emissaries |
| 3 | Hallowed Grove (Pipe Room) | During the second jumping puzzle. Reach the room with a large pipe along the far left wall. Jump to it, follow passages/pipes to a larger red pipe. Before jumping up to the exit from the end of the red pipe, look right to a glowing feather on a ledge. | Reach the Shard (Jumping Puzzle 2) (Note: This feather was reported as potentially bugged/missing) |
| 3 | Hallowed Grove (Railway) | Continue from the previous feather's location. Enter a corridor with train tracks on the ground. Follow the tracks to their end. Turn right; the feather is hiding in the corner. | Reach the Shard (Jumping Puzzle 2) |
Once you collected all 100 feathers, the "Bird of Prey" quest would update, directing you to "Return to the Hawk of Light" to claim your ship. This involved returning to the Harbinger entrance building in Trostland, but instead of entering the fireplace on the second floor, you'd climb to the top floor and follow a new path leading back into the dam to commune with the Traveler and receive the Radiant Accipiter.
Survive the Arena: Mastering the Lake of Shadows Gauntlet
After successfully hunting down the three Emissaries within the Reservoir, your spectral hawk guide would lead you onward. The path culminates in a large, open arena – instantly recognizable as the boss encounter space from the Lake of Shadows strike. Here, your objective shifts to a simple, yet demanding task: Survive.
The Gauntlet Structure:
This encounter wasn't just a random onslaught; it was a structured, multi-wave defense against increasingly difficult combinations of Taken forces. The core mechanic revolved around "key" enemy types – specific Taken majors or ultras whose presence on the battlefield triggered infinite respawns of associated weaker enemies. You had to endure three distinct rounds, each featuring a different enemy pairing and escalating Champion presence.
Enemy Waves and Their Triggers:
- Wave Type 1 (Wizard Trigger): Two Taken Wizards (Void shielded) appear. As long as they remain alive, waves of Taken Thrall will continuously spawn.
- Wave Type 2 (Centurion Trigger): Two Taken Centurions (Arc shielded) appear. As long as they remain alive, waves of Taken Vandals (Solar shielded snipers) will continuously spawn.
- Wave Type 3 (Captain Trigger): Two Taken Captains (Solar shielded) appear. As long as they remain alive, waves of Taken Goblins will continuously spawn.
Champion Escalation:
Adding to the pressure, Unstoppable Taken Phalanxes/Colossi joined the fray alongside these waves:
- Round 1: Key enemies were red-bar difficulty. No Champions initially.
- Round 2: Key enemies were tougher Majors. One Unstoppable Champion spawned.
- Round 3: Key enemies were Ultra difficulty. Two Unstoppable Champions spawned simultaneously.
This knowledge allowed for a crucial tactic: after killing the two key enemies for a wave, you could intentionally leave one or two of the remaining weaker adds alive. This created a pause in the action, giving you a safe window to reposition, regenerate health and abilities, and most importantly, collect any dropped ammo bricks before triggering the next, potentially more dangerous wave.
Threat Management:
- Vandals: If the Centurion wave was active, Taken Vandals were your highest priority threat due to their devastating sniper damage. Eliminate them immediately.
- Champions: Unstoppable Champions needed to be dealt with decisively. Stun them with your Unstoppable weapon/mod, then quickly burn them down using Heavy weapons (Lament was excellent here), Supers, or focused fireteam damage. Having two Champions active in the final round required careful positioning and target prioritization.
Positioning and Cover:
Staying mobile and utilizing cover was essential for survival.
- Ground Cover: The large metal crates and various rock formations scattered around the arena provided necessary cover from enemy fire. The area behind the large box directly across from the entrance was often cited as a relatively safe fallback point.
- High Ground: Some players found success using the upper platforms or ledges. One popular spot involved reaching a high platform via a diagonal steel girder, offering good views and protection from ground enemies like Thrall. However, this position left you exposed to snipers, requiring constant vigilance.
- Adapt to the Waves: Your positioning needed to adapt based on the active wave, which, remember, was determined by your Emissary kill order. If Vandals were spawning, you needed solid cover from multiple angles. If Thrall were spawning, you had more freedom to move but needed to avoid getting swarmed.
Completion and Reward:
Successfully weathering all three rounds and defeating all enemies, including the Champions, would complete the "Survive" objective. A reward chest would spawn, granting you a bundle of Paracausal Feathers. The spectral hawk would then reappear, guiding you towards the entrance of the next section: the Hallowed Grove.
Into the Grove: The Second Jumping Puzzle
Following the spectral hawk's guidance after surviving the arena battle, you'd enter the Hallowed Grove, initiating the mission's second major jumping puzzle. This section should feel familiar if you completed the original quest to obtain Hawkmoon ("The Crow and the Hawk"), as it reused many of the same assets and pathways through the spooky, Taken-infested EDZ wilderness.
Navigating the Path:
This puzzle involved a series of platforming challenges across large gaps within expansive caverns and winding tunnels. Key navigational elements included:
- Jumping between ledges and rock formations.
- Utilizing various pipes – grey ones to cross gaps, large suspended pipes, and pipes running along walls.
- Following rows of glowing purple mushrooms, which often served as visual guides if you lost your way.
- Traversing specific landmarks like a large rusted pipe guarded by a Hobgoblin, jumping across a chasm towards rusted doors, and following a collapsed tunnel containing train tracks.
Feather Hunt Continues:
Remember those hidden Paracausal Feathers? Several of them were tucked away within this Hallowed Grove jumping section, with their specific locations changing depending on the active week. Finding them often required slight detours from the main path or keen observation while platforming. Refer back to the table in the Paracausal Feathers section for precise weekly locations.
The Final Gatekeeper:
The jumping puzzle concluded as you approached the entrance to the final boss arena – the large chamber housing the Shard of the Traveler. Guarding this entrance was one last Unstoppable Taken Champion. You typically needed to defeat this Champion to lower an energy barrier blocking access to the final fight.
Final Showdown: Driving Savathûn Out (Boss Strategies)
Passing the final Unstoppable Champion and the energy barrier brought you into the heart of the mission: the vast, open chamber containing the dormant Shard of the Traveler. This familiar space, echoing the original Hawkmoon acquisition quest, was the stage for the final objective: Drive Savathûn Out. This meant facing down one of Harbinger's challenging, rotating final bosses.
General Tactics (Applicable Across Weeks):
While each week's boss presented unique threats, some core strategies remained consistent:
- Add Control Remains King: Just like the Survive encounter, managing the waves of additional enemies was absolutely critical. Letting adds overwhelm you was a fast track to a wipe. Specific enemy types often held the key to controlling the flow of the fight.
- Goblins: These were a constant nuisance, often spawning periodically (e.g., three in the back every 30 seconds during Week 1). Their ability to shield the boss or other high-priority targets made them a top kill priority.
- "Key" Enemies & Infinite Spawns: The theme of specific enemies enabling infinite spawns continued here. In Week 1, Solar Knights were the key; killing them stopped the endless Acolyte waves. Similar mechanics likely applied to the sniper spawns in Weeks 2 and 3, making identifying and eliminating the "source" crucial.
- Snipers: Hobgoblin snipers were a major threat in Weeks 2 and 3, demanding immediate attention.
- Damage Phases and Immunity: Bosses typically had health thresholds or "gates." Damaging a boss to a certain point would often trigger an immunity phase, accompanied by a large wave of adds. You usually needed to clear the majority (or specific types) of these adds before the boss became vulnerable again.
- Positioning and Cover: Use the environment! The various rocks and structures within the arena provided essential cover. Many players utilized the area near the entrance as a relatively safe fallback point, though adds could push back there. Notably, the back portion of the arena was identified as being free from the damaging Taken floor blasts present in the Week 1 encounter.
- Dodge Boss Attacks: The bosses themselves packed a punch. Be ready to dodge powerful attacks like ground slams, volleys of tracking projectiles (Void Blights, Arc Seekers), and area-denial blasts (Solar fire). These attacks were often telegraphed but could easily kill you if you weren't careful.
Specific Boss Strategies by Week:
| Week | Boss Name(s) | Boss Type(s) | Key Mechanics / Adds | Shield(s) | Recommended Strategy Focus | Key Elements |
|---|---|---|---|---|---|---|
| 1 | Akorith, Lightdrinker of Savathûn | Taken Knight | Single boss. Health gates trigger add waves. Key Adds: 2 Solar Knights (spawn left/right). Void Acolytes spawn infinitely while respective Knight lives. Goblins spawn periodically. Taken floor blasts (avoidable at back). Powerful Solar fire attack. | Boss: None. Knights: Solar. Acolytes: Void. | Kill Goblins ASAP. Prioritize killing Solar Knights immediately upon spawn (Xeno/Supers) to stop Acolyte waves. Clear remaining adds. Damage boss. Use cover (entrance/back rocks). | Void (Acolytes), Solar (Knights, Resist) |
| 2 | Ishrasek, Lightbinder of Savathûn | Taken Captain | Single boss. Highly mobile. Key Adds: Infinitely spawning Major Hobgoblin snipers covering all angles during add phases. Boss uses Shrapnel Launcher & Darkness Bolts. Boss blight attacks are Arc. | Boss: Arc. | Constant sniper removal is paramount (long-range precision needed). Use cover extensively. Break Arc shield quickly (Arbalest ideal). Manage mobility. Patience required; fight of attrition. | Arc (Boss Shield, Resist), Precision Weapons |
| 3 | Korusk & Tarask, Lighteater of Savathûn | Two Taken Centurions | Dual bosses, both very tanky. Key Adds: Infinitely spawning Hobgoblin snipers and Taken Thrall. Bosses constantly spam tracking Arc seeker darts. Killing one boss makes the other hyper-aggressive. | Bosses: Arc. | Damage both bosses somewhat evenly initially to delay aggression phase. Constant sniper removal. Use cover (cave/upper ledges). High sustain builds (Sunspots/Devour). Anarchy for passive damage. Burst damage (Swords/Supers) to finish quickly. | Arc (Boss Shields, Resist), High Sustain/Damage |
Defeating the final boss(es) would finally complete the mission, dropping the final chest and your coveted rewards.
Going It Alone vs. Strength in Numbers: Solo and Team Play
Harbinger offered different experiences depending on whether you faced its challenges alone or with a fireteam.
Solo Strategy - The Ultimate Test:
Attempting Harbinger solo was a true test of skill, patience, and preparation. It was absolutely possible, with many Guardians achieving solo flawless completions, but it was undeniably a significant undertaking, especially during the tougher weekly rotations (Weeks 2 and 3).
- Prerequisites: Success typically required being at or above the recommended Power Level (1270+), bringing a highly optimized loadout covering all necessary elements and Champion types, and having a deep understanding of the mission's mechanics.
- Core Principles for Solo Success:
- Patience is Paramount: Rushing would get you killed. Take your time, especially in combat encounters. There's no timer.
- Master Add Control: Understand which enemies trigger spawns and prioritize them. Methodically clear threats before engaging bosses or moving forward. Prioritize dangerous enemies like snipers and Goblins.
- Know Your Safe Spots: Identify and utilize cover effectively. Learn the safest places to stand during the Survive encounter and boss fights.
- Mechanics Mastery: Internalize the boss patterns, add spawn triggers, and the optimal Emissary kill order for the Survive encounter.
- Perfect Your Platforming: Wiping on a jumping puzzle during a flawless run is heartbreaking. Practice the routes until they're second nature.
- Avoid Overconfidence: Even when things seem under control, a single mistake or moment of carelessness could lead to death. Stay focused.
- Recommended Solo Builds: Loadouts often prioritized survivability and self-sufficiency. Popular choices included:
- Warlocks: Top-tree Voidwalker (Devour) with Contraverse Hold for grenade spam and healing. Well of Radiance for emergency healing and damage phases.
- Titans: Bottom-tree Sunbreaker for constant healing and ability regen via Sunspots.
- Hunters: Top-tree Nightstalker for invisibility to escape danger or reposition.
- Key Weapons: Arbalest (for Match Game), Xenophage or Anarchy (for safe damage), Lament (for burst/healing), a good Void primary.
- Essential Mod: Protective Light was considered almost mandatory for the added survivability.
Fireteam Strategy - Strength in Numbers:
Bringing a fireteam of two or three Guardians into Harbinger was highly recommended, especially for initial clears or if you weren't aiming for the solo Triumphs. It made the entire experience considerably more manageable.
- Divide and Conquer: Coordinate roles within the team. Ensure all three elemental shields can be broken efficiently and that at least one person has an Unstoppable counter equipped. Call out high-priority targets like snipers, Champions, or key add spawners ("Focus the Knights!", "Unstoppable pushing left!").
- Synergistic Builds: Combine subclasses and exotics for maximum effect. A Well of Radiance or Ward of Dawn provides immense safety during damage phases or chaotic add waves. Someone running Divinity can debuff bosses for increased team damage. Coordinate Supers for burst damage on bosses or clearing dangerous groups of enemies.
- Revives: Having teammates allows for revives, offering a safety net that solo players lack. Communicate when going for a revive and try to do so safely, perhaps using invisibility or cover.
- Efficiency: A well-coordinated fireteam could clear Harbinger much faster than a solo player. This was beneficial for farming multiple Hawkmoon rolls across characters each week or completing the time-based Triumphs like "Hunter Killer" (complete in under 15 minutes).
Whether you tackled it alone or with friends, Harbinger offered a rewarding challenge that demanded skillful play and smart preparation.
Mission Accomplished: Rewards Breakdown
Successfully navigating the treacherous platforms and defeating the formidable Taken within Harbinger yielded some of the most unique and sought-after rewards available during its time.
- Hawkmoon with Random Rolls: This was the headline attraction. Harbinger was the only source for Hawkmoon hand cannons featuring randomized perks in their final column, a first for an Exotic weapon in Destiny 2.
- Weekly Loot Lockout: Your first completion of Harbinger per character, per week awarded two randomly rolled Hawkmoons from the final chest. Running the mission again on the same character within the same week would not grant additional Hawkmoons. This allowed dedicated players to farm up to six potential rolls each week by completing the mission on all three characters.
- Desirable Perks: Guardians were often hunting for perks that enhanced the weapon's consistency and lethality in PvP or PvE. Popular choices included Rangefinder, Opening Shot, Killing Wind, Snapshot Sights, Eye of the Storm, Hip-Fire Grip, Quickdraw, and Surplus. Perks boosting range were particularly coveted.
- Hawkmoon Exotic Catalyst: Your very first successful completion of the Harbinger mission, on any character, guaranteed the drop of the Hawkmoon Exotic Catalyst.
- Catalyst Effect: Once masterworked (by getting kills with Hawkmoon), the Catalyst provided tangible benefits: it increased the magazine size by one bullet and granted bonus stats (similar to the Killing Wind perk – boosting mobility, range, and handling) whenever you had stacks of Paracausal Charge active.
- Radiant Accipiter Exotic Ship: This unique, feather-themed ship was the ultimate reward for completing the "Bird of Prey" quest, which involved the lengthy process of collecting 100 Paracausal Feathers from Harbinger runs (through hidden collectibles and encounter chests). As detailed earlier, claiming the ship required a final visit to a specific path near the Harbinger entrance after the quest step was complete.
- Associated Triumphs: Harbinger came with its own set of Triumphs for dedicated players to chase, found under the "Season of the Hunt" legacy Triumphs section. These included:
- Alpha Hunter: Complete the Harbinger mission solo without dying (flawless).
- Hunter Killer: Complete the Harbinger mission in 15 minutes or less (typically required a fireteam).
- Lightseeker: Find all five hidden Paracausal Feathers within a single weekly rotation (needed across all three weeks for completion, but was reportedly bugged at times).
- Paracausal Plumage: Complete the "Bird of Prey" Exotic quest (collect 100 feathers and claim the ship).
Conclusion: Harbinger's Place in Destiny History
Though its corridors are currently inaccessible, the Harbinger mission remains a significant and fondly remembered chapter in Destiny 2's ongoing story. It offered a unique blend of challenging platforming, intense combat against the Taken, and a compelling reason to return week after week – the pursuit of the perfect Hawkmoon roll, a first for Exotic weapons.
Harbinger wasn't just a mission; it was an experience. Its hidden entrance, atmospheric environments within the EDZ's dam and Hallowed Grove, and demanding encounters created a sense of mystery and accomplishment. The weekly rotation system, while sometimes frustrating due to bugs, kept the mission feeling dynamic and forced players to adapt their strategies, arguably serving as a precursor to the more formalized Exotic Mission Rotator we see today. The way it tested different mechanics and difficulty levels each week suggests it was fertile ground for Bungie to experiment with evolving endgame design. The strategic depth offered by influencing the Survive encounter through Emissary kill order was another layer that rewarded thoughtful play.
While we can't revisit its specific challenges right now, understanding Harbinger provides valuable insight into Destiny 2's past content philosophies and the evolution of its endgame activities. It represents a high point in mission design for many players, blending lore, challenge, and unique rewards effectively. And who knows? With the framework of the Exotic Mission Rotator in place, perhaps one day, Guardians will once again hear the call of the Hawk and venture back into the depths of the EDZ dam. Until then, Harbinger remains a powerful echo in Destiny's history.
"The feathers led us to our prey, and now the Light finds its way back to the Traveler. We have much to learn from these whispers of the past."