
Whispers from the Void: The Tale of the Glykon
Setting the Scene: The Derelict Ghost Ship
The Glykon Volatus wasn't always a vessel of dread. It was a Cabal carrier, likely part of Calus's Loyalist fleet. Its current state—drifting near the Reef, close to the spatial wound left by Mars's vanishing—is a direct consequence of the events that transpired aboard. The constant, unanswered distress signal is the final testament of its doomed crew, a lure drawing Guardians into its depths. Osiris detects strange energy signatures, "ripples meeting in conversation," hinting at the unnatural forces at play even before boarding. Caiatl, Empress of the Cabal and Calus's estranged daughter, also holds interest, seeking answers about her father's whereabouts and actions.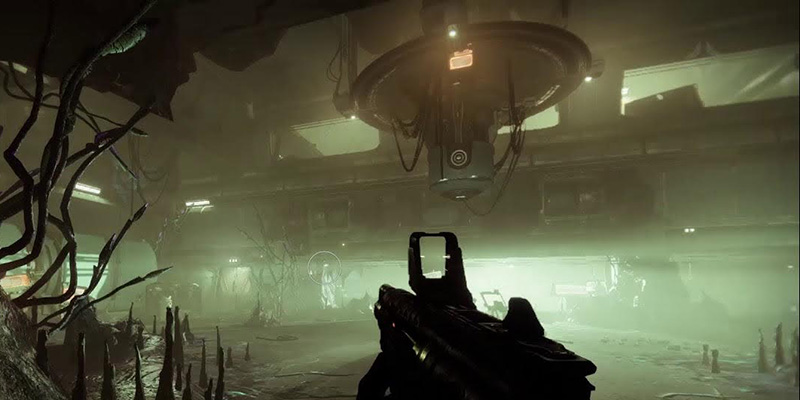
Calus, the Crown, and the Communion: Unraveling the Narrative
Emperor Calus, once the ruler of a Cabal empire shifting from martial might towards decadence, was overthrown in the Midnight Coup orchestrated by his own protégé Ghaul, his daughter Caiatl, and other conspirators. Exiled aboard the colossal ship Leviathan, Calus encountered something profound while adrift in a non-existent space—a void that stared back, choosing him, in his view, as a herald. This encounter ignited an obsession. Feeling abandoned by the entity he encountered in the void, Calus sought to re-establish contact. His physical form withered, hidden behind robotic proxies, but his desire for communion with the Darkness, or the Witness as it would become known, only grew. This pursuit led him to the Crown of Sorrow. Originally a Hive artifact, the Crown was a trap laid by Savathûn to ensnare Calus, having previously driven the Hive warrior Gahlran mad. Despite this, Calus saw it as a tool, first attempting to use it to control Hive, and later, aboard the Glykon, as a conduit to commune with the Darkness. The Crown possessed the terrifying ability to not just control, but merge minds.Note
The Crown of Sorrow would later play a significant role in Season of the Haunted, where it was repurposed by the Vanguard to commune with the nightmares aboard the Leviathan.
Katabasis's Final Log: The Guardian Lost Within
Katabasis, a Hunter Guardian who joined Calus's Loyalists after abandoning the Last City during the Red War, was assigned command of the Glykon for this final, fateful mission. When Calus disappeared and the ship warped, chaos erupted. The Scorn, freed from their containment, rallied under the Locus of Communion, a being seemingly empowered or created by the communion event. Katabasis and the few remaining Cabal Loyalists made a desperate last stand while the Psion Qinziq attempted to use the Crown to pull the ship back to normal space. Though Qinziq succeeded in returning the Glykon from the anomaly's grasp before perishing, the defenders were overwhelmed. Katabasis, resurrected by his Ghost, Gilgamesh, found himself hiding among the dead, taking time to bury the fallen Cabal. But the corruption spread. Gilgamesh, perhaps influenced by the Crown or the ambient Darkness, began whispering to Katabasis, speaking of the Scorn offering salvation, a way out, if Katabasis would only sever his Light. Realizing his Ghost had succumbed, Katabasis shot Gilgamesh. Alone, starving, and hunted, Katabasis eventually fell, his last act a distress signal offering his prized Tex Mechanica scout rifle—Dead Man's Tale—in exchange for rescue. Guardians arriving aboard the Glykon find his corpse grotesquely strung up by the Egregore tendrils, his Light slowly being siphoned.Answering the Distress Call: Accessing Presage
Legacy Access: A Historical Note
Originally, during Season of the Chosen, Guardians discovered the mission start by chance or word-of-mouth. It required launching The Arms Dealer strike (either the standard version from the EDZ map or the Nightfall variant when available). Instead of proceeding left in the first room, players went through a newly opened door to the right, fighting through Cabal turrets to an outdoor landing pad. There, interacting with a specific crate yielded the "Intercepted Distress Signal" datapad. Taking this datapad to Commander Zavala in the Tower initiated "The Voice on the Other Side" quest, unlocking the Presage mission node on the Tangled Shore map.Current Access: The Exotic Mission Rotator
With the Tangled Shore vaulted and mission structures evolving, Presage is now accessed exclusively via the Exotic Mission Rotator. This playlist is found under the "Legends" tab in the Director. The rotator features a selection of past exotic missions (currently including Presage, Vox Obscura, Operation: Seraph's Shield, Avalon, Starcrossed, and potentially others like Whisper and Zero Hour). One mission is featured each week, cycling on a fixed schedule. This means Presage becomes available periodically, roughly every five to six weeks depending on the current pool size. Both Normal and Legend difficulties are available when the mission is active.Critical Note
Launching Presage, even from the rotator, has specific ownership requirements. Players must own either the Beyond Light expansion OR the Season of the Chosen pass. Season of the Chosen is typically included with Beyond Light Deluxe editions or legacy collection bundles.
Navigating the Nightmare: Presage Walkthrough
Steel yourself, Guardian. The Glykon's corridors twist with more than just Egregore; they echo with madness and loss.Breaching the Hull: Finding the Way In
You arrive outside the main loading bay, but the doors are sealed tight. To find an entrance, turn right (facing away from your ship, towards open space) and locate a series of red pipes and external scaffolding. Carefully jump across these platforms, following the path around the ship's exterior until you reach an open vent leading inside.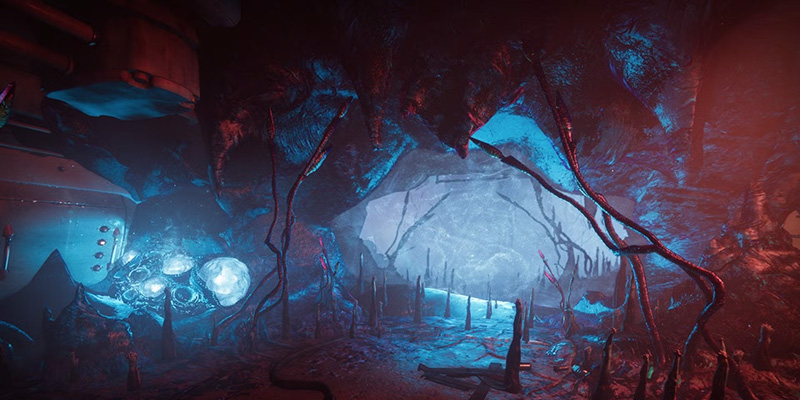
Egregore and Electricity: Early Puzzles and Hazards
- Ventilation Ducts: Crawl through the claustrophobic initial vents. Shoot open grates blocking your path to proceed. Osiris will provide commentary on the ship's state.
- First Spore Barrier & Egregore Link: You'll emerge into a room dominated by strange flora and the suspended corpses of Cabal. A pulsating Darkness barrier blocks the way. Locate the glowing Egregore Spores nearby. Shoot them to gain the Egregore Link buff, indicated by a 15-second timer. While active, you can pass through Darkness barriers. Note that the spores turn green while recharging and cannot be shot again until they return to their glowing blue state. All fireteam members must be in close proximity when the spores are shot to receive the buff.
Pro Tip
A key quality-of-life change in the rotator version is that the Egregore Link buff now persists between rooms. Originally, the buff often expired if you moved too far from the spores, forcing backtracking. This persistence streamlines navigation, particularly in later sections like the maze.
- Electrical Walls & Switches Puzzle: You'll soon reach an area with electrified floors or walls, requiring levers and fuses to bypass.
- Drop down into the puzzle area. Find a corridor (often to the left) leading to Lever 1. Pull it.
- Return to the main ledge. Another door should now be open, containing Egregore Spores. Shoot the spores, get the buff, and quickly jump across the gap into the next room before the buff expires.
- Locate and pull Lever 2 (found in the penultimate room of this sequence).
- Proceed to the final room of this section and pull Lever 3.
- Go back to the room where Lever 2 was located. As soon as you enter, drop down below the main ledge. Look for a newly opened panel on the wall containing a shootable fuse. Destroy this fuse. This action opens a door in the area below where Lever 3 was, allowing progress.
- Hazard Navigation: Remember the basics: look for destructible vents, listen for the beeping alarm indicating a nearby switch, and pay attention to what shooting a fuse affects—it might disable an electrical field, open a door, or trigger something on a timer requiring you to move quickly.
The Compactor's Embrace: Surviving the Trash Room
Eventually, you'll drop into the infamous trash compactor. Pulling the lever initiates the sequence: the walls begin to close in, and panels on the floor retract, revealing destructible fuses beneath. Your objective is to find and destroy three active fuses before being crushed. Adding to the pressure, waves of explosive Screebs spawn in the center.Warning
The trash compactor is one of the most challenging sections for new players. Be prepared for sudden death from both the crushing walls and exploding Screebs. Have area-of-effect weapons ready.
Strategy:
Survival is paramount. Use weapons with high fire rates (SMGs) or area-of-effect damage (Grenade Launchers, Rocket Launchers) to quickly clear Screebs and break the floor panels covering the fuses. Don't shoot panels randomly; jump and look down to spot the distinct glow of an active fuse beneath a panel before firing. Prioritize clearing the Screebs if they become overwhelming. Hunter
Hunters can use Shatterdive before pulling the lever to break the floor grates, making fuse spotting much easier. Also consider using Shadowshot to tether clusters of Screebs, preventing them from overwhelming you.
Warlock
Warlocks benefit from Devour or Well of Radiance for survivability, and floating can aid in spotting fuses. Vortex grenades can control Screeb spawns while you look for fuses.
Titan
Titans can use Barricades for temporary cover and area-denial abilities against Screebs. Consider using Thundercrash to quickly eliminate groups of enemies if they become overwhelming.
Troubleshooting:
If overwhelmed, retreat to the far end of the room (opposite the lever). Some reports suggest standing still in this area might prevent death even if the walls fully close. The walls may then retract, allowing another attempt without Screebs respawning. This is not guaranteed and may depend on positioning or specific emotes.Exiting:
Once the three fuses are destroyed, the walls stop. Locate the escape vent on the floor—often marked by red lights or a game waypoint—and drop through.Combat Encounters: Scorn Infestation
The Glykon is overrun with corrupted Scorn. Be prepared to face:| Enemy Type | Description | Threat Level |
|---|---|---|
| Raiders | Standard rifle troops | Low |
| Ravagers | Aggressive melee units swinging flaming censers | High |
| Stalkers | Crawling units that explode on proximity | Medium |
| Chieftains | Deploy elemental totems (Arc shields, Solar burn fields, Void tethers) | Very High |
| Abominations | Large Scorn Ogres firing Arc blasts from range | High |
| Screebs | Small, fast suicide units that explode violently | Medium |
First Darkness Zone:
Shortly after the trash compactor, you'll enter a Darkness Zone (respawn restricted). The Locus of Communion will appear briefly, summon Scorn reinforcements, and then vanish. Clear the room carefully. Use cover and prioritize high-threat targets like Chieftains and Ravagers.The Hangar Bay Standoff
You'll proceed into a large hangar bay, triggering a major combat encounter. Expect multiple waves of Scorn, including numerous Chieftains and Ravagers, culminating in the appearance of two powerful Darkmind Abomination majors.Strategy:
The large crate near the entrance provides initial cover. Focus fire on Chieftains to disable their totems and Ravagers to prevent being overwhelmed in melee. Use long-range precision weapons (Scout Rifles, Bows) against the Abominations, aiming for their critical spots. Heavy weapons like Rocket Launchers can dispatch Chieftains quickly, but watch for dodges. Utilize the raised platforms around the hangar for better sightlines and repositioning, but be aware that Screebs may spawn up there during later waves. Killing the first Abomination triggers another wave of reinforcements, so be prepared.Exiting:
Once the hangar is clear, look for the large opening leading back outside. Progress by carefully navigating the series of external platforms suspended in space.
Through the Labyrinth: Advanced Puzzles and Platforming
The section following the hangar features more intricate environmental puzzles.Post-Hangar Puzzles:
Expect a combination of levers in plain sight, hidden fuses, timed electrical fields (like one overhead deactivated briefly by a fuse), and Egregore Link buffs. Thoroughly explore each area, look for switches on walls, and remember which doors were previously closed—a thrown switch might have opened one elsewhere. If a fuse seems to do nothing, it might be timed; shoot it again and quickly look for the effect.Maze Section:
You'll navigate a dimly lit maze requiring the Egregore Link buff. Thanks to the persistent buff in the rotator version, this section is less punishing than originally. A possible path: find spores (often near a grate on the right upon entering), get buffed, proceed straight, take the second path on your left, and follow the faint light.Two Abominations Fight:
After the maze and puzzle rooms, expect a smaller encounter against two Abominations.Long Room with Burning Wall:
You'll enter a long, narrow room requiring platforming across ledges while fighting enemies. At the far end is a burning wall you cannot pass.Puzzle Solution
- Proceed to the end, near the burning wall. Find a switch just around the corner. Throwing it reveals a Cabal turret behind you.
- Backtrack about halfway down the long room. A previously closed side door will now be open, but it also contains a burning wall.
- To pass the burning wall in the side room, you must return to the very beginning of this long platforming section to acquire the Egregore Link buff from spores located there. Run back to the side room (you can refresh the buff by dipping back into the spore area if needed) and proceed through the passage beyond its burning wall.
Confronting the Locus: Boss Encounter Guide
The final confrontation takes place in the ship's boiler room against the Locus of Communion.Arena Layout:
The encounter spans two levels. The upper level is the main area with a rally banner spot, cover, and three crucial coolant activation switches. The lower level is the boiler room, accessed via holes in the floor, where the main damage phases occur.Fight Cycle:
The fight follows a strict three-phase cycle:- Initial Engagement: Approach the Locus on the upper level and deal a small amount of damage. It will quickly teleport down into the boiler room. Avoid using Supers or heavy ammo here, as it's inefficient.
- Upper Level Add Clear: Scorn enemies will spawn on the upper level. Clear them completely. Prioritize Chieftains.
- Activate Coolant Flush: Locate the three activation panels on the upper level. Two are on blue screens at opposite ends of the main area. The third is inside a small side room that is constantly burning—quickly enter, activate the panel, and exit. All three must be activated to cool the lower level.
- Lower Level Damage Phase: Drop down into the boiler room through the openings near the two end coolant panels. Focus fire on the Locus of Communion. Damage the boss until one segment of its health bar is depleted. The rotator version features a clearly partitioned health bar, making phase transitions obvious.
- Lower Level Add Management: Additional Scorn waves will spawn in the boiler room during the damage phase. This is the ideal time to use powerful Supers (Well of Radiance, Gathering Storm, Thundercrash are effective) and area-of-effect weapons to manage the adds while damaging the boss. Avoid getting cornered. The boss may briefly pause if its flail gets stuck in the ground.
- Escape the Heat: As soon as the boss reaches the next health gate (one-third depleted), the boiler room floor will begin to glow red and inflict heavy burning damage very quickly. Immediately ascend back to the upper level through any of the floor openings to avoid death.
- Repeat Cycle: Repeat steps 2 through 6 two more times. Each cycle requires clearing adds upstairs, activating coolants, damaging the boss downstairs while managing adds, and escaping the heat until the Locus of Communion is defeated.
Critical Note
After the Locus falls, a new door opens on the upper level. Follow the indicated path through a vent to the command bridge where Katabasis's body hangs. Interact with the Dead Man's Tale rifle propped below him or the general scene to trigger the final dialogue. Important: Wait for the "Mission Complete" notification to appear on screen before leaving the activity; there can be a significant delay after the dialogue finishes.
Echoes of the Crew: Collectibles (Legacy Context)
The original Presage mission was rich with hidden lore and collectibles that unfolded the story week by week. However, it is crucial to understand that in the current Exotic Mission Rotator version of Presage, all original collectibles—Captain's Logs, Smuggler's Caches, and weekly Scannables—are disabled and non-functional. The associated Triumphs like "Bound in Memory," "Tucked Away," "Figments of an Answer," and "All the Scattered Pieces" are part of the legacy system and cannot be progressed in the rotator. The following information is provided for historical context only.The Captain's Logs & Smuggler's Caches (Original System)
Originally, after completing Presage for the first time (to get the initial Dead Man's Tale), subsequent completions awarded one page of the Captain's Log lore book per account, per week. There were 12 logs in total, released sequentially over 12 weeks. Each Captain's Log acquired unlocked the ability to interact with a specific yellow datapad hidden within the Glykon on a future run. Scanning the corresponding datapad opened a nearby secret Smuggler's Compartment, revealing a chest containing standard legendary gear. These caches had to be opened sequentially, matching the order of the logs obtained. Finding all 12 Smuggler's Compartments awarded the "Tucked Away" Triumph.| Log Week | Location Description |
|---|---|
| 1 | Vent near start, shootable grate on left after second turn |
| 2 | Walkway before dropping into main ship entrance, door on floor |
| 3 | First Egregore Link room, datapad/door on the right side |
| 4 | Room after second Egregore barrier (with Screebs) |
| 5 | Second floor room, left side, near previous cache area |
| 6 | Inside escape vent after destroying trash compactor fuses |
| 7 | Closed room on the left after the first combat encounter |
| 8 | Back of first hangar area, near docked ship/closed door |
| 9 | Back of second hangar area, behind the Thresher |
| 10 | First room after second hangar, turn right |
| 11 | Inside the "maze" section, turn right at first intersection |
| 12 | Final room, behind Katabasis's body |
Scannable Objects (Original System)
In addition to the logs and caches, the original Presage featured sets of scannable objects that appeared on a weekly rotation. Interacting with these objects provided extra dialogue from Osiris and Caiatl, deepening the narrative and revealing more about the experiments and the crew's fate. Finding all objects across the weeks completed Triumphs like "Figments of an Answer" and "All the Scattered Pieces", ultimately rewarding the exotic "Shell of Gilgamesh" Ghost shell. These scannables are also disabled in the rotator version.Embracing the Darkness: Legend Difficulty
For Guardians seeking a greater challenge and the Dead Man's Tale Catalyst, the Legend difficulty awaits.The Legend Challenge: Modifiers and Power Cap
Legend difficulty in the rotator replaces the original "Master" difficulty designation. It presents a significant step up in challenge due to several factors:- Power Level: While the recommended Power Level aligns with current endgame activities (e.g., 2005 for Legend), the critical factor is the Power Limit. Your effective Power Level is capped at 15 levels below the activity's Power Level (e.g., if the activity is 1830, you are capped at 1815). Exceeding this cap provides no offensive or defensive advantage. Being below the cap significantly increases the difficulty.
- Time Limit: You have 30 minutes to complete the entire mission, starting from the moment you board the Glykon. This is an increase from the original 25-minute timer.
- Champions: A notable feature of Presage's Legend difficulty in the rotator is the complete absence of Champions. This differs from many other Legend/Master activities and simplifies loadout requirements slightly.
| Modifier | Description | Impact |
|---|---|---|
| Power Limit | Max Effective Power Level capped 15 below activity level (e.g., 1815) | Significant increase in incoming damage, slight reduction in outgoing. |
| Time Limit | 30 minutes to complete | Requires efficient play and puzzle-solving. |
| Equipment Locked | Loadout cannot be changed after starting | Requires careful pre-planning of gear. |
| Increased Shields | More enemies with elemental shields (Arc, Solar, Void possible) | Requires diverse elemental coverage or shield-piercing abilities. |
| Threat (e.g. Void) | Increased incoming damage from specified element | Demands specific elemental resistance mods. |
| Surge (e.g. Arc) | Increased outgoing damage with specified element | Encourages matching subclass/weapon elements. |
| Overcharge (e.g. Scout) | Increased damage for specified weapon type | Rewards using the designated weapon type. |
| No Champions | Barrier, Overload, Unstoppable Champions are absent | Simplifies loadout building (no Champion mods needed). |
| Other Modifiers | May include increased grenade frequency (Scorched Earth) or melee damage | Adds specific environmental or combat pressure. |
Mastering the Gauntlet: Strategy Adjustments
Success on Legend demands refined tactics:- Loadout: Build crafting is essential. Prioritize matching elemental Surges and utilizing Overcharged weapons. Ensure you can break all potential shield types present. Survivability is key: lean into builds providing Restoration, Woven Mail, Devour, or Invisibility. Don't neglect add clear, as enemy density remains high. Long-range boss DPS options are generally safer.
- Pacing: The 30-minute timer is less restrictive than the original 25, allowing for slightly more cautious play, but efficiency is still vital. Avoid reckless pushes, especially when solo. Memorizing puzzle routes and solutions is critical to save time.
- Combat: Enemies are significantly more lethal due to the power disadvantage. Utilize cover constantly. Identify and eliminate high-threat targets (Chieftains, Abominations, distant snipers) immediately. Control enemy numbers proactively to avoid being overwhelmed.
- Solo Legend: This is a formidable challenge requiring optimized builds, extreme patience, and near-perfect execution. Exploit safe zones whenever possible, such as the upper level during the boss fight. Master movement and positioning to minimize exposure.
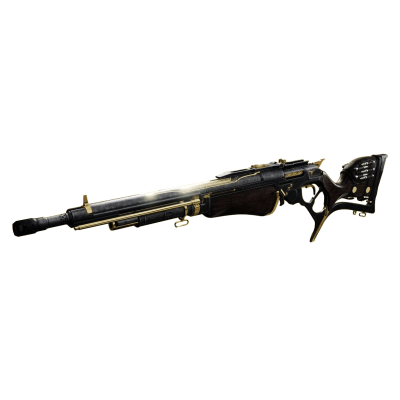
The Dead Man's Spoils: Rewards and Farming
The Glykon's primary lure, beyond its chilling atmosphere, is its unique loot, centered around the Dead Man's Tale exotic scout rifle.Acquiring Dead Man's Tale
Your very first completion of the Presage mission (on either Normal or Legend difficulty) during a week it is featured in the Exotic Mission Rotator will guarantee a drop of the Dead Man's Tale exotic scout rifle. Importantly, this initial drop is guaranteed to have Deepsight Resonance (a red border).
Crafting the Legend: Patterns and Intrinsic Upgrades
The introduction of Presage into the rotator brought with it the ability to craft Dead Man's Tale:- Unlocking the Pattern: Simply extract the pattern from the first Deepsight version you receive. This single pattern unlocks Dead Man's Tale for crafting at the Enclave on Mars.
- Intrinsic Upgrades: Dead Man's Tale features unique intrinsic upgrades (named Cranial Spike II, III, and IV in the crafting menu) that must be unlocked to access its full suite of perk options. Each subsequent completion of Presage (on Normal or Legend) after your first grants one of these intrinsic upgrades. You will need approximately three total completions (your initial run plus two more) to unlock all intrinsics and gain access to all perk columns for crafting.
Pro Tip
Dead Man's Tale originally dropped with random rolls. The craftable version offers a curated pool of perks to choose from, allowing players to build their preferred PvE or PvP "god roll".
| Barrel | Magazine | Trait 1 | Stock |
|---|---|---|---|
| Chambered Compensator | Flared Magwell | Vorpal Weapon | Composite Stock |
| Corkscrew Rifling | High-Caliber Rounds | Fourth Time's the Charm | Fitted Stock |
| Fluted Barrel | Ricochet Rounds | Killing Wind | Hand-Laid Stock |
| Polygonal Rifling | Light Mag | Moving Target | Short-Action Stock |
| Smallbore | Armor-Piercing Rounds | Outlaw | |
| Hammer-Forged Rifling | Accurized Rounds | Compulsive Reloader | |
| Arrowhead Brake | Steady Rounds | Rapid Hit | |
| Extended Barrel | Shoot to Loot | ||
| Full Bore |
The Catalyst: Dark-Forged Trigger
The exotic catalyst significantly enhances Dead Man's Tale's unique hip-fire capabilities.- Acquisition: The catalyst is awarded upon your first completion of Presage on Legend difficulty while it is the featured weekly mission. (Historically, it was tied to the original Master difficulty or could drop randomly from playlists when Presage was vaulted).
- Effect: The catalyst grants the perk Dark-Forged Trigger. This perk removes accuracy penalties when firing from the hip and increases the hip-fire rate of fire (from 120 RPM to approximately 140 RPM). Furthermore, stacks of the Cranial Spike intrinsic perk provide additional increases to hip-fire rate and grant bonus damage when hip-firing at maximum (x5) stacks. It fundamentally changes the weapon's feel and effectiveness in close-to-mid range engagements.
- Application: Once acquired, the catalyst can be applied directly to your crafted Dead Man's Tale when reshaping it at the Enclave. Unlike older catalysts, there is no kill objective required to apply the perk. You still need to level up the crafted weapon to change other perks.
Weekly Farming: Rotator Rewards Structure
Presage is highly rewarding to farm when it's available in the rotator, thanks to a generous loot structure:- Guaranteed Weekly Deepsight: Once per week, per account (likely with separate lockouts for Normal and Legend difficulty), you are guaranteed one Deepsight (red border) Legendary weapon from the Presage loot pool that you have not yet unlocked the pattern for.
- Guaranteed Weekly Armor: Similarly, you are guaranteed one piece of the Eidolon Pursuant armor set you haven't acquired for your current class, per week, per account (again, likely separate Normal/Legend lockouts).
- Knockout System: These guaranteed drops operate on a knockout list. Once you have collected all weapon patterns and all armor pieces from the Presage pool, these guaranteed drops will become random rolls.
- Additional Weapon Drops: Every single completion of Presage (Normal or Legend) will award an additional weapon from its pool. These drops are not guaranteed to be Deepsight but have a random chance to drop with a red border.
- Weekly Challenge: The Exotic Mission Rotator weekly challenge (found in the Director) also awards a Pinnacle-power drop from the active mission's loot pool, following the same Deepsight/armor knockout priority.
- Xûr Quest Progress: Completing Presage also grants bonus progress for Xûr's weekly Xenology quest (4 points for Normal, 7 for Legend).
Presage Specific Loot Pool:
Beyond Dead Man's Tale, Presage offers a rich selection of craftable Legendary gear:| Category | Items |
|---|---|
| Armor | Eidolon Pursuant Set (Titan, Hunter, Warlock) |
| Weapons (Season of the Haunted - Craftable) | Nezarec's Whisper (Glaive), Bump in the Night (Rocket Launcher), Tears of Contrition (Scout Rifle), Hollow Denial (Trace Rifle), Firefright (Auto Rifle), Without Remorse (Shotgun) |
| Weapons (Opulent / Menagerie Reprised - Craftable) | Austringer (Hand Cannon), Drang (Baroque) (Sidearm), Beloved (Sniper Rifle), CALUS Mini-Tool (Submachine Gun) |
Farming Value
The sheer density of desirable, craftable rewards—an Exotic, a full seasonal weapon set, AND the highly sought-after Opulent weapons—makes Presage arguably the single most valuable mission to farm when it appears in the Exotic Mission Rotator. This concentration of top-tier loot provides exceptional efficiency for players aiming to complete multiple pattern collections simultaneously.
Alone in the Dark: Solo vs. Fireteam Tactics
Whether you brave the Glykon's depths alone or with allies affects the approach.Tips for the Lone Guardian
Venturing into Presage solo is a test of skill and patience, especially on Legend difficulty.Preparation:
On Normal, focus on strong add clear and survivability. Strand subclasses offer good control. Ensure a reliable long-range option for the final boss. For Legend, build meticulously around the active modifiers (Surges, Overcharge, Shields, Threat) and prioritize resilience and recovery.Mindset:
Patience is paramount. Avoid unnecessary risks, especially in combat encounters and during the boss fight. Memorize puzzle layouts and solutions to minimize time lost. Constant movement and situational awareness are vital to avoid being swarmed.Key Sections Solo Strategy:
// Trash Compactor
- Use AoE weapons (GLs, Rockets) to break panels and clear Screebs quickly
- Jump to spot fuses before shooting
- If overwhelmed, consider the "safe spot" at the far end

// Hangar
- Utilize cover extensively (central box, upper platforms)
- Eliminate threats methodically: Chieftains first, then Ravagers/Snipers, then rank-and-file, then Abominations
- Long-range weapons are effective here
- If low on ammo, carefully farm the Screebs that spawn on upper platforms

// Boss Fight
- Leverage the safety of the upper level
- Use long-range DPS weapons (Snipers, LFRs) or damage-over-time exotics (Anarchy, Witherhoard)
- Prioritize clearing adds immediately upon spawning, especially on the lower level
- Stay mobile in the boiler room, using circular paths if needed
- Don't get greedy; chip away health safely
Loadout Examples:
While meta-dependent, successful solo runs often utilize survivability subclasses (Devour Warlock, Strand Titan/Hunter, Solar Restoration builds). Weapon choice should balance add clear (SMGs, Wave Frame GLs) and safe boss damage (LFRs, Rockets, specific Exotics). Solo flawless clears are possible on all classes.Strength in Numbers: Fireteam Synergies
Bringing a fireteam significantly changes the dynamic:Benefits:
The most obvious advantage is the ability to revive fallen teammates, reducing the penalty for mistakes. Fireteams clear adds faster, manage multiple threats simultaneously, and can coordinate burst damage on the boss. Puzzles involving multiple switches or timed elements can be handled more efficiently. Recommended for first-time clears or tackling Legend difficulty.Roles & Coordination:
Teams can assign roles: one player focuses on high-threat targets, another on rank-and-file adds, while a third handles mechanics like switches. Support Supers like Well of Radiance or debuffs like Tether drastically improve survivability and damage output. During the boss fight, players can split up to activate the three coolant switches simultaneously.Communication:
Clear communication is key for coordinating Egregore Link buffs, calling out switch activations, focusing fire on priority targets, and signaling boss phase transitions or the need to retreat from the boiler room.Presage's Legacy: Enduring Mission
Years after its introduction, Presage remains a significant piece of Destiny 2 content.Current Status in Destiny 2
Presage is widely regarded as one of Destiny 2's best missions, lauded for its masterful blend of environmental storytelling, atmospheric horror, engaging puzzles, and compelling narrative. Its preservation within the Exotic Mission Rotator ensures that both new and veteran players can experience this classic content. Currently, it serves as the sole source for obtaining and crafting Dead Man's Tale, and acts as a highly efficient farm for two full sets of desirable craftable Legendary weapons (Season of the Haunted and Opulent sets).Risk vs. Reward: Balancing Exploration and Progression
The transition to the rotator has subtly shifted the mission's risk/reward dynamic. Originally, the reward loop involved weekly exploration: completing the mission granted a lore page, which unlocked a hidden cache for the next run, encouraging repeated visits focused on uncovering secrets and piecing together the narrative bit by bit. The risk was in missing a week or failing to find the hidden elements. In the rotator version, with collectibles disabled, the focus shifts squarely to the gameplay loop and loot acquisition. The primary rewards are the craftable exotic, its catalyst, intrinsic upgrades, and the patterns for the Legendary weapons. The risk lies in failing the Legend difficulty timer or overcoming the challenging modifiers, while the reward is the efficient acquisition of powerful, craftable gear. The emphasis moves from narrative discovery through exploration to mastering the encounter for tangible loot progression.Mission Evolution
This evolution mirrors how Bungie handles legacy content. Missions like Presage, Whisper, and Zero Hour represent high points in mission design. Rather than letting them fade into obscurity due to content vaulting, the rotator provides a framework for their return. Crucially, Bungie updated their reward structures to integrate with modern systems like weapon crafting. This ensures these missions remain relevant not just as nostalgic experiences, but as active parts of the current endgame grind, demonstrating an adaptive strategy for content preservation and sustained player engagement. The Glykon may be adrift, but its echoes—and its rewards—continue to call to Guardians across the system.
"The void stared back. And chose me."