
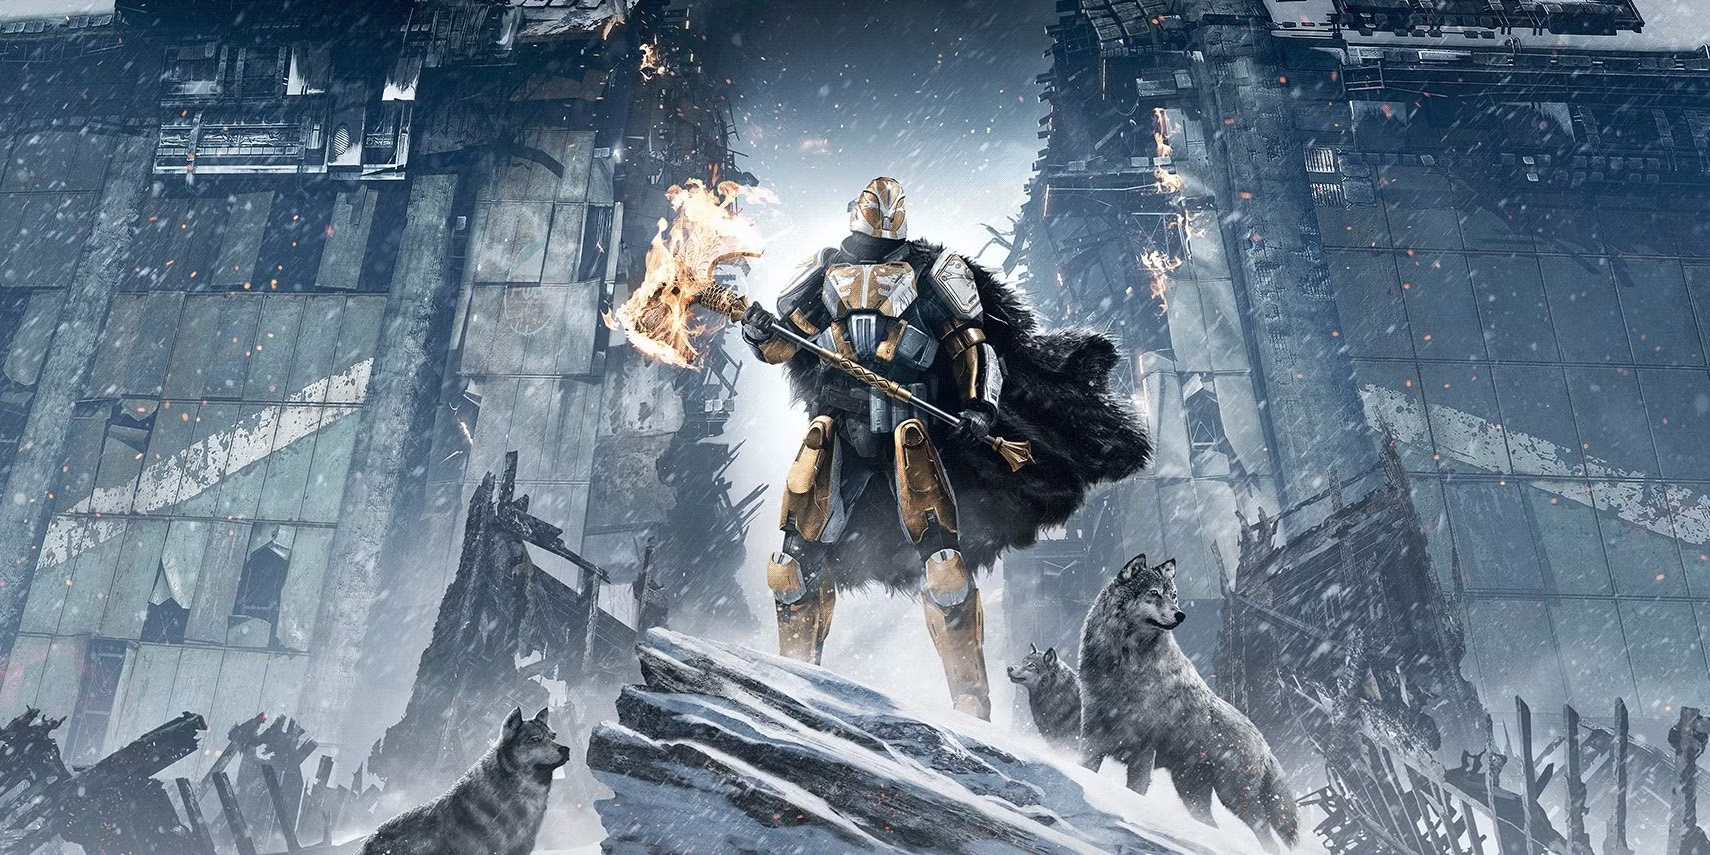
Eyes up, Guardian! Hear that clang? That's the sound of the Iron Banner returning to the Tower, calling the strongest among us to test their mettle. But what exactly is this fiery crucible that Lord Saladin oversees? It's more than just another playlist; it's a tradition steeped in the very foundations of the Last City, a competitive Player-vs-Player (PvP) event with unique challenges, exclusive rewards, and a history forged in heroism and sacrifice.
Led by figures like Radegast, and including legendary names like Felwinter, Jolder, Efrideet, Perun, Timur, Skorri, Gheleon, and Silimar, they banded together to fight these Warlords, deposing them and bringing a measure of peace to the shattered world. They were instrumental in raising the Last City's walls and defended them valiantly in the legendary Battle of Six Fronts, holding firm against overwhelming Fallen forces and cementing their status as heroes.
Their story, however, ends in tragedy. Seeking the replication technology known as SIVA to help rebuild civilization, the Iron Lords ventured into the Cosmodrome's forbidden Plaguelands. They were met with fierce resistance from the Warmind Rasputin and the unleashed SIVA itself. In a final act of sacrifice, eight of the most prominent Lords sealed themselves within SIVA's replication chamber to contain the techno-plague, saving the City but losing themselves. Lord Saladin Forge, once mentor to both Commander Zavala and Lord Shaxx, became the last of the original Iron Lords.
The Iron Banner tournament was established by Saladin to honor the memory and sacrifice of these fallen heroes, including the second generation known as the Iron Wolves, who also perished fighting SIVA. Saladin's philosophy, distinct from Shaxx's more structured Crucible training, was initially about stripping Guardians of their illusions, preparing them for the harsh realities of war where fairness is a luxury. Though their methods differ, and their relationship can be tense (stemming from disagreements during the Battle of Twilight Gap), Saladin and Shaxx cooperate, allowing the Iron Banner to utilize Crucible arenas.
Later, in recognition of your prowess against the SIVA threat, Saladin named you, the player Guardian, the "Young Wolf"—the first of a new generation of Iron Lords, tasked with carrying their legacy forward. Understanding this history is key to grasping the feel of Iron Banner. It's designed to be a trial by fire, a test of strength and resolve, honoring those who faced impossible odds. It's a celebration of Guardian culture, albeit one expressed through the glorious chaos of competitive combat.
Why Play? What Makes Iron Banner Special?
So, why step into Saladin's forge?
- Exclusive Loot: This is the only place to earn unique Iron Banner weapons and armor sets, each with distinct aesthetics often referencing the Iron Lords themselves. You can also snag exclusive shaders, emblems, and ornaments to truly show off your dedication.
- Pinnacle Rewards: Completing the weekly challenges grants Pinnacle Gear, essential for pushing your Power Level towards the cap each season.
- Unique Game Modes: Iron Banner often features unique twists on standard Crucible modes or entirely distinct modes like Eruption, Fortress, Rift, or Tribute, offering a fresh PvP experience.
- The Iron Lord Title: For the truly dedicated, completing a series of challenging Triumphs unlocks the prestigious "Iron Lord" title, a visible mark of your mastery over the event.
A Word for All Warriors (New and Old)
Crucially, unlike its historical iterations, Power Level advantages are now disabled in Iron Banner. This means your skill, strategy, and build synergy matter far more than your raw Power number, making the event more accessible than ever.
So, take a breath, prepare your loadout, and get ready to forge your own legend. This guide will equip you with the knowledge to navigate the systems, understand the modes, optimize your grind, and ultimately, succeed in the Iron Banner.
Mark Your Calendar: Event Schedule & Access
Before you can heed Saladin's call, you need to know when and how to answer it.
When Does the Iron Banner Arrive? (Frequency & Duration)
Iron Banner isn't a permanent fixture like the regular Crucible playlists. It's a limited-time event that typically graces the Tower two or three times per Season. When it does arrive, it usually lasts for one week, starting and ending with the Weekly Reset (Tuesdays at 1700 UTC / 10 AM PDT / 1 PM EDT - adjust for your local time zone and Daylight Saving Time). Note: Some past iterations lasted two weeks, but the current standard appears to be one week per occurrence.
To find the exact dates for the current Season, always check the in-game Director (look for the Iron Banner node in the Crucible section) or official Bungie communications (like their "This Week At Bungie" blog posts or social media announcements). Schedules can sometimes change, so staying updated is key. For example, sources indicated the schedule for Episode: Heresy (early 2025) included events in March and April 9, but always verify the current dates in-game.
Gaining Entry: Your First Steps with Saladin
- Complete the New Light introductory questline ("A Guardian Rises") to gain access to the Tower.
- Speak with Lord Shaxx in the Tower Courtyard and complete his "Light Reforged" quest, which introduces you to the basics of the Crucible.
- Once Iron Banner is active, visit Lord Saladin (now often referred to as Valus Forge). You'll find him in the Tower Courtyard, typically up the stairs near the Gunsmith. He'll only be present during the event week.
On your very first visit to Saladin during an Iron Banner event, he'll offer you an introductory quest called "Forging Iron". This is a simple, one-time quest designed to familiarize you with the event's core loop. The steps usually involve:
- Complete one Iron Banner match.
- Complete one daily challenge (more on those later).
- Earn 300 Iron Banner Rank points.
- Collect an Iron Banner Engram from Lord Saladin (earned by ranking up).
- Complete Iron Banner matches while wearing at least one piece of Iron Banner armor.
- Speak with Lord Saladin again to finish.
Completing this quick quest is necessary to fully participate and access all of Saladin's vendor features.
First Hour Tips: Ignite Your Forge Early
The Iron Banner waits for no one! When the weekly reset hits and Saladin appears, hitting the ground running can set you up for a much smoother and more rewarding week. Here's your checklist for the first hour:
Hitting the Tower Running: Initial Checklist
- Visit Saladin Immediately: As soon as you load into the Tower, make a beeline for Valus Forge. If this is your first-ever Iron Banner, grab the "Forging Iron" quest. Even if you're a veteran, check his inventory for any new dialogue or items.
- Check Daily Challenges: Open the Director, navigate to the Crucible section, and hover over the Iron Banner playlist node. Hold the indicated button (L2/LT on console) to view the active Daily Challenges. The first challenge unlocks immediately on Tuesday. Note the required subclass element (e.g., Arc, Solar, Void) for challenge progress.
- Grab Extra Bounties: Swing by Lord Shaxx and pick up his daily and weekly Crucible bounties. Also, visit Ada-1 in the Tower Annex for her weekly Armor Synthesis (transmog) bounties. Many of these can be progressed passively while playing Iron Banner, giving you extra rewards and materials for your time.
Gearing Up for the First Match (Maximizing Early Rep)
- Equip an Iron Banner Emblem: Dig through your Collections (Flair > Emblems > Competitive) and equip any Iron Banner emblem you own. This provides a significant, immediate reputation boost (currently believed to be 50% or a 1.5x multiplier applied later). If you don't have one, you'll earn one from Saladin's rank track later, or they can drop randomly after matches.
- Equip Iron Banner Gear (Even Just a Little!): Slot in any Iron Banner weapons or armor pieces you have. Even one piece starts contributing to the gear reputation multiplier. Don't sacrifice a build you're comfortable with too much early on, but aim to incorporate pieces as you earn them. Remember, Iron Banner ornaments applied to any armor count, and applying an IB ornament to an actual IB armor piece counts as two items towards the five-item cap for the max bonus.
- Tune Your Ghost: Equip a Ghost shell with the Prosperity (Crucible) mod for a chance at extra Legendary gear drops after matches. Other mods like Blinding Light (bonus XP) might also be beneficial depending on your goals.
- Set Your Subclass: If possible, equip a subclass matching the element required by the active daily challenge to start making progress immediately.
Getting these multipliers active from your very first match is the single biggest step towards an efficient grind. The emblem and gear provide passive boosts, and completing the first challenge (usually just 3 matches) unlocks the first tier of the powerful challenge multiplier.
Mental Prep: Embracing the Challenge
- Expect Chaos: The first few hours of Iron Banner can be particularly wild. Players are learning the ropes of the current game mode, testing loadouts, and matchmaking might take a bit to stabilize. Don't get discouraged by early losses or chaotic matches.
- Focus on Objectives & Learning: Pay close attention to the rules and objectives of the active game mode. Learning the flow and how to contribute effectively is more important than your K/D ratio initially.
- Play Smart, Not Hard (Necessarily): Stick with your teammates, even the random ones (blueberries). Use cover effectively. Don't push into unwinnable fights. A little caution goes a long way.
- Keep Calm and Carry On: Iron Banner will test you. You'll face tough opponents and frustrating losses. Remember it's a game, and the goal is to earn rewards and improve over the week. Don't let tilt ruin your experience. Take breaks if needed.
Know the Rules of Engagement: Game Mode Breakdowns
Lord Saladin doesn't just run standard Crucible drills. Iron Banner often features unique game modes or variants with special rules and mechanics that shake up the familiar rhythm of PvP. The active mode rotates with each event or sometimes even within the event week.
Recently, Bungie introduced a structure with two Iron Banner nodes in the Director:
- Iron Banner Control: A dedicated Control playlist, usually featuring Skill-Based Matchmaking (SBMM), focusing on matching players of similar skill levels, potentially at the cost of connection quality.
- Iron Banner Quickplay: A rotating playlist featuring other modes like Eruption, Fortress, Rift, or Tribute. This playlist typically uses Connection-Based Matchmaking (CBMM), prioritizing good connections over skill parity.
Always check the Director to see which modes are active and which matchmaking style is being used. Here's a breakdown of the common modes you might encounter:
This is a modified version of the classic Control mode.
Rules & Objective:
Two teams of six fight to capture and hold three control zones (A, B, C) across the map.
Scoring:
You earn points for defeating opponents. Holding two zones grants "Zone Advantage," making each kill worth 2 points. Holding all three zones triggers "The Hunt". The score limit might be slightly lower than standard Control (e.g., 125 points instead of 150).
"The Hunt" Mechanic:
When a team captures all three zones, all zones become locked for approximately 30 seconds, preventing capture by either team. During The Hunt, kills by the controlling team grant 3 points each. After The Hunt timer expires, all zones become neutral, forcing both teams to recapture them.
Strategy:
- Prioritize Two Zones: Consistently holding two zones is the most reliable way to win, providing a steady stream of bonus points from kills.
- The Hunt - Risk vs. Reward: Pushing for the third zone to trigger The Hunt offers a massive potential score boost but comes with risks. It often requires overextending, can flip enemy spawns unfavorably, and resets all zone control after it ends. Only attempt a coordinated three-cap if your team is positioned well and ready to capitalize aggressively on the triple points.
- During The Hunt: If your team initiated it, push aggressively as a group to maximize kills during the 30-second window. If the enemy initiated it, focus on survival. Avoid feeding them kills, play defensively, and wait for the zones to reset.
- Map Control is King: Understand which two zones offer the best strategic advantage on each map (often B and one home flag) to control heavy ammo spawns and favorable engagement lanes.
The Hunt mechanic introduces intense, decisive moments. It forces teams to weigh the benefit of a temporary, high-scoring power play against the stability of maintaining two-zone control. Managing spawns and coordinating pushes around this mechanic is key.
This mode transforms Clash into a high-octane race for kill streaks.
Rules & Objective:
6v6 team deathmatch. The first team to 150 points wins. The focus is on chaining kills and assists without dying to gain powerful buffs.
Scoring & Mechanics:
- Base Kill: 1 point.
- Surging: Get 2 kills/assists in one life to become "Surging".
- Effect: You glow slightly. Kills while Surging grant bonus ability energy (10% Super, 20% Grenade/Melee/Class) and score 3 points each.
- Primed: Get 5 kills/assists in one life (while Surging) to become "Primed".
- Effect: Triggers "The Hunt". You glow brightly and are marked on the HUD for both teams (like wallhacks).
- Energy Regen: Kills while Primed grant massive energy: 12% Super and 5% G/M/C energy to you, PLUS 5% Super and 10% G/M/C energy to your entire team, regardless of their location.
- Scoring: Kills while Primed score 3 points.
- The Timer: You gain a 15-second countdown timer. Getting a kill or assist resets this timer.
- Eruption: If the timer hits zero, you explode and die, resetting your streak. This death does not grant points to the enemy team.
- Shutdown: If an enemy kills you while you are Primed, they score bonus points (likely 3 points, though some sources mention 5).
Strategy:
- Survival First: Staying alive is paramount to building the streaks needed for Surging and Primed states.
- Team Play: Stick together, team-shoot enemies, and support each other. This makes getting streaks easier and helps protect Primed allies.
- Aggression Pays (Mostly): The mode rewards chaining kills, so play aggressively when you have the advantage. However, know when to disengage to preserve a streak.
- Ability Spam: Use your abilities frequently, especially when Surging or when a teammate is Primed, thanks to the enhanced energy regeneration.
- Primed Player Tactics: If you become Primed, communicate it! Your team benefits hugely from your kills. Decide your strategy: push aggressively to maximize team energy gains and points, or play safer and hide near the end of the timer to deny the enemy shutdown points. Be aware you're marked for everyone.
- Countering Primed Enemies: When an enemy becomes Primed, they become the highest priority target. Coordinate with your team to hunt them down quickly to stop the point gain and energy feed to their team.
Eruption creates a snowball effect. Getting that initial streak provides a significant advantage, allowing faster ability and Super cycling for the whole team once someone hits Primed. This makes shutting down enemy streaks and protecting your own Primed players the central tactical focus.
A high-stakes, objective-focused mode reminiscent of Capture the Flag.
Rules & Objective:
6v6. A neutral "Spark" spawns periodically in the center of the map. Teams must capture the Spark and transport it to the enemy's "Rift" (goal) to score a point (dunk). The first team to score 5 dunks wins. There's a 10-minute match timer.
Scoring & Mechanics:
- Primary scoring comes from dunking the Spark (1 dunk = 1 win point).
- Reputation/individual score is gained through various actions: Picking up Spark (+300), Checkpoints passed (+100 each, 5 total), Dunking (+1500 / +1650 for backflip), Kill as Runner (+150), Kill on Runner (+300), Regular Kill (+100).
- The Spark carrier is marked on the enemy HUD, making them a prime target.
- Carrying the Spark allows weapon use and most abilities (but not Super activation).
- The Spark detonates if held for too long.
- Dunking is interrupted if the carrier takes damage.
- Respawn timer is long (10 seconds). Revives are possible but often risky.
Strategy:
- Control Mid: Winning the initial fight at the Spark spawn is crucial.
- Escort the Runner: Never let the Spark carrier run alone. Move as a team, provide cover fire, and be ready to revive or pick up the Spark if they fall.
- Aggressive Pushes: When you have the Spark, push hard. Kills force long enemy respawns, creating openings.
- Flank and Distract: Not everyone needs to escort directly. Send players on flanks to draw enemy attention away from the runner's path.
- Clear the Dunk Zone: Before the runner attempts the dunk, the team must aggressively clear defenders from the enemy Rift area. Use Supers and heavy ammo here.
- Map Knowledge: Learn the specific maps used for Rift (Disjunction, Convergence, Bannerfall mentioned) and their optimal routes, cover spots, and sniper lanes.
- Strategic Defense: Defend by controlling choke points leading to your Rift, not just standing on the Rift itself. Prioritize killing the enemy runner (+300 points).
- Play the Clock: If you're ahead near the end, consider grabbing the Spark and playing defensively in your own territory to run out the clock, rather than risking a dunk.
- Mobility Matters: Subclasses and Exotics that enhance movement are highly valuable for runners.
Rift demands strong team coordination and objective focus. Kills are merely a means to an end – controlling the Spark. The long respawns heavily punish team wipes, making coordinated pushes and defenses incredibly impactful.
A unique Control variant where points are scored passively through zone ownership, not kills, punctuated by a high-value central objective phase.
Rules & Objective:
6v6. Capture and hold up to three zones (A, B, C). Score points over time based on the number of zones held. Kills do not grant score.
Scoring & Mechanics:
- Points tick periodically for each zone held (2 points per zone per interval).
- Zone Advantage (2 zones held): 4 points per interval.
- Power Play (3 zones held): 6 points per interval.
- The Hunt / Fortress Zone: Occurs twice per match (triggered by score thresholds like 40/80 points or potentially mid-match). Regular zones lock. A single, central "Fortress" zone spawns, heavily defended by Cabal Scorpius turrets.
- Teams must destroy the turrets before capturing the Fortress zone. Capturing and holding this zone grants points very rapidly. After a set time, the Fortress zone vanishes, and regular zones reset.
- Turret Power Level Anomaly: Player Power Level does affect damage dealt to and received from the Cabal turrets, even though PvP power is disabled.
Strategy:
- Zone Control is Everything: Since kills don't score, capturing and defending zones is the only path to victory.
- Hold Two Zones: Maintain control of two zones for consistent scoring via Zone Advantage.
- Strategic Kills: Kills are only useful if they directly facilitate capturing or defending a zone.
- Defend, Don't Roam: Once zones are captured, actively defend them. Don't wander off looking for kills.
- Fortress Zone Tactics: When the Fortress spawns, prioritize eliminating enemy players first before focusing fire on the turrets. Use area denial Supers (Bubble, Well) to capture and hold the Fortress zone. Be aware of the Power Level impact on turrets if significantly under-leveled.
- Avoid Spawn Flips: Be cautious about triple-capping regular zones, as it can lead to unfavorable spawn flips.
Fortress demands a complete shift in mindset from kill-focused PvP. Success hinges on map control, coordinated defense, and capitalizing on the high-value Fortress zone phases. The PvE turret element adds a unique challenge during the Hunt.
This mode blends the kill-confirmation of Supremacy with an objective deposit mechanic.
Rules & Objective:
6v6. Defeat opponents to make them drop crests (glowing engrams). Collect these crests (both enemy and friendly) and deposit them at one of several rotating Cabal Beacons on the map to score points for your team. The first team to deposit enough crests wins.
Scoring & Mechanics:
- Points are scored only by depositing crests at active Cabal Beacons.
- Players drop all crests they are currently holding upon death.
- Picking up friendly crests denies the enemy team the chance to score them.
- Only one player can deposit crests at a beacon at a time.
- Central Beacon / "The Hunt": Similar to Fortress, a special central beacon guarded by Cabal turrets spawns mid-match. Depositing crests here likely offers bonus points. Filling a beacon (possibly this central one) triggers "The Hunt," resetting beacon locations.
Strategy:
- Play the Objective: Focus on collecting and banking crests, not just getting kills. Kills only matter if the crest is secured.
- Stick Together: Move as a group to win engagements, protect crest carriers, and make it easier to recover friendly crests.
- Deny Enemy Crests: Prioritize picking up fallen friendly crests to prevent the enemy from scoring.
- Control Beacons: Fight near active beacons to secure your team's deposits and prevent the enemy from banking.
- Movement is Key: Use abilities and subclasses that enhance mobility (like Strand Grapple) to quickly collect crests and traverse the map to beacons.
- Central Beacon Phase: Coordinate to destroy the turrets and control this high-value deposit point when it appears.
- "Crest Runner" Role: Consider having players focus specifically on collecting crests (especially friendly ones) and banking safely, rather than frontline combat.
- Banking Etiquette: If a teammate is already depositing, wait your turn or cover them.
Tribute adds layers of complexity to Supremacy. You must not only win fights but also manage the risk of carrying crests and navigate to dynamic objective points while avoiding death. Teamwork and objective focus are absolutely critical.
Earning Glory: The Reputation Grind
Iron Banner utilizes its own reputation system, separate from Crucible Valor or Glory. Ranking up with Lord Saladin is how you unlock the event's exclusive weapons, armor, and other rewards. Understanding how this system works is key to an efficient and rewarding grind.
Ranking Up: From Guardian to Legend
The journey involves progressing through several major ranks, each divided into three sub-ranks (I, II, III): Guardian, Brave, Heroic, Fabled, Mythic, and finally Legend. Reaching the pinnacle of Legend requires accumulating a total of 10,000 reputation points within a single season.
Here's a breakdown of the points needed:
| Rank | Total Reputation Requirement | Reputation Needed for Next Rank |
|---|---|---|
| Guardian I | 0 | 50 |
| Guardian II | 50 | 75 |
| Guardian III | 125 | 125 |
| Brave I | 250 | 250 |
| Brave II | 500 | 450 |
| Brave III | 950 | 600 |
| Heroic I | 1,550 | 375 |
| Heroic II | 1,925 | 600 |
| Heroic III | 2,525 | 825 |
| Fabled I | 3,350 | 525 |
| Fabled II | 3,875 | 775 |
| Fabled III | 4,650 | 1,050 |
| Mythic I | 5,700 | 750 |
| Mythic II | 6,450 | 1,075 |
| Mythic III | 7,525 | 1,475 |
| Legend | 9,000 | 1,000 |
| Legend (Max) | 10,000 | Reset Available |
As you can see, the points required per rank increase significantly as you climb higher, making the later stages of the grind much longer without multipliers.
The Reputation Multiplier: Your Key to Faster Ranks
| Boost Source | Requirement | Max Bonus Value | Notes |
|---|---|---|---|
| Wins | Win an Iron Banner match | Double Base Rep (vs. Loss) | Winning is the most fundamental way to increase gains. May also have a small bonus based on rank. |
| Activity Streak | Play consecutive matches (up to 5) without leaving the playlist or going AFK | +20 Reputation Points (at 5 streak) | Provides a flat point bonus per match, scaling +4 per streak level (+4, +8, +12, +16, +20). Does not apply to losses. |
| Gear Multiplier | Equip up to 5 Iron Banner items (Armor, Weapons, or Ornaments count) | +400% Reputation Gain | Stacks per piece equipped, reaching max at 5 items. Ornament trick (IB ornament on IB armor = 2 items) helps. |
| Challenge Bonus | Complete Daily/Weekly Challenges (up to 4 per event) | +200% Reputation Gain (Stacking) | Each completed challenge adds +50% to the multiplier. |
| Emblem Bonus | Equip any Iron Banner Emblem | x1.5 Multiplier (Applied after Gear/Challenge bonuses) OR +50% Reputation Gain | Provides a significant boost. Sources differ on whether it's additive (+50%) or multiplicative (1.5x). 1.5x seems more likely based on phrasing. |
These multipliers stack, leading to significantly faster reputation gains when fully optimized.
The Optimal Grind: Strategies for Max Efficiency
- Stack Everything: The goal is to have all multipliers active simultaneously. Wear 5 pieces of Iron Banner gear (use the ornament trick on one piece if you need an Exotic armor slot), equip an Iron Banner emblem, complete all four daily challenges, maintain a 5-match activity streak, and try to win as many matches as possible.
- Wait for the Weekend (or at least Friday): The maximum reputation potential isn't unlocked until Friday when the fourth daily challenge becomes available, granting the full +200% challenge bonus. Grinding heavily before Friday means significantly lower rep gains per match.
- Challenge Focus: Play just enough matches from Tuesday to Thursday to complete the daily challenges as they unlock on one character. This activates the account-wide challenge bonus tiers progressively. Once all challenges are done on that character by Friday, the full +200% bonus is active for all your characters.
- Weekend Warrior: Do the bulk of your grinding from Friday onwards when all multipliers can be active.
- Stay in the Playlist: Don't leave matchmaking between games, return to Orbit unnecessarily, or go AFK, as this will break your 5-match activity streak bonus. Trips to the Tower/H.E.L.M. are usually safe.
- Win! While streaks and multipliers help even on losses, winning provides substantially more base reputation. Playing with a coordinated team can significantly increase your win rate.
This system clearly rewards focused, consistent play during the event week, particularly towards the latter half when all challenges are available. Casual play spread throughout the season won't be nearly as efficient for ranking up compared to dedicated grinding during an Iron Banner week with maximized multipliers.
Resetting Your Rank: Rewards and Prestige
Once you hit the 10,000 reputation cap and reach Legend rank, you can reset your rank by visiting Lord Saladin.
- Rewards:
- First Reset of the Season: Grants an Ascendant Shard.
- Subsequent Resets (within the same season): Grant an Exotic Engram.
- Triumph Requirement: Resetting your rank is necessary for certain achievements, most notably the "Crimil's Dedication" Triumph for the Iron Lord title, which requires two rank resets within a single season.
- Seasonal Reset: Remember, your Iron Banner rank and any unclaimed rewards or engrams reset at the end of each Season (or potentially with the start of new Episodes). Make sure to claim everything and spend your engrams before the final Iron Banner event of the season concludes!
Answer the Call: Daily & Weekly Challenges
Iron Banner challenges are your primary source of Pinnacle Gear from the event and a major contributor to your reputation multiplier.
Challenge Cadence: When They Unlock
- A new challenge step typically unlocks each day from Tuesday to Friday at the daily reset time.
- This means there are four challenges (or challenge tiers) in total per Iron Banner event week.
- Once unlocked, challenges remain available until the weekly reset when Iron Banner ends. You can view their progress by hovering over the Iron Banner playlist node in the Director.
Common Objectives (Matches, Subclasses)
The challenge structure has evolved slightly, but generally involves two main types:
- Match Completions (with Subclass): This is usually a multi-step challenge requiring you to complete a cumulative number of Iron Banner matches while using a specific elemental subclass (e.g., Arc, Solar, Void, Stasis, Strand - the required elements change seasonally).
- Example progression: Complete 3 matches, then complete 4 more matches, then 5 more, then 6 more, totaling 18 matches for all four steps.
- Wins and losses both count.
- Prismatic subclass counts if your selected Super matches one of the required elements.
- Points Earned (with Subclass Super): A separate challenge might require earning points (e.g., 50 points) in Iron Banner while having a Super equipped that matches one of the specified elements (e.g., Arc, Solar, Void). Points are generally earned through kills and match participation. This challenge can often be completed multiple times (e.g., up to 8 times) during the event.

Rewards: Pinnacle Gear & Reputation Boosts
Completing challenges yields significant rewards:
- Pinnacle Gear: Each completed challenge step (including repeatable ones like the points challenge) awards a Pinnacle Engram, dropping gear above your current Power Level, up to the season's Pinnacle Cap.
- Reputation Multiplier: Each of the four main match completion challenges you finish adds a stacking +50% bonus to your Iron Banner reputation gains, maxing out at +200% when all four are done. This boost is crucial for ranking up quickly.
Challenges and their Pinnacle rewards are character-based, so you can earn Pinnacles on your Hunter, Titan, and Warlock separately. However, the reputation boost is account-wide, determined by the highest number of challenges completed on any single character. Completing challenges on a second character won't increase the rep boost beyond what the first character achieved.
Smart Completion: Getting Them Done Fast
- Prioritize One Character for Rep: If your main goal is fast reputation gain, focus on completing all four match challenges (18 total matches) on one character as quickly as possible, ideally by Friday, to unlock the maximum +200% account-wide rep boost.
- Equip the Right Subclass: Double-check the challenge requirements and make sure you have an appropriate subclass equipped before launching into Iron Banner. Progress won't count otherwise.
- Plan Your Playtime: If you want Pinnacles on all characters, you'll need to play the required matches on each. You can spread this out daily or grind them all on the weekend. If only focusing on rep, minimize play until Friday when the full multiplier is available.
The challenge system encourages players to engage throughout the first half of the Iron Banner week to unlock the reputation bonuses progressively. Max efficiency involves getting those 18 matches done on one character by Friday to benefit from the full +200% boost for weekend grinding.
Saladin's Wares: Vendor & Focusing Guide
Lord Saladin, or Valus Forge as Caiatl knows him, isn't just the announcer; he's your source for all Iron Banner loot and rewards. Understanding his vendor screen and the focusing system is vital for acquiring the gear you want.
Valus Forge's Offerings: Understanding the Vendor Screen
When you interact with Saladin in the Tower Courtyard during an Iron Banner event, you'll see several key sections:
- Rank Rewards Track: Similar to Zavala, Shaxx, and Drifter, Saladin has a reputation track. As you earn Iron Banner reputation (XP), you unlock rewards at specific ranks. These include Iron Engrams, specific weapons (often new or reprised ones for the season), Enhancement Prisms, Ascendant Shards, and an exclusive Iron Banner Emblem (usually at Rank 16).
- Focused Decoding: This tab allows you to spend Iron Engrams and other currencies to acquire specific current season Iron Banner weapons and armor pieces.
- Legacy Gear / Legacy Ornaments: These tabs allow you to spend resources to acquire weapons, armor sets, and armor ornaments from past Iron Banner seasons.
Iron Engrams: Earning Your Rewards
Iron Engrams are the primary currency for acquiring specific Iron Banner gear through focusing.
- How to Earn:
- Ranking Up: You earn one Iron Engram for every major rank and sub-rank you achieve with Lord Saladin.
- Match Completions: You have a chance to receive an Iron Engram as a random drop at the end of each Iron Banner match. Winning increases this chance.
Focused Decoding: Getting What You Want (Current Gear, Costs)
This is how you target specific gear from the current Iron Banner loot pool.
- Requirement: You generally need to have obtained the weapon or armor piece at least once (from a rank-up reward or random drop) before you can focus it.
- Costs:
- Weapon Focusing: 1 Iron Engram + 20,000 Glimmer.
- Armor Focusing: 1 Iron Engram + 20,000 Glimmer.
Legacy Focusing: Acquiring Gear from the Past (Legacy Gear, Costs)
Want that cool armor set or weapon from a previous season? Legacy focusing is your (expensive) answer.
- Availability: Allows acquiring older Iron Banner weapons and armor, potentially even items you haven't unlocked before (though this might vary). Known available legacy armor sets include Iron Companion, Forerunner, Will, Truage, Fellowship, Remembrance, and Symmachy.
- Costs:
- Legacy Weapon Focusing: 3 Iron Engrams + 25,000 Glimmer.
- Legacy Armor Focusing: 3 Iron Engrams + 15,000 Glimmer.
- Legacy Ornament Focusing: 3 Iron Engrams + 10,000 Glimmer per piece.
Spending Wisely: Focusing vs. Random Decryption
- Focusing: Best used when targeting a specific weapon roll or high-stat armor piece you desperately want. Be mindful of the Glimmer cost, especially for legacy items. It can take many focused attempts to get a desired roll.
- Random Decryption: Simply interacting with Saladin allows you to decrypt Iron Engrams for a random piece of current Iron Banner gear at no additional Glimmer cost. This is good for filling out your Collections, hoping for random god rolls, or acquiring high-stat armor without the Glimmer drain.
The combination of relatively high focusing costs and the seasonal expiration of engrams means players need to grind significantly during the event weeks to acquire enough engrams and Glimmer for targeted focusing. This system rewards dedicated participation during the event.
Does Power Level Matter? The Level Advantage Lowdown
One of Iron Banner's most defining (and sometimes controversial) features throughout Destiny history was its use of Power Level advantages. But how does it work now?
A Quick History Lesson
For most of Destiny and early Destiny 2, Iron Banner stood apart from the regular Crucible because Power Level mattered. Guardians with higher Power Levels dealt more damage to, and took less damage from, lower-level opponents. This was Saladin's way of emphasizing the importance of gear and preparation for "real" combat, unlike Shaxx's level-playing-field approach in standard Crucible. However, the implementation sometimes felt inconsistent, with the actual damage difference being minimal at times, and matchmaking didn't always pit high-level players against low-level ones effectively.
The Fortress Turret Anomaly
There's one quirky exception to the "Power Disabled" rule. In the Iron Banner: Fortress game mode, the Cabal Scorpius turrets that guard the central capture point during the Hunt phase behave like PvE combatants. This means your Power Level does affect the damage you deal to them and the damage you take from them. If you are significantly under-leveled (e.g., just starting the season or returning after a long break), you might find these turrets surprisingly tough to destroy and capable of eliminating you very quickly, even though your fights against other players are on an even playing field.
What It Means for Your Loadout
- Focus on Stats and Perks: Since your gear's Power Level doesn't matter against other players, prioritize armor with high stats in Resilience, Recovery, and relevant ability stats (Discipline, Intellect, Strength) that complement your build. Choose weapons based on their perks, archetype performance, and your personal preference, not just their Power number.
- Accessibility: The removal of Power Level advantages makes Iron Banner significantly more accessible. Players who focus on PvP or haven't reached the Pinnacle cap can jump in and compete without being at an inherent statistical disadvantage. Skill, strategy, and build crafting are now the primary determinants of success.
- Fortress Awareness: If Fortress is the active mode, be mindful of the turret anomaly if you are considerably below the current Power curve. You might need to rely on teammates to help destroy the turrets or play more cautiously during the Hunt phase.
Overall, the shift away from Power Level advantages has changed Iron Banner from a gear-gated activity to a more widely playable event, emphasizing skill and unique game modes over raw Power grind.
The Shape of Battle: Iron Banner Meta Analysis
While Power Level might be disabled, the weapons and abilities you bring into the Iron Banner absolutely matter. Understanding the current Player-vs-Player (PvP) meta can give you an edge, but remember that comfort and skill with your chosen loadout are paramount.
Weapons of Choice: Dominant Archetypes & Perks
The Destiny 2 PvP meta is a fluid thing, influenced by seasonal artifact mods, balance patches, and new weapon releases. However, certain archetypes and perks consistently perform well. Based on recent trends and community usage data:
| Weapon Type | Notable Archetypes | Example Weapons |
|---|---|---|
| Hand Cannons | Aggressive (120 RPM), Adaptive (140 RPM) | Igneous Hammer, Crimil's Dagger, Rose, Palindrome, Ace of Spades |
| Pulse Rifles | High-Impact (340 RPM), Rapid-Fire (540 RPM), Adaptive (390 RPM) | The Messenger, Claws of the Wolf, BxR-55 Battler, Red Death Reformed |
| Shotguns | Aggressive, Lightweight, Precision Slug | Matador 64, Riiswalker, Gunnora's Axe, The Chaperone |
| Fusion Rifles | Adaptives, Precisions | Zealot's Reward, PLUG ONE.1, Pressurized Precision, Jötunn |
| SMGs | Lightweight, Aggressive | Multimach CCX, Unending Tempest, Osteo Striga, The Immortal |
| Sidearms | Adaptive Burst, Rocket-Assisted | Peacebond, Tinasha's Mastery, Trespasser, Drang (Baroque) |
Lethality: Kill Clip, Headseeker, Precision Instrument, Onslaught, Explosive Payload, Target Lock
Utility: Snapshot Sights, Impulse Amplifier, Chill Clip, Voltshot, Destabilizing Rounds
Subclass Supremacy: Top Picks for the Crucible
The "best" subclass often depends on the current seasonal artifact mods and overall balance, but some consistently strong options exist:
Void Nightstalker: Invisibility, radar manipulation, traps
Solar Gunslinger: Radiant buffs, potent Supers, Weighted Knife
Stasis Revenant: Slow/Freeze abilities for control
Arcstrider: High mobility, strong melee
Prismatic: Powerful combinations, leveraging invisibility or movement aspects from different elements
Void Sentinel: Overshields via Barricade, Ward of Dawn Super
Arc Striker: Knockout melee, powerful Supers like Thundercrash, great movement
Strand Berserker: Woven Mail DR, Suspend, Banner of War
Solar Sunbreaker: Sunspots, devastating Supers
Prismatic: Potent melee combos like Peregrine Greaves + Diamond Lance/Shoulder Charge
Solar Dawnblade: Icarus Dash, Heat Rises, Well of Radiance
Stasis Shadebinder: Freeze abilities, especially with Osmiomancy Gloves
Void Voidwalker: Powerful grenades, Child of the Old Gods
Arc Stormcaller: Arc Souls, Stormtrance/Chaos Reach
Prismatic: Unique ability combinations like Bleak Watcher turrets with healing grenades
Playing the Meta vs. Your Comfort Picks
Knowing the meta is valuable. It tells you what weapons and abilities you're likely to face and what loadouts are generally considered strong. However, don't feel forced to use a meta loadout if you're not comfortable or skilled with it. A player who has mastered an off-meta weapon will often outperform someone struggling with a meta pick.

Arming for Victory: Optimized Class Builds
Okay, let's get practical. While personal preference is key, having a well-constructed build provides a solid foundation for success in Iron Banner. Here are some general principles and example builds to get you started.
General Buildcrafting Principles for Iron Banner:
- Prioritize Recovery (faster health regeneration is vital in PvP)
- Aim for Resilience tiers that help you survive specific threats (e.g., certain weapon TTKs, Thorn's damage-over-time); Tier 6-7 is often a good target, though Titans might go higher for Barricade cooldown
- Mobility is crucial for Hunters (dodge cooldown, strafe speed)
- Discipline, Intellect, and Strength should be invested in based on your build's reliance on grenades, Super, or melee abilities
Armor Mods: These are essential for enhancing performance
- Helmet: Targeting mods for your primary and special weapons (e.g., Hand Cannon Targeting, Shotgun Targeting). Siphon mods (Harmonic, Kinetic, specific elements) to create Orbs of Power on multi-kills.
- Arms: Loader mods (e.g., Hand Cannon Loader) for faster reloads, Dexterity mods (e.g., Shotgun Dexterity) for faster ready/stow speed, Fastball (grenade throw distance), Kickstart mods (Grenade, Melee, Utility) to regain ability energy after use.
- Chest: Unflinching Aim mods for your primary and special weapons (e.g., Unflinching Pulse Rifle Aim) to reduce flinch while aiming down sights. Damage Resistance mods (Arc, Solar, Void) are generally less impactful in PvP than PvE but can slightly help against ability spam.
- Legs: Holster mods (e.g., Special Ammo Holster) to automatically reload stowed weapons over time, Scavenger mods (less common now but potentially useful if special ammo economy is tight), Innervation/Invigoration/Absolution (orb pickup grants ability energy), Recuperation/Better Already (orb pickup grants health). Weapon Surge mods (Kinetic, Arc, Solar, Void) grant a small damage bonus while you have Armor Charge (from orb pickup).
- Class Item: Utility Kickstart (gain class ability energy when used), Bomber (grenade energy on class ability use), Outreach (melee energy on class ability use), Reaper (create Orb of Power after using class ability and getting a kill). Distribution (all ability energy when using class ability near enemies).
Hunters excel at agility, misdirection, and burst damage.
Example Build 1: Void Nightstalker (Invis/Control)
- Exotic: Gyrfalcon's Hauberk (Volatile Rounds on Invis exit), Omnioculus (Team Invis, DR), Wormhusk Crown (Heal on Dodge), Gemini Jester (Disorient/Radar removal on Dodge)
- Super: Spectral Blades or Shadowshot (Deadfall for area denial, Moebius Quiver for shutdowns)
- Abilities: Gambler's Dodge (Melee near enemies), Snare Bomb (weakens/removes radar), Vortex/Suppressor Grenade
- Aspects: Vanishing Step (Invis on Dodge), Stylish Executioner (Invis/Truesight on debuffed kill) or Trapper's Ambush (Dive for team Invis/Smoke)
- Fragments: Echo of Persistence (longer Invis/Devour), Echo of Undermining (weaker grenades), Echo of Starvation (Orbs grant Devour), Echo of Vigilance (Overshield on low health kill)
- Stats: Max Mobility, High Recovery, High Discipline/Strength (depending on Smoke Bomb focus)
- Playstyle: Use invisibility for repositioning, flanking, and escaping danger. Utilize Smoke Bombs for radar manipulation and weakening targets. Gyrfalcon's provides potent weapon damage after dodging.
Example Build 2: Solar Gunslinger (Aerial/Radiant)
- Exotic: St0mp-EE5 (Enhanced Movement), Wormhusk Crown (Heal on Dodge), Knucklehead Radar (Radar while ADS), Athrys's Embrace (Stronger Weighted Knife)
- Super: Golden Gun (Deadshot or Marksman) or Blade Barrage
- Abilities: Marksman's Dodge (Reload near enemies), Weighted Throwing Knife (Precision damage/Ignition), Healing/Tripwire Grenade
- Aspects: Knock 'Em Down (Super enhancement, Radiant on knife kills), On Your Mark (Reload/Handling on precision hits/dodges) or Heat Rises (Consume grenade for aerial play - pairs well with Icarus Grip weapons)
- Fragments: Ember of Torches (Radiant on powered melee hit), Ember of Solace (Longer Radiant/Restoration), Ember of Empyrean (Solar kills extend Radiant/Restoration), Ember of Beams (Super tracking)
- Stats: Max Mobility, High Recovery, Discipline/Strength depending on knife focus
- Playstyle: Focus on landing precision hits and utilizing Radiant buffs for faster TTKs. Weighted Knife offers high skill/high reward plays. Heat Rises allows for aggressive aerial engagements.
Titans bring resilience, powerful abilities, and frontline presence.
Example Build 1: Void Sentinel (Overshields/Defense)
- Exotic: One-Eyed Mask (Health/Overshield on kill after taking damage), Peacekeepers (SMG focus), Peregrine Greaves (Airborne Shoulder Charge damage), Mask of the Quiet One (Ability energy/health on taking damage)
- Super: Ward of Dawn (Defensive Bubble) or Sentinel Shield (Roaming)
- Abilities: Towering Barricade, Shield Bash/Throw, Suppressor/Vortex Grenade
- Aspects: Bastion (Overshield on Barricade cast), Offensive Bulwark (Grenade regen/melee damage/range while Overshielded)
- Fragments: Echo of Persistence (Longer Overshields), Echo of Leeching (Melee kills start health regen), Echo of Vigilance (Overshield on low health kill), Echo of Undermining (Weaker grenades)
- Stats: Max Resilience, High Recovery, High Discipline
- Playstyle: Control space with Barricades providing Overshields for yourself and teammates. Use Suppressor grenades to shut down enemy abilities/Supers. Ward of Dawn is excellent for locking down objectives.
Example Build 2: Arc Striker (Aggression/Movement)
- Exotic: Antaeus Wards (Slide reflects projectiles), Dunemarchers (Sprint speed, chain lightning on melee), Peregrine Greaves (Shoulder Charge damage)
- Super: Thundercrash (High damage shutdown/initiation) or Fists of Havoc (Roaming)
- Abilities: Thruster (Quick evasion), Seismic Strike/Thunderclap, Pulse/Storm Grenade
- Aspects: Knockout (Melee kills amplify/heal/increase melee range/damage), Touch of Thunder (Enhanced grenades)
- Fragments: Spark of Resistance (DR near enemies), Spark of Feedback (Melee damage taken increases outgoing melee), Spark of Ions (Creates Ionic Trace on defeating Jolt target), Spark of Amplitude (Orbs while amplified)
- Stats: Max Resilience, High Strength, High Recovery
- Playstyle: Highly aggressive. Use Thruster and Seismic Strike for movement and engagement. Knockout provides huge benefits after a melee kill. Enhanced Pulse Grenades offer excellent area control.
Warlocks manipulate the battlefield with potent abilities and unique movement.
Example Build 1: Solar Dawnblade (Aerial/Support)
- Exotic: Transversive Steps (Sprint speed/reload), Ophidian Aspect (Handling/Reload/Melee range)
- Super: Well of Radiance (Team buff/heal) or Daybreak (Roaming)
- Abilities: Healing Rift, Celestial Fire/Incinerator Snap, Healing/Solar Grenade
- Aspects: Heat Rises (Consume grenade for aerial play), Icarus Dash (Mid-air dodge)
- Fragments: Ember of Torches (Radiant on powered melee hit), Ember of Solace (Longer Radiant/Restoration), Ember of Benevolence (Ability regen on healing/buffing allies), Ember of Tempering (Solar weapon kills grant Recovery/create Firesprite)
- Stats: Max Recovery, High Discipline, High Mobility (if using skating techniques)
- Playstyle: Utilize superior aerial movement with Heat Rises and Icarus Dash to engage from unexpected angles. Provide team support with Healing Rifts/Grenades and Well of Radiance.
Example Build 2: Stasis Shadebinder (Control/Freeze)
- Exotic: Osmiomancy Gloves (Enhanced Coldsnap Grenades, extra charge)
- Super: Winter's Wrath (Freeze/Shatter roaming Super)
- Abilities: Healing Rift, Penumbral Blast (Freeze melee), Coldsnap Grenade
- Aspects: Iceflare Bolts (Shattering frozen targets spawns seekers), Bleak Watcher (Hold grenade to create Stasis turret)
- Fragments: Whisper of Durance (Longer Slow/Lingering abilities), Whisper of Chains (DR near frozen targets/crystals), Whisper of Rime (Stasis shards grant Overshield), Whisper of Torment (Grenade energy on taking damage)
- Stats: Max Discipline, High Recovery, Resilience
- Playstyle: Control space and lock down enemies with frequent Coldsnap grenades and Bleak Watcher turrets. Freeze opponents for easy kills for yourself or teammates. Winter's Wrath is excellent for shutting down pushes or capturing objectives.
Remember to tailor these examples to your preferred weapons and playstyle. Experiment with different fragments and armor mods to find what feels best for you.
Mastering the Maps: Strategy & Positioning
Knowing your weapons and abilities is only half the battle. Understanding the terrain you fight on – the maps – is crucial for survival and success in Iron Banner. Effective positioning maximizes your strengths and minimizes your weaknesses.
Universal Principles: Map Control, Lanes, Chokepoints
These concepts apply to nearly all PvP maps and modes:
- Map Awareness: This is fundamental. Learn the layouts of the maps in the current rotation. Know the common names for key areas (callouts), identify major sightlines (where snipers might be), locate good cover, and recognize potential flanking routes. Use your radar constantly to track enemy movement.
- Map Control: This isn't just about holding objectives. It's about occupying positions that give your team an advantage, dictating where the enemy can safely move and engage from. Controlling center map, heavy ammo spawns, or key objective areas often translates to controlling the match.
- Lane Control: Holding down long sightlines or pathways prevents enemies from pushing freely or rotating between objectives. Snipers, Pulse Rifles, and Scout Rifles excel at this. Be aware of lanes pointing towards your position.
- Chokepoints: These are narrow passages, doorways, or corridors that funnel players. They are dangerous places to push through but excellent locations to defend with grenades, AoE abilities, or focused team fire.
- Escape Routes: Before engaging, identify a potential escape route. If a fight turns sour, knowing how to disengage quickly can save your life and prevent feeding the enemy points or Orbs.
Power Positions: Where to Hold Your Ground
A "power position" is a location on the map that offers significant tactical advantages:
- Strong Cover: Provides good protection from multiple angles.
- Good Sightlines: Overlooks key objectives (like Control zones, Rift spawn, Tribute beacons), heavy ammo spawns, or high-traffic routes.
- Multiple Escape Routes: Allows you to retreat safely if pushed or flanked.
Examples (based on general map knowledge and Control principles):
- Midtown: Controlling the central "Street" (B zone) and the "Market/Arcade" (C zone) area offers strong map control and forces enemies into the less advantageous "Tower/Garden" (A zone) spawn.
- Dead Cliffs: Holding the "Cave" (C zone) and the central "Platform" (B zone) area controls heavy ammo and forces enemies into the exposed back spawn near A.
- Bannerfall: Controlling the central "Courtyard" (B zone) and the high ground platforms overlooking it provides significant map dominance.
- Javelin-4: The central "Control Room" (B zone) and the adjacent hallways offer critical control over map flow.
Power positions are dynamic and depend heavily on the active game mode. In Rift, controlling the sightlines overlooking the central Spark spawn is crucial initially. In Fortress or Tribute, controlling the area around the active Fortress zone or Cabal Beacons becomes the priority during those phases.
Adapting to Mode and Flow
- Reading the Match: Pay attention to where the fighting is concentrated. Are enemies pushing your spawn? Are they holding back defensively? Adjust your position to counter their strategy or support your team's push. Use your radar and teammate positions to anticipate enemy movements.
- Spawns: Be aware of spawn locations and how capturing objectives can flip them. Pushing too deep into the enemy spawn can cause them to respawn behind your team, collapsing your map control.
Effective map usage isn't just memorizing layouts; it's about dynamically using the environment to create advantages based on the ever-changing circumstances of the match. Good positioning keeps you alive longer and makes you more impactful.
The Strength of the Wolfpack: Teamplay & Communication
While individual skill matters, Destiny 2 PvP, especially objective modes like those often featured in Iron Banner, heavily rewards teamwork. Playing as a coordinated unit—a wolfpack—amplifies your effectiveness significantly.
Playing Stacked: Coordination is Key
Joining Iron Banner with a pre-made fireteam provides a substantial edge over teams of random solo players. Why?
- Team-Shooting: The most fundamental advantage. Focusing fire from multiple Guardians melts opponents far faster than any single player can. Coordinated teams call targets and delete them quickly. Effective team shots often involve combining damage types – for instance, one player landing a body shot with a sniper allows a teammate to finish with a single hand cannon headshot, achieving a near-instant kill.
- Ability Synergy: Coordinated teams can chain abilities for devastating effect. Think a Stasis Warlock freezing targets for a Titan's Thundercrash, or a Hunter's Tether suppressing enemies before a coordinated push. Supers can be used strategically to capture objectives, shut down enemy pushes, or counter enemy Supers.
- Controlled Revives: A coordinated team can safely revive fallen allies, maintaining numbers advantage, whereas revives in chaotic solo queue games are often risky.
- Objective Play: Capturing zones, escorting the Rift Spark, or banking Tribute crests is far easier and safer with teammates covering angles and providing support.
Essential Callouts for Iron Banner
Effective communication is the lifeblood of a successful fireteam. Use voice chat (in-game or third-party like Discord) and focus on clear, concise, and actionable information. Avoid unnecessary chatter that clutters comms. Key callouts include:
| Callout Type | Examples | Importance |
|---|---|---|
| Enemy Location | "Sniper top mid," "Two enemies pushing B stairs," "Hunter flanking C side" | High - Prevents ambushes and helps focus fire |
| Enemy Health | "Absolute!" (one shot), "Weak/No shields," "Cracked" (shield broken), "Lit" | High - Essential for team-shooting |
| Threats | "Shotgun ape incoming," "Warlock has Well," "Titan Thundercrash active," "Heavy ammo up" | High - Warns of major dangers |
| Objective Status | "Capping B," "Enemy capping A," "Spark is down mid," "Banking crests at beacon" | High - Coordinates objective play |
| Player Status | "I'm down, orb is unsafe," "Revive me, clear," "Got the kill, orb at..." | Medium - Helps with revive coordination |
| Intent | "Pushing with you," "Flanking right," "Dropping Bubble on B," "Need help mid" | Medium - Coordinates team movements |
Synergy and Support: Making Your Fireteam Stronger
Beyond callouts, true teamwork involves playing off each other:
- Complementary Roles: While not strictly necessary in 6v6, having a mix of playstyles can be beneficial. Someone focused on aggressive pushes, someone holding down lanes, someone providing support (healing, buffs).
- Playing Off Teammates: If a teammate engages an enemy, collapse to help secure the kill (team-shot). If an ally pops their Super, support them – either by adding damage or protecting them from being shut down. If someone makes a risky play for the objective, provide cover fire.
- Stick Together: Especially in objective modes, avoid scattering across the map. Move in pairs or small groups to maximize team-shooting opportunities and ensure you can trade kills effectively.
Lone Wolf's Guide: Thriving in Solo Queue
Not everyone runs with a dedicated fireteam. Venturing into Iron Banner solo presents unique challenges, but success is still possible with the right mindset and approach.
Setting Expectations: The Solo Experience
Be prepared for a different kind of battle:
- Facing Stacks: You will encounter pre-made fireteams of varying sizes. They will likely have better coordination and communication, putting you at an immediate disadvantage. Matchmaking balance can feel inconsistent.
- Unpredictable Teammates: Your randomly assigned teammates (blueberries) will have varying skill levels and objective focus. Some might be godsends, others might seem determined to feed the enemy team. You can't rely on them for coordinated plays.
- No Communication: Assume you won't have effective voice communication with your team. You'll need to rely heavily on your own awareness and game sense.
Focus on You: Shift your primary goal from "winning every match" to "playing well, contributing effectively, and improving your own skills". Wins will come, but focusing solely on the outcome in solo queue can lead to frustration.
Playing Smart: Survival and Contribution
How can you make a difference as a lone wolf?
- Radar is Your Best Friend: With no voice comms, your radar is your primary source of information. Constantly scan it to anticipate enemy positions, flanks, and pushes. Learn to interpret the different segments and flashing indicators.
- Stick Near Teammates (Intelligently): While you can't rely on randoms for perfect coordination, sticking loosely with one or two teammates increases your survivability and allows for accidental team-shooting opportunities. Don't blindly follow them into bad situations, but avoid isolating yourself completely. Shadowing the seemingly best player on your team can sometimes work.
- Play the Objective (Smartly): Don't ignore the objective, but be strategic. Don't try to capture a zone solo against multiple enemies. Wait for teammates or look for opportunities to flank defenders. In Rift, focus on denying the enemy Spark carrier or clearing the path if a teammate grabs it. In Tribute, prioritize grabbing friendly crests to deny points. In Fortress, defend the zones your team holds.
- Adapt Your Role: Identify what your team is lacking. Are they all ignoring Zone B? Try to hold it down defensively. Is no one challenging the enemy sniper? Try to flank them. Are they constantly dying trying to grab the Spark? Focus on clearing the mid-map enemies first. Be the flexible player who fills the gaps.
- Use Self-Sufficient Loadouts: Builds that provide healing (Wormhusk Crown, Healing Grenades, Devour), damage resistance (Woven Mail, Void Overshields), or radar manipulation (Invisibility, Gemini Jester) can significantly improve your solo survivability and impact.
Managing Frustration and Focusing on Improvement
- Accept Losses: You will lose games due to factors outside your control (team balance, facing stacks). Don't let it tilt you.
- Learn from Deaths: When you die, quickly analyze why. Were you out of position? Did you miss your shots? Did you challenge a Super? Use each death as a learning opportunity.
- Don't Blame Teammates (Too Much): It's easy to get frustrated with blueberries, but focusing on their mistakes won't help you improve. Focus on what you could have done differently.
- Take Breaks: If you find yourself getting angry or playing poorly, step away for a bit. Resetting mentally is important.
- Set Personal Goals: Aim to improve your K/D ratio, increase your objective score, die less often, or master a specific map or weapon. Focusing on personal growth makes the experience more rewarding, regardless of wins or losses.
Playing solo queue Iron Banner is a test of patience and adaptability. By playing smart, focusing on survival, and contributing where you can, you can still have a positive impact and earn those coveted rewards.