
The Desert Perpetual might just be the toughest raid Destiny 2 has ever thrown at players. Every encounter demands tight coordination and flawless communication from your entire fireteam. This guide breaks down every mechanic, strategy, and boss fight you'll face on your way to victory.
What You Need Before Starting
Before jumping in, make sure your team has covered the basics:
- Hit Power level 100 (you'll get there after finishing the Edge of Fate campaign)
- Everyone needs a working mic and patience for complex callouts
- Pack Solar and Sniper damage resistance mods
How the Raid Works
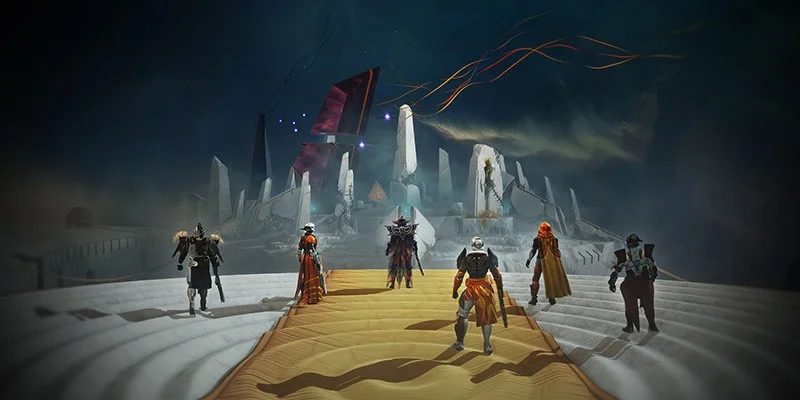
Unlike most recent raids, Desert Perpetual lets you pick your path. Think back to the original Leviathan raid - this is exactly the same concept. After clearing the opening area, you'll reach a central tower with three half-spheres and a full sphere arranged in a square formation.
Picking Your Fights
Each half-sphere takes you to a different boss encounter:
- "All are entangled": Epoptes, Lord of Quanta (the Hydra fight)
- "Axion is axiom": Agraios, Inherent (Hobgoblins everywhere)
- "Interference patterns swell": Iatros, Inward-Tuned (Wyvern madness)
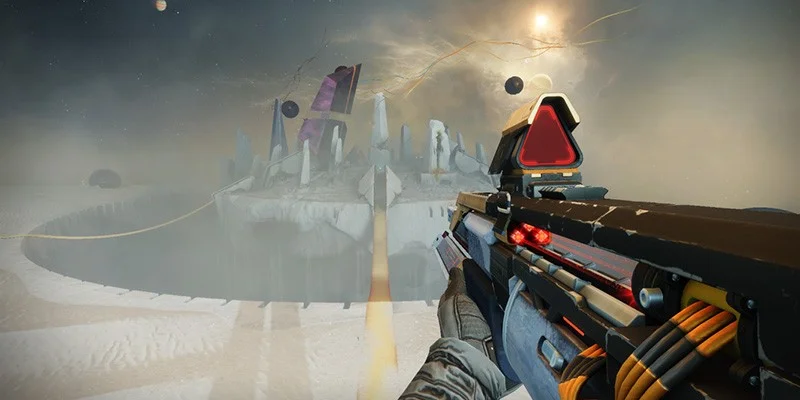
When you interact with one, smaller spheres line up to point toward your chosen encounter. Fair warning, the jumping puzzles between fights are brutal. Keep an Eager Edge sword handy or grab Mountaintop for the extra mobility boost.
Agraios, Inherent (The Hobgoblin Nightmare)
What You're Walking Into
The encounter start may look a little bit overwhelming: five electric coils in the center of the arena, three massive Hobgoblins perched on floating platforms above you, all waiting to snipe your head off. Each boss has a name with either "Absolute," "Cyclical," or "Constant" in it - remember those words, because they're about to become very important.
Slap on those Solar and Sniper resistance mods now. You'll be eating sniper shots all fight long.
These mods will keep you alive against the constant sniper fire throughout this encounter.
Phase 1: Light Up Those Coils
Start by clearing the Goblins that spawn, then focus fire on the yellow-bar Hydra. It always spawns in the same spot, so you'll learn to pre-position for it. Once it's down, five Minotaurs appear.
Here's where team positioning matters. Spread out around the arena near the Vex spawn portals - each person camps one portal, kills their Minotaur, grabs the Chronon it drops, then runs through one of the five coils to activate it. Don't double up on coils or you'll have to start over.
Phase 2: Buff Time and Wyvern Clearing
After all coils light up, big angry Wyverns spawn. Kill them fast, as they hit like trucks. While this happens, three plates with white geometry appear in the arena center.
Three players need to stand on these plates simultaneously (one per plate) to get temporality buffs. You'll receive either Cyclical, Absolute, or Continuous Temporality. Different names, but they all do the same job here.
Phase 3: Finding Your Boss
Each player with a buff needs to find the Hobgoblin boss whose name matches their buff type, then get underneath it. If you did everything quickly, you can choose which boss to align with. Take too long, and one of them starts the Variable Elimination sniper sequence that forces the matching player to go to that specific boss.
Phase 4: The Coil Reading Game
This part gets tricky. The two temporality players who didn't align need to look at the five coils and call out which ones appear blue or calm versus red. Each player sees different blue coils, so communication is crucial.
Label the coils however works for your team - L1, L2, R1, R2, middle works fine. The pattern reveals four coils that need charging first, plus one "leftover" coil.
Now the three players WITHOUT buffs get back to work. Kill Minotaurs, grab Chronons, and run through those four identified coils first, then finish with the leftover one last.
Phase 5: Detention Sphere Setup
Once all coils turn blue, the aligned player runs through all five in sequence. This changes their grenade into a Vex detention sphere, which is basically a bubble shield you can throw.
Now everyone groups up in the arena center. Here's where timing gets crucial. Each player has their own Variable Elimination countdown timer that resets when they break line of sight with the boss. The countdowns won't sync up, so you need constant callouts.
The person with the lowest timer calls the shots. When they hit 2-3 seconds left, the aligned player throws the detention sphere. Too early and it disappears. Too late, and someone dies.
Damage Phase
Block that sniper shot successfully, and the Hobgoblin disappears from above and reappears in front of you after a delay. Don't pop your Well of Radiance or buffs until the boss actually shows up.
The aligned player isn't done yet. They need to keep running the five-coil circuit to refresh their detention sphere, letting them block up to three total sniper shots for extended damage phases.
Rinse and Repeat. After damage ends, you're back to square one. Reactivate those five coils, get your buffs, do the whole sequence again. The fight doesn't change; you just need to execute it consistently until the boss goes down.
Iatros, Inward-Tuned (The Wyvern Challenge)
Setting Up for Success
This encounter trades mechanical complexity for pure execution and a serious DPS check. You're fighting a massive Wyvern in a smaller arena with a floating hoop that becomes your best friend.
Role assignments matter here:
- Builder: Handles platform construction (gets assigned based on Chronon color)
- Shooters: Three players who destroy Vex towers with perfect timing
- Runners: Everyone else focuses on adds and Chronon management
Phase 1: Color Coordination
Minotaurs spawn in the center while Harpies spread around the edges. Focus on the central Minotaurs first, as they drop the Chronons you need.
The floating hoop glows to match the Chronon color: white, blue, or red. This determines where your Builder goes:
- White: Top plate (highest up)
- Blue: Center plate (near the boss)
- Red: Bottom plate (lowest down)
Phase 2: Fill That Hourglass
Everyone grabs Chronons from dead Minotaurs, then literally jumps through the glowing hoop. Each successful jump fills the container below. When it's full, shoot the Vex crystal underneath to move forward.
Phase 3: The Timing Challenge
Everyone gets hit with the Diastole buff: four squares that fill up over time. When the fourth square completes, you get launched into the air if you're standing still.
Success spawns a white Vex diamond. Failure shows red and drains your hourglass. All three Shooters must nail the timing simultaneously or it doesn't count.
Phase 4: Building the Way Up
Perfect timing from all Shooters triggers the "boss loses control of phase space" message and builds platforms for the Builder.
The Builder grabs their Temporality buff and climbs the newly formed platforms to interact with objects at each level. Communication is key here - the Builder tells Shooters when to hit the next level (middle boxes), then the final level (top boxes).
Each new platform set destroys the previous one, so timing between Builder movement and Shooter execution has to be tight.
Phase 5: Mobile DPS
After the Builder completes the third interaction, the boss teleports to their platform location. Everyone groups up there, but give it 15-20 seconds for the boss to actually appear.
Critical mechanic: Partway through damage, everyone gets the Neomutation debuff. Someone with a held Chronon needs to jump through the hoop immediately or the team wipes. If nobody has one ready, quickly kill a Minotaur and grab it.
The encounter repeats this same sequence until the boss dies. Master the timing challenge and Chronon management, and you'll get through it.
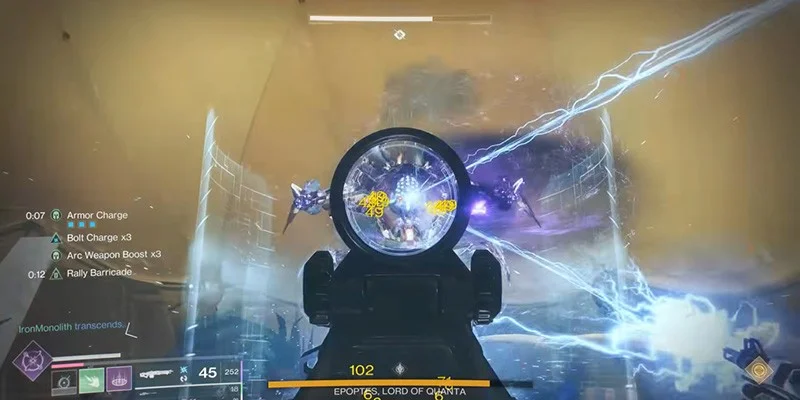
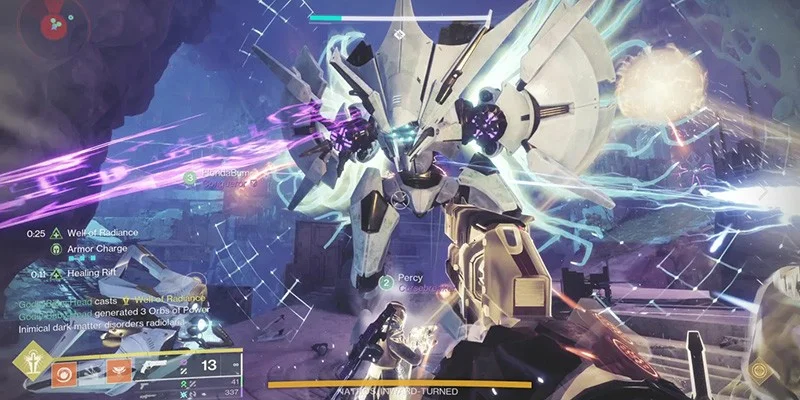
Epoptes, Lord of Quanta (The Hydra Maze)
The Most Complex Assignments Yet
This fight requires six different jobs across three areas: inside rooms, central arena, and add clearing. Communication makes or breaks this encounter.
Team setup:
- Inside Eyes: Two players (left and right sides) handle Hydra shields
- Outside Eyes: Two players manage central boss mechanics
- Add Clear: Two players keep everyone alive
Phase 1: Getting Inside
Clear adds with priority on Cyclops enemies. Killing them spawns floating platforms on the left and right sides. Inside Eyes players grab Temporality buffs from these platforms and enter their respective side rooms.
Phase 2: The Eye Communication Game
Each side room has a Hydra with a shield covered in seven eyes, six around the outside, one in the center. Above each Hydra, a hexagon of squares appears.
Standing in the Hydra's light beam shows which square is lit up. Both Inside Eyes players call out their lit square, then each shoots the eye their partner called out. The shots need to be nearly simultaneous or the eyes regenerate and close.
This happens four times before the next phase kicks in.
Phase 3: Central Boss Integration
When you see "boss blocks the unforeseen" appear, the Outside Eyes team springs into action. They grab Temporality buffs and stand in the central boss's light projection.
Two sets of three eyes appear on opposite sides of a central pillar. Each Outside Eyes player sees only their side's glowing eyes. They call out which eye is NOT glowing, then shoot the glowing eyes that their partner identifies.
Meanwhile, Inside Eyes players look for a triangle of eyes above their Hydra and shoot the eye position that is called as "not glowing." This removes their buff, so they need to exit and grab a new one to continue.
Phase 4: Final Preparations
Inside players finish destroying all six outer eyes on their Hydra shields, then shoot the central glowing eye. Outside Eyes players shoot their final two eyes on the central boss. Now damage can begin.
Phase 5: The Pull Through Time Dance
Damage starts, but the boss goes immune almost immediately. Two random players get selected for "pull through time", which means they need to find their designated glowing eye and stand in its light beam while it rotates around the shield.
The other four players damage the boss while the selected two handle spawning eyes. Six outer eyes plus one central eye appear, and they can only be destroyed while standing in the light. Clear all eyes, rejoin the team for damage, then two different random players get selected for the next cycle.
This rotation happens three times before you get a longer damage phase with all six players contributing.
The encounter demands perfect communication and quick reactions to random selections, but the long damage phases make it worth mastering.
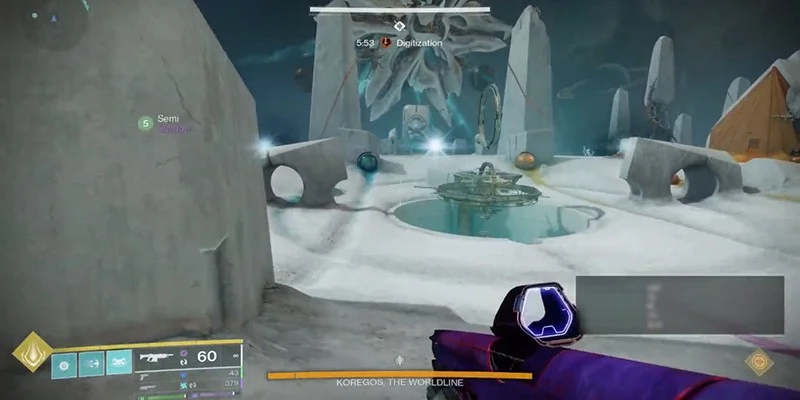
Keregos, The Worldline
The Ultimate Test
This fight combines elements from every previous encounter while adding new layers of complexity. You'll work on a lower platform for mine identification, then move to an upper platform for coordination challenges and damage phases.
Buff Distribution Strategy
Plate assignments (looking away from spawn):
- Constant Temporality: Three players, leftmost plate
- Cyclical Temporality: Two players, rightmost plate
- Absolute Temporality: One player, center plate
Each buff type handles different responsibilities throughout the fight.
Phase 1: Lower Platform Mine Game
A Digitization timer starts immediately: you need to fill the hourglass before it expires or everyone dies.
The boss spawns four laser turrets that Constant players destroy. This makes white circles appear on four pillars around the arena. Three players (one from each buff type) stand on a pillar simultaneously to get Temporal Oculus, which lasts 20 seconds and can be refreshed individually.
Phase 2: Three-Layer Mine Identification
- Absolute player checks the central ring color (red, white, or blue)
- Constant players find mines matching that color and call out locations
- Cyclical players verify if those mines glow bright white (real) or don't glow (fake)
- Absolute player destroys confirmed real mines of the right color
- Cyclical players collect dropped Chronons and dunk them through the ring
Each role extends their buff by doing their job: Constant by stunning the boss, Absolute by shooting mines, Cyclical by dunking Chronons.
Phase 3: Boss Stunning and Continuation
Constant players focus fire on the boss's four corner arms to stun it. This spawns more Temporal Oculus opportunities and extends their buffs. The mine identification process continues until the hourglass fills completely.
Shoot the Vex crystal below the full hourglass to extend platforms toward the upper boss area.
Phase 4: Upper Platform Coordination
Everyone moves to the upper platform for a three-player coordination puzzle.
Absolute sees three glowing Vex objects around central pillars. Constant and Cyclical each see two different glowing objects. The solution: Constant and Cyclical players stand next to their visible objects, then Absolute interacts with whichever object neither of them is covering.
Repeat this process four times to make the boss vulnerable.
Phase 5: Multi-Phase Damage
The boss's eye crit spots become shootable. One player handles Chronon collection while everyone else focuses damage on the glowing eyes.
During damage, a colored ring appears on the platform. The designated player finds Chronons matching the ring color and dunks them to extend the damage phase. This can happen up to three times per damage cycle.
Multiple Cycles and Final Stand
The encounter typically requires several complete cycles of lower platform → upper platform → damage. When the boss reaches final health, all mechanics intensify with more lasers and environmental hazards.
Stay committed to damage despite the chaos, but evacuate the platform immediately after the boss dies, since the explosion will kill you if you stick around.
- Flawless mine identification communication
- Smooth buff extension timing
- Perfect upper platform coordination
- Sustained damage under environmental pressure
- Mine color miscommunication
- Buff timing errors
- Platform coordination mistakes
- Environmental damage deaths
General Strategy and Tips
Communication That Works
Set up callout systems before starting each encounter. Consistent terminology prevents confusion: if you call something "L1" once, keep calling it "L1" throughout the fight.
Assign primary communicators for complex callouts. Not everyone needs to talk during critical sequences, but the people who do need to be crystal clear.
Practice timing coordination in less stressful situations. The difference between success and failure often comes down to milliseconds.
Loadout Recommendations
Avoiding Common Mistakes
Timing issues: Practice detention sphere deployment in safe situations first. Establish who calls countdowns and stick to that system.
Role confusion: Define responsibilities clearly before starting. Have backup players ready for every critical role.
Traversal problems: Keep mobility tools equipped for jumping sections. Scout difficult areas before bringing the full team through.
Pre-Fight Checklist
Before each encounter:
- Confirm everyone knows their role
- Check loadouts and resistance mods
- Test communication systems
- Set rally flag and prepare mentally for multiple attempts
Between encounters:
- Return completely to the central hub
- Clear all yellow-bar enemies (seriously, don't skip this)
- Restock ammo and adjust gear
- Review the next encounter strategy
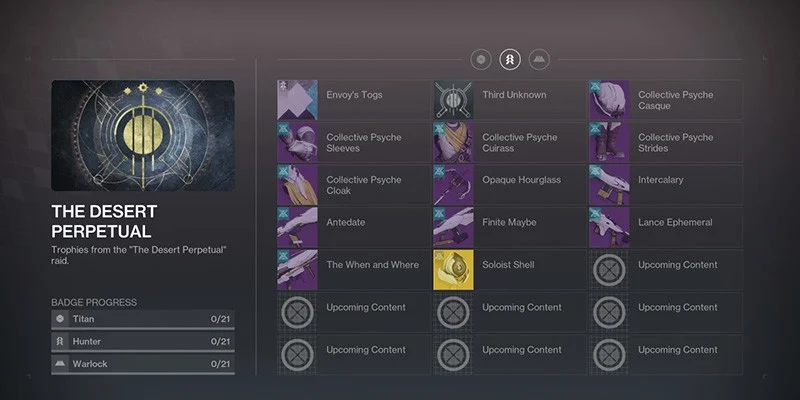
Raid Rewards and Loot Table
The Desert Perpetual offers some of the most powerful gear in Destiny 2. Here's what you can earn:
This weapon's rockets seek targets and create chain lightning on impact, dealing massive area damage.
Complete Loot Table
Armor Sets and Bonuses
For the first time in Destiny 2, raid armor comes with exclusive set bonuses:
- Accretion (2 Piece): Picking up an ammo brick gives you a stacking bonus to weapon swap and stow speeds until you die
- Doppler Effect (4 Piece): Suspend, unravel, and sever effects applied to targets, and radiant and restoration effects applied to you have increased duration
| Encounter | Boss Name | Key Mechanic | Difficulty |
|---|---|---|---|
| First Choice | Agraios, Inherent | Detention Spheres | Hard |
| Second Choice | Iatros, Inward-Tuned | Timing Challenge | Medium |
| Third Choice | Epoptes, Lord of Quanta | Eye Communication | Very Hard |
| Final Boss | Keregos, The Worldline | Multi-Phase Coordination | Extreme |
Final Thoughts
Congratulations on making it through this comprehensive Desert Perpetual guide! You now have all the knowledge needed to tackle Destiny 2's most challenging raid. Remember that even the most experienced teams needed multiple attempts to master these encounters.
Whether you're going for a Day One clear or taking your time to learn each mechanic thoroughly, the key to success lies in preparation, communication, and persistence. The exotic Whirling Ovation and exclusive armor sets await those brave enough to face Keregos and emerge victorious.
Good luck, Guardian! May your aim be true and your callouts be clear. The Desert Perpetual awaits your conquest!