
So, Guardian, you're looking to add the Collective Obligation to your arsenal? An excellent choice! This guide will break down exactly how to secure this unique Exotic Pulse Rifle from the Vow of the Disciple raid, without technical jargon and fluff!
What is Collective Obligation?
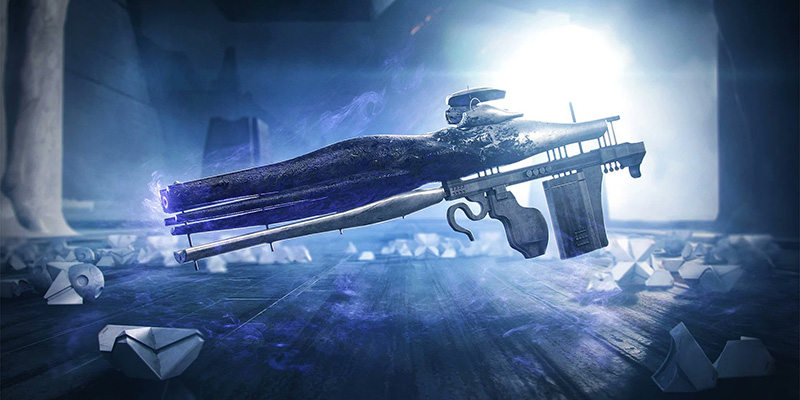
Collective Obligation is an Exotic Void Pulse Rifle that drops exclusively from the Vow of the Disciple raid. Its defining characteristic is the Exotic perk "Void Leech." This allows the weapon to absorb Void debuffs — Suppress, Weaken, and Volatile — from targets damaged by the Guardian or their fireteam. Once charged by leeching these debuffs, players can engage an alternate firing mode that applies these same leeched debuffs to any enemies hit by the Pulse Rifle.
Why It's Worth the Grind
The Collective Obligation offers a truly unique playstyle focused on battlefield control through consistent debuff application. In the hands of a Guardian with a well-crafted Void build, it can be exceptionally potent, especially for clearing groups of enemies and providing utility like constant suppression of dangerous foes. Moreover, as a raid Exotic, it stands as a trophy, a testament to a Guardian's skill and perseverance in conquering one of Destiny 2's pinnacle endgame activities.
How to Get Collective Obligation
Understanding the acquisition path is the first step to claiming this coveted weapon.
The Source: Vow of the Disciple Raid
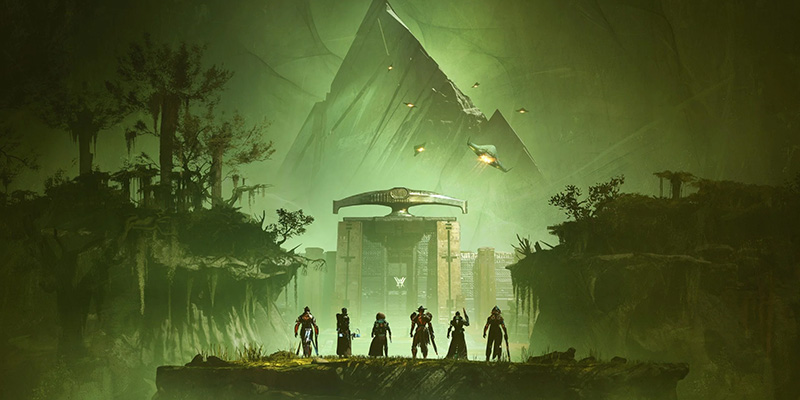
Collective Obligation is a potential reward for defeating Rhulk, Disciple of the Witness, the final boss of the Vow of the Disciple raid. This raid is located within a massive Pyramid ship that has crashed into the swamps of Savathûn's Throne World.
The Catch: RNG
The Good News: Players Can Boost Their Odds!
Fortunately, Guardians are not entirely at the mercy of base drop rates. There are ways to improve the chances of Collective Obligation dropping:
- Completing specific Triumphs associated with the Vow of the Disciple raid can increase the weapon's drop rate.
- Farming the raid when Vow of the Disciple is the "featured weekly raid" offers a significant advantage. During this time, players can complete the final encounter multiple times on the same character within the week and have a chance at the Exotic each time. When it's not the featured raid, the opportunity for the Exotic drop is limited to once per character class per weekly reset.
Boosting The Drop Rate: Smart Guardian Tactics
Maximizing the chances of getting Collective Obligation involves strategic approaches to Triumphs and raid farming.
Triumph Time!
Players should prioritize completing Triumphs within the Vow of the Disciple raid that explicitly state they "Increase initial Collective Obligation drop rate". Not all Triumphs offer this benefit, so focusing efforts is key. While some Triumphs, like completing the raid flawlessly ("Risen from the Deep"), offer a boost, they represent an extreme challenge. A more practical approach for many players is to target more achievable Triumphs.
More Accessible Drop-Boosting Triumphs Include:
| Triumph Name | Requirement | Difficulty |
|---|---|---|
| Master Difficulty Vow of the Disciple | Complete the raid on Master difficulty | High |
| Together in the Deep | Complete all encounters with the same Guardian class | Medium |
| Swift Destruction / On My Go | Acquisition encounter challenges | Medium |
| Base Information / Handle With Care | Caretaker encounter challenges | Medium |
| Defenses Down / Glyph to Glyph | Exhibition encounter challenges | Medium |
| Looping Catalyst / Symmetrical Energy | Rhulk encounter challenges | High |
Weekly Featured Raid: Farm, Farm, Farm!
The most opportune time to dedicate to farming Collective Obligation is when Vow of the Disciple is the designated weekly featured raid. During these weeks, the standard weekly loot lockout for the Exotic is lifted, allowing players to defeat Rhulk multiple times on the same character and have a chance at the weapon dropping on each successful completion. This dramatically increases the number of opportunities within a single week.
If Vow of the Disciple is not the featured raid, players are restricted to one chance per character class per week for the Exotic to drop from Rhulk.
Bad Luck Protection? Not Really (Officially)
Conquering Rhulk, Disciple of the Witness
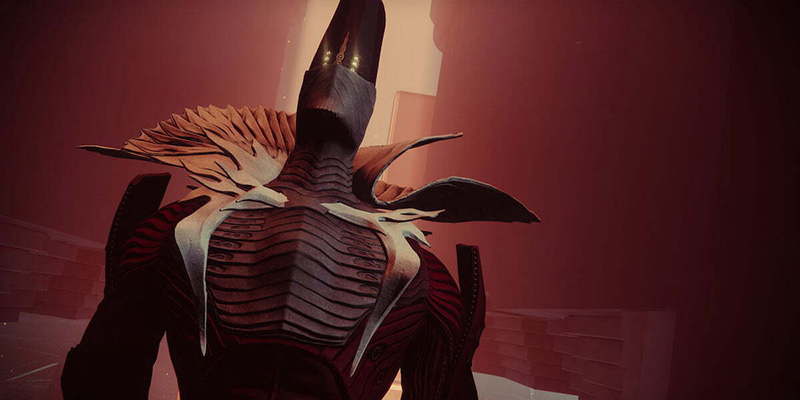
The path to Collective Obligation culminates in a showdown with Rhulk. This encounter is mechanically intensive and demands coordination.
Before The Battle: The Arena Basics
Rhulk awaits Guardians at the conclusion of the Vow of the Disciple raid, deep within the sunken Pyramid ship. The encounter unfolds in distinct phases, characterized by buff-juggling and crucial symbol callouts. Upon entering the arena, Rhulk is seen floating behind a large orange barrier. Getting too close results in a knockback and the appearance of a Darkness crystal above him. If the encounter's mechanics are not managed correctly, players will rapidly accumulate stacks of Pervading Darkness, leading to a wipe.
Key Buffs: Leeching Force & Emanating Force
Two critical buffs govern this fight:
- Leeching Force: This buff is acquired by shooting specific Darkness crystals that appear in the arena or, in a later phase, by shooting Rhulk's glaive. It has a 45-second duration and, crucially, allows the buffed player to survive Rhulk's potent energy beam attack.
- Emanating Force: When a player holding Leeching Force is struck by Rhulk's energy beam, Leeching Force is transformed into Emanating Force. This is the buff that must be "dunked" or deposited at specific locations to progress the encounter.
Phase 1: Breaking Rhulk's Shield (The Dunking Phase)
The initial goal is to deposit Emanating Force into six smaller totems located at the rear of the arena. Each successful deposit pushes back Rhulk's protective shield.
- Get Leeching & Split It: One player initiates by shooting the first Darkness crystal that appears above Rhulk, gaining Leeching Force. This action also temporarily halts the accumulation of Pervading Darkness for the team. The player with Leeching Force then stands on a prominent, large symbol or plate on the arena floor. This action causes two additional Darkness crystals to spawn. Two different fireteam members must then shoot these newly spawned crystals. Each of these players will gain Leeching Force, while the original player will lose their buff. At this point, two players now possess Leeching Force.
- Create Emanating Force & Callouts: One of the two players currently holding Leeching Force must intentionally position themselves to be hit by Rhulk's sweeping laser beam. This converts their Leeching Force into Emanating Force. Simultaneously, other team members (those without Leeching or Emanating Force) must defeat elite enemies called Glyphkeepers. Upon defeating the Glyphkeepers, symbols will appear. Players who have either the Leeching Force or Emanating Force buff will see one set of three symbols (typically on a pillar to the left). Players without these buffs will see a different set of three symbols (typically on a pillar to the right). The fireteam must communicate effectively to identify the single matching symbol that appears in both sets.
- Keep the Leeching Going: This is a critical step: the second player who still possesses Leeching Force must not take Rhulk's beam yet. Instead, they must return to the large plate on the floor to "split" or share their Leeching Force with two other teammates (often designated next players). This perpetuates the Leeching Force buff within the team, allowing the cycle to continue. A vital tip: the team should never allow the last player holding Leeching Force to convert it into Emanating Force before splitting it. Doing so can deplete the team's ability to generate new Leeching Force, as the initial crystal spawns are limited.
- Dunk It:The Guardians without the Emanating Force buff must use this time to find the matching symbol, previously identified by the team, on two of the six totems. Those totems should then be called to the players who now hold Emanating Force. They must carry their buffs to the back of the arena and deposit ("dunk") them into those small totems at the same time. Communication with the team is crucial, as the symbols on the totems are not visible to the Emanating Force holders.
Repeat: This cycle of splitting Leeching Force, creating Emanating Force through the laser attack, identifying matching symbols, and dunking the Emanating Force must be repeated 3 times, as your fireteam moves further into the arena. Teams often achieve this by designating two "runners" (players who will acquire Emanating Force and dunk) and two "leech-swappera" or "leechers" that change each other on the buff-sharing duty.
Phase 2: Exposing Rhulk's Weak Points (Upstairs)
After six successful dunks in Phase 1, Rhulk will ascend a ramp, and the encounter transitions to a new, smaller arena at the top.
Goal: In this phase, the objective is to shoot four of Rhulk's exposed weak points to make him fully vulnerable for a damage phase.
Repeat: This sequence - shoot glaive, gain Leeching, convert to Emanating via laser, receive symbol callout, dunk Emanating, shoot weak point - must be repeated four times to break all necessary weak points.
The Symbols: Quick Guide
The Vow of the Disciple raid utilizes a unique set of 27 symbols. It is highly advisable for players, especially those new to the raid, to have a visual reference chart of these symbols readily available. Numerous community-created resources provide clear images and names for each symbol.
- Key for Rhulk Phase 1 (Shield Breaking): After Glyphkeepers are defeated, players with Leeching or Emanating Force see one set of three symbols. Players without these buffs see a different set of three symbols on the other side. The team's task is to find the one common symbol that appears in both sets. This common symbol dictates which of the six totems the Emanating Force must be dunked into.
- Key for Rhulk Phase 2 (Weak Point Exposure): After a player shoots Rhulk's glaive, a single symbol (Traveler, Pyramid, Light, or Dark) appears. This symbol indicates to the player with Emanating Force which of the four corner totems they must dunk into.
A crucial element for success in both phases is the clear designation of roles within the fireteam. Who is responsible for shooting the initial crystals? Who will take Leeching Force first? Who are the primary symbol readers and callers? Who will focus on clearing adds? Clearly defined roles prevent confusion and hesitation, which are often the biggest obstacles in raid encounters. Remember, defeated Guardians cannot perform mechanics or deal damage.
Damage Phase: Unleash the Fury!
After all four of Rhulk's weak points are broken in Phase 2, he will become fully vulnerable for a brief period. This is the fireteam's opportunity to unleash their most powerful weapons and Super abilities on him.
For maximizing damage and survivability during this phase, having a Warlock in the fireteam use Well of Radiance is highly beneficial, as it provides both healing and a damage buff to those standing within it. Additionally, the Exotic Trace Rifle Divinity can be invaluable, as its effect creates a large, easy-to-hit critical spot on Rhulk, amplifying damage from all other sources.
Following the damage phase, Rhulk will likely execute an attack designed to push players to the start of the encounter and reset his mechanics. Guardians should quickly move to a safe position and prepare to repeat the mechanics of Phase 1. Teams typically have three damage phase cycles to defeat Rhulk before an "Enrage" mechanic triggers, which will wipe the fireteam.
Gearing Up & Teaming Up
Proper preparation in terms of loadout and team dynamics is essential for tackling Rhulk and the Vow of the Disciple raid.
What to Bring (General Ideas):
- Ad Clear Weapon: An effective weapon for clearing numerous weaker enemies is crucial throughout the raid. Submachine Guns and Auto Rifles are reliable choices. If players have managed to acquire the Forbearance Grenade Launcher from earlier encounters in Vow of the Disciple, it is an outstanding option for add clear.
- Boss Damage Weapon: For inflicting significant damage on Rhulk during his vulnerable phases, high-impact Sniper Rifles, Linear Fusion Rifles, or Rocket Launchers are generally recommended.
- Solar Subclass: Solar subclasses for all classes are highly synergistic and provide a lot of utility in raid content. Well of Radiance is always welcome on boss encounters, as well as Hunter's Golden Gun with Celestial Nighthawk Exotic Helmet and Still Hunt Sniper Rifle, and Solar Titan's survivability can be beneficial during the ad clear and raid mechanics.
- Power Level: Players should ensure their Guardian's Power Level is at or above the recommended level for the raid. Even for the Master difficulty, for players tackling it later in the season, this may be less of a barrier, but it's always a good practice for any raid.
- Champion Mods: While Rhulk himself is not a Champion, the Vow of the Disciple raid does feature Unstoppable Champions in its earlier encounters. The fireteam should be equipped with the necessary anti-Champion mods or abilities to deal with these threats effectively.
LFG Etiquette: Finding Your Fireteam & Being a Good Teammate
Many Guardians will tackle raids using LFG tools. Positive and effective LFG experiences depend on good etiquette:
- Use LFG Tools: Utilize resources like the official Destiny 2 LFG tab, community Discord servers, or platform-specific LFG systems to find a team.
- Be Clear in Your Post/Search: If a player is new to the raid or still learning the mechanics, it's important to state this in their LFG post or when joining a group. Many experienced players, often referred to as "Sherpas," are happy to teach and guide newcomers.
- Communication is KEY: While some LFG communities emphasize that microphones are not strictly required, for a mechanically complex encounter like Rhulk that relies heavily on real-time callouts, voice communication is highly advantageous and strongly recommended. If a player cannot use a microphone, they should inform the team and be proficient with in-game text chat if available.
- Listen to the Sherpa/Leader: If an experienced player is leading or teaching the raid, other fireteam members should listen attentively to their explanations and strategies. Asking questions to clarify any points of confusion is encouraged.
- Be Patient & Positive: Wipes (where the entire team is defeated, forcing a restart of the encounter) are a natural part of the learning process in raids. Maintaining a positive attitude, constructively discussing what went wrong, and being ready to try again are crucial. Leaving the fireteam abruptly out of frustration (rage quitting) is highly discouraged and detrimental to the group's morale and progress.
- Commit the Time: Raids, particularly when learning or with an LFG team, can be time-consuming. Players should ensure they have a reasonably large block of uninterrupted time available before committing to a raid group.
- Own Mistakes: Everyone makes mistakes, especially when learning complex mechanics. If a player's error contributes to a wipe, a quick acknowledgment (e.g., "my bad, I missed that callout") helps the team understand and adjust. It fosters a more forgiving and constructive learning environment.
You Got This, Guardian!
Final Words of Encouragement
Securing the Collective Obligation is a notable accomplishment, a tangible reward for dedication and the successful navigation of one of Destiny 2's more intricate raids. The journey itself—learning the Vow of the Disciple's mechanics, coordinating with a fireteam, overcoming challenges, and finally witnessing that Exotic drop—is a core part of what makes Destiny 2's endgame so compelling.
Players are encouraged to seek out a patient and communicative team, to embrace the learning process (as wipes are inevitable when mastering new encounters), and to ultimately enjoy the unique challenge that raids provide.
- Unique debuff leeching mechanics
- Excellent for Void builds
- Great battlefield control
- Automatic reload with Void abilities
- Prestigious raid exotic trophy
- RNG-dependent acquisition
- Requires raid completion
- Best with coordinated teams
- Situational effectiveness
- Requires Void build investment
While opinions within the community on Collective Obligation's absolute power level may vary, with some finding it "mid" in certain contexts, many others champion its unique utility and the fun factor it brings to Void-centric gameplay. Praises like "it's good everywhere" and "love the thing" are common from those who have integrated it into synergistic builds. Its defining feature—the ability to leech and then reapply multiple Void debuffs—sets it apart from almost any other weapon in the game. This isn't just another weapon for raw damage output; it's a specialized tool for battlefield manipulation and debuff control, offering a distinct and engaging playstyle. For Guardians who appreciate such unique mechanics and the depth of build-crafting, the effort to obtain Collective Obligation is often considered very much worthwhile.