
Guardians seeking the iconic Dead Man's Tale Exotic Scout Rifle will find their path leads to the derelict, Scorn-infested Cabal ship, the Glykon, through the Presage mission. This guide provides a comprehensive walkthrough for acquiring this coveted weapon, its powerful catalyst, and understanding its place in the current Destiny 2 landscape.
Dead Man's Tale Overview
What's Special About Dead Man's Tale?
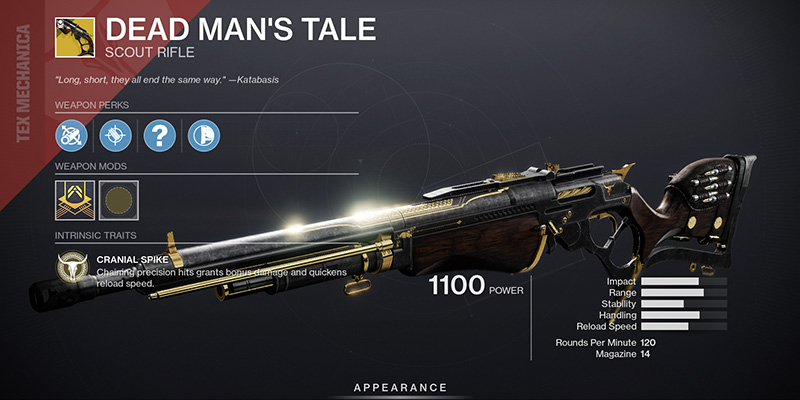
Dead Man's Tale (DMT) stands as a unique Exotic Scout Rifle, distinguished by its Tex Mechanica "cowboy repeater" feel and its hard-hitting, lever-action shots. Its signature perk, "Cranial Spike," rewards consecutive precision hits by granting bonus damage, increased reload speed, target acquisition, and range. This makes it a formidable weapon in various combat scenarios.
A significant evolution for this Exotic is its craftable nature in the current version of Destiny 2. Upon first acquiring it from the Presage mission, players will receive a Deepsight version, allowing them to extract its pattern and subsequently craft their own Dead Man's Tale at the Enclave. This shift from purely random rolls on previous completions to a craftable system empowers players with greater agency in building their ideal version of the rifle, tailoring it with specific barrels, magazines, and traits as they level it up. The original "Transformative" perk, which indicated random rolls, now translates into this robust crafting potential.
About the Presage Mission
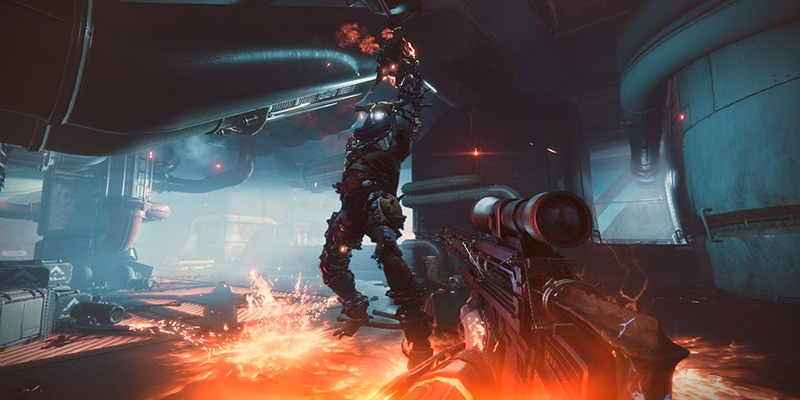
The Presage mission is more than a mere checklist item; it's a carefully crafted atmospheric experience. Players will find themselves exploring the Glykon, a ghost ship steeped in a chilling sci-fi horror ambiance reminiscent of classic films like Alien or Event Horizon. The mission is lauded for its intricate design, weaving together environmental puzzles, tense exploration, and challenging combat encounters.
Accessing Presage
Exotic Mission Rotator
Access to the Presage mission is now managed through the "Exotic Mission Rotator," a system introduced in Season 22. This feature cycles through a selection of classic Exotic missions on a weekly basis, allowing players to revisit older content and earn their associated rewards. Presage is one of such missions currently in this rotation. Guardians will need to check the in-game Director to see which mission is active each week.
| Mission | Typical Weapon Reward | Example Week in Rotation |
|---|---|---|
| Presage | Dead Man's Tale | Week 1 |
| Vox Obscura | Dead Messenger | Week 2 |
| Operation: Seraph's Shield | Revision Zero | Week 3 |
| //NODE.OVRD.AVALON// | Vexcalibur | Week 4 |
| Starcrossed | Wish-Keeper | Week 5 |
Expansion Requirements
A critical prerequisite for launching Presage, even when it's the active mission in the rotator, is ownership of specific Destiny 2 content. Players must own either the Beyond Light expansion OR Season of the Chosen. Without one of these licenses, the Presage mission will remain inaccessible. This is a standard model for how Destiny 2 manages access to its legacy content, ensuring that the original content ownership is respected even as missions return through features like the rotator. Verifying this ownership early can prevent any disappointment when trying to embark on this quest.
Launching the Mission
Once it's confirmed that Presage is the active weekly Exotic mission and the necessary expansion/season is owned, launching it involves these steps:
- Open the Director (the main game map).
- Navigate to the "Destinations" tab.
- Select the "Legends" node, typically located in the top right of the Destinations screen.
- The currently featured Exotic Mission will be prominently displayed within the Legends screen. If it is Presage's week, it can be selected and launched from here.
The "Legends" node serves as a central hub for various legacy activities, and this is the current and correct way to access Presage, as its original launch point on the Tangled Shore is no longer available.
Recommended Loadouts
Weapon Recommendations
Presage is teeming with Scorn combatants, making efficient add-clear a top priority, especially on a first playthrough. A well-rounded loadout will also need to account for tougher elite enemies and the final boss.
- Primary Weapon: Scout Rifles (fitting, as one is the mission's reward), Pulse Rifles, or Submachine Guns are excellent for dealing with numerous Scorn. Given that Scout Rifles receive an Overcharge damage bonus on Legend difficulty, familiarizing oneself with a good Scout Rifle during a Normal run can be beneficial.
- Special Weapon: Fusion Rifles are effective against more durable Scorn (Majors). Shotguns can be invaluable for close-quarters engagements, such as the confines of the Trash Compactor room. Sniper Rifles can also serve well in certain encounters for players comfortable with precision shots from a distance.
- Heavy Weapon: For damaging the final boss, Linear Fusion Rifles or Rocket Launchers are strong choices due to their burst damage potential. A Heavy Machine Gun can also be very useful for clearing dense groups of enemies in challenging rooms like the Hangar.
Subclass Guide
Choosing a subclass that offers good survivability is highly recommended for a first-time clear of Presage, as it allows more room for learning mechanics and navigating unfamiliar territory.
The Well of Radiance Super (Solar) is a perennial top-tier choice, providing both healing and a damage buff for the player and their fireteam. Voidwalkers using the Devour effect can also achieve excellent survivability. Strand Warlocks (Broodweavers) can leverage Threadlings for the add control and Woven Mail for damage resistance, offering a good balance of offense and defense.
Void Nightstalkers, with their access to Invisibility, can find many opportunities to safely revive teammates, interact with objectives, or escape dangerous situations. Arcstrider Hunters utilizing the Assassin's Cowl Exotic helmet can gain invisibility and healing from powered melee kills, greatly enhancing their survivability in close-quarters. Strand Hunters (Threadrunners) bring valuable crowd control through Suspend abilities.
Strand Titans (Berserkers) equipped with the Banner of War Aspect and leveraging Woven Mail can become incredibly resilient. Solar Titans (Sunbreakers) can provide support with Healing Grenades and create Sunspots for damage and ability regeneration.
Solo vs Fireteam
Presage mission is designed to be completable by a solo player. However, navigating its puzzles and combat encounters can often be a smoother and more enjoyable experience with a fireteam of up to three Guardians. The absence of a time limit on the Normal difficulty version of Presage makes solo attempts less punishing, allowing for methodical progression. There is no shame in using Looking For Group (LFG) tools or asking friends for assistance.
Mission Walkthrough
A general tip for navigating the Glykon: the mission is rich with environmental storytelling and audio cues. Listening to the dialogue between Osiris, Caiatl, and the player's Ghost reveals a dark and compelling narrative. If progress seems blocked, it is often fruitful to thoroughly inspect the surroundings, looking up, down, and around for destructible grates, hidden levers, or narrow passages that might offer a way forward.
Getting Inside the Glykon
- Getting In: The main entrance to the Glykon is sealed. To gain entry, Guardians must turn left from their initial spawn point and navigate a series of external platforms and pipes wrapping around the ship's hull. This unconventional entry immediately establishes the derelict and hostile nature of the vessel.
- Egregore Link Buff: This is the core puzzle mechanic of Presage. Throughout the ship, players will encounter glowing flora called "Egregore Spores." Shooting these spores grants a temporary buff called "Egregore Link," which typically lasts 15 seconds. While this buff is active, players can pass through shimmering, dark energy barriers that would otherwise block progress or cause damage. If the Egregore Spores appear green, they are recharging; players must wait for them to turn blue before they can be shot again to receive the buff.
- Early Levers & Switches: The initial interior sections involve navigating corridors by shooting open ventilation grates and activating levers or switches to open new pathways. These early puzzles serve as an introduction to using the Egregore Link buff in sequence with environmental interactions. The unsettling sounds and dark, overgrown environment begin to build the mission's signature atmosphere from these first moments inside.
The Trash Compactor
- The Setup: Players will eventually drop into a chamber where the walls ominously begin to close in, threatening to crush them. To complicate matters, explosive Scorn creatures called Screebs will spawn in the room.
- The Goal: The objective is to locate and destroy three hidden fuses (also referred to as power cells) concealed behind destructible vents or panels on the floor of the compactor. Once all three fuses are destroyed, the walls will stop moving, and an escape hatch will open, often identifiable by red lights around a specific vent.
- Area-of-effect (AoE) weapons like Grenade Launchers or Shotguns are highly effective for quickly dispatching Screebs and breaking open the floor vents.
- Crucially, for players struggling with this section, there is generally no penalty for dying within the trash compactor itself; progress on destroyed fuses is often retained, and Screebs typically do not respawn if a player dies and restarts the sequence.
- A specific strategy involves activating the compactor and then retreating to the far end of the room. This "cheese spot" can allow players to survive the initial crushing phase and deal with the Screebs more safely before focusing on the fuses.
The trash compactor is a classic "pressure cooker" encounter, designed to induce a sense of urgency and panic through its combination of environmental hazard, puzzle-solving, and enemy spawns. Understanding the lenient death penalty and Screeb respawn behavior transforms the encounter.
Hangar and Egregore Puzzles
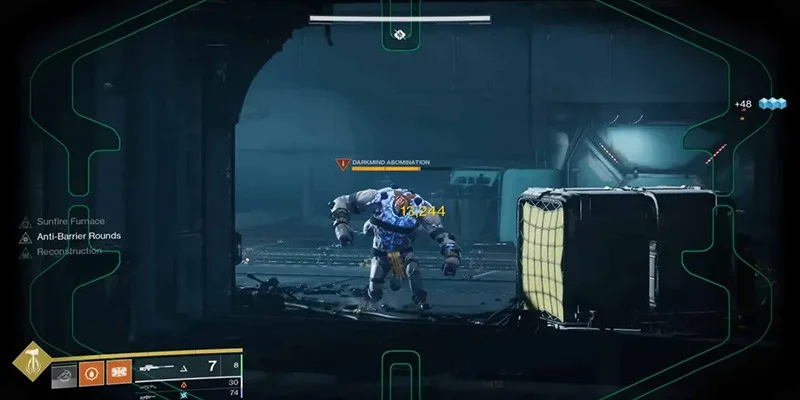
- First Hangar Fight: Following the trash compactor, players will enter a large hangar bay for a significant combat encounter. This room will be filled with numerous Scorn, headlined by two durable, yellow-bar Abominations. The recommended strategy is to prioritize clearing out the dangerous Scorn Chieftains first, followed by other adds, and then focusing fire on the Abominations. Players should be aware that additional Scorn may continue to spawn as the Abominations take damage, so it's wise to either commit to burning them down quickly or to manage enemy waves between bursts of damage on the Abominations. Constant movement is key to survival in this open area.
- More Egregore Puzzles: After clearing the hangar, the mission transitions into more complex puzzle sequences involving the Egregore Link buff. These sections require players to find and activate levers, destroy power cells (often hidden behind destructible objects or revealed by killing specific enemies like Scorn Turrets/Scorpius), and navigate past environmental hazards like electric fences.
- The Maze (Ventilation Shafts): Players will eventually reach a labyrinthine network of ventilation shafts. The original challenge here was to find a source of Egregore Spores, memorize a path through the vents, and reach a Darkness barrier before the buff expired, often requiring refreshing the buff at intermediate spore locations within the maze.
Locus of Communion Boss Fight
Room Layout: The final encounter takes place in a multi-level arena. Players will start on an upper floor, while the boss, the Locus of Communion, initially resides in a fiery underground "boiler room".
The Dance (Fight Mechanics):
- Initial Damage: Engage the Locus of Communion on the top floor. After taking a small amount of damage, it will teleport down into the fiery boiler room below.
- Activate Coolants/Switches: To make the boiler room temporarily safe to enter (extinguishing the flames), players must activate three switches or coolant panels located on the top floor. One of these switches is often situated in a small central room that periodically becomes extremely hot, requiring quick activation. Numerous Scorn adds will also spawn on this upper level and need to be managed.
- Damage Phase: Once all three coolants are active, the flames in the boiler room will subside. Players can then drop down and deal damage to the Locus of Communion. The boss is primarily a melee attacker, so kiting it around the pillars in the room is an effective tactic. The boss's health bar is partitioned, providing a clearer indication of when damage phases will end. This visual clarity helps players know when the boss is about to become immune or when the environment will change, preventing wasted Super abilities or heavy ammo.
- Adds & Retreat: After the boss takes approximately one-third of its total health in damage, a wave of powerful adds, including Scorn Chieftains, will spawn in the boiler room. Simultaneously, the room will begin to heat up again, forcing players to ascend back to the relative safety of the top floor.
- Rinse and Repeat: Once back on the top floor, players must clear out any remaining adds, then repeat the process: activate the three coolants again, drop down for another damage phase, and deal with the subsequent wave of adds and returning fire. This cycle is typically repeated three times to defeat the Locus of Communion.
- The Locus of Communion will not follow players to the top floor, making it a safe area to regroup, heal, and clear adds before reactivating the coolants.
- It's advisable to save Super abilities for either quickly clearing the dangerous adds that spawn in the boiler room (especially the Chieftains) or for maximizing damage on the boss during the DPS phases.
- When the boss is low on health during a damage phase, players should try to position themselves near one of the openings leading back to the top floor for a quick escape when the boiler room reignites.
- For solo players, weapons that can deal damage over time (DoT) like Anarchy (if available) can be effective; two shots on the boss from the boiler room, then retreat to the top floor while the DoT ticks away.
| Phase | Main Goal | Hot Tip! |
|---|---|---|
| Initial | Damage boss slightly on the top floor | He'll teleport to the fiery boiler room below. |
| Top Floor 1 | Activate 3 coolant switches, clear adds | One switch is in a very hot room – be quick! |
| Boiler Room 1 | DPS boss (approx. 1/3 health) | Kite around pillars; prepare for flames to return & adds to spawn. |
| Top Floor 2 | Clear adds, reactivate 3 coolant switches | More adds will challenge you up here. |
| Boiler Room 2 | DPS boss (to approx. 2/3 health) | Prioritize newly spawned Chieftains in the boiler room. |
| Top Floor 3 | Clear adds, reactivate 3 coolant switches | Almost there, Guardian! |
| Boiler Room 3 | Finish him off! | Stay near an exit hole as his health gets critically low for escape. |
Claiming Your Reward
Getting the Weapon
Upon defeating the Locus of Communion, a previously sealed door will open. Following the waypoint will lead players to the bridge of the Glykon. There, they will encounter a very creepy tableau: the remains of Katabasis, the lost Guardian whose distress signal initiated this journey, entangled in Darkness tendrils. Interacting with Katabasis or the rifle itself will allow players to claim their Dead Man's Tale.
The first completion of Presage (on either Normal or Legend difficulty) when it is the featured weekly Exotic mission will reward a Deepsight (red border) version of Dead Man's Tale. Extracting the pattern from this Deepsight weapon is the first step to crafting it.
Crafting Dead Man's Tale
- Cranial Spike Perk: The intrinsic perk on Dead Man's Tale, "Cranial Spike," is its defining feature. Chaining precision hits grants stacking bonuses to damage, range, and target acquisition, making the rifle increasingly lethal with sustained accuracy.
- Crafting 101:
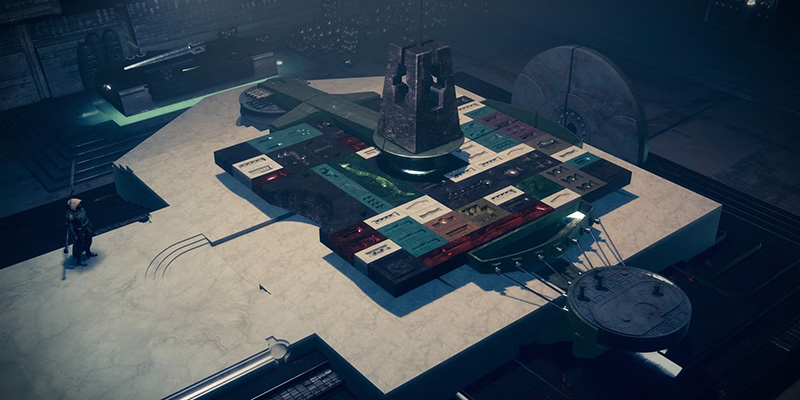
- After extracting the weapon pattern from the initial Deepsight DMT, players can craft their own version at the Relic in the Enclave, located on Mars (within Savathûn's Throne World destination).
- Crafted weapons, including Dead Man's Tale, can be leveled up by defeating enemies and completing activities while the weapon is equipped, or by investing crafting materials. Leveling up the crafted DMT unlocks a wider array of perk options for customization.
- To unlock the full potential of the crafted Dead Man's Tale, specifically its enhanced Cranial Spike intrinsic traits (Levels I, II, III, and IV), players will need to complete the Presage mission a few more times (on any difficulty). Each subsequent completion can award an intrinsic upgrade, allowing for more potent versions of Cranial Spike to be slotted into the crafted weapon. These intrinsic upgrades are separate from the catalyst but contribute significantly to the weapon's performance. This system of tying intrinsic upgrades to further mission completions encourages replayability and offers a clear progression path for enhancing the Exotic.
The Catalyst Guide
Obtaining the Catalyst
The Exotic Catalyst for Dead Man's Tale is named "Dark-Forged Trigger". It is obtained by successfully completing the Presage mission on Legend difficulty during a week when Presage is the featured Exotic mission in the rotator.
Legend difficulty presents a heightened challenge:
- Power Level: Set at 2025, with players' effective Power capped lower than enemies' Power level.
- Locked Loadouts: Weapon and armor choices cannot be changed after the mission starts.
- Increased Threats: Enemies have more shields, deal increased melee damage, and players take more damage overall.
- Time Limit: A strict 30-minute time limit is imposed to complete the entire mission.
- Modifiers: Specific gameplay modifiers will be active, such as elemental surges (e.g., Arc and Strand Surge, increasing damage from those sources) and weapon overcharges (e.g., Scout Rifle Overcharge, increasing their damage).
- No Champions: Unlike many other Legend difficulty activities, Presage on Legend does not feature Champion enemies.
Catalyst Benefits
The Dark-Forged Trigger catalyst dramatically enhances Dead Man's Tale's capabilities when firing from the hip:
- It removes all hip-fire accuracy penalties, making shots much more precise without aiming down sights.
- It increases the weapon's rate of fire when hip-firing.
- Furthermore, existing stacks of the Cranial Spike perk will further boost this hip-fire rate of fire. This transforms Dead Man's Tale into an exceptionally potent tool for aggressive, mobile engagements, allowing for rapid, accurate fire without the movement penalty of aiming.
Applying the Catalyst
Once the Dark-Forged Trigger catalyst drops upon completing Legend Presage, it can be applied to a crafted Dead Man's Tale at the Relic in the Enclave.
| Feature | Details |
|---|---|
| Name | Dark-Forged Trigger |
| Source | Complete Presage on Legend difficulty (when it is the weekly featured Exotic Mission Rotator activity) |
| Effect | Removes hip-fire accuracy penalties; increases hip-fire Rate of Fire (further boosted by Cranial Spike stacks) |
| Application | Apply directly to a crafted Dead Man's Tale at the Enclave (no separate kill objective needed to unlock its perk) |

Additional Rewards
Hidden Collectibles
The original iteration of the Presage mission featured a series of scannable clues that contributed to the "Figments of an Answer" Triumph and unlocked lore entries. Additionally, there were hidden datapads that, when activated in a specific sequence over multiple weeks (tied to collecting "Captain's Log" lore entries), opened smuggling compartments containing extra loot and granting progress towards the Dead Man's Tale catalyst objective. Finding all these compartments awarded the "Tucked Away" Triumph.
Farming Benefits
Even after acquiring Dead Man's Tale and its catalyst, there are compelling reasons to revisit the Glykon:
- Perfecting Your Crafted DMT: Players will want to continue leveling up their crafted Dead Man's Tale to unlock and experiment with its full suite of perk options, tailoring it to their preferred playstyle.
- Other Cool Legendary Weapons: Presage boasts a loot pool of highly desirable Legendary weapons, many of which are also craftable. Completing the mission offers chances to acquire these weapons and their Deepsight versions needed for pattern extraction. Notable examples include:
- CALUS Mini-Tool (Solar Submachine Gun)
- Austringer (Kinetic Hand Cannon)
- Beloved (Solar Sniper Rifle)
- Drang (Baroque) (Solar Sidearm)
- And others such as Hollow Denial (Void Trace Rifle) and Firefright (Kinetic Auto Rifle)
- Pinnacle Gear: Completing Presage or any other rotating Weekly Exotic Mission 2 times per week awards a Pinnacle Gear reward, which helps in raising a player's overall Power Level, as it's a common incentive for engaging with weekly featured activities. One helpful thing you should keep in mind is that higher difficulty completions give more progress, which means 1 Legend difficulty completion will be enough to obtain Pinnacle Gear. However, this Weekly Challenge is account-, not class-based, meaning you can only get its rewards 1 time a week.
- The Fun Factor: Presage is widely regarded as one of Destiny 2's best missions due to its atmosphere and design. Replaying it with friends, attempting faster solo clears, or simply soaking in the spooky ambiance can be enjoyable in its own right.
The curated pool of craftable Legendary weapons alongside Dead Man's Tale provides strong long-term engagement for players, making Presage a rewarding mission to farm well beyond the initial Exotic acquisition.
Conclusion
With this knowledge, any Guardian should be well-equipped to brave the haunted halls of the Glykon, uncover its dark secrets, and claim the Dead Man's Tale. The journey through Presage is a unique and memorable one, blending tense exploration with challenging combat and a chilling narrative. Now, it's time to gear up, dive into the Exotic Mission Rotator when Presage is active, and add this formidable scout rifle to your arsenal. Good luck, and may your aim be true.