
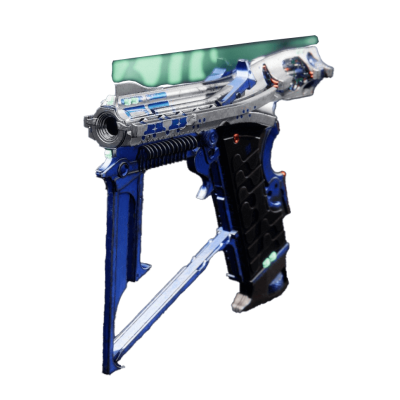
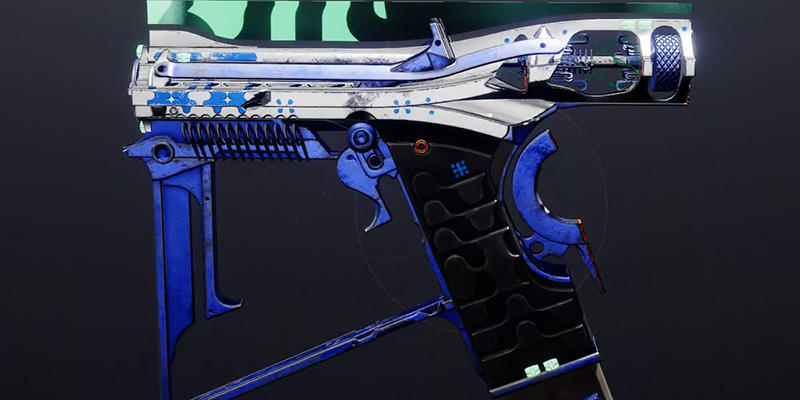
The Final Warning stands as a distinctive Exotic Sidearm introduced within Destiny 2's Lightfall expansion. Occupying the kinetic weapon slot yet dealing Strand damage, it carves a unique niche in a Guardian's arsenal. Its defining characteristic lies in its ability to charge up and fire bursts of tracking projectiles, capable of marking targets and synergizing powerfully with the Strand subclass by unraveling foes. This potent sidearm is the ultimate reward for completing the multi-step Exotic quest known as "The Final Strand".
Released alongside other Lightfall Exotics like the Void Machine Gun Deterministic Chaos and the Stasis Glaive Winterbite, Final Warning marked the debut of Exotic Strand weaponry in Destiny 2. Its mechanics, involving target marking, charged bursts, and dual firing modes based on aiming, set it apart from conventional sidearms.
This guide serves as a definitive resource for Guardians seeking to acquire the Final Warning. It provides a comprehensive walkthrough covering all necessary prerequisites, a detailed step-by-step breakdown of "The Final Strand" quest, including potential pitfalls and solutions, and an in-depth analysis of the weapon itself – its perks, performance, and optimal usage.
Gearing Up: Prerequisites for The Final Strand
Mandatory Checkpoints: Lightfall Campaign & Strand Subclass Unlock
Before embarking on the quest for Final Warning, several non-negotiable prerequisites must be met. The foundational requirement is the completion of the entire main Lightfall campaign storyline, culminating in the mission "Desperate Measures". Finishing the campaign grants access to the post-story activities on Neomuna and, crucially, unlocks the Strand subclass for the player's character.
However, merely unlocking the base Strand subclass is insufficient. "The Final Strand" quest is gated behind a significant investment in the new power: players must purchase and unlock all available Strand Aspects, Fragments, and Grenades for at least one character class. This requirement functions as a form of mastery gate. The quest rewards a weapon deeply intertwined with Strand's mechanics, specifically the 'Unravel' debuff. By mandating the full unlock of the subclass, which necessitates considerable playtime using Strand abilities and engaging with Neomuna's content to earn the required currency, the game ensures players possess a fundamental understanding and practical experience with Strand before obtaining an Exotic designed to leverage it. It connects the reward directly to demonstrated engagement with the associated power set.
The Meditation Grind: Acquiring All Strand Aspects, Fragments, & Grenades
The currency required to unlock these Strand abilities is Strand Meditations, dispensed primarily at the Pouka Pond located in the Hall of Heroes on Neomuna. The costs are substantial: each of the three Grenade options (Threadling, Shackle, Grapple) costs 50 Strand Meditations, the two class-specific Aspects cost 150 each, and the fourteen universal Fragments cost 200 each. This totals 3250 Strand Meditations for a full unlock, although initial grants can offset this. Players receive 500 Meditations upon first interacting with the Pouka Pond after the campaign, and completing the campaign on Legendary difficulty yields an additional 300 from Nimbus.
Earning the remaining Strand Meditations involves actively playing the game, particularly on Neomuna. Defeating enemies anywhere using Strand abilities has a chance to drop Meditations, which appear as green triangular motes that must be collected. Completing activities on Neomuna is the primary source. Activities within the designated Vex Incursion Zone (marked on the Neomuna map) offer a higher drop chance from enemies. To maximize efficiency, players should prioritize high-yield activities:
| Activity | Strand Meditations Awarded |
|---|---|
| Terminal Overload Key Chest | Up to 100 |
| Heroic Public Events (Neomuna) | 25 |
| Lost Sector Chests (Neomuna) | 12 |
| Vex Incursion Zone Enemies | Higher Chance / Variable |
| Patrols (Neomuna) | 7 (Normal), 20 (Heroic) |
| High-Value Targets (Neomuna) | 7 |
| Nimbus Reputation Rank 18 | 200 (One-time bundle) |
This farming process inherently encourages engagement with the Lightfall expansion's core systems. Earning Meditations compels players to utilize their Strand subclass actively and participate in Neomuna's unique activities like Terminal Overload and Vex Incursions. This serves to reinforce familiarity with the new destination and the intricacies of Strand combat, integrating the Exotic quest prerequisite smoothly into the broader expansion experience.
Starting the Journey: Picking up the Quest at the Pouka Pond
Once a player has successfully purchased every Strand Aspect, Fragment, and Grenade for a single character class, they must return to the Pouka Pond in the Hall of Heroes. Interacting with the pond at this point will grant "The Final Strand" Exotic quest. Some players historically reported issues with the quest not appearing even after fulfilling the requirements. In such cases, diligently double-checking that every single upgrade has been purchased is the first step. As a general troubleshooting measure, checking the Quest Archive terminal (located in the Tower Courtyard or the H.E.L.M.) is advisable, though less commonly the source of this specific issue. It's also prudent to check the Exotic Collections tab to ensure the Final Warning wasn't somehow obtained previously and forgotten.
Weaving the Path: The Final Strand Quest Walkthrough
With the prerequisites met and the quest acquired, Guardians can begin the steps to forge their Final Warning.
Step 1: Consulting Nimbus (Striders' Gate)
The quest begins with a simple conversation. Travel to the Strider's Gate landing zone and approach Nimbus, typically found near the center of the area. Interact with them to discuss the potential of weaponizing Strand energy, setting the quest's narrative in motion.
Step 2: Veil Containment Infiltration
Navigate to the Veil Containment area, situated on the western side of the Neomuna map. Access is gained by heading west from Zephyr Concourse, passing through the Esi Terminal, and taking the portal within the Irkalla Complex. Following the quest marker will guide the way.
Upon arrival, players will encounter Shadow Legion Cabal forces guarding the entrance to a building. The objective requires defeating these initial waves of enemies. The "search" completes automatically once these Cabal are eliminated.
Step 3: Intercepting Shadow Legion Orders
Immediately following the clearance of the initial guards in Veil Containment (Step 2), additional waves of Shadow Legion will spawn. Among them will be a specifically marked target – often a Colossus miniboss or another high-ranking Cabal – identified as carrying the necessary orders. Defeat this specific enemy. They will drop a quest item titled "Shadow Legion Orders". Players must collect this item.
The Bug: A significant bug plagued this step for an extended period after Lightfall's launch. Many players discovered that picking up the "Shadow Legion Orders" item failed to advance the quest. The item would appear in the player's inventory (often under Consumables) with only a "Dismantle" option available, preventing progress to Step 4.
Community Workaround: Before an official fix, the player community devised and shared a complex workaround:
- Confirm the bugged "Shadow Legion Orders" item is present in the inventory.
- Return to the Veil Containment area and defeat the specific Shadow Legion target again, causing a second set of orders to drop.
- Crucially, do not pick up these newly dropped orders.
- While near the new drop, open the inventory and manually dismantle the original, bugged orders.
- Immediately open the Director map and fast travel to a different location on Neomuna. The Terminal Overload public event zone was frequently cited as the most reliable destination.
Official Patch: Bungie officially deployed a fix for this issue in Patch 7.3.5.2 (March 2024). The patch notes state: "An issue where collecting the Cabal Missive did not advance The Final Strand quest has been fixed." While this should resolve the problem for most players, retaining knowledge of the workaround may be beneficial should any residual issues persist.
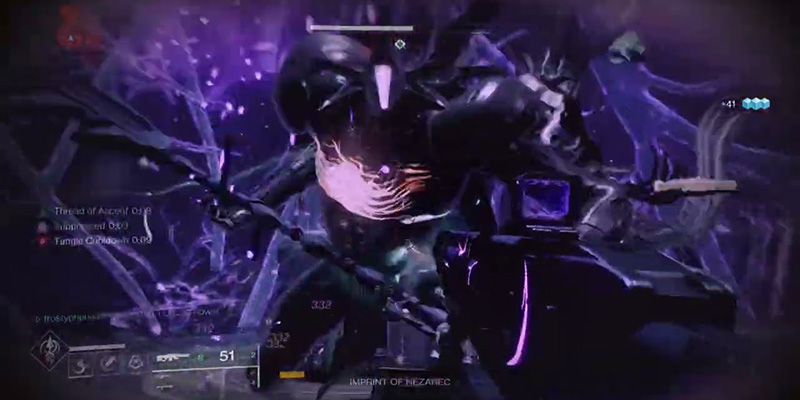
Step 4: Confronting the Imprint of Nezarec
Proceed to the Typhon Imperator, the colossal Cabal Pyramid ship located in the Ahimsa Park region of Neomuna (south/east on the map). Access is typically gained via the Liming Harbor area. Upon entering the ship, deviate from the main campaign path and head towards the large, central bridge or platform area, often described as brightly lit and flanked by giant statues. Players need to jump down onto this lower platform.
Here, players will face a powerful Tormentor miniboss designated as the "Imprint of Nezarec".
Tormentor Strategy:
- Initially, focus fire on the glowing weak points located on its shoulders.
- Destroying both shoulder weak points will cause the Tormentor to become enraged, significantly increasing its aggression but also exposing a large critical spot on its chest.
- During its enraged state, the Tormentor frequently uses a devastating leaping slam attack that emits a suppressing area-of-effect pulse upon impact. It is vital to create distance by jumping away when it leaps to avoid both the direct hit and the suppression.
- Utilizing crowd control abilities is highly effective. Strand subclasses can Suspend the Tormentor (either through abilities or by destroying Strand Tangles near it), while Arc subclasses can apply Blind, making the encounter significantly more manageable.
- Once the chest critical spot is exposed, unleash high-damage Supers and Heavy weapons to defeat it quickly.
Upon its defeat, the Imprint of Nezarec drops the crucial Veil spectrometer quest item.
Step 5: Meditation at the Pouka Pond
With the Veil spectrometer secured, return to the Hall of Heroes and approach the Pouka Pond. Interacting with it initiates a meditation sequence where the Guardian realizes the spectrometer's Strand energy is unstable and needs retuning.
Step 6: Mastering the Headlong Time Trial
This step requires launching a specific mission variant called "Headlong Time Trial," accessible via a node on the Neomuna map, typically located near Liming Harbor or the Radiosonde area.
This timed mission is a reprise of the "Headlong" campaign mission, demanding speed and efficiency.
- Embrace Strand Mobility: The initial sections are an obstacle course heavily favoring Strand's Grapple grenade. Utilize the numerous grapple points, including environmental Tangles and those created by Strand abilities, to traverse rapidly. Aiming to complete this traversal phase in approximately 60-90 seconds is a good benchmark.
- Efficient Combat: Subsequent sections involve combat against Vex forces. Employ strong area-of-effect weapons (Special Grenade Launchers like Forbearance are recommended) and leverage Strand's crowd control capabilities (Hunter's Ensnaring Slam, Warlock's Threadlings, Titan's Suspending Barricade) to clear enemy waves swiftly.
- Prioritize the Boss: The final encounter features waves of Vex culminating in a Minotaur boss, all while a rotating "death wall" closes in. While initial add clear is necessary, the moment the Minotaur boss appears, all focus should shift to eliminating it as quickly as possible. Use your Super and Heavy weapon reserves (having ample Heavy ammo is crucial; the Lament sword is suggested for high burst damage). Defeating the Minotaur immediately ends the time trial, regardless of any remaining lesser enemies.
- Survival Tactics: If the death wall becomes threatening, use the Tangle grapple points located near the ceiling to quickly gain height and distance. Players will likely be at a higher Power level than during their initial campaign run, making enemies easier to defeat.
While designed to be soloable, players struggling with the combat or time limit can benefit from running the mission with a fireteam. This time trial serves as more than just another quest step; it's a practical examination of the player's ability to apply the Strand skills they've unlocked. The quest is centered around forging a Strand weapon, and its prerequisite demanded acquiring all Strand abilities. This step directly tests the player's proficiency with Strand's unique traversal (grapple) and combat potential under significant time pressure. It acts as a final validation, ensuring the player can effectively utilize the power the Exotic weapon is built upon.
Step 7: Forging the Final Warning
After successfully completing the Headlong Time Trial within the allotted time, return to the Pouka Pond in the Hall of Heroes one final time.
Interact with the Pouka Pond to complete "The Final Strand" quest and claim the Final Warning Exotic Sidearm.
Weapon Analysis: Understanding Final Warning
Acquiring the Final Warning is only the beginning. Understanding its intricate mechanics is key to unlocking its full potential.
Core Mechanics: "All at Once" & "Pick Your Poison"
Final Warning's exotic behavior is defined by two synergistic perks:
- Intrinsic Trait - All at Once: This governs the charge mechanic. Holding down the trigger initiates the charge, marking targets within the weapon's effective range and loading multiple bullets (up to 10, consuming half the magazine) into a single burst. Releasing the trigger fires this charged burst, benefiting from increased stability during the shot. A critical interaction occurs when hitting a marked target with a fully charged burst: the target becomes Unraveled, suffering damage over time and spreading the effect to nearby foes. The full charge time is 1000 milliseconds (1 second).
- Exotic Trait - Pick Your Poison: This perk introduces two distinct firing behaviors depending on whether the player is hip-firing or aiming down sights (ADS):
- Hip-Fire Mode: When firing from the hip (charged or uncharged, though marking requires charging), projectiles aggressively track any marked targets. Furthermore, these tracking shots deal increased body shot damage upon impact. This makes it effective for hitting fast-moving enemies or engaging targets from behind cover.
- Aiming Down Sights (ADS) Mode: When aiming down sights, the projectiles lose their tracking capability but gain significantly increased velocity (resulting in less projectile travel time and a more direct trajectory). Crucially, ADS shots deal substantially increased critical hit damage (often cited as double damage or a 100% precision multiplier) specifically against marked targets. This mode provides the weapon's highest potential for single-target damage output.
Key Stats & Performance
Understanding the base statistics provides context for Final Warning's performance profile:
| Stat | Value |
|---|---|
| Impact | 35 |
| Range | 35 |
| Stability | 61 - 66 |
| Handling | 47 |
| Reload Speed | 33 - 48 |
| Aim Assistance | 88 |
| Airborne Effectiveness | 27 |
| Rounds Per Minute (RPM) | 450 (Base Semi-Auto) |
| Magazine | 20 - 21 |
| Charge Time | 1000 ms |
| Recoil Direction | 40 (Tends Right; Vertical w/ Combat Grip) |
The low base Range stat (35) confirms its nature as a close-quarters weapon, with damage falloff reportedly beginning around 16 meters in PvP. The high Aim Assistance (88) aids in target acquisition, while the Stability (61+) helps manage recoil, further improved by the Combat Grip perk making recoil more vertical. The 1-second charge time is a defining characteristic impacting its usability in reactive situations.
Optimizing Usage: Charge Timing, Marking, and Mode Selection
Mastering Final Warning involves nuanced control over its unique features:
- Marking Targets: Holding the trigger initiates marking, indicated by red diamond icons appearing on enemies within range. Marking only functions within the weapon's effective range; if targets are too distant, no marks will appear. A partial charge (less than the full second) is sufficient to establish the mark, enabling the tracking (hip-fire) or critical damage bonus (ADS) for subsequent shots. The mark persists for approximately two seconds after release, allowing for a few follow-up shots (spam-fired semi-auto) to benefit before needing to re-mark. Players should be aware that marking can feel inconsistent near the edge of its range, may unpredictably switch between multiple nearby targets, and (following a patch) cannot mark targets through enemy Titan Barricades. The tracking itself, while potent, can occasionally be unreliable or dodged by erratic movement.
- Charge Timing: Achieving the Unravel effect requires hitting a marked target with a fully charged burst (10 bullets after a 1-second charge). Experienced users can learn the timing to release the trigger just as the charge completes, slightly before the automatic release, optimizing firing speed. Partial charges fire fewer bullets but are still useful for applying the mark or dealing damage without the full charge time, especially against weaker enemies.
- Mode Selection Strategy:
- PvE: The ADS mode is generally the superior choice for dealing significant damage, particularly against durable targets like majors, champions, or bosses, due to the massive critical hit multiplier. Hip-fire finds its niche in clearing groups of weaker enemies (using full bursts to spread Unravel) or engaging highly mobile or awkwardly positioned targets where precision is difficult. Utilizing partial charges in hip-fire against basic red-bar enemies can be more time and ammo efficient than a full charge.
- PvP: The choice between hip-fire and ADS is highly tactical. Hip-fire's aggressive tracking excels at finishing off opponents attempting to disengage behind cover or dueling agile players. However, it relies on body shot damage. ADS offers a significantly faster time-to-kill (TTK) potential through critical hits but demands better aim and leaves the user more exposed. The 1-second charge time is a substantial liability in the fast-paced environment of the Crucible. Success hinges on pre-charging the weapon before engaging, anticipating enemy movement, and utilizing cover effectively during the charge. Effective counter-strategies involve maintaining distance beyond its optimal range (~16m), forcing engagements during its reload or charge cycle, or using hard cover to completely break the tracking lock.
Despite the apparent ease-of-use suggested by its tracking projectiles, Final Warning demands considerable practice and sharp situational judgment to wield effectively, particularly in PvP. Its dual firing modes, charge management, marking system, and range limitations create a complex interplay of mechanics. This complexity elevates it beyond a simple point-and-shoot weapon, giving it a high skill ceiling where mastery of its unique systems translates directly into significantly increased effectiveness.
Synergy Spotlight: Strand Builds
Final Warning's inherent ability to apply Unravel with fully charged bursts makes it a natural fit for Strand-focused builds.
It pairs exceptionally well with the Swarmers Exotic boots. Swarmers cause destroyed Tangles to spawn Threadlings, and allow the Warlock's Threadlings to Unravel targets. This creates a powerful feedback loop: Final Warning applies Unravel, potentially creating Tangles on kills (if using Thread of Rebirth fragment); destroying these Tangles spawns Threadlings via Swarmers; these Threadlings then Unravel more targets, leading to more potential Tangles and sustained damage/debuffs.
Synergizes well with Exotics that enhance survivability or Strand effects. Cyrtarachne's Facade grants Woven Mail (damage resistance) after grappling, allowing safer close-range engagements. Foetracer enhances target marking and provides a damage bonus against low-health marked enemies. The Bombardier boots can apply Sever (reduced enemy damage output) on dodge, complementing Final Warning's Unravel.
While less explicitly synergistic than Warlock/Hunter options in the provided material, Strand Titans can use Suspend abilities (like Drengr's Lash via Barricade) to immobilize targets, making them easy prey for Final Warning's high-damage ADS critical bursts.
Fragments: Benefits greatly from Strand Fragments that enhance its core effects, such as Thread of Continuity (extends duration of Suspend, Unravel, Sever), Thread of Rebirth (Strand weapon final blows create Threadlings), and Thread of Evolution (Threadlings travel farther and deal more damage).
The Catalyst: "String Theory"
Final Warning does possess an Exotic Catalyst, though details surrounding its acquisition and exact effects warrant careful consideration. Some sources describe the catalyst perk as "String Theory," which reportedly increases damage against marked targets and provides a chance to refund ammunition to the magazine on hits against marked targets. Unlocking the catalyst requires defeating 700 enemies with the weapon. However, other anecdotal reports suggest the catalyst might be obtained as a random drop from playlist activities (like Vanguard Ops, Crucible, Gambit), and its exact function might differ slightly or have changed, as some players reported receiving it unexpectedly at the launch of The Final Shape expansion. As with many evolving elements in Destiny 2, players should verify the current acquisition method and precise catalyst benefits in-game. Regardless, obtaining and applying the catalyst upgrades Final Warning to a Masterwork, typically providing orb generation on multi-kills and enhancing certain stats in addition to its unique perk.
Conclusion: Adding Final Warning to Your Arsenal
Recap
Final Warning emerges as a potent and intricate Exotic Strand sidearm, acquired through the dedicated "The Final Strand" questline following the completion of the Lightfall campaign and the full mastery of the Strand subclass. Its unique mechanics—charging bursts, target marking, aggressive hip-fire tracking, and high-damage ADS criticals—reward skillful play and situational awareness. The ability to apply the Strand 'Unravel' debuff directly integrates it into powerful subclass builds.
Final Thoughts
While the initial prerequisite grind for Strand Meditations and the historical quest progression bugs (now officially addressed) presented hurdles, the weapon itself offers a unique and powerful tool for Guardians. Its strength shines particularly brightly in PvE when paired with Strand synergies like the Warlock's Swarmers, delivering excellent damage and add control. In PvP, it occupies a challenging but potentially devastating niche, capable of frustrating opponents with its tracking or melting them with precise ADS bursts, though heavily reliant on mastering its charge time and positioning. Final Warning is a weapon that encourages experimentation and rewards dedication, a valuable and engaging addition to any Guardian's Exotic collection.