
Gjallarhorn. The name itself evokes memories of unparalleled power, raid boss melts, and a time when owning this Exotic Rocket Launcher was the ultimate status symbol in the original Destiny. Now, this legendary weapon has made its triumphant return in Destiny 2, bringing its signature Wolfpack Rounds and a new team-focused utility. Acquiring it involves embarking on the "And Out Fly the Wolves" quest, a multi-step journey celebrating Bungie's history and testing your skills.
This comprehensive guide details every step required to obtain the Gjallarhorn, from starting the quest to understanding its perks and unlocking its powerful catalyst. Prepare to delve into dungeons, hunt down powerful foes, and reforge a legend.
Prerequisites: Gearing Up for Glory
Before you can even dream of wielding Gjallarhorn, there's one essential requirement: You must own the Destiny 2: Bungie 30th Anniversary Pack. This paid DLC, released to celebrate Bungie's three decades of game development, grants access to the necessary content, including the Grasp of Avarice dungeon and the "And Out Fly the Wolves" quest itself. Without this pack, the quest and its ultimate reward remain inaccessible.
The pack includes not only the Gjallarhorn questline but also the Grasp of Avarice dungeon, the Dares of Eternity activity (though the activity itself is free, Pack owners get extra rewards), unique armor sets like the Thorn-themed and Marathon-themed gear, and other weapons inspired by Bungie's past.

Starting the Quest: An Invitation from Xur
With the 30th Anniversary Pack secured, your journey begins not with a direct quest marker, but with an activity and a visit to a familiar, enigmatic vendor.
Step 1: Complete Dares of Eternity
The first time you log in after the 30th Anniversary update (or after purchasing the pack), you will automatically be launched into the Dares of Eternity activity. Complete one full round of this chaotic, game-show-like six-player event.
Step 2: Visit Xur in the Treasure Hoard
Upon completing Dares of Eternity, you'll find yourself in Xur's Treasure Hoard, a special location within Eternity. Approach Xur and interact with him. Exhaust his initial dialogue until you reach his standard vendor screen.
Step 3: Acquire the Quest
This is where many Guardians initially stumble. The "And Out Fly the Wolves" quest is not on Xur's primary vendor page. You must navigate to the second page of his inventory (usually indicated by tabs or arrows at the bottom of the vendor screen). Here, you will find the quest available for pickup.
Step 4: Speak to Shaw Han
Once you have the "And Out Fly the Wolves" quest in your inventory, the first objective directs you to the Cosmodrome to speak with Shaw Han, the zone's primary vendor and guide. This interaction firmly establishes Shaw Han as the central point of contact for the Cosmodrome-based steps of this quest, reinforcing his narrative role within that patrol space.
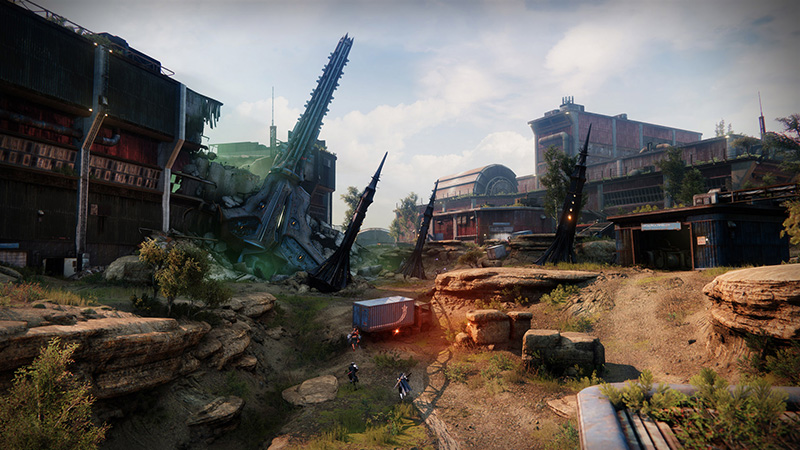
The Grasp of Avarice: Delving into the Dungeon
After your initial chat with Shaw Han, the quest presents its most significant challenge: completing the Grasp of Avarice dungeon.
Starting the Dungeon
The Grasp of Avarice dungeon can be launched directly from the Cosmodrome map (look for its unique node, usually in the upper section) or via the Director's Eternity section. It has a recommended Power Level of 1310 for the Normal difficulty and 1360 for the Master difficulty, though current Destiny 2 power scaling may make the effective difficulty different.
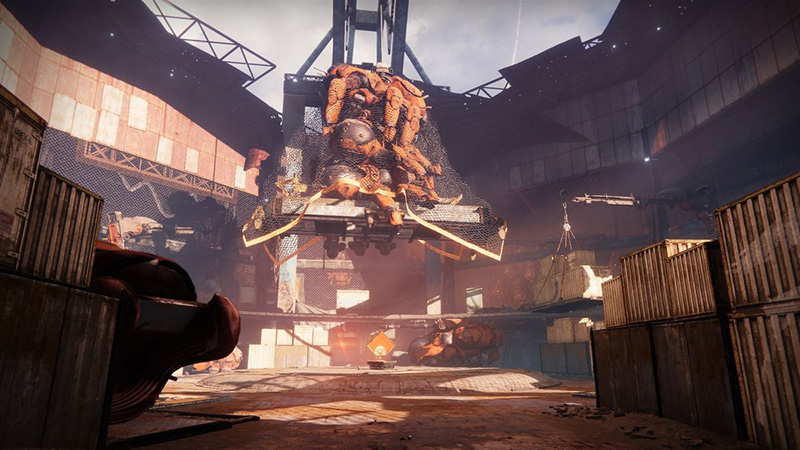
Dungeon Overview & Key Mechanics
Grasp of Avarice is themed around the infamous "loot cave" from Destiny 1's early days, filled with traps, greedy Fallen, and Hive. This thematic choice demonstrates Bungie's willingness to engage with its own history and community memes, turning a past exploit into a core gameplay experience. The dungeon revolves around a few key mechanics:
Burdened by Riches: Defeated Hive enemies (and specific Vandals later) drop engrams that look like Exotics but grant stacks of a debuff called "Burdened by Riches" upon pickup. This debuff has a timer; if it expires, you die instantly.
Hive Crystals: Throughout the dungeon, you'll find Hive crystals. Standing near these crystals allows you to deposit your Burdened by Riches stacks, removing the debuff and typically charging an objective or progressing the encounter.
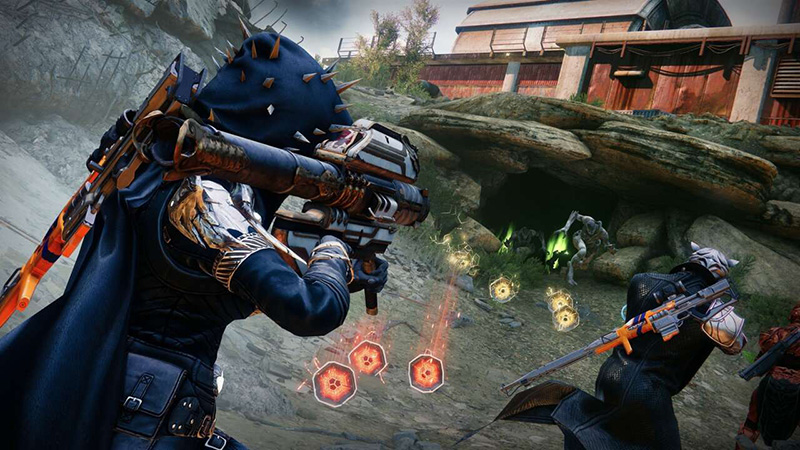
Scorch Cannons: Specific Fallen Vandals drop Scorch Cannons. These function similarly to those found in other Fallen activities. You fire a projectile that sticks to surfaces or enemies, and then hold the fire button to charge the detonation (typically needing two full charge levels for dungeon mechanics).
Notable Sections
While a full dungeon walkthrough is beyond this guide's scope, key progression points include: navigating the booby-trapped entrance mimicking the original loot cave, solving environmental puzzles involving switches and pressure plates, the high-speed Sparrow section requiring mine defusal, the large-scale Fallen Shield encounter involving launching Servitors with Scorch Cannons, and the final boss battle against Captain Avarokk, the Kell's Scourge.
Tips for Completion
Grasp of Avarice is designed as a three-player activity. While solo completion (including solo flawless) is possible, it is significantly more challenging. Finding a fireteam via LFG resources (like the Destiny 2 Companion App, Discord servers, or third-party websites) is highly recommended.
The dungeon serves as the primary skill and coordination checkpoint for the Gjallarhorn quest. Its mechanics require communication and execution, ensuring that such a powerful Exotic weapon feels earned through significant effort rather than being handed out easily. Furthermore, mastering the dungeon's core mechanics (Burdened by Riches, Scorch Cannons) pays dividends later, as they are directly reused for acquiring the Gjallarhorn's catalyst.
The Hunt for Wolfpack Rounds
Emerging victorious from the Grasp of Avarice dungeon marks a major milestone, but the quest is far from over.
Quest Step: Return to Shaw Han
Return to Shaw Han in the Cosmodrome. After debriefing him on your dungeon exploits (and presumably handing over a sample Wolfpack Round found within), he'll task you with gathering more. You need to collect seven (7) Wolfpack Rounds by defeating powerful Fallen (those with orange or yellow health bars) anywhere within the Cosmodrome patrol zone.
Farming Strategy: Exodus Garden 2A
While powerful Fallen can be found in various locations and public events across the Cosmodrome, the overwhelmingly recommended farming spot is the Exodus Garden 2A Lost Sector, located in The Divide area. This Lost Sector is relatively short and contains numerous powerful Fallen Shanks, Vandals, and a Servitor boss at the end, maximizing your chances per run. The quest design clearly funnels players here, likely for efficiency and because the location is revisited later, reinforcing familiarity.
Efficiency Tips
Be aware that Wolfpack Rounds are not guaranteed drops from every powerful Fallen kill; it relies on RNG. Expect to run Exodus Garden 2A multiple times – typically two or three completions should yield the required seven rounds. The most efficient method is to clear the Lost Sector entirely (defeating the boss), loot the chest, exit the Lost Sector, and immediately turn around and re-enter to reset it.
Troubleshooting
Occasionally, players have reported getting stuck, particularly if disconnected during the collection process. If you find yourself stuck at a certain number (like 6/7) and rounds cease to drop after numerous kills, first double-check that the quest is active and tracking correctly. If it is, the issue is almost certainly unfavorable RNG. Persistence is key; continue defeating powerful Fallen in the Cosmodrome, focusing on Exodus Garden 2A, and the rounds will eventually drop. This step functions as a traditional RPG "collect X items" grind, designed to add time to the quest, but localized within the Cosmodrome and with a clear optimal farm to prevent excessive frustration.
Gathering the Components: A Trip to the Gunsmith
With a pouch full of volatile Wolfpack Rounds, it's time to start assembling the weapon itself.
Step 1: Return to Shaw Han
Speak with Shaw Han in the Cosmodrome once more. Presenting the collected Wolfpack Rounds, he'll provide you with the first major piece of the puzzle: the Rocket Housing component.
Step 2: Visit Banshee-44
Shaw recognizes the need for a true weapons expert. He directs you to the Tower to consult with Banshee-44, the Gunsmith. Travel to the Tower Courtyard and speak with Banshee in his usual workshop. This part of the quest leverages the established roles of the NPCs – Shaw for field intelligence and Banshee for technical expertise – providing narrative justification for the quest progression.
Step 3: Return to Exodus Garden 2A
Banshee examines the housing and determines the location of the final critical component – the Trigger Mechanism. Predictably, it's located back in the Exodus Garden 2A Lost Sector in the Cosmodrome. You must venture into this familiar territory one last time.
Step 4: Loot the Chest
Complete the Exodus Garden 2A Lost Sector again, defeating the final Servitor boss. Upon looting the Lost Sector chest at the end, you will receive the Trigger Mechanism, and your quest objective will update. This run is purely about completion; you don't need to worry about specific enemy drops beyond clearing the path. The repetition, while potentially feeling tedious, ensures players are intimately familiar with the Lost Sector's layout by this point.

Forging the Gjallarhorn: Assembly Required
You now possess all the necessary components. The final step is to assemble them into the legendary rocket launcher.
Step 1: Locate the Assembly Point
Head back to the Cosmodrome, landing near Shaw Han's usual position. Crucially, do not interact with Shaw Han himself yet. Instead, locate his nearby hideout or workshop. This is typically described as being in the small structure beneath the platform where he stands, or slightly off to the right side of his location. Some players have found this location slightly non-obvious, highlighting the need for careful observation or precise directions.
Step 2: Use the Tool Chest
Inside this small hideout, you will find an interactable tool chest. Approach it and follow the prompt to assemble the Gjallarhorn. This action combines the Rocket Housing and Trigger Mechanism in your inventory, resulting in a "nearly complete Gjallarhorn" quest item. This physical act of assembly provides a more engaging and satisfying conclusion to the collection phase than a simple menu interaction.
Step 3: Speak to Shaw Han
With the nearly complete weapon framework in hand, turn and approach Shaw Han. Initiate dialogue with him one final time. He will offer his congratulations and formally grant you the fully functional, ready-to-fire Gjallarhorn Exotic Rocket Launcher. The "And Out Fly the Wolves" quest is now complete!

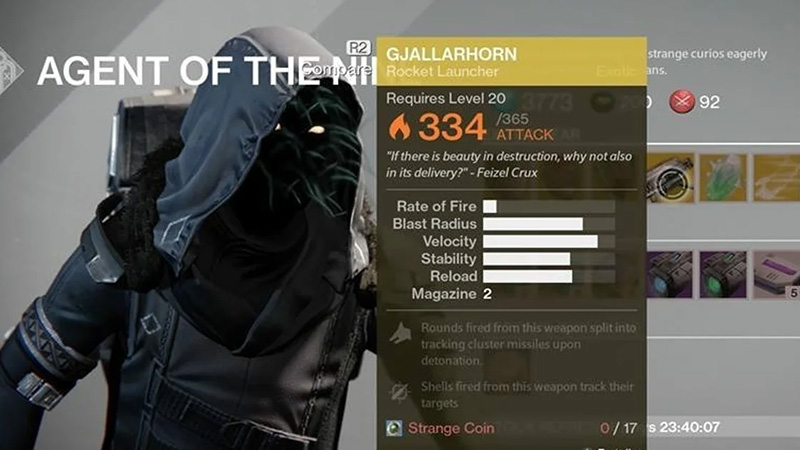
Understanding Your New Power: Gjallarhorn's Perks & Stats
Gjallarhorn isn't just a trophy; it's an incredibly potent weapon defined by its unique perks.
Exotic Intrinsic: Wolfpack Rounds - This is the signature perk. Upon detonation, the main rocket splits into multiple (reportedly 8) smaller, tracking cluster missiles. These secondary missiles aggressively seek out nearby targets, massively increasing both area-of-effect damage for add clear and total damage against single, large targets like bosses.
Exotic Trait: Pack Hunter - When standing near allies, you gain increased Handling and Reload Speed. When you fire Gjallarhorn, nearby allies who are currently wielding non-Exotic (Legendary) Rocket Launchers are temporarily granted the Wolfpack Rounds perk for their own rockets.
Hidden Perk: Grenades and Horseshoes - Though not listed explicitly on the weapon, Gjallarhorn possesses intrinsic proximity detonation. Its rockets will detonate automatically if they pass within approximately 2 meters of an enemy target.
Team DPS Implications
The Pack Hunter trait is revolutionary. It shifts Gjallarhorn's role from the must-have individual DPS weapon of Destiny 1 to a powerful force multiplier in Destiny 2. In most raid and dungeon scenarios, the optimal strategy involves one player using Gjallarhorn to grant Wolfpack Rounds to the rest of the fireteam, who can then use their own Legendary rocket launchers optimized for damage (like those with perks such as Bait and Switch or Explosive Light). This synergy means a team with one Gjallarhorn and five well-rolled Legendary rockets will typically out-damage a team using six Gjallarhorns or six Legendaries without the buff. This design cleverly avoids the exclusionary LFG practices of D1 by promoting loadout diversity and teamwork rather than mandating Gjallarhorn for every fireteam member.
| Stat | Value |
|---|---|
| Blast Radius | 90 |
| Velocity | 45 |
| Stability | 64 |
| Handling | 66 |
| Reload Speed | 37 |
| Rounds Per Minute | 15 |
| Magazine | 1 |
| Aim Assistance | 76 |
| Inventory Size | 50 |
| Zoom | 20 |
| Airborne Effectiveness | 6 |
| Recoil Direction | 49 |
Recommended Legendary Rocket Launchers (for Pack Hunter Synergy)
While many Legendary rockets benefit from Pack Hunter, some stand out due to their perk pools and availability.
| Rocket Launcher | Source | Recommended PvE Perks | Notes |
|---|---|---|---|
| Apex Predator | Last Wish Raid | Reconstruction / Bait and Switch | Craftable. Considered top-tier for DPS. Requires raiding. |
| Hothead (Adept) | Grandmaster Nightfalls | Auto-Loading Holster or Field Prep / Clown Cartridge or Explosive Light | Excellent non-raid option, but Adept version requires high-level PvE. |
| Cold Comfort | Ghosts of the Deep Dungeon | Envious Assassin / Bait and Switch or Bipod | Strong option from a different dungeon. Requires Dungeon Key access. |
| Crux Termination IV | World Drop / Gunsmith | Slideshot or Reconstruction / Surrounded or Explosive Light or Bipod | More easily accessible world drop option. Good perk variety. |
| Hezen Vengeance | Vault of Glass Raid | Overflow or Demolitionist / Vorpal Weapon or Lasting Impression | Craftable option from another raid. Solid perks. |
Enhancing the Legend: The Gjallarhorn Catalyst
Like many Exotics, Gjallarhorn has a catalyst that further enhances its capabilities.
Obtaining the Catalyst
The catalyst is obtained by finding and opening three specific hidden chests within the Grasp of Avarice dungeon.
These chests have special conditions:
- They will only appear if at least one member of your fireteam has acquired the Gjallarhorn.
- To open a chest, you must have at least one stack of the Burdened by Riches debuff active.
- Near each chest location, a special Fallen Vandal will spawn. Defeating this Vandal will cause it to drop the necessary Burdened by Riches engram.
Detailed Chest Locations
| Chest # | Encounter Area | Vandal Location Hint | Chest Location Hint | Requirement |
|---|---|---|---|---|
| 1 | Entrance / Initial Loot Cave Area | On a metal platform structure across from the chest location | On a raised ledge shortly after descending into the main cave area | Burdened by Riches x1+ |
| 2 | Before Ogre Boss (Phry'zhia) | Vandal runs into a storage room after the red-lit staircase | Inside the next room after exiting the vent from the storage room, immediately turn hard right on the first platform | Burdened by Riches x1+ |
| 3 | Fallen Shield / Servitor Encounter | Vandal roams near the waterfall area (east side if facing north upon entry) | On top of the central building (where Scorch Cannon Vandal often spawns) | Burdened by Riches x1+ (Time is tight here!) |
Catalyst Perk: "More Wolves"
Completing the catalyst unlocks the "More Wolves" perk, which provides two significant benefits:
- Increases the magazine size from 1 to 2.
- Final blows with the secondary Wolfpack Round missiles will spawn an additional, faster, and more powerful tracking missile at the target's location.
Completing the Catalyst
Once obtained, the catalyst requires 400 kills with Gjallarhorn to fully masterwork it. Efficient farming locations include:
- The Shuro Chi checkpoint in the Last Wish raid (requires obtaining the checkpoint).
- Exodus Garden 2A Lost Sector (again!).
- The Dares of Eternity activity (high enemy density).
- Sorrow's Harbor on the Moon (Altar of Sorrows public event).
Builds, Usage, and Troubleshooting
Simply owning Gjallarhorn is great, but integrating it effectively into your builds and knowing how to handle common issues maximizes its potential.
Build Synergies
Gjallarhorn benefits greatly from damage buffs. Since it deals Solar damage, pairing it with Solar subclass effects and armor mods is effective.
Solar Wells: Create Solar Wells (e.g., via Melee Wellmaker) and use mods like Elemental Charge (to become Charged with Light) and Font of Might (temporary Solar weapon damage boost) for a significant damage increase.
Note: The Charged with Light mod Argent Ordnance (bonus rocket damage) does not stack with Font of Might, making Font of Might generally preferable when using Solar Wells.
Gjallarhorn remains a top-tier choice for various endgame activities, including Grandmaster Nightfalls (excellent for bursting down Champions and clearing rooms), Dungeons, and Raids (especially when coordinating Pack Hunter buffs).
Usage Tips
Team Play: Always coordinate with your fireteam. If you are the designated Gjallarhorn user, ensure you fire first during DPS phases to grant Pack Hunter to allies with Legendary rockets.
Solo Play: While its main strength shines in teams, Gjallarhorn is still a fantastic solo weapon due to its high burst damage and exceptional add clear via Wolfpack Rounds.
Aiming (Controller): Rocket launchers like Gjallarhorn are generally forgiving on controller due to their large blast radius and tracking capabilities (especially Wolfpack Rounds). Fine-tuning sensitivity settings (both look sensitivity and ADS sensitivity multiplier) is key to comfort.
Troubleshooting Recap
If you encounter issues during the quest, refer back to these common problems and solutions:
Quest Not Appearing: Ensure 30th Anniversary Pack is owned, Dares of Eternity is complete, check Xur's second vendor page in the Treasure Hoard, and check the Quest Archive terminal.
Wolfpack Rounds Stuck: This is usually an RNG issue. Verify the quest is active, check network connection, and continue defeating powerful Fallen in the Cosmodrome (Exodus Garden 2A preferred).
Quest Abandoned: Check the Quest Archive terminal located in the Tower (near the Postmaster) or the H.E.L.M.
While Gjallarhorn possesses immense power inherently, unlocking its absolute peak performance involves thoughtful buildcrafting and communication within a fireteam. The documented troubleshooting steps also indicate that while the quest is straightforward on paper, minor points of confusion or potential bugs were common enough to warrant specific guidance, highlighting the importance of comprehensive resources.
Conclusion: The Legend Reborn
The journey to reclaim Gjallarhorn through the "And Out Fly the Wolves" quest is a rewarding experience that encapsulates the spirit of the 30th Anniversary Pack. It guides players through the pack's core offerings – from the whimsical chaos of Dares of Eternity to the trap-laden depths of the Grasp of Avarice dungeon – culminating in the reforging of one of Destiny's most beloved icons.
Completing the quest grants you not just a weapon, but a piece of Destiny history reimagined for the modern sandbox. Gjallarhorn remains incredibly powerful, capable of clearing entire rooms of enemies and contributing significantly to boss damage. However, its true strength in Destiny 2 lies in the Pack Hunter perk, transforming it into a unique support weapon that elevates the entire fireteam's lethality. Whether you're a veteran reliving the glory days or a newer Guardian experiencing the legend for the first time, the roar of Gjallarhorn and the satisfying swarm of Wolfpack Rounds offer an unparalleled power fantasy. Go forth, Guardian, and let the wolves fly.
