
What Makes Graviton Spike Worth Getting
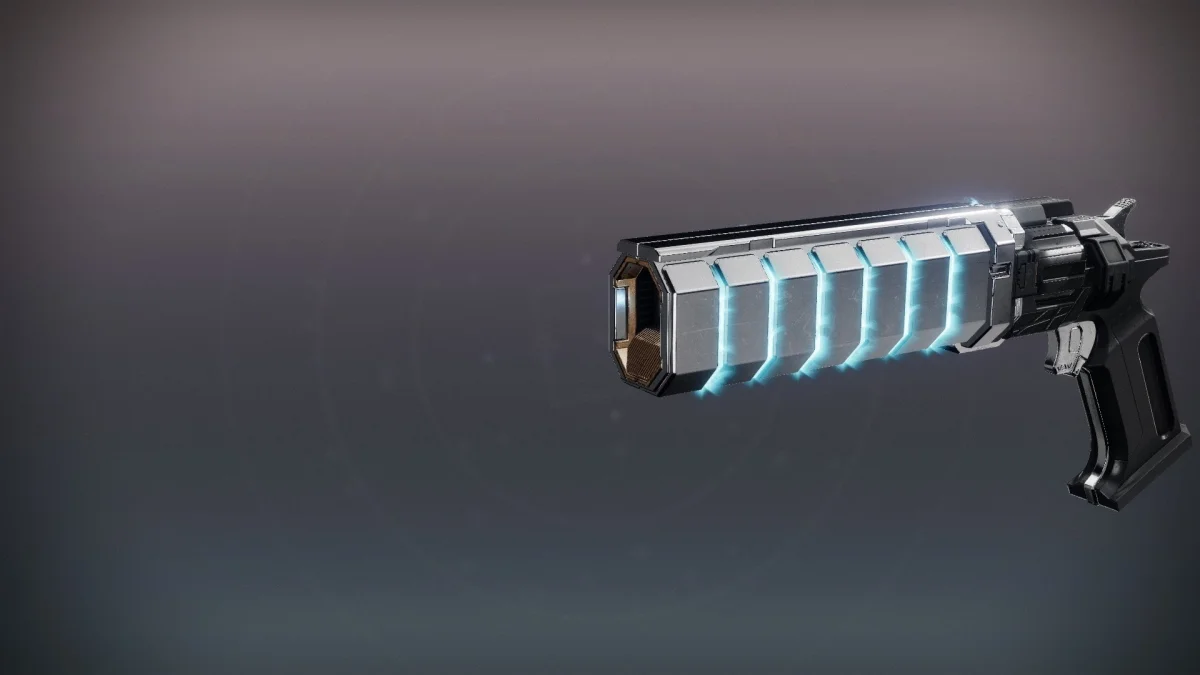
Graviton Spike is easily one of the coolest Exotic hand cannons to drop with The Edge of Fate expansion. This 150 RPM beast brings something completely new to the table - dual-element functionality that lets you swap between Arc and Stasis modes on the fly.
Swap between fast-firing Arc mode or slow-firing Stasis mode. Final blows and precision hits overcharge the opposing mode.
How the Weapon Actually Works
Temporal Manipulation (Intrinsic Perk): Hit your reload button to switch between two completely different firing modes:
Arc Mode: Fast-firing setup that's perfect for getting up close and personal
Stasis Mode: Slower, more deliberate shots that pack a serious punch
Landing kills and precision hits will overcharge the opposite mode, which is where things get really interesting.
Temporal Anomaly (Trait): When you've got overcharge built up, both modes start doing some wild extra damage:
Arc Mode: Calls down actual lightning strikes when you nail precision hits or get kills
Stasis Mode: Makes enemies explode and creates Stasis crystals you can shatter for even more damage
This setup makes Graviton Spike incredibly versatile. You can stay aggressive with Arc mode when enemies get close, then switch to Stasis for long-range crowd control. It's basically like having two weapons in one.
What You Need Before Starting
You can't just jump into this quest right away. There are some specific things you need to knock out first:
Campaign Requirements
Finish the entire Edge of Fate campaign (Normal or Legendary difficulty both work)
Get your Rosetta ability up to level 3 during the story
If you did Legendary mode, you'll also get an exotic armor piece
Why These Matter
The Rosetta device is going to be your best friend during this quest. You need it fully upgraded to access all the locations and solve the puzzles. Plus, finishing the campaign unlocks the NPCs you'll need to talk to.
Getting Started: The "Graviton Through the Ages" Quest
Once you've wrapped up the campaign, head to the Altar of Relativity on Kepler. That's where you'll pick up the exotic quest that starts this whole process.
Your First Two Stops
Talk to Lodi First
You'll find him hanging out in the Caldera social hub on Kepler. He'll give you the rundown on what you're looking for and how the Rosetta device fits into everything.
Then Find The Emeritus
Also in the Caldera hub, The Emeritus will point you toward your first real destination - the Outer Steppes - and explain more about the triangulation process.
Hunting Down the First Piece in Outer Steppes
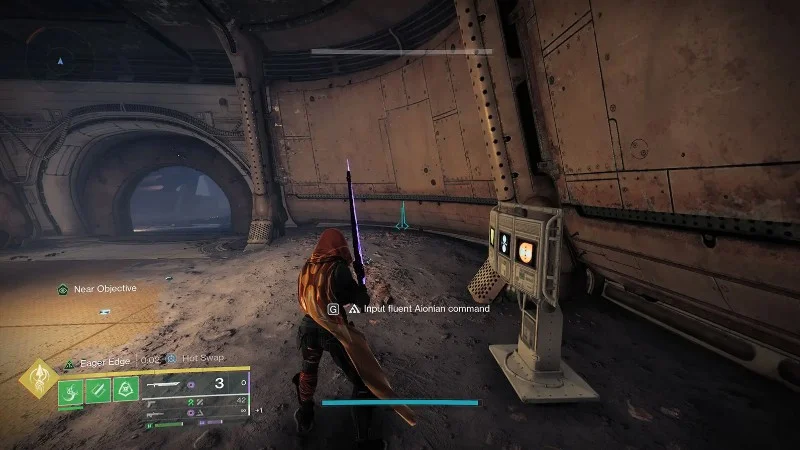
Finding the Command Module
Head to the Outer Steppes and make sure you've got the quest tracked so you can see the search area. Once you're in the main zone, look for the Aionian Command Module on the left side near some rock formations. It'll say "Input fluent Aionian Command" but won't let you interact with it yet.
Deal with the Guardian First
Every single command module in this quest is guarded by a yellow-bar Rosetta Sentry Minotaur. You have to kill it before you can use the terminal. Just clear the area and then activate the module.
The Matterspark Puzzle
After you activate the command module, you'll get a new objective to find the weapon piece. This part involves using your Matterspark ability, which works just like calling your Sparrow - same button and everything.
Here's How the Node System Works:
Find the first charging node near a small cliff - it's pretty close to where you start
Charge it up, and a launch portal appears right next to it
The portal shoots you toward the second node - just keep following the route
Use Matterspark to navigate through the tunnels and hit the third node
Once you've charged all three nodes, you'll end up in a small room with a pile of debris. Search it to grab the first weapon piece.
The Gorge Gets Tricky
Back to The Emeritus
Before heading to the Gorge, swing by The Emeritus again. They'll update your quest and give you some hints about what's coming next.
Getting to the Gorge
Fast travel to the Assimilated Easement - it's the closest waypoint. The Gorge section is where things start getting more complex because you'll need both Mattermorph and Matterspark abilities.
Solving the Second Puzzle
You'll run into a Mattermorph node along the way to the main area. Here's the sequence:
Use Matterspark to get to the portal on the left side of the area
When you come out the other side, immediately turn left and head into the cave
Navigate through the narrow passage until you can turn left again
Use Mattermorph to break through the sealed passage
After the barrier drops, search the pile of materials for the second weapon piece.
Exile's Accord Navigation Challenge
Check in with Lodi Again
Head back to Lodi in Caldera for your next assignment. He'll send you to Exile's Accord, which has one of the trickier navigation sections in the quest.
Don't Fall for the Train Trap
Fast travel to the Curtilage Divide to get close. When you reach the search area, you'll see a train and might think you need to go through it. Don't do that yet. Instead, look to the right of the train for a Matterspark portal.
Getting the Third Piece
Take the Matterspark portal and follow the route until you reach an open area with enemies. There's a small room on the left side where you'll fight another Rosetta Sentry Minotaur (and maybe a Fallen Brig too). Clear them out and activate the command module.
Now you can go back to that train from earlier. Go through the tunnel this time, and at the end of the hallway, you'll find another material pile with the third weapon piece.
Vex Data Fragment Farming
Final Chat with The Emeritus
Return to The Emeritus one more time. They'll tell you to start collecting Vex Data Fragments - you need 100 total.
Farming Strategy
Regular Vex give you small amounts of data, but yellow-bar enemies drop way more. The good news is that there are tons of Vex spawning around the Caldera area, especially across from where all the vendors hang out.
The Final Piece Puzzle
Aionian Campus
Once you've got your 100 fragments, fast travel to the Aionian Campus (top right of the Kepler map). Clear out the Vex in the area and activate the final command module.
The Relocator Cannon Solution
This last puzzle is the most involved one in the quest:
Step 1: In the far left corner, there's a Mattermorph node inside a tube-like structure. Activate it.
Step 2: Go to the center of the area where there's a crane holding a suspended container. Use Mattermorph on the container to open it up.
Step 3: Jump inside and grab the Relocator Cannon.
Step 4: Find the door that's slightly cracked open. You need to shoot the Relocator Cannon through the gap to hit a node on the other side.
Step 5: This activates a teleporter on the right side of the room. Step through it to reach the final material pile.
The Final Step: The Sieve Activity
Last Words from Lodi
Go back to Lodi one final time. He'll tell you about The Sieve, which is the only time-gated part of this entire quest.
What The Sieve Is
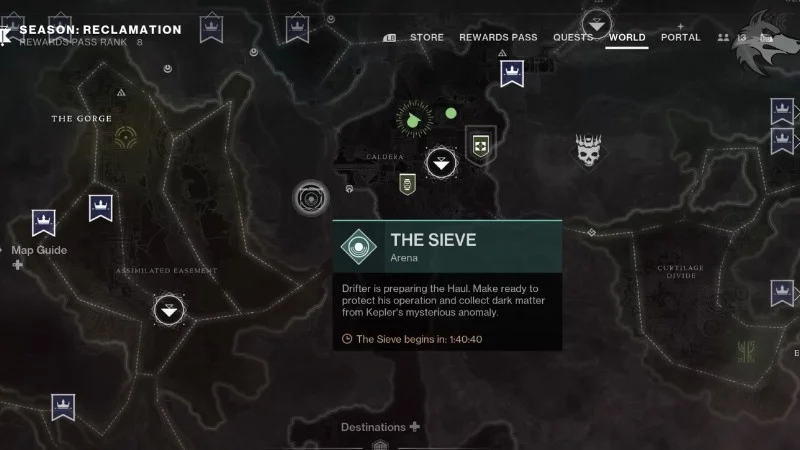
The Sieve is a matchmade activity that only shows up periodically on Kepler. The countdown timer you see on the map can be used to determine how much time you have left till the next run.
When the Sieve does appear, you can launch it from a flag in the Caldera hub. It supports matchmaking, so you don't need a premade team. Complete the activity and you'll finally get your Graviton Spike.
After You Get It: Crafting Options
When you first get Graviton Spike, it comes with a Deepsight version that lets you extract the pattern. Take this to The Enclave, and you can craft additional copies with different rolls later on.
How to Actually Use This Thing
Arc Mode Tips
The fast-firing Arc mode is perfect for aggressive plays. The lightning strikes from precision hits and kills make it great for clearing groups of adds quickly. You want to stay mobile and keep landing those precision shots to build up overcharge.
Stasis Mode Strategy
Switch to Stasis when you need more range or crowd control. The crystal explosions give you area denial and extra damage when you shatter them. This mode works really well for controlling choke points or dealing with tougher enemies.
Mode Switching
The key to getting the most out of Graviton Spike is knowing when to switch. Start encounters in Arc mode for quick add clear, then swap to Stasis for long-range precision work or when you need the crowd control from crystal formations.
Common Problems and How to Fix Them
Quest Tracking Issues
If your waypoints disappear or get confusing, just open your map and make sure the quest is still being tracked. This usually fixes any navigation problems.
Ability Timing
Both Mattermorph and Matterspark have cooldowns, so don't rush through the puzzle sections. Take your time and make sure your abilities are ready before starting complex sequences.
Enemy Respawns
If you move too far away from a command module after killing the Rosetta Sentry, it might respawn. Stay close to the terminal area until you've activated it.
Waiting for The Sieve
This is the most frustrating part for a lot of players. The activity's timing is genuinely unpredictable due to the time anomalies on Kepler. You might wait anywhere from 30 minutes to several hours. Just keep checking back periodically.
Time Investment
Total Quest Time: 2-4 hours for most players (not counting Sieve wait time)
Difficulty: Moderate - mostly puzzle-solving with standard combat
Solo Friendly: Yes, except for The Sieve which has matchmaking
Repeatable: No, but you can craft additional copies once you have the pattern
This quest gives you one of the most unique weapons in Destiny 2, and the dual-element system opens up a lot of interesting build possibilities for both PvE and PvP content.