
Prepare for an exciting journey to acquire one of The Final Shape's most unique armaments: Microcosm. This isn't just any weapon; it's Destiny 2's first-ever Kinetic Heavy Trace Rifle, a true game-changer capable of tearing through enemy shields with its brilliant beam of light. While the path to obtaining Microcosm is described as one of the longer Exotic quests in the game, the sheer power and distinctive nature of this weapon make every step a worthwhile endeavor. This guide will illuminate the path, making the acquisition process clear and, hopefully, a thrilling experience.
Prerequisites
Before embarking on the quest for Microcosm, a few prerequisites must be met. These are essential groundwork that pave the way to the Exotic weapon.
The Final Shape expansion is required, as Microcosm is an exclusive reward tied to this chapter of Destiny 2.
Next, Guardians must have completed The Final Shape campaign. This can be done on any difficulty, but successfully finishing the main story is non-negotiable. Completing the campaign is crucial as it unlocks the Pale Heart of the Traveler as a fully explorable patrol zone, the setting for much of this Exotic quest. For those seeking an edge, completing the campaign on Legendary difficulty is highly recommended, as it rewards a full set of 1960 Power Level gear and other juicy loot. This higher-level gear will prove invaluable for the more challenging encounters ahead.
Once the campaign is concluded, the "Destined Heroes" quest will automatically be given by the Guardian's Ghost. This overarching quest serves as a narrative bridge into the post-campaign activities.
A critical early step within "Destined Heroes" is to complete the "Queens, Part 1" adventure. This mission is a direct prerequisite to unlocking the "Convalescence" questline from Micah-10, which ultimately yields Microcosm.
"Queens, Part 1" is more than just a story beat; it introduces players to key mechanics, such as wielding a Hive sword to reflect projectiles and destroy shielded runes. Mastering these abilities early on will be beneficial, as similar mechanics reappear in later stages of the Microcosm quest.
The Convalescence Quest
With the initial requirements fulfilled, the main journey to Microcosm begins with the "Convalescence" questline. This is a four-part series of missions provided by Micah-10, who can be found via Micah's Conduit at the Vanguard table in the Lost City, located within the Pale Heart. Each completed step brings Guardians closer to wielding the powerful Exotic.

Convalescence: Rootbound
The first mission from Micah-10, "Convalescence: Rootbound," tasks Guardians with following the traces left by scattered, unpartnered Ghosts.
- After completing "Queens, Part 1," interact with Micah's Conduit to receive "Convalescence: Rootbound".
- Teleport to The Landing in the Pale Heart. From there, proceed south into the Forgotten Deep Lost Sector. It's important to note that completing the entire Lost Sector activity is not required; Guardians only need to reach the final room.
- Inside the Lost Sector's final chamber (after clearing enemies and possibly shooting a Stasis crystal to open the path), the lost Ghost can be found on a ledge near the base of a large tree. The quest waypoint may disappear when close, so careful observation is needed.
- After interacting with the lost Ghost, return to the Lost City. Follow the marker to investigate new growth in the Arbor of Light and interact with a Ghost Shell found near a growing tree.
- Interact with Micah's Conduit once more. This will yield rewards, including a red-bordered Someday Shotgun, and grant the next quest in the chain, "Convalescence: Underbrush".
This quest step does more than just send players on an objective hunt; it subtly immerses them in the evolving narrative of the Pale Heart. Finding lost Ghosts and observing "new growth" connects the Guardian's actions to the healing and transformation of this mysterious destination.
Convalescence: Underbrush
The second part, "Convalescence: Underbrush," involves collecting special items from the Pale Heart.
While some quest descriptions or community shorthand might lead one to believe they are hunting for "hidden emblem shards," this is not the case for the Microcosm quest. The items required are tangible buff items known as Traveler's Blessings or Flickering Blessings.
Guardians need to acquire two "Flickering Blessing" mods or, as sometimes described, "blessings from the traveler". These blessings are found by opening chests anywhere in the Pale Heart. For a significantly higher chance of obtaining them, focus on opening Pathfinder field assignment chests. They can also be discovered through random exploration or by completing public events within the destination.
Once two blessings are collected, they must be equipped. This is done by opening the Traveler's Blessings menu, accessible from the Pale Heart destination map.
| Blessing Name | Effect |
|---|---|
| Traveler's Animus | Defeating a combatant might drop an Orb of Power or a random elemental Orb |
| Traveler's Fervor | Sliding after a short sprint creates a burning line of fire ahead, causing Solar damage and Scorched |
| Traveler's Abundance | Defeating combatants with grenades may spawn Special ammo; using Super damage may spawn Heavy ammo |
After equipping the two blessings, return to the Lost City. Interact with another Ghost as indicated, and then speak with Micah's Conduit to receive another red-bordered weapon (Pro Memoria) and the "Convalescence: Greenery" quest.
This stage of the quest serves a dual purpose. It directly progresses the Microcosm acquisition but also familiarizes Guardians with the Pale Heart's unique buff system (Traveler's Blessings) and encourages engagement with its various activities, such as Pathfinder assignments and public events.
Convalescence: Greenery
"Convalescence: Greenery" escalates the action, requiring participation in a new activity and a combat-focused mission.
- The initial task is to farm the Overthrow activity in The Landing zone of the Pale Heart. Opening chests from this activity (which involves defeating Hive enemies and destroying crystals) will fill a progression bar. A single full Overthrow completion typically grants around 15-30% progress towards the quest goal.
- Once sufficient progress in Overthrow is made, a "Convalescence: Greenery" icon will appear on the map, north of The Refraction area. Travel to this location.
- Upon arrival, "light birds" or a "celestial bird" will appear and guide the Guardian to a cave or a massive door locked by Hive runes.
- Unlock the entrance by shooting the correct Hive symbols on the wall behind the door. Inside, Guardians will need to summon and wield a Hive Sword, similar to the one used in the "Queens, Part 1" mission.
- The sword is used to smash red crystals blocking the path, clear debris, and defeat waves of Hive enemies. Some enemies will be shielded and require the sword's power to damage. The culmination of the Cyst involves fighting three Lucent Hive.
- After successfully completing the Sword Dance Cyst and defeating all enemies, return to the Lost City. Interact with the designated Ghost, and then with Micah's Conduit to receive the final quest in the chain: "Convalescence: Budding".
This quest step cleverly reintroduces and builds upon the sword mechanics taught earlier, reinforcing player learning through familiar actions in a new context. Furthermore, the Overthrow requirement effectively funnels players into one of The Final Shape's core new patrol activities, ensuring they experience the breadth of the new destination's content.
Convalescence: Budding - The Cooperative Gauntlet
This is the ultimate and most demanding part of the Microcosm questline. "Convalescence: Budding" requires Guardians to complete three specific campaign missions on the Cooperative Focus difficulty setting. These missions are:
- Ascent
- Dissent
- Iconoclasm
Cooperative Focus is a significantly more challenging version of the standard story missions. It features unique, intricate mechanics that absolutely require a fireteam of at least two Guardians, though a team of three is highly recommended for a smoother experience. Enemies in this mode are tougher, deal more damage, and their difficulty does not scale down based on fireteam size. The recommended Power Level for this activity is 2005.
These missions can be launched by selecting their icons on the Pale Heart destination map. This mode is designed for communication and mutual support, making it a true test of teamwork.
Key Co-op Mission Mechanics
| Mechanic Name | What it is (Simplified!) | How to Beat It (Quick Tip!) |
|---|---|---|
| Witness Fracturing | A deadly, stacking debuff from the Witness | Pass it to a teammate by letting them interact with you before it hits 10 stacks! |
| Berserkers | Large, shielded enemies requiring coordinated attacks | One player shoots the front weak spot, another shoots the back – simultaneously! |
| Darkness Cruxes | Locks that bar progress, tied to Berserkers | After killing Berserkers, two players shoot two Cruxes – simultaneously! |
| Glyph-Touched | A symbol-matching puzzle requiring keen eyes and communication | Players describe symbols to each other to activate the correct ones |
| Aegis Granted | (Dissent mission) Only one player can wield a special shield | Protect the shield-bearer; they are vital for breaking boss defenses |
Detailed Breakdown of Key Mechanics
Witness Fracturing (The "Don't Hog the Doom!" Game)
The Witness will periodically inflict a random Guardian with the "Fractured by the Witness" debuff. This debuff applies stacks, and if it reaches 10 stacks, the affected Guardian instantly dies. To prevent this, another fireteam member must approach the Fractured player and interact (typically a melee input) to take the debuff from them. It's advisable to pass the debuff around 7 or 8 stacks. A crucial detail is that there's a cooldown period before the same player can take the debuff again. In a three-person fireteam, this necessitates juggling the debuff among all members, making constant communication ("Fracture at 7 stacks, need a take!") absolutely vital.
Berserkers & Darkness Cruxes (The "Sync or Swim" Duo)
Guardians will face formidable "Berserker" enemies, often protected by arc shields. Approaching these enemies may apply a "suppressed" debuff to nearby players. To damage a Berserker, one player must shoot its glowing chest weak spot while another player simultaneously shoots its glowing back weak spot. Precise coordination ("Ready? 3-2-1-FIRE!") is essential. Upon defeating a Berserker, two "Darkness Cruxes" (dark orbs or lock-like mechanisms) will typically become vulnerable. To progress (such as lowering a barrier or unlocking a path), two players must shoot these Cruxes at the exact same time. Failure to synchronize these shots may result in the Berserkers respawning, prolonging the encounter.
Glyph-Touched (The "Blind Leading the Seeing" Puzzle)
In certain sections, one player will be designated as "Glyph-touched". This player can see symbols in the main environment (e.g., on walls or platforms where they need to be activated). Conversely, the other players (those without the Glyph-touched buff) will see different symbols, often those dropped by specific defeated enemies. The solution requires clear communication: players who see the enemy-dropped symbols must accurately describe them to the Glyph-touched player, who then locates and activates the corresponding symbols in the room. Voice chat is practically indispensable for this mechanic.
Aegis Granted (Dissent Mission's Special Shield)
Specifically in the final boss encounter of the Dissent mission, only one Guardian at a time will receive the "Aegis Granted" buff. The player with this buff is the only one capable of picking up and using the Aegis shield (reminiscent of the relic from the Vault of Glass raid). This shield is used to break the defenses of the Pillar of Devotion or to provide temporary protection for the fireteam.
General Tips for Cooperative Focus Missions
- Communication is paramount - use voice chat
- Survival first - staying alive is critical due to limited revives
- Play cautiously, especially when under debuff effects
- Focus on clearing adds if overwhelmed
- Not communicating debuff stacks promptly
- Attempting to damage Berserkers solo
- Poor timing on Darkness Crux shots
- Inadequate loadout preparation
Versatile Loadouts
- Ranged Weapons: Many encounters favor engagements from a distance. Sniper Rifles (such as Still Hunt or Whisper of the Worm), Linear Fusion Rifles, and Scout Rifles (like Polaris Lance) are strong choices.
- Shield Management: Ensure the fireteam has options to deal with various elemental shields. Once obtained, Microcosm itself is excellent for this role on subsequent runs or when assisting others.
- Add Clear: Weapons or abilities proficient at clearing groups of weaker enemies are essential (e.g., Forbearance, Sunshot, Trinity Ghoul).
- Boss/Major Damage (DPS): For quickly dispatching Berserkers and Subjugators, consider Rocket Launchers, high-impact special weapons, and potent damage Supers (e.g., Celestial Nighthawk Golden Gun, Nova Bomb). Dragon's Breath can provide excellent passive damage against Subjugators.
- Support and Healing: A Warlock's Well of Radiance (potentially with Speaker's Sight), a Titan's Bastion Barricade, or widespread use of Healing Grenades can significantly increase survivability.
While the Legendary campaign completion provides gear at 1960 Power, aiming for 1970+ is advisable for a slightly easier time in these 2005 Power activities.
Mission-Specific Pointers
Ascent
This mission serves as an early test of the core Cooperative Focus mechanics. Focus on mastering the Berserker/Darkness Crux synchronization and the Witness Fracturing debuff juggle.
Dissent
The final encounter heavily revolves around the Aegis shield mechanic. The designated Aegis carrier must be protected. Throughout the mission, diligent management of the Fracture debuff and coordinated takedowns of Berserkers are key. The escape sequence involving falling stairs while simultaneously juggling the Fracture debuff is particularly intense.
Iconoclasm (Often considered the most challenging)
- Witness Encounter Safe Zones: During the final encounter against Subjugators and the Witness, certain areas offer more protection. For instance, the corridors where the Relic (Aegis shield) spawns can be used to shoot at Subjugators through walls with reduced risk.
- Darkness Node Buff: Utilize the "dark nodes" (also referred to as "walnuts" or "seeds") scattered in the arena. Shooting these grants a temporary buff ("shielded from darkness") that protects from environmental hazards like poison air and allows passage through orange energy barriers. Coordinate their use to ensure all fireteam members maintain the buff.
- Subjugator Strategy: Focus fire to bring down Subjugators quickly. Lingering damage Supers can be effective. Prioritize eliminating smaller, more numerous enemies like Attendants or "birds" first to reduce incoming damage.
- Witness Attacks: When the Witness telegraphs a major attack, immediately seek cover.
These Cooperative Focus missions represent the pinnacle of the Microcosm quest's challenge. They are deliberately designed to test a fireteam's coordination, communication, and ability to execute complex mechanics under pressure. Successfully navigating this gauntlet is a significant achievement.
Victory! Microcosm is YOURS!
After conquering all three demanding Cooperative Focus missions, the final step is to return to Micah-10 in the Arbor of Light within the Lost City. Interact with Micah's Conduit, and the Microcosm Exotic Heavy Trace Rifle will be awarded!

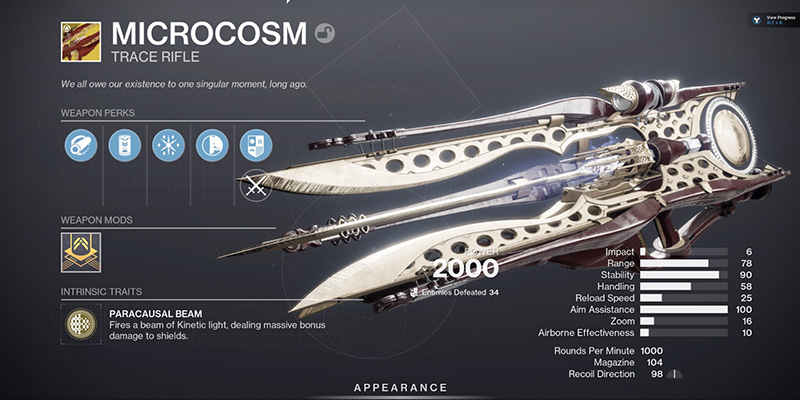
What Makes Microcosm So Special
This is a standout feature, as Kinetic weapons typically do not excel against elemental shields. The arduous journey culminates in a truly unique and powerful reward, justifying the effort invested.
The Microcosm Catalyst
The journey with Microcosm doesn't end with its acquisition. This Exotic weapon also has a Catalyst that can be unlocked to further enhance its capabilities. However, at the current point, it is not obtainable by players and can only be seen through Destiny 2 item databases like Light gg.
The Catalyst is generally understood as a massive stat or perk improvement for any Exotic weapon that has it. Completing the Catalyst upgrades the Exotic to a Masterwork, which typically involves enhanced stats and the ability to generate Orbs of Power on multikills.
Completing the Catalyst
Unfortunately, the only thing we know so far is that, to unlock the Masterwork, Guardians will have to defeat 400 targets using the Microcosm Trace Rifle. Here are efficient farming locations for the future:
| Location | Description | Efficiency |
|---|---|---|
| Shuro Chi Checkpoint | Classic farming spot with high density of Shadow Thrall | Excellent |
| Altar of Sorrows | Constantly active public event with continuous Hive waves | Very Good |
| Grasp of Avarice | Opening encounter cave area filled with Dreg enemies | Good |
| Overthrow Activity | Familiar activity from the quest with good enemy density | Good |
| General Play | Using Microcosm during regular activities and patrols | Casual |
Providing multiple farming options allows Guardians to choose the method that best suits their playstyle and available content, making the path to a Masterworked Microcosm more flexible and enjoyable.
Go Forth and Melt Faces (and Shields!), Guardian!
Congratulations on conquering one of The Final Shape's most involved Exotic quests! The Microcosm is a testament to dedication and teamwork. Now, it's time to unleash its unique power upon the enemies of the Last City. The Witness and its forces won't know what hit them.
Consider pairing Microcosm with the Prismatic subclass. Its Kinetic damage is effective at building energy for both Light and Dark abilities, adding another layer of synergy to this exceptional weapon.