
Alright, Guardian! So, you're ready to dive into the King's Fall raid and snag one of Destiny's most infamous Exotic scout rifles, the Touch of Malice? Awesome! This gun is a beast, a piece of Hive magic that literally feeds on your life force to deal extra damage. Sounds metal, right? It's a unique weapon with a cool history, and getting it is a true badge of honor. This guide will walk you through exactly how to get your hands on Touch of Malice right now, break down the big boss fight in an exciting way, and give you some pro tips to make the journey smoother. We're skipping the dry stats and heavy jargon – just the important stuff to get you that sweet, sweet loot!
What's the Big Deal with Touch of Malice?
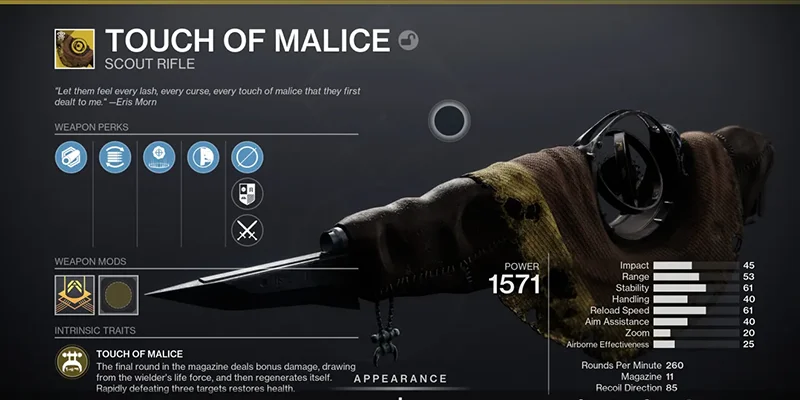
Touch of Malice isn't just any scout rifle. Its main trick is that the final round in the magazine deals bonus damage, draws from your life force (yep, it hurts you a bit!), and then regenerates itself. This means, in theory, you can fire that super-powered last shot forever! To balance this, rapidly defeating three targets will restore a chunk of your health. It's a high-risk, high-reward playstyle that can be incredibly powerful, especially in situations where you can negate the self-damage, like standing in a Well of Radiance.
The Destiny 2 version of this iconic Exotic also comes with a perk called Charged with Blight. Precision hits charge up a ball of Darkness, and you can then fire this blight to poison and temporarily blind enemies, just like those annoying Taken Captains. It's a fantastic addition that gives the weapon more utility.
King's Fall Raid Basics
Before you can even think about Touch of Malice, you need to venture into the King's Fall raid. This is a six-player activity, so grab your most reliable fireteam members!
Prerequisites & Preparation
- Power Level: Make sure your Guardian's Power Level is up to snuff. While older raids become easier over time, being at or above the recommended Power Level (check the current season's recommendations, though a baseline around 1790-1955 has been relevant) will make things significantly smoother.
- Communication is Key: Like all raids, King's Fall demands clear communication. You'll be calling out symbols, coordinating movements, and timing abilities. A good headset and a willingness to talk are crucial.
Recommended Loadouts
| Role | Recommended Weapons | Purpose |
|---|---|---|
| Ad Clear | Trinity Ghoul, Area Denial GLs, Machine Guns | Clearing hordes of Taken and Hive |
| Boss Damage (DPS) | Linear Fusion Rifles, Rocket or Grenade Launchers, Special Sniper Rifle with Kinetic Tremors | Burning down boss health bars |
| Support | Divinity, Well of Radiance, Ward of Dawn | Team survival and damage buffs |
| Mobility | High mobility builds, mobility Exotics, Eager Edge swords | Jumping puzzles and relic carrying |
The King's Fall raid is a journey through Oryx's massive ship, the Dreadnaught. You'll face several unique encounters before you even get to the big man himself: the Basilica (Totems), the Warpriest, Golgoroth, and the Daughters of Oryx. Each has its own mechanics to learn, but for Touch of Malice, our eyes are on the final prize: Oryx.
How to Beat Oryx, The Taken King
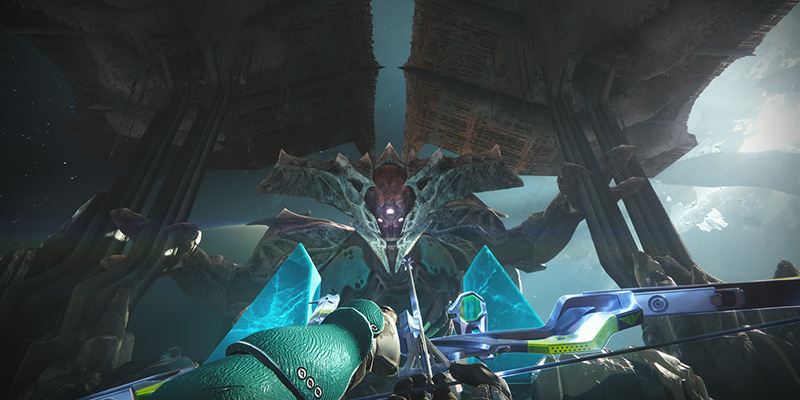
The fight against Oryx is one of Destiny's most iconic ones. It's a multi-phase encounter that tests your team's coordination, execution, and ability to stay calm under pressure. It's less about just shooting the boss until he falls over and more about performing a complex dance of mechanics in the right order. A single misstep can often lead to a wipe, so everyone needs to be on their A-game.
Phase 1: The Platform Dance & Setting Up the Pain
- Plate Guardians - Starting the Fight: Clear out the initial wave of enemies. Oryx will then move to one of the four plates and slam it with his fist - this will make the plate glow green. The green plate is always the starting point for the sequence! The player assigned to that plate should then jump and stay on it for the remainder of the sequence.
- The Runner - Torn Between Dimensions: After Plate Guardian jumps on the first plate, one lucky (or unlucky, depending on how you see it!) Guardian will randomly get the "Torn Between Dimensions" buff. This is very easy to notice, as their screen will go black-and-white, they will see themselves in a third person, and will only be able to run and jump. This person is the Runner. Their crucial job is to collect an orb of light that appeared above the other plates - but first, you need to spawn the platforms that they could jump onto to collect that orb!
- The Runner (or a designated spotter) calls out which plate has the light orb above it. The Plate Guardian assigned to that specific plate then steps on it and also stays until the orb is collected. The action of both Plate Guardians standing on the correct plates makes shimmering, transparent platforms in the air into platforms you could actually jump on.
- The Runner must then skillfully jump across these newly formed platforms to reach and grab the orb of light. As soon as the orb is collected, both Plate Guardians should hop off their plates to start the new sequence. If they tarry, the plates will start glowing red!
- This process repeats two more times. Be careful, as the next starting plate has a good chance of not being in the same spot. Moreover, the Runners are also different for each sequence, and can even end up being the Plate Guardians assigned to the green plates! That's where your substitutes come in and save you with the power of teamwork by standing on the plate for you. After successfully collecting the third orb, which requires not just running through it, but pressing the prompt button, the Runner will receive a special buff called the "Brand Claimer". This item is vital for the next steps.
Ogres and Knights Management
Shortly after Ogres, Light-Eater Knights will also appear, diagonally opposite the Ogre spawn. These Knights have one goal: to run towards the Corrupted Light bombs and consume them. You MUST kill these Knights before they reach the bombs. If a Knight eats a bomb, it disappears, which can cause serious problems for the damage phase. Work in tandem with your Plate Guardian buddy to deal with both Knights on your side, especially if they're busy doing the sequence mechanic.
Stealing the Aura: After the third orb of light is collected by the Runner, they will be able to deal with a particularly nasty, glowing Knight called the Vessel of Oryx that should be running around the center of the arena. This Knight is shrouded in an "Aura of Immortality." The Runner, now equipped with their Brand Claimer buff, needs to approach the Vessel and use the Brand Claimer prompt to steal this Aura and then kill him. This stolen Aura is absolutely essential for surviving the upcoming damage phase!
Phase 2: Hurting the Big Guy (DPS Phase)
- Gather Up! Once the Aura of Immortality has been successfully stolen from the Vessel, and all Ogres and Light-Eater Knights from the current cycle are defeated, 4 Plate Guardians (or their substitutes if the current Runner is one) should quickly position near the Corrupted Light bombs that were dropped by the Ogres near their assigned plates - but do not go into them yet!
- Oryx Slams Again: Oryx will then fly towards one of the four main plates and dramatically slam his fist down onto it.
- Call of Bomb Duty! This is the signal! As SOON as Oryx's fist makes contact with the plate, walk into the bomb. Stand directly inside the bomb's blighted pool until you see your Guardian's name appear in the bottom-left corner of the screen, accompanied by the message: "[Your Guardian Name] has detonated a Corrupted Light."
- To Safety! The INSTANT you see your name and that message, immediately turn and run back to the safety of your Runner, who should be positioned in the center, ensuring you are inside their Aura of Immortality. If you are not within the Aura's protective embrace when the bombs you just triggered explode on Oryx, you will die. No questions asked.
- DAMAGE HIM! The coordinated detonation of these bombs will stun Oryx. His massive chest will rip open, revealing a large, glowing critical hit spot. This is your prime opportunity to lay into him! Unleash everything you've got – Supers, heavy weapons, special weapons – and pour damage into that crit spot. The more bombs you manage to trigger this DPS round, the longer the phase will be!
Phase 3: Surviving Oryx's Retaliation
After you've dished out some pain, Oryx isn't just going to sit there. He'll retaliate in one of two ways:
- Oryx launches tracking bombs
- EVERYONE RUNS and scatters
- Keep moving to avoid explosions
- Don't run into teammates
- Kill Knights on the plates to end the phase
- Dark spherical blight appears
- Players teleported into it one by one
- Must kill Shade of Oryx quickly
- Outside players kill Thralls
- When Shade of Oryx dies, everyone is teleported out of the blight
The Grand Finale: Oryx's Last Stand
Repeat those stages until you finally manage to whittle Oryx's health down to its last critical segment (usually the last 20-25% of his health bar). When that happens, he'll become immune and move to the front of the arena, preparing for his desperate final stand. This is it – the home stretch!
- Final Ogres: An Ogre will spawn near the front-right plate as you face Oryx. Your team must kill it quickly. Immediately after it dies, another Ogre will spawn near the front-left plate. Kill this one just as fast.
- Stun Him! As the second Ogre dies, Oryx's crit spot will open once more, allowing you to DPS him. While the rest of the team is busy with that, as soon as the message "Oryx calls upon the Darkness" appears on the left, the nominated bomber must run to and detonate the Corrupted Light bomb dropped by the first Ogre in this last stand phase. This detonation will stun Oryx, interrupting his wipe mechanic and, critically, keeping his chest open for damage.
- Burn Him Down! With Oryx stunned and his chest open, everyone else should unleash every last bit of damage they have. Beware, as those bombs still can kill you if you're not in the Aura, so huddle up and stay close!
- Second Stun (if needed): Oryx might try to initiate his wipe mechanic again if your DPS is not enough. If he does, the bomber needs to be ready to detonate the left bomb dropped by the second Ogre to stun him once more.
Keep pouring on the damage until the Taken King finally succumbs, his massive form dissipating into the void. Congratulations, you've (hopefully) defeated Oryx and have a chance at that Touch of Malice!
Boosting Your Odds: Getting Touch of Malice Without (Too Much) Pain
So, you've conquered Oryx, the cheers erupt in your headset, but… no Touch of Malice drops. Don't despair, Guardian! This is pretty common. The Touch of Malice is an Exotic weapon with a notoriously low base drop chance, estimated to be around 5% per eligible clear. That means you might need to defeat Oryx quite a few times.
However, the fantastic news is that Bungie has implemented a system to help you out: you can increase your chances of getting Touch of Malice by completing specific in-raid Triumphs!
The Power of Triumphs!
Within Destiny 2, Triumphs are like in-game achievements. For many raids, including King's Fall, there's a set of special Triumphs that, when completed, provide a small boost to the drop rate of the raid's Exotic weapon. While Bungie doesn't release the exact percentage increase for each Triumph, every single one you complete adds a little more weight to your odds. Think of it as tipping the scales of RNG slightly more in your favor.
| Triumph Name | Brief, Easy Explanation of What To Do |
|---|---|
| Sundered Flesh | Loot all the hidden chests within the King's Fall raid in a single run. (We'll cover these chest locations in the next section!) |
| The Grass Is Always Greener | Complete the Basilica (Totems) encounter's specific raid challenge. |
| Overzealous | During the Totems encounter, ensure that never more than one player is standing near an Annihilator Totem at the same time. |
| Devious Thievery | Complete the Warpriest encounter's specific raid challenge (these challenges rotate weekly, with one active at a time). |
| Brand Buster | During the Warpriest fight, ensure that every player on the team has held the Brand before any player holds it twice. |
| Gaze Amaze | Complete the "Golgoroth" encounter's specific raid challenge. |
| Taking Turns | During the Golgoroth fight, make sure every player on the team has successfully held Golgoroth's Gaze before any player takes it a second time. |
| Under Construction | Complete the "Daughters of Oryx" encounter's specific raid challenge. |
| The Floor Is Lava | During the Daughters' encounter, the player who is Torn Between Dimensions (the platform runner) must not touch the ground. |
| Hands Off | Complete the "Oryx" encounter's specific raid challenge. |
| Overwhelming Power | Defeat Oryx by detonating enough Corrupted Light bombs in a single damage cycle to push him directly into his final stand phase. |
| One True King | Complete the entire King's Fall raid on Master difficulty. (A significant challenge that offers a substantial boost!) |
| Crux of the King | Complete the entire raid without dying. (Very hard for the unprepared Guardians!) |
Secret Chests & The Special "Red Border" Chest
While you're navigating the treacherous halls of the Dreadnought and repeatedly showing Oryx who's boss, don't forget to pick up some extra goodies along the way! King's Fall has several secret chests hidden throughout its encounters. These chests won't drop Touch of Malice itself, but they will reward you with raid-specific armor, weapons (which you might need for Triumphs or just to fill out your collection), and sometimes raid mods. The inclusion of these chests, with varying methods to access them, encourages exploration and rewards players who take the time to look around.
Secret Chest #1: Tomb Ship Jumping Puzzle (Before Totems)
- Location: This chest is found during the first major jumping puzzle, the one with the sequence of Hive Tomb Ships you need to ride across a vast chasm, right before the Totems encounter.
- How to get it: Near the end of this jumping puzzle, before you reach the final platform where two players typically stand on pressure plates to open a door, look up and to your left. You should spot a diagonal ledge running up the main wall towards a small opening. To open the door hidden in that opening, you need two players from your fireteam to proceed to the exit of this jumping puzzle area and stand on the two circular pressure plates located there. This will open the hidden door. The other four players should then ride one of the Tomb Ships until it gets close to that diagonal ledge, jump onto the ledge, carefully walk up it, and enter the now-open doorway. The chest will be inside on a small platform. After these four have claimed their loot, two of them can swap places with the Guardians holding the plates, allowing them to also get the chest.

Secret Chest #2: Golgoroth's Cellar (The Maze after Warpriest)
- Location: This chest is hidden within the dark, confusing maze that you navigate right after defeating the Warpriest and before you reach Golgoroth's arena.
- How to get it: This one requires more coordination. There are five secret pressure plates hidden throughout the maze. Your fireteam needs to locate all five plates, assign one player to each, and then have everyone step on their assigned plate in a specific sequence.
- From the maze entrance, take the first right turn. Follow it to a dead end; the plate is in a small alcove to your right.
- Find the hallway that is to the left of the maze's exit. At the very end of this hallway, turn left again; the plate is there.
- This plate is in the left-hand hallway, relatively close to the entrance of the maze.
- Located in the middle-left hallway of the maze. You'll need to look for a hole high up in the wall to get past a blocked section of the path. The plate is directly ahead after you navigate this.
- This plate is at the end of the hallway that is to the right of the maze's exit. Once all five players are in position, they must step onto their plates in the numerical order listed above (1 through 5). If done correctly, the secret chest will spawn in the central hallway of the maze. Be very careful when moving through the maze, as there are many bottomless pits!
Secret Chest #3: Piston Jumping Puzzle (Before Daughters)
- Location: You'll find this chest in the final jumping puzzle section of the raid, the one with invisible platforms and giant wall pistons that try to push you off, which occurs just before the Daughters of Oryx encounter.
- How to get it: Proceed through this jumping puzzle until you reach the first pressure plate that you need to stand on to activate a bridge or open a pathway. From this plate, look towards your right. Now, the trick: pull out your Ghost! Doing so will reveal a series of previously invisible platforms floating in the air. Carefully jump across these ethereal platforms (you may also need to use some small, visible ledges along pillars and walls to reach the next set of invisible ones), making your way upwards and diagonally. If you navigate this hidden path correctly, you will eventually reach a doorway that leads into a small room where the chest is waiting. This chest primarily tests individual platforming skill and keen observation.
The "Red Border" Chest (Deepsight Resonance Weapon Cache)
This is a special bonus chest that guarantees a "red border" weapon (a Deepsight Resonance weapon) upon opening. These red border weapons are essential for unlocking and progressing weapon crafting patterns at the Enclave. This chest does NOT drop Touch of Malice.
- Identify the Active Symbols: At the very beginning of the King's Fall raid, in the initial area (Hall of Souls) where you dunk relics into statues to open the main portal to the Dreadnaught, there's a crucial step. Before or after opening the portal, go underneath the large central platform that holds the portal itself. Look up. You will see three distinct Hive runes displayed there. These three runes are the active symbols for your current raid instance. Someone in your fireteam needs to memorize these symbols, take a screenshot, or write them down!
- Find & Shoot the Matching Runes: Throughout the rest of the raid, there are nine predetermined locations where Hive runes can appear. Your fireteam needs to find the three specific locations that display the runes matching the ones you identified at the start, and then shoot these matching runes to activate them. This must be done within a single, continuous raid session (you can't leave the raid and come back later to finish it).
Touch of Malice Catalyst Guide
YES! You finally got Touch of Malice to drop! The crowd goes wild! But hold on, Guardian, because the journey isn't quite over if you want to unlock its full potential. Like many Exotics, Touch of Malice has a Catalyst that you can earn and complete to make it even better.
What Does Catalyst Do?
For Touch of Malice, completing its Catalyst unlocks the Rapid Hit perk. This perk is a game-changer for this Exotic: landing rapid precision hits temporarily increases the weapon's stability and reload speed. Given that Touch of Malice encourages you to keep firing that final, life-draining round, improved stability helps you stay on target, and faster reloads (if you ever need to fully reload) mean less downtime. This perk directly addresses potential handling downsides of the weapon's core mechanic, making it more user-friendly and effective.
After you acquire the catalyst, you'll need to get 700 kills with Touch of Malice to fully masterwork it and activate the Rapid Hit perk.
The Catalyst Puzzle: A Team Effort!
Getting the Touch of Malice Catalyst isn't a random drop; it's tied to a secret puzzle hidden inside the King's Fall raid. Crucially, at least one player in your fireteam MUST have Touch of Malice equipped to initiate and progress through the steps of this puzzle. The puzzle involves finding hidden plates, which then spawn several orbs of light (Relics). Your team must then collect these Relics and dunk them simultaneously at a designated altar. This entire process turns the Touch of Malice from simply being a reward into a key that unlocks further discovery and challenges within the raid.
Step 1: Raid Entrance (Hall of Souls / Statues Area)
- Plate Location: After your fireteam completes the initial statue-dunking encounter that opens the portal to the Dreadnaught proper, head into the large, open chamber. Go to the room located in the rear left corner of this chamber. The player with Touch of Malice equipped needs to stand on a pressure plate found here.
- Relics: Standing on the plate will cause four Relics (glowing orbs of light) to spawn in various locations within the main chamber. Your team will need to quickly locate these and assign one player to each Relic.
- Dunk Spot: The altar where these Relics must be dunked is situated in the middle of the large central chamber, directly behind where the main portal opened after you completed the first encounter.
- Action: Coordinate your team. Everyone assigned to a Relic needs to pick it up AT THE SAME TIME. A timer will begin as soon as the first Relic is picked up, so speed and coordination are vital. Once all four Relics are held, everyone must dunk them into the altar AT THE SAME TIME. Be prepared for resistance; Shriekers often spawn to harass you during this process.
Step 2: Golgoroth's Cellar (The Maze)
- Plate Location: Proceed through the raid until you reach Golgoroth's Cellar (the dark maze after the Warpriest). Make your way to the room that contains the second secret chest (the one requiring the specific plate activation sequence). The player with Touch of Malice needs to stand on another pressure plate, which is located in a small alcove to the side of this secret chest room.
- Relics: Activating this plate will spawn four more Relics in and around the maze and secret chest area. Spread out and find them.
- Dunk Spot: Look for the large pit in the hallway immediately next to where the second secret chest spawns. For the catalyst puzzle, this pit is no longer a deadly fall; instead, it leads to a small, hidden room containing another altar.
- Action: Once all four Relics are located and assigned, everyone should grab their Relic and carefully jump down into this pit to reach the hidden altar. Dunk all four Relics simultaneously.
Step 3: The Transept (Jumping Puzzle before Daughters / "Basketball Court of Oryx")
- Plate Location: Continue until you reach the Transept, the challenging jumping puzzle area with the large wall bumpers that launch unsuspecting Guardians into the abyss, right before the Daughters of Oryx encounter. After you successfully cross the second hidden bridge (the one that materializes after a player stands on a plate to activate it), look at the floor. The pressure plate for this step is located at the base of the climb that leads to the exit of the Transept.
- Relics: Four more Relics will spawn throughout this jumping puzzle area once the plate is activated.
- Dunk Spot: This time, you need to head back towards the entrance of the Transept area (the way you came in). Some new, narrow, floating platforms will have formed at the far end of this room, opposite the normal exit path. Carefully climb these newly appeared platforms. The altar for this step is at the top.
- Action: As before, all four Relics must be dunked simultaneously at this altar.
Final Step: The Basketball Court of Oryx!
- Successfully dunking the Relics in the Transept will cause a previously sealed door to open. This door is located just to the left of the Transept altar you just used. Entering it will lead you to a hidden area famously known among Destiny veterans as the "Basketball Court of Oryx" – a fun Easter egg from the original Destiny's King's Fall, now repurposed!
- Inside this large, hidden room, you'll see a tall altar at the back and a veritable TON of Relics scattered all over the floor.
- Action: This is the grand finale of the puzzle! EVERYONE on the fireteam should immediately start grabbing these Relics and dunking them at the large altar as quickly as they possibly can. There's no need for simultaneous dunks in this final phase; it's a coordinated frenzy of collecting and depositing Relics.
- Once all the Relics in the Basketball Court have been dunked, any player(s) in the fireteam who had Touch of Malice equipped and actively participated in the puzzle steps will be rewarded with the Touch of Malice Catalyst!
The Taken King's Legacy in Your Hands
Obtaining Touch of Malice, and especially its catalyst, is a significant accomplishment in Destiny 2. It's a testament to your skill, your team's coordination, and your perseverance through one of the game's most iconic raids.
The journey involves mastering the intricate dance of the Oryx encounter, from platforming as the Runner to strategically detonating Corrupted Light. It encourages a deep dive into the raid's systems by rewarding players who complete Triumphs with increased drop chances, pushing them to explore every challenge King's Fall has to offer. The hunt for secret chests adds another layer of exploration, while the elaborate catalyst puzzle provides a unique post-exotic chase, further extending the life and engagement of the raid.
Touch of Malice itself is more than just a powerful weapon; it's a piece of Destiny history, a direct link to the Taken King. Its unique perks demand a different approach to combat, rewarding risky plays with high damage output, especially once the catalyst is unlocked to smooth out its performance.
So, gather your fireteam, study the mechanics, communicate clearly, and face the Taken King. The path to Touch of Malice might be challenging, but the reward – wielding a weapon literally dripping with Hive magic and the legacy of Oryx – is well worth the effort. Good luck, Guardian, and may your drops be ever in your favor!