
Hey there, Guardian! So, you've heard the whispers, seen the glint of that awesome Exotic Glaive, Vexcalibur, and now you're ready to dive into the Vex network and claim it for yourself? Fantastic! The Avalon mission is a wild ride – a bit tricky, super atmospheric, and totally worth it. Now, I'm your fireteam buddy who's done it a few times and is here to spill all the secrets. We'll skip the super dry stuff and get straight to what you really need to know to snag that Vexcalibur right now. Let's do this!
What Makes Vexcalibur Special
Before we jump into the "how-to," let's talk about why Vexcalibur is such a neat toy. This isn't just any pointy stick; it's a Void Exotic Glaive that's all about defense and offense working together beautifully.
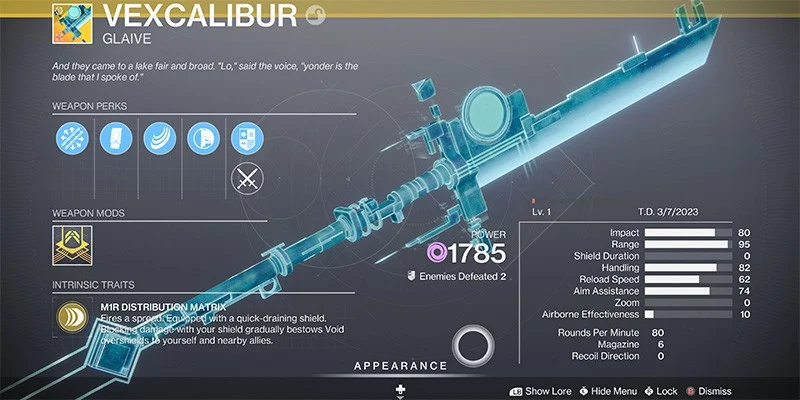
Its main gigs are:
Players who get into it, especially Void Titans, often rave about how it can make you feel nearly unkillable, letting you tank tons of damage and play super aggressively even in tough spots like Grandmaster Nightfalls. It's a glaive that's also a bit like a shotgun and a shield-generating machine all in one – what's not to love? Plus, it's craftable, so you can fine-tune it to your liking once you get the hang of it.
Unlocking Avalon
Alright, first things first: you can't just select Avalon from a director menu, oh no. This is a secret mission, which makes it even cooler! Here's how you kick things off:
Finding the Vex Cubes
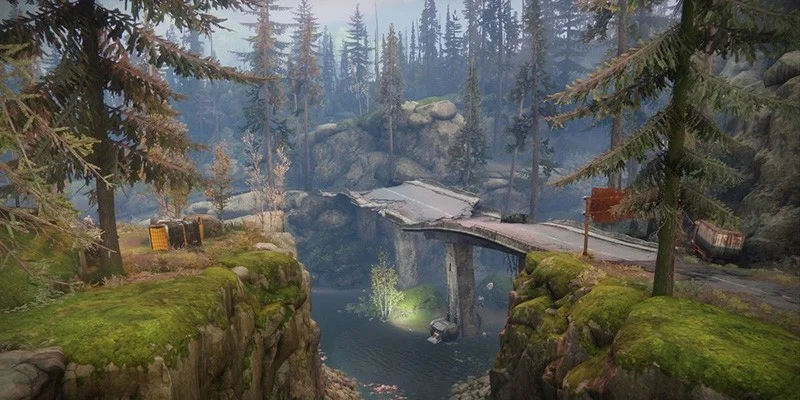
Your journey begins in the European Dead Zone (EDZ) on Earth. Specifically, you need to head to The Gulch landing zone.
- The Mission: Scattered around The Gulch are six mysterious, holographic Vex cubes (sometimes called nodes or electric boxes). Your job is to find and "collect" all six of them.
- The Catch: Here's where it gets spicy! Once you touch the first cube, a timer starts (usually 25-30 seconds). You need to find and touch the next cube before the timer runs out. Thankfully, touching a new cube resets the timer, giving you fresh seconds to find the next one. If you run out of time, you have to start the sequence all over again.
To make this initial sprint a little less frantic, here's a quick rundown of where those sneaky cubes like to hide in The Gulch:
| Cube # | Quick Location Hint |
|---|---|
| 1 | Near the spawn, drive along the road, across the broken bridge. As the road turns downhill, go right into the damaged trees. |
| 2 | Amid some broken trees in the middle of The Gulch. |
| 3 | Above the rusted road sign on the north road. |
| 4 | Next to a tree up against the northwest cliff wall, near the entrance to the Cabal tunnel base. |
| 5 | On top of some Cabal equipment on the hill towards the southeast. |
| 6 | Under the broken bridge. |
The Cave Appears
- Once you've successfully grabbed all six cubes within the time limit, you'll see a message like "Simulate terrain subnode //CAVE// deactivated…" and a big, flashy Vex data hologram will appear in the sky. This is your beacon!
- Follow that hologram! It will lead you to a cave entrance, usually in the southeast corner of The Gulch. Sometimes it's described as being near a large floodlight.
- Head inside the cave. You'll need to jump up to a ledge at the back. This will magically open a previously blocked path.
- Jump down the hole that appears, and you'll find a friendly (yes, friendly!) Vex Harpy. This is our old buddy Asher Mir, in a new Vex-y form! Interact with this Harpy to officially start the NODE.OVRD.AVALON mission and 'The Variable' quest for Vexcalibur!
Navigating the Vex Network
Alright, you're in! The Avalon mission is a journey deep into the Vex network, a place that feels ancient, digital, and a bit spooky. It's got cool visuals, tricky puzzles, and some tough fights. But don't worry, we'll break it all down! The mission itself is pretty linear, but the Vex love their hidden paths and moving obstacles, so keep your eyes peeled.
The Symbol Puzzles
The first part is a bit of a platforming adventure. You'll be dropping down, following Vex 'radiolaria' streams (that milky, digital-looking stuff), and looking for small gaps or crevices in walls to slip through. The atmosphere here is really something – you definitely feel like you're trespassing in a forbidden Vex zone.
You'll fight a few Vex along the way, but nothing too crazy yet. Eventually, you'll hit an open area with a Rally Banner – plant it and get ready for the first real encounter!
How the Access Code Puzzle Works
This is a classic Vex puzzle! You'll see a central Vex pillar (or conflux) where three shapes will appear: a cube, a pyramid (it looks like a triangle), and a diamond (an octahedron, like two pyramids stuck together at the base).
- Look around the arena for a holographic column of shapes stacked vertically. This is your code!
- Memorize the order from top to bottom
- Shoot the shapes that appear around the central pillar in that exact same order
- Wait for new shapes to spawn after each correct shot
- Repeat for multiple sequences (3 symbols, then 4, then 5)
Surviving the Symbol Room
While you're code-breaking, Vex Goblins will be constantly pouring in, and Hobgoblin snipers will perch on floating platforms. Don't ignore them! These guys are designed to break your concentration.
- Pillar to your left when you first land on the platform
- Right-hand corner on the lower level (second room)
- Near the lower Vex gate for enemies that can't path down
- Hobgoblin snipers on floating platforms
- Constant Goblin spawns
- Tough Cyclopses in the second room
The Data Nullifier Boss Fight
After more platforming (watch out for those Vex pistons trying to push you off narrow ledges! Take it slow), you'll reach a large, circular arena. This is home to the Data Nullifier boss and a nasty wipe mechanic called the 'Deletion Cycle'. This part can feel pretty intense, with a constant timer ticking down.
Collecting Data Fragments
When the encounter starts, special Vex Goblins called 'Dataholder (Corrupt)' will spawn. These headless guys are your key – they drop purple data motes (they look just like the motes from Gambit) when you defeat them.
Your goal is to collect a specific number of these motes. Your quest objective on screen will tell you how many you need – it starts with 8, then 10 for the next wave. After the boss appears and takes some damage, you'll need to collect 10 again, and then 12 for the final mote phases.
Surviving the Deletion Cycle
Once you have the required number of motes, run to the conflux (that Vex pillar structure) in the middle of the arena and deposit them.
This is crucial: depositing the motes will open a pit in the floor directly under the conflux.
JUMP IN THE HOLE! You have a timer (usually around 40 seconds from the start of each mote collection phase) before the Deletion Cycle activates and wipes out everything in the main arena. The hole is your only safe zone from this insta-kill mechanic.
Pro-Tip for Wyverns in the Pit:
- A Glaive projectile can sometimes stun a Wyvern peeking into the hole
- Strand abilities can suspend Wyverns (absolute lifesaver!)
- Some players use emotes like 'seated' or 'sleeping' near pit walls to clip slightly
Fighting the Data Nullifier Hydra
After you successfully survive a couple of data deposit and deletion phases, the Data Nullifier Hydra boss will appear.
This Hydra has a LOT of health. Pour damage into it with your Super abilities and Heavy weapons. When you get its health down by about half (or around 40% according to some), it'll retreat, and you guessed it – you'll have to do the data collection/hiding routine again. This time you'll need to collect 10 motes, survive the wipe, then collect 12 motes and survive again.
After those two mote phases, the Data Nullifier comes back out. This time, you can finish it off! Focus all your firepower on the boss; the other adds will despawn once it's defeated, so don't get too distracted by them unless they're directly threatening you.
The Final Boss: Brakion
After more Vex-y platforming, including navigating past more of those wall-mounted pistons, you'll reach the final boss: Variant Stalker Brakion, Repurposed Mind. If you're a Destiny veteran, you might remember Brakion as the imposing boss of 'The Pyramidion' Strike on Io – he's back, and he's definitely meaner than ever in this Vex network incarnation!
Phase 1: Initial Assault
This phase is relatively straightforward: your goal is to damage Brakion while dealing with waves of Vex adds that will continuously spawn (expect Goblins, Minotaurs, and even Wyverns).
Brakion will teleport around the three points of the arena periodically. When he does, make sure you reposition to keep some cover between you and his powerful laser attacks.
Get Brakion's health down by about one-third (you'll see his health bar has segments; aim for that first marker). Once he takes enough damage, he'll dramatically lose his head, enrage (meaning he'll start sprinting right at you while still firing!), and then retreat through a portal. Take a deep breath, and follow him through!
Phase 2: The Firewall & Symbol Puzzle
Welcome to the next arena! Here, Brakion is protected by an impenetrable firewall. You can't hurt him directly, so you have to improvize!
To drop this firewall, you need to solve another Vex symbol puzzle, just like the ones at the start of the mission. Look around for the holographic code – it's often found underneath a transparent triangular piece of flooring on either the left or right side of the arena. Once you spot the sequence, shoot the corresponding shapes at the central conflux.
Once you enter the code correctly, the firewall drops for a precious 30 seconds, giving you a window to damage Brakion. Pour on the firepower! He won't be alone; expect adds like Cyclopses and Harpies to be harassing you.
Be very wary of the Cyclopses that spawn to the left and right of Brakion during this phase; they can melt you quickly if you're not careful. Take them out as a priority if they have an angle on you.
Phase 3: The Final Showdown
Brakion has had enough! He flees to one last, smaller arena. Now he's really mad and will become extremely aggressive. He'll relentlessly chase you around the room, often supported by explosive Vex Fanatics that will rush you.
This phase is all about kiting (running away while shooting), add control (kill those Fanatics before they get too close!), and chipping away at Brakion's remaining health whenever you have a safe moment to do so.
In this final arena, as you enter, try running to the right side. You should find a Vex milk waterfall (or geyser). You can often hide behind this structure. Brakion and most of the adds seem to have trouble targeting you effectively there, or their AI can get a bit confused. This can give you a much-needed breather and a safer spot to shoot from.
If you're using the waterfall spot, you can often shoot out from behind it. Long-range weapons - Sniper Rifles like The Supremacy, or Exotics like Arbalest or Outbreak Perfected - are your savior here.
Keep up the pressure, manage the adds (especially those Fanatics!), and eventually, the mighty Brakion will fall!
| Phase | Brakion's Attack/Mechanic | Your Counter-Move/Pro-Tip |
|---|---|---|
| Phase 1 | Standard attacks, teleports, summons adds | Use cover, reposition when he teleports. Consider the "safe bunker" on the left. Focus adds when he's out of sight. Damage him to ~66% health. |
| Phase 2 | Impenetrable firewall, summons adds (Cyclops, Harpies) | Solve symbol puzzle to drop firewall for 30s. Prioritize Cyclopses. Damage him to ~33% health. |
| Phase 3 | Highly aggressive chase, summons explosive Fanatics | Kite Brakion, kill Fanatics ASAP. Use the Vex milk waterfall on the right for cover. Chip away at his final health bar. |
Victory and Claiming Vexcalibur
You did it! Brakion is toast! Go ahead and grab it! The frame of the Vexcalibur Exotic Glaive is yours, and completing the 'NODE.OVRD.AVALON' mission should progress 'The Variable' Exotic quest as well.
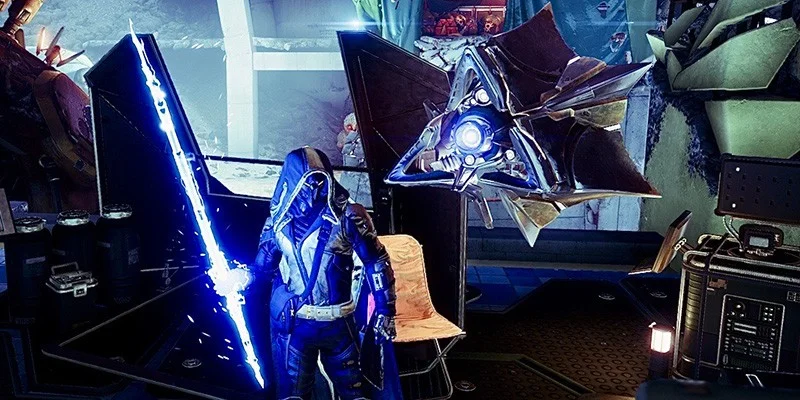
Now, for the grand finale of this part of your adventure. Take that Vexcalibur frame you just picked up and head to the H.E.L.M. (the Hub for Emergency Logistics and Maneuvers).
Once you're in the H.E.L.M., go to the War Table (the one that was central during the Season of Defiance). Interact with it, and you'll officially claim your shiny new Vexcalibur! Congrats, Guardian, you've truly earned it!
The first Vexcalibur you get is already crafted, so you can start using its awesome abilities right away! After all that hard work, taking that Vexcalibur frame to the War Table and officially making it yours feels pretty awesome. It's like pulling the sword from the stone, Vex-style!
Power-Up Tips
- Abuse Those Hiding Spots: The Vex milk waterfalls in Brakion's final phase? Use 'em!
- Add Control is Key: Don't let yourself get swamped by Vex, especially Hobgoblin snipers
- Manage the Motes: Collect only what you need and DUNK 'EM FAST
- Void Builds Shine: Especially for Titans, Vexcalibur has fantastic synergy with Void subclasses
Powering Up Your Vexcalibur
So you've got Vexcalibur! Awesome! But the fun doesn't stop there. This glaive is craftable, meaning you can take it to the Enclave on Mars and tweak its perks to better suit your playstyle. The first one you received is ready to go, but as you use it and complete certain objectives, you can unlock even more cool stuff for it.
Catalysts and Intrinsic Upgrades
Vexcalibur has some amazing catalysts (which are special Exotic weapon upgrades) and intrinsic perk improvements that make it even stronger.
These catalysts give it cool new abilities that really enhance its unique playstyle:
Available Catalysts
How to Get Them
Now, here's a super important thing to know about making Vexcalibur even more awesome with its special upgrades. Some old guides might tell you about hunting for super-secret chests for these catalysts. While there are secret chests in Avalon that give other rewards, the main way to get Vexcalibur's three main catalysts and its intrinsic upgrades (for the haft, magazine, and stock) now is to run the Avalon mission on LEGEND difficulty.
- You'll need to complete Legend Avalon three times in total
- Each successful Legend clear rewards one of the three main catalysts
- Legend difficulty is a serious step up with tougher enemies and challenging modifiers
- The payoff for Vexcalibur is totally worth it!
This is a more straightforward path than some older methods might suggest, making the upgrade path more predictable.
Future Adventures
So, once you're comfortable with the normal Avalon mission and you're having a blast with your new Vexcalibur, tackling Legend difficulty is your next big step to unlock its full, incredible potential. But for now, just enjoy your new Exotic – you've definitely earned it, Guardian! Go make Asher proud!