
Alright, Guardians, gather 'round! Are you ready to hunt down one of the most peculiar, potent, and downright satisfying heavy weapons in our arsenal? We're talking about Xenophage – the Exotic Machine Gun that spits pure, explosive Solar fury. Forget precision; this chitinous cannon delivers walloping punches with every shot, making Majors flinch and invaders evaporate. Its unique Pyrotoxin Rounds don't just hit; they detonate, offering unparalleled ease of use and staggering impact. While it might not always top the raw DPS charts due to its lack of critical hits, its reliability, infinite range, and knack for solving specific, troublesome encounters make it a prized specimen in any Guardian's collection. It holds a solid A-Tier spot in the PvE meta for good reason. So, grab your best bug net – metaphorically speaking – because we're embarking on the hunt for Xenophage!
The Hunt Begins: Xenophage Quest Acquisition

Before we delve into the Moon's darkest corners, let's cover the essentials for starting this exotic safari.
Prerequisites: Gearing Up for the Chase
- Expansion Required: Access to the Destiny 2: Shadowkeep expansion is mandatory. This quest is intrinsically tied to the Moon's secrets unveiled in that chapter.
- Power Level: While specific Power Level requirements shift with seasons, ensure your Guardian is sufficiently leveled to tackle Moon activities and, crucially, the Pit of Heresy dungeon at its base difficulty. Check the current recommended Power for the dungeon before diving in.
Step 1: Emergence - Lighting the Path Forward
Our quest begins not with Eris Morn directly, but in the chamber overlooking the ominous Pyramid ship deep within the Moon.
- Accessing the Chamber:
- Portal Route: The quickest way is via the portal that sometimes appears next to Eris Morn in Sanctuary, often active when her weekly memory quest directs you there.
- Manual Route: If the portal isn't active, hoof it! Spawn at Sorrow's Harbor, head north into the Scarlet Keep entrance, and immediately take the path veering left into the Hive tunnels. Follow this path until you see Hive lanterns. Look up and to the right for an opening in the cave wall; jump up and follow this passage. This leads to the overlook chamber.
- The Statue Puzzle: Inside the chamber, you'll find four Hive statues, two on each side. Interacting with one lights up another. The goal is to light all four simultaneously.
- Solution: While facing away from the Pyramid ship (towards the entrance you came from), interact with the statues in this specific order: Front Right, Back Left, Back Right, Front Left OR Bottom Left, Top Left, Bottom Right, Top Right. Note: Some sources offer slightly different sequences like anti-clockwise or FR, BL, FL. The FR, BL, BR, FL sequence is commonly cited and reliable.
- Claim the Quest: Successfully lighting all statues spawns a chest in the center of the room. Open it to receive the first quest step, "The Journey: Emergence".
Step 2: Anchor of Light - A Fiery Trail
With the quest active, it's time to head to the Anchor of Light region on the Moon for a timed torch relay.
- Find the Orb: Head towards the northwestern part of Anchor of Light, near the large radio tower. Locate a small, yellowish building slightly south of the main tower structure. Inside, you'll find a flaming orb – "Pick Up Light".
- The Timed Sequence: You must carry this orb and dunk it into six specific Hive lecterns (bowls/plates) scattered around Anchor of Light in a precise order. You have exactly 60 seconds between each successful dunk to reach the next one. The timer resets upon each successful dunk, giving you a fresh minute. Failure means the orb vanishes, and you must restart from the beginning.
Pro TipScout the locations beforehand so you know the route! Having fireteam members positioned near later lecterns can speed things up, as anyone with the quest step can complete it for the team. The timer doesn't start until the first lectern is lit.
| Order | Location Description |
|---|---|
| 1 | Inside the same small building where you picked up the orb. |
| 2 | North of building 1, under a large fallen radio tower leaning against a hill on the left side of the open area. |
| 3 | South towards the large central saucer building; inside a small yellow building on the ground opposite it. |
| 4 | Climb the large radio tower (northwest area); one level up, on the north side outer edge/scaffolding. |
| 5 | Look north from tower 4 to ground buildings; up the ramp of the building on the right. |
| 6 | On the very top/roof of the large, round saucer-like building in the middle of Anchor of Light. |
Complete the Step: After lighting the sixth lectern, a waypoint will appear nearby. Dunk the orb one last time at this final Hive spire to complete the "Emergence" step and receive "The Journey: Pathfinder".
Step 3: Pathfinder - Decoding the Lost Sectors
This step sends us spelunking into the Moon's four K1 Lost Sectors to solve intricate Hive rune puzzles.
- Objective: Clear each of the four specified Lost Sectors: K1 Communion (Anchor of Light), K1 Logistics (Archer's Line), K1 Revelation (Sorrow's Harbor), and K1 Crew Quarters (Hellmouth).
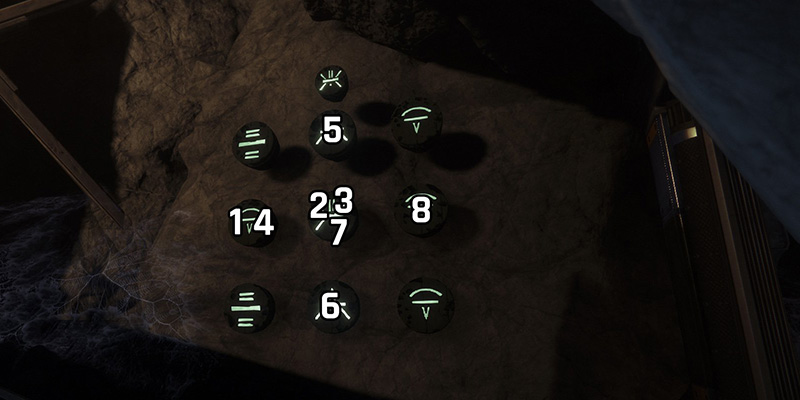
- Locate the Puzzle: After defeating the Lost Sector boss and looting the chest, look for a 3x3 grid of Hive runes on a nearby wall. Above the grid is a single target rune.
- Puzzle Mechanic: The goal is to make all nine runes in the grid match the target rune above. Shooting a specific rune on the grid will rotate the symbol shown on all runes in that same row and column to the next symbol in a fixed sequence. The typical rotation order is something like: Five Lines → V Shape → Up Arrow → X Shape (exact visual sequence may vary slightly).
- Solutions & Troubleshooting: These puzzles demand precision. The provided solutions only work if the grid is in its initial, untouched state. If you make a mistake, leave the Lost Sector entirely and re-enter to reset the puzzle.
| Lost Sector | Location | Solution (Positional: T=Top, M=Middle, B=Bottom, L=Left, C=Center, R=Right) | Solution (Numpad: 1=TL, 9=BR) | Key Troubleshooting Tip |
|---|---|---|---|---|
| K1 Communion | Anchor of Light | BL, BR, TM, TM | 7, 9, 2, 2 | Stand on metal grating if needed. Use simple weapon. |
| K1 Logistics | Archer's Line | TL, BL, C, MR | 1, 7, 6, 5 | Use simple weapon. Verify sequence. |
| K1 Revelation | Sorrow's Harbor | ML, C, C, ML, MT, MB, C, MR | 6, 4, 5, 5, 4, 8, 5, 2 | Use simple weapon. Verify sequence. |
| K1 Crew Quarters | Hellmouth | TR, ML, C, BM, BR, BR, BM, BM | 3, 4, 5, 8, 9, 9, 8, 8 | Use simple weapon. Verify sequence. |
Path Uncovered: After successfully solving all four puzzles and collecting the Path Fragments, you'll receive the next quest step, "The Journey: Descent".
Step 4: Pit of Heresy - Descent and Discovery
The hunt now takes us deep into the Hive's domain – the Pit of Heresy dungeon. This quest cleverly weaves its steps into the dungeon's structure, requiring navigation and survival alongside puzzle-solving. You'll need to progress through the first encounter (Necropolis) and then navigate specific hidden paths in the subsequent areas.
- Post-Necropolis: The Wall of Doors: After completing the first encounter (killing the three minibosses with the Hive sword and opening the chest), you'll face a large wall filled with dark doorways.
- Identify the Correct Door: Look carefully – one door will be missing the usual Hive rune/symbol hanging above its entrance. This is your target. Its location is typically cited as upper-left or sometimes upper-right or described positionally. Use pillars or ledges to jump to it.
- Beware the Traps: Most other doors have push traps that will launch you to your death if you get too close or linger. Be quick and precise with your jumps.
- Interact: Once safely inside the unmarked door, find and interact with the Hive rune or scannable object within to "Reveal Path's End" and progress the quest.
- The Tunnels & Ogre Encounter Area: Proceed further into the dungeon until you reach the large, open area with pathways crisscrossing a chasm, patrolled by invincible Ogres (the Pariahs).
- Find the Hidden Ledge: Head towards the left side of this area as you enter. Look down over the cliff edge into the chasm marked by a green glow and a large skeleton below. Carefully drop down onto a narrow ledge path below the main walkway.
- Activate the Plate: Follow this ledge path until you find a plate with Hive runes on it. Interact with this plate.
- The Flame Puzzle:
- Summon Platforms: Activating the plate summons a series of floating platforms extending out over the chasm.
- Retrieve the Orb: Carefully jump across these platforms. The Ogres can still shoot you here, so be swift. On the final platform, pick up another flaming orb (similar to the Anchor of Light one). This orb likely does not have a timer.
- Navigate to the Door: Carry the orb back across the platforms to the hidden ledge. Now, carefully make your way across the main tunnels towards the right side of the area, avoiding the Ogres.
- Light the Lecterns: Look for a locked, reddish door with two unlit Hive lecterns/plates/firepits beside it. Use the flaming orb to light both of these lecterns. Note: While one source mentions needing two orbs, the overwhelming consensus describes carrying one orb and using it on both lecterns.
- Enter the Final Arena: Lighting the lecterns opens the door. Proceed through the newly opened passage; this path leads directly to the secret boss encounter required for Xenophage.
The Final Confrontation: Slaying Volmâr, the Tempted
You've navigated the hidden paths and now face the final guardian of this quest: Volmâr, the Tempted. This Hive Wizard demands a unique approach, testing your elemental adaptability.
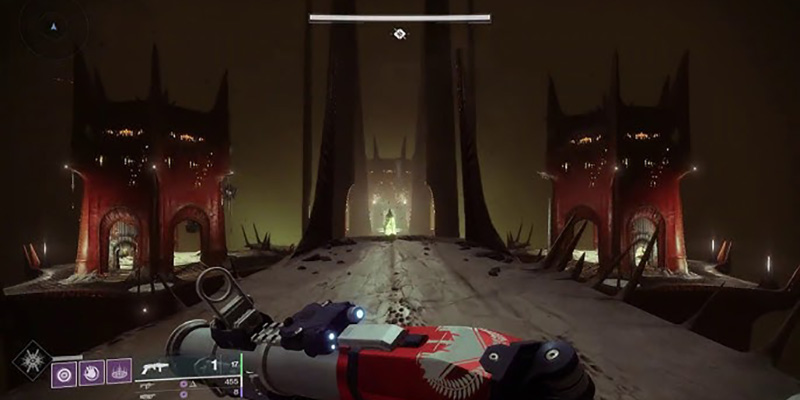
The Arena and Setup
Before engaging the boss, take stock of your surroundings. You'll enter a room with a central platform, surrounded by upper and lower levels, with distinct corners.
Boss Mechanics: Dread and Vengeance
Volmâr herself is a formidable Hive Wizard (listed as 980 Power historically, though this scales) and starts the fight invincible. The core mechanic revolves around matching elemental debuffs to specific locations.
- Elemental Dreads: As the fight begins, each player in the fireteam will be randomly assigned one of four debuffs, visible on the bottom-left of the screen: Abyssal Dread (Void), Thunderous Dread (Arc), Fiery Dread (Solar), or Neutral Dread (Kinetic).
- Activating the Damage Phase:
- Grab the Orb of Light/Flame from the center of the arena.
- Identify the correct dunking plate/location in one of the four corners. This location corresponds to the Hive symbol associated with your current Dread debuff (which you memorized from the previous room).
| Dread Debuff | Associated Element | Required Dunk Symbol (Desc) | Dunk Location (Arena Corner) |
|---|---|---|---|
| Abyssal Dread | Void | A-like rune | Top Level, Back-Left |
| Thunderous Dread | Arc | V-like/Cone rune | Bottom Level, Front-Left |
| Fiery Dread | Solar | W/X-like rune | Bottom Level, Back-Right |
| Neutral Dread | Kinetic | I-like/Lines rune | Top Level, Front-Right |
Outcome: Dunking the orb in the correct location grants the Vengeance buff for approximately 25-30 seconds. Dunking in the wrong location results in a temporary slow debuff and a "Path Unclear" message, wasting time.
- Dealing Damage: While the Vengeance buff is active, Volmâr becomes vulnerable only to damage matching the element of the Dread debuff you originally had for that cycle. For example, if you had Fiery Dread, dunked at the Solar symbol plate, you must now use Solar weapons or abilities to damage the boss. Kinetic damage is needed for Neutral Dread.
- Repeat Cycle: Once the Vengeance buff expires, Volmâr becomes immune again. Each player receives a new random Dread debuff, and the cycle of grabbing the orb, identifying the correct symbol/location, dunking, and dealing element-matched damage repeats until the boss is defeated. This fight design is quite distinct, forcing individual adaptation rather than synchronized team buffs, making personal loadout and awareness paramount.
Strategies and Tips for Squashing Volmâr
Solo Survival: Invisibility with Graviton Forfeit is a strong choice. Knife Trick or Lightweight Knife for applying Scorch and triggering Radiant. Marksman's Dodge for instant reloads. Consider Golden Gun for burst damage on Knight adds and decent boss damage.
Devour Warlock provides excellent survivability. Well of Radiance offers unparalleled team support (healing + damage buff). Rain of Fire boots grant instant reloads via Icarus Dash. Use Solar abilities to maintain Radiant.
Actium War Rig is essential for continuous firing. Ward of Dawn (Bubble) provides Weapons of Light for team damage. Bastion Aspect grants Overshield on Barricade deployment. Control the battlefield from your position of strength.
Loadout Essentials
- Bring reliable weapons covering Solar, Arc, Void, and Kinetic damage types. You must be able to deal damage regardless of which Dread you receive.
- Consider:
- Element-swapping Exotics like Borealis or Hard Light.
- Strong special weapons for each element (Fusion Rifles, Snipers).
- A good Kinetic option for Neutral Dread phases and add clear (Izanagi's Burden recommended for burst on the Knight add and decent boss damage).
- A solid add-clear weapon.
- A burst Super (Nova Bomb, Thundercrash, Golden Gun).
Quick Fire Tips: Volmâr Vanquishing
- Memorize or screenshot the element-symbol pairings before starting!
- Always have damage options ready for Solar, Arc, Void, and Kinetic.
- Prioritize survival: manage adds, use cover, equip resist mods.
- Bait the boss away from the center before grabbing the orb.
- Know your dunk locations based on symbols, don't guess.
- Call out your Dread element in a team.
- Kill the orange-bar Knight quickly after each damage phase.
Claiming the Prize: The Bug Within
Defeating Volmâr, the Tempted, causes her to drop the final quest item: a peculiar Hive Bug, identified in the quest log as "A Loyal Friend". This completes the "Slay Volmâr, the Tempted" step.
- No Need to Finish the Dungeon: You can leave Pit of Heresy immediately after defeating Volmâr and collecting the bug; completing the rest of the dungeon is not required for the Xenophage quest.
- Return to Eris: Take the Hive Bug back to Eris Morn on the Moon. After a brief interaction, she will perform her Hive magic, infusing the bug into a weapon frame to grant you the Xenophage Exotic Machine Gun. Congratulations, Hunter!
- Bonus Chest: For the truly thorough, there's a hidden chest located beneath the floor in Volmâr's arena. It's accessible via a hidden drop-down in one of the connecting tunnels from the main dungeon path. It typically contains minor rewards like Glimmer, materials, or dungeon-specific Essences.
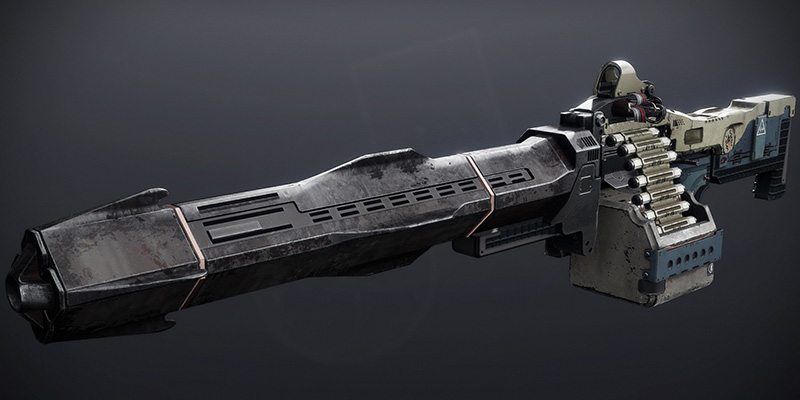
Xenophage Unveiled: Anatomy of the Alien-Eater
You've captured the beast! Let's dissect this exotic specimen and examine its unique traits.
Core Stats and Perks: What Makes it Sting
Xenophage deviates significantly from standard Machine Gun behavior, primarily due to its intrinsic perk.
- Intrinsic Perk: Pyrotoxin Rounds: This is the heart of Xenophage. It fires high-powered explosive ammunition.
- Effect: Each round detonates on impact, dealing Solar area-of-effect damage.
- Key Consequence: These explosive rounds cannot deal precision (crit) damage under normal circumstances. Aiming for weak spots provides no damage benefit without external factors like the Divinity debuff.
- Barrel: Full Bore: Optimized for distance. Greatly increases Range, but decreases Stability and slightly decreases Handling.
- Magazine: High-Caliber Rounds: Shots knock targets back further. Slightly increases Range. Adds significant flinch in PvP.
- Trait: Rangefinder: Aiming this weapon increases its effective range and zoom magnification. Given that Pyrotoxin Rounds effectively grant infinite range by eliminating damage falloff, Rangefinder's utility on Xenophage is questionable and might be less impactful than on conventional weapons. It could be a remnant perk choice or offer a minor benefit to aim assist stickiness at range.
- Stock: Composite Stock: Versatile dual-purpose stock. Slightly increases Stability and Handling.
Key Stats Breakdown:
| Stat | Value | Notes |
|---|---|---|
| Impact | 100 | Maximum |
| Range | 68 | Base (API often shows higher values like 88 due to perk calculations) |
| Stability | 32 | Base (API may show lower values like 27) |
| Handling | 30 | |
| Reload Speed | 31 | Base (Feels very slow in practice, one source lists 38, another notes 1.85s time) |
| Rounds Per Minute (RPM) | 120 | Slow for an LMG |
| Magazine | 20 | |
| Aim Assistance | 33 | |
| Recoil Direction | 85 | Tends vertical. Noticeable kick per shot. |
| Damage Type | Solar | |
| Ammo Type | Heavy |
The Missing Exoskeleton: Xenophage's Catalyst
One persistent topic surrounding Xenophage is its lack of an obtainable Catalyst.
- Current Status: Despite having a visible (but empty) catalyst slot on the weapon's inspection screen, Xenophage currently has no obtainable Catalyst in Destiny 2. Data for a catalyst might exist within the game's files (API), but Bungie has never officially released it.
- Community Desire: The player base frequently requests a catalyst for this popular exotic, hoping to enhance its capabilities or mitigate its weaknesses.
- Popular Catalyst Ideas: Speculation abounds, with common suggestions including:
- Ammo Economy: Increased Reserves (Deeper Pockets) or faster Reload (Field Prep, Reconstruction, Auto-Loading Holster).
- Damage Boost: Perks like Onslaught, Target Lock, Explosive Light, Firing Line, or Vorpal Weapon.
- Synergy & Utility: Adding Solar 3.0 verbs like Scorch or Incandescent, intrinsic Anti-Champion properties, Chain Reaction, or even the quirky Lasting Impression.
- Lore Nod: Some wish for the return of its rumored pre-release ability to deal critical damage.
- Why No Catalyst? The continued absence of a catalyst for such a unique and widely used weapon might be a deliberate balancing decision. Xenophage occupies a powerful niche; a catalyst addressing its main drawbacks (reload, reserves) or significantly boosting its damage (via perks or Scorch synergy) could easily propel it to meta-dominance, potentially overshadowing other heavy weapon choices. Keeping it catalyst-free maintains its status as a strong, situational tool rather than an all-encompassing best-in-slot option.
Conceptual Stat Comparison: Xenophage vs. Other Exotic LMGs
| Stat | Xenophage | Thunderlord | Grand Overture | Heir Apparent |
|---|---|---|---|---|
| Impact | 100 | 53 | 55 (Missiles: High) | 35 |
| RPM | 120 | 450 | 100 (Charge) | 900 |
| Magazine | 20 | 68 (w/ Catalyst) | 20 (Charge) | 150 |
| Reload Speed | 31 (Slow) | 55 (Average) | 50 (Average) | 45 (Slow) |
| Stability | 32 (Low) | 50 (Average) | 40 (Low) | 100 (w/ Shield) |
| Key Feature | Explosive Rounds | Chain Lightning | Missile Volley | Arc Shield |
Wielding the Alien-Eater: PvE Mastery
Alright, let's talk about where this bug truly shines: Player versus Environment combat. Xenophage is a workhorse, capable of handling threats that make other weapons struggle.
Strengths: Why It's a Top Pick
- Devastating Impact: That 100 Impact stat isn't just for show. Xenophage hits hard, deleting tougher enemies like Hive Knights, Wizards, Shriekers, Taken Captains, and Champions with just a few shots. Its explosive rounds deal significant Solar damage per hit.
- Supreme Ease of Use: This is Xenophage's defining advantage. Because Pyrotoxin Rounds explode and cannot crit normally, you don't need to aim for weak spots. Just point at the center mass of your target and pull the trigger. This makes it incredibly forgiving and highly effective for players who aren't confident snipers.
- Infinite Effective Range: The explosive projectiles don't suffer from damage falloff. You can engage targets from the safest distances across massive arenas without losing any damage potential.
- Solar Utility: Deals Solar damage, making it effective against Solar shields and allowing it to benefit from Solar Surges, Radiant buffs, and other Solar-focused build elements.
- Specific Encounter Dominance: Xenophage trivializes certain mechanics. It famously one-shots Oracles in the Vault of Glass raid. It's excellent for quickly destroying the floating Blight Takers/Eyes in the Deep Stone Crypt's Atraks-1 and Security encounters. It performs well in target-rich environments with durable enemies like the Prophecy dungeon's Cube room or the Vow of the Disciple's Exhibition encounter. It even excels at taking down annoying airborne threats like Threshers during public events.
- Legacy Warmind Cell Synergy: While less relevant now due to mod system changes, Xenophage used to be a premier Warmind Cell generator when paired with the Wrath of Rasputin mod, as its Solar explosive kills counted for cell creation.
Weaknesses: The Chinks in its Armor
No weapon is perfect, and Xenophage has distinct drawbacks to consider.
- No Precision Damage: This is its biggest limitation for pure boss DPS. Without the ability to land critical hits (outside of the Divinity debuff), its maximum single-target damage potential is capped compared to precision weapons like Linear Fusion Rifles or Sniper Rifles.
- Glacial Reload Speed: The base reload is painfully slow, creating significant downtime in sustained damage scenarios. Mitigation through mods or exotics is almost mandatory for serious use.
- Shallow Ammo Reserves: Compared to many Legendary LMGs or even Thunderlord, Xenophage holds relatively few rounds in reserve. Ammo finder and reserve mods are crucial to avoid running dry in extended fights.
- Slow Rate of Fire: At 120 RPM, it fires much slower than typical LMGs, limiting its burst damage output.
- Exotic Slot Competition: Occupying the Exotic slot means foregoing powerful options in the Primary or Special slots, like Witherhoard, Izanagi's Burden, Arbalest, or top-tier primary Exotics.
Best Activities & Encounters: Where the Bug Bites Hardest
Raids:
- Vault of Glass: S-Tier for Oracles (one-shot kill). Also effective against Hobgoblins and Wyverns.
- Deep Stone Crypt: Excellent for destroying the Sentinel Augment Replication Eyes during the Atraks-1 fight and for quickly eliminating the Security Fuses. Good for general Major clear.
- Other Raids (Vow, King's Fall, Crota's End, Salvation's Edge): Situational. Useful for specific durable Majors (e.g., Vow Exhibition's Glyphkeepers, King's Fall Light-Eater Knights/Ogres, Crota's End Wizards/Knights) or encounters where range and ease-of-use are prioritized over raw boss DPS.
Dungeons:
- Pit of Heresy: Naturally thematic! Great for clearing Knights, Wizards, and Ogres throughout the dungeon.
- Prophecy: Highly effective in the Hexahedron (Cube Room) encounter for clearing Taken Knights and Hobgoblins from safety.
- Spire of the Watcher: Good for dealing with distant Hobgoblins and tough Vex Minotaurs.
- Ghosts of the Deep/Warlord's Ruin: Useful for chunking down powerful Hive/Scorn Majors from a distance.
Grandmaster Nightfalls:
Viable, but often situational. Its infinite range allows safe elimination of high-threat targets like distant Wizards, Shriekers, or Champions. However, its ammo economy can be strained in GMs, and it often competes with meta choices like Rocket Launchers, Linear Fusions, or specific anti-champion Exotics. It's rarely the optimal choice for speedrunning but can be a reliable tool for safer clears, especially if Solar Surge is active or specific enemies are problematic.
Gambit:
Top-Tier. Xenophage is arguably one of the best Invasion weapons in the game. Two body shots kill a Guardian at literally any range. It melts Blockers quickly and efficiently damages the Primeval envoys. If you enjoy invading, Xenophage is almost mandatory.
Seasonal Activities (e.g., Onslaught, Coil):
Excellent for dealing with high-health priority targets like Tormentors, Champions, or large vehicles/constructs from a safe distance. Its ease of use shines when dealing with chaotic enemy spawns.
Comparisons: Xenophage vs. The Exotic Heavy Field
- Vs. Gjallarhorn: Ghorn provides superior team damage via Wolfpack Rounds buffing Legendary rockets. Xeno offers better precision against single tough targets and avoids self-damage risk.
- Vs. Thunderlord: Thunderlord excels at add clear with chain lightning and sustained fire thanks to its catalyst. Xeno hits harder per shot, requires no crits, and has infinite range.
- Vs. Leviathan's Breath: Leviathan's hits harder per shot (especially with catalyst) and stuns Unstoppables intrinsically. Xeno fires instantly (no draw time), is easier to use (no crits needed), and has explosive AoE.
- Vs. Sleeper Simulant / Whisper of the Worm: Both Sleeper and Whisper offer significantly higher precision DPS potential. Xeno is the choice when crits are difficult or impossible.
- Vs. Lament / Parasite: Lament (close range sword) and Parasite (stacked single shot) offer higher burst DPS in specific scenarios. Xeno provides consistent ranged damage.
Quick Fire Tips: PvE Bug Blasting
- Aim center mass – forget crits!
- Prioritize durable targets: Majors, Champions, vehicles, objectives.
- Use its infinite range to stay safe in challenging content.
- Build around its slow reload (mods, exotics, abilities).
- Dominate Vault of Glass Oracles and Deep Stone Crypt objectives.
- Invade with impunity in Gambit.
Building Around the Bug: Loadouts and Synergies
To truly harness Xenophage's power, you need to build around its strengths and, more importantly, mitigate its weaknesses – primarily that sluggish reload and hungry ammo consumption.
Core Mod Synergies: The Essential Exoskeleton
Regardless of class, these mods form the foundation of any effective Xenophage build:
| Category | Recommended Mods | Notes |
|---|---|---|
| Reload Mitigation (Choose one primary method) | Machine Gun Loader / Solar Loader (Arms) | Direct increase to reload animation speed. Essential if not using other reload methods. |
| Solar Holster (Legs) | Gradually reloads Xeno while stowed. Good for swap-heavy playstyles. | |
| (Class-specific methods covered below) | ||
| Ammo Economy (Stack these) | Machine Gun Reserves / Solar Reserves (Chest) | Increases max ammo capacity. Crucial. Stacking multiple reserve mods is generally effective now (historical bugs likely fixed). |
| Machine Gun Scavenger / Solar Scavenger (Legs) | More ammo per Heavy brick pickup. Non-negotiable. | |
| Heavy Ammo Finder (Helmet) | Increases Heavy brick drop chance (or ammo per brick if stacking). | |
| Special Finisher (Class Item) | Uses Super energy for guaranteed Heavy ammo on a Finisher. A lifesaver when running low. | |
| Damage Enhancement | Solar Weapon Surge (Legs) | Stacking 3x provides a significant damage boost (currently 22%) while you have Armor Charge. Requires consistent Orb of Power generation. |
| Orb Generation | Use Siphon mods (Helmet - matching primary weapon element), Heavy Handed (Arms - powered melee kills), Firepower (Arms - grenade kills), or Reaper (Class Item - kill after class ability use) to create Orbs. | |
| Time Dilation (Class Item) | Run 2x to extend Armor Charge duration, maximizing Surge uptime. | |
| External Buffs/Debuffs | Radiant (Solar subclasses/perks), Well of Radiance, Ward of Dawn (Weapons of Light), Divinity (also enables crits!), Tractor Cannon, Shadowshot Tether. | |
| Survivability | Resilience Stat | Aim for Tier 10 (100 Resilience) in PvE for 30% damage reduction. |
| Chest Resist Mods | Tailor Arc, Solar, Void, Melee, Sniper, or Concussive Dampener mods to the specific threats of the activity. | |
| Recuperation (Legs) | Heal on Orb pickup. Excellent synergy with Orb generation for Surges. |
Titan Build Focus: Actium War Rig Supremacy
For Titans, the answer to Xenophage's reload woes is simple and overwhelmingly effective: Actium War Rig. This Exotic chest piece turns Xenophage into a relentless damage hose.
- Exotic: Actium War Rig (Chest)
- Why it Works: Completely eliminates Xenophage's slow reload, enabling constant firing.
- Core Mods: 3x Solar Weapon Surge, 2x Time Dilation, Heavy Ammo Finder, Solar Scavenger, Solar Reserves, Recuperation.
- Subclass Synergy: Void (Bubble/Overshields), Solar (Radiant/Sunspots), Prismatic (Mix survivability and buffs).
- Playstyle: Plant your feet, deploy Barricade, and unleash an uninterrupted stream of explosive death.
Warlock Build Focus: Reloading Rifts and Rain of Fire
Warlocks have excellent options for rapid Xenophage reloads, primarily tied to their Rifts or Solar subclass mobility.
- Exotic: Lunafaction Boots OR Rain of Fire (Solar Only)
- Why it Works: Lunafactions provide fast reloads while in a Rift. Rain of Fire grants instant reloads via Icarus Dash (Solar).
- Core Mods: 3x Solar Weapon Surge, 2x Time Dilation, Heavy Ammo Finder, Solar Scavenger, Solar Reserves, Recuperation. Consider Ashes to Assets (Helmet) / Bomber (Class Item).
- Subclass Synergy: Solar (Well of Radiance, Icarus Dash are key).
- Playstyle: Control the battlefield from your Rift (Lunafaction) or dance through the air with instant reloads (Rain of Fire).
Hunter Build Focus: Dodging for Reloads & Damage
Hunters rely on their class ability and potentially specific Exotics to keep Xenophage firing.
- Exotic: Foetracer (Helmet for damage) OR general use Exotic (Celestial Nighthawk, Star-Eater Scales).
- Why it Works: Marksman's Dodge provides instant Xenophage reloads. Solar abilities grant Radiant and can trigger Foetracer's damage buff.
- Core Mods: 3x Solar Weapon Surge, 2x Time Dilation, Heavy Ammo Finder, Solar Scavenger, Solar Reserves, Recuperation. Utility Kickstart (Class Item), Powerful Attraction/Reaper (Class Item).
- Subclass Synergy: Solar (Marksman Dodge, Radiant knives/grenades). Prismatic (Marksman Dodge + other elements/buffs).
- Playstyle: Weave shots, dodges, and Solar abilities into a deadly rhythm, maintaining damage buffs and instantly reloading.
Ultimately, the best Xenophage builds leverage class-specific mechanics to overcome its primary weakness: the reload. Titans have the easiest time with Actium War Rig, Warlocks have strong Rift-based or Solar-dodge options, and Hunters rely on mastering the Marksman's Dodge cycle.
Xenophage in the Crucible: PvP Viability - The Long-Range Nuisance
While primarily a PvE powerhouse, Xenophage possesses unique traits that give it a niche, albeit controversial, role in the Crucible and absolute dominance in Gambit invasions.
Strengths: The Unexpected Sting
- Forgiving Two-Tap Kills: Xenophage downs opposing Guardians in just two body shots. No need for precision hits makes it incredibly easy to secure kills if you land both shots.
- Infinite Range: Damage does not fall off with distance. You can challenge opponents across the longest sightlines on any map, often catching snipers or scout rifle users completely off guard.
- High Flinch: The combination of High-Caliber Rounds and explosive impact delivers substantial flinch, making it difficult for opponents to return fire accurately.
- Potential Collateral Damage: The explosive nature of the rounds means near misses can still inflict damage, and hitting one Guardian might splash onto another nearby target.
- Super Shutdown Capability: While not an instant kill, two quick, accurate shots can effectively neutralize most roaming Supers before they cause havoc.
Weaknesses: Why It's Not Meta
- Abysmal Ammo Economy: This is its biggest PvP downfall. Picking up a Heavy brick typically grants only 3 or 4 rounds. Since it requires two shots per kill, you're usually guaranteed only one kill, possibly two if you're perfect. This is far less efficient than most other Heavy options.
- Painfully Slow Rate of Fire: The 120 RPM fire rate leaves significant gaps between shots, making you vulnerable to faster-firing weapons or team-shooting. You cannot use it to suppress lanes effectively.
- Significant Recoil: Each shot has a hefty kick that requires manual compensation, especially for the crucial follow-up shot.
- Exotic Slot Cost: Heavy weapons have limited uptime in PvP modes. Dedicating your Exotic slot to Xenophage means sacrificing the constant benefit of an Exotic primary or special weapon.
- Not an Instant Kill: Unlike Rocket Launchers, many Grenade Launchers, or high-impact Sniper Rifles, Xenophage requires landing two shots. This gives opponents a chance to react, find cover, or even kill you between your first and second shot. This role mismatch – not quite a one-shot wonder, not quite a suppressive LMG – makes it awkward in standard Crucible play.
Strategies and Tactics: Playing to its Strengths
- Master Long Angles: Use maps with extended sightlines to your advantage. Peek-shoot from cover, leveraging the infinite range and high flinch. Maps like Eternity, Widow's Court, Vostok, and Disjunction are prime territory.
- Ambush and Surprise: Catch opponents off guard as they cross open lanes or challenge predictable sniping spots. Its unusual firing sound and unexpected range can be disorienting.
- Heavy Ammo Control: Prioritize securing Heavy ammo spawns. Given the low yield per brick, every opportunity counts.
- Target Prioritization: Be deliberate with your shots. Focus on securing kills on exposed or distracted opponents rather than taking speculative potshots. Use it defensively to shut down incoming Supers.
- Pair Wisely: Equip strong dueling Primary and Special weapons (e.g., Hand Cannons, Pulse Rifles, Shotguns, Fusion Rifles) to handle engagements when Heavy ammo isn't available.
Quick Fire Tips: PvP Pest Control
- Secure Heavy ammo religiously.
- Abuse long sightlines on large maps.
- Aim center mass – two quick taps.
- Don't waste precious shots.
- Use it to counter predictable Super pushes.
- INVADE WITH IT IN GAMBIT. Seriously.
Lore Corner: The Tragic Tale of Omar Agah
Xenophage isn't just a tool; it's a vessel containing the fragmented soul and burning vengeance of a Guardian long thought lost. Understanding its history adds a profound layer to wielding it.
Omar Agah: The Hunter of the First Fireteam
Omar Agah was a Human Hunter, partnered with the Ghost Karsys. He was recruited by Eriana-3 and Eris Morn into the ill-fated "First Crota Fireteam," a desperate group seeking to assassinate the Hive Prince Crota, Son of Oryx, in retaliation for the devastating Guardian losses during the Great Disaster on the Moon. Though initially doubtful of their chances, Omar's own anger and desire for retribution fueled his participation. He possessed a gruff exterior but cared for his fireteam, even crafting a talisman for Eris which she initially refused, but later cherished.
Capture and Unspeakable Transformation
Deep within the Hellmouth, the fireteam faced overwhelming Hive forces. Omar was grievously wounded and captured alive by the Heart of Crota, a powerful Hive Wizard. Eris and the others believed him dead. The Wizard subjected Omar to unimaginable torment, slowly and painfully siphoning his Light – not just the energy, but his very essence – to nurture gestating Hive abominations. His Ghost, Karsys, was forced to witness this horror before being destroyed. Eris herself heard his dying screams and witnessed the final moments of his perceived demise. Yet, even in agony, Omar found a strange peace, his "inner fire" of defiance and connection to his friends persisting.
Crucially, the Hive ritual went awry. Instead of merely extracting his Light, the Wizard inadvertently tore out Omar's entire soul and consciousness, accidentally transferring it into a small, insect-like creature – a Hive thrall larva or similar bug. He remained self-aware, trapped within this alien form: "I'm still me. I'm just not the me I knew... I'm something smaller now".
Becoming Xenophage: A Weapon Forged from Soulfire
Years passed. During the Guardian's exploration of the Pit of Heresy (as part of the Xenophage quest), this very bug, containing Omar Agah's soul, was recovered after defeating the secret boss, Volmâr. This bug was brought back to Eris Morn. Recognizing the lingering essence of her lost friend, Eris used her knowledge of Hive magic and Light manipulation to infuse Omar's bug form into the weapon frame of his own machine gun, thus creating Xenophage. The physical manifestation of this fusion is visible during the reload animation, where the glowing bug can be seen encased within a crystal in the weapon's stock.
The Weapon's Deeper Meaning
- Name: "Xenophage" translates to "alien-eater" or "stranger-eater". It perfectly encapsulates its origin and purpose: a weapon born from Hive torture, now turned back against them, fueled by a Guardian soul to consume the alien darkness.
- Vengeance Embodied: The weapon is the literal manifestation of Omar's enduring spirit and his desire for retribution against the Hive. Its fiery, explosive nature reflects his "inner fire" that refused to be extinguished. The perk "Pyrotoxin Rounds" likely symbolizes this burning essence fueling the shots.
- Unique Origin: Xenophage stands out as likely the only known instance of a Guardian using another Guardian's soul as the core component of a weapon. This contrasts sharply with weapons derived from powerful enemies, like Whisper of the Worm (Xol) or Touch of Malice (Oryx).
- Eris's Burden: The weapon serves as a constant, tangible reminder for Eris Morn of her lost fireteam and the horrific fates they suffered. It deepens her tragic narrative and connection to the Moon's dark history.
- Pit of Heresy Connection: Omar's fate and transformation are deeply intertwined with the themes of the Pit of Heresy dungeon – suffering, Hive experimentation, soul manipulation, and the heretical practices (like resurrection and soul transference) Savathûn fostered among the Hidden Swarm. Omar's experience is a direct result of these dark Hive arts.
Xenophage is more than just code and pixels; its gameplay mechanics directly reflect its lore. The Solar explosive rounds, the lack of precision, the visible bug – these aren't arbitrary design choices. They embody Omar Agah's fiery, transformed spirit seeking vengeance. When you fire Xenophage, you are literally wielding the burning soul of a fallen hero.
Advanced Tactics & Common Pitfalls: Honing the Sting
Mastering Xenophage involves leveraging its unique properties while sidestepping its inherent limitations.
Advanced Techniques: Becoming the Apex Predator
- Reload Mitigation Mastery: Practice your class-specific reload cancel. Hunters need seamless Marksman Dodge timing. Solar Warlocks must master the Icarus Dash reload with Rain of Fire. Warlocks using Lunafactions need optimal Rift placement and uptime. Titans using Actium War Rig simply need to maintain line of sight and suppress the urge to manually reload.
- Debuff Synergy: The single most impactful damage boost comes from pairing Xenophage with Divinity. The Divinity bubble allows Xenophage's explosive rounds to register as critical hits, massively increasing its damage potential against vulnerable bosses. Coordinate with teammates using Tractor Cannon (30% debuff) or Shadowshot Tether for significant team DPS gains.
- Strategic Ammo Management: Be conscious of your reserves. Actively utilize Ammo Finder, Scavenger, and Reserve mods. Communicate with teammates using Aeonic Cult exotics for Heavy ammo generation. Use Special Finisher in emergencies. Don't expend precious heavy rounds on minor enemies unless absolutely necessary.
- Peek-Shooting: In high-difficulty PvE or PvP, use cover effectively. Leverage Xenophage's high impact and lack of falloff to fire single, deliberate shots from safety, minimizing your exposure time.
- Target Prioritization: Xenophage excels against specific targets. Focus its fire on:
- High-health, non-critical Majors and Ultras (Knights, Ogres, Captains, Minotaurs).
- Champions (especially Overloads when stunned, or Barriers/Unstoppables after the stun wears off).
- Enemies with difficult or inaccessible crit spots.
- Static objectives (Vault of Glass Oracles, Deep Stone Crypt Fuses).
- Guardians in PvP/Gambit, particularly Invaders.
- Exploit Encounter Design: Intentionally bring Xenophage to encounters where its strengths shine, like the aforementioned VoG Oracle phase or DSC objectives. Use it against bosses where maintaining precision aim with other weapons is difficult due to movement or mechanics.
Common Mistakes to Avoid: Don't Get Swatted
- Treating it like a Bullet Hose: Don't just hold down the trigger expecting sustained fire like Thunderlord (unless you're a Titan with Actium War Rig). The slow fire rate and significant recoil make controlled bursts or single shots more effective for accuracy and ammo conservation.
- Aiming for Crits (Without Divinity): This is the most common mistake. You gain no damage bonus by hitting precision spots under normal circumstances. Aim for the largest part of the target – center mass.
- Ignoring the Reload: Failing to build around the slow reload speed (using mods, exotics, or abilities) will cripple your damage uptime and leave you vulnerable. Never get caught reloading in the open.
- Poor Ammo Management: Wasting shots on weak red-bar enemies is inefficient. Forgetting to equip Ammo Finder, Scavenger, and Reserve mods will lead to frequent ammo shortages.
- Using it for Every Boss: While viable, Xenophage is rarely the absolute highest DPS option for bosses with easily accessible crit spots. Meta Linear Fusions, Rocket Launchers (especially with Gjallarhorn support), or precision Exotics often outperform it in pure damage phases. Know when it's the right tool for the job.
- Wasting PvP Shots: With only 3-4 rounds per brick, every shot in PvP must be deliberate. Avoid speculative firing; confirm your target and aim carefully for the two-tap.
- Forgetting Solar Synergy: Not running Solar Weapon Surge mods or failing to activate Radiant buffs when possible means leaving free damage on the table.
Quick Fire Tips: Advanced Bug Handling
- Master your class's instant reload method (Dodge/Rift/Exotic).
- Pair with Divinity for crit potential or other strong debuffs.
- Always run ammo economy mods (Finders, Scavs, Reserves).
- Aim center mass, always.
- Pick your targets: Majors, Ultras, Objectives, Invaders.
- Don't get caught reloading in the line of fire.
- Leverage Solar Surges and Radiant buffs.
Conclusion: Why This Bug Gun Belongs in Your Arsenal
The journey to acquire Xenophage is a memorable trek through lunar secrets and Hive heresy, culminating in a unique and rewarding Exotic weapon. While it may not always sit atop the absolute peak of the DPS meta, its unique advantages solidify its place as an essential tool for any Guardian serious about tackling Destiny 2's diverse challenges.
Xenophage offers unmatched ease of use. Its explosive Pyrotoxin Rounds require no precision aiming, delivering potent Solar damage with every pull of the trigger. This makes it incredibly forgiving and reliable, especially against tough enemies without obvious crit spots or during chaotic encounters. Its high impact per shot deletes Majors and chunks down Champions effectively, while its infinite range allows engagement from positions of safety that few other weapons can match. It excels in specific, often troublesome situations – vaporizing Vault of Glass Oracles, neutralizing Deep Stone Crypt objectives, and dominating Gambit invasions like few other weapons can.
It fills a valuable niche as the ultimate "problem solver." When precision damage is impractical, when targets are durable but lack easy weak points, or when you need reliable, high-impact damage from across the map, Xenophage answers the call.
Beyond its potent stats and unique function lies a compelling story. Wielding Xenophage means carrying the fiery, vengeful spirit of Omar Agah, a Guardian transformed by Hive cruelty but whose will endures within the weapon's core. It's a tangible piece of Destiny's history, a testament to the sacrifices made in the dark corners of our system.
Despite its quirks – the slow reload needing mitigation, the limited reserves demanding management, and the persistent lack of a catalyst – Xenophage remains a "must-have" Exotic. Its unique blend of power, forgiveness, and specific utility makes it an invaluable addition to any Guardian's arsenal. The hunt is challenging, the puzzles intricate, but the reward – this chittering, explosive cannon of vengeance – is absolutely worth the trouble. Go forth, Guardian, track down this rare specimen, and unleash the sting of Xenophage upon the enemies of the Light.