
Phoenix, the fiery duelist from the U.K., brings an aggressive and self-sufficient playstyle to the Valorant Protocol. Known for his ability to manipulate flames for both offense and healing, Phoenix is a formidable agent capable of leading the charge and turning the tide of battle with his explosive abilities. This guide delves into every facet of Phoenix's kit, offering strategies and techniques to help players of all levels master this radiant agent.
Phoenix: The Radiant Duelist from the U.K.
Phoenix is classified as a Duelist, a role centered around initiating engagements, securing opening kills, and creating space for the team to advance. His design encourages players to take fights on their own terms, utilizing a unique blend of offensive firepower and self-sustain. While considered to have an "Easy" difficulty rating, making him accessible for newcomers, Phoenix possesses a high skill ceiling, demanding strategic utility usage and game sense for optimal performance at higher levels of play.
His aggressive nature is intrinsically linked to his pyromantic abilities. Phoenix's passive, "Heating Up," allows him to heal from his own flames, a core mechanic that fuels his capacity for sustained aggression and independent plays. This self-sufficiency is a hallmark of his kit, enabling him to take more risks and recover from engagements without solely depending on support agents.
Phoenix's Arsenal: Igniting the Battlefield
Understanding the intricacies of Phoenix's abilities is paramount to unleashing his full potential. Each tool in his arsenal serves multiple purposes, from offensive pressure to crucial self-preservation.
Passive - Heating Up
Phoenix's cornerstone passive, Heating Up, allows him to regenerate health when standing in the area of effect of his Blaze wall or Hot Hands molotov. Instead of taking damage from his own fire, he is healed. Initially, Patch 1.0 standardized this healing to a total of 50 HP over the full duration of the respective ability. A significant update in Patch 9.10 enhanced this, causing the heal-over-time effect to persist for a short duration even after Phoenix steps out of the flames, offering more flexibility in its use.
C - Blaze (Flame Wall)
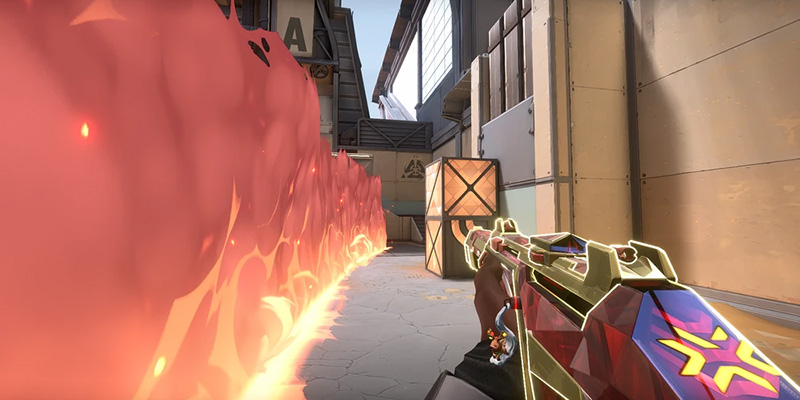
Mechanics: Phoenix equips a flame wall. Firing creates a line of flame that moves forward, even passing through world geometry like thin walls. Holding the fire button allows the player to bend the wall's path in the direction of their crosshair.
Vision Blocking: The primary function of Blaze is to create an opaque wall of fire, obstructing enemy sightlines.
Damage: Enemies passing through the wall take damage at a rate of 1 per tick, equating to approximately 30 DPS. The wall can deal a total of 225−240 damage if an enemy remains in it for the full duration and has a 0.5x damage multiplier against objects and certain agent utility like Chamber's Trademark or Sova's Recon Bolt.
Self-Healing: Blaze heals Phoenix for up to 50 HP, at a rate of 1 HP every 0.16 seconds.
Duration: The wall lasts for 8 seconds.
Cost: 150 Credits.
Charges: 1.
E - Curveball (Flash Orb)
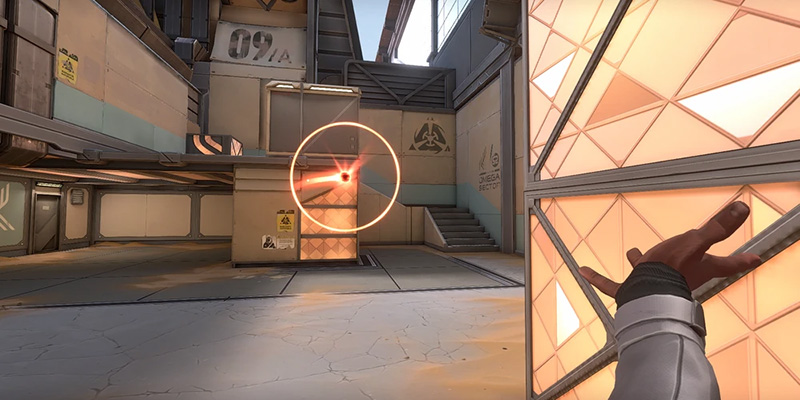
Mechanics: Phoenix equips a flare orb that travels on a curving trajectory before detonating. Primary fire curves the orb to the left, while alternate fire curves it to the right.
Blinding Effect: The detonation blinds any player who sees the orb, including Phoenix and his teammates if they are not careful. The blind duration is 1.5 seconds, with a windup time of 0.5 seconds after Patch 4.04.
Cost: 250 Credits.
Charges: 2. As Phoenix's signature ability (changed in Patch 9.10), he receives one charge for free at the start of each round, and can regain an additional charge by securing two kills. This change fundamentally boosted his core dueling capability, ensuring he always has access to his primary engagement tool.
Q - Hot Hands (Fireball/Molly)
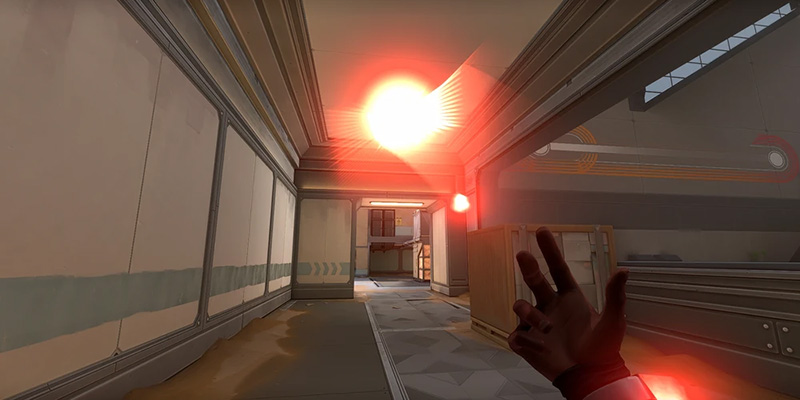
Mechanics: Phoenix equips a fireball that he throws (or lobs with alternate fire). It explodes after a short delay or upon impact with the ground, creating a lingering zone of fire. The projectile will drop straight down after traveling approximately 25 meters.
Area Damage: The fire zone damages enemies at a rate of 60 DPS.
Self-Healing: Standing in his own Hot Hands heals Phoenix for up to 50 HP, at a rate of 1 HP every 0.08 seconds. This cap, introduced in Patch 1.0, means Phoenix must be strategic about healing, as he cannot indefinitely sustain himself in the flames.
Duration: The fire zone lasts for 4 seconds.
Cost: 200 Credits. This ability was changed from his free signature to a purchasable one in Patch 9.10, making its use for healing or area denial a more deliberate economic choice.
Charges: 1.
X - Run It Back (Ultimate)
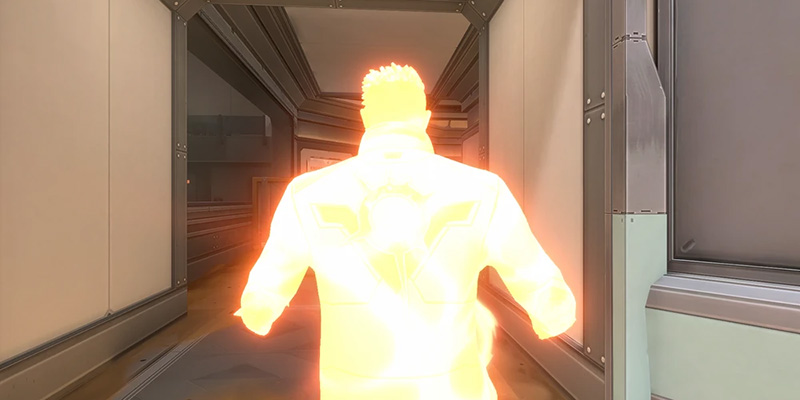
Mechanics: Upon activation, Phoenix instantly places a marker at his current location. For the duration of the ultimate, if he is killed or the timer expires, he is teleported back to this marker.
"Second Life" Concept: This ultimate provides a temporary "second life," ideal for making aggressive plays, scouting enemy positions, and taking risks without the consequence of permanent death in the round.
Health/Armor on Return: Phoenix returns to the marker with full health and the amount of armor he possessed when the ability was cast (a change from Patch 4.04). Additionally, all his weapons are automatically reloaded upon respawn (Patch 1.0). These quality-of-life improvements made the ultimate significantly more potent for aggressive follow-up plays.
Duration: The ability is active for 10 seconds.
Ultimate Cost: Requires 6 Ultimate Points.
Ability Breakdown Table
| Ability Name | Key | Cost | Charges | Duration | Damage | Healing | Key Mechanics |
|---|---|---|---|---|---|---|---|
| Blaze | C | 150 | 1 | 8s wall | 1/tick (30 DPS) | Up to 50 HP (1 HP/0.16s) | Bendable vision-blocking wall, passes through terrain, heals self. |
| Curveball | E | 250 | 2 (1 free, 1 on 2 kills) | 1.5s blind | Blind | N/A | Left/Right curve flash, 0.5s windup, signature ability. |
| Hot Hands | Q | 200 | 1 | 4s fire zone | 60 DPS | Up to 50 HP (1 HP/0.08s) | Molly, heals self, drops after ~25m. |
| Run it Back | X | 6 Ult Points | 1 | 10s active | N/A | Full HP on return | Places marker, respawns at marker with original armor, reloads weapons. |
| Heating Up | Passive | N/A | N/A | While in fire (persists briefly after) | N/A | Heals from own fire instead of damage. Persists briefly after leaving fire. | Enables self-heal from Blaze/Hot Hands |
Mastering Phoenix's Playstyle: The Art of Aggression
Phoenix's kit is inherently designed for an aggressive playstyle, focusing on initiating combat and creating openings for his team. However, true mastery lies in balancing this aggression with intelligent utility usage and decision-making.
Entry Fragging & Creating Space
As a duelist, Phoenix is expected to be at the vanguard of an attack, seeking out the first engagement (entry fragging) and thereby creating space for teammates to follow and secure objectives. His Curveball flashes are pivotal for blinding defenders holding angles, while his Blaze wall can segment sightlines, making entries safer and more manageable. One can consider Phoenix an "escort for your team," using his presence and utility to draw attention and create pathways. Even if Phoenix is traded out after securing an entry kill or significant map control, it can be a net positive for the team if they capitalize effectively.
The effectiveness of Phoenix as an entry fragger is directly linked to his ability to deploy Curveballs without inadvertently blinding his advancing teammates and his skill in placing Blaze walls that effectively isolate threats rather than hinder his own team. A poorly thrown flash or a misplaced wall can quickly turn an attempted push into a disadvantageous situation for his allies.
Self-Sufficiency
A key strength of Phoenix is his self-sufficiency, primarily derived from his ability to heal using Blaze and Hot Hands. This allows him to take more aggressive duels, recover from chip damage, and sustain his presence on the map without constant reliance on support agents for healing. It is often advised not to hesitate to use a charge of Hot Hands for healing, especially if a Sage or other healer is unavailable.
Decision-Making: Aggression vs. Utility for Zoning/Healing
Phoenix players must constantly weigh the options between aggressive utility usage and reserving abilities for healing or area denial. While his primary role is to push aggressively, his Blaze and Hot Hands are also potent tools for zoning enemies, delaying pushes, or securing post-plant situations.
On attack, the priority is generally entry and space creation, with healing used to recover for subsequent engagements or to hold a site post-plant. On defense, Blaze and Hot Hands can be invaluable for stalling enemy advances, buying time for teammates to rotate and reinforce a site. Healing is crucial for maintaining presence on a site or during retake scenarios. The context of the round—such as whether an aggressive push is necessary, if a defuse needs to be denied, or if a clutch situation demands self-preservation through healing—should dictate ability usage.
Advanced Techniques & Ability Combos
Beyond basic ability usage, several advanced techniques and combinations can elevate Phoenix's impact on the battlefield.
Combining Blaze and Curveball
A cornerstone Phoenix combo involves deploying the Blaze wall to obstruct vision and then throwing a Curveball flash through the wall. This tactic shields Phoenix from view while delivering the flash, making it significantly harder for opponents on the other side to anticipate and dodge. It allows Phoenix to then push through his own wall with a higher probability of catching blinded enemies.
Tactical Hot Hands Usage
Hot Hands is more than just a healing tool; it's a versatile molotov.
- Flushing Enemies: It can be thrown into common hiding spots or tight corners to force defenders out into the open.
- Area Denial/Post-Plant: Strategically placed, Hot Hands can temporarily block chokepoints, delay enemy pushes, or prevent Spike defuses.
- Strategic Healing: After an engagement, Phoenix can retreat to a safe position and use Hot Hands to recover health. An advanced trick involves throwing the molly away from the expected healing spot to bait enemies checking that location, allowing Phoenix to peek them unexpectedly.
- Aggressive Push Through Molly: Enemies rarely expect Phoenix to push through his own damaging Hot Hands. This can be a potent surprise tactic, especially when combined with a well-timed flash.
Advanced Curveball Usage (Pop Flashes & Angles)
Mastering Curveball involves more than just throwing it around a corner.
- Pop Flashes: This technique involves timing the Curveball so it detonates the instant it clears an angle, giving enemies minimal reaction time. Throwing the flash from further away from the corner can help achieve this effect, as the orb is visible for a shorter period before popping.
- Bouncing Flashes: Curveball can be bounced off walls or even the ground to reach awkward angles or to flash without direct exposure. This requires significant practice to avoid self-flashing or blinding teammates.
- High/Low Flashes: Varying the vertical angle of the flash can catch opponents off guard, as they typically expect flashes at head height. This is particularly useful on maps with vertical elements, such as flashing into or out of vents.
- "Korean Flash": A high-skill maneuver where Phoenix throws the flash behind himself while peeking an angle. This minimizes the flash duration on Phoenix while fully blinding an opponent holding the angle.
- Double Flashing: Throwing two Curveballs at the same angle in quick succession can counter enemies who turn away from the first flash or attempt to pre-fire through the blind.
Effective Run It Back (Ultimate) Activation and Follow-up
Phoenix's ultimate, Run It Back, is a powerful tool when used strategically.
- Safe Activation: Always activate Run It Back from a secure location where enemies are unlikely to push and eliminate the returning body.
- Team Coordination: Communication is key. Inform teammates when using the ultimate, and if possible, have a teammate watch the respawn marker. The true advanced value of Run It Back lies in coordinated team plays; teammates should be ready to trade kills or secure space created during the ultimate.
- Utilize Abilities During Ult: Make full use of Curveball, Hot Hands, or Blaze while Run It Back is active to maximize impact and clear space.
- Objective Play: The ultimate can be used to retrieve the Spike from a dangerous area and reposition for a safer plant.
- Baiting Rotations: Activating Run It Back on one bombsite can draw enemy attention and rotations, creating an opportunity for the rest of the team to execute on the opposite site.
- Post-Ult Play: Be aware of the brief vulnerability during the respawn animation. A proactive measure is to throw Hot Hands onto the respawn point as the ultimate is about to expire, deterring potential campers.
Map-Specific Strategies & Lineups
Phoenix's utility can be adapted to the unique layouts of each map in Valorant. While detailed pixel-perfect lineups are best learned through visual guides, understanding the strategic intent behind ability usage on different maps is crucial.
General Principles:
Blaze (Wall): On maps with long sightlines like Breeze or Icebox, Blaze is invaluable for blocking vision during pushes or rotations. It's commonly used to "cut" a site in half during an execute, isolating defenders and creating more manageable engagements. Defensively, it can stall pushes at chokepoints. The ability to curve Blaze allows it to conform to specific map geometry. Aiming the wall upwards can allow it to pass over cover or block higher vantage points like Heaven areas. However, players must be cautious of a known issue where Blaze walls can sometimes have unintended gaps, potentially compromising their effectiveness. This mechanical flaw requires players to be vigilant and, where possible, double-check wall integrity.
Curveball (Flash): Essential for flashing tight corners and chokepoints prevalent on maps like Split, Bind, and Ascent. On Split, Curveballs can be thrown into or out of the vents to surprise enemies. Using Curveball through a Blaze wall offers a safer method of flashing.
Hot Hands (Molly): Universally useful for clearing common defensive cubbies and corners. It is highly effective for post-plant denial by targeting default plant spots. Specific lineups exist for many common molly placements across all maps.
Run It Back (Ultimate): On maps featuring teleporters, such as Bind, Run It Back can be combined with teleporter usage for creative and unpredictable plays. It's a strong tool for breaking stalemates at contested chokepoints on any map.
Map Highlights (Textual Overview):
Ascent
- Blaze/Curveball: Effective for A Main entries and pushing Mid to A Tree. Walls can block A Heaven.
- Hot Hands: Lineups exist for B site default plant, A site generator, defensive B Main holds, and cutting off Mid-to-B pushes. Some lineups utilize UI elements for aiming.
- Flash Spots: Standard entry flashes for A Main and subsequent chokepoints. Flashing through the B site window is also an option.
- Wall Setups: Walls can block A Tree and Heaven during an A take. On B, a wall down B Long followed by a flash into the site's main entrance is a common execute.
Bind
- Blaze/Curveball: Useful for aggressive Elbow takes on B site. Flashing through a Blaze wall when pushing A Showers is a strong tactic. Walls can also block vision from Hookah to B site or from B Long towards site.
- Hot Hands: Numerous lineups for A site corners, cubby, behind boxes, A boost, default plant denial, and from A teleporter to Hookah. On B, mollies for B Long close corner and B Short into Hookah corner are common.
- Flash Spots: Standard flashes for A Lamps and then onto site are typical.
- Wall Setups: Walls from A Short towards Lamps can facilitate pushes. On B, a wall can be placed to drop close to the site box from Hookah.
Haven
- Blaze/Curveball: Phoenix is considered strong on Haven due to Blaze's utility in controlling its multiple entryways and Curveball's effectiveness in close-quarter fights common on this three-site map. Walls can be used for retaking A site (CT to box), pushing A Long (A Long to box), splitting B site, pushing C Long, or pushing from Connector to C site.
- Hot Hands: Lineups for A Long to A Short corners, A site retake positions, clearing A Long corners, and into Garage are available. C Cubby and default plant spots are also common molly targets.
- Flash Spots: Flashing into Garage is a key tactic due to common shotgun plays.
Split
- Blaze/Curveball: Phoenix excels on Split due to its many tight angles and corridors, making Curveball particularly potent. Walls can block A Heaven from site or be used from Vent Room towards A Heaven.
- Hot Hands: Lineups exist for mollying A Rafters from A Main, and A Rafters onto A site. B Heaven and default plant spots are also common targets.
- Flash Spots: Flashing through the vents connecting Mid to A Heaven is a unique option on Split.
Icebox
- Hot Hands: Lineups are available for B Green to B Site Default, A Nest to A Pipes, and A Nest to A Site Nest/general A Site. Mollies for the generator area and denying B site defuses are also common.
- Map Strategy: While Icebox generally favors mobile agents, Phoenix can leverage its cover-rich areas for his abilities.
Breeze
- Blaze: Walls can be used for Mid Doors pushes, easy B site executes, and from B Main to B site.
- Hot Hands: Lineups include A Cave to A Pyramid and B Main for Mid Market control. Mollies can target the B Main ultimate orb or halt rushes from B Main.
- Flash Spots: Numerous flash spots exist, such as bouncing off the A Main wall to blind multiple angles, retake flashes for B site from the default pyramid, flashes from B Bricks for front site control, and a specific flash from B back site pillar into a wall hole to blind multiple retake paths.
Fracture
- Blaze/Curveball: A simple A Site execute involves combining Blaze and Curveball.
- Hot Hands: Post-plant setups for B Tower are noted. Lineups exist for controlling A Hall orb, A Dish orb, B generator, B Main orb, default A site plant, and a specific high-traffic spot near A ramp.
Lotus
- Blaze/Curveball: Executes for C Site and A Site often involve Blaze and Curveball combinations. Blaze walls can be paired effectively with flashes on this map.
- Hot Hands: A B Main execute combo uses Hot Hands and Curveball. Lineups include Tree to Default molly, and mollies for C default and safe plant spots.
Sunset
- Blaze/Curveball: An aggressive Elbow take can be executed with Blaze and Curveball.
- Hot Hands: Lineups for default molly from Elbow, default plant molly, and an anti-push molly for A site are available.
Economic Warfare: Fueling Phoenix's Fire
Effective economy management is crucial in Valorant, and Phoenix players must make smart decisions to ensure they have the utility and firepower needed to execute their aggressive game plan.
Pistol Round Strategies:
Prioritizing Purchases:
- Full Buy: On full buy rounds, Phoenix should aim for a Vandal or Phantom, Heavy Shields, and his complete utility kit (Blaze, two Curveballs, Hot Hands). His abilities are relatively affordable compared to some other agents, with Blaze at $150, Curveball at $250, and Hot Hands at $200.
- Eco/Save Rounds: The priority is to save enough credits for a full buy in the subsequent round. Purchases might be limited to a Sheriff or keeping the Classic pistol, potentially with a single Curveball for an opportunistic pick.
- Force Buy: When the team commits to a force buy, Phoenix might acquire a less expensive rifle like a Bulldog or Guardian, or an SMG such as the Spectre, along with Light Shields and essential utility, primarily Curveballs. His self-healing capabilities can make Light Shields a more viable option in these scenarios.
- Bonus Round: After winning the pistol round and the following anti-eco round, if the team is carrying over SMGs or Stingers, Phoenix should ensure he has enough utility to remain impactful. Upgrading to Heavy Shields is advisable if credits permit.
Value of Run It Back (6-Point Ultimate):
Phoenix's ultimate, Run It Back, costs only 6 ultimate points, which is relatively low compared to many other agents. This low cost makes actively collecting ultimate orbs a highly viable strategy to increase the frequency of its use. It's possible to consistently use the ultimate 3−4 times per half by focusing on orb collection, even without exceptionally high fragging.
Impact of Self-Healing on Buys:
Phoenix's inherent ability to heal with Blaze and Hot Hands can influence decisions regarding shield purchases. In rounds where credits are particularly tight, a Phoenix player might consider Light Shields, relying on their healing abilities to recover from chip damage. However, it's important to recognize that healing takes time and consumes utility that might be needed offensively.
Economy Quick Reference Table for Phoenix
| Round Type | Weapon Priority | Shield Priority | Ability Priority | Rationale |
|---|---|---|---|---|
| Pistol | Ghost | Light (if affordable) / None | 1× Curveball (E) | Strong sidearm + entry tool. Healing can compensate for no/light shield. |
| Eco (Save) | Sheriff / Classic | None / Light (if >min save) | 0−1× Curveball (E) | Maximize savings for next round; flash for potential pick. |
| Force Buy | Bulldog / Spectre | Light Shields | 1−2× Curveball (E), consider Hot Hands (Q) | Balance firepower with key utility; self-heal makes light shields more viable. |
| Full Buy | Vandal / Phantom | Heavy Shields | Full Kit (Blaze C, 2× Curveball E, Hot Hands Q) | Maximize combat effectiveness and utility options. |
| Bonus (Won Pistol + Anti-Eco) | Keep SMG/Stinger | Upgrade to Heavy if credits allow | Full Kit | Maintain advantage; prepare for rifle round if lost. |
Synergies & Counters: Navigating the Battlefield
Phoenix's effectiveness can be significantly amplified or diminished based on team compositions and enemy strategies. Understanding these interactions is key to maximizing his impact.
Ideal Agent Pairings:
Phoenix thrives when paired with agents who can either set up his aggressive plays with information and control, or follow up on the space he creates.
Controllers (Omen, Brimstone, Viper, Astra, Clove):
Omen: Omen's Dark Cover smokes provide excellent cover for Phoenix to use Curveball flashes or to enter sites with Run It Back. Omen's Paranoia blind can be layered with Phoenix's flashes for devastating disorientation. This synergy allows Phoenix to secure entries more safely.
Brimstone: Brimstone's Sky Smokes can block multiple angles simultaneously, paving the way for Phoenix's pushes. The combination of Brimstone's Incendiary and Phoenix's Hot Hands creates potent area denial, forcing enemies out of position or into crossfires.
Viper: While Viper is often cited as a counter, her Toxic Screen or Poison Cloud can create defined pathways for Phoenix to flash through or push aggressively. Layering her Snake Bite with Hot Hands can create inescapable damage zones. However, Phoenix must be mindful of Viper's decay effect if pushing through her utility.
Astra: Astra's versatile Stars (providing smokes, Gravity Well, or concussive effects) can perfectly set up Phoenix's entries. A Gravity Well can pull enemies into Hot Hands or make them stationary targets for Curveball. A specific combo involves Astra using her pull on an ultimate orb while Phoenix throws Hot Hands on it for an easy kill.
Clove: The combination of Clove's smokes and Phoenix's Curveball allows for highly effective pop flashes, as enemies have minimal time to react when the flash emerges from the smoke. Furthermore, Clove's decay abilities can soften targets for Phoenix's Hot Hands to finish off.
Initiators (Sova, Fade, Breach, Gekko, KAY/O):
Sova: Sova's Recon Bolt and Owl Drone provide crucial intelligence, allowing Phoenix to use his flashes and pushes with greater precision and less risk. Shock Darts can flush enemies from cover into Phoenix's line of fire or utility.
Fade: Fade's Haunt and Prowlers reveal enemy locations, enabling Phoenix to capitalize with well-aimed flashes or aggressive engagements. The information gathered by Initiators is particularly valuable for Phoenix, who lacks his own reliable scouting tools.
Breach: Breach is an excellent partner, as his Fault Line stun and Flashpoint can clear chokepoints and disorient enemies, paving the way for Phoenix's entry. Aftershock can force enemies out of strong defensive positions, setting them up for Phoenix's abilities. Breach's Rolling Thunder ultimate combined with Phoenix's entry can overwhelm site defenses.
Gekko: Gekko's Dizzy can supplement Phoenix's flashes. His Wingman can handle planting or defusing the Spike, freeing Phoenix to focus on fragging and space creation. Mosh Pit is effective for clearing corners ahead of Phoenix's push.
KAY/O: KAY/O's ZERO/POINT knife can suppress defensive utility, making Phoenix's entry significantly easier. His FLASH/DRIVE can be layered with Phoenix's Curveball for extended blinding or used to counter-flash opponents.
Countering Phoenix:
Opponents can exploit Phoenix's aggressive tendencies and the characteristics of his abilities.
Specific Agent Counters:
| Agent | Counter Mechanics |
|---|---|
| Reyna | Leer can blind Phoenix even through his own Blaze wall or smokes. Dismiss allows Reyna to reposition after a kill, avoiding a trade if Phoenix used Run It Back. |
| Sage | Slow Orbs hinder Phoenix's aggressive pushes. Barrier Orb can block entries and waste Phoenix's utility. Her Healing Orb can often out-heal the damage from Hot Hands if not immediately lethal. |
| Viper | Toxic Screen and Poison Cloud inflict decay, weakening Phoenix before engagements and making it risky to flash through. Snake Bite denies Hot Hands healing and can punish his Run It Back respawn location. |
| KAY/O | His ZERO/POINT knife silences Phoenix, preventing all ability usage including flashes, healing, and Run It Back. FRAG/MENT molly denies healing spots. FLASH/DRIVE can counter-flash. NULL/CMD ultimate suppresses Phoenix, rendering Run It Back useless if caught. |
| Breach | Fault Line can stun Phoenix mid-push. Flashpoint can counter-flash. Aftershock denies healing zones. Rolling Thunder can completely disrupt Run It Back pushes. |
| Cypher | Trapwires can catch Phoenix during aggressive rushes or Run It Back entries, especially through smokes. Spycam provides intel on common push routes. |
| Sova | Recon Bolt can reveal Phoenix even behind his Blaze wall. Shock Darts can force him out of Hot Hands healing. Owl Drone can track him during Run It Back, and Hunter's Fury can eliminate him at his respawn or during his push. |
| Astra | Gravity Well can pull an immobile Phoenix out of position, making him vulnerable. |
Overcoming Counters (Phoenix's Perspective):
- Against Flashes/Blinds: Play "anti-flash" by briefly hiding or turning away when anticipating an enemy flash. Use the Blaze wall for cover before peeking known flash angles.
- Against Area/Healing Denial: Be unpredictable with Hot Hands placement for healing. Use Blaze to create temporary safe pockets. Avoid healing in obvious, exposed locations.
- Against Intel: Quickly destroy Sova darts and Cypher cameras/tripwires. Vary pathing to avoid common recon spots. Use Blaze to block lines of sight for recon abilities.
- Against Run It Back Counters: Activate the ultimate from very safe, unexpected locations. Communicate with teammates to have them watch the return marker. Be prepared for an immediate fight upon respawning. Use the 10-second duration strategically for information or kills, then reposition if the respawn point is likely camped. Consider throwing Hot Hands on the respawn marker as the ultimate expires to deter campers.
- Against Mobility Agents (Jett, Yoru): Attempt to bait out their movement abilities before committing Phoenix's own utility. Hold angles they might dash or teleport into.
Synergy Snapshot Table
| Paired Agent Role | Specific Agent | Key Synergistic Abilities | Tactical Benefit |
|---|---|---|---|
| Controller | Omen | Dark Cover, Paranoia | Safe entries for Phoenix, combined blinding effects. |
| Controller | Brimstone | Sky Smokes, Incendiary | Covered pushes, enhanced area denial with Hot Hands. |
| Controller | Clove | Smokes, Decay | Pop flashes through smokes, decay + Hot Hands combo for quick eliminations. |
| Initiator | Breach | Fault Line, Flashpoint, Aftershock, Rolling Thunder | Stun/flash setups for Phoenix entry, forcing enemies from cover. |
| Initiator | Sova | Recon Bolt, Owl Drone, Shock Darts | Intel for targeted flashes/pushes, flushing enemies into Phoenix's LoS. |
| Initiator | Gekko | Dizzy, Wingman, Mosh Pit | Supplementary flashes, objective play freed up, corner clearing. |
| Initiator | KAY/O | ZERO/POINT, FLASH/DRIVE | Disabling enemy utility for easier Phoenix entry, combined flashes. |
Common Pitfalls & How to Soar Above Them
While Phoenix is a potent duelist, several common mistakes can hinder his effectiveness. Recognizing and addressing these pitfalls is crucial for improvement.
Team Flashing with Curveball:
Consequence: This disrupts team pushes, can lead to friendly fire or easy kills for the enemy, and understandably frustrates teammates.
Solution: Extensive practice of flash angles in custom games is essential. Clear communication before deploying a flash (e.g., "Flashing A Main left in 3, 2, 1!") is non-negotiable. Players should always be aware of teammate positioning relative to the flash's path. Flashing from further away from the corner can give enemies less reaction time while also reducing the risk to nearby allies. The "Korean Flash" technique (flashing behind oneself while peeking) can be effective for solo plays but requires precision.
Ineffective Blaze Wall Placements:
Consequence: Wasted utility, providing a false sense of security, or even leading to teammates being caught out.
Solution: Practice wall placement to ensure comprehensive coverage of desired angles. Aiming higher can allow Blaze to extend over obstacles or cover elevated positions effectively. A thorough understanding of how the wall deploys and curves is necessary. Communicate intended wall placements to the team. For healing, select safer, covered locations or use Blaze in conjunction with other utility to secure the healing phase. Players should also be aware of the potential for random wall gaps and visually confirm the wall's integrity when possible. This technical issue with wall gaps means players must be vigilant, as it's not always a matter of skill but an inconsistency in the ability itself.
Misusing Hot Hands (Molly):
Consequence: Loss of kill potential, failed objective denial (like a Spike defuse), inefficient healing leading to increased vulnerability.
Solution: Prioritize Hot Hands for flushing enemies from strongholds, crucial post-plant denial, or essential self-healing. Learning common lineups for default plant spots and chokepoints significantly increases its effectiveness. Since there's no audio cue for enemy damage, rely on visual confirmation or team communication.
Predictable or Unsafe Run It Back Usage:
Consequence: A wasted ultimate, potentially feeding a kill to the enemy, and gaining no valuable information or map control.
Solution: Activate Run It Back from a concealed, safe position. Communicate ultimate usage clearly with the team so they can capitalize on the entry, distraction, or trade potential. Utilize the 10-second duration to gather intelligence, create chaos, or achieve a specific objective like a Spike grab. Be acutely aware of the timer and potential enemy flanks targeting the respawn marker. A proactive tactic is to throw Hot Hands on the respawn point if campers are anticipated.
Hesitation and Passivity:
Consequence: Failure to fulfill the duelist's primary role of space creation and entry fragging, leading to lost momentum and initiative for the team.
Solution: Cultivate a confident and proactive mindset. Use utility to create advantages and then decisively act upon them. Actively seek out ultimate orbs to ensure frequent use of Run It Back. As one source advises, "Don't hesitate and if you're gonna go full aggro, do it FAST".
Common Mistakes & Solutions Table
| Mistake | Consequence | How to Avoid/Solution |
|---|---|---|
| Team Flashing (Curveball) | Disrupts team, friendly fire, lost engagements | Practice angles in custom games, clear communication (e.g., countdown), flash further from corners, learn Korean Flash. |
| Ineffective Blaze Wall | Gaps, no/poor vision block, hinders team | Practice placement, aim high for obstacles, understand curve mechanics, communicate intent, check for random wall gap. |
| Wasting/Misplacing Hot Hands | Lost utility, no impact on objective/healing | Prioritize for flush/denial/crucial heal, learn common lineups, use visual cues for damage (no audio cue). |
| Predictable/Unsafe Run It Back | Wasted ultimate, feeds kill to enemy, no value | Activate from safe/hidden spot, coordinate with team for follow-up/marker watch, use for specific objectives (info, spike). |
| Hesitation/Passivity | Fails duelist role, loses team momentum | Be confident, proactive with utility usage, actively farm ultimate orbs, take initiative in engagements. |
Phoenix's Evolution: Key Patch Changes
Phoenix's abilities have undergone several notable adjustments since Valorant's launch, aimed at refining his role as a duelist and balancing his overall impact.
This ability has seen significant evolution. Its cost was initially increased from 100 to 200 credits (Patch 0.50). Patch 1.0 then increased its maximum flash duration from 0.8s to 1.1s to better justify the new price point. Later, in Patch 3.0, the cost was further increased to 250 credits. A major buff arrived in Patch 4.04, which increased the maximum flash duration again, from 1.1s to 1.5s, and decreased the flash windup time from 0.7s to 0.5s, making his flashes quicker and more potent. The most impactful change occurred in Patch 9.10, when Curveball was moved to become his signature ability, granting one free charge per round and an additional charge upon securing two kills. This solidified his role as a flash-based entry duelist by ensuring he always has his primary engagement tool available. Audio and visual cues for Curveball were also improved in Patch 1.06 to better indicate to all players when to turn away.
The duration of Blaze was increased from 6s to 8s in Patch 1.0. The same patch also altered its damage model (from 15 damage every 0.25s to 1 damage every 0.033s) and healing model (to 1 HP every 0.16s, for a total of 50 HP). The cost of Blaze was later decreased from 200 to 150 credits in Patch 5.12. Patch 6.0 ensured Blaze properly damaged various enemy agent utility. A quality-of-life change in Patch 4.04 allowed Phoenix to equip his weapon earlier if he stops bending the wall. A significant buff in Patch 9.10 allowed the initial projectile of Blaze to pass through walls, greatly enhancing its placement versatility. Most recently, Patch 10.00 fixed some visual offset and asset reference issues with Blaze.
Similar to Blaze, Hot Hands' healing model was updated in Patch 1.0 to provide 1 HP every 0.08s (for a 50 HP total). Patch 0.50 increased the height required to jump out of the fire zone. The audio of its lingering fire was made easier to hear in Patch 2.03. Patches 5.12 and 6.0 ensured it properly damaged enemy utility. A major shift occurred in Patch 9.10 when Hot Hands was changed from Phoenix's signature ability to a non-signature, purchasable ability costing 200 credits. This made his self-heal/area denial molly an economic decision each round.
A key quality-of-life improvement in Patch 1.0 made it so Phoenix automatically reloads all weapons upon respawning from his ultimate. Previously, returning from the ult without armor and needing to reload was a significant drawback. Patch 4.04 further buffed the ultimate by allowing Phoenix to respawn with the amount of shields he had when the ability was cast, whereas previously armor was always lost. These changes made the "second life" more immediately impactful.
Patch 1.0 changed the passive healing effect from a flat rate (3 HP every 0.25s) to a total of 50 HP healed over the full duration of contact with his fire abilities. Patch 9.10 introduced a significant improvement where the Heal over Time effect now persists for a short period even after Phoenix leaves the fire, offering more flexible healing opportunities. This, combined with Hot Hands becoming a paid ability, reflects a balance: the healing itself is more tactically flexible, but accessing one of his primary healing tools (Hot Hands) now involves an economic trade-off.
Conclusion: Rise from the Ashes and Dominate
Phoenix stands as a uniquely self-sufficient and aggressive duelist in Valorant. His strengths lie in his potent entry-fragging capabilities fueled by his Curveball flashes, his ability to control space and heal with Blaze and Hot Hands, and the game-changing potential of his Run It Back ultimate, which offers risk-free opportunities for information gathering and aggressive plays. He is particularly effective in solo queue environments due to his self-sustain and can be a true playmaker on maps with tight angles and chokepoints where his utility shines.
Mastering Phoenix, however, extends beyond simply understanding his abilities. It demands dedicated practice in utility placement to avoid common pitfalls like team flashing, consistent communication with teammates to coordinate pushes and ultimate usage, and astute decision-making to balance aggression with tactical patience. Players who embrace his fiery nature while playing intelligently, varying their strategies to avoid predictability, and capitalizing on his economic strengths will find Phoenix to be a rewarding agent capable of carrying games and leading their team to victory. By rising from the ashes of each engagement, Phoenix players can truly ignite the battlefield and dominate their opponents.