
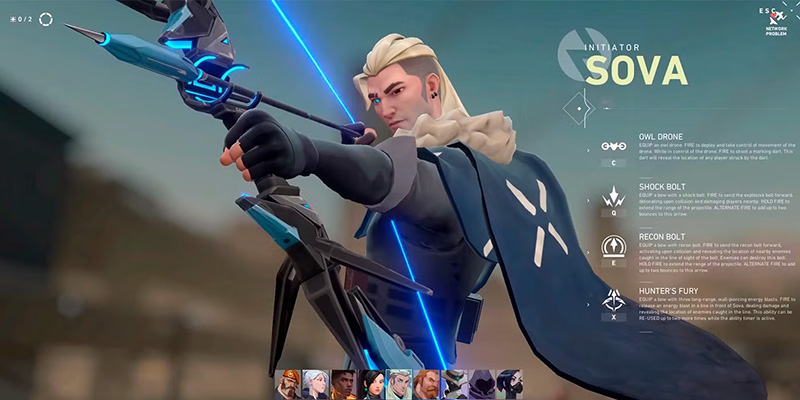
In the tactical landscape of Valorant, information is paramount, and few agents rival Sova in his ability to procure vital intelligence. Classified as an Initiator, Sova, born from the eternal winter of Russia's tundra, excels at tracking, finding, and enabling the elimination of enemies with ruthless efficiency and precision. His custom bow allows him to deploy reconnaissance and damaging tools from safe distances, utilizing unique ricochet mechanics to access angles unavailable to others. This capability makes him arguably the game's premier scan agent, often outclassing others in the quantity and quality of information gathered.
However, Sova's potential comes with a demanding learning curve, reflected in his official "Hard" difficulty rating. Mastering his kit, particularly the precise lineups required for his Recon and Shock Bolts, demands significant practice and understanding of map geometry. His strategic value lies in transforming the battlefield from a realm of uncertainty into a calculated engagement zone, providing his team with the actionable intelligence needed for decisive plays, coordinated pushes, and informed defensive stands.
Core Abilities Deep Dive
Understanding the precise mechanics, statistics, and strategic nuances of Sova's abilities is fundamental to mastering the agent. Recent patches have introduced significant changes, including nerfs to the Owl Drone's duration and health, alterations to the Recon Bolt's scanning frequency, and increases in ability costs. These adjustments necessitate adapting strategies learned from older resources and impact tactical and economic decision-making. For instance, the reduced drone duration demands more efficient pathing, while higher costs make losing utility more detrimental.
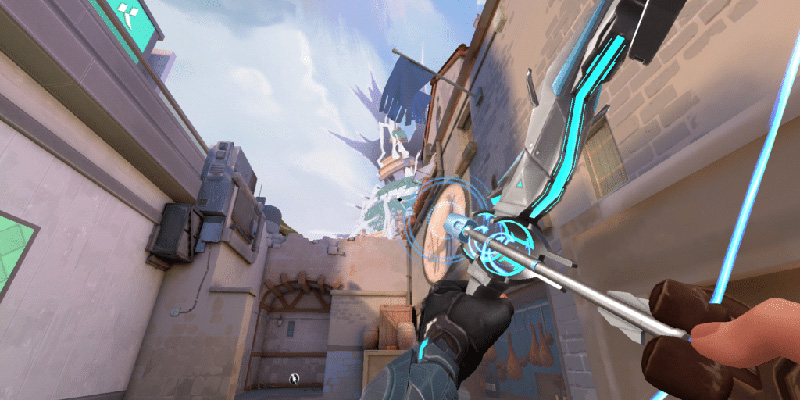
Recon Bolt (E): The All-Seeing Eye

Mechanics
The Recon Bolt is Sova's signature ability. Upon equipping his bow, firing the bolt causes it to activate upon collision with a surface. It then emits pulses that reveal the location of any enemies caught within its line of sight (LoS). It's crucial to remember that the scan does not penetrate walls or solid objects; enemies must be directly visible to the bolt itself to be revealed. Enemies can destroy the bolt. Players can hold the fire button to charge the shot, increasing its range and affecting its trajectory arc. Pressing the alternate fire key (Alt-Fire) cycles through adding zero, one, or two bounces to the arrow before it activates upon its final impact. The charge mechanic isn't purely linear; there are effectively four distinct power levels corresponding to the segments on the charge bar, allowing for consistent lineup replication.
Stats
As a signature ability, the Recon Bolt is free and recharges over time. It has one charge with a 40-second cooldown (increased from 35 seconds in Patch 3.0). Once active, the bolt pulses twice (reduced from three in Patch 4.08), with a 1-second interval between scans, lasting a total of 5 seconds before disappearing. The bolt has 20 Health (HP), significantly increased from its previous 1 HP (Patch 5.12), making it slightly more durable, and it is immune to damage from allied sources. Its visual model size was also increased to better reflect its hitbox. Notably, the scan now only reveals the portion of an enemy visible behind cover, rather than their entire outline.
Bounce/Charge Mechanics
Mastering the interplay between charge power and bounces is key to Sova's effectiveness. Higher charges result in faster, flatter trajectories suitable for long distances or direct shots, while lower charges create higher arcs useful for clearing obstacles or achieving specific landing spots. Bounces allow the arrow to navigate around corners and reach seemingly inaccessible locations. Consistent execution requires significant practice in custom games to develop muscle memory for different lineups.
Strategic Use
The Recon Bolt is Sova's primary tool for gathering intelligence. It's used for obtaining early-round information on enemy positions, clearing angles before a site push, setting up teammates for kills on revealed targets, and gaining crucial information during site retakes. To maximize its effectiveness and prevent immediate destruction, players should vary their arrow placements and timings. Aiming for high ground or obscure surfaces can make the bolt harder for enemies to spot and destroy quickly. It can even be fired nearby as a deliberate distraction to draw enemy attention before peeking. Remember that a lack of detection doesn't guarantee an area is clear; enemies may hide outside the scan radius or wait for it to expire.
Shock Bolt (Q): Zapping the Opposition
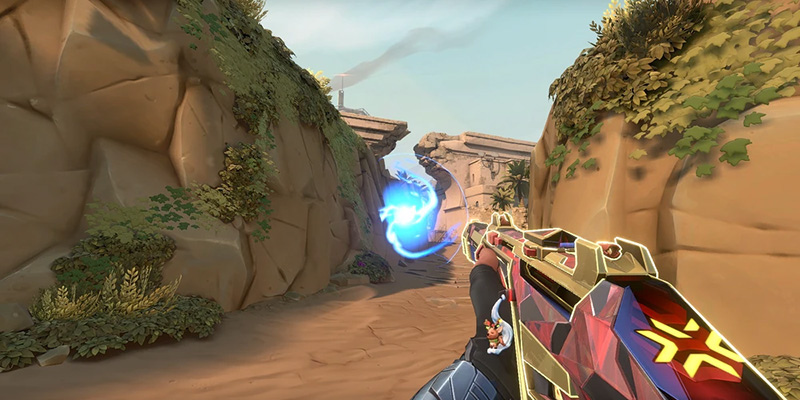
Mechanics
Sova equips his bow with an explosive bolt. Firing sends the bolt forward, which detonates upon collision with any surface or player, dealing area-of-effect (AoE) damage to nearby enemies. Like the Recon Bolt, holding fire extends the range (charges power), and Alt-Fire adds up to two bounces. The firing mechanics, including charge levels and bounce physics, are identical to the Recon Bolt.
Stats
Shock Bolt is a purchasable ability costing 150 Credits per charge (increased from 100 in Patch 3.0), with a maximum of two charges available. Each bolt deals a maximum of 75 damage at the epicenter of the explosion (decreased from 90 in Patch 4.08). The damage decreases radially as the distance from the center increases. This damage nerf means landing both bolts precisely is often necessary to secure a kill on a full-health enemy. Shock Bolts are effective at destroying enemy deployable utility, including Cypher's Trapwires, Killjoy's Nanoswarms, Turret, and Alarmbot, Fade's Prowlers, and Sage's Barrier Orb, among others.
Bounce/Charge Mechanics
The principles mirror those of the Recon Bolt. Precision is vital for lineups intended for post-plant denial or hitting specific utility placements, requiring dedicated practice.
Owl Drone (C): The Hunter's Companion
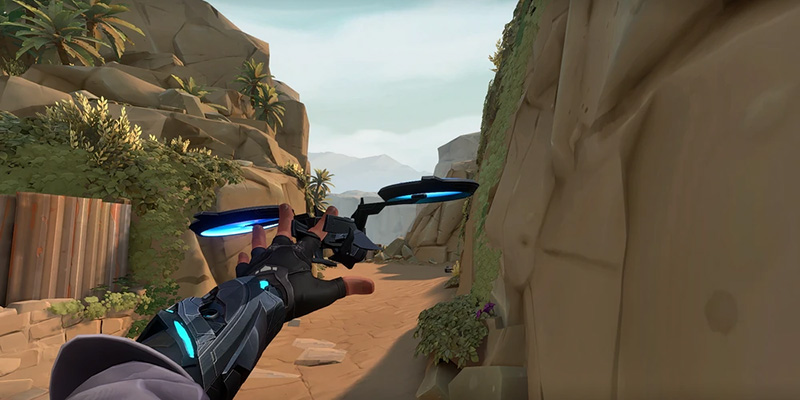
Mechanics
Sova equips and deploys a controllable Owl Drone. While piloting, he can fly it around the map to scout. Pressing fire while piloting shoots a marking dart; if this dart hits an enemy player, it reveals their location through walls with intermittent pings. Enemies can shoot and destroy the drone. The drone has vertical mobility, but its maximum height is determined by the nearest ground surface directly beneath it.
Stats
The Owl Drone costs 400 Credits (increased from 300 in Patch 3.0) and Sova can purchase one per round. Its flight duration is 7 seconds (reduced from 10 seconds in Patch 4.08), and it has 100 HP (reduced from 125 in Patch 4.08). A successful dart tag reveals the enemy with 2 pings (reduced from 3 in Patch 4.08). Each ping provides vision for 0.6 seconds. The first ping occurs 1.6 seconds after the dart impacts (increased from 1.2 seconds), and the second ping occurs 1.2 seconds after the first ping's reveal ends. The dart itself has a 5-second cooldown after firing, meaning a maximum of one dart can typically be fired per drone deployment given the 7-second duration. Equip time is 0.9 seconds, deploy time is 0.25 seconds, and unequip time is 0.7 seconds. The drone is immune to allied damage.
Control Tips
Effective drone control requires practice, especially navigating tight corridors or utilizing verticality. Flying the drone low to the ground can make it a harder target and distract enemy aim more effectively. Utilize map geometry for cover while flying. Understanding the elevation mechanic is key for advanced scouting – fly over boxes or elevated terrain to reach higher vantage points like Haven A Heaven. Looking towards the ground while flying allows clearing both left and right angles simultaneously, maximizing info gain within the short duration.
Hunter's Fury (X): Nowhere to Hide
Mechanics
Sova equips his bow for his ultimate ability, allowing him to fire up to three long-range energy blasts that pierce through all map geometry. Enemies hit by a blast take damage and are briefly revealed to Sova and his team. The ability can be fired twice more after the initial shot, provided the duration timer hasn't expired. A range indicator appears on the minimap while the ultimate is active, showing the maximum reach. Hunter's Fury cannot be canceled by switching weapons; the ultimate key (X) must be pressed again to cancel it early. While aiming, Sova has full turning speed, but this speed is drastically reduced while charging a shot, returning to normal immediately after firing.
Stats
Hunter's Fury costs 8 Ultimate Points (increased from 7 in Patch 3.0). The ability duration is 6.5 seconds, within which all three shots must be fired. Each blast deals 80 damage. There is no damage falloff based on distance. The blasts also damage destructible enemy utility, such as Killjoy's Lockdown and Nanoswarms, Cypher's Trapwires, Sage's Barrier Orb, enemy Sova Recon Bolts, KAY/O's ZERO/POINT knife, Chamber's Trademark and Rendezvous anchors, Fade's Prowlers, and Raze's Blast Packs. An ammo count is displayed on the HUD.
| Ability Name | Type | Cost/Cooldown | Charges | Key Stats |
|---|---|---|---|---|
| Recon Bolt | Signature | Free / 40s Cooldown | 1 | Reveals enemies in LoS. 2 Scan Pings (1s apart). 5s Duration. 20 HP. Immune to allied damage. Bounces: 0-2. Charge affects range/arc. |
| Shock Bolt | Basic | 150 Credits | 2 | Deals 1-75 AoE damage. Destroys enemy utility. Bounces: 0-2. Charge affects range/arc. |
| Owl Drone | Basic | 400 Credits | 1 | Pilotable drone. Duration: 7s. Health: 100 HP. Dart tags enemy (2 pings, 1.6s initial delay, 1.2s between pings, 0.6s reveal/ping). Dart Cooldown: 5s. Immune to allied damage. |
| Hunter's Fury | Ultimate | 8 Ultimate Points | 3 Shots | Wall-piercing blasts. Damage: 80 per hit. Reveals hit enemies. Duration: 6.5s. Destroys enemy utility. No damage dropoff. Range indicator on minimap. Immune to allied damage. |
Mastering the Recon Bolt: Map-Specific Lineups
The Recon Bolt is Sova's defining ability, but its effectiveness hinges on precise placement and timing. While countless lineups exist across various online resources, simply memorizing them is insufficient. True mastery involves understanding the purpose of each arrow – whether for an attack execute, defensive information, or a site retake – and knowing when to deploy it based on the game state and enemy tendencies.
Varying lineups is crucial to prevent predictability, as experienced opponents will quickly learn to anticipate and destroy commonly used arrows. Aiming for high ground or unexpected surfaces often increases an arrow's lifespan. Timing the arrow's landing with your team's push maximizes its impact, forcing defenders to choose between shooting the arrow or fighting players.
Ascent
Attacking Executes
Positioning: Stand in A Main, near the large wooden door, against the left wall. Aim Point: Look up towards the archway leading into A Site. Place your crosshair on the highest point of the stone arch. Charge/Bounce: Full charge, one bounce. Coverage: Scans default plant area near the generator and the front site box. Does not clear Heaven or deep corners well.
Positioning: Stand near the large wooden box in B Main. Aim Point: Look up towards the back wall of B Site, aiming for the top-left section. Charge/Bounce: Full charge, one bounce. Coverage: Scans the back platform of B site and the entrance towards Market/CT Spawn.
Positioning: Stand near the green boxes in A Lobby. Aim Point: Align crosshair precisely with the tip of the highest antenna visible on the A Site roof structure. Charge/Bounce: One bar charge, no bounces. Coverage: Specifically designed to land high and reveal enemies playing around the Generator or deep backsite.
Defensive Holds
Positioning: Stand in A Heaven, in the corner next to the wooden box. Aim Point: Aim towards A Main. Place the left diamond of the bounce indicator HUD element at the bottom edge of the middle tree visible outside. Charge/Bounce: One bar charge, no bounces. Coverage: Lands on the wall in A Lobby/Main, revealing early pushes.
Positioning: Stand in the far-right corner of B Site, near CT spawn entrance. Aim Point: Aim at the large rock formation visible across Mid. Charge/Bounce: Almost full charge (just below max), one bounce. Coverage: Lands deep in Mid, scanning Mid Link, Tiles, and potentially Catwalk approach.
Haven
Attacking Executes
Positioning: Stand against the back ledge in A Lobby. Aim Point: Aim just above the lightbulb hanging near the A Long entrance tunnel, in the gap between the wire and the tree leaves. Charge/Bounce: Two bars charge, no bounces. Coverage: Lands on or near the default box on A Site, revealing close Long entrance and backsite angles.
Positioning: Stand in the corner of Garage (requires Garage control). Aim Point: Aim towards the center of B site, slightly elevated. Charge/Bounce: Two bars charge, one bounce. Coverage: Lands on the floor near the central structure, positioned to reveal both the Garage entrance and the Mid Window entrance simultaneously. Difficult for enemies to destroy.
Retake Scenarios
Positioning: Stand in the corner of C Link near CT spawn, by the plant pot. Aim Point: Aim high towards C Site. Align the top of the first charge bar HUD element with a specific spot on the roof edge/intersection of flags (visual needed). Charge/Bounce: Full charge (or sometimes two bars), one bounce. Coverage: Lands on the corner roof structure, scanning logs, platform, and front site. Doesn't clear behind default box.
Icebox
Attacking Executes
Positioning: Stand on A Belt near Attacker Spawn. Aim Point: Aim towards A Site, targeting just underneath the corner of the large structure above Pipes/Nest. Charge/Bounce: Full charge, no bounces. Coverage: Scans Nest, default plant area, and parts of the main site floor.
Positioning: Specific spot in Attacker Spawn or A Belt (requires visual). Aim Point: Complex alignment involving distant structures or UI elements (requires visual). Charge/Bounce: Typically full charge, specific bounce count. Coverage: Designed to land high on Rafters or Belt structure, scanning a wide area including elevated positions.
Defensive Holds
Positioning: Stand on the edge of the tank in Mid Boiler. Aim Point: Align the left corner of the left bounce diamond HUD element with a specific part of the metal structure towards B Garage/Green. Charge/Bounce: One bar charge, no bounces. Coverage: Reveals pushes coming from B Garage and B Green towards Mid.
Lethal Precision: Shock Dart Applications & Lineups
While the Recon Bolt gathers intel, the Shock Bolt (Q) provides Sova with proactive map control and damage potential. Often underestimated or relegated solely to post-plant scenarios, Shock Darts are a versatile tool for clearing utility, flushing enemies, and securing kills when used precisely. The nerf reducing maximum damage to 75 means perfect centering is often required for kills, especially with double shock lineups, demanding greater precision than before.
Common Angle Clearing
One of the most consistent uses for Shock Darts is clearing common defensive angles or hiding spots before your team commits to a push. Firing a Shock Dart into a predictable corner forces any player holding that position to either reposition (giving up the angle) or take significant damage. Examples include:
- Ascent B Site's back corner or Market entrance.
- Haven's A Short cubby or C Long cubby.
- Icebox B Site's Yellow container area.
- Split's tight corners on A or B site entrances.
- Shooting into smokes where enemies are likely holding or pushing through can yield damage or kills.
Shock Darts can also serve as a distraction; firing one just before peeking an angle can cause the enemy to flinch or look away momentarily, creating an advantage. Quick, zero-charge shots are useful for this in close quarters.
Post-Plant Denial
Numerous lineups exist for default plant spots across all maps. Knowing a few reliable ones per site is crucial. Examples include:
- Ascent A Default (Generator): Lineups from A Main or A Lobby.
- Ascent B Default: Lineups from B Main or B Lobby.
- Haven A Default: Lineups from A Long.
- Haven C Default: Lineups from C Long or CT.
- Icebox B Default (Yellow): Lineups from B Green or Snowman area.
- Lotus A Default: Lineups from A Main or A Root.
- Split B Default: Lineups from B Garage/Heaven.
Double Shock Darts
This technique involves firing both Shock Darts to land in the same location almost simultaneously, maximizing damage potential to secure a kill on the defuser. Due to the 75 max damage per dart, both must hit very close to the target for a kill on a full-health armored enemy. This requires precise lineups and timing.
Example Double Shock for Ascent B Site:
Positioning: Stand at the edge of the large box in B Main near attacker spawn entrance.
Aim Point 1: Aim high on the B Site back wall. Align the middle of the bounce indicator boxes with the top edge of a specific dark panel texture.
Charge/Bounce 1: Two bars charge, one bounce.
Aim Point 2: Aim slightly lower on the same wall, near the center.
Charge/Bounce 2: One bar charge, perform a jump-throw (jump and release fire at apex).
Timing: Fire sequentially, second dart immediately after the first.
Coverage: Both darts converge on the default plant spot behind the main site structure.
Utility Destruction
An often underutilized but highly effective application of Shock Darts is destroying enemy utility, particularly Sentinel setups that hinder pushes. For 150 Credits, a Shock Dart can neutralize abilities that might otherwise cost your team health, time, or even the round.
- Cypher Tripwires: A well-aimed Shock Dart can destroy Tripwires placed across chokepoints before your team enters. Example: Shocking the B Main entrance trip on Ascent from safety.
- Killjoy Utility: Shock Darts can destroy Nanoswarms (mollies), Turrets, and Alarmbots. This is invaluable for breaking site holds or clearing post-plant mollies. Example: Clearing Killjoy mollies in Ascent B Lane or destroying her ultimate.
- Other Utility: Shock Darts also damage Fade Prowlers, Sage Walls, enemy Recon Bolts, KAY/O Knives, and more.
The Owl's Path: Strategic Drone Usage
Sova's Owl Drone (C) is a powerful scouting tool, but its effectiveness is heavily reliant on skillful piloting, strategic pathing, and clear communication. Simply flying it forward often results in its quick destruction and wasted credits. The nerfs reducing its duration to 7 seconds and health to 100 HP, while increasing its cost to 400 credits, further emphasize the need for efficient and purposeful usage. Advanced techniques involve utilizing map geometry for cover and elevation, clearing multiple angles efficiently, and coordinating directly with teammates.
Effective Scouting Paths (Attack & Defense examples per map)
Knowing pre-planned drone paths for common scenarios saves valuable time and maximizes information gain within the drone's limited duration.
Ascent
- Attack A: Drone from A Main, fly low clearing close corners, then potentially use box boost (see below) to check Heaven.
- Attack B: Drone from B Main, clear close left/right, then push towards site/Market.
- Defense Mid: Drone from Pizza/Cubby, clear Market entrance, then sweep Mid Top/Catwalk.
- Retake B: Drone from CT/Heaven, clear Stairs, Market, Switch, Logs, Lane, then B Main.
Haven
- Attack A: Drone from A Long or A Short, clearing site corners and Heaven approach.
- Attack C: Drone from C Long, clearing close cubby, site boxes, and back platform.
- Defense Garage: Drone out from Garage to check Mid Window/Grass control. Can enable Operator plays.
- Retake C: Drone from CT/Garage, clear Logs, hold spacebar to fly over site box, clear default and backsite.
Drone Boost Spots & Advanced Maneuvering
Technique: Identify elevated objects near areas you want to scout vertically. Fly the drone towards the object, and as it passes over, hold the ascend key (typically Spacebar) to gain height relative to the object's surface.
Examples:
- Ascent A Heaven: Fly the drone over the boxes near A Main entrance while ascending to peek into A Heaven window.
- Haven A Heaven: Similarly, use the boxes in A Site or A Long to boost the drone high enough to clear Heaven.
- Other Maps: Look for similar opportunities on maps with vertical elements like Icebox Rafters or Split Heaven.
Advanced Piloting: Practice flying low to the ground while looking down. This allows the drone's camera to clear both left and right angles simultaneously, maximizing information gathered per second, crucial given the 7-second duration.
Information Relay & Tagging Tactics
The drone's information is useless if not communicated effectively.
Communication:
Use clear, concise callouts about enemy locations, numbers, and utility spotted by the drone. Specify what areas are clear. Coordinate the drone's path with teammate movements – tell them when you are droning and where, and encourage them to follow up.
Tagging:
The marking dart confirms an enemy's presence and tracks them intermittently. However, firing the dart reveals the drone's general location and makes it a priority target.
Tag When: You need precise location for an ult or wallbang, to confirm an enemy in a deep/hidden corner, or to track a high-priority target (e.g., Operator user).
Don't Tag When: Pure scouting is needed, the enemy is already visible to teammates, or preserving the drone for longer scouting is more valuable.
Unleashing the Fury: Hunter's Fury Tactics
Sova's ultimate, Hunter's Fury (X), is a high-impact ability capable of securing kills through walls, denying objectives, and clearing space. Its effectiveness, however, relies heavily on accurate information, strategic timing, and precise targeting. Randomly firing the ultimate is often wasteful; maximizing its value requires combining it with intel and understanding optimal usage scenarios.
Combining with Intel (Drone/Recon Bolt)
The most reliable way to secure kills with Hunter's Fury is to use it immediately after locating an enemy with the Owl Drone or Recon Bolt.
The Combo: Deploy the Owl Drone, tag an enemy, immediately cancel the drone (press C again), and activate Hunter's Fury (X). The lingering reveal from the dart provides a clear target. Similarly, fire a Recon Bolt; if it detects an enemy, quickly activate the ultimate and fire at the revealed ping.
Prediction: Even with a reveal, enemies will try to move. Anticipate their likely escape path based on the ping's location and map layout. Read their movement before firing the first shot. Don't rush the shots; slight delays can catch enemies off guard as they try to juke.
Clearing Tight Spaces & Chokepoints
Hunter's Fury excels at forcing enemies out of confined areas or punishing pushes through narrow corridors.
Usage: Target common chokepoints like Bind Hookah entrance, Haven C Long, Ascent A Main, or Split B Main during enemy executes.
Impact: Even if it doesn't secure a kill, the damage, reveal, and sheer pressure force enemies to halt their push, reposition, or risk taking heavy damage, buying valuable time for your team to rotate or set up a defense.
Post-Plant and Defuse Denial
Effectiveness: Even single hits force them off the objective, delaying the process significantly and potentially winning the round, especially in clutch situations. Use intel (if available) to confirm someone is on the spike before committing the ult.
Advanced Tactics
Beyond the basic applications, several advanced techniques enhance Hunter's Fury's impact:
- Delayed Shots: Avoid firing all three blasts immediately. Introducing a slight pause between shots makes dodging much harder for the enemy. You have 6.5 seconds, use the time wisely.
- Elevation Aiming: Use map pings placed before ulting as a reference for vertical aim. Aim slightly above the ping marker on your screen for a level shot across the map, preventing the beam from hitting the ground prematurely.
- Range Optimization: Target enemies positioned further away (towards the edge of the minimap indicator, ~65m+). They have less relative screen space to move within the ult's beam, making dodges more difficult compared to close-range targets.
- Utility Destruction: Hunter's Fury can destroy clusters of enemy utility like Killjoy setups or Cypher nests, opening paths for your team.
- "Creeping" Ults: By aiming slightly upwards from a lower position, the beam can "creep" over obstacles or up ramps, potentially surprising enemies.
- Strategic Cancellation: Remember you can cancel the ult early by pressing X again. Use this if you feel threatened or to bait enemy reactions.
Synergistic Hunts: Agent Pairings
Sova's strength lies in information, but that information is only as valuable as his team's ability to act upon it. His reconnaissance tools create opportunities that specific agent roles, particularly Controllers and Duelists, are well-equipped to exploit. Understanding these synergies is key to integrating Sova effectively into a standard team composition (often 1 Duelist, 1 Controller, 1 Sentinel, 2 Initiators) and maximizing his impact.
Working with Controllers (Omen, Brimstone, Viper, Astra, Harbor, Clove)
Controllers shape the battlefield with smokes and area denial, and Sova's intel allows them to do so with greater precision and impact.
Guided Utility: Recon Bolt scans or Owl Drone sightings inform Controllers exactly where to place smokes, mollies, or walls to block critical sightlines, isolate enemies, or deny space revealed by Sova. Omen, for instance, can place smokes precisely for a Jett dash revealed by Sova.
Setup & Denial: Sova's Shock Darts or Hunter's Fury can clear defenders from an area just before a Controller deploys large-scale denial like Viper's Pit or Brimstone's Orbital Strike, ensuring the area is secure for the utility to land effectively.
Post-Plant Combinations: Sova's Shock Dart lineups pair exceptionally well with Controller mollies (Viper, Brimstone) for layered post-plant denial, making defuses extremely difficult. Hunter's Fury can also be combined with damaging Controller ults for guaranteed area clearing.
Enabling Duelists (Jett, Raze, Neon, Yoru, Phoenix, Reyna)
Informed Aggression: A Recon Bolt scan clearing a corner or an Owl Drone tag allows Duelists like Jett or Raze to dash or satchel in aggressively, knowing where threats are (or aren't). The Jett/Sova combination is particularly potent and common in team compositions.
Targeted Damage: Raze players can use Sova's reveals to land devastating Paint Shells or Showstopper rockets on unsuspecting or grouped enemies.
Angle Clearing: Shock Darts fired ahead of a Duelist's entry can clear common close angles, forcing defenders back and creating safer passage onto the site.
Pairing with other Initiators (Skye, KAY/O, Fade, Breach, Gekko)
Layered Information & Utility: Sova provides long-range scans (Recon Bolt) or safe scouting (Drone), while Initiators like Skye (Dog/Flashes), Fade (Haunt/Prowlers), or KAY/O (Knife/Flashes) offer close-range clearing, flashes, or disruption. This layered approach overwhelms defenders. Fade's reveal synergizes well, though Sova's Recon is often harder to destroy.
Setup Plays: Sova's reveals perfectly set up abilities like Breach's Fault Line/Aftershock or KAY/O's FRAG/MENT, allowing for guaranteed stuns or damage on located enemies. The Sova/KAY/O pairing is noted as strong on maps like Ascent.
Coordinating with Sentinels (Killjoy, Cypher, Sage, Chamber, Deadlock)
Informed Defense: Early Recon Bolts or Drone scouts inform Sentinels where attackers are likely pushing, allowing them to place utility (Cypher trips, Killjoy turret/mollies, Sage wall) more effectively or prepare for contact.
Utility Protection/Denial: Sova's Shock Darts can destroy enemy utility attempting to counter Sentinel setups (e.g., breaking Fade Haunt revealing a Cypher setup) or protect friendly setups by clearing flanking routes.
Ultimate Combos: Hunter's Fury combined with Killjoy's Lockdown or Sage's Slow Orbs can trap and eliminate enemies caught within the Sentinel's utility effect radius.
Economic Warfare: Managing Sova's Credits
Effective economy management is crucial in Valorant, dictating the strength of buys and influencing round outcomes. Sova, with a combined cost of 700 credits for his purchasable utility (400 for Owl Drone, 150 x 2 = 300 for Shock Bolts), falls into the medium-to-high spending category among agents. Balancing the purchase of his impactful abilities with the essential need for weapons and shields requires careful consideration based on team economy and round strategy.
Buy Priorities
Understanding standard buy thresholds helps contextualize Sova's decisions:
| Buy Type | Credit Range | Typical Purchases |
|---|---|---|
| Full Buy | 3900+ credits | Primary rifle (Vandal/Phantom @ 2900) and Heavy Shields (1000), plus utility if credits exceed ~4600 |
| Force Buy | 2500-3800 credits | Cheaper rifles (Bulldog/Guardian), SMGs (Spectre/Stinger), or upgraded pistols (Sheriff) with Light/Heavy Shields, plus partial utility |
| Half Buy / Light Buy | 2000-3500 credits | Spectres, Marshals, or Sheriffs with Light Shields and partial utility |
| Save / Eco Round | Below ~2000 credits | Only pistol (Classic is free, maybe Ghost/Sheriff) or nothing at all, prioritizing saving for next round |
Sova's specific buy priorities within these thresholds:
Pistol Round (800 Credits):
Sova gets his Recon Bolt for free. Options include:
- Buying both Shock Bolts (300) + Light Shields (400) = 700 credits.
- Buying a Ghost (500) + one Shock Bolt (150) = 650 credits.
- Buying a Sheriff (800).
Prioritizing abilities (Shock Bolts) is common for early map control or post-plant potential, while upgrading the pistol offers better dueling power. Saving for an early Drone (Round 2) is less common but possible.
Half Buy (2000-3800 Creds):
This is where prioritization becomes key.
- If info is critical for the round plan (e.g., executing based on drone clear), prioritize the Owl Drone (400) alongside a weapon like Spectre/Marshal and Light Shields.
- If post-plant denial or utility clearing is expected, prioritize Shock Bolts (150/300) with a weapon and Light Shields.
- Often, Sova will need to choose between the Drone or Shock Darts on these rounds, rarely affording both with a decent weapon and shields.
Full Buy (3900+ Creds):
Aim for Rifle + Heavy Shields first.
- With ~4600+ credits, Sova can afford Rifle (2900) + Heavy Shields (1000) + Drone (400) + 2x Shock Bolts (300) = 4600.
- If credits are tighter (e.g., 3900-4500), a choice must be made. Sacrifice the second Shock Bolt first (saving 150). If still short, consider sacrificing the Drone (saving 400) or both Shock Bolts (saving 300) depending on the round's strategic needs (info vs. damage/denial). Sometimes downgrading to Light Shields (saving 600) might allow full utility but is generally less advisable on full buy rounds.
Adapting Buys
Prioritize Drone When: Early information is crucial for executes or identifying defensive setups; coordinating pushes with Duelists who rely on drone clearing; needing to scout complex areas safely.
Prioritize Shock Darts When: Post-plant lineups are a key win condition; facing heavy Sentinel utility (Killjoy/Cypher) that needs clearing; playing anti-eco rounds where chip damage is valuable; specific angle denial is planned.
Communication: Always communicate your utility status and buy intentions to your team. If you're short on credits for a crucial piece of utility (like the drone for an execute), ask teammates with excess credits for a buy. Coordinate team buys – don't be the only one forcing if the team is saving, and ensure everyone can full buy together when possible. Avoid repeated force buys that cripple the team's economy long-term.
Avoiding Pitfalls: Common Sova Mistakes
While Sova possesses immense potential, realizing it requires avoiding common mistakes that often stem from predictability, poor timing, lack of coordination, or misunderstanding ability nuances. Mastering Sova isn't just about hitting lineups; it's about applying his kit intelligently within the flow of the game.
Predictable Recon Bolt Usage
One of the most frequent errors is using the same Recon Bolt lineups repeatedly. Experienced opponents will quickly learn these standard arrows, anticipate their landing spots, and destroy them instantly, negating their value entirely.
Solution: Cultivate a diverse repertoire of lineups for each site and scenario (attack, defense, retake). Learn both simple, quick arrows and more complex, situational ones. Crucially, vary the timing of your recons – don't always fire them at the exact start of the round or execute. Use bounces creatively to land arrows in unexpected locations that force enemies to expose themselves or look away from common angles to destroy them.
Inefficient/Risky Drone Paths
Bad drone usage wastes 400 credits and provides little value. Common mistakes include:
- Flying the drone too high or directly towards enemies, making it an easy target.
- Deploying the drone too late, after teammates have already pushed into danger without intel.
- Failing to clear immediate close angles before sending the drone deep into enemy territory.
- Wasting the drone's limited 7-second duration scanning already safe or irrelevant areas.
- Using the drone when a free Recon Bolt could gather similar information.
Solution: Practice efficient drone pathing in custom games. Fly low, utilize map geometry for cover, and clear angles systematically. Coordinate drone deployment with your team's timing – ensure they wait for the drone or are ready to follow up immediately. Clear close threats before droning further. Prioritize scouting high-threat areas within the drone's duration.
Ignoring Team Coordination
Sova is an Initiator; his primary role is to enable his team. Playing in isolation negates his core strength.
- Using Recon Bolts, Drones, or Ults without communicating intent or findings to teammates.
- Sticking rigidly to pre-planned lineups without adapting to the team's strategy, enemy positioning, or the round's timing.
- Spending excessive time setting up complex lineups far from the team, effectively leaving them a player down during crucial moments (the "Lineup Larry" syndrome). Sova needs to stay alive to provide continued support.
Solution: Use voice communication constantly. Announce when and where you are using utility. Provide clear, concise callouts based on intel gathered. Ask teammates to wait for drone/recon before pushing. Adapt utility usage based on the developing round and team needs.
Over-reliance on Lineups
While lineups are essential, becoming overly dependent on them can be detrimental.
- Spending too long finding the perfect pixel alignment, making you vulnerable or causing you to miss crucial timing windows.
- Lacking the ability to shoot effective, simple recon arrows "on the fly" when a complex lineup isn't feasible or necessary.
- Prioritizing a fancy lineup over basic game sense or immediate team support.
Solution: Develop a strong foundation of simple, reliable arrows for common situations that can be executed quickly. Practice lineup execution in custom games to build speed and muscle memory. Understand that in many fast-paced scenarios, a quick, well-aimed basic arrow is more valuable than a delayed, pixel-perfect one. Balance lineup knowledge with adaptability and situational awareness.
Conclusion: Becoming the Ultimate Hunter
Sova stands as one of Valorant's most impactful and rewarding agents, offering unparalleled information-gathering capabilities that can dictate the flow of entire rounds. His potential, however, is locked behind a high skill ceiling demanding dedication and a deep understanding of his intricate toolkit.
Mastering Sova revolves around several key pillars:
- Intelligent Information Gathering: Utilizing the Recon Bolt and Owl Drone not just frequently, but effectively. This means employing varied and unpredictable Recon lineups, practicing efficient and safe drone pathing, and clearly communicating the gathered intel to the team.
- Precise Utility Usage: Leveraging Shock Darts beyond simple damage, using them to clear critical enemy utility, deny objectives through post-plant lineups (especially double shocks), and flush enemies from advantageous positions.
- Impactful Ultimate Timing: Deploying Hunter's Fury based on concrete information, targeting key objectives like the spike plant/defuse, or clearing crucial chokepoints, rather than firing speculatively.
- Strong Team Synergy: Recognizing that Sova's intel is most potent when enabling teammates – guiding Controller utility, setting up Duelist entries, and coordinating with other Initiators and Sentinels.
- Sound Economic Decisions: Balancing the cost of Sova's valuable utility with the team's overall economy, making informed buy decisions based on the round's strategic needs.
By embracing the challenge, practicing diligently, focusing on communication, and avoiding common pitfalls, players can transform Sova from a mere scout into the ultimate hunter – the eyes and ears of the team, guiding them to victory through unparalleled vision and precision.