
Battlefield 6 requires Secure Boot to be enabled on your Windows PC before you can play. This security feature works with EA's Javelin Anticheat technology to detect and remove cheaters, ensuring fair gameplay for everyone. This comprehensive guide walks you through every step needed to enable Secure Boot and get into the action.
Understanding Secure Boot Requirements
What Is Secure Boot and Why Does Battlefield 6 Need It?
Secure Boot is a security feature built into Windows 10 and Windows 11 that only lets your PC load verified, safe software during startup. Battlefield 6 requires this before you can jump into matches.
The requirement exists because of EA Javelin Anticheat technology. With Secure Boot active, Battlefield 6 can better identify and remove cheaters from matches. You'll see fewer bad actors disrupting your Battlefield 6 gameplay.
Technical Prerequisites You Must Meet
Your system needs to satisfy specific technical requirements before Secure Boot will work. Understanding these beforehand helps you avoid problems during setup.
Your Windows installation disk must use GPT (GUID Partition Table) instead of MBR (Master Boot Record). This is non-negotiable. If your disk currently uses MBR formatting, you'll need to convert it to GPT first.
Your BIOS must run in UEFI mode instead of Legacy mode. UEFI (Unified Extensible Firmware Interface) is the modern replacement for traditional BIOS systems and is required for Secure Boot.
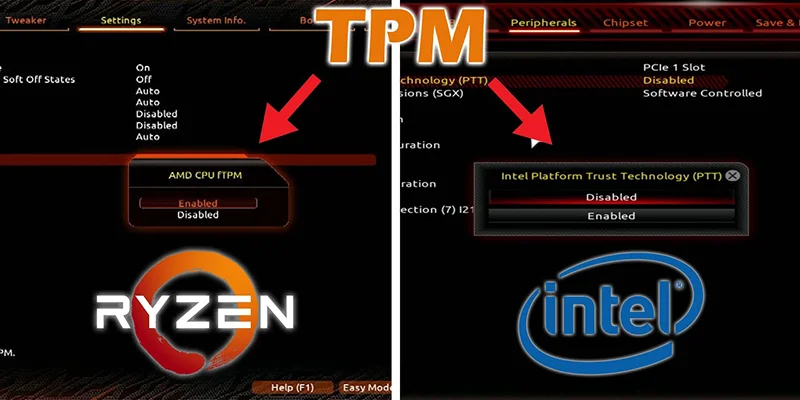
Your system must have TPM 2.0 (Trusted Platform Module) enabled. This security chip or firmware provides hardware-based security functions that Secure Boot depends on.
Enabling Secure Boot requires changes to your BIOS settings. If you're not familiar with navigating BIOS menus or changing system settings, contact a professional technician or your computer manufacturer's support team.
Wrong BIOS configuration can create serious problems, including complete failure to boot. EA explicitly doesn't take responsibility for any changes you make to your BIOS settings.
You should consult your computer or motherboard manufacturer's support docs before proceeding. Every manufacturer implements their BIOS differently, and following generic instructions without understanding your specific system can cause issues.
Checking Your Current System Status
Verifying Secure Boot Status
Before making any changes, check whether Secure Boot is already enabled. This process is the same for Windows 10 and Windows 11.
- Press Windows Key + R at the same time. This opens the Run window.
- Type
msinfo32into the Run window and press Enter or click OK. - When System Information opens, click System Summary in the left panel.
- Scroll through the right side until you find these two values: BIOS Mode should show "UEFI" and Secure Boot State should show "On"
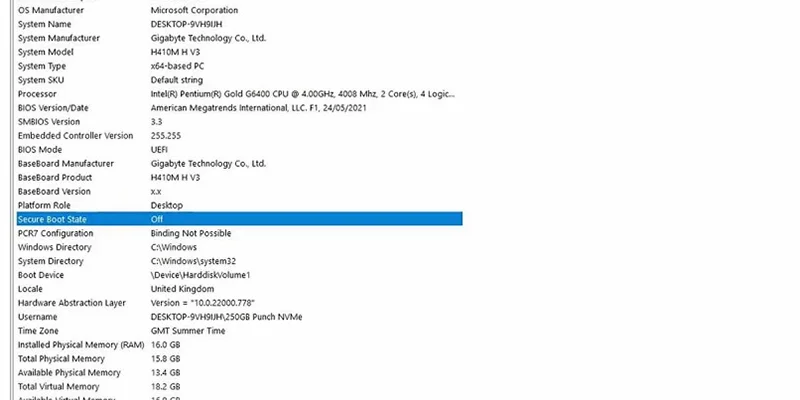
Understanding Your Results
The values in System Information determine your next steps:
- If Secure Boot State shows "On": You're already set. Your EA game should launch without issues.
- If Secure Boot State shows "Off": Check the BIOS Mode value and prepare to enable Secure Boot.
- If Secure Boot State shows "Unsupported": Your motherboard might not support Secure Boot. Check your motherboard manufacturer's spec sheet or manual to confirm. If your hardware doesn't support it, you can't enable it.
- If BIOS Mode shows "UEFI": You can move straight to enabling Secure Boot.
- If BIOS Mode shows "Legacy": You need to verify whether your Windows disk uses MBR or GPT partition formatting first.
Preparing Your System for Secure Boot
Manufacturer Support Resources
Every computer and motherboard manufacturer handles BIOS settings differently. Here are official support resources from major manufacturers. If your system doesn't match the general instructions in this guide, refer to your specific manufacturer's docs:
| Manufacturer | Support Resources |
|---|---|
| Acer | General support with guides for Secure Boot, TPM 2.0, and UEFI BIOS |
| Alienware (Dell) | Separate documentation for Secure Boot, TPM 2.0, and UEFI BIOS |
| ASUS | Individual guides for each security feature |
| ASRock | Combined documentation for all security settings |
| Corsair | Troubleshooting guide for Secure Boot and TPM 2.0 |
| Gigabyte | Dedicated Secure Boot documentation with Windows Security Features guide |
| MSI | Individual documentation for Secure Boot, TPM 2.0, and UEFI BIOS |
Verifying TPM 2.0 Status
TPM 2.0 must be enabled before you activate Secure Boot. Here's how to check:
- Press Windows + R to open the Run window.
- Type
tpm.mscand press Enter. - Look at the Status box in the TPM Management window. If it says TPM is ready to use, you can move to the next step.
- If TPM shows as not ready, check your manufacturer's docs for instructions on enabling TPM on your device. Don't proceed with Secure Boot until TPM works correctly.
Checking Disk Partition Format
Your Windows disk must use GPT formatting for Secure Boot to work. Here's how to verify:
- Press Windows + X, then select Disk Management.
- Find the disk labeled "OS Disk (C:)". Right-click on the left column (the disk number area, not the partition area) and select Properties.
- In the Properties window, click the Volumes tab.
- Find the "Partition style" entry. If it shows "GUID Partition Table (GPT)", you're good. Skip to the BIOS verification section. If it shows "MBR", you need to convert it using the steps below.
Converting MBR to GPT Format
This conversion lets you change your disk formatting without losing data. Back up important files first as a safety measure.
// Validation Command
mbr2gpt /validate /disk:0 /allowfullOS

// Conversion Command
mbr2gpt /convert /disk:0 /allowfullOS- Press Windows + R, type
powershell, then press Ctrl + Shift + Enter together. This opens PowerShell with admin rights. - Check that the title bar says "Administrator" to confirm you have proper permissions.
- Type this command exactly:
mbr2gpt /validate /disk:0 /allowfullOSthen press Enter. The/disk:0part should match the disk number shown in Disk Properties under the Volume tab. - This validation checks whether your system can convert to GPT. You should see "validation completed successfully" if your computer can proceed.
- In the same admin PowerShell window, type:
mbr2gpt /convert /disk:0 /allowfullOSthen press Enter. - Once this completes successfully, your partition is now GPT format and you can proceed with BIOS configuration.
Enabling Secure Boot in BIOS
Prerequisites Checklist
Before proceeding, confirm you've completed these steps:
- TPM 2.0 is enabled and showing as ready to use
- Your Windows disk is formatted as GPT (not MBR)
- Your BIOS is set to UEFI mode (not Legacy)
Accessing Your BIOS Settings
- Press Windows Key and search for "Change Advanced Startup Options".
- Next to "Advanced startup", click "Restart now". Your computer will restart into Advanced Startup instead of booting normally to Windows.
- When the restart menu appears, select "Advanced options".
- From Advanced options, select "UEFI Firmware Settings".
- Your computer will restart again and enter your BIOS interface. The appearance varies significantly between manufacturers but should look like a menu system with various configuration tabs.
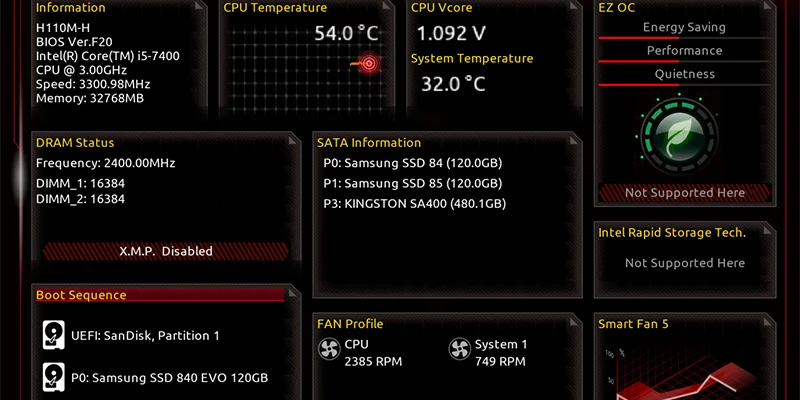
Navigating BIOS and Enabling Secure Boot
- Navigate to the Boot tab in your BIOS menu. If you have trouble finding the right option, many modern BIOS systems include a search function.
- Find the "Secure Boot state" or "Secure Boot" setting. If it shows Disabled, change it to Enabled. If it shows Enabled, no changes needed.
- On some motherboards, you must disable CSM (Compatibility Support Module) before Secure Boot can be enabled. If you see a CSM setting, make sure it's disabled.
- On ASUS motherboards specifically, you might see an option labeled "Other OS". Change this to "Windows UEFI Mode" if present.
- Some motherboards display an error about keys or require you to install default Secure Boot keys. If you see such a message, look for an option to "Install Default Secure Boot Keys" or similar wording.
- Once Secure Boot is enabled and all supporting settings are configured, save your changes. This is usually done by pressing F10.
- Your computer will restart with Secure Boot now active.
Verifying Successful Activation
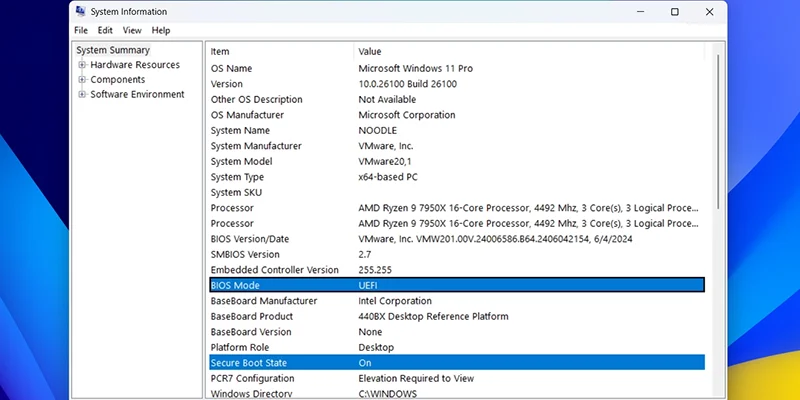
After your computer restarts with the new BIOS settings, verify that Secure Boot is properly active before trying to launch your game.
- Press Windows Key + R to open the Run window.
- Type
msinfo32and press Enter or click OK. - In System Information, look at the System Summary section.
- Verify that "Secure Boot State" now shows "On".
If Secure Boot State shows "On", the process worked and you should now be able to launch your EA game without security warnings.
Troubleshooting Common Issues
Computer Won't Boot After Enabling Secure Boot
If your computer fails to start properly after enabling Secure Boot, the most common cause is that your disk was still in MBR format instead of GPT. Follow these steps:
- Enter your BIOS again during startup (press F2, Delete, or the right key for your system).
- Temporarily disable Secure Boot to let your system boot normally.
- Boot into Windows and verify your partition format using the disk checking procedure described earlier.
- If your disk is still MBR, you must convert it to GPT before Secure Boot will work.
Secure Boot Option Is Greyed Out
If you can't change the Secure Boot setting because it appears locked or unavailable:
- Verify UEFI mode is active: Secure Boot requires UEFI mode. If your BIOS is still in Legacy or CSM mode, you must change it to UEFI first.
- Check for CSM settings: Many motherboards require CSM (Compatibility Support Module) to be disabled before Secure Boot can be enabled.
- Install Security Keys: Some manufacturers require you to install or reset Secure Boot Keys to factory default values before the setting becomes available.
- Set BIOS password: Certain manufacturers require an administrator password in BIOS before allowing changes to security settings.
Game Still Shows Secure Boot Error
If you enabled Secure Boot successfully but still get error messages when launching your game:
- Do an extra restart: Some Windows versions require a full restart cycle after enabling Secure Boot for the changes to take full effect.
- Verify all dependencies: Confirm that TPM 2.0 is enabled and working, your disk is GPT formatted, and your BIOS is in UEFI mode.
- Check Windows Security settings: In rare cases, Windows security settings might need refreshing. Check Windows Security in your system settings to make sure no conflicts exist.
Too Many Partitions Preventing Conversion
The MBR to GPT conversion tool supports a maximum of four primary partitions. If you get an error during validation saying you have too many partitions:
- Review your partitions carefully: Some computer manufacturers include special utility partitions that serve important functions. Don't delete partitions without understanding what they do.
- Back up important data: Before making any partition changes, make sure all important files are backed up to an external location.
- Contact manufacturer support: If you have manufacturer-specific utility partitions, contact your computer manufacturer's support team for guidance.
- Extra system restart can resolve lingering issues
- Verify all prerequisites are met before troubleshooting
- Check manufacturer documentation for system-specific solutions
- Ensure BIOS firmware is up to date
- Don't force Secure Boot without meeting all prerequisites
- Avoid deleting unknown partitions without research
- Don't proceed if you're unsure about BIOS changes
- Never skip the validation step before MBR conversion
Final Notes and Recommendations
Backup Procedures
Anytime you work with system configurations, disk formatting, or BIOS settings, backing up your important files is strongly recommended. While the procedures in this guide work reliably in most cases, maintaining recent backups protects you against unexpected problems.
Manufacturer Documentation Priority
This guide provides general procedures that apply to most systems. Motherboard and computer manufacturers implement their BIOS systems differently though. If your system's BIOS interface or options don't match what's described here, always defer to your specific manufacturer's official docs.
When to Get Professional Help
If you're uncomfortable navigating BIOS settings, unfamiliar with system changes, or run into problems you can't resolve by following this guide and your manufacturer's docs, contact a professional computer technician or your manufacturer's support. BIOS misconfiguration can create serious issues with system stability and boot functionality.
Keeping Your System Updated
After successfully enabling Secure Boot, maintain your system with regular Windows updates. These updates can include security improvements and compatibility fixes that work with Secure Boot to provide better security and performance for your EA games.