
This guide is designed for Marvel Rivals players aiming to master Groot, transforming from a mere participant into a formidable Flora Colossus who dictates the terms of engagement. Groot is more than a towering tree; he is a master of battlefield control, a steadfast protector, and a surprisingly potent offensive force when played effectively. Understanding his capabilities, especially in light of recent game updates, is key to unlocking his full potential. This analysis incorporates the latest information, including the significant Season 2.5 balance changes, ensuring players receive current and relevant strategies. Players often seek updated guidance after patches alter character dynamics, and this report addresses that need by examining Groot through the lens of the most recent game version.
Groot's Role and Strategic Gameplay
Groot fulfills the Vanguard role within a team composition. As a Vanguard, his primary responsibilities include spearheading the team's frontline presence, absorbing incoming damage, and creating safe opportunities for his allies. With a substantial health pool of 700 HP, Groot is built to withstand significant punishment.
His gameplay revolves around several key functions:
- Controlling Space: This is arguably Groot's most defining characteristic. Through the strategic deployment of his various wall abilities, he can dictate engagement zones, obstruct enemy lines of sight, and shield teammates from harm. One analysis notes, "Groot stands out as a Vanguard who excels at controlling space, disrupting enemy formations, and enabling his team through strategic wall placement". He effectively becomes a battlefield architect, shaping the terrain to his team's advantage.
- Absorbing Damage & Protecting Teammates: His inherent tankiness, augmented by his wall abilities (particularly Ironwood Wall), allows him to serve as a mobile bastion for his team.
- Initiating Fights: While not a traditional dive-focused Vanguard, Groot's ultimate ability, Strangling Prison, is a powerful tool for initiating engagements by pulling and immobilizing multiple enemies.
- Dynamic Area Control: Groot is not a static defender; his abilities allow for active and continuous manipulation of the battlefield, forcing opponents to adapt.
Unlike some Vanguards designed for deep dives into enemy lines, Groot's strength lies in establishing and maintaining favorable ground. His inherent lack of mobility options like dashes or sprints reinforces this approach. Consequently, his method of "tanking" often involves making specific areas safer for his team or rendering enemies more vulnerable through strategic wall placements, rather than simply absorbing all incoming fire directly.
The Season 2.5 balance changes, which reduced Vine Strike's damage and increased Ironwood Wall's cooldown, may subtly shift Groot's optimal playstyle further towards that of a defensive area control specialist. With diminished poke damage from his primary attack and less frequent access to his key defensive wall, Groot players must be more calculated and impactful with each ability use, prioritizing strategic control over relentless aggression.
Abilities Deep Dive
A thorough understanding of Groot's abilities, including their most recent statistical adjustments, is fundamental to effective play.
| Ability Name | Keybind | Brief Description | Damage (Post-Patch) | Cooldown (Post-Patch) | Key Season 2.5 Change |
|---|---|---|---|---|---|
| Vine Strike | Left Click | Launches vines to attack enemies; projectile with delayed impact. | 65 per hit | 0.7s attack interval | Damage reduced from 70 to 65. |
| Spore Bomb | Right Click | Throws an explosive bomb that splits into multiple small spores, creating spell fields. | Spore Bomb: 55; Small spores: 10 each (6 total). Projectile itself: 0. | 6s | No direct change in Season 2.5 patch notes provided. |
| Thornlash Wall | SHIFT | Grows a Thornlash Wall. Awakened: strikes nearby enemies attacked by Groot/allies. | Awakened: 60 damage every 0.5s. Wall HP: 250. | 2 charges; 6s recharge per charge | No direct change in Season 2.5 patch notes provided. |
| Ironwood Wall | E | Grows an Ironwood Wall. Awakened: damage dealt by Groot/allies to nearby enemies grants Groot Bonus Health. | Wall HP: 600. Heals 40 Bonus Health/sec (up to 250). | 12s | Cooldown increased from 8s to 12s. |
| Flora Colossus | Passive | Wooden walls near Groot Awaken, activating extra effects. | N/A | Persistent | No direct change in Season 2.5 patch notes provided. |
| Furious Flora | V (Melee) | Performs a 3-strike melee combo; third strike slightly launches enemy airborne. | Varies per strike (not specified in detail, focus is on utility) | N/A | No direct change in Season 2.5 patch notes provided. |
| Strangling Prison | Q (Ultimate) | Fires a massive vine cluster that pulls nearby enemies to its center and Imprisons them for 3.5s, dealing damage. | Projectile: 10; Spell field: 70; Imprisoned: 20 damage every 0.5s. | Energy Cost: 2800 | No direct change in Season 2.5 patch notes provided. |
Vine Strike (LMB)
This is Groot's primary ranged attack, launching vines that deal damage upon impact. As a projectile, it requires players to lead their shots against moving targets. Vine Strike does not inflict critical hits, making consistent body shots the most reliable way to deal damage.
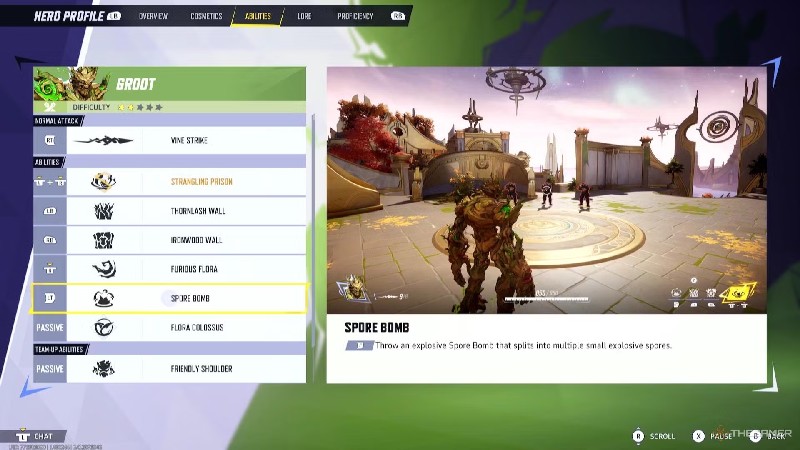
Spore Bomb (RMB)
Groot throws an explosive projectile that, upon impact, splits into six smaller spores, each creating a damaging area-of-effect (AoE) field. This ability is excellent for applying pressure, denying area, finishing off low-health targets, and, crucially, Awakening Thornlash Walls. With a relatively short 6-second cooldown, it should be used frequently, especially in proximity to deployed Thornlash Walls to activate their offensive capabilities.
Thornlash Wall (Shift)
This is Groot's primary offensive wall. It has 250 HP and, when Groot is nearby (activating his Flora Colossus passive), it becomes "Awakened." An Awakened Thornlash Wall will automatically strike nearby enemies who are damaged by Groot or his allies, dealing 60 damage every 0.5 seconds. Groot can hold two charges of this ability, with each charge replenishing in 6 seconds, allowing for frequent deployment. Effective placement, such as behind enemies or across critical pathways, can significantly boost Groot's damage contribution.
Ironwood Wall (E)
This is Groot's main defensive structure, boasting 600 HP. When Awakened by Groot's proximity, if Groot or his allies deal damage to enemies near the wall, Groot receives bonus health (healing 40 Bonus Health per second, up to a maximum of 250).
Flora Colossus (Passive)
This passive ability is the cornerstone of Groot's wall mechanics. When Groot is within a 20-meter radius cylindrical area of his Thornlash or Ironwood walls, they "Awaken". Awakened Thornlash Walls gain their offensive lashing capability, and Awakened Ironwood Walls enable the bonus health generation for Groot. Therefore, Groot's positioning relative to his deployed walls is as crucial as the wall placement itself. A Groot who places walls and then moves too far away is severely underutilizing his kit, as the walls become mere static obstacles without their Awakened effects.
Furious Flora (V - Melee)
Groot can engage in melee combat with a three-hit combo. The third successful strike will briefly launch the target airborne. Some strategies suggest alternating Vine Strikes with melee attacks to manage the primary fire's rhythm or during close-quarters engagements to ensure the knock-up effect.
Strangling Prison (Q - Ultimate)
Groot's ultimate ability involves launching a projectile vine cluster. Upon impact with terrain or an enemy, it creates an 8-meter radius field that pulls nearby enemies to its center, Imprisoning them for 3.5 seconds and dealing damage over time. This is a powerful engagement and crowd-control tool, ideal for setting up combination plays with teammates or isolating high-priority targets. The projectile nature allows for creative placements, including sticking it to walls, floors, or even ceilings for surprise initiations.
Wall Placement Mastery
Proficient wall usage is what separates an average Groot from an exceptional one. These structures are not just barriers but active tools for damage, defense, and battlefield manipulation.
Thornlash Tactics (Offensive Wall - Shift)
Thornlash Walls are primarily offensive tools. Optimal placement involves positioning them behind an enemy being targeted. As the enemy attempts to retreat or reposition, they will likely move into the wall's attack range, especially when it's Awakened. These walls are also highly effective for cutting off escape routes or bisecting the enemy team, thereby isolating vulnerable targets like healers or damage dealers from their support. Stacking two Thornlash Walls can create a "gateway of pain," luring enemies through a concentrated damage zone. An advanced and often underutilized technique is to deploy a Thornlash Wall as a makeshift ramp, providing allied backline damage dealers, such as Hela or Hawkeye, with elevated firing positions and improved sightlines over friendly and enemy frontlines.
Ironwood Wisdom (Defensive Wall - E)
Given the extended 12-second cooldown following the Season 2.5 patch, each Ironwood Wall deployment must be deliberate and impactful. Its primary defensive uses include blocking major choke points to stall enemy advances, particularly during objective contests, and shielding teammates who are under focused fire or channeling critical abilities. To maximize the bonus health generation from its Awakened state, it's advisable to place the Ironwood Wall slightly behind natural cover or just outside the direct line of enemy fire. This allows it to absorb some damage and provide sustain without being immediately destroyed. The 5-second cooldown refund upon manual destruction is now a cornerstone of effective Ironwood Wall management. If a wall is poorly positioned, or the engagement shifts, recalling it promptly is crucial for maintaining defensive uptime.
General Wall Smarts
Effective wall play hinges on acute map awareness and foresight. Players should constantly assess how wall placement can disrupt enemy plans or create advantages for their own team. A critical consideration is to avoid obstructing teammates, particularly healers or escape paths. Walls should be dynamic elements; if a deployed wall serves no current purpose or is disadvantageously positioned, it should be recalled—Thornlash Walls to preserve charges, and Ironwood Walls for the cooldown refund. Creating 45-degree angles or "death-trap" corridors with walls can severely limit enemy movement options, making them easier for the team to target. Walls can also be used creatively to provide vertical access for Groot or his teammates, enabling access to high ground or unexpected engagement angles.
Combo Strategies
Combining Groot's abilities effectively, particularly in conjunction with his ultimate, can lead to devastating burst damage and fight-turning plays.
The Classic Wombo Combo: Strangling Prison (Q) -> Thornlash Wall (Shift) -> Spore Bomb (RMB)
This sequence is Groot's signature combination for eliminating enemies caught by his ultimate. The execution involves initiating with Strangling Prison to pull enemies together and immobilize them. While they are trapped, one or two Thornlash Walls should be immediately deployed directly onto or around the clustered targets. This is followed by a Spore Bomb thrown into the mix. The Awakened Thornlash Walls will repeatedly strike the imprisoned foes, while the Spore Bomb adds significant AoE damage. An advanced tip suggests firing the Strangling Prison projectile at an existing Thornlash Wall if one is suitably positioned, or placing a Thornlash Wall immediately as the ultimate lands. This ensures the wall begins lashing out as soon as enemies are pulled in and take the initial tick damage from the ultimate, maximizing the damage output from the wall. Crucially, players must ensure that both Thornlash Wall charges and Spore Bomb are off cooldown before committing Strangling Prison. Initiating the ultimate without available follow-up abilities severely diminishes its impact.
Aggressive Poke Combo: Thornlash Wall (Shift) -> Spore Bomb (RMB) -> Vine Strikes (LMB)
Even without his ultimate, Groot can exert considerable pressure. This combo involves placing a Thornlash Wall, often behind an enemy, then using Spore Bomb to deal initial damage and Awaken the wall. This is followed by sustained Vine Strikes. This sequence can quickly overwhelm less durable heroes.
Melee Weaving
Furious Flora (V) should not be overlooked in close-quarters combat. Melee attacks can be woven between Vine Strikes, which can be useful for managing the rhythm of primary fire or when enemies are directly upon Groot. Each third successful melee strike provides a slight knock-up, offering minor crowd control. One source suggests a pattern like "Primary Fire -> Melee -> Primary Fire -> Melee -> Spore Bomb -> Melee" as an example of integrating melee into ability rotations.
Optimal Teammates & Synergies
Groot's capabilities are significantly amplified when paired with synergistic allies. Certain heroes can capitalize on his crowd control and area denial, while others provide him with enhanced survivability or utility.
| Synergistic Hero | Key Team-Up Ability/Interaction | Why it Works |
|---|---|---|
| Rocket Raccoon | Planet X Pals (Team-Up); Friendly Shoulder (Passive) | Groot gains +150 Max Health. Rocket gains damage reduction when on Groot's shoulder. Both are strong meta picks, making the stat boosts very impactful. |
| Jeff the Land Shark | Planet X Pals (Team-Up); Friendly Shoulder (Passive) | Groot gains +150 Max Health. Jeff gains damage reduction when on Groot's shoulder. |
| Doctor Strange | Eye of Agamotto (Ultimate); General defensive support | Strange's shields protect Groot. Eye of Agamotto combos well with Strangling Prison for extended lockdown. Groot's walls provide cover for Strange. |
| Moon Knight | THE MOON (Ultimate) | Strangling Prison pulling enemies into THE MOON is a highly effective team-wipe combo. Groot's walls also help cluster enemies for Moon Knight's attacks. |
| Invisible Woman | Invisible Boundary (Ultimate); Force Physics | Strangling Prison can pull enemies into Invisible Boundary; walls keep them there. Force Physics can pull enemies into wall traps or peel for Groot. |
| Poke-Oriented Heroes (e.g., Namor, Punisher, Hela) | N/A (General Synergy) | These heroes benefit from the safe firing positions and controlled sightlines created by Groot's walls. |
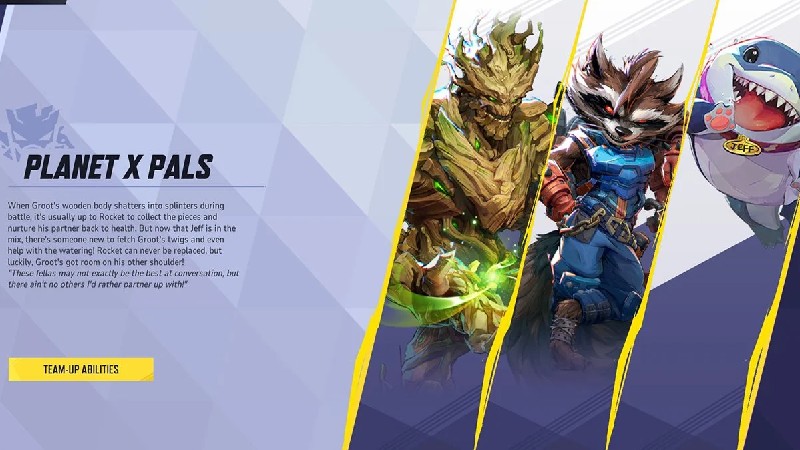
Rocket Raccoon & Jeff the Land Shark (Planet X Pals Team-Up)
This is a premier team-up for Groot. The "Friendly Shoulder" passive allows Rocket or Jeff to ride on Groot, granting them damage reduction. More significantly for Groot, this specific team-up provides a direct buff of +150 Maximum Health. This increases his total health to 850, substantially enhancing his survivability. This team-up is considered A-Tier, primarily because both Groot and Rocket Raccoon are individually strong heroes in the current meta, and the mutual benefits are potent, even if Jeff the Land Shark's active role in the team-up is less pronounced. The damage reduction for the rider also makes them more difficult for opponents to eliminate. This substantial health increase is particularly valuable for Groot in Season 2.5, helping to offset the reduced poke from Vine Strike and the longer cooldown on his Ironwood Wall by allowing him to endure more damage and maintain his frontline presence.
Doctor Strange
Pairing Groot with Doctor Strange creates a formidable Vanguard duo. Strange's shields can offer Groot crucial protection, especially when Ironwood Wall is on cooldown or when Groot is maneuvering to establish new wall positions. While Groot excels at controlling ground engagements with his walls, Strange can utilize these structures for cover while simultaneously contesting high-ground positions with his own abilities. Furthermore, Doctor Strange's ultimate, Eye of Agamotto, can be combined effectively with Groot's Strangling Prison for extended periods of enemy lockdown.
Moon Knight
The synergy between Groot's Strangling Prison and Moon Knight's ultimate, "THE MOON," is one of the most devastating combinations in Marvel Rivals. Groot's ability to pull multiple enemies into a confined space perfectly sets up Moon Knight's high-damage AoE ultimate, often resulting in multiple eliminations. Additionally, Groot's walls naturally encourage enemies to cluster, which benefits Moon Knight's cleaving Ankh attacks even outside of ultimate combinations.
Counters and Threat Mitigation
Despite his resilience, certain heroes and strategies can effectively counter Groot. Understanding these threats and how to mitigate them is crucial for consistent performance.
| Counter Hero | Why They Counter Groot | Quick Tip to Mitigate |
|---|---|---|
| High Mobility / Flying Heroes (e.g., Iron Man, Storm, Human Torch, Ultron) | Can bypass walls, attack from difficult angles, and out-range Groot. | Use Ironwood Walls to block LoS to team/objectives. Focus on ground control; rely on allied DPS for anti-air. |
| Wolverine | High mobility, can jump over walls, high burst damage, Feral Leap is dangerous. | Avoid 1v1s. Stick with team. Use walls for peel or to trap him. Consider creating ramps to gain height advantage if desperate. |
| The Punisher | High sustained damage, especially in turret mode, melts walls quickly. Ultimate ignores walls. | Deploy walls one by one to bait ammo/time. Run for solid cover from his ultimate. Rely on team to pressure him. |
| Strong Crowd Control (CC) | Groot lacks mobility and escape options, making him vulnerable when CC'd. | Prioritize good positioning near teammates who can peel or cleanse CC. Be aware of enemy CC threats. |
| Emma Frost | Telepathic Pulse now gains energy from hitting Groot's walls (post-fix). Diamond Form can be threatening. | Be mindful of feeding her energy with walls. If she uses Diamond Slam, retreat behind a wall and have team focus her. Isolate with Thornlash if possible. |
High Mobility / Flying Heroes
Characters possessing high aerial mobility or long-range capabilities pose a significant challenge for Groot, as they can often bypass his terrestrial wall placements and attack from angles he cannot easily contest. There is a general community sentiment that Vanguards, including Groot, can struggle against team compositions with multiple flying characters. The most effective strategy for Groot against such threats is not to engage them directly in their preferred airspace, but to use Ironwood Walls to obstruct their line of sight to his team or key objectives. Groot should focus on controlling the ground and enabling his team's hitscan or ranged damage dealers to handle the aerial threats.
Wolverine
Wolverine is frequently cited as one of Groot's most difficult matchups, often described as his "worst nightmare". Wolverine's high mobility allows him to easily traverse or bypass Groot's walls, and his significant burst damage can quickly overwhelm Groot, especially if isolated. Direct one-on-one confrontations should be avoided. Instead, Groot should stay close to his teammates and use his walls defensively to create temporary separation or to attempt to trap Wolverine for allied focus fire. A highly situational tip involves creating a ramp with a wall to gain a height advantage, potentially making it harder for Wolverine's Feral Leap to connect.
The Punisher
The Punisher's high sustained damage output, particularly when he is in his turret configuration, can dismantle Groot's walls with alarming speed. This is exacerbated if The Punisher is benefiting from team synergies that further boost his damage. Against The Punisher, it is advisable to deploy walls sequentially rather than all at once, forcing him to expend ammunition and time on individual structures while teammates attempt to neutralize him. It is critical to remember that Groot's walls offer no protection against The Punisher's ultimate ability; seeking hard, map-based cover is the only recourse.
Strong Crowd Control (CC)
Groot's lack of inherent mobility, escape abilities, or personal shields (beyond his walls) makes him exceptionally vulnerable to potent crowd control effects. Once immobilized or stunned, he often becomes an easy target. Vigilant positioning near allies who can provide peel (damage or abilities to deter attackers) or cleanse CC effects is paramount when facing teams with significant CC capabilities.
Emma Frost (Post-Fix)
A notable change in Season 2.5 was a fix to Emma Frost's Telepathic Pulse, which now correctly gains energy when striking Groot's walls. Previously, Groot's walls could block her pulse without contributing to her energy gain. Now, however, they can inadvertently help her charge her abilities faster. This adds a layer of nuance to wall placement against an enemy Emma Frost; while walls are still needed for blocking, they come with the cost of potentially accelerating her resource generation. If Emma Frost enters her Diamond Form and uses Diamond Slam, Groot players should immediately seek cover behind a wall and allow their team to capitalize on her subsequent vulnerability. Isolating her with Thornlash Walls can also be an effective tactic.
Pro-Level Advanced Techniques
Transitioning from competent to exceptional Groot play involves mastering subtle techniques and developing a deeper strategic understanding.
- Mastering Wall Recall: The ability to manually recall walls, especially the Ironwood Wall with its now 12-second base cooldown, is a critical skill. If an Ironwood Wall is misplaced, under imminent threat of destruction without having provided value, or if the engagement has shifted elsewhere, reactivating the 'E' key will destroy it and set its cooldown to a mere 5 seconds instead of the full 12. This technique is fundamental for maximizing Ironwood Wall's uptime and adapting to dynamic battlefield conditions.
- Utilizing Groot's Physical Presence (Body Blocking): Groot's large character model can be used advantageously. In narrow corridors or doorways, his physical presence can temporarily obstruct enemy passage or shield a vulnerable ally, buying crucial moments.
- Predictive Wall Placement: Advanced Groot play involves anticipating enemy movements and objective shifts. Walls should be placed not just reactively, but proactively to control space before it becomes contested, thereby dictating the flow of engagements.
- The "Bait" Wall Tactic: A strategically placed Thornlash Wall in an obvious location can sometimes bait out enemy abilities or draw their attention, creating tactical openings for allies to exploit. This is a psychological tactic that leverages enemy reactions.
- Defensive Play in Solo Queue Environments: When reliable healing support is uncertain, as is often the case in solo queue, a more defensive posture is advisable. This involves hugging natural cover more closely, prioritizing Ironwood Wall for personal sustain, and avoiding overextensions. The +150HP from the Planet X Pals team-up with Rocket Raccoon or Jeff the Land Shark becomes even more valuable in such scenarios.
- Effective Communication: Clear communication significantly enhances Groot's impact. Announcing Strangling Prison initiations allows teammates to prepare follow-up damage or abilities. Pinging enemies trapped by walls helps coordinate focus fire. Marvel Rivals features a robust ping system (default Middle Mouse Button on PC, D-pad on console), which should be utilized frequently.
- Adapting to Support Deficiencies: If allied healers are struggling or eliminated, Groot may need to adopt a more self-reliant playstyle. This involves using walls to hold chokepoints independently and for self-peel. If flanked, attempting to trap the aggressor with walls while retreating can create opportunities for survival or counter-attack.
- Leveraging Walls for Verticality: Beyond providing ramps for allied DPS, Groot can use his walls to access unconventional high-ground positions for himself or to enable teammates to traverse obstacles, creating surprising engagement angles or escape routes.
Conclusion
Mastering Groot in Marvel Rivals is a journey of understanding intricate ability synergies, precise spatial control, and adaptive team play. The Season 2.5 adjustments, particularly to Vine Strike's damage and Ironwood Wall's cooldown, necessitate a more calculated and strategic approach to his gameplay.
Key takeaways for any aspiring Flora Colossus include:
- Wall Mastery is Paramount: Thornlash Walls are for aggressive area denial and damage augmentation; Ironwood Walls are for crucial defensive stands and sustain. The extended cooldown on Ironwood Wall demands judicious placement and skillful use of the manual recall mechanic.
- Strangling Prison as a Playmaker: Groot's ultimate is not just a damage tool but a powerful setup for team-wide combinations. Effective use requires awareness of allied cooldowns and clear communication.
- Synergy and Team Awareness: Groot thrives with coordinated teammates who can capitalize on his control and benefit from his protection. The Planet X Pals team-up offers a significant survivability boost.
- Strategic Counter-Play: Recognizing and adapting to heroes who counter Groot, primarily those with high mobility or wall-breaking capabilities, is essential for maintaining effectiveness.
By internalizing these principles and continuously refining wall placement, cooldown management, and team coordination, players can transform Groot into an unyielding bastion and a decisive force on the battlefield, truly embodying the might of the Flora Colossus.