Prepare to shatter expectations, Guardian. Winterbite, Destiny 2's first Exotic Heavy Glaive imbued with the chilling power of Stasis, has carved its place in the Power weapon slot. This formidable weapon isn't just about raw force; it's a tool of battlefield control, capable of freezing entire squads solid and fundamentally altering the flow of combat. Its arrival during the Lightfall expansion marked a significant addition to the Guardian arsenal, offering a unique blend of Stasis crowd control and devastating melee potential.
This guide serves as a comprehensive manual to this "Big Frigid Glaive". It will navigate the icy path to acquiring Winterbite, delve into its intricate Stasis mechanics, dissect its unique perks, and provide optimized builds and strategies for conquering both PvE and PvP challenges. From managing its Heavy ammo reserves to understanding its role against the forces of the Darkness, this document aims to be the definitive resource for any Guardian seeking to master Winterbite's chilling power. Let's break the ice and unleash the frost.
Breaking the Ice: How to Unlock Winterbite
Acquiring Winterbite requires navigating a series of post-campaign quests on Neomuna, culminating in the "Strider" quest. This journey serves not only to reward the Exotic but also to familiarize Guardians with the core activities and lore of Neptune's hidden city.
Laying the Foundation: Prerequisites
Before the quest for Winterbite can begin, several foundational steps must be completed:
- Complete the Lightfall Campaign on any difficulty setting
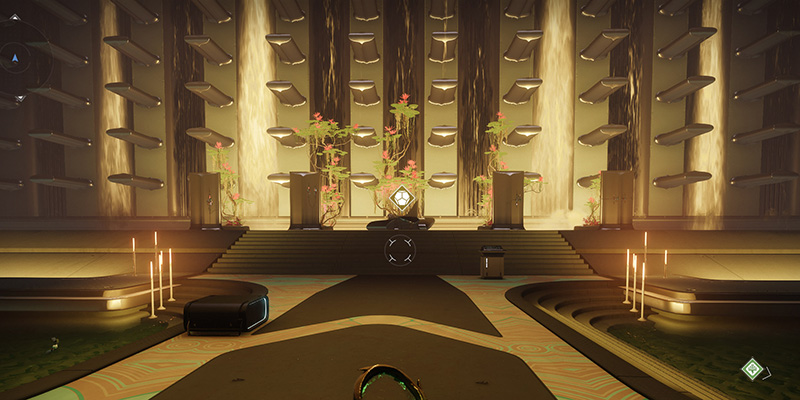
- Visit the Hall of Heroes and complete the "Welcome to the Hall of Heroes" quest
- Reach Nimbus Reputation Rank 11 (recommended) to unlock fast-travel to Terminal Overload
- Complete the Hall of Heroes Quest Chain: Stargazer, Maelstrom, and Bluejay
The Strider Quest: Step-by-Step
Once Stargazer, Maelstrom, and Bluejay are complete, Quinn Laghari will offer the final quest, "Strider". Follow these steps meticulously:
- Visit Quinn Laghari in the Hall of Heroes to formally accept the Strider quest
- Spend Terminal Overload Keys in each of Neomuna's three main patrol zones: Ahimsa Park, Zephyr Concourse, and Liming Harbor
- Defeat Shadow Legion & Complete Gilded Precept Lost Sector
- Return to Quinn in the Hall of Heroes
- Repair Strider's Memorial within the Hall of Heroes
- Defeat Vex at Maya's Retreat
- Return to Quinn Laghari for your Winterbite reward
Neomuna's Frozen Heartbeat: Mastering Terminal Overload
Terminal Overload is central to acquiring Winterbite and a key endgame activity on Neomuna. Understanding its mechanics, rotation, and rewards is vital.
Activity Overview
Terminal Overload is a challenging, multi-stage public event found rotating daily across Neomuna's main zones. Similar in structure to past activities like Escalation Protocol or Altars of Sorrow, it pits Guardians against waves of Vex and Shadow Legion forces in a high-intensity battle. The recommended Power Level is high, reflecting its endgame nature, so ensure your gear is appropriately leveled, ideally after completing the Lightfall campaign for a power boost.
Mechanics and Objectives
The event unfolds across three main stages, each with multiple phases and timed objectives:
- Initiation: Locate a specific Shadow Legion Psion (Sizmic, the Net-Desecrator) in the active zone and destroy the three Darkness Spikes surrounding it to begin the event
- Wave Objectives: Face various tasks including defeating waves of enemies, capturing Vex Sync Plates, destroying structures, and eliminating high-value targets
- Final Boss: Defeat a powerful final boss (either Sizmic or Protometon, Nexial Hijacker) by breaking their immunity phases
Rotation Schedule and Targeted Loot
The location of Terminal Overload, and consequently the specific weapon available from the keyed chest, changes daily at reset (9 AM PST / 12 PM EST / 5 PM GMT). The rotation follows a predictable clockwise pattern through Neomuna's zones. Understanding this schedule is crucial for completing the Strider quest step and for farming specific weapons.
| Location | Exclusive Weapon | Weapon Type | Element | Rotation Day Example |
|---|---|---|---|---|
| Zephyr Concourse | Circular Logic | Machine Gun | Strand | Day 1 |
| Ahimsa Park | Basso Ostinato | Shotgun | Void | Day 2 |
| Liming Harbor | Synchronic Roulette | Submachine Gun | Strand | Day 3 |
Tips for Success
- Terminal Overload Keys are essential for the second chest and the Strider quest. They drop randomly from most activities on Neomuna (patrols, public events, chests) after completing the Stargazer quest.
- Prioritize reaching Nimbus Rank 11 for the fast travel point, Rank 13 for the daily key bounty, and Rank 15/16 for the upgrade guaranteeing the exclusive weapon drops from the keyed chest.
- Terminal Overload takes place in public patrol zones, so other Guardians can join freely. If you load into an empty instance, try fast traveling to the location again or simply waiting, as others often join ongoing events.
Anatomy of an Avalanche: Winterbite's Perks and Mechanics Explained
Winterbite stands apart not just as a Heavy Stasis weapon, but through its unique combination of intrinsic traits that define its icy utility.
Core Stats & Archetype
Winterbite is an Exotic Stasis Heavy Glaive. It belongs to the Aggressive Frame (45 RPM) archetype, characterized by high impact. Key stats include a very high Impact of 95, respectable Range (75), and decent Shield Duration (39). However, it suffers from very low Handling (5) and Reload Speed (10). Its magazine holds 4 rounds.
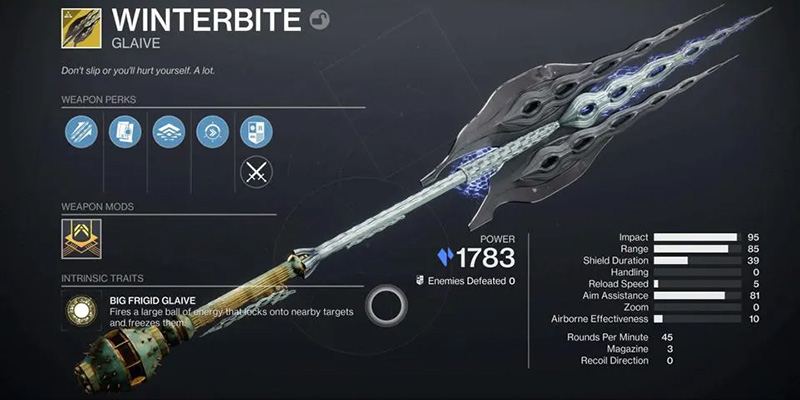
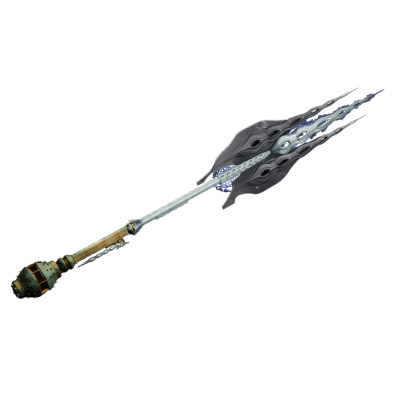
Intrinsic Trait: Big Frigid Glaive
This is Winterbite's signature ranged attack. It fires a large, slow-moving projectile of Stasis energy that actively locks onto nearby targets before detonating, freezing enemies caught within its blast radius. The projectile's behavior, a large energy ball seeking targets, has drawn comparisons to the iconic BFG9000 from the Doom series. For maximum effectiveness, it's often better to fire the projectile near or above a group of enemies, allowing its tracking and area-of-effect freeze to control multiple targets, rather than aiming directly at a single foe.
Exotic Trait: Weighted Edge
This trait enhances Winterbite's melee capabilities significantly. As long as the glaive has at least one round of ammunition loaded, its melee attacks gain two powerful effects: increased damage and the application of Stasis Slow. The exact damage bonus has been subject to tuning and interacts with other buffs, but it represents a notable increase over standard glaive melees (potentially around 15-50% base increase, amplified further against frozen targets or with buffs like Synthoceps). Each melee hit applies stacks of Slow (reportedly 40x base, potentially increased by Fragments), and repeated strikes on the same target will eventually freeze them solid.
Trait: Tilting at Windmills
This perk provides a defensive mobility boost. Blocking incoming damage with Winterbite's shield temporarily increases the Guardian's movement speed while they continue to hold the shield up. This speed increase can stack with other movement buffs. While potentially useful for repositioning under fire or making aggressive pushes after absorbing hits, some find this perk less impactful on a Heavy weapon compared to damage-focused or utility perks like Close to Melee or Unstoppable Force found on Legendary glaives.
Stasis Interactions Deep Dive
Winterbite leverages the core mechanics of the Stasis subclass:
- Slow: Applied by the Weighted Edge melee. Slow reduces enemy movement, ability regeneration, and accuracy. Crucially, Slow stuns Overload Champions.
- Freeze: Applied by the Big Frigid Glaive projectile and by accumulating enough Slow stacks from melee hits. Frozen targets are immobilized (with exceptions for some bosses) and vulnerable to being shattered.
- Shatter: Dealing sufficient damage to a frozen target or destroying a Stasis crystal causes a damaging area-of-effect explosion. Shattering frozen enemies stuns Unstoppable Champions. Winterbite enables Shatter by freezing targets with its projectile or repeated melees.
- Stasis Crystals: While Winterbite doesn't create Stasis crystals directly like Salvation's Grip or Glacier Grenades, its ability to freeze targets allows for powerful synergy with Aspects and Fragments that trigger effects upon shattering crystals or interacting with frozen enemies (e.g., Whisper of Fissures, Whisper of Chains, Iceflare Bolts).
Heavy Ammo Economy
As a Heavy weapon, managing Winterbite's ammunition is crucial. Glaives, particularly when used for their utility or melee functions rather than pure ranged damage, can feel ammo-hungry. Standard strategies apply: equipping Heavy Ammo Finder and Scout mods on helmets is highly recommended, especially in group content where Scouts share Finder bricks. Coordinated teams might utilize Aeon Cult Exotics or a Warlock with Cenotaph Mask to generate Heavy ammo for the fireteam. Finisher mods that generate Special or Heavy ammo can also supplement reserves.
However, Winterbite possesses a unique advantage regarding its core melee function. The Weighted Edge perk, providing bonus damage and Slow, only requires one round to be loaded in the glaive; the melee hits themselves cost no ammo. This allows Guardians to maintain the potent melee buff for extended periods even when Heavy ammo bricks are scarce, conserving the limited shots for the Big Frigid Glaive projectile when its AoE freeze is most needed. This contrasts sharply with weapons where every enhanced action consumes precious ammo, making Winterbite's primary melee utility surprisingly efficient.
Wielding the Glacier: Optimal Winterbite Builds & Strategies
Mastering Winterbite involves understanding its roles in different content types and synergizing it with appropriate subclass builds.
PvE Applications: The Frozen Frontline
In PvE, Winterbite shines primarily as a tool for crowd control and major/Champion disruption. Its Big Frigid Glaive projectile can lock down large groups of enemies with AoE freeze, while the Weighted Edge melee provides potent single-target Slow and damage, particularly effective against tougher enemies.
Champion Stunning
Winterbite offers intrinsic methods for handling two Champion types:
- Unstoppable Champions: Freeze them with the Big Frigid Glaive projectile, then shatter them with subsequent damage (weapon shots or melee).
- Overload Champions: Land melee attacks while Winterbite has ammo loaded to apply Slow stacks, triggering the stun. Note that multiple hits may be required, and the stun might feel less immediate than dedicated Overload mods or abilities.
Endgame Viability
Winterbite can be a valuable asset in high-level content like Grandmaster Nightfalls and Dungeons due to its Stasis utility and Champion coverage. However, its raw single-target boss DPS generally falls short of meta Heavy weapons like Rocket Launchers or Linear Fusion Rifles, especially after patches addressed early damage bugs. Its strength lies more in controlling dangerous encounters than melting bosses. Historical damage glitches and subsequent nerfs have somewhat impacted its perception and peak damage potential.
Synergistic Stasis Builds
To maximize Winterbite's potential, pair it with Stasis subclasses and complementary Exotics:
Exotics: Synthoceps dramatically boosts Weighted Edge melee damage when surrounded, enabling high burst damage. Hoarfrost-Z generates Stasis crystals with Barricade, synergizing with shatter-focused builds. Icefall Mantle provides overshields and synergizes with Slow effects.
Abilities & Aspects: Howl of the Storm (melee), Glacier Grenade, Tectonic Harvest, Diamond Lance. Cryoclasm aids movement and shattering.
Fragments: Focus on shatter effects (Fissures, Rending), survivability (Chains, Rime), and ability regeneration (Shards, Refraction). The Whisper of Reversal + Fractures combo enables a faster 2-hit melee freeze.
Strategy: Synthoceps builds leverage Winterbite's melee for damage, requiring positioning near enemies. Hoarfrost builds focus on creating and shattering Stasis crystals from abilities and the barricade, using Winterbite to supplement freezing and shattering. Diamond Lance provides additional freezing and Frost Armor.
Exotics: Assassin's Cowl grants invisibility and healing on powered melee kills (triggered by Weighted Edge) or finishers, boosting survivability. Fr0st-EE5 enhances ability regeneration while sprinting, ideal for grenade/melee spam builds. Triton Vice enhances glaive matching-element explosions and reload speed. Renewal Grasps buffs Duskfield Grenades for enhanced control. Mask of Bakris provides a damage buff after dodging.
Abilities & Aspects: Duskfield Grenade, Withering Blade (melee), Touch of Winter (enhanced grenades), Grim Harvest (Stasis Shards). Winter's Shroud (slow on dodge) can add utility.
Fragments: Emphasize ability uptime (Shards, Torment, Refraction, Hunger), duration (Durance), and survivability (Rime, Conduction).
Strategy: Assassin's Cowl builds rely on Winterbite's melee kills for constant invisibility and healing. Fr0st-EE5 builds cycle abilities rapidly, using enhanced Duskfields for control and Winterbite for freezing/damage. Triton Vice builds focus on glaive projectile kills for explosions (test interaction carefully).
Exotics: Osmiomancy Gloves provide enhanced Coldsnap grenades and near-infinite Bleak Watcher turrets, the cornerstone of Shadebinder control builds. Ballidorse Wrathweavers grant Frost Armor and a Stasis damage surge after casting Winter's Wrath, significantly buffing Winterbite. Karnstein Armlets provide healing on melee kills, synergizing with Weighted Edge. Necrotic Grip spreads poison on melee kills, adding add-clear potential.
Abilities & Aspects: Coldsnap/Glacier Grenade, Penumbral Blast (melee), Bleak Watcher (turrets), Iceflare Bolts (seekers on shatter). Glacial Harvest for crystal generation.
Fragments: Prioritize turret uptime and survivability: Durance, Shards, Torment, Rime, Chains, Fissures, Hedrons.
Strategy: Osmiomancy builds focus on blanketing the battlefield with Bleak Watcher turrets and Coldsnaps, using Winterbite's projectile as supplemental AoE freeze. Ballidorse builds use the Super offensively, followed by empowered Winterbite attacks. Karnstein/Necrotic builds lean into Winterbite's melee for survival and add clear.
PvP Applications: Glacial Warfare
Winterbite's role in the Crucible is niche and heavily constrained by its Heavy ammo requirement. It offers unique utility but faces stiff competition.
- Viability: It's generally considered a B-Tier or situational pick in PvP. Its effectiveness hinges entirely on securing Heavy ammo and leveraging its unique effects before being shut down.
- Projectile Use: The Big Frigid Glaive projectile is slow and challenging to land on agile Guardians. However, a direct hit or close detonation results in a freeze, guaranteeing a kill for the user or teammates. It can be used tactically to deny areas, freeze opponents attempting to capture zones, or catch enemies grouped together.
- Melee Use: The Weighted Edge melee deals significant damage, potentially killing Guardians already weakened by the projectile or other sources. The Slow effect makes disengagement difficult for the target. However, closing the distance to use the melee is inherently risky in PvP.
- Limitations: The primary drawbacks are severe: dependence on scarce Heavy ammo, a slow and predictable projectile, and the inherent risks of glaive melee combat in PvP. Meta Heavy weapons like Rocket Launchers offer more reliable multi-kills and shutdown potential, while Machine Guns provide better sustained pressure.
The Cold Comparison: Winterbite vs. Other Exotic Glaives
Winterbite occupies a unique space within the Exotic glaive category.
vs. Vexcalibur
This is perhaps the most relevant comparison. Vexcalibur resides in the Special slot, uses Void energy, and focuses heavily on defense via generating Void Overshields with its melee attacks. Many consider Vexcalibur the superior overall PvE glaive due to its incredible survivability and Special ammo economy, making it usable more consistently. Winterbite, being a Heavy Stasis weapon, trades this consistent defense and ammo availability for potent AoE freezing via its projectile and a highly damaging, ammo-efficient melee buff (Weighted Edge). In PvP, Vexcalibur's Special ammo makes it far more practical. They fill fundamentally different roles: Vexcalibur is about sustained defense, Winterbite about Stasis control and burst melee potential.
vs. Class Glaives (Edge of Action/Intent/Concurrence)
These three Witch Queen Exotics also use Special ammo and offer effects tied to specific classes: Edge of Action (Titan) creates a mini Ward of Dawn, Edge of Intent (Warlock) deploys a Healing Turret, and Edge of Concurrence (Hunter) unleashes chain lightning. Winterbite's general Stasis utility (Freeze/Slow for all classes) is often seen as more broadly applicable or impactful in endgame PvE than the effects of the Titan and Warlock glaives, while potentially being comparable in utility level to the Hunter's Arc glaive.
vs. Legendary Glaives
Several Legendary glaives offer strong performance in the Special slot, freeing up the Exotic slot for other powerful weapons or armor. Craftable options like The Enigma or Nezarec's Whisper, or well-rolled drops like Judgment of Kelgorath, Unexpected Resurgence, Greasy Luck, and particularly Rake Angle, can provide excellent utility or damage through perks like Impulse Amplifier, Unstoppable Force, Close to Melee, Demolitionist, Destabilizing Rounds, Voltshot, or Chill Clip. Rake Angle, specifically, offers a Legendary Stasis alternative with Chill Clip, capable of slowing and freezing targets, albeit without Winterbite's unique projectile or potent melee buff.
| Glaive | Ammo Type | Element | Key Feature | Best For |
|---|---|---|---|---|
| Winterbite | Heavy | Stasis | AoE Freeze + Enhanced Melee | Crowd Control, Champion Stunning |
| Vexcalibur | Special | Void | Void Overshields | Sustained Defense, General Use |
| Edge of Action | Special | Void | Mini Ward of Dawn | Titan-specific Defense |
| Edge of Intent | Special | Solar | Healing Turret | Warlock Support |
| Edge of Concurrence | Special | Arc | Chain Lightning | Hunter Add Clear |
| Rake Angle | Special | Stasis | Legendary with Chill Clip | Legendary Stasis Alternative |
Ultimately, Winterbite's value proposition is tied to its unique status as a Heavy Stasis glaive. It offers unparalleled Stasis crowd control and Champion stunning capabilities directly from a weapon, alongside a powerful, ammo-efficient melee enhancement, at the cost of the Heavy slot and the consistent survivability offered by Vexcalibur.
Thawing Out: Accessibility and Tips for All Guardians
Making Winterbite work effectively, or simply surviving the journey to obtain it, can be made easier with a few considerations.
While You Wait: Alternative Weapons
The path to Winterbite involves completing the Lightfall campaign and several subsequent quests featuring activities like Terminal Overload, Lost Sectors, and Partition. While working through these prerequisites, consider using other strong weapons:
- Exotics: Quicksilver Storm (Auto Rifle, Kinetic/Strand), Osteo Striga (SMG, Kinetic), Deterministic Chaos (Void LMG, obtained via its own post-campaign quest), or crowd-control weapons like Trinity Ghoul or Graviton Lance can be effective.
- Legendary Options: Well-rolled Legendary weapons suited for add clear (Voltshot/Incandescent primaries) or major/Champion damage (Fusion Rifles, Sniper Rifles) are essential. For Terminal Overload, having weapons capable of handling dense waves and tough bosses is key.
- Other Glaives: Crafting The Enigma provides an early, solid Void glaive. Farming Nightfalls when available for a Rake Angle with Chill Clip offers a Legendary Stasis glaive alternative. Salvation's Grip is another Exotic Stasis Heavy, focused on creating crystals, but is generally considered very niche.
Simple Frost: Accessible Stasis Builds
For players lacking specific Exotic armor pieces or high-stat gear, effective Stasis builds are still achievable:
- Essential Fragments: Utilize broadly useful Fragments available from the Exo Stranger on Europa. Whisper of Rime (overshield on Stasis Shard pickup) greatly boosts survivability for all classes. Whisper of Durance (longer ability effects) enhances control. Whisper of Shards (grenade energy on crystal shatter) helps ability uptime.
- Accessible Exotics: Use generally useful, easily obtainable Exotics. Warlocks can benefit from Eye of Another World (passive ability regen). Hunters can use Fr0st-EE5 (sprint-based regen). Titans might use Armamentarium (extra grenade) or Heart of Inmost Light (general ability empowerment) if lacking specific Stasis Exotics.
- Simplified Mods: Focus on basic mods: Resilience (survivability), Recovery (health regen), Discipline/Strength (ability cooldowns). Use Siphon mods matching your primary weapon for Orb generation, and Recuperation/Better Already on legs for healing from Orbs. Avoid complex Armor Charge setups initially.
Controller Considerations: Glaive Handling
Using glaives, especially Winterbite with its unique projectile, can feel different on a controller compared to traditional firearms.
- Sensitivity Settings: Finding the right sensitivity is crucial but highly personal. Many skilled controller players use a higher look sensitivity (e.g., 10-20) for faster turning and target acquisition, paired with a lower ADS (Aim Down Sights) sensitivity modifier (e.g., 0.5-0.8) for precision when aiming the projectile. Experiment by adjusting sensitivity incrementally until finding a comfortable balance between reaction speed and aiming stability. Start lower (e.g., 6-8 look, 1.0 ADS) and gradually increase if needed.
- Aiming Tips: For Winterbite's Big Frigid Glaive projectile, precise headshots are less important than hitting near the target or center mass ("model aiming") due to its tracking and AoE freeze. Practice leading moving targets, anticipating their path. Use small movements on the left stick (strafing) to fine-tune aim while firing, rather than relying solely on the right stick.
- Field of View (FoV): Increasing FoV (available on current-gen consoles and PC) to around 95-105 provides better peripheral vision, which is advantageous for the close-to-mid-range engagements where glaives often operate.
Running on Fumes: Low Heavy Ammo Strategies
Winterbite's Heavy ammo dependency requires smart play when reserves dwindle.
- Conserve the Projectile: Save the Big Frigid Glaive shots for high-impact moments when ammo is scarce. Use it to freeze dangerous Champions (especially Unstoppables), control large, overwhelming waves of enemies, or secure a vital revive by freezing nearby threats. Avoid wasting shots on single minor enemies.
- Rely on Abilities: When Heavy ammo is low, lean more heavily on your Stasis subclass abilities – grenades, powered melees, Aspects like Bleak Watcher or Diamond Lance – to provide crowd control and damage.
- Optimize Ammo Generation: Ensure Heavy Ammo Finder mods are equipped. In group play, coordinate with teammates using Aeons or Cenotaph if possible. Use finishers frequently if using ammo-generating finisher mods.
- Strong Supporting Weapons: Pair Winterbite with effective Primary and Special weapons capable of handling rank-and-file enemies efficiently, allowing you to reserve Winterbite's melee and limited shots for priority targets.
// Optimal Mod Setup for Winterbite
// Helmet
- Heavy Ammo Finder
- Scout Rifle Ammo Finder (shares bricks)

// Arms
- Impact Induction or Heavy Handed

// Chest
- Unflinching Glaive Aim
- Concussive Dampener (reduces projectile self-damage)

// Legs
- Scavenger mod (when available)
- Innervation or Better Already

// Class Item
- Striking Light or Recuperation
- Utility Kickstart or Element-matching Surge mod
Conclusion: Embrace the Frost
Winterbite carves a unique identity within the Destiny 2 Exotic arsenal. As the premier Heavy Stasis glaive, it offers an unparalleled blend of direct Stasis utility – potent AoE freezing with its Big Frigid Glaive projectile and a remarkably ammo-efficient, high-damage slowing melee via Weighted Edge. Its intrinsic ability to handle both Overload and Unstoppable Champions grants it significant value in challenging PvE content.
It is not without its eccentricities. The Heavy ammo slot demands careful consideration, particularly given its lower raw boss DPS compared to meta alternatives. The Big Frigid Glaive's self-damage requires cautious positioning, and the Tilting at Windmills perk feels somewhat underwhelming to many. Yet, for Guardians who embrace the Stasis subclasses, enjoy a melee-hybrid playstyle, or value supreme crowd control, Winterbite offers a deeply engaging and powerful experience.
The journey through the Strider quest, while involving a time gate, serves as a valuable introduction to the depths of Neomuna. Once obtained, experimenting with class builds, particularly those leveraging melee enhancements or Stasis synergies, unlocks Winterbite's true, chilling potential. Brave the prerequisites, master its icy mechanics, and let Winterbite freeze the battlefield according to your will.