
Alright, Guardian, you're looking to get your hands on one of the most legendary sniper rifles in Destiny 2 history – the Whisper of the Worm? Fantastic choice! This isn't just a weapon; it's a statement. Get ready for an exciting adventure, and I'll guide you every step of the way.
Getting the Whisper of the Worm
Let's talk about why this sniper is such a big deal and what you're about to dive into.
What is this Monster Sniper and Why You NEED It
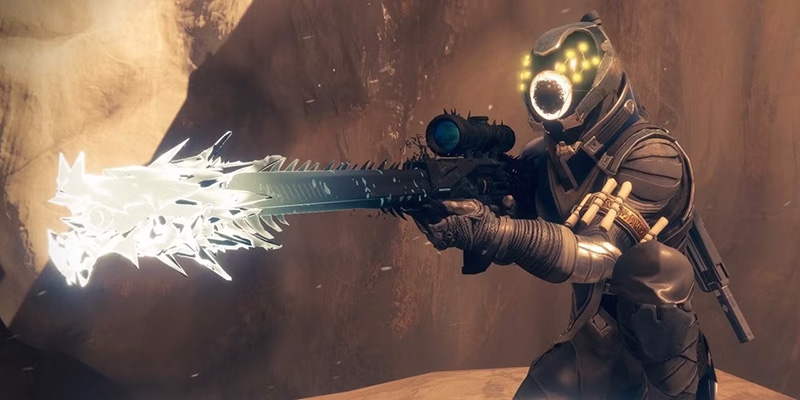
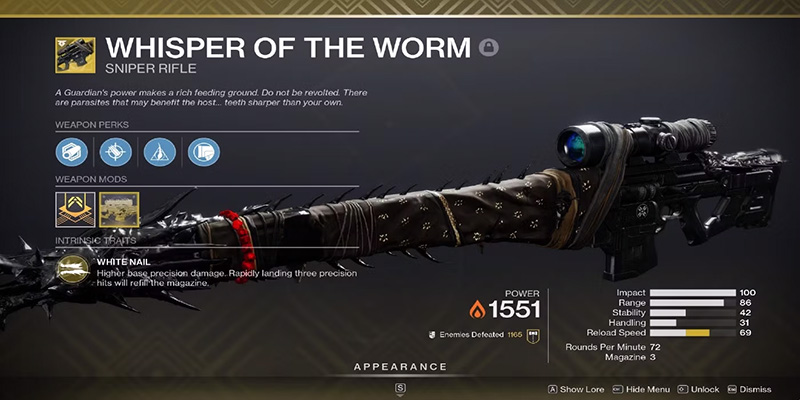
The Whisper of the Worm is more than just a cool-looking gun; it's a boss-melting machine, a true icon from Destiny's past that's back and better than ever. Its claim to fame is an incredible intrinsic trait called White Nail. Picture this: you line up your sights on a big bad boss, land three quick, precise headshots, and BAM! Your magazine magically refills itself from your reserves. That's right, you can keep pouring on the damage without that pesky reload animation interrupting your flow, making it devastating during damage phases. As a Heavy ammo sniper rifle, it naturally packs a colossal punch with each shot.
Now, if you've heard tales from veteran Guardians about how this weapon used to be locked behind a super-secret, notoriously difficult-to-trigger event, take a breath! While its legendary status is well-earned from those days, Bungie has made the path to acquiring it much more straightforward now. The mystery of starting the quest is gone, but the thrill of the mission itself? Oh, that's definitely still there!
The Mission: "The Whisper" - A Test of Skill and Will (But Super Fun!)
To earn this beast, you'll need to conquer an Exotic Mission called "The Whisper". Think of Exotic Missions as mini-adventures, unique experiences packed with specific challenges and awesome loot at the end. "The Whisper" is a classic for a reason. It's a thrilling journey deep beneath the surface of Io (or at least, a simulation of it now!), and it's divided into two main parts.
First, you'll face a sprawling, intricate jumping puzzle that will seriously test your platforming skills and spatial awareness. It's like a massive, Vex-themed jungle gym, but with more deadly drops. Don't let that intimidate you, though! Many Guardians find mastering these jumps incredibly satisfying.
Once you've navigated the dizzying heights and treacherous gaps, the mission shifts gears into a series of intense combat rooms. Here, you'll be blasting your way through hordes of Taken enemies, culminating in a multi-stage boss fight.
The mission has been "reprised," meaning it's a beloved piece of content brought back from the past, but with some modern touches. For instance, the Whisper of the Worm you'll get is now craftable, allowing for more customization, and the old hidden chests have been replaced with interactive Oracles that tie into upgrading the weapon and unlocking other secrets. This blend of nostalgia and new systems means it's a fresh experience even for some veterans, but perfectly approachable for newcomers ready for a challenge.
Starting the Quest
Getting started on your path to the Whisper is now much simpler than the old days of waiting for specific public events on long-gone planets. Bungie has made it much more accessible, ensuring everyone has a clear shot at this iconic weapon.
Step 1: Chat with Eris Morn on the Moon

Your first port of call is the ever-enigmatic Eris Morn. You'll find her in her usual spot on the Moon, contemplating the Darkness and probably muttering about Hive gods. Approach her, and she'll be the one to set you on this path. She will grant you a quest titled "Whispers of the Past". This quest is your official key to unlocking "The Whisper" mission.
Step 2: Finding "The Whisper" Mission in Your Director
With "Whispers of the Past" active in your quest log, it's time to locate the mission itself. Open your Director (your main map and activities screen). You'll need to look for a specific node. Most often, "The Whisper" mission can be found in the "Legends" node, which is typically located next to the Crucible playlist icon. Keep an eye out for the distinctive mission icon.
Once you find it, you'll see options for difficulty. For your initial run, absolutely select Normal difficulty. This will give you the 40-minute timer and a more forgiving Power Level requirement, perfect for learning the mission's layout and encounters.
Recommended Loadouts
Alright, you've got the quest and know where to launch the mission. Now, let's talk about what gear will help you succeed. The mission has two distinct phases – a long platforming section and then several combat encounters – so a little flexibility can go a long way.
General Advice: Comfort and Versatility First!
For your first clear on Normal difficulty, the absolute best weapons you can bring are the ones you feel most comfortable and effective with. Don't worry about chasing the "perfect meta" loadout just yet. Focus on a setup that allows you to move confidently and deal with enemies efficiently.
A good rule of thumb is to have:
- Something for clearing groups of weaker enemies (often called "ads" or "add-clear").
- Something for dealing with tougher, single targets (like shielded enemies or mini-bosses).
- Something that can dish out significant damage to bosses.
Weapon Archetypes for Beginners
Special Weapon (Green Ammo)
- Fusion Rifles: Great for a burst of damage against tougher enemies or to quickly pop a shield.
- Sniper Rifles: If you're confident in your aim, a sniper can help deal with distant threats. However, for your first run, you might find a Fusion Rifle more forgiving.
- Grenade Launchers: Amazing choice for any situation. Find your loadout lacking in damage against mini-bosses? Need a strong weapon for add clear? There are many GL Frames that can practically do your job for you.
- Rocket Sidearms: Special ammo Rocket-Assisted Sidearms are a newer addition to the game, but definitely a welcome one. Their damage and perk versatility can provide healing, control, and a huge burst in one tiny Sidearm package.
Heavy Weapon (Purple Ammo)
- Rocket Launchers: A solid choice for burst damage against bosses. If you have the Exotic Rocket Launcher Gjallarhorn, it's a fantastic option.
- Linear Fusion Rifles: These are excellent for sustained precision damage on bosses. Regardless of what content you're more interested in, there are always good LFRs you can use. Even craftable Taipan-4FR from the Witch Queen campaign is a very accessible and powerful option.
- Machine Guns: Great for clearing out groups of tougher enemies (yellow-bar enemies) or for sustained damage if you're not comfortable with precision Heavy weapons yet.
- Swords: Swords may not look like a good option for the combat here, but don't start raising your eyebrows just yet! If you already have a Sword with an Eager Edge perk, commonly met on Half-Truths or the Slammer Swords, this will trivialize many of the jump puzzles in the first section, and will probably leave you enough ammo to swap to something else after you're done with it. Eager Edge makes any class's movement so much more mobile - but if that's not your cup of tea, maybe try the Strand subclass and its Grapple grenade instead?
Exotic Armor (If You Have 'Em, Flaunt 'Em!)
Exotic armor pieces can provide significant advantages. If you have any of these, consider equipping them:
Hunters
Platforming: St0mp-EE5 boots will significantly improve your jump height and maneuverability, making the jumping puzzle much easier.
Combat: Orpheus Rig (for Nightstalker Tether) or Raiden Flux (for Arcstrider Arc Staff) can greatly enhance your Super's effectiveness. If you have Lucky Pants and the Malfeasance Hand Cannon, this combo can surprisingly shred the bosses due to Malfeasance's bonus damage to Taken and Lucky Pants' damage boost.
Titans
Platforming: Lion Rampant boots are king here, allowing you to "fly" or sustain your lift for much longer, trivializing many jumps.
Combat: Synthoceps for enhanced melee damage and lunge range if you like getting up close and personal. Heart of Inmost Light is a fantastic all-around Exotic for boosting ability regeneration and power, and Loreley Splendor Helm if you're lacking survivability.
Warlock
Platforming: Transversive Steps boots increase your sprint speed and automatically reload your equipped weapon while sprinting, which is great for moving through the puzzle quickly.
Combat: Phoenix Protocol is excellent if you plan on chaining Supers for your team during boss damage. Otherwise, consider an Exotic that enhances your chosen subclass, like Sunbracers (Solar grenades), Crown of Tempests (Arc abilities), or Nezarec's Sin (Void abilities). The Stasis Exotics have also been noted as a strong option in Warlock builds for ad control!
Subclass Suggestions (Play Your Strengths!)
Your choice of subclass can also make a big difference.
- General Use: Any subclass with good survivability is a strong pick. For Warlocks, Devour (Voidwalker) provides constant healing on kills. For Titans, Solar subclasses often have access to healing grenades or Sunspots.
- Mobility for Jumps: Strand subclasses with the Grapple ability can be a literal lifesaver in the jumping puzzle, allowing you to correct mistakes or cross tricky gaps. For Warlocks, the Top Tree Dawnblade (Attunement of Sky) provides unparalleled aerial maneuverability with Icarus Dash.
- Combat Prowess: Well of Radiance (Warlock) is always a welcome addition for survivability and damage boost in the combat rooms and boss fight. High-damage Supers like Thundercrash (Titan) or Golden Gun (Hunter with Celestial Nighthawk for big single-target damage) can help burn down bosses quickly.
Mission Modifiers (Good to Know for Normal, Crucial for Expert!)
"The Whisper" mission has a few active modifiers that affect gameplay:
- Solar Threat: You will take increased damage from Solar sources. Many Taken Knights and Witches use Solar attacks, so be extra careful around them.
- Epitaph (Appears on Expert Difficulty): When you defeat Taken combatants, they will leave behind a damaging blight geyser on the ground where they died. This means you need to stay mobile in combat and avoid standing where enemies just fell.
- Overcharge (Appears on Expert Difficulty): In this mission, Sniper Rifles will be "Overcharged." This means they deal a significant 25% bonus damage. This is a huge advantage, especially once you have the Whisper of the Worm itself for subsequent runs.
The Jumping Puzzle
This is it, Guardian – the part of the mission that has tested the patience and platforming prowess of countless players. But with a cool head and a bit of practice, you'll be navigating these treacherous Vex structures like a pro.
General Jumping Tips: Patience, Young Grasshopper!
- Observe Before You Leap: If you're in a fireteam, watch where your teammates go. If you're solo, look for ledges that are subtly lit, have a distinct texture, or just seem like the logical next step. The path is there; you just need to spot it.
- Know Your Jump: Every class and subclass jump (e.g., Strafe Jump for Hunter, Catapult Lift for Titan, Burst Glide for Warlock) has its own nuances. Make sure you're comfortable with how your chosen jump controls, how much height and distance it gives you, and how to cancel it mid-air if needed.
- Sword for Perspective (and maybe cheese!): If you're really struggling to judge a jump, try equipping a Sword. The third-person camera view can sometimes make it easier to see your character and the landing spot. If you have a Sword with the Eager Edge perk, you can perform a Light Attack to dash yourself forward and cover more distance quickly.
Key Sections & Tricky Bits (Simplified Path)
Let's break down the main path through this Vex labyrinth:
- The Entrance Drop: You'll start near what looks like the end of a Lost Sector. Move into the adjacent room with some Taken Thrall. Instead of jumping down into the main Lost Sector area, look across the room for a Vex Cube floating near a tree. Shoot it! This will materialize a couple of Vex platforms. Use these platforms to reach an exit, destroy a Taken Blight blocking a hole, and then jump down into the chasm below.
- The "Wall Pistons" Room (Cavern Hug): You'll slide under a narrow gap and enter a massive cavern. Your immediate goal is to hug the right wall while descending. The main hazard here is small Vex platforms (pistons) that will periodically slide out from the wall, trying to push you into the abyss. The trick is to wait for a piston to retract INTO the wall, then quickly move past its position. Take it one piston at a time. Don't try to rush past multiple active pistons. You're aiming for an isolated platform bathed in red light further down.
- The "Red Light" Platforms & Column Shimmy: From the red-lit platform, you'll make a few more careful jumps to a large pillar structure. You need to hug the wall of this pillar and shimmy your way to the left. When you hit a dead end, you'll need to jump off the platform and around the corner to land on a very small ledge. This small ledge is a crouch-walk section with more slow-moving pistons pushing out from the wall. Again, patience is key. Wait for each piston to recede before moving forward. One section at a time.
- The Moving Platform & "Don't Go Straight!" Bit: Once past the narrow piston corridor, jump across the chasm to a nearby wall. You'll find a cube-like platform at the end of this path. Jump on it; it acts as an elevator, taking you up. At the top, jump to the small ledge ahead. CRITICAL TIP: Immediately turn LEFT and proceed down that hallway. If you go straight, it's a dead end and a common point of confusion.
- The Sloping Pillars with Snipers: You'll enter another large chasm filled with multiple diagonal pillars. You need to jump on the platforms jutting out from them to reach the other side. Be wary of Taken energy blasts that periodically shoot from the walls near these platforms (they can knock you off) and Taken snipers positioned to make your life difficult. Time your jumps to land just after a blast.
- The "Room of Many Holes" (Vex Death Traps): After the snipers, you'll arrive in a room with many Vex portal-like holes in the walls. Most of these are instant death traps! The correct path is the final hole on your RIGHT-HAND side, on the upper level of these holes. Jump in to drop down to the next path.
- The "Green Room" Shortcut (A HUGE Timesaver!): You'll soon enter a very large, open room with a distinct greenish hue and overgrown Vex structures – this is often called the "Green Room." The "intended" path involves a lengthy and tricky climb around the outer ledges of this room. However, there's a MASSIVE SHORTCUT! As soon as you drop into the Green Room from the previous section, immediately turn around (180 degrees) and look towards the wall you just came from, slightly to your right (if facing the entrance you just came through). You should find a small, somewhat hidden hole or gap in the rocks/structure at floor level, or slightly below the ramp you entered on, that you can crouch and slide into. This shortcut bypasses almost the entire Green Room climbing puzzle, saving you a ton of time and potential frustration. It leads you down a series of tunnels directly to the next section. This is probably the single most important tip for clearing the jumping puzzle efficiently.
- The Final Leap of Faith: After navigating the tunnels from the Green Room shortcut (or the long way around if you missed it), you'll find yourself on a narrow, curving ledge. Follow this ledge until it extends out like a plank. From here, you need to make a large drop down to a brightly lit hole/opening far below you. Try to aim carefully and use your jump ability to cushion your landing, as it's a long fall. Once you land, follow the path as it winds, make a few more jumps, and you'll be at the end of the platforming section and heading into combat!
Combat Encounters
You've made it through the treacherous jumps – give yourself a pat on the back! Now it's time to let your guns do the talking. The combat section of "The Whisper" consists of several rooms filled with Taken enemies, leading up to a challenging multi-stage boss encounter.
General Combat Tips: Stay Alive, Kill Everything!
- Room by Room: You'll progress through a sequence of combat arenas. The general objective in each room is to eliminate all Taken enemies to unlock the door or portal to the next area.
- Use Cover Wisely: Don't try to be a hero and stand out in the open. The Taken hit hard, especially on Expert difficulty. Utilize the environment for cover. Many rooms have small tunnels, side passages, or high ground you can use to your advantage, or to retreat to if you need to recover health.
- Prioritize Dangerous Threats: Some enemies are much more dangerous than others. Focus fire on:
- Taken Snipers (Hobgoblins, Vandals): These can pick you off from afar if you're not careful.
- Taken Wizards: Their Solar attacks can do a lot of damage, and their shadow thrall can overwhelm you.
- Taken Captains: Their darkness blasts can blind you, and they teleport frequently, making them annoying targets.
- Taken Blights (The Big Black Orbs): In these combat rooms, you'll see many large Taken Blights. While they can spawn enemies or make areas hazardous, you generally do not need to destroy every single one of them to progress. Focus on eliminating the actual combatants. Only destroy Blights if they are directly blocking your path or are spawning an overwhelming number of adds in a critical spot.
The Boss Room: It's a Triple (then Quadruple) Threat!
After clearing the preceding combat rooms, you'll make a final drop into the main boss arena. Be careful with this drop – it's easy to misjudge and slide into the abyss, forcing a respawn and costing time.
- Initial Wave & Rally Banner: When you land, you'll first need to clear out an initial wave of Taken enemies. Once they're dealt with, a Rally Banner spot will appear. Make sure everyone in your fireteam uses it! This will give you full Super energy, abilities, and Heavy/Special ammo – crucial for the fight ahead.
- The Three Mini-Bosses (Taken Champions): After rallying, you'll notice three distinct Vex Cubes in the arena. Shooting each of these cubes will summon one of three Taken champion mini-bosses: a Taken Knight, a Taken Captain, and a Taken Centurion. SUPER IMPORTANT PRO-TIP (especially for newer players or solo attempts): You DO NOT have to shoot all three Vex Cubes at once! This is a significant change from the original version of the mission that makes it much more manageable. The easiest strategy is to shoot ONE Vex Cube, defeat the boss it summons, then shoot the next cube, kill that boss, and finally the third. This allows you to focus your fire and deal with one major threat at a time, which is far less chaotic than fighting all three simultaneously. Use your Supers and Heavy weapons liberally on these champions. They are quite tanky. Good sustained damage from Machine Guns or Linear Fusion Rifles works well. The side tunnels in the arena can offer good cover if you need to regroup.
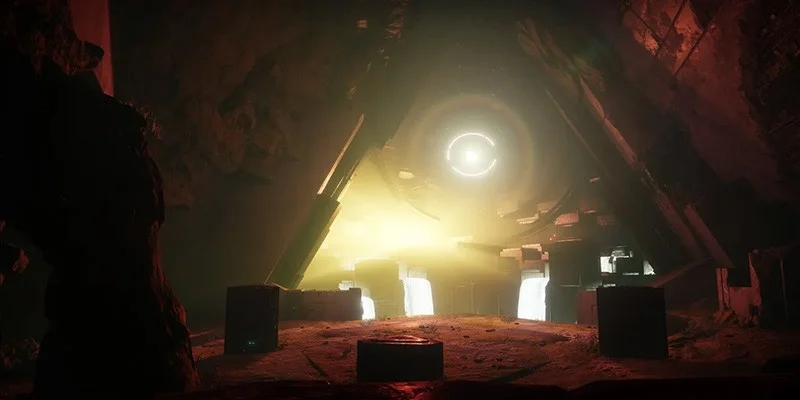
- The REAL Boss: Tulgorh, Aspect of Agony (The Ogre)! Once the three Taken champions are defeated, the true final boss will spawn: Tulgorh, a massive Taken Ogre. Tulgorh will initially be immune to all damage. To make him vulnerable, you must find and defeat two Taken Wizards (Shield Weaver Wizards) that spawn in the arena, often towards the back or on elevated platforms. Once both Wizards are down, Tulgorh's shield will drop. This is your damage phase! Unload everything you have on him – Supers, Heavy ammo, precision shots. When Tulgorh reaches approximately 50% health, he will become immune again, and another pair of Taken Wizards will spawn. Repeat the process: kill the Wizards to break his shield, then finish off Tulgorh. During the Tulgorh fight, the main additional enemies you'll face are Taken Thrall, which are relatively easy to clear out with primaries or abilities, allowing you to focus on the Ogre and Wizards.
Victory! Claim Your Prize!
Once Tulgorh falls, a chest will appear at the end of the room. Open it, and you will be rewarded with the Whisper of the Worm! On your very first completion, you'll likely get the weapon schematic only, but more things are ahead!
After your first clear, make sure to return to Eris Morn on the Moon to complete the "Whispers of the Past" quest. She will then give you a version of Whisper of the Worm with Deepsight Resonance, allowing you to extract the pattern at the Enclave on Mars and begin crafting your own customizable version. This crafting ability is one of the best updates to the reprised mission!
Oracle Locations & Rewards
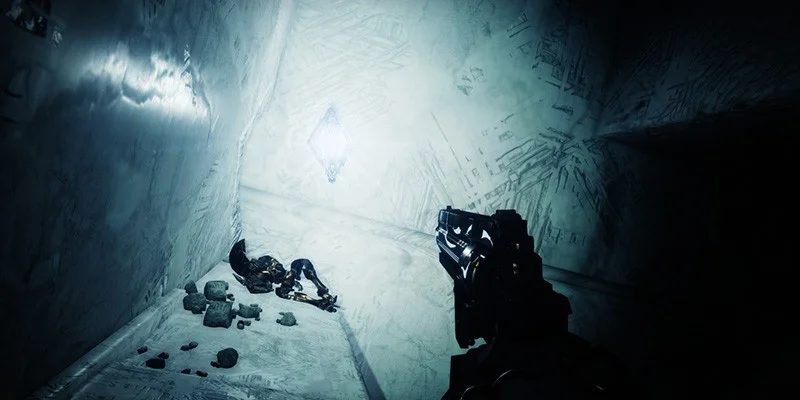
The reprised "The Whisper" mission has done away with the old hidden chests. In their place, you'll find Oracles – glowing, resonant Vex objects hidden throughout the extensive jumping puzzle section of the mission. There are a total of seven Oracles to find and destroy.
Why should you hunt for these Oracles? They offer two fantastic rewards:
- Upgrade Whisper's "White Nail" Trait: Certain Oracles, when destroyed, will grant intrinsic upgrades to your craftable Whisper of the Worm, specifically enhancing its signature White Nail perk. This means more damage potential!
- Unlock the "Karve of the Worm" Exotic Ship: If you find and destroy all seven Oracles (your progress is saved, so you can do this across multiple runs), you'll unlock the Karve of the Worm, a sleek and menacing Exotic ship that's a variant of the original "A Thousand Wings" ship.
This system of Oracles makes secret hunting more interactive and directly ties into improving the weapon itself, providing a strong incentive beyond just cosmetics.
Oracle Hunting - A Quick Guide to Their Lairs
Finding all the Oracles is an adventure in itself, and many excellent video guides online provide precise visual walkthroughs. However, here are some general locations to get you started on your treasure hunt:
| Oracle # | Location | Description |
|---|---|---|
| 1 | Early Vex Cavern | Located very early in the Vex cavern section, just after you drop down the initial hole and make the first big jump across the chasm. Instead of following the main path forward, turn left and explore a small offshoot ledge. |
| 2 | After Vex Elevator | Found at the end of the first major jumping puzzle cavern, after you ride the Vex elevator platform up. Instead of taking the immediate left turn that continues the mission, continue straight along the ledge you're on and look for an opening higher up. |
| 3 | Sloping Pillars Area | This one is in the area with the series of sloping pillars where Taken snipers attack you (after the long diamond-shaped Vex passage). Once you reach the final platform in this section, look around for a shootable Vex cube. Destroying it will spawn a new platform leading to the Oracle. |
| 4 | Green Room (Upper) | Inside the large, green, grassy room (the one with the big shortcut!). You'll need to climb the grass-covered ledges that ring the outer walls of the room. Circle around until you are roughly above the point where you first entered the room. Look down into a crack or gap near the entrance area to spot a ledge you can drop to, leading to a small hidden room. |
| 5 | Green Room (Lower) | Also in the Green Room. This time, instead of climbing, drop down into the pit in the center/floor of the room where Taken Thrall spawn. Explore the far end of this lower area and look for a low passage on your right. |
| 6 | Narrow Ledge | After you exit the Green Room, you'll be on a very narrow ledge that curves around a large Vex cylindrical structure. Before you make the big "leap of faith" drop to continue the mission, look down and to your left. There's a hidden alcove or platform you can drop into. |
| 7 | Final Oracle | After destroying the sixth Oracle, you'll see a message on screen: "A seventh Oracle appears…". To find it, you'll need to backtrack slightly from Oracle 6's location along that circular ledge, towards where you first entered that area (near the exit from the Green Room). When you're facing the large Vex portal structure in the distance, look to your right for a series of platforms built into the main cavern wall. You'll need to jump across to these. Climb these platforms; the final Oracle is hidden behind the large Vex gate structure. |
When you successfully destroy an Oracle, you'll usually hear a distinct chime, and you might see on-screen text like "Karve of the Worm schematic acquired" or "White Nail Intrinsic Upgrade".
Catalyst & Perks
So, you've got the Whisper of the Worm. Awesome! But like many Exotics in Destiny 2, its true potential is unlocked through its "Catalyst" perks. For the craftable Whisper of the Worm, this system is a bit different from older Exotics. Instead of finding a single catalyst item that you then grind kills for, you'll be unlocking its most powerful traits by completing a series of follow-up quests from Eris Morn.
The Main "Catalyst" Perk: Whispered Breathing
The most iconic and sought-after perk for Whisper of the Worm is Whispered Breathing. Here's how it works: when you aim down the sights of the Whisper without firing for just a brief moment, the perk activates. While active and you remain zoomed, you gain a significant bonus to both range and precision damage. When in doubt, listen for a noticeable audio cue or check your weapon buffs on the left to see if it's active. This is an absolutely massive damage increase for sustained boss DPS, synergizing perfectly with White Nail. This perk used to be the catalyst for the original Whisper. Now, it's one of the powerful traits you unlock for your craftable version.
Unlocking Whispered Breathing and Other Awesome Perks
After you've acquired the Whisper of the Worm and completed the initial "Whispers of the Past" quest with Eris Morn, she will begin to offer you a series of new quests. These are typically titled "Whispers of the Taken I," "Whispers of the Taken II," and "Whispers of the Taken III".
Each of these quests, when completed, will unlock a new, powerful perk that you can then select and craft onto your Whisper of the Worm at the Enclave on Mars. This deterministic approach ensures you can get the weapon to its full potential by mastering the mission.
The Quest Loop (A Familiar Pattern)
The "Whispers of the Taken" quests generally follow a similar structure:
- Defeat Taken Combatants: You'll need to defeat a certain number of Taken enemies. Sometimes this requires using the Whisper of the Worm itself, and sometimes it specifies precision kills, to collect Taken Essences.
- Destroy Specific Taken Blights: This is a key step. You must enter "The Whisper" mission on Expert difficulty and destroy a specific set of small, hidden Taken Blights. These are not the large, ambient Blights in the combat rooms but special quest-related ones.
- Complete "The Whisper" on Expert: After destroying the Blights, you must successfully complete the entire mission on Expert difficulty.
- Return to Eris Morn: Speak with Eris on the Moon to turn in the quest and unlock the perk.
Expert Difficulty - The Real Test!
This is where your skills will truly be put to the test.
- Expert difficulty, sometimes colloquially known as Legend, significantly ramps up the challenge. It has a much tighter 20-minute timer, and enemies are tougher and hit harder (you'll effectively be at a -15 Power Level disadvantage).
- For Expert runs, a coordinated fireteam is highly recommended. Use the in-game Fireteam Finder or community LFG sites. Clear communication, well-synergized loadouts, and knowledge of the mission are vital.
- A good benchmark for Expert runs is to have at least 10-14 minutes remaining on the clock by the time you reach the first combat encounter after the jumping puzzle. This gives you a decent buffer for the fights ahead.
Taken Blight Locations for Catalyst Quests (Simplified)
These special quest Blights are often small and can be tricky to spot. For some quest steps, you may need to use the Whisper of the Worm itself to destroy them for progress to count.
This fantastic perk increases your ammo reserves for Whisper and significantly speeds up your reload, stow, and ready speed when you are crouching. More bullets and faster reloads are always good!
When you aim down sights for a short period, this perk reduces the amount of flinch you experience when taking damage. This is incredibly helpful for maintaining your aim on a boss's critical spot while under fire.
Dealing damage with Whisper improves its reload speed and handling. The more you shoot, the faster and snappier the gun becomes.
Whisper of the Worm Craftable Perks at a Glance
| Perk Name | What It Does (Simple Terms) | How to Unlock (Quest from Eris) |
|---|---|---|
| Whispered Breathing | Aim ADS briefly for bonus range & precision damage (stays zoomed) | Whispers of the Taken (often the first major perk quest) |
| Field Prep | More ammo, faster reload/stow/ready when crouching | Whispers of the Taken I |
| No Distractions | Less flinch when ADS and taking hits | Whispers of the Taken II |
| Enlightened Action | Dealing damage boosts reload speed & handling | Whispers of the Taken III |
| Mulligan (default option) | Missing a shot might return ammo to the mag | Base option when crafting |
Conclusion
Congratulations, Guardian! You've braved the depths of Io, conquered the treacherous jumping puzzles, vanquished the Taken hordes, and silenced the Whisper. You now hold in your hands one of the most iconic and powerful sniper rifles in Destiny 2.
Take some time to practice with it. Get a feel for the rhythm of White Nail – those three quick precision hits that keep the bullets flying. Learn to activate Whispered Breathing for that extra damage punch when you need it most.
The Whisper of the Worm truly shines in endgame content. Take it into Raids, Dungeons, Grandmaster Nightfalls (when Sniper Overcharge is active!), or any activity where you need to dish out serious, sustained precision damage from a safe distance. Those bosses and champions won't know what hit 'em!
And your journey with "The Whisper" mission doesn't have to end here. Remember those Oracles? Keep hunting them down to unlock the Karve of the Worm Exotic ship and fully upgrade your Whisper's White Nail intrinsic. And those Expert difficulty runs for the "Whispers of the Taken" quests will allow you to craft the ultimate version of this legendary weapon, tailored to your playstyle.
The Whisper of the Worm is a testament to your skill and determination. Now, get out there and make some noise, Guardian. You've absolutely earned it.