
Hailing from the USA, Agent Brimstone stands as a cornerstone Controller within the VALORANT Protocol. As a Controller, his primary function is to manipulate the battlefield to his team's advantage, primarily by obstructing enemy sightlines, controlling contested space, and paving the way for coordinated team movements. Brimstone achieves this through a potent orbital arsenal, allowing precise and relatively safe utility deployment. He excels as Valorant's premiere site executor, leveraging his tools to orchestrate aggressive pushes onto objectives. Furthermore, his kit makes him exceptionally strong in post-plant scenarios, capable of locking down planted spikes and denying defuses with formidable efficiency. A defining feature is his Sky Smoke ability, which deploys the longest-lasting smoke screens in the game, offering unparalleled duration for executes and holds. While his abilities are often considered straightforward and beginner-friendly, mastering their nuances and coordinating their use reveals a high strategic skill ceiling.
Core Playstyle: The Boots-on-the-Ground Commander
Brimstone operates as the quintessential "boots-on-the-ground commander". Unlike some Controllers who can influence the map globally, Brimstone's effectiveness hinges on his proximity to the action due to the limited casting range of his Sky Smokes and Orbital Strike. This inherent range limitation shapes his playstyle significantly. To deploy his crucial Sky Smokes onto a target site, he must physically position himself within approximately 55 meters. This necessitates staying relatively close to his team during offensive pushes, reinforcing a coordinated, grouped approach.
The act of deploying smokes or his ultimate requires him to access his tactical map via his arm-mounted bracer, a process during which he is vulnerable and cannot defend himself. This contrasts sharply with agents like Omen or Astra, who can deploy their vision-blocking utility from safer distances, often across the entire map. Consequently, Brimstone's design intrinsically ties his powerful utility deployment to his physical presence near the fight. This fosters closer team play and makes him a direct participant in the execute, but it also demands greater map awareness to find safe positions for activating his abilities without being caught off guard. Maximizing Brimstone's impact is therefore heavily reliant on clear communication and tight team coordination; he is an enabler whose utility shines brightest when used in concert with his allies' actions.
Brimstone's Toolkit: Mastering the Orbital Arsenal
Understanding the specifics of Brimstone's abilities is crucial for effective deployment. The following tables summarize the key statistics for each tool in his arsenal:
| Incendiary (Q) Stats | |
|---|---|
| Cost | 250 Credits |
| Max Charges | 1 |
| Duration | ~8 seconds |
| Damage | 60 DPS |
| Radius | ~5 meters |
| Bounce Mechanics | Up to 2 bounces, detonates on floor contact |
| Utility Damage | Yes (50% damage to non-players) |
| Stim Beacon (C) Stats | |
|---|---|
| Cost | 200 Credits |
| Max Charges | 1 |
| Beacon Duration | ~12 seconds |
| Buff Duration | 4 seconds after leaving Area of Effect (AoE) |
| Radius | ~6-7 meters |
| Buffs | +15% Fire Rate, +15% Speed Boost, +10% Reload Speed, +10% Equip Speed, +10% Recovery Speed |
| Indestructible | Yes |
| Affects Enemies | No |
| Cast/Equip Time | Fast / Quick Cast |
| Sky Smoke (E) Stats | |
|---|---|
| Cost | 1 Free per round, 100 Credits each for 2nd/3rd |
| Max Charges | 3 |
| Duration | ~19.25 seconds |
| Deployment Time | ~1 second |
| Range | ~55 meters |
| Radius | ~10 meters diameter |
| Fade Warning | Yes (Audio/Visual cue 1.5 seconds before fade) |
| Orbital Strike (X) Stats | |
|---|---|
| Ultimate Cost | 8 Points |
| Cast Time | ~2 seconds windup |
| Duration | ~4 seconds |
| Damage | High DPS (~20 per tick / ~125 DPS) |
| Radius | ~8 meters |
| Range | ~60 meters |
| Blocks LoS | Yes (for abilities & minimap) |
| Damages Utility | Yes (e.g., Killjoy Lockdown, Cypher Trapwire, Sage Barrier Orb) |
Incendiary (Q): Burn Them Out

Brimstone equips an incendiary grenade launcher and fires a projectile that detonates upon resting on a horizontal surface, creating a lingering pool of fire. This grenade can bounce off surfaces up to two times before detonating, with its arc and velocity decreasing after each bounce. The resulting fire zone deals consistent damage over time (approximately 60 DPS) to any agent within its radius for about 8 seconds, potentially dealing more damage to those nearer the center.
Tactically, the Incendiary serves multiple purposes. It's highly effective for clearing out tight corners, cubbies, or common hiding spots without needing direct line of sight. It functions as potent area denial, blocking choke points or hallways to stall enemy pushes or rotations. It can flush defenders out of strong positions, forcing them into the open. Perhaps its most impactful use is in post-plant situations, where precisely aimed Incendiary grenades (lineups) can land on the planted spike, denying defuses and buying invaluable time. Combining an Incendiary with a Sky Smoke placed over the target area creates a deadly trap, punishing enemies who push through the smoke unaware. Additionally, the Incendiary damages enemy deployable utility, such as Killjoy's Nanoswarm or Lockdown, adding another layer to its strategic value.
Stim Beacon (C): Combat Enhancement
Activated by tossing a beacon onto the ground, the Stim Beacon creates a field that grants beneficial effects to Brimstone and his allies within its radius. The primary buff, historically known as "RapidFire," significantly enhances combat effectiveness by increasing fire rate (+15%), reload speed (+10%), weapon equip speed (+10%), and recoil recovery speed (+10%). Crucially, it also provides a 15% speed boost, aiding movement. These buffs linger for 4 seconds after an agent leaves the beacon's radius, allowing for continued benefit even when moving out of the immediate area. The beacon itself lasts for approximately 12 seconds, is indestructible by enemy fire, and importantly, does not provide any buffs to enemies who enter its field. Recent updates have also made its deployment faster via quick cast.
The Stim Beacon is ideal for boosting team pushes onto sites, increasing both the speed of entry and the firepower available upon arrival. Defensively, placing it on a contested site or angle can give defenders a crucial edge when holding against an enemy rush. The combination of faster firing rate, better recoil control, and quicker reloads can dramatically shorten the time-to-kill in gunfights, while the speed boost facilitates faster rotations or allows teams to cross dangerous sightlines more quickly during executes. Faster weapon swapping aids in reacting to sudden threats or transitioning smoothly after using other abilities. Thus, the Stim Beacon acts as a powerful force multiplier for coordinated team plays, enhancing both offensive pressure and defensive resilience. Creative uses include placing it away from one's current position to bait enemies or misdirect their attention. Strategic placement is key: deploy it where allies can benefit while maintaining cover and line of sight on potential enemy entry points.
Sky Smoke (E): Control the Map
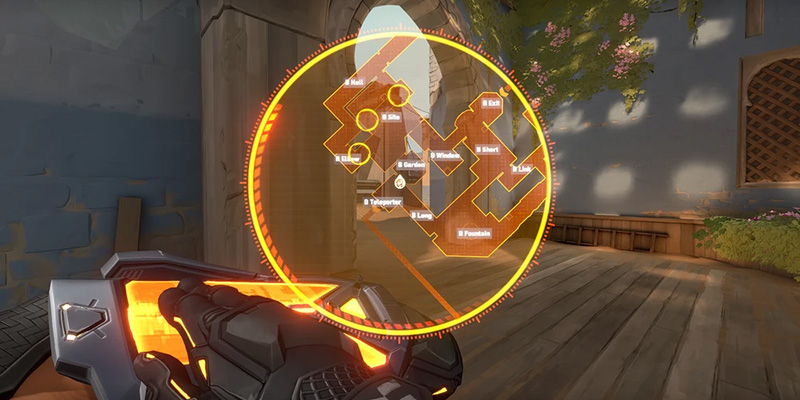
Sky Smoke is Brimstone's signature ability, defining his role as a Controller. Using his tactical map interface, Brimstone can select up to three locations within a 55-meter radius to deploy smoke clouds. These smokes deploy rapidly (~1 second) after confirmation and boast the longest duration of any smoke ability in Valorant, lasting approximately 19.25 seconds. Each smoke cloud has a substantial radius, effectively blocking vision over a wide area. Players receive one free smoke charge per round and can purchase up to two additional charges. A helpful audio and visual cue alerts players 1.5 seconds before the smokes dissipate.
The tactical applications of Sky Smokes are vast. Offensively, they are the cornerstone of site executes, used to simultaneously block multiple critical lines of sight such as Heaven positions, CT (Counter-Terrorist spawn) entrances, and common defensive angles, creating safer passage for the attacking team. Defensively, they are used to obstruct attacker vision at choke points, delaying pushes and allowing defenders to reposition or hold advantageous angles. They can isolate specific parts of a site during retakes or create temporary safe zones. Advanced techniques include deploying one-way smokes, where Brimstone can see enemies' lower bodies before they can see him, though these require precise placement and carry risks. Smokes can also be used deceptively, placing them on one site to fake presence and draw enemy rotations before committing to the opposite site. Effective use demands coordination and clear communication with teammates regarding placement and timing. Smokes should ideally be placed flush with choke points to deny enemies the ability to play around the edges.
Orbital Strike (X): Rain Fire
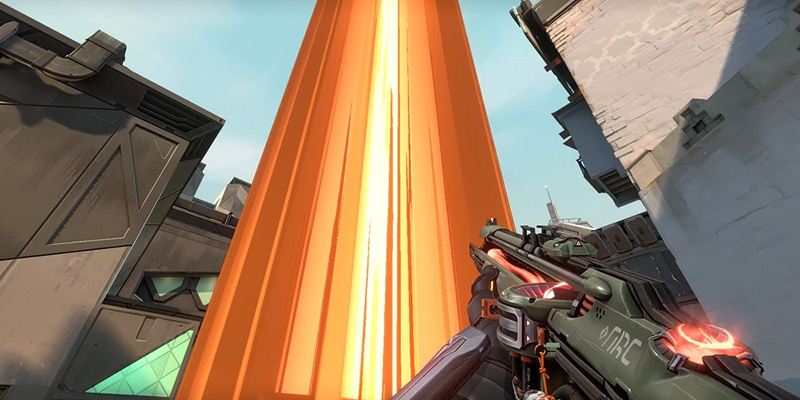
Brimstone's ultimate ability, Orbital Strike, requires 8 ultimate points to charge. Accessed via his tactical map, he selects a target location within a 60-meter range. After a brief windup of about 2 seconds, a devastating orbital laser beam strikes the designated area, lasting for approximately 4 seconds. This laser deals massive damage over time (around 125 DPS) to any agent caught within its large radius (~8 meters). While active, the strike also blocks line of sight for targeting abilities (like flashes or Sova's Recon Bolt) and obscures enemy positions on the minimap within its visual effect.
Orbital Strike is a game-changing ultimate with several key applications. It can be used offensively during a site execute to clear entrenched defenders from stubborn positions or flush them out into the open. However, its most renowned and powerful use is for post-plant denial. By targeting the planted spike location immediately upon hearing the audio cue for a defuse attempt, Brimstone can force the defuser to abandon the defuse or perish. Given the ultimate's 4-second duration compared to the 7-second defuse time, it frequently secures the round win by simply running out the clock, even if it doesn't result in a kill. It's effective even against enemies attempting to defuse behind cover or through thin structures. Furthermore, Orbital Strike is capable of destroying various enemy deployable utilities caught in its blast, including Killjoy's Lockdown ultimate, Cypher's Trapwires, Sage's Barrier Orb, and KAY/O's ZERO/point knife, adding strategic counter-play value. While incredibly powerful, the 2-second delay before the strike lands means attentive players can sometimes escape if they react quickly, especially if not caught in an enclosed space.
Orchestrating the Attack: Site Execution Strategy
Coordinating the Push
Successful site executions with Brimstone revolve around synchronized utility usage and team movement. The fundamental principle is to deploy Sky Smokes to simultaneously block multiple critical defensive sightlines precisely as the team begins their entry. This creates corridors of safe passage and isolates defenders. The Stim Beacon should be deployed strategically just before the team enters the site or along the primary entry path. This boosts movement speed, allowing the team to cross dangerous open areas faster, and enhances firepower for the initial engagements. Timing the Stim Beacon is crucial – it needs to be placed from a safe position but timed so the team benefits as they commit to the push. Effective execution is impossible without clear communication. Brimstone must announce where smokes are being placed and when, allowing the team to coordinate their push with the utility drop. The call to push should coincide with the smokes landing.
Synergizing with Entry Agents

Brimstone's utility provides the crucial foundation upon which Duelists and Initiators build a successful site take. His smokes define the areas the team can safely control upon entry, directly enabling the specialized roles of his teammates.
Agents designed for entry fragging and creating space benefit immensely from Brimstone's smokes. The smokes block off common angles and crossfires, creating safer pathways for Duelists to use their movement abilities (like Jett's dash or Raze's satchels) to enter the site, take initial space, and seek advantageous opening duels. The Stim Beacon further amplifies their potential by increasing their speed and combat effectiveness during these critical first engagements.
These agents specialize in gathering information and disrupting defenders to set up pushes. Brimstone's smokes synergize powerfully with Initiator utility. By blocking vision from key areas, smokes force defenders to reposition or hold predictable spots within the site. Initiator abilities like flashes (Skye, KAY/O, Breach), reconnaissance tools (Sova dart, Skye dog/bird, Fade Prowler), or concussive abilities (Breach, Fade) can then be used more effectively to clear these limited, predictable locations.
Essentially, Brimstone sets the stage. His smokes reduce the immediate threats entry players face, allowing Duelists to confidently take space. Simultaneously, this controlled environment funnels defenders into positions where Initiator utility can efficiently root them out, paving the way for a successful site capture.
Fundamental Smoke Patterns for Executes
The key principle is to place smokes deep enough to fully obscure the angle being blocked, preventing defenders from peeking edges. However, smokes should not be placed so deep into the site that they provide cover for defenders within the smoke itself. Achieving a placement that is "flush" with the choke point entrance is ideal, minimizing the area enemies can emerge from and denying them cover.
For instance, executing onto Ascent's A site typically involves smoking A Heaven (Rafters), the Generator area, and potentially the doorway connecting to A Link/Tree. For Bind's B site, common execute smokes cover the Elbow position and the CT entrance near Garden.
Securing the Round: Post-Plant Dominance
Once the spike is planted, Brimstone transitions into one of the most formidable post-plant agents in Valorant, capable of single-handedly denying defuses and securing rounds.
The Art of the Incendiary Lineup
A "lineup" refers to a predetermined method of aiming Brimstone's Incendiary grenade, using specific map geometry and elements of the player's Heads-Up Display (HUD), to ensure the molotov consistently lands on common spike plant locations from a safe distance. The value of mastering these lineups is immense. A well-timed Incendiary forces any enemy attempting to defuse the spike to either abandon the defuse or die in the flames. This buys crucial seconds, often winning the round purely based on time, especially when the clock is low. Brimstone's Incendiary lineups are widely considered among the most potent and reliable post-plant denial tools in the game.
Learning lineups requires dedication: players should practice them extensively in custom games to ensure consistency. Utilizing reliable resources, such as online guides or video tutorials, is recommended. Understanding the timing is critical – the Incendiary lasts about 8 seconds, while a full defuse takes 7 seconds. Players should listen carefully for the distinct audio cue of an enemy starting the defuse before launching the molotov.
Denying Defuses with Orbital Strike
Orbital Strike serves as another incredibly powerful tool for post-plant denial. Similar to Incendiary lineups, the optimal usage involves listening for the defuse audio cue. Once the sound is heard, Brimstone should immediately target the spike location with his ultimate. The ~2-second activation delay means timing is important, but the subsequent ~4-second duration of high-damage laser bombardment makes defusing impossible while it's active. As the ultimate's duration is longer than half the defuse time, it reliably forces the defuser off the spike. In late-round scenarios, this delay is often enough to guarantee a round win due to time expiration, regardless of whether the ultimate secures a kill. Its ability to damage through roofs and structures makes it effective even if the defuser attempts to hide behind cover while defusing.
Optimal Post-Plant Positioning
Effective post-plant play as Brimstone involves strategic positioning to maximize utility impact while ensuring survival. If planning to use lineups, Brimstone should position himself in a safe location from which he can see the necessary visual cues for his lineup and hear the defuse sound, while minimizing exposure to enemy pushes. Staying alive is paramount; Brimstone's value plummets if he dies before deploying his round-securing Incendiary or Orbital Strike. Post-plant scenarios demand coordination. Teammates should ideally cover flanks and watch angles while Brimstone focuses on preparing and deploying his denial utility.
The true strength of Brimstone's post-plant lies not just in the individual power of his Incendiary and Orbital Strike, but in his ability to layer them. The Incendiary denies the spike for roughly 8 seconds, and the Orbital Strike denies it for 4 seconds after its windup. Since a defuse takes 7 seconds, forcing an enemy off the spike with an Incendiary, only to immediately follow up with an Orbital Strike as the fire fades or if they try to "stick" the defuse through the initial damage ticks, creates an extended period of denial. This layering makes it nearly impossible for enemies to complete a defuse in low-time situations without being eliminated, showcasing a synergy more potent than using either ability in isolation.
Defensive Operations: Holding Ground & Retakes
While renowned for his offensive prowess, Brimstone's toolkit is also highly effective for defensive strategies and site retakes.Stalling Aggression
On defense, Brimstone's primary role is often to delay enemy pushes and control choke points. Sky Smokes are deployed at the main entry points attackers are using, blocking vision and forcing them to either wait for the lengthy smoke duration (~19.25s) to expire or push through blindly. By staggering the deployment of his three smokes, Brimstone can significantly extend the period of vision denial at a key choke. Placing an Incendiary into a smoked choke point or onto common pre-push positions is a powerful deterrent, damaging enemies who attempt to push through and forcing them to reconsider their advance. Proper smoke placement is crucial here; ensuring smokes are flush with the entrance prevents attackers from using the edge of the smoke as partial cover.
Leveraging Stim Beacon in Defensive Fights
The speed boost component can also facilitate faster rotations between defensive positions or allow for quick repositioning to counter attacker movements. Additionally, tossing a Stim Beacon into the path of advancing attackers can act as a deterrent, potentially causing them to hesitate or funneling them into less advantageous positions.
Utility Usage During Site Retakes
When a site is lost and a retake is necessary, Brimstone's abilities remain highly valuable. Sky Smokes can be used to block off sightlines held by the attackers who are now in post-plant positions, isolating defenders and creating safer entry paths for the retaking team. The ability to deploy up to three smokes simultaneously is particularly potent here. This allows the retaking team to instantly block vision from multiple key angles (like Heaven, back-site positions, and site entrances) that attackers typically hold after planting. This simultaneous denial isolates attackers, breaks crossfires, and simplifies the angles the retaking team needs to clear, enabling a more coordinated and less hazardous retake compared to agents who smoke angles sequentially. Incendiary grenades can clear common post-plant hiding spots (e.g., behind default boxes on many sites). Orbital Strike serves as a powerful retake tool, capable of clearing a large portion of the site to initiate the retake, or used to deny the spike if an ally attempts a risky defuse under pressure.
Map Control: Essential Placements & Strategies
Principles of Effective Smoke Placement
Mastering Brimstone requires understanding not just when to smoke, but where and how. Key principles include:
- Flush Placement: Always aim to place smokes so their edge sits flush against the entrance of a choke point or angle. This minimizes gaps enemies can peek through and prevents them from using the smoke edge as cover.
- Appropriate Depth: Avoid placing smokes too shallow, which might not fully block the intended line of sight. Conversely, avoid placing them too deep into an area, as this can inadvertently provide cover for enemies pushing out.
- No Gaps: Ensure multiple smokes used for an execute connect seamlessly, leaving no slivers of vision between them or between the smoke and map geometry. Careful aiming on the tactical map is required.
- One-Way Opportunities: Be aware of map geometry that allows for one-way smokes, where Brimstone can see enemy feet or legs before they can see him. These require specific setups and positioning.
- Communication: Clearly announce intended smoke locations to teammates before deployment to ensure coordination.
Map-by-Map Breakdown
Brimstone's effectiveness varies across maps, often correlating with the map's geometry and the distances involved in common executes. Maps with relatively tight choke points and sites where multiple key angles can be smoked from a single, safe location within his ~55m range tend to favor him. His ability to deploy three smokes at once shines when multiple critical angles need simultaneous blocking for an execute. Maps like Ascent, Bind, and Split are often considered strong choices for Brimstone due to layouts that facilitate his execute style. Conversely, maps with very large, open sites or long distances between execute staging areas and defensive positions can stretch his range limitations.
Generally considered a strong Brimstone map. Standard execute involves smoking Heaven/Rafters, Generator/Dice, and potentially Door/Tree from A Main when attacking A. When attacking B, smoke Market entrance and CT spawn connector from B Main. Advanced smokes include one-way setups for Mid Cubby control. Complex executes might involve coordinating mid-control smokes with site smokes. Key Orbital Strike spots include default plant locations on both A (near Generator) and B (front box), A Hell, and B Main choke during pushes.
Another favorable map for Brimstone. When attacking A, smoke Truck/U-Hall and Heaven/Lamps from A Short or Showers. For B site attacks, smoke Elbow and CT/Garden entrance from B Long or Hookah. Advanced strategies include faking presence with smokes on one site while executing the other, and one-way smokes near Hookah window. Using smokes to control B Halls/Garden during A executes can be effective. Key Orbital Strike spots include default plant A (Truck side), default plant B (near site box), Lamps/U-Hall, and Hookah interior.
Historically a good Brimstone map due to tight chokes, though map changes can alter viability. When attacking A, smoke Heaven and Screens/Elbow from A Main. For B site attacks, smoke Heaven and Back B/Rafters from B Main/Garage. Advanced strategies include mid control smokes targeting Vents and Screens connector, with one-ways possible on A Ramps or B Stairs. Key Orbital Strike spots include default plant A (behind screen), default plant B (corner near stairs), A Rafters, and B Hell.
A three-site map presenting unique challenges. When attacking A, smoke Heaven and Connector/CT entrance from A Long. For B site attacks, smoke back B and both side entrances (A Link, C Link) from Mid/Window. When attacking C, smoke CT spawn connector and back Plat/Platform from C Long. Advanced strategies include complex split pushes requiring careful smoke coordination across multiple entrances (e.g., smoking Garage window and C Link for a B push). Faking sites is particularly viable on Haven due to three potential targets. Key Orbital Strike spots include default plant locations on all three sites, Garage window area, A Heaven, and C Plat.
Advanced Brimstone Techniques
Moving beyond the fundamentals, advanced Brimstone play involves precise utility usage, sophisticated strategies, and adaptability.
Pixel-Perfect Incendiary Lineups
Mastering post-plant requires consistent Incendiary lineups. This involves learning specific points on the map geometry and aligning HUD elements (like ability icons or crosshair placement) to launch the molotov accurately onto default spike plant locations from safe distances. Consistent execution requires significant practice in custom games to memorize the visual cues and muscle memory for each lineup.
Sophisticated Sky Smoke Usage
- Layering Smokes: Deploying multiple smokes in sequence or slightly overlapping to create deeper vision denial, block wider areas, or create specific pathways through complex parts of the map.
- Fake Smokes: A powerful mind game involves using one or two smokes on one bombsite to simulate an impending execute, drawing defender rotations and attention, before quickly rotating and executing onto the now weakened opposite site. This requires excellent timing and team coordination to sell the fake effectively.
- Reactive Smokes: While Brimstone excels at planned executes, skilled players can use smokes reactively mid-round. This might involve smoking off an unexpected enemy flank, isolating a specific fight to support a teammate, or blocking vision during a chaotic scramble. This demands strong game sense and quick decision-making.
- One-Way Smokes: These smokes exploit map geometry, landing on elevated surfaces (like boxes) to create a situation where Brimstone, positioned correctly below, can see the feet or legs of approaching enemies before they can see him through the smoke. While powerful, they require precise placement, specific positioning to hold the angle, and awareness that experienced opponents may know how to counter them (e.g., by prefiring the likely holding spot or using utility).
Strategies for Countering High-Mobility Agents
Counter-strategies include:
- Preemptive Incendiary: Use Incendiary on common dash spots (like Jett's dash onto site) or aggressive peek locations (like Raze satcheling out) to deny space or punish their movement abilities.
- Defensive Smoke Placement: When defending against mobile agents, consider placing smokes slightly further back from the choke point. This forces them to cross more open ground after exiting the smoke before reaching cover, increasing their vulnerability time.
- Zoning with Orbital Strike: In post-plant scenarios, use Orbital Strike not just on the spike, but also to zone out areas where mobile agents might quickly reposition to flank or retake angles.
- Disciplined Angle Holding: Avoid unnecessary aggression. Hold tight angles and let mobile agents commit to pushing through smokes or into cleared areas. The Stim Beacon can provide an edge in duels if they challenge directly.
Getting Started: Brimstone Fundamentals for Beginners
For players new to Brimstone or the Controller role, focusing on the fundamentals is key to building a strong foundation.
Core Responsibilities Recap
As Brimstone, your primary job is to use your Sky Smokes to block enemy vision for your team, enabling safer movement and site executes. Think about which angles are most dangerous for your team and aim to cover those. Remember that your utility is most effective when used to support the team's overall plan, not just for individual plays. Communication, even simple callouts like "Smoking Heaven" or "Using Stim now," helps immensely with coordination. Brimstone is considered one of the more accessible agents to learn initially, so concentrate on mastering these basic functions first.
Basic, High-Impact Smoke Placements
A simple rule of thumb:
- On Attack: If your team is pushing towards a site (e.g., A site), use your smokes to block the main defensive positions overlooking that site (e.g., A Heaven, the entrance from CT spawn).
- On Defense: If you anticipate attackers pushing through a specific choke point (e.g., B Main), smoke that entrance to slow them down and obscure their vision.
Simple and Effective Stim Beacon Usage
The Stim Beacon provides a valuable boost, and using it effectively early on is straightforward:
- Attack: When your team groups up to push onto a site, throw the Stim Beacon down just before you go in, or place it on the path you'll take onto the site.
- Defense: If you hear or see multiple enemies rushing towards the site you're defending, deploy the Stim Beacon in a safe spot on site to give yourself and any nearby teammates an advantage in the ensuing fight.
Don't overthink its use initially; deploying it during key engagements is generally better than saving it indefinitely.
Managing Resources: Brimstone's Economy
Effective resource management is crucial in Valorant, and understanding Brimstone's specific costs helps optimize buying decisions.
Ability Costs & Buying Priorities
Brimstone's full utility kit costs 650 Credits, excluding the free first smoke. The costs are:
- Sky Smoke: First charge is free, subsequent two charges cost 100 Credits each.
- Incendiary: 250 Credits.
- Stim Beacon: 200 Credits.
Prioritization depends on the team's strategy and the game state. Sky Smokes are fundamental, especially on attack, so securing at least two, if not all three, is often a high priority on buy rounds. The Incendiary is extremely valuable for post-plant scenarios; its purchase should be considered based on whether the team plans to play for lineups or needs the area denial. The Stim Beacon, while useful, is often the lowest priority buy unless a specific fast-paced execute strategy is planned or credits allow for the full kit.
Balancing Utility Investment with Weapon Purchases
Brimstone's purchasing decisions must align with standard Valorant economic principles like save rounds, force buys, and full buys. On full buy rounds, the goal is typically to afford full armor, a primary rifle (Vandal or Phantom), and as much utility as possible. Prioritize the smokes, then decide on Incendiary/Stim based on remaining credits and strategic needs. On save or eco rounds, Brimstone can still offer significant value. The free Sky Smoke provides essential vision control, and purchasing just the Incendiary (250 Credits) can be a round-winning investment if the team manages to plant the spike, allowing for post-plant denial even with weaker weapons.
Avoiding Common Errors
Even experienced players can fall into bad habits. Recognizing and correcting common Brimstone errors is key to consistent performance.
Diagnosing and Fixing Poor Smoke Placements
- Issue: Gaps. Leaving small gaps between adjacent smokes or between a smoke and map geometry allows enemies to peek through unexpectedly.
Solution: Aim carefully on the tactical map, ensuring smoke icons slightly overlap or sit snugly against walls. Practice placements in custom games. - Issue: Smoking Too Shallow. Placing smokes too close to the entrance doesn't fully block vision from deeper angles defenders might hold.
Solution: Position the smoke icon further back on the tactical map to ensure it covers the entire line of sight intended. - Issue: Smoking Too Deep. Placing smokes too far into a site or area can give enemies cover to play within or push out from unexpectedly.
Solution: Aim to place the smoke edge flush with the entrance of the choke point or angle being blocked. Visualize where the smoke cloud will land relative to the terrain.
Breaking Predictable Post-Plant Habits
Maximizing Stim Beacon Value
- Issue: Forgetting to Use It. Many Brimstone players simply forget they have a Stim Beacon available.
Solution: Make a conscious effort to incorporate it into attack executions and defensive holds. Consider binding it to an easily accessible key. Remember that using it, even imperfectly, is often better than not using it at all. - Issue: Poor Placement. Deploying the Stim Beacon in an exposed location or where it doesn't cover key teammates diminishes its value.
Solution: Prioritize placing it behind cover while ensuring the AoE covers the team's intended path or defensive position.
Safe Ability Deployment Practices
Communicate your intention to use smokes or the ultimate beforehand so your team is aware you'll be momentarily stationary.
Conclusion: Leading the Charge
Summary of Brimstone's Strategic Impact
Brimstone solidifies his position in Valorant as a powerful and reliable Controller. His strength lies in his unparalleled ability to orchestrate site executions through simultaneous, long-duration smoke deployment and combat-enhancing Stim Beacons. His post-plant prowess, fueled by devastating Incendiary lineups and the round-securing Orbital Strike, makes him a constant threat after the spike is down. While possessing a kit that is relatively straightforward to understand initially, mastering the precise timing, placement, and coordination required elevates his impact significantly.
Final Emphasis on Communication and Team Play
Ultimately, Brimstone embodies the role of the field commander. His effectiveness is directly proportional to the level of coordination and communication within his team. His limited range necessitates close proximity to his allies, and his utility shines brightest when deployed in concert with their actions. Smokes need to align with pushes, Stim Beacons need to hit teammates entering fights, and post-plant utility requires awareness of the team's positioning and the enemy's actions. Mastering Brimstone isn't just about learning ability mechanics; it's about learning to lead the charge through clear communication and synergistic teamwork, ensuring his squad always has the advantage.