
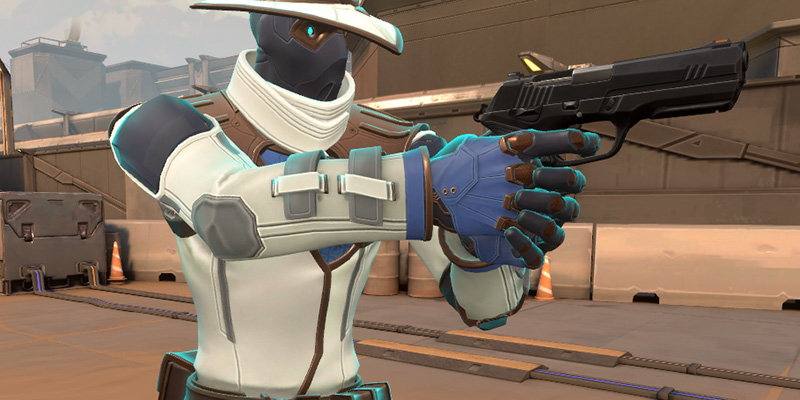
Cypher stands as Valorant's quintessential information broker, a Moroccan Sentinel agent specializing in surveillance, area denial, and battlefield control. Unlike agents focused purely on firepower or aggressive entry, Cypher's strength lies in his ability to passively gather intelligence and manipulate enemy movements through a sophisticated network of traps and vision-blocking devices. He embodies the "hard Sentinel" archetype, prioritizing site lockdown and utility-centric play, often anchoring bombsites single-handedly, in contrast to "soft Sentinels" like Sage or Chamber who might offer more mobility or direct healing support.
The Cypher Philosophy: Information is Power
The core philosophy behind effective Cypher play is the strategic acquisition and utilization of information. His entire toolkit – Trapwires, Cyber Cages, Spycam, and Neural Theft – is designed to reveal enemy locations, intentions, and timings. Mastering Cypher means understanding that knowledge is the ultimate weapon. It involves proactively setting up intel networks to predict enemy actions and reactively deploying control measures to exploit the information gathered. Success isn't just about reacting to a triggered wire; it's about understanding why it triggered and what the enemy's likely next move is. His kit is fundamentally built around intelligence gathering, yet achieving this often requires more effort compared to other info agents, rewarding players most when enemies become careless.
The agent's power lies in information, but this presents a significant cognitive load. Cypher players must constantly process incoming intel from cams, trips, and cage sounds, cross-reference it with map knowledge and potential enemy strategies, predict movements, and adapt their own plans or setups accordingly – often while vulnerable or under duress. Predictable utility placement is a major weakness, meaning map knowledge isn't just helpful, it's essential for varying setups and maintaining effectiveness throughout a match.
This guide aims to serve as a definitive, expert-level resource for intermediate to advanced Valorant players dedicated to mastering Cypher. It will delve into the intricacies of his abilities, core strategic principles, map-specific setups for the current competitive pool, advanced techniques, economic considerations, and common pitfalls to avoid, empowering players to become true information brokers on the battlefield.
Cypher's Arsenal: A Detailed Analysis
Understanding the nuances of each tool in Cypher's kit is fundamental to maximizing his potential. Recent patches have subtly shifted the optimal usage of his abilities, demanding a more refined approach to deployment and resource management.
| Ability | Type | Cost | Max Charges | Cooldowns | Key Stats & Effects |
|---|---|---|---|---|---|
| Trapwire | Basic | 200 Creds | 2 | Pickup: N/A (Before Trigger) Rearm: 2s |
Placeable between surfaces (15m max length). Covert, 20HP. Reveals after 0.5s windup, tethers, dazes (1.25s slow). Cannot pickup after trigger. |
| Cyber Cage | Basic | 100 Creds | 2 | Pickup: Buy Phase Only | Throwable, remotely activated. Vision-blocking zone (7s duration). Plays audio cue on enemy entry/exit. Does not slow. |
| Spycam | Signature | Free | 1 | Recall: 15s (Requires LoS/Proximity) Destroyed: 45s |
Placeable camera (1HP). Remotely viewable. Fires marking dart (reveals static image every 2s). Looping audio when actively watched. |
| Neural Theft | Ultimate | 7 Ult Points | 1 | N/A | Use on enemy corpse (18m range). Reveals all living enemies twice (4s delay between pings). No corpse timer. Cast completes if Cypher dies. |
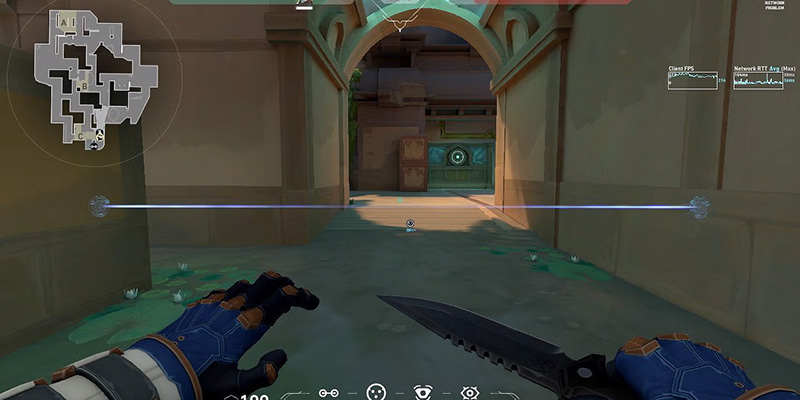
Trapwire (C): The Unseen Snare
Mechanics: Cypher equips and places this destructible (20HP), covert tripwire between two surfaces up to 15 meters apart. It remains hidden until an enemy approaches closely. When triggered, it tethers the enemy, revealing their outline after a 0.5-second windup, and applying a 1.25-second daze (slow) if not destroyed quickly. The wire takes 2 seconds to re-arm after being triggered. Importantly, Trapwires can be picked up and redeployed before they are triggered, but become permanent once activated. They are not triggered by enemy utility like Sova Drones or Killjoy Turrets.
Placement Principles: Ideal locations include chokepoints, common flank routes, and site entryways. Placement height is critical; placing the wire at head-height while crouching generally prevents enemies from jumping over or crouching under it, making it unavoidable without utility or destruction. Avoid highly predictable, common spots that enemies pre-fire or clear with utility. The increased health (from 1HP to 20HP) offers some resilience against accidental destruction from stray bullets or minor area-of-effect damage, though many damaging abilities still break it.
Strategic Use: Trapwires serve multiple purposes: pure information gathering (even a destroyed wire confirms enemy presence), setting up kills (especially potent when combined with Cyber Cages), delaying enemy pushes by forcing them to stop and destroy the wire, and securing sites post-plant.
Cyber Cage (Q): The Controlled Blind
Mechanics: Cypher tosses a device that can be remotely activated (even through walls) to create a cylindrical vision-blocking zone lasting 7 seconds. A distinct audio cue plays whenever an enemy enters or passes through the cage, providing valuable sound intel. Each cage costs 100 Credits, with a maximum of two charges. Crucially, Cyber Cages no longer slow enemies. They can only be picked up and redeployed during the buy phase.
Placement Principles: Cages excel at blocking sightlines at entry points and chokepoints, covering pushes or retreats. They are essential for creating one-way vision angles; placing the cage emitter high allows players to see enemy feet beneath the cage while remaining obscured. They can be deployed on elevated surfaces or even through walls. "Corner cages" involve placing a cage to obscure a corner, allowing Cypher to hide nearby for an ambush.
Strategic Use: Primary uses include blocking vision like a standard smoke, enabling one-way advantages, concealing Trapwires from view, providing temporary cover for planting or defusing the spike, isolating fights by cutting off angles, creating safe passage across dangerous sightlines, and gathering audio intelligence via the entry/exit sound cue.
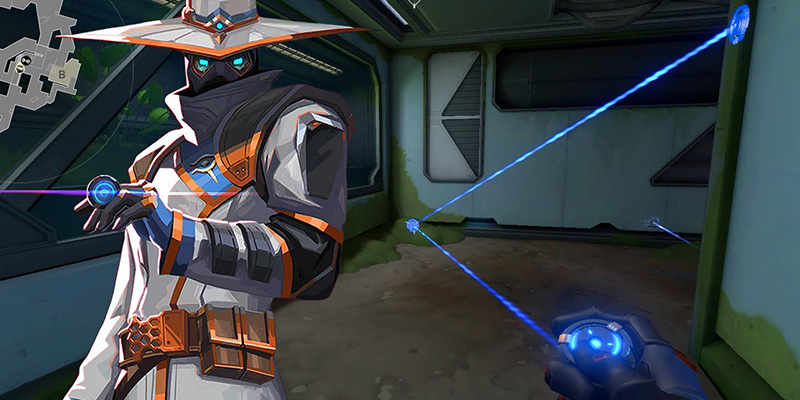
Spycam (E): The All-Seeing Eye
Mechanics: Cypher's signature ability allows him to place a camera (1HP) on most surfaces. He can remotely access the camera's view and fire a marking dart. This dart, upon hitting an enemy, periodically reveals their location as static snapshots (every 2 seconds) until the dart is manually removed by the tagged player. The Spycam is free, with one charge per round. It has two distinct cooldowns: a short 15 seconds if Cypher manually recalls it (requiring proximity and line of sight), and a lengthy 45 seconds if it's destroyed by enemies. A crucial mechanic is the looping audio cue that enemies hear when Cypher is actively watching them through the camera. The Spycam is immune to damage from allies.
Placement Principles: Effective camera placement is paramount due to the punishing 45-second cooldown if destroyed. Prioritize high ground for wider fields of view, hidden or unconventional spots that enemies won't immediately check, locations covering key chokepoints, rotation paths, or potential flank routes, dedicated retake positions, and offensive placements for clearing angles or gathering early intel.
Strategic Use: The Spycam is Cypher's primary information-gathering tool. Use it to safely clear angles, watch for flanks, provide overwatch during post-plant scenarios, and set up plays by tagging key enemies with the marking dart. Clear and timely communication of camera intel is vital.
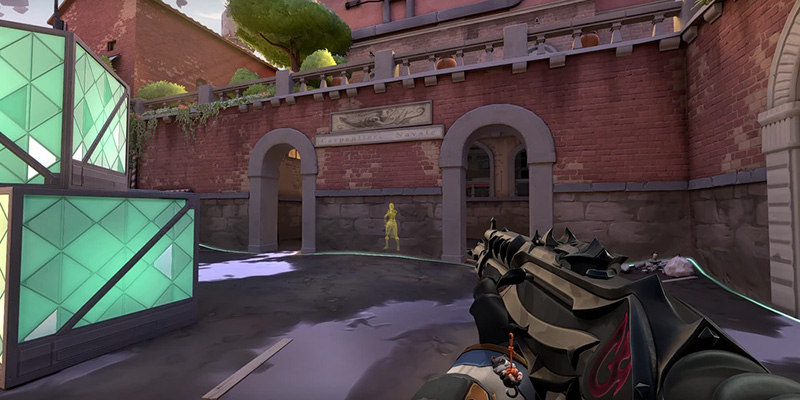
Neural Theft (X): The Ultimate Revelation
Mechanics: Cypher's ultimate ability, Neural Theft, costs 7 Ultimate Points. It is activated by targeting an enemy corpse within an 18-meter radius. Upon activation, it instantly reveals the locations of all living enemy players as static snapshots on the map and minimap. This reveal occurs twice, with a 4-second delay between the two pings. There is no longer a time limit on how recently the enemy must have died. A significant quality-of-life improvement ensures the cast completes and the reveals occur even if Cypher is killed immediately after activating the ultimate.
Strategic Use: Neural Theft provides unparalleled global information, making it invaluable for mid-round decision-making. Use it to confirm enemy positions before committing to a site push or retake, identify and counter lurkers, or make informed rotation calls based on the enemy team's spread. Its value is maximized when used earlier in a round when more enemies are alive. The intel gained can be powerfully combined with ultimates from agents like Sova. However, players must be cautious, as using the ultimate requires exposing oneself near an enemy corpse, potentially revealing their own position to attentive opponents.
Mastering the Cypher Playstyle: Core Strategies
Excelling as Cypher involves more than just placing utility; it requires a deep understanding of information flow, map control, and strategic adaptation.
The Art of Information: Proactive vs. Reactive Intel
Cypher's gameplay revolves around managing information. This can be broken down into two approaches:
- Proactive Intel: This involves setting up utility before enemy contact to gain early warnings or insights. Examples include placing Spycams to watch common initial pushes or default positions at the start of a round, and deploying Trapwires across expected enemy paths or flank routes. This approach aims to anticipate enemy actions.
- Reactive Intel: This involves using utility in response to enemy actions or gathered information. Examples include activating Cyber Cages upon hearing footsteps or a tripwire trigger, using the Spycam to investigate a specific area after hearing utility usage, or deploying Neural Theft immediately following a crucial kill to understand the remaining enemy spread. This approach focuses on responding to confirmed threats or gaining clarity mid-round.
A skilled Cypher fluidly combines both proactive and reactive intel gathering throughout the round. However, the value of this information is directly tied to communication. Cypher's intel is often gathered passively or from positions isolated from the main team fight. Therefore, prompt, clear, and actionable communication is not just beneficial, but essential. Callouts should be specific: "Trip triggered B Main," "Cam sees two rotating through Mid Courtyard," "Tagged Jett pushing A Short." Vague calls lack impact. Combining voice comms with map pings enhances clarity. Informing teammates about destroyed utility (e.g., "A Main trip broken") is also crucial, as it signals a potential enemy presence and a gap in the information network. A silent Cypher, regardless of setup quality, fails to leverage his primary strength – transforming raw data into a tactical advantage for the entire team.
Anchoring Principles: Holding Your Ground
As a Sentinel, Cypher excels at anchoring – holding a specific area, typically a bombsite, and making it difficult for the enemy to take control.
Controlling Space: Cyber Cages are key for dictating enemy movement and controlling sightlines. Blocking a common angle forces enemies down less favorable paths, potentially into Trapwires or pre-aimed crosshairs. One-way cages create powerful, albeit situational, defensive angles.
Supporting Teammates: Anchoring isn't always about solo holds. Cypher supports his team by providing reliable flank security with Trapwires, using his Spycam to safely clear angles for teammates holding adjacent areas, and deploying Neural Theft for team-wide strategic information.
Defensive Fortification: Building the Web
Creating effective defensive setups requires layering utility and adapting throughout the match.
Standard Approaches: Combine abilities for greater effect, such as placing a Cyber Cage to conceal a Trapwire or positioning a Spycam to overlook tripwire locations. Cover the primary entry points to the site. Use the Spycam for early warning of enemy presence or commitment.
Adapting Mid-Round: Defense is not static. If enemies consistently bypass or destroy initial setups, Cypher must adapt. This might involve repositioning Trapwires further back on site, changing Spycam locations, or saving utility for a retake scenario. When rotating, remember to recall deployables like the Spycam (15s cooldown) or pick up untriggered Trapwires to conserve resources and utility for the new position.
Offensive Operations: The Lurking Threat
While Cypher's kit is inherently defensive, he provides significant value on attack through flank control, lurking, and post-plant security.
Secure Flanks: Cypher's most crucial role on attack is typically setting up Trapwires to watch the team's flank as they execute onto a site. Use the crouch-head-height placement principle to create "uncrossable" wires that prevent enemies from easily slipping past via jumping or crouching. Remember that Trapwires deactivate if Cypher dies, making survival paramount when holding flank.
Lurking Effectively: Cypher can exert pressure away from the main push by lurking. This involves using map knowledge and timing to catch rotating defenders off-guard. The Spycam is invaluable for gathering information safely while lurking, and Cyber Cages can be used to take space, cross dangerous angles, or create diversions. Successful lurking requires excellent game sense and timing to avoid getting caught out or arriving too late to support the team.
Post-Plant Lockdown: Once the spike is planted, Cypher transitions back into his defensive strengths. Repurpose any remaining utility to secure the site. Place Trapwires on common retake paths or chokepoints leading to the bomb. Use the Spycam to watch entry points or spot enemies attempting to defuse. Cyber Cages are excellent for blocking vision towards the spike, creating one-way angles onto the defuser, or providing cover for defenders holding the site.
Navigating Retakes: Reclaiming Lost Ground
When defending a site falls through, Cypher's utility remains valuable for retake attempts.
Information is Key: Before rushing back onto the site, leverage the Spycam for intel. Place it cautiously from a safe distance to identify enemy positions, numbers, and potential crossfires. If a friendly kill occurred on or near the site, Neural Theft can provide a complete picture of enemy locations, drastically improving the retake's chances of success.
Isolate Engagements: Cyber Cages are crucial for sectioning off the site during a retake. Throw cages onto common defender angles (like Haven Heaven, Ascent Generator, Split Rafters) or site entrances to block vision, allowing the retaking team to clear areas incrementally and avoid facing multiple angles simultaneously.
Tripwires for Post-Retake Security: As the team pushes onto the site, placing Trapwires across potential re-peek angles or flank routes can prevent defenders from easily repositioning or catching retakers off-guard.
Map Mastery: Setups & Tactics
Cypher's effectiveness varies across maps, heavily influenced by geometry that enables or hinders his setups. The following sections detail setups for the current competitive map pool (Ascent, Icebox, Sunset, Haven, Lotus, Pearl, Split), offering both beginner-friendly and advanced options.
The inherent design of certain maps significantly impacts Cypher's potential. Locations with distinct chokepoints, significant verticality, and numerous structures suitable for high or hidden utility placements (like Split's rafters, Haven's C Long structures, or Ascent's A Main arch) naturally lend themselves to more complex and effective Cypher setups, including powerful one-ways and hard-to-reach cameras. Conversely, maps with wider, more open spaces and fewer exploitable geometric features can limit options, potentially leading to more predictable or less impactful utility usage, thus affecting Cypher's overall strength on those specific battlegrounds.
Ascent
Ascent's traditional layout with distinct chokepoints offers excellent opportunities for Cypher.
Beginner: Place Trapwires across the main entrance archway and the Catwalk/Tree entrance. Position the Spycam high on the back wall or rafters for a view of A Main and Short. Use Cyber Cages reactively on the A Main arch or Tree door entrance upon detecting enemies.
Advanced: Utilize one-way Cyber Cages for A Main. Place the emitter high on the left or right side of the archway; play from behind Generator for the right-side cage or default boxes for the left-side cage. Deploy a one-way cage for the A Short door entrance, played from site. Hide a Spycam inside the Screens structure for deep A Main vision. Place a creative low Trapwire across the Generator entrance, potentially paired with wallbangs. A deeper trip inside Tree room combined with an A Main one-way and Generator cam creates a layered defense.
Beginner: Set Trapwires across the B Main entrance near the stairs/logs and across the Market entrance. Place the Spycam high above the B site arch or on the large sign overlooking B Main. Use Cyber Cages on the B Main entrance or Market door to block pushes.
Advanced: Master the B Main one-way Cyber Cage, typically thrown onto the arch ledge, playable from Stairs or CT spawn entrance. Use a diagonal Trapwire across the site (e.g., from Boathouse corner to stairs). Place a low trip covering both Lane and Boathouse entrance. Jump onto the barrels near Market to place a high Spycam on the B Main wall for a commanding view. Another option is placing the cam through the Market window from the buy phase boxes. Combine the B Main one-way, a diagonal trip, a trip covering Switch, and a Market cage for a comprehensive hold.
Mid Control: A one-way Cyber Cage can be placed on the Mid Cubby structure or Market entrance shield. Position the Spycam Top Mid overlooking Courtyard and Catwalk. Place a Trapwire across Mid Bottom near the Market entrance.
Attack:
- Flank Watch: Trip Mid Link towards B, Trip A Main towards spawn.
- Intel: Cam Top Mid for rotation info. Cam jump-placed on A site box clears Heaven. Cam through B window clears Market/CT/Logs.
- Execute/Post-Plant: Cages block A Heaven/Generator. Cages block B Market/Stairs. Post-plant trip across A Main door prevents easy retake entry.
Icebox
Icebox's verticality and multiple angles require careful utility placement.
Beginner: Tripwire across the main ramp entrance from attackers' side. Tripwire across the Pipes exit onto site. Spycam placed high on rafters or back site wall overlooking the site. Cages used reactively on ramp or Pipes exit.
Advanced: Hide Trapwires inside the destructible boxes near Belt or Pipes for surprise triggers. Place Spycam on the railing above Belt watching the push and site. Alternatively, place cam behind the central pillar for site control. Deploy double Cyber Cages on Screens structure to block vision from Belt and Nest. A setup could involve hidden box trips, the pillar cam, and screen cages for a layered defense.
Beginner: Tripwire across the main B entrance near Yellow box. Tripwire covering the Kitchen or Tube exit. Spycam placed high on the back wall or near Snowman overlooking the site. Cages used on the main entrance or Kitchen exit.
Advanced: Place a Trapwire across the default plant spot behind the lower site box (potential for wallbangs through the box). Place a trip deep in Kitchen watching for Tube lurks. Position Spycam high near the Tube exit looking towards site and Yellow. Jump-throw a cam onto the high roof structure for a wide overview. A potential setup combines the Kitchen trip, a Yellow entrance trip, the high roof cam, and double cages for entry denial.
Mid Control: Spycam placed to watch Boiler entrance and Tube exit. Trapwire across Tube passage.
Attack:
- Flank Watch: Trips placed in Kitchen or near Snowpile watching Mid/Spawn rotates.
- Intel: Attack cam clearing close angles on A site or Pipes exit. Attack cam clearing close angles B site or behind Green container. Attack cam Mid watching Window/Boiler.
- Execute/Post-Plant: Utilize cages to block common angles like Nest, Rafters (A), or Snowman, Backsite (B). Post-plant setups focus on watching defuses with cam and using trips on entry points.
Sunset
Sunset's traditional layout with a crucial Mid area benefits from Cypher's control.
Beginner: Tripwire across the A Main entrance arch. Tripwire across the A Link/Elbow entrance. Spycam placed high in a back corner watching both Main and Elbow. Cages used reactively on entrances.
Advanced: Place Spycam in the A Main window pre-round for very early info (recall immediately after). A high cam on the back site wall offers good coverage. Place a creative low Trapwire across the Elbow entrance, harder to spot. A vertical trip near the A Main light fixture can catch dashing agents. Combine the low Elbow trip with a standard Main trip and a strategic cam.
Beginner: Tripwire across the B Main archway. Tripwire across the Market entrance. Spycam placed high on the back wall or central pillar. Cages used reactively on entrances.
Advanced: Utilize the "unbreakable" Trapwire placed low on the wooden box under the B Main arch; this trip often requires utility or triggering it to pass. Deploy a one-way Cyber Cage for the B Main arch, often thrown onto the arch itself. Place Spycam high on the Market sign structure. A deep B Main cam provides later info. Combine the unbreakable trip with the one-way cage and a Market-watching cam for a strong hold.
Mid Control: Spycam placed high overlooking Mid Top and Tiles. A teammate boost might be required for the "god cam" spot on A site box overlooking Mid. Place a Trapwire across Mid Bottom near Tiles entrance.
Attack:
- Flank Watch: Trip A Link towards Mid. Trip B Market towards Mid. Use crouch head-height placement.
- Intel: Attack cam in A Main window. Attack cam in B Main window.
- Execute/Post-Plant: Post-plant one-way cage for A site default plant (bounce off pipe crack near Elbow). Post-plant one-way cage for B site pillar plant (bounce off roof structure). Another B site one-way for back wall plant (lineup using HUD elements).
Haven
Haven's three sites demand strategic utility distribution and map awareness.
Beginner: Tripwire across A Long entrance. Tripwire across A Short entrance tunnel. Spycam placed high back site or in Heaven overlooking site. Cages used reactively on Long/Short entrances.
Advanced: Utilize one-way Cyber Cages for A Long (multiple lineup variations exist, often involving bouncing off walls/roofs). Deploy one-way cages for A Short entrance. A risky Spycam can be placed outside the A Tower window on the rocks, but it's vulnerable and potentially exploitable. A safer alternative is the cam on the A Long lightbulb fixture. Place a deep Trapwire in A Short near the connector. Combine a Long one-way, a Short trip, and a standard backsite cam.
Beginner: Place Trapwires across the Mid Window entrance and the Mid Doors entrance. Position Spycam high above B site overlooking the area. Use Cages reactively on entrances.
Advanced: Place Spycam on the Mid Window ledge watching the Doors approach. Deploy deep Trapwires inside Mid Doors to catch pushes earlier.
Beginner: Tripwire across C Long entrance. Tripwire across the Garage window or door entrance. Spycam placed high back site or on the logs structure. Cages used reactively on entrances.
Advanced: Deploy a one-way Cyber Cage for C Long push. Utilize a one-way cage for the Garage door entrance (requires a lineup, often thrown from back site). Place a Trapwire across the Garage window. A deep C Long trip, potentially placed from the green boxes to the far wall, can be very hard to break without triggering. Place Spycam on the wood above the back platform. Combine the Garage one-way, a Long trip, and a high cam for a robust defense.
Attack:
- Flank Watch: Trip Garage watching Mid. Trip C Link watching Mid. Trip A Link watching Mid.
- Intel: Attack cam clearing A Short. Attack cam clearing Garage. Attack cam clearing C Long.
- Execute/Post-Plant: Post-plant one-way cage for A site default (bounce off roof near entrance). Post-plant one-way cages for C site (plant under wood, bounce off roof; plant back site, lineup bounce). Attack one-way cage for Mid Doors push (lineup needed). Cages can block C Long or Logs during C execute. Cage can block A Short door during A execute.
Lotus
Lotus's rotating doors and multiple pathways offer unique challenges and opportunities.
Beginner: Tripwire across A Main entrance. Tripwire across Tree/Stairs entrance. Spycam placed high back site or on the central pillar. Cages used reactively on entrances.
Advanced: Place Spycam high on the A Main pillar for early info. Deploy a deep Trapwire inside Tree room. A one-way Cyber Cage for A Main push can be effective but requires a specific lineup. Combine the pillar cam, Tree trip, and Main trip for site control.
Beginner: Tripwire across B Main entrance. Tripwire across C Link entrance (near door). Spycam placed high back site. Cages used reactively on entrances.
Advanced: Place Spycam high watching the B Main push. Utilize creative Trapwires around the central structure and boxes.
Beginner: Tripwire across C Main entrance. Tripwire across Mound entrance. Spycam placed high back site or above Mound overlooking site. Cages used reactively on entrances.
Advanced: Utilize a one-way Cyber Cage for C Main push (requires lineup). Jump-throw Spycam onto the high wall near Waterfall watching Mound and site entrance. Place creative trips on the stairs or around the central pillar. Combine the C Main one-way with the high wall cam for strong control.
Attack:
- Flank Watch: Trip A Link/Rubble. Trip B Door/Link. Trip C Mound/Link. Use crouch head-height placement.
- Intel: Attack cam high on A pillar. Attack cam on B site wall clear. Attack cam on C site wall clear/Stairs. Use early round info cams in A or C Main quickly.
- Execute/Post-Plant: Post-plant one-way cage for A site corner plant (lineup using HUD). Post-plant one-way cage for C site wall plant (bounce off lip above). Post-plant one-way for C Mound plant (lineup using HUD).
Pearl
Pearl's straightforward layout emphasizes mid-control and well-placed utility.
Beginner: Tripwire across A Main entrance. Tripwire across Dugout/Secret entrance. Spycam placed high back site or near Flowers overlooking Main. Cages used reactively on entrances.
Advanced: Place a deep Trapwire in A Main. Hide a trip behind the Flowers box. Position Spycam high in Flowers watching Main and Dugout. Combine deep trips with the Flowers cam and a reactive cage.
Beginner: Tripwire across B Long entrance. Tripwire across B Link/Tower entrance. Spycam placed high back site or in Tower overlooking site. Cages used reactively on entrances.
Advanced: Utilize a one-way Cyber Cage for B Long (requires lineup). Jump-throw Spycam onto the B Link roof structure for info. Place a trip across the Hall entrance. Combine the Long one-way, Hall trip, and a high back site cam.
Mid Control: Spycam placed watching Mid Doors and Connector. Trapwire across Art or Connector entrance.
Attack:
- Flank Watch: Trip A Link towards Mid. Trip B Link towards Mid. Use crouch head-height placement.
- Intel: Attack cam clearing A Main. Attack cam clearing Mid Doors. Attack cam clearing B Long.
- Execute/Post-Plant: Use cages to block common angles like Flowers, Secret (A) or Tower, Hall (B). Post-plant requires creative tripwires to catch defusers or delay retakes. Cam placed near spike can spot defuses through smokes.
Split
Split's verticality and distinct choke points make it a strong map for Cypher.
Beginner: Tripwire across A Main entrance. Tripwire across Ramps/Screens entrance. Spycam placed high in Rafters or back site overlooking site. Cages used reactively on entrances.
Advanced: Deploy a one-way Cyber Cage for Ramps push. Place Spycam high in A Tower for extensive vision. Jump-throw a Spycam onto the A Main wall from Rafters. Combine the Ramps cage, Tower cam, and a Main trip for a solid hold.
Beginner: Tripwire across B Main (Garage) entrance. Tripwire across Mid/Vent entrance. Spycam placed high in Rafters or back site. Cages used reactively on entrances.
Advanced: Master the B Main one-way Cyber Cage: hug the back wall near Heaven, look up at the highest horizontal beam, and throw. Place a Trapwire across the stairs in B Heaven; this is difficult to break without exposure, especially if Mid is smoked. Place a trip across the default plant spot. Jump onto the box in Rafters and place the Spycam high on the roof overlooking B Main and Mid push. A standard setup combines the B Main one-way, the Heaven stairs trip, and the roof cam.
Mid Control: Spycam placed low in the back of B Heaven can watch Mid pushes around the corner. Place a Trapwire across the Mail room entrance.
Attack:
- Flank Watch: Trip Sewers watching Mid. Trip A Main watching Spawn. Use crouch head-height placement.
- Intel: Attack cam jump-thrown onto A site wall from A lobby boxes. Attack cam peeking Mid watches Mail/Vent. Attack cam peeking B Main clears close angles.
- Execute/Post-Plant: Cage on A Ramps provides cover for site take. Cages block B Heaven or CT angles during B execute. Post-plant cam placed near spike is crucial for watching defuses, especially paired with cages.
Advanced Tactics & Synergies
Beyond basic setups, advanced techniques and team coordination unlock Cypher's full potential.
Layering Utility: Creating Death Zones
Combining Cypher's abilities creates setups far more potent than individual placements.
Spycam + Trapwire/Cyber Cage: Positioning a Spycam with a view of your traps allows for confirmation and follow-up. If a tripwire is triggered or an enemy enters a cage, the cam can be used to tag the enemy with a marking dart, providing persistent location information for the entire team. This allows for safer peeks or coordinated pushes onto the revealed target.
Multiple Tripwires: Using both Trapwires in proximity can create layered defenses or cover multiple angles of approach simultaneously. This forces enemies to clear multiple threats sequentially, increasing delay and potential for error.
One-Way Cage Mastery: Pixel-Perfect Deception
One-way cages are a powerful, albeit advanced, tool in Cypher's arsenal.
Principles: The concept relies on placing the Cyber Cage emitter high enough that a gap exists between the bottom edge of the activated cage and the ground. This allows players positioned correctly (usually further back or at a specific angle) to see the feet or lower legs of enemies walking through the choke point, while the enemies cannot see the player through the cage. Consistent execution requires learning specific, often pixel-perfect, lineups for different locations across maps.
Execution & Counterplay: Mastering one-ways necessitates practice in custom games to ensure consistent placement and understanding the required positioning to exploit the angle. Players must be aware of potential counters: enemies may spam bullets through the cage, use utility like flashes or damaging abilities to flush out the holder, or simply push through quickly, minimizing the time spent vulnerable. Over-reliance on the same one-way setups makes Cypher predictable and easily countered. While extremely potent when executed correctly and unexpectedly, one-ways demand precision and carry inherent risks. A slightly misplaced cage can fail to provide the one-way effect or even disadvantage the Cypher player. They are best employed situationally as part of a varied defensive toolkit, rather than being the sole strategy.
Creative Tripwire Philosophy: Beyond the Obvious
To combat predictability, Cypher players must think creatively about Trapwire placement.
Kill Trips vs. Info Trips: Decide the purpose of the wire. Place trips deeper within a site or in tight corridors where triggering them leaves enemies highly vulnerable for a kill setup. Alternatively, place wires further out on flanks or entryways purely for early warning information; their destruction is still valuable intel.
"Unbreakable" Trips: Identify map locations where geometry forces enemies to either trigger the wire or expend significant utility to destroy it (e.g., the low trip under the arch on Sunset B Main). These provide highly reliable information or force resource expenditure.
Baiting Utility: Intentionally place a trip in a very common, predictable spot for one round. Enemies may waste utility like Sova darts or Raze grenades clearing it. If you see the utility coming, quickly pick up the trip (if possible) and reposition it elsewhere for the next round, gaining a resource advantage.
Agent Synergies: The Information Network
Cypher's information and control abilities are amplified when coordinated with specific teammates. His intel often requires follow-up from others to translate into map control or eliminations.
| Partner Agent | Synergistic Abilities | How to Execute Combo | Strategic Value |
|---|---|---|---|
| Sova | Neural Theft + Hunter's Fury | Cypher uses Ult, communicates locations; Sova fires Ult at revealed targets. | High-impact kill potential across map on revealed enemies. |
| Sova / Fade | Spycam/Tripwire + Recon Bolt/Haunt | Cypher gets initial contact/tag; Initiator uses recon to confirm numbers/positions. | Layered information gathering, confirming threats. |
| Brimstone / Omen | Cyber Cage + Sky Smoke/Dark Cover | Layer cage and smokes on chokepoints or during executes. | Extended/wider vision denial, safer passage/holds. |
| Breach / Skye | Tripwire/Cam Info + Flashpoint/Guiding Light/Fault Line/Trailblazer | Cypher calls contact/reveal; Initiator uses flash/stun/concuss on location. | Capitalize on revealed/trapped enemies, secure kills. |
| Raze / Jett | Spycam Dart/Trip Reveal + Aggression | Cypher reveals/tags target; Duelist uses mobility/damage to push aggressively. | Secure kills on vulnerable/tagged targets. |
| Killjoy | Trapwire/Spycam + Turret/Nanoswarm | Layer defensive utility on site (e.g., Turret watches area, trip covers angle). | Extremely strong site lockdown, forces massive utility investment. |
| Clove | Cyber Cage + Meddle/Pick-Me-Up | Place trip inside Clove smoke; use cage defensively while Clove plays aggressively. | Unexpected traps, cage provides fallback/stall for Clove. |
With Controllers (Omen, Brimstone, Viper, Harbor, Clove): Layering Cypher's Cages with Controller smokes creates larger, longer-lasting areas of vision denial, excellent for executes or holding sites. Controller utility can also funnel enemies towards Cypher's Trapwires. Combining Clove's decay (Meddle) with a Trapwire inside her smoke can be lethal. Harbor's Cove ability can potentially elevate Cyber Cages.
With Duelists (Jett, Raze, Neon, Yoru): Information from Spycam darts or Trapwire reveals allows aggressive Duelists to push and secure kills on known targets. Cages can provide temporary cover for Duelist entries or escapes. However, high-mobility agents like Jett, Raze, Neon, and Yoru can easily bypass Trapwires using their movement abilities, representing a counter-synergy on defense.
With Initiators (Sova, Breach, Skye, KAY/O, Fade, Gekko): This is often Cypher's strongest synergy category. Neural Theft combined with global ultimates like Sova's Hunter's Fury is devastating. Initiator recon utility (Sova Drone, Skye Dog, Fade Prowler, Gekko Wingman) can safely trigger traps or clear areas before Cypher exposes himself. Flashes and stuns from Breach or Skye allow the team to capitalize immediately on enemies revealed by Cypher's utility. Sova and Fade's recon abilities help plan defensive setups or confirm information gathered by Cypher.
With Sentinels (Killjoy, Sage, Chamber, Deadlock): Combining Cypher's traps with Killjoy's Turret and Nanoswarm can create nearly impenetrable site holds, forcing attackers to expend massive amounts of utility. Sage's Barrier Orb can block pathways, funneling enemies into Cypher's setups, or provide elevated platforms for Cages or Spycams. Chamber's teleport can bypass trips, and his faster-paced style may not always align with Cypher's slower, more methodical approach.
Resource Management: Cypher's Economy
Effective economy management is crucial in Valorant, and Cypher's relatively inexpensive kit offers unique advantages and considerations.
Utility Costs & Prioritization
- Trapwire: 200 Credits each (Max 2 = 400 Creds).
- Cyber Cage: 100 Credits each (Max 2 = 200 Creds).
- Spycam: Free (Signature Ability).
- Neural Theft: 7 Ultimate Points.
The total cost for Cypher's purchasable utility (2 Trips, 2 Cages) is 600 Credits. This is relatively low compared to agents with expensive signature abilities or costly basic charges (e.g., Sage's 400c Barrier Orb, Raze's 200c Blast Packs).
Buy Strategy Considerations
Bonus Round (After Win): If the team won the pistol round, typically avoid buying expensive rifles like the Vandal or Phantom. Opt for an SMG (Spectre) or Shotgun (Judge), Light Shields, and replenish full utility. Coordinate with the team; if most are saving, forcing a better weapon might be detrimental.
Eco Round (After Loss): The primary goal is to save credits for a full buy in the subsequent round. Spending should be minimal. If Trapwires or Cages survived the previous round, they remain available. Focus on securing kills with cheaper weapons (like the Classic or a saved sidearm) to damage the enemy economy or planting the spike for the 300-credit team bonus. Surviving a lost round grants only 1000 credits, so dying is often economically preferable unless holding expensive gear. Loss bonuses increase with consecutive losses (1900 -> 2400 -> 2900 max).
Force Buy: When the team decides to buy non-optimal gear despite low funds, Cypher can always contribute his full 600-credit utility suite plus a mid-tier weapon like a Spectre, Bulldog, or Judge, and potentially Light Shields. Team coordination is key for force buys.
Full Buy: The standard goal. Prioritize a primary rifle (Vandal/Phantom - 2900 Creds), Heavy Shields (1000 Creds), and Cypher's full utility (600 Creds). This typically costs around 4500-4900 Credits. Cypher's relatively low utility cost makes achieving a full buy slightly easier compared to agents with more expensive kits.
Adapting Economy Based on Game State
Enemy Economy: Consider what the opponents can afford. If they are likely on an eco or force buy with SMGs/Shotguns, the extra 25 HP from Heavy Shields (1000 Creds) might be more valuable than Light Shields (400 Creds), as it could survive an extra bullet. Against full buys with Vandals, the value of Heavy Shields diminishes slightly, making Light Shields a more efficient purchase if credits are tight. Also factor in enemy abilities that deal chip damage (grenades, mollies), which make Heavy Shields more impactful.
Utility Management: Don't waste credits buying full utility every round if consistently losing or if setups are being instantly destroyed. Adapt spending based on effectiveness. Remember to pick up untriggered Trapwires when rotating or if a setup is compromised to save 200 Credits for the next round. Since Cages can only be picked up during the buy phase, their placement requires more commitment.
Credit Cap & Sharing: The maximum credits a player can hold is 9000. If nearing this cap while teammates are low on funds, purchase weapons for them to avoid wasting potential earnings.
Avoiding Pitfalls: Common Cypher Mistakes
Even experienced players can fall into common traps when playing Cypher. Recognizing and correcting these mistakes is key to consistent performance.
Fix: Constant variation is essential. Rotate between several different cam spots per site. Mix up tripwire heights (low, crouch-head, standing-head) and placements (deep vs. shallow, diagonal vs. horizontal). Use different cage setups, including standard vision blocks, one-ways, and tripwire concealment. Switch the site you primarily defend every few rounds to keep the enemy guessing. Observe how enemies react to your setups and adapt accordingly. Have backup setups prepared.
Spycam Mismanagement
Placing the camera in obvious locations where it gets instantly destroyed wastes the ability due to the long 45s cooldown. Conversely, being too passive and never using the camera for fear of it being destroyed negates its value. Sitting in the camera view for extended periods leaves Cypher extremely vulnerable to being pushed. Missing marking darts or tagging low-impact targets reduces the dart's effectiveness. Failing to recall the camera when rotating or after getting information unnecessarily risks the longer cooldown. Forgetting that enemies hear an audio cue when being actively watched can give away your attention.
Fix: Prioritize camera survivability by using hidden or elevated spots. Use brief "peeks" with the camera to gather info, then exit the view. Recall the camera whenever safely possible. Practice dart accuracy and prioritize tagging enemies initiating a push or holding critical angles. Be acutely aware of your physical surroundings before entering the camera view. Use the audio cue strategically – sometimes a quick look is enough without alerting the enemy for too long.
Tripwire Troubles
Placing wires at heights that can be easily jumped over (too low) or crouched under (too high) negates their purpose. Setting them in locations easily bypassed by agents with high mobility (Jett dash, Raze satchel, Yoru TP) without alternative coverage. Placing them too far forward where they can be shot from safety without the enemy committing. Not considering enemy utility like Sova drones, Skye dogs, or Raze Boombots that can trigger or destroy wires prematurely. Forgetting that all active Trapwires deactivate upon Cypher's death is a critical mistake, especially when relying on them for flank security on attack.
Fix: Learn the optimal crouch head-height placement for unavoidable flank wires. Vary heights on site defense based on expected threats. Place wires deeper into sites to force enemy commitment. Conceal wires with cages or place endpoints behind cover. Prioritize staying alive when holding flank watch on attack.
Cyber Cage Errors
Activating cages too early (wasting duration) or too late (failing to block vision or get value). Inconsistent one-way lineups that don't work or expose the player. Placing cages in ways that unnecessarily obstruct teammate vision or movement. Ignoring the valuable audio cue intel provided when enemies pass through the cage. Forgetting that cages cannot be picked up mid-round and must be placed thoughtfully. Using both cages defensively early in the round, leaving no utility for retake situations or flexible mid-round plays.
Fix: Practice one-way lineups until consistent. Activate cages based on specific triggers (sound cues, tripwire activation, teammate calls). Communicate cage usage clearly ("Caging B Main"). Listen attentively for the entry/exit audio cue. Plan cage deployment – consider saving one for retake or post-plant scenarios.
Fix: Develop clear, concise, and immediate communication habits. Use standard map callouts. Specify the location and number of enemies seen/heard. Announce triggered or broken trips instantly. Call out Spycam tags and locations.
Failure to Adapt
Rigidly sticking to a pre-planned setup even when it's clearly being countered round after round. Not adjusting strategy based on the enemy team's composition (e.g., playing standard trips against multiple mobility agents) or their observed tactics.
Fix: Treat each round as a new puzzle. Analyze why setups are failing. Identify how the enemy is countering you. Have multiple setups and strategies prepared for each site and adapt based on the flow of the game. Be flexible enough to change roles if needed, such as shifting from a hard anchor to a retake support player.
Conclusion: Become the Ultimate Information Broker
Cypher offers a unique and rewarding playstyle centered on intelligence and control. His capacity to gather information passively through his Spycam and Trapwires, combined with the area denial potential of his Cyber Cages and the global reveal of Neural Theft, makes him an unparalleled agent for dictating the flow of a round. When played effectively, he can lock down sites, secure flanks, and provide his team with the critical knowledge needed to outmaneuver opponents.
However, reaching Cypher's highest potential requires significant dedication. Mastery hinges not just on learning ability mechanics, but on developing deep map knowledge, sharp strategic acumen, constant adaptation, and clear communication. The burden of processing information and the threat of predictability demand a thoughtful and ever-evolving approach to the game.
Players seeking to excel with Cypher should embrace the learning process. Continuously experiment with new setups, analyze personal gameplay to identify weaknesses, study how higher-level players utilize his kit, and adapt strategies based on the opponent and the changing meta. By committing to this path of refinement, a Cypher player transcends the role of a simple defender, becoming a true strategic mastermind – the ultimate information broker who ensures that while enemies can run, they can never truly hide.