
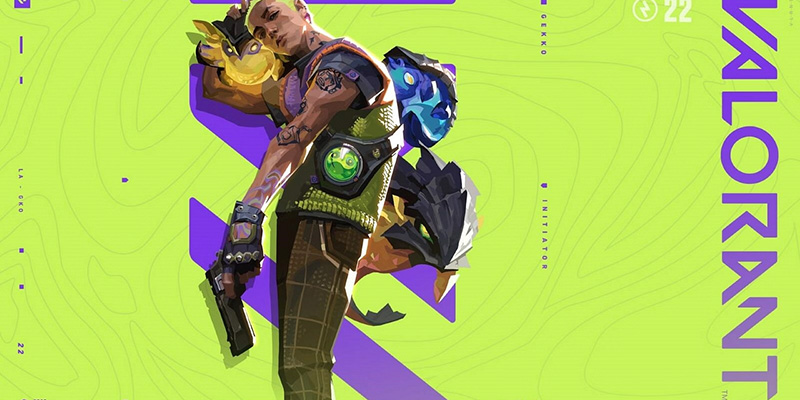
Welcome to the definitive guide to mastering Gekko, Valorant's Creature Commander. This comprehensive resource will cover everything from his unique background to advanced techniques used by professional players. Whether you're just starting with Gekko or looking to refine your gameplay, this guide has you covered.
Introduction: Meet Gekko, the Creature Commander
Gekko's Angeleno Roots and Background
Valorant Protocol welcomed its 22nd agent and sixth Initiator, Gekko, real name Mateo, on March 7, 2023. Hailing from the vibrant streets of East Los Angeles, California, Gekko brings a unique cultural blend and a distinctive playstyle centered around his crew of "calamitous creatures". Narrative developers intentionally crafted Gekko as a first-generation character, embodying the experience of navigating two worlds: the rich cultural heritage of his Mexican-American parents and the dynamic influences of his Angeleno hometown. This background is reflected in his visual design, which incorporates a skater/punk aesthetic complete with a skateboard and graffiti-inspired elements, capturing the essence of East LA. His agent trailer offers glimpses into his family life, showcasing this cultural fusion.
Authenticity extends to his voice, provided by Alejandro Antonio Ruiz, himself an East LA native who voices Gekko in both English and Spanish. While concrete details about Gekko's past remain somewhat limited upon his release, intriguing connections exist. He shares a notably close, potentially mentor-like relationship with Reyna, an agent known for her guarded nature. Furthermore, lore hints suggest past entanglements with the Kingdom Corporation, possibly related to how he acquired his creature companions, Wingman, Dizzy, Mosh, and Thrash. An email referenced in the game suggests he may have stolen them from Kingdom. This backstory, combined with his described personality – supportive, relaxed, and team-oriented – subtly informs his gameplay role. He isn't a lone wolf; his strength lies in coordinating his creature crew, much like navigating the diverse influences of his upbringing, emphasizing collaboration and the collective power of his team.
Role as an Initiator: Setting Up the Team
Within Valorant's tactical landscape, Initiators are crucial for breaking defensive setups and paving the way for their team. Their primary function involves challenging angles, gathering information, displacing defenders, and creating openings for Duelists to secure entry onto contested sites. Gekko fulfills this role through his unique creature-based abilities.
Gekko operates as a highly versatile Initiator. He can facilitate aggressive site takes by sending his creatures first, clearing space and applying pressure. He also excels in supportive actions, gathering intelligence and enabling objective play like planting or defusing the Spike with Wingman. Typically, Gekko players position themselves slightly behind their entry Duelists, using their abilities to clear paths and set up favorable engagements for the team.
Unique Playstyle: The Power of the Pack and Reclamation
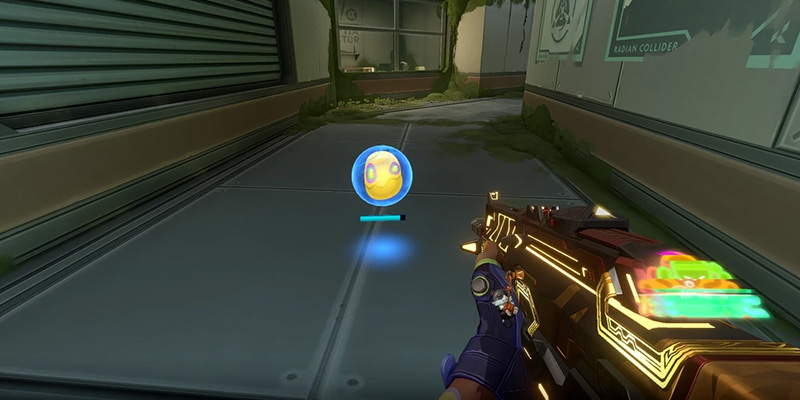
Gekko's defining gameplay element is his command over a tight-knit crew of creatures: Wingman, Dizzy, Mosh, and Thrash. This "power of the pack" approach is augmented by his passive ability, Globules, which introduces the core mechanic of creature reclamation. After Wingman, Dizzy, or Thrash expire or complete their function, they revert into a dormant globule. Gekko can interact with these globules to reclaim the ability charge after a short cooldown (10 seconds), allowing for multiple uses within a single round. Note that Thrash can only be reclaimed once per ultimate use, and Mosh Pit is not reclaimable.
This reclamation mechanic represents a fundamental shift from Valorant's typical ability economy, where most agents have fixed charges per round. Gekko's potential for ability reuse introduces unique gameplay loops and strategic considerations. It allows for sustained pressure, enabling Gekko to use utility early for map control, retrieve it, and still have abilities available for later site executes or crucial post-plant scenarios. This creates a dynamic "stop-and-start" tempo during rounds, forcing opponents to track Gekko's potential utility differently than other agents. Mastering Gekko, therefore, involves not just understanding how to use each creature, but strategically deciding when and where to deploy them to ensure safe reclamation, adding a significant layer of depth compared to agents with single-use abilities. Success hinges on map control, positional awareness, and calculated risk-taking to maximize the value derived from this unique passive.
Gekko's Creature Crew: Ability Deep Dive
Understanding each member of Gekko's crew is paramount to mastering the agent. Each creature serves distinct functions, and their effectiveness is amplified by the potential for reclamation.
Wingman (Q): The Versatile Sidekick
Mechanics & Stats:
Wingman is purchased for 300 credits and Gekko holds one charge per round. This creature possesses 80 Health Points (HP), reduced from an initial 100 HP. When deployed (FIRE), Wingman travels forward, capable of bouncing off walls, actively seeking enemies within a 65-degree frontal cone (increased from 45 degrees). Upon visually detecting an enemy, Wingman accelerates, takes the shortest path (discerning Yoru decoys), and leaps to unleash a concussive blast. The concussion effect is significant, comparable in duration to Raze's pre-nerf Boombot, though the exact time isn't specified. Wingman provides audio cues when nearing an enemy. If destroyed or after completing its task, Wingman reverts to a reclaimable globule with a 10-second cooldown upon pickup.
Objective Play (Plant/Defuse):
Wingman's standout feature is its ALT FIRE functionality. If Gekko possesses the Spike, he can target a Spike site, and Wingman will autonomously run to that location and plant the Spike. Conversely, if the Spike is planted, Gekko can target it with ALT FIRE, and Wingman will attempt to defuse it. This interaction occurs even if Gekko is eliminated after deployment. However, Wingman is vulnerable during these actions; taking damage (down to 0 HP) or being displaced by enemy abilities will interrupt the plant/defuse and turn it into a globule. This objective capability makes Wingman invaluable in post-plant and retake scenarios, particularly in clutch situations where it can force enemy reactions.
Tactical Uses:
Beyond objective play, Wingman serves as a potent information-gathering tool, akin to Raze's Boombot or Skye's Trailblazer, scouting ahead and revealing enemy presence through audio cues or by drawing fire. It excels at clearing tight corners and close angles that are risky to peek directly. Its primary concussive blast is effective for initiating pushes, stunning defenders holding angles, and setting up teammates for easier kills. A tactical approach involves using Wingman as bait; forcing opponents to shoot it can create opportunities for teammates to peek while the enemy's crosshair is displaced.
Wingman's dual nature—offering both initiation utility and objective interaction—is its core strength. However, this versatility presents a strategic challenge. The temptation to use the unique plant/defuse function is strong, but deploying Wingman for this purpose without adequate site control or protection is a frequent error among developing Gekko players. Since Wingman is fragile (80 HP), sending it into an unsecured area often results in its destruction and potentially handing the Spike over to the enemy team. Effective Wingman usage demands situational awareness. Players must evaluate whether the immediate value of information or a stun outweighs the potential, yet riskier, payoff of an autonomous plant or defuse. Mastering this decision-making process, and reserving the objective function for strategically sound moments (e.g., post-execute, clutch scenarios, with cover), is key to unlocking Wingman's true potential.
Dizzy (E): The Blinding Scout
Mechanics & Stats:
Dizzy is Gekko's Signature Ability, meaning it's free each round with one charge. Like Wingman, Dizzy is fragile, possessing only 20 HP. Gekko throws Dizzy as a projectile that travels forward and can bounce off surfaces. After a very brief wind-up (pre-fire delay reduced to 0.35s from 0.5s), Dizzy scans for enemies within its line of sight and fires rapid plasma blasts (missile speed increased in patch 7.12). Enemies hit by the plasma are blinded for approximately 1 second. Notably, this blind also affects the enemy's minimap and cannot be avoided simply by turning away; physical cover or breaking line of sight is required. Importantly, Dizzy does not inflict friendly fire – it cannot blind teammates. Upon expiring or being destroyed, Dizzy transforms into a reclaimable globule (10s cooldown after pickup). The reclaim channel time for Dizzy was reduced to 1 second.
Information Gathering:
While primarily a flash, Dizzy is an equally potent information tool. The direction Dizzy fires its plasma reveals the precise location of sighted enemies, providing valuable intel. Furthermore, the distinct sound Dizzy makes upon blinding an enemy confirms their presence, even if line of sight is blocked. This makes Dizzy excellent for checking corners, verifying site presence before committing, scouting pushes, and clearing angles safely.
Effective Usage/Lineups:
Due to Dizzy's vulnerability (20 HP) and wind-up time, simply throwing it directly at enemies often results in it being destroyed before activation. Advanced usage focuses on mitigating these weaknesses. Throwing Dizzy high into the air increases its travel time, potentially allowing it to scan over cover, makes it a harder target, and maximizes the area scanned. Throwing Dizzy straight up allows for safe information gathering over walls or near corners, often landing back at Gekko's feet for an easy reclaim. Utilizing bounces off walls or ceilings can create unexpected angles, catch enemies off-guard, or allow Gekko to gather info from safer positions. Timing the throw is critical; launching Dizzy so its half-second wind-up occurs behind cover or within a smoke ensures it begins scanning immediately upon exposure, giving enemies minimal time to react. Numerous lineups exist for specific map locations and scenarios, enabling consistent and effective deployment. These techniques are not merely stylistic choices; they are necessary adaptations to Dizzy's core mechanics required to consistently extract value and differentiate skilled Gekko players.
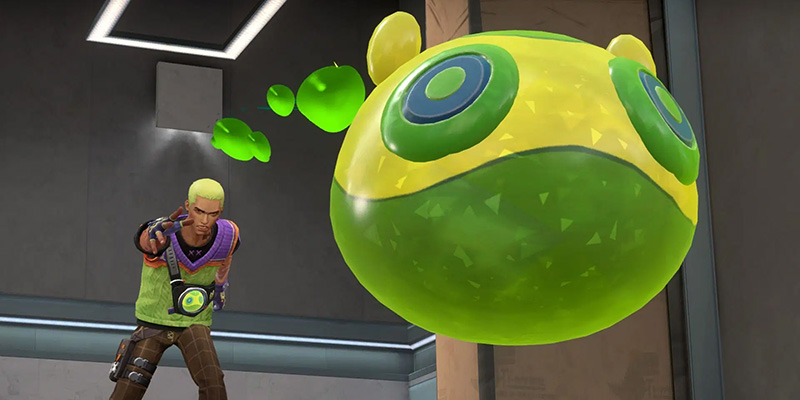
Mosh Pit (C): Area Denial Incarnate
Mechanics & Stats:
Mosh Pit is Gekko's purchasable basic ability, costing 250 credits for a single charge. It functions like a projectile grenade, thrown using FIRE (overhand) or ALT FIRE (underhand). Upon landing, Mosh duplicates, rapidly spreading green goo across a large circular area (Inner Radius: 5.5 meters, Outer Radius: 6.2 meters). For the first 3 seconds, this area deals minor damage over time (10 damage per second, totaling 30 damage). After this initial 3-second windup, the pit violently explodes over 0.3 seconds, dealing significant burst damage: 150 total damage (50 per tick) in the inner radius and 75 total damage (25 per tick) in the outer radius. This results in a total potential damage of 180 in the inner zone and 105 in the outer zone. Unlike Gekko's other creatures, Mosh Pit cannot be reclaimed after use.
Strategic Uses:
Mosh Pit is primarily an area denial tool. Its large radius and delayed high-damage explosion are perfect for forcing enemies out of entrenched positions, clearing common hiding spots (like U-Hall, Lamps, Generator), blocking chokepoints to stall pushes, or preventing rotations. It is exceptionally potent in post-plant scenarios, thrown onto the planted Spike (often via lineups) to delay or kill defusing enemies. Mosh Pit can also damage enemies through certain thin walls or cover.
Lineups/Combos:
A vast library of Mosh Pit lineups exists, allowing Gekko players to target specific default plant locations, common defensive angles, and chokepoints from safe distances across various maps. The ability's effectiveness skyrockets when combined with abilities that trap, slow, or make enemies vulnerable, preventing them from escaping the final explosion. Key synergies include Fade's Seize, Astra's Gravity Well, Deadlock's GravNet, Breach's Fault Line or Aftershock, and Viper's Snakebite. An interesting interaction allows Mosh Pit to spread onto lower ground if it initially lands on an elevated surface, expanding its coverage potential.
The delayed explosion mechanic distinguishes Mosh Pit from instantaneous damage mollies like Phoenix's Hot Hands or Brimstone's Incendiary. While the initial low damage might seem weak, the 3-second delay allows for strategic zoning and setup. Enemies caught without an escape route during the final burst face lethal damage. This makes Mosh Pit less about immediate flushing and more about calculated punishment of static play or predictable positioning. Success relies heavily on timing (e.g., throwing upon hearing a defuse tap), precise lineups for critical areas, and coordinating with teammates' crowd-control abilities to guarantee impact during the high-damage explosion phase.
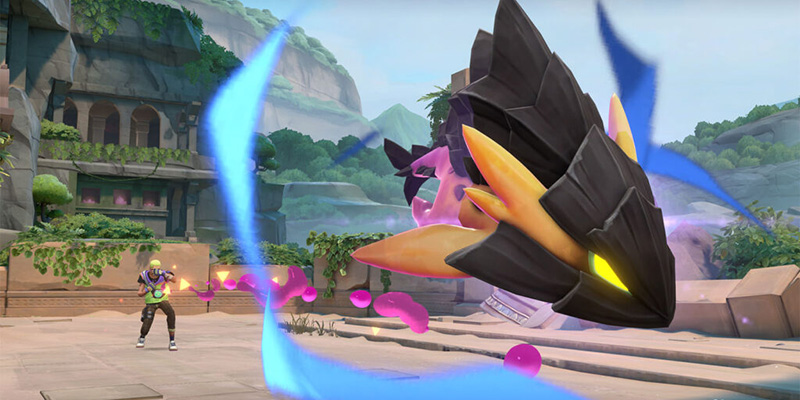
Thrash (X): The Detaining Powerhouse

Mechanics & Stats:
Thrash is Gekko's Ultimate ability, requiring 7 ultimate points to charge. Upon activation (FIRE), Gekko links with Thrash's mind, controlling her movement similarly to Skye's Trailblazer. Thrash possesses a substantial 200 HP pool, making her relatively durable. Gekko has 6 seconds to pilot Thrash around the map. Pressing ACTIVATE (default Left Mouse Button) causes Thrash to lunge forward and explode, detaining any players caught within the blast radius for a significant 6 seconds. The Detain status effect prevents enemies from using weapons or abilities and significantly slows their movement speed, making them easy targets. Thrash's lunge can be detonated early by pressing ACTIVATE again during the lunge animation, useful for hitting close targets or ensuring detonation before Thrash is destroyed. Thrash can be shot down by enemies. Crucially, Thrash can be reclaimed once after use (expiring or detonating), turning into a globule that Gekko can pick up for a 10-second cooldown before the ultimate charge is available again. Be cautious, as Thrash's explosion can detain teammates if they are within the radius.
Uses:
Thrash is a powerful tool for initiating site executes, leading the charge to clear space, force defenders off angles, and detain key targets. It's equally effective in retake scenarios, clearing sites of hidden attackers and detaining players holding post-plant positions. Thrash also serves as a potent information-gathering tool, allowing Gekko to safely scout enemy setups and numbers before committing the team. Simply deploying Thrash can force enemies to reposition or reveal themselves. Its detain effect is ideal for setting up easy kills for teammates who follow closely behind.
Control Tips:
To maximize Thrash's survivability, avoid predictable movement. Utilize constant strafing, bunny-hopping (possible with Thrash), and hugging walls or cover to make her a difficult target. Never travel in straight lines down open corridors. Use the early detonation feature (double-clicking ACTIVATE) for precise targeting on close enemies or to secure the detain before Thrash can be destroyed. While piloting and even during the lunge, Gekko can still look around, allowing for last-second information gathering. A critical aspect of advanced Thrash usage involves prioritizing the reclaim. If no immediate, high-value detain target presents itself, it's often better to clear space, gather information, and then steer Thrash back to a safe location for pickup. Be aware that Thrash's lunge does not automatically navigate vertical obstacles like ledges; manual jumping might be required during piloting.
The ability to reclaim Thrash once per use fundamentally changes its strategic value. While securing a detain on the first deployment is impactful, the potential for a second use later in the round (e.g., during a critical post-plant or retake) often holds greater strategic weight. This encourages a more calculated approach. Instead of aggressively chasing a single detain and risking Thrash's destruction deep in enemy lines, experienced players often use the first deployment primarily for information and space creation, ensuring Thrash survives to be reclaimed. This disciplined approach unlocks Thrash's full potential as a two-stage ultimate, offering significant value in both the initial push and the round's closing moments. Ignoring the reclaim potential often means wasting one of Gekko's most powerful resources.
The Reclamation Mechanic: Maximizing Value
How it Works:
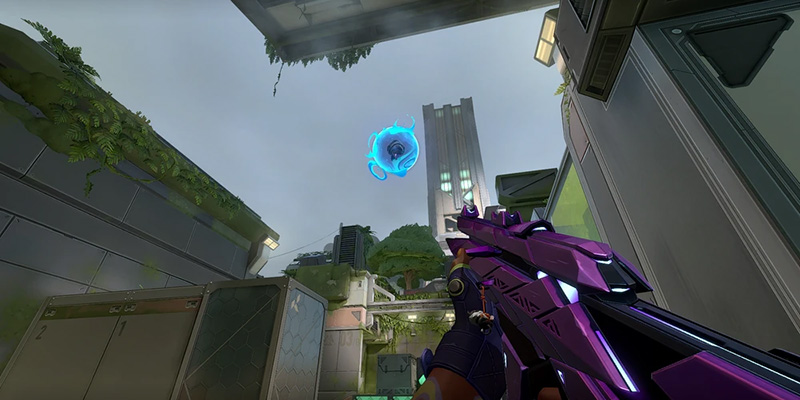
The core of Gekko's unique identity lies in his ability to reclaim his creatures. After Wingman (Q) or Dizzy (E) expire or are destroyed, or after Thrash (X) is used (detonated or expires), they revert into dormant globules. These globules remain on the ground for 15 seconds (reduced from 20s in patch 9.08). To reclaim the ability charge, Gekko must physically approach the globule and hold the INTERACT key (default 'F') for a 1-second channel time (reduced from 2s in patch 7.12). Successfully reclaiming triggers a 10-second cooldown, after which the ability charge becomes available again. The act of reclaiming emits a distinct audio cue that nearby enemies can hear. Remember, Thrash can only be reclaimed once per ultimate cast.
Strategic Importance:
This reclamation mechanic is central to Gekko's strength and playstyle. It allows for significantly higher utility uptime compared to other agents, enabling Gekko to contribute consistently throughout extended rounds. Successfully reclaiming abilities rewards strategic positioning, map control awareness, and calculated risk assessment. It makes Gekko a highly adaptable and resource-efficient agent, capable of influencing multiple phases of a round with the same ability charge.
Reclaiming Tips:
The key to effective reclamation is proactive planning. Throw abilities into locations where retrieval is feasible and relatively safe. Keep the 15-second globule expiration timer in mind. The 1-second reclaim channel leaves Gekko completely vulnerable, so only attempt retrieval when the immediate area is clear or covered by teammates. Utilize map geometry to facilitate safer reclaims: throwing Dizzy straight up often brings the globule right back down, and bouncing abilities off walls can sometimes land globules in more accessible spots. Avoid taking unnecessary risks; dying while attempting to reclaim a globule is rarely worth it, especially if the situation is dangerous. Communicate with your team if you need cover during a reclaim attempt. Be aware that globules can occasionally get stuck in awkward map geometry, making them unreachable, though developers have made efforts to mitigate this.
The act of reclaiming introduces a constant mini-game of risk versus reward after nearly every ability deployment for Gekko. Unlike other agents who use an ability and move on, Gekko players must immediately assess: Is it safe to reclaim? Can I reach the globule before it expires (15s)? Is the potential value of having this ability again later worth the risk of exposing myself now? This continuous decision-making process, directly linking current actions to future utility availability, adds a unique layer of strategic complexity. Mastering the art of reclamation – knowing when to push forward, when to hold back for a pickup, and how to position abilities for safe retrieval – is arguably the most significant factor separating proficient Gekko players from novices. It dictates whether Gekko has the tools needed for critical mid-to-late round engagements, such as post-plants or retakes.
| Ability Name | Cost / Ult Points | Charges | HP | Key Effect | Effect/Roaming Duration | Radius / Area | Reclaimable | Reclaim Cooldown |
|---|---|---|---|---|---|---|---|---|
| Wingman (Q) | 300 Credits | 1 | 80 | Concuss / Plant/Defuse | ~3.5s Concuss (est.) | 65° Cone (Concuss) | Yes | 10s |
| Dizzy (E) | Free | 1 | 20 | Blind / Minimap Blind | ~1s Blind | Line of Sight | Yes | 10s |
| Mosh Pit (C) | 250 Credits | 1 | N/A | Damage / Area Denial | 3s DoT + 0.3s Explosion | 5.5m Inner / 6.2m Outer | No | N/A |
| Thrash (X) | 7 Ult Points | 1 | 200 | Detain | 6s Roam / 6s Detain | Small Radius (Detain) | Yes (Once) | 10s |
Gekko on the Attack: Orchestrating the Push
Gekko's toolkit provides multiple avenues for initiating attacks, executing site takes, and securing rounds after the Spike is planted.
Initiating Entries and Taking Space
When leading an attack onto a site, Gekko's creatures are instrumental in creating openings and gathering information. Throwing Dizzy high or utilizing bounces allows it to flash potential entry points, clear common angles, and provide early intel on defender positions. Effective Gekko players coordinate these flashes with their Duelists' entry timing, maximizing the blind's impact. Simultaneously or alternatively, Wingman can be sent ahead like a vanguard to clear immediate corners, trigger defender utility like Cypher trips, or deliver a concussive blast to the first enemy encountered, disrupting their hold. Teammates should be prepared to follow Wingman closely to trade if it draws fire. Mosh Pit serves to flush defenders from predictable power positions or safe corners (e.g., Bind's Lamps, Ascent's Generator), forcing them into less advantageous spots or delaying their ability to contest the push.
While each ability has individual merit, Gekko's true initiation strength emerges when layering his utility. A common tactic involves sending Dizzy high to flash deeper angles while Wingman pushes low to clear close corners simultaneously. Adding a well-placed Mosh Pit to deny a common defensive angle further complicates the situation for defenders. Although individual creatures can be shot down, this coordinated onslaught makes it exceedingly difficult for opponents to counter every threat at once, creating chaos and increasing the chances of a successful entry. Defenders are forced into split-second decisions under pressure, often leading to mistakes that the attacking team can exploit.
Executing Site Takes (Including Wingman Plant Strategy)
For a full site execute, Gekko's ultimate, Thrash, is a formidable tool. Piloting Thrash onto the site first can clear significant space, force defenders to abandon positions, and potentially detain one or more key opponents, crippling the site defense. Clear communication is vital, ensuring teammates push in immediately behind Thrash to capitalize on the disruption and secure kills on detained or retreating enemies.
Once initial control is established – meaning chokepoints are smoked, key angles are cleared or flashed, and defender utility is managed – Gekko can deploy Wingman's unique planting ability. Using ALT FIRE to designate the plant spot, Wingman will proceed autonomously. This is a powerful advantage, freeing Gekko from the vulnerable planting animation, allowing him to hold angles, watch flanks, or assist teammates. However, a critical mistake is sending Wingman to plant prematurely onto a site that isn't adequately controlled. Wingman's 80 HP makes it susceptible to enemy fire, and its destruction while carrying the Spike results in losing the objective on-site, often leading to a lost round. Therefore, the Wingman plant should only be initiated when the site is reasonably secure, or when Wingman can be adequately protected by smokes, walls (like Sage's Barrier Orb or Harbor's Cove), or covering fire from teammates. This objective function transforms Gekko into a potential "sixth player" during the plant phase, but its success is directly tied to proper timing and team coordination, preventing this strength from becoming a critical weakness. Following a successful execute and plant, Gekko should look for safe opportunities to reclaim any expired globules (Wingman, Dizzy, Thrash) to bolster his resources for the post-plant phase.
Post-Plant Dominance (Mosh Pit Lineups & Control)
Gekko stands out as one of the strongest agents in post-plant situations, primarily due to the potent area denial of Mosh Pit and the potential to have reclaimed utility ready for defense. Mastering Mosh Pit lineups for default plant spots across various maps is crucial for any aspiring Gekko main. These lineups allow Gekko to deploy Mosh Pit onto the Spike from a safe distance, forcing defenders off the defuse or killing them if they remain. Timing is key; listen for the defuse sound ("tap") and deploy Mosh Pit accordingly, remembering the 3-second delay before the main explosion.
Beyond Mosh Pit, reclaimed abilities provide additional layers of post-plant control. A retrieved Dizzy can be thrown to gather information on defenders attempting a retake or to blind them as they push. A reclaimed Wingman can be sent to concuss defenders pushing through chokepoints. Most powerfully, if Thrash was successfully reclaimed after the initial site take, it can be deployed again to hunt down and detain defusing players or to disrupt the retake push entirely. Combining Mosh Pit with other post-plant denial tools from teammates, such as Viper's Snakebite or Killjoy's Nanoswarm, creates overlapping zones of damage that are extremely difficult for defenders to navigate. This ability to maintain significant utility presence after the Spike is down, thanks to the reclaim mechanic, distinguishes Gekko from many Initiators who may have expended their key abilities during the initial execute, making his post-plant defense exceptionally robust.
Faking Sites Effectively
Gekko's kit lends itself well to executing convincing site fakes, particularly in lower to mid-level play where opponents might be more susceptible to misdirection. To sell a fake, Gekko can deploy a combination of abilities towards the intended fake site. Throwing Dizzy creates the threat of a flash and provides a visual/audio presence. Using Mosh Pit to clear a common defensive spot adds credibility to the push. Sending Wingman towards the site creates noise, a visual threat, and the potential implication of a plant attempt. Coordinating this utility usage with fake smokes from a Controller teammate significantly enhances the deception.
The goal is to make the defenders believe a full execute is happening on the fake site, prompting them to rotate resources away from the actual target site, which Gekko's teammates can then attack more easily. The reclaim mechanic adds an interesting layer to Gekko's fakes. Even after Dizzy or Wingman expire on the fake site, defenders know Gekko might be able to reclaim them. This lingering potential threat, unlike the definitive expenditure of single-use utility from other agents, could potentially hold defender rotations for longer or make them hesitate more before committing resources away from the fake site, thus increasing the effectiveness of the misdirection.
Gekko on Defense: Holding the Line and Retaking Sites
On the defensive side, Gekko transitions from orchestrator to disruptor, using his creatures to gather information, stall enemy advances, and anchor positions, while retaining significant power for retake scenarios.
Early Round Information Gathering
Gekko's reclaimable abilities allow for sustained information gathering throughout the round. Early deployment of Dizzy is a low-risk way to scout common attacker approach routes like Ascent A Main or Lotus C Main. Throwing Dizzy high over walls or straight up allows Gekko to gain intel from relative safety and often positions the globule for an easy reclaim if no enemies are detected. Wingman can be used more cautiously for information, sent down specific lanes to check for early aggression, similar to a Boombot. If contact is made, it provides an audio cue and potentially a stun, but Gekko should be prepared for it to be destroyed. In situations where a fast push is strongly suspected on a specific area, Thrash can even be used aggressively for early information, with the intent to immediately steer it back for reclaim if no targets are found.
This capacity for repeated information gathering sets Gekko apart from initiators with limited recon charges like Sova or Fade. While their scans might be more precise, Gekko can maintain a continuous, low-commitment awareness of enemy movements throughout the early and mid-round phases by cycling his reclaimable Dizzy and Wingman. This sustained intel flow provides a unique defensive advantage, allowing for more informed rotations and setups.
Stalling Pushes and Anchoring Sites
When attackers commit to a push, Gekko's abilities shift to disruption and delay. Mosh Pit is a prime tool for stalling, thrown into chokepoints or onto default plant spots to deny entry, slow the advance, or force attackers into unfavorable positions. Dizzy can be deployed into the path of the push to blind multiple attackers, breaking their coordination and creating opportunities for defenders to take advantageous fights. Wingman can be used reactively to stun the first attacker rounding a corner or entering the site, potentially halting the push momentarily or securing an opening kill.
A key aspect of Gekko's defense is longevity. By playing from safer positions and prioritizing survival, Gekko can maximize the number of times he reclaims and reuses his abilities, offering sustained resistance against enemy pushes. Unlike agents who might expend their primary utility early in a defense, Gekko's potential to flash, stun, and molly multiple times within a single enemy execute makes him a persistent and frustrating obstacle for attackers to overcome. This sustained disruption, rather than just a single burst of stopping power, defines his anchoring capability.
Retake Strategies
Gekko is widely regarded as a potent agent for retaking captured bomb sites. His ultimate, Thrash, is often the centerpiece of a retake plan. Sending Thrash in first allows the team to clear dangerous corners, gather precise information on enemy post-plant positions, and, most importantly, detain defenders holding critical angles. A successful Thrash detain can instantly turn the tide of a retake. The team should coordinate their push to follow immediately behind Thrash, ready to eliminate detained targets or capitalize on the space created. If possible, reclaiming Thrash after its initial use provides a powerful tool for later in the retake or the next round.
Supporting the Thrash push or used independently, Dizzy should be thrown high over the site to blind defenders holding common post-plant angles, making it harder for them to contest the retake. Mosh Pit is used to flush enemies from common hiding spots (like behind site boxes or in corners) or thrown directly onto the Spike to prevent or delay a defuse attempt.
The Wingman defuse adds another powerful dimension to Gekko's retakes, especially in clutch or chaotic situations. Sending Wingman to initiate the defuse forces any remaining attackers to react immediately. They must expose themselves to shoot Wingman, revealing their position and making them vulnerable, or risk losing the round to the autonomous defuse. This creates immense psychological pressure, particularly in 1vX scenarios where the attacker has limited time to locate and eliminate both Gekko and the defusing Wingman. This unique ability to force disadvantageous engagements during the crucial defuse phase gives Gekko a significant edge. While powerful, players shouldn't rely solely on the Wingman defuse; sometimes using Wingman for its stun or info during the retake provides more immediate value. Combining the Wingman defuse with protective utility like smokes or a Harbor Cove can increase its success rate.
Synergies and Team Composition
Gekko's versatile kit allows him to mesh well with various agents and strategies, but certain pairings and compositions particularly amplify his strengths.
Strong Agent Pairings (Ability Combos)
Gekko's abilities create numerous opportunities for powerful combinations with teammates:
Mosh Pit's delayed explosion becomes significantly more lethal when enemies are trapped or hindered within its radius. Pairing it with abilities like Fade's Seize (which tethers and decays), Astra's Gravity Well (which pulls and makes vulnerable), Deadlock's GravNet (which slows and forces crouch), or Breach's Fault Line/Aftershock (stun/damage) can guarantee high damage or secure kills on trapped opponents. Viper's Snakebite can also stack damage with Mosh Pit.
Gekko excels at setting up plays for aggressive Duelists. The brief windows created by Dizzy's blind, Wingman's stun, or Thrash's detain allow agents like Jett, Raze, Neon, or Yoru to push forward and secure entry frags with a significant advantage. Neon's high speed complements Thrash's movement, enabling quick follow-ups. Yoru can use his Gatecrash teleport to capitalize on the chaos Gekko creates, appearing in unexpected locations while enemies are disoriented.
Gekko fits seamlessly into double Initiator compositions, layering his utility with others for overwhelming effect. Pairing with Breach results in relentless stun and flash pressure. Combining with Skye adds more flashes and healing/info potential. Sova or Fade provide powerful recon (Recon Bolt, Haunt) that can pinpoint targets for Gekko's Mosh Pit or follow-up utility. KAY/O offers suppression with ZERO/POINT and additional pop flashes that synergize well with Dizzy's unavoidable blind.
Controllers are vital for enabling Gekko's objective play and providing safe spaces. Harbor's Cove or High Tide walls offer excellent protection for Wingman during plant or defuse attempts. Omen's Dark Cover smokes can obscure angles, while his Paranoia flash or Shrouded Step teleport can be combined with Gekko's initiation for aggressive maneuvers. Clove's smokes provide necessary cover, and their Ruse (decay orb) can be combined with Mosh Pit for increased damage potential. Brimstone's Orbital Strike ultimate is devastating when comboed with a Thrash detain. Viper's Toxic Screen or Viper's Pit can create isolated fights or combo with Mosh Pit's damage.
Sentinels help secure the space Gekko takes and lock down sites. Killjoy's Lockdown ultimate forces enemies into predictable spots, perfect targets for Thrash or Mosh Pit, while her Nanoswarms add another layer to post-plant denial. Cypher's Trapwires can catch enemies flushed out by Gekko's utility, and his Spycam provides intel to guide ability usage. Sage's Barrier Orb is invaluable for walling off angles to protect a Wingman plant or defuse. Deadlock's GravNet, as mentioned, pairs exceptionally well with Mosh Pit.
While Gekko's versatility allows him to function alongside most agents, his most potent synergies typically revolve around two core strategies: amplifying the lethality of Mosh Pit through crowd control, or enabling aggressive Duelists to convert his initiation utility (blinds, stuns, detains) into swift kills. Understanding these core synergistic patterns helps in building effective team strategies around Gekko's unique capabilities.
| Partner Agent | Synergistic Ability Combo | Description of Strategy/Outcome |
|---|---|---|
| Fade | Mosh Pit (C) + Seize (E) | Fade tethers enemies, preventing escape from Mosh Pit's explosion and applying decay for increased vulnerability. |
| Astra | Mosh Pit (C) + Gravity Well (C) | Astra pulls enemies into the Mosh Pit radius and applies Vulnerable, significantly increasing explosion damage. |
| Deadlock | Mosh Pit (C) + GravNet (E) | Deadlock slows enemies and forces crouch, making escape from Mosh Pit difficult. |
| Jett/Neon | Dizzy (E) / Wingman (Q) / Thrash (X) + Dash/Sprint | Gekko blinds/stuns/detains, allowing fast Duelists to dash/slide in for easy frags on disabled targets. |
| Yoru | Dizzy (E) / Wingman (Q) + Gatecrash (E) | Gekko disrupts enemies, Yoru teleports into the chaos for surprise flanks or site takes. |
| Breach | Dizzy (E) + Flashpoint (Q) / Fault Line (E) | Layered flashes and stuns overwhelm opponents, making it nearly impossible to fight back effectively. |
| Sova/Fade | Recon Bolt (E) / Haunt (E) + Dizzy/Wingman/Mosh | Recon reveals enemy locations, allowing precise targeting for Gekko's follow-up utility. |
| Harbor/Sage | Cove (Q) / Barrier Orb (C) + Wingman (Q Plant/Defuse) | Controller/Sentinel provides a protective barrier for Wingman during vulnerable objective interactions. |
| Killjoy | Lockdown (X) + Thrash (X) / Mosh Pit (C) | Lockdown forces enemies into corners or specific areas, setting them up for Gekko's detain or area denial. |
| Brimstone | Orbital Strike (X) + Thrash (X) | Thrash detains enemies, guaranteeing they cannot escape Brimstone's high-damage ultimate. |
Building Effective Team Comps Around Gekko
Gekko's adaptability allows him to fit into various team structures, but he generally shines in compositions that leverage his unique strengths: sustained utility and objective interaction. He is often picked as the primary or secondary initiator in double initiator setups. Pairing him with an info-focused initiator like Sova or Fade provides comprehensive scouting, while Gekko offers repeatable disruption and post-plant strength.
A standard Gekko composition typically includes:
- Gekko (Initiator): Providing primary disruption, info, and objective play.
- Second Initiator (Optional but common): Sova, Fade, Skye, KAY/O, or Breach for layered utility, enhanced info, or stronger post-plant ultimates.
- Controller: Essential for smokes to enable site executes and protect Wingman plants/defuses. Omen, Astra, Viper, Harbor, or Brimstone are common choices depending on the map. Double controller comps with agents like Clove are also viable.
- Sentinel: Killjoy or Cypher are frequently chosen for their ability to lock down sites after Gekko helps take control, and for their post-plant utility. Sage can also fit, particularly for her wall's synergy with Wingman.
- Duelist: An aggressive entry fragger like Jett, Raze, or Neon is crucial to capitalize on the space and opportunities Gekko creates.
Specific map metas influence the ideal composition. Examples seen in analysis or high-level play include:
- Lotus: Gekko, Killjoy, Raze, Fade, Astra/Clove
- Split: Gekko, Raze, Skye, Cypher, Viper/Omen
- Bind: Gekko, Raze, Fade, Viper, Astra
- Fracture: Gekko, Raze, Breach, Viper/Brimstone, Killjoy
- Sunset: Gekko, Neon, Cypher, Omen, Raze
Ultimately, Gekko thrives in structured, coordinated teams that understand how to play around his reclaim mechanic and enable his Wingman objective plays. Compositions that provide strong smoke cover and have agents capable of capitalizing on his initiation tend to maximize his potential.
Map Mastery: Gekko Across the Battlefield
Gekko's effectiveness varies across Valorant's diverse map pool, influenced by map geometry, common engagement distances, and the feasibility of reclaiming his creature globules.
General Map Strengths and Weaknesses
Gekko generally performs better on maps characterized by:
- Tight Corridors and Numerous Corners: Maps like Bind, Split, Lotus, and Fracture feature enclosed spaces and frequent angles where Wingman can easily find targets, Dizzy can effectively flash chokepoints, and Mosh Pit can reliably deny space or clear corners.
- Feasible Reclaim Opportunities: Maps where fights commonly occur in areas with sufficient cover allow Gekko to more safely retrieve his globules after use. Predictable engagement spots make it easier to plan ability usage with reclamation in mind.
Conversely, Gekko may face challenges on maps with:
- Wide Open Spaces and Long Sightlines: On maps like Breeze or parts of Icebox, Gekko's creatures (especially the low-HP Dizzy and ground-based Wingman) are more easily spotted and destroyed from a distance before they can be effective. Reclaiming globules dropped in exposed areas becomes extremely risky.
- Complex Verticality or Highly Segmented Sites: While manageable, maps like Ascent or Sunset with intricate site layouts and many hiding spots can sometimes make it harder for Gekko's abilities to cover all necessary angles effectively compared to simpler geometries.
- Prevalence of Operator Angles: Gekko's kit is generally geared towards closer-range engagements. He lacks the long-range flashing or info tools of agents like Skye or KAY/O, making him inherently weaker when challenging entrenched Operator players holding long angles.
| Map Name | General Suitability | Key Reasons |
|---|---|---|
| Bind | Strong | Tight corridors (Hookah, Showers), TP plays, good Mosh lineups, reclaim often feasible. |
| Split | Strong | Close quarters, Vents/Mid control, strong Mosh lineups, reclaim generally safe. |
| Lotus | Strong | Three sites, many corners, enclosed spaces favor creatures, good reclaim potential. |
| Fracture | Strong | Divided map structure, good for Wingman plant, strong Breach/Gekko synergy. |
| Haven | Good | Mix of close (Garage) and longer ranges, Mosh lineups available, reclaim possible. |
| Ascent | Fair | Complex sites can be tricky, Mid control important, Mosh lineups exist, reclaim needs care. |
| Sunset | Fair | Cramped sites offer hiding spots, Mosh/Dizzy lineups exist, reclaim needs care. |
| Pearl | Fair | B site okay, Mid/A can be open, reclaim needs caution. |
| Icebox | Fair / Weak | Verticality, some open areas, Wingman plant potentially useful, reclaim can be risky. |
| Breeze | Fair / Weak | Very open sites, long sightlines challenge creatures, reclaim often dangerous. |
| Abyss | Fair (TBD) | New map, verticality, unique layout requires specific strategies, lineups emerging. |
Specific Tips and Ability Usage for Key Maps
Ascent:
- Info: Use Dizzy over A Garden wall for Main info, or over Mid wall for Courtyard/Link info. Throw Dizzy high from Market towards B Main.
- Denial/Post-Plant: Mosh Pit lineups exist for A Generator (from Main/Lobby/Tree) and B Default (from Main/Logs). Landing Mosh on elevated Generator can spread to cover back-site too. Mosh from Tree to A Main cubby is useful defensively.
- Execute/Retake: Wingman plant is viable on both sites. Use Dizzy high over site during retakes. Mosh can clear Generator or Hell during retakes.
Bind:
- Control: Dizzy and Wingman are highly effective in clearing Hookah and Showers. Dizzy thrown from Attacker Spawn can safely clear all of B Short.
- Execute/Post-Plant: Wingman plant is strong, potentially combined with teleporter fakes. Numerous Mosh Pit lineups cover A Default (from Showers/Lobby), A Tower (from Short), B Default (from Long/Garden), and B Elbow/Cube.
- Advanced: Use teleporters to send Dizzy or Thrash through for unexpected angles or info gathering. Steer Thrash back through TP for safe reclaim.
Split:
- Control: Excellent map for Gekko due to close angles. Use Dizzy/Wingman to contest Mid control from Mail/Vents, or to clear Garage/Rafters. Dizzy bounced off Vent wall provides safe Mid info.
- Execute/Post-Plant: Mosh Pit lineups cover A Default (from Ramp/Screens), A Hell, B Default (from Garage/Main), and B Heaven. Wingman plant effective on both sites.
Lotus:
- Control: Strong Gekko map. Use Dizzy for early info/control at A Main, C Main, or B Doors. Flash from A Stairs clears A Main orb area; flash from C Water clears Mound.
- Execute/Post-Plant: Mosh Pit lineups for A Default (from Tree/Rubble), B Default (from Main/Pillars), C Default (from Mound/Waterfall). Wingman plant on B is common. Thrash is effective for clearing the complex sites.
- Defense/Retake: Use Dizzy/Mosh to stall pushes at main entrances. Wingman defuse is viable, especially on C. Confined spaces generally make reclaims easier. Use Thrash for retakes, aiming to reclaim.
Other Maps (Brief Notes):
- Breeze: Use Wingman for Mid control; Mosh for A default/underpass; Dizzy for B doors/retakes. Be wary of open sightlines.
- Sunset: Mosh lineups for A/B sites exist. Dizzy mid-to-tiles useful. Retake lineups for A. Site complexity can be challenging.
- Icebox: Wingman plant is valuable due to exposed default plants. Mosh lineups available. Openness requires careful utility usage.
- Haven: Dizzy/Wingman useful in Garage/C Long. Mosh through Garage door. Standard lineups apply.
- Fracture: Wingman plant strong. Mosh lineups available. Fits well in double initiator comps often seen here.
- Pearl: Dizzy for B Link info. Mosh lineups available. Mid control can be difficult.
- Abyss: New map; lineups for Mosh/Dizzy are emerging. Verticality requires specific consideration for ability trajectories.
Common Mistakes and How to Avoid Them
While Gekko's kit is powerful, several common pitfalls can hinder player effectiveness. Recognizing and avoiding these mistakes is crucial for climbing the ranks.
The Error: Sending Wingman to plant or defuse the Spike immediately upon reaching a site or in a retake situation, without first securing adequate control or providing cover.
The Consequence: Wingman (only 80 HP) is easily destroyed, often resulting in the Spike being lost in an unfavorable position for the attackers, or the defuse being instantly stopped. This can single-handedly lose rounds.
Correction: Treat Wingman's objective function as a strategic tool, not a default action. Only deploy Wingman to plant after initial site control is gained (smokes down, key angles cleared) or with dedicated protection (Sage wall, smokes, teammate cover). For defusing, use it primarily in clutch situations to force enemy reaction or when teammates can cover Wingman effectively. Prioritize using Wingman for its stun/info if site control is lacking.
The Error: Throwing Dizzy, Wingman, or Thrash into inaccessible locations, deep into enemy territory without a plan for retrieval, or simply forgetting to pick up globules before they expire (15s timer).
The Consequence: Losing out on Gekko's primary strength – ability reuse. This significantly reduces his impact throughout the round, essentially playing him like a standard initiator with weaker individual abilities.
Correction: Be mindful of ability placement. Aim for locations where reclamation is feasible and relatively safe. Utilize techniques like throwing Dizzy straight up or bouncing abilities strategically. Prioritize survival and safe positioning to enable reclaims. If Thrash doesn't find a target, actively steer it back to safety.
The Error: Throwing Dizzy directly at enemies in the open with no travel time, allowing it to be easily shot down during its windup. Throwing it too low or too short, failing to cover key angles or gather meaningful info.
The Consequence: Dizzy provides little to no value, wasting the signature ability charge and potential reclaim.
Correction: Utilize high throws, bounces, or deploy Dizzy from behind cover/smokes to allow the windup to complete safely before exposure. Aim high to maximize scan area and make it harder to destroy. Use it proactively for info, not just reactively as a panic flash.
The Error: Piloting Thrash in straight lines down corridors or across open sites.
The Consequence: Makes Thrash (despite its 200 HP) an easy target for focused enemy fire, often getting destroyed before reaching its target or achieving its objective.
Correction: Employ erratic movement. Constantly strafe, bunny-hop, and utilize cover while piloting Thrash. Clear corners methodically. Use early detonation for close or guaranteed targets.
The Error: Playing Gekko like an entry Duelist, pushing ahead of teammates, and getting caught out while deploying utility or attempting risky reclaims.
The Consequence: Frequent deaths limit Gekko's ability to use and reclaim abilities, negating his core strengths. Poor positioning makes reclaims impossible or leads to being vulnerable during the channel.
Correction: Understand Gekko's role as an Initiator who typically plays behind Duelists. Prioritize safer positioning that allows for effective utility deployment and potential reclamation. Let teammates capitalize on the utility rather than always trying to follow up personally. Communicate ability usage clearly.
Advanced Techniques and Pro Insights
Elevating Gekko play beyond the basics involves mastering nuanced ability usage, strategic thinking, and seamless team coordination, often observed in high-rank and professional gameplay.
Advanced Dizzy Deployment
Pros utilize precise timing and geometry for Dizzy. This includes throwing Dizzy so its 0.35s windup occurs entirely behind cover or within a smoke, ensuring it starts scanning the instant it becomes visible to enemies, giving them minimal reaction time. Bouncing Dizzy off specific walls or objects creates unexpected flash angles that are harder to anticipate and dodge. Throwing Dizzy straight up near a contested corner provides repeatable, safe info and an easy reclaim.
Strategic Thrash Reclaim Prioritization
Top players understand Thrash's value often lies in its second use. Unless a high-impact detain is guaranteed on the first deployment (e.g., stopping a defuse, catching multiple enemies in a choke), they prioritize using Thrash for initial info/space creation and then actively maneuvering it back to a safe location for reclaim. This ensures the ultimate is available for crucial post-plant or final retake scenarios.
Layered Utility Execution
Professional teams excel at combining Gekko's utility not just with other agents, but with itself in quick succession. For instance, using Dizzy high followed immediately by Wingman low to overwhelm defenders at an entry point. Or using Wingman to stun an enemy in a corner, followed immediately by Mosh Pit to secure the kill or force them out. This requires precise timing and communication.
Reactionary Ability Usage
Instead of throwing utility speculatively, advanced Gekko players often wait for audio cues or teammate intel before deploying abilities reactively. Hearing an enemy planting, defusing, or using an ability triggers a precisely timed Mosh Pit, Dizzy flash, or Wingman stun for maximum impact. This conserves utility and increases its effectiveness.
Wingman Baiting and Trading
Skilled players use Wingman not just for its direct effect, but as bait. Sending Wingman around a corner can force an enemy to reveal their position by shooting it. Teammates positioned correctly can instantly trade the Wingman, capitalizing on the enemy's brief focus shift.
Mastering Mosh Pit Lineups
While basic usage involves direct throws, high-level Gekko play incorporates learned lineups for consistent post-plant denial and clearing specific off-angles from safety. Knowing lineups for multiple plant spots on each map adds significant strategic depth.
Exploiting Thrash Mobility
Pros utilize Thrash's movement capabilities fully, employing bunny-hopping and erratic strafing to make it a difficult target during site entries or retakes. They also leverage the ability to look around during the lunge for final info sweeps.
Adaptive Playstyle
Top Gekko players adapt their approach based on the round context, enemy composition, and team needs. They know when to prioritize Wingman's stun for aggression versus its plant/defuse for objective control, and when to use Thrash for a decisive detain versus prioritizing its reclaim for later value.
Conclusion: Unleashing Gekko's Potential
Gekko emerges as a uniquely dynamic Initiator in Valorant, defined by his creature companions and the game-altering reclamation mechanic. Hailing from East LA, his team-oriented nature is woven into his kit, encouraging coordination and strategic deployment of his versatile crew. Mastering Gekko requires moving beyond simple ability descriptions to understand the nuanced interplay between his creatures and the crucial element of retrieval.
Wingman offers unparalleled flexibility with its potent stun and game-changing plant/defuse capabilities, demanding careful assessment of risk versus reward. Dizzy serves as both a flash and an information tool, whose effectiveness hinges on creative deployment to overcome its fragility. Mosh Pit provides powerful area denial, excelling in post-plant scenarios and when combined with crowd-control abilities. Thrash, the reclaimable ultimate, offers immense potential for site clears and detains, rewarding players who prioritize its strategic reuse.
Success with Gekko is predicated on understanding his role as an enabler. He thrives when setting up teammates, disrupting enemy lines, and controlling objectives through calculated use of his creatures. Effective Gekko play demands strong communication, map awareness, and the discipline to prioritize safe ability reclamation to maintain pressure throughout the round. By avoiding common mistakes like reckless Wingman usage or neglecting reclaims, and by incorporating advanced techniques observed in high-level play, players can unlock the full potential of this Creature Commander. Gekko offers a rewarding experience for those willing to invest in mastering his unique mechanics, proving to be a valuable asset capable of significantly impacting the flow of any match.