
Jett. The name itself evokes images of blinding speed, impossible aerial maneuvers, and game-changing plays. She is Valorant's quintessential high-speed duelist, the agent synonymous with mechanical prowess and highlight reels that leave spectators breathless. Hailing from South Korea, Sunwoo Han, known as Jett, embodies a fearless, agile, and sometimes cocky persona, reflected in her unique ability kit designed around unparalleled mobility and assassination potential. Her visual design, featuring light armor and sneakers, further emphasizes this focus on swift, silent movement.
Mastering Jett is a journey into the heart of Valorant's fast-paced action. It demands precision, tactical thinking, and an embrace of calculated aggression. She represents a high-risk, high-reward playstyle, capable of breaking defenses, securing opening kills (entry fragging), and clutching rounds through sheer mechanical skill. This guide serves as a comprehensive manual, dissecting Jett's abilities, movement techniques, strategic applications, and team interactions, from foundational principles to the advanced tactics employed by the world's best. Prepare to harness the wind and unlock the full potential of Valorant's most dynamic agent. While her iconic cosmetics, like the K/DA All Out or Elderflame skins, and signature Kunai-themed items add flair, true mastery lies in understanding the mechanics beneath the style.
Section 1: Jett's Arsenal - Wielding the Wind
Jett's abilities grant her unmatched control over movement and positioning. Understanding the nuances of each tool, including their costs, cooldowns, and strategic applications, is the first step towards mastery. Many abilities have seen significant changes over Valorant's patches; understanding this history provides context for their current state.
1.1 Glide (Passive)
Mechanic: Jett possesses a unique passive ability, Glide, allowing her to negate fall damage and control her descent by holding the jump key while airborne.
Application: Its most obvious use is preventing fall damage after an Updraft or dropping from high locations, enabling safer repositioning or surprise drops. However, Glide offers more subtle utility. It facilitates reaching tricky ledges or platforms that might otherwise require an Updraft charge, conserving resources. It allows for silent landings, preserving stealth. Furthermore, Glide extends airtime, enabling slight horizontal adjustments mid-fall for micro-repositioning behind cover or peeking angles unexpectedly upon landing. This transforms it from a simple safety feature into a tool for fine-tuning aerial maneuvers, especially potent when combined with the perfect accuracy of Blade Storm. Past bug fixes have addressed animation issues during glides.
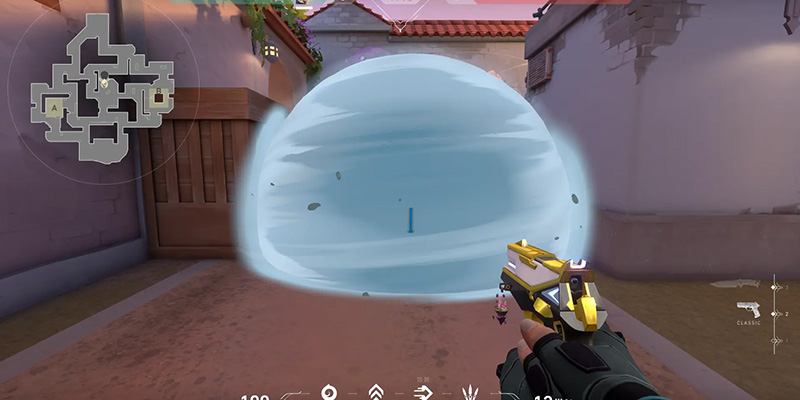
1.2 Cloudburst (C)
Mechanics: Jett instantly throws a projectile that expands into a spherical, vision-blocking cloud upon impact with a surface. This smoke costs 200 Credits per charge, with a maximum of two charges available per round. The cloud lasts for a brief 2.5 seconds and has a radius of 3.35 meters. Crucially, the smoke is hollow, offering visual cover but no physical protection. A key feature is the ability to curve the smoke's trajectory mid-flight by holding the ability key and guiding it with the crosshair. Its duration and cost have been significantly adjusted over time (previously lasting up to 7 seconds and costing only 100 credits), reflecting balance changes aimed at sharpening its tactical role. There's a slightly longer weapon re-equip time after using Cloudburst, and Jett cannot use Glide while suppressed or detained.
Tactical Uses:
- Cover & Escape: The primary function is blocking sightlines for safe passage across open areas, facilitating entries onto sites, or covering retreats. It's particularly vital for escaping after taking an Operator shot.
- Entry Execution: Cloudbursts are fundamental to Jett's entry fragging role. They are used to smoke off common defensive angles, chokepoints, or elevated positions like Heaven as she dashes onto a site.
- Angle Isolation: Strategically placed smokes can block off specific lines of sight, forcing enemies into isolated 1v1 engagements.
- One-Way Smokes: The curve mechanic allows for the creation of temporary one-way smokes, providing Jett with a vision advantage (detailed below). This often involves aiming the smoke high onto geometry.
- Misdirection: The hollow nature of the smoke can sometimes be used to bait enemies or mislead them about Jett's exact position. The smoke's presence is also visible on the minimap, aiding coordination.
- Utility Denial: Cloudburst can obscure enemy utility like Killjoy's Turrets or Sova's Recon Bolts, preventing them from gathering information or dealing damage.
- Animation Cancel: A niche but useful trick involves using Cloudburst just before switching from the knife back to a gun, effectively canceling the weapon equip animation for instant readiness.
Cloudburst One-Way Tutorial:
- Principle: The goal is to place the Cloudburst high on a piece of geometry (doorframe, box top, ramp edge) so that the bottom edge of the smoke creates a gap. This gap allows Jett, positioned correctly, to see the feet or lower legs of approaching enemies before they can see her body through the smoke.
- Technique: Aim the crosshair significantly above the desired choke point or angle. Throw the Cloudburst and immediately hold the ability key, curving the smoke downwards so it impacts and settles on the upper edge of the structure. Practice is key to mastering the curve and placement.
- Conceptual Example 1 (Doorway One-Way): Imagine Haven A Short entrance. Jett aims high on the doorframe from cover, throws the Cloudburst, and curves it down to land on the top edge. The resulting smoke hangs, leaving a visible gap at foot level for Jett peeking from Short, while enemies pushing through see a wall of smoke.
- Map Examples: Effective one-ways can be created on numerous maps. Examples include Split A Ramp looking towards Main, Ascent Mid Catwalk or A Main entrance, Bind Hookah entrance or A Site defense, and Haven C Link looking towards Garage.
1.3 Updraft (Q)
Mechanics: Updraft instantly propels Jett vertically into the air. It costs 150 Credits and, crucially, Jett now only has a single charge per round. This is a significant change from her previous two charges. The cost also increased from 100 credits. While airborne from Updraft (or Glide), most weapons suffer severe movement inaccuracy, making precise shots difficult. However, this penalty does not apply to Blade Storm, which retains perfect accuracy mid-air.
Tactical Uses:
- High Ground & Off-Angles: Updraft's primary function is accessing elevated positions that are unreachable for most other agents, providing powerful sightlines and unexpected angles. Examples abound: Haven B site boxes or C site containers, Bind's defender-side showers box, Split's A Rafters, Ascent's A Generator, Sunset's various crates and rooftops.
- Surprise Engagements: Quickly popping up over cover or structures to catch enemies off guard is a hallmark Jett play.
- Evasion: Updraft can be used to dodge ground-targeted abilities like mollies, Sage Slow Orbs, or even incoming gunfire in desperate situations.
- Information Gathering: A quick Updraft can allow Jett to peek over smokescreens or tall cover to gather information on enemy positions.
- Movement Combinations: Updraft is integral to Jett's advanced movement, combining fluidly with Tailwind for complex entries, escapes, or repositioning maneuvers (detailed in Section 2). The Dash-then-Updraft combo notably allows for a faster weapon draw after the dash.
- Operator Angles: Gaining high ground provides potent, often unexpected angles for Operator users.
- Blade Storm Synergy: Updraft enables devastating aerial attacks with Blade Storm, leveraging its perfect mid-air accuracy.
Updraft Angle Examples:
- Conceptual Example 2 (Ascent A Generator): From the ground beside A Site Generator, Jett uses Updraft to instantly land on top. This grants sightlines towards A Main, Tree Room, and potentially deep into Defender Spawn, angles difficult for attackers to clear simultaneously.
- Conceptual Example 3 (Split B Heaven): Attacking B Site on Split, Jett can Updraft from B Main directly onto the rafters in B Heaven. This bypasses the main choke point and provides a powerful angle overlooking the entire site and Defender Spawn entrance.
- Numerous specific map spots exist and should be learned through exploration and guides.
1.4 Tailwind (E - Signature Ability)
Mechanics: Tailwind is Jett's defining signature ability. It is free and starts charged each round, with the unique ability to refresh after securing two kills. The current mechanic, implemented in Patch 4.08, requires a two-part activation. Pressing 'E' first activates a 7.5-second window (reduced from 12 seconds in Patch 7.04). During this window, pressing 'E' again triggers the dash, propelling Jett in the direction she is currently moving (WASD input) or straight forward if stationary. There is a 1-second activation windup before the dash window opens (increased from 0.75s in Patch 7.04). The charge is consumed regardless of whether the dash is used or the 7.5s window expires. The dash itself lasts 0.45 seconds and covers approximately 11-14 meters, depending on momentum and jump timing. Concuss effects can slow the dash speed. Notably, Tailwind no longer breaks Cypher's Trapwires. There is a slight delay in pulling out the equipped weapon after dashing, though a bug making this excessively long was fixed, and the Dash-Updraft combo mitigates this delay. Dashing Jett cannot trigger the spike defuse sound.
Tactical Uses:
- Site Entry: The quintessential use is dashing onto bomb sites, often through Cloudburst smoke, to break defensive setups and create space for the team.
- Escape & Disengagement: Dashing to safety after taking a shot (especially with the Operator) or when caught in a disadvantageous position remains a key function, though the pre-activation requirement makes it less reactive.
- Repositioning: Quickly shifting between cover, angles, or objectives.
- Aggressive Peeking: While harder now due to pre-activation, it can still be used for quick peeks if timed correctly, especially with the Operator.
- Evasion: Dodging predictable projectiles or repositioning during enemy ability usage.
- Mid-Dash Angle Clearing: An advanced technique involves rapidly flicking the mouse left and right during the dash animation to clear multiple close angles simultaneously, using the minimap to register spotted enemies.
- Closing Distance: Rapidly reducing the gap to engage enemies at close range.
Dash Timings & Activation:
- Intentionality is Paramount: The rework fundamentally shifted Tailwind from a reactive escape tool to a predictive engagement/disengagement ability. Activation must occur before the moment it's needed due to the 1s windup and the 7.5s window. Purely reactive dashes are no longer possible.
- Entry Timing: Activate Tailwind just before peeking the entry point or committing to the path. Coordinate activation with incoming friendly utility like smokes or flashes – ideally, flashes should pop just after the dash completes.
- Operator Escape Timing: When planning to escape after an Operator shot, activate Tailwind before taking aim and firing. This telegraphs intent but is necessary for the escape. This change significantly reduced Jett's defensive Operator dominance.
- Window Management: The 7.5-second window requires careful management. Activating too early risks wasting the charge before an opportunity arises.
- Jump-Dash Momentum: Mastering the timing of jumping relative to the dash input can extend the dash distance. Jumping slightly before dashing yields ~13m, while jumping and dashing simultaneously (requiring precise timing) can reach ~14m, compared to a standard ~11m grounded dash.
1.5 Blade Storm (X - Ultimate)
Mechanics: Jett's ultimate ability, Blade Storm, equips her with a set of five deadly throwing knives. Activating the ultimate costs 8 ultimate points (increased over time from 6, then 7). These knives boast perfect accuracy, meaning they hit exactly where the crosshair is aimed, regardless of whether Jett is running, jumping, gliding, or even on ziplines. While Blade Storm is active, Jett moves at her fastest speed, equivalent to having her knife out.
Firing Modes: Left-click (Primary Fire) throws a single, precise knife. Right-click (Alternate Fire) throws all remaining knives simultaneously in a tight spread, similar to a shotgun blast.
Refresh Mechanic: Securing a kill with a left-click instantly refreshes the full set of five knives. This allows for potential chain kills. However, kills obtained with the right-click burst do not refresh the knives. This is a critical distinction resulting from balance changes (Patch 3.06).
Damage: Each knife deals 150 damage on a headshot (an instant kill against opponents without full shields) and 50 damage to the body or limbs. This means three body/limb shots are required for a kill against a full-health, fully-armored opponent.
| Firing Mode | Best Use Cases | Damage | Refresh on Kill |
|---|---|---|---|
| Left-Click (Single Knife) | Medium-Long Range, Precision Shots | 150 Head / 50 Body | Yes - Full Refresh |
| Right-Click (Burst) | Close Range (within 10m) | 150 Head / 50 Body per knife | No |
Tactical Uses:
- Economy Rounds: Blade Storm is exceptionally powerful on eco or save rounds, providing Jett with lethal potential without needing to purchase an expensive weapon. This allows her to invest credits in armor or buy a weapon for a teammate.
- Clutch Potential: The combination of high accuracy, instant kill headshots, and the refresh mechanic on left-click kills makes Blade Storm a formidable tool in clutch situations.
- Aggressive Maneuvers: Blade Storm synergizes perfectly with Jett's mobility. Combining Updrafts and Tailwinds with the ultimate allows for high-speed, aerial attacks where Jett maintains perfect accuracy while being incredibly difficult to hit.
- Operator Synergy: It serves as a reliable close-range backup weapon when holding angles with an Operator, allowing Jett to defend herself if pushed without needing to switch weapons.
Blade Storm Accuracy & Usage (Left vs. Right-Click):
- Left-Click Strategy: This should be the default firing mode for most engagements, especially at medium to long ranges. The focus should be on precise headshots for instant kills and knife refreshes. Leverage Jett's movement – constant strafing, jump-peeking corners with glide – to disrupt enemy aim while maintaining perfect accuracy. While headshots are ideal, landing three body shots is a viable alternative if necessary. Patience is key; avoid rushing shots.
- Right-Click Strategy: Reserve the right-click burst exclusively for point-blank encounters, generally within 10 meters. It functions as a close-range panic button or a way to quickly eliminate a low-health enemy nearby. Due to the spread, aiming at the center of mass at very close range (5-10m) often yields better results than trying to hit the head, maximizing the chance of landing multiple knives. Remember, using right-click consumes all remaining knives and offers no refresh upon a kill, making it a high-commitment, situational choice. Its effectiveness drops drastically beyond very close range.
In-Game Range: Utilize the practice range bots. Set challenges like "Eliminate 100" with "Strafe" enabled. Practice tracking bot heads while strafing (A/D keys), then momentarily stopping movement to fire accurate left-clicks. Practice jump-peeking corners using Glide and firing mid-air. Practice close-range right-clicks on bots. Emphasize constant movement while maintaining aim.
Aim Trainers: External aim trainers offer valuable practice. Look for scenarios focusing on clicking accuracy while moving or tracking strafing targets. Examples include KovaaK's (e.g., "pasu extra small horizontal," Voltaic benchmark strafe scenarios) or Aim Lab (which features custom scenarios like "Dirk A Peek" and "Defo 1v4" specifically designed for Jett knives).
Deathmatch: Playing Deathmatch exclusively with Blade Storm active forces practice in realistic combat scenarios against human opponents.
Section 2: The Dance of the Duelist - Mastering Jett's Movement
Jett's identity is intrinsically linked to her movement. Mastering her dashes, updrafts, and glides—both individually and in combination—is crucial for unlocking her potential. This section breaks down movement from fundamental techniques to advanced aerial combinations.
2.1 Beginner Basics: Finding Your Flow
New Jett players should first focus on understanding and controlling each movement ability in isolation before attempting complex sequences. The core principle is leveraging mobility for unpredictable positioning.
- Basic Tailwind Usage: Begin by practicing dashing in all cardinal directions (forward, backward, left, right) while stationary and while moving. Focus on the two-part activation: press E to start the 7.5s window, then press E again to dash. Practice the common entry tactic of throwing a Cloudburst and immediately dashing into it for cover. Initially, use Tailwind for simple escapes from danger or for crossing open sightlines safely.
- Basic Updraft Usage: Practice using the single Updraft charge to reach simple elevated positions, such as single crates or standard double-stacked boxes found on most maps. Get comfortable with the vertical height gained and practice landing precisely on the intended platform without overshooting or falling short.
- Basic Glide Usage: Find high spots on maps and practice jumping off while holding the space bar. Focus on controlling the descent speed and making soft, silent landings. Use it primarily to avoid fall damage initially.
- Fundamental Positioning: Remember that Jett's mobility doesn't negate core Valorant fundamentals. Use walking (default Shift key) to move silently when approaching angles or before initiating a play. Avoid reckless, noisy movement that gives away position unnecessarily.
2.2 Advanced Techniques: The Art of Aerial Combat & Evasion
Advanced Jett play involves seamlessly combining her abilities for fluid, unpredictable, and often vertical maneuvers.
Combining Abilities:
- Tailwind -> Updraft: This is a cornerstone combination. Use Tailwind to dash horizontally (e.g., through a choke point, into a smoke, onto site), then immediately activate Updraft. This sequence offers multiple advantages: it significantly reduces the weapon pull-out delay after dashing, allowing for faster combat readiness; it propels Jett into an unexpected high-ground position or off-angle, making her harder to track and shoot; and it can be used to quickly gain verticality after entering a site. A niche trick involves intentionally hitting the head on low ceilings like doorways during the Updraft to halt vertical momentum and land faster.
- Updraft -> Tailwind: Use Updraft first to gain vertical height, then activate Tailwind mid-air to cover horizontal distance, cross large gaps, peek over obstacles, or reposition aggressively. This is useful for surprising enemies holding angles behind cover or reaching specific platforms across gaps.
- Jump -> Tailwind (Momentum Dash): As mentioned earlier, precise timing of a jump simultaneous with the second Tailwind activation grants the maximum dash distance (~14m). This requires significant practice to execute consistently but can be crucial for crossing specific gaps or reaching cover faster.
- Strategic Single Updraft (Post-Nerf Adaptation): While "Double Updraft" plays referred to using two charges, the principle of using vertical mobility aggressively, especially with Blade Storm, remains vital with the single charge. Use the Updraft strategically to create aerial attack opportunities with the ultimate, understanding it's a one-time use per round.
Movement Techniques:
- Off-Angle Positioning: Master using Updraft, often combined with Glide, to reach unconventional positions that enemies rarely pre-aim or clear thoroughly. This requires deep map knowledge. Examples include gliding from B Hut onto the Back B roof structure on Haven, using Updraft to get onto A Generator on Ascent, reaching Split's B Rafters, perching on Bind's Hookah entrance box, or utilizing the various crates and structures on Sunset.
- Entry Path Variations: Avoid predictable entries. Mix up dash angles (dashing deep into site vs. landing short behind initial cover), smoke placements, and combine with different movement abilities (e.g., dash-updraft vs. simple dash) to keep defenders guessing.
- Mid-Dash Clearing: This technique is essential for safer entries. As Jett dashes (typically into smoke or onto site), rapidly flick the mouse left and right to visually clear immediate close corners or angles. Since the visual information is processed quickly during the dash, rely heavily on the minimap – any enemy briefly spotted will appear as a red marker, providing crucial intel even if not fully registered visually.
- Jump Peeking & Gliding: Utilize quick jumps combined with Glide around corners for information gathering. This presents a smaller, faster-moving target than a standard strafe peek, making Jett harder to hit. This technique is particularly effective when Blade Storm is active, allowing for accurate shots during the peek.
Section 3: Strategic Dominance - Outplaying the Opposition
Applying Jett's unique kit effectively requires understanding her strategic roles within the team, particularly in entry fragging and utilizing the Operator, alongside prudent economy management.
3.1 Entry Fragging: Spearheading the Assault
Jett is arguably Valorant's premier entry fragger. Her primary objective on attack is often to be the first agent onto a contested site, using her mobility to break through defensive lines, create space for her teammates, and secure the crucial opening kill(s). This role demands confidence, decisiveness, and a willingness to take initiative.
The Entry Sequence - A Calculated Approach:
- Coordination: Effective entry is a team effort. Communicate the intended entry path and timing clearly to teammates. Request specific supporting utility – smokes for cover, initiator flashes or recon to clear angles or reveal defenders. Precise timing with this utility is critical for success.
- Preparation: Activate Tailwind before peeking or committing to the entry path. Deploy initial Cloudburst(s) to block key sightlines or common defensive positions (e.g., Heaven, back-site angles).
- Execution: Dash decisively into the smoke or onto the site. While dashing, actively clear immediate close angles using the mid-dash clearing technique.
- Chaos Creation: Upon landing, immediately assess the situation. Use the remaining Cloudburst for additional cover or isolation. Consider using Updraft for an unexpected off-angle or quick repositioning. Fight aggressively to secure space and draw defender attention.
- Trading: Understand that dying during entry is acceptable, if a teammate immediately follows up to trade the kill. Jett's role is to create the opening; the team capitalizes on it. Surviving is ideal, but creating space and enabling trades is paramount.
3.2 Operator Play: The Mobile Sniper
Jett's Operator Advantage: Jett is widely considered one of the best, if not the best, Operator agents in Valorant. Her Tailwind ability provides an unmatched safety net, allowing her to take aggressive shots and instantly dash back to cover, mitigating the Operator's inherent vulnerability after firing. Furthermore, Updraft grants access to unique and powerful elevated sniping positions that other agents cannot easily reach or contest.
- Aggressive Peeking Strategy: The classic Jett OP play involves activating Tailwind, quickly peeking an angle, taking an Operator shot, and immediately pressing E again to dash back behind cover. The Tailwind rework requires this activation to happen before the peek, demanding more foresight.
- Off-Angle Holds: On defense, use Updraft to establish unexpected high-ground nests with the Operator. Holding an angle from atop a crate stack or unusual ledge can catch attackers completely off guard. It is crucial to vary these positions round-to-round to maintain unpredictability.
- Defensive Repositioning: Jett can take an aggressive early peek with the Operator at the start of a round to gain information or attempt an opening pick. If enemies push or she feels pressured, Tailwind allows for a rapid retreat to a safer position or back towards the site.
- Attacking with the Operator: While less common than defensive OPing, Jett can use the Operator on attack to clear long sightlines during a site execute, relying on her dash for safety if she misses or needs to reposition quickly after securing a pick.
3.3 Economy Management: Maximizing Value
- Blade Storm's Economic Power: Blade Storm is a cornerstone of Jett's economic flexibility. Activating it on save rounds, eco rounds, or even force-buy rounds provides Jett with a highly lethal weapon at zero credit cost. This allows the team to allocate funds elsewhere, potentially enabling Jett to purchase a rifle for a teammate while still posing a significant threat herself.
- Ability Cost Awareness: While Tailwind is free, Cloudburst (200c each) and Updraft (150c) represent a non-trivial investment. Their costs were increased in past patches, partly to balance their impact, especially on crucial pistol rounds. Using these abilities frivolously – unnecessary smokes or speculative Updrafts – can negatively impact both personal and team economy. Prudent use is essential.
- Risk Management: Jett's aggressive playstyle inherently carries the risk of early deaths. Frequently losing expensive weapons like Operators or Vandals due to risky plays can cripple a team's economy. Balancing aggression with survival and considering the economic implications of each play is vital. Sometimes, a safer approach that preserves resources is the smarter long-term strategy.
- Tailwind's Intrinsic Value: The fact that Tailwind is free and refreshes on two kills provides consistent economic value throughout a match. Successfully securing those two kills to regain the dash charge significantly boosts Jett's impact without additional credit expenditure.
Section 4: Synergies & Threats - Navigating Team Dynamics
Jett's effectiveness is significantly influenced by her team composition and the threats posed by the enemy lineup. Understanding agent synergies and how to counter potential threats is crucial for maximizing impact.
4.1 Agent Synergies: Amplifying Jett's Power
Jett, as a primary entry fragger, thrives when paired with agents who can facilitate her aggressive pushes, provide crucial information, offer supportive cover, or mitigate the risks she takes.
Controllers (Vision Blockers):
- Omen: A classic pairing. Omen's rechargeable Dark Cover smokes provide excellent, flexible cover for Jett's dashes and site entries. His Paranoia flash can blind common angles Jett needs to push through. On maps with teleporters like Bind, their combined global presence can enable potent flanks.
- Brimstone: Long-lasting Sky Smokes offer reliable cover for executes. Incendiary can clear out tight corners or delay pushes into areas Jett controls. Stim Beacon offers a niche speed/fire rate boost.
- Viper: Toxic Screen provides a wall to split sites, guiding Jett's entry path. Viper's Pit creates a deadly playground for a Blade Storm Jett, limiting enemy vision while she hunts freely. Their combined utility offers strong post-plant control.
- Astra: Global Star placement offers versatile smoke cover. Gravity Well can trap enemies for Jett or hold flanks, while Nova Pulse can concuss key angles.
- Harbor: Cove offers a unique, temporary shield bubble that Jett can potentially dash into for safety. The High Tide water wall can guide entries effectively.
Initiators (Information & Disruption):
- Sova: The quintessential info partner. Recon Bolt reveals enemy positions, allowing Jett to dash or peek with significantly reduced risk. Owl Drone clears angles safely or tags enemies for Jett to eliminate. Shock Darts can flush defenders from cover into Jett's line of sight. A historically dominant and reliable pairing.
- Skye: Guiding Light provides powerful flashes to blind defenders during Jett's entry. Trailblazer (dog) can scout close corners, preventing surprises. Seekers hunt down opponents, creating distractions or revealing locations. A strong offensive initiator synergy.
- KAY/O: FLASH/drive offers potent flashes for entry. ZERO/point is invaluable, suppressing enemy abilities like Sentinel traps or counter-utility, paving the way for safer dashes. NULL/cmd provides large-scale site disruption and ability denial. An extremely strong pairing for aggressive Jett plays.
- Breach: Perhaps the ultimate enabler for hyper-aggressive Jett entries. Aftershock clears common hiding spots. Flashpoint blinds through walls, neutralizing angle holders. Fault Line stuns defenders, making them easy targets for a dashing Jett. Rolling Thunder offers unparalleled site disruption, allowing Jett to capitalize on the chaos. This duo excels at forceful site takes.
- Fade: Haunt provides area reconnaissance. Prowlers clear close angles. Seize can lock down enemies, preventing escapes from Jett's push. A solid information and control pairing.
- Gekko: Dizzy offers rechargeable blinds. Wingman provides the unique ability to plant or defuse the spike, freeing Jett to focus on combat or cover. Mosh Pit clears space or denies areas. A versatile initiator pairing.
Sentinels (Support & Security):
- Sage: Crucial for sustainability. Healing Orb allows Jett to recover from damage taken during aggressive plays, maximizing her uptime. Slow Orbs impede enemy aggression or retakes. Barrier Orb can block sightlines, create temporary safe zones for Jett, or even provide unconventional boosts. A very strong supportive synergy.
- Cypher: Provides vital flank security with Trapwires and Spycam, allowing Jett to push forward with less worry about being caught from behind. Cyber Cages can offer temporary visual cover.
- Killjoy: Turret watches flanks or provides crossfire during site holds. Nanoswarm and Lockdown excel in post-plant scenarios, securing rounds after Jett has created the initial opening. Strong defensive synergy, especially on maps like Icebox or Ascent.
- Chamber: (Post-nerf) Primarily offers flank watch with Trademark. Rendezvous teleports offer less synergy than before but can still allow Chamber to hold aggressive angles alongside Jett.
Duelists (Double Duelist Compositions):
- Raze: Combines Jett's dash with Raze's Blast Packs and Paint Shells for explosive, fast site takes, particularly effective on maps with tight chokes like Split or Bind.
- Neon: Offers similar high-speed entry potential. Neon's Fast Lane wall can provide cover, while her Relay Bolt stuns can set up Jett's dash.
- Yoru: Can create diversions using Gatecrash teleports or Dimensional Drift ultimate while Jett makes the primary entry push.
- Phoenix: Curveball flashes can assist Jett's entry. Run It Back allows Phoenix to gain aggressive information safely.
4.2 Common Counters & How to Overcome Them
Jett's high mobility makes her a potent threat, but she is not without counters. Agents who can restrict her movement, disable her abilities, or punish predictable aggression can effectively neutralize her.
| Counter Agent | Key Threat Abilities | How to Play Against Them |
|---|---|---|
| Cypher | Trapwire (Reveal/Stun), Cyber Cage (Vision Block) | Use recon utility to spot traps; have teammates clear; avoid dashing blindly; play slower if needed. |
| Killjoy | Turret (Detection/Damage), Nanoswarm (Area Denial) | Clear Turrets before pushing; avoid lingering in smokes on common spots; bait out Nanoswarms. |
| Sage | Slow Orb (Movement Slow), Barrier Orb (Block Path) | Avoid dashing into Slow Orbs; use Cloudbursts carefully; break/go around walls; anticipate defensive wall placements. |
| KAY/O | ZERO/point (Suppress), NULL/cmd (Suppress) | Track ult status; bait suppression knife; play around timers; rely on gunplay if suppressed. |
| Breach/Skye/Phoenix | Flashes, Stuns | Learn audio cues to turn from flashes; use Cloudbursts for temporary cover; avoid tight corners; coordinate counter-utility/trades. |
| Chamber/Enemy Jett/OP | High-Damage Sniping, Mobility (Jett) | Avoid dry peeking common angles; use utility to displace; use unpredictable movement (Updraft/Glide peeks); coordinate double peeks with teammates. |
Section 5: Avoiding Turbulence - Common Jett Pitfalls
Even experienced players can fall into bad habits. Recognizing and correcting common mistakes is crucial for consistent performance and climbing the ranks as Jett.
5.1 Reckless Aggression & Bad Timing:
Mistake: The most frequent pitfall is mistaking mobility for invincibility. This manifests as dashing onto sites without information, team support, or a coherent plan. Dashing predictably through multiple enemy utilities (mollies, slows) is another common error. Taking unnecessary duels before the team is ready or dying before even using Tailwind wastes potential impact. Over-peeking angles or swinging too wide, relying solely on dash to escape, is also detrimental.
Correction: Emphasize coordinated entries. Wait for team utility (smokes, flashes, recon) before committing. Always use Cloudbursts to create cover for dashes. Gather information before dashing – use jump peeks, ask for initiator utility. Understand the risk versus reward of each aggressive play. Vary entry timings and paths; don't dash the same way every round. Remember to activate Tailwind before needing it.
5.2 Poor Utility Usage:
Mistake: Ineffectively placed Cloudbursts that fail to block key sightlines, accidentally create one-ways favoring the enemy, or are simply wasted. Using the single Updraft charge predictably or in positions easily traded or spammed. Consistently forgetting to pre-activate Tailwind, rendering it useless in critical moments. A critical error during entry is "tunnel visioning" – staring straight ahead into the smoke while dashing instead of actively clearing close corners left and right. Holding Blade Storm for too long, missing opportunities on eco rounds, or activating it in clearly unwinnable situations. Misusing Blade Storm's right-click – firing it at medium/long range, or using it when securing the refresh with left-clicks is more valuable.
Correction: Actively practice Cloudburst placements and curves in custom games to understand their coverage and potential for one-ways. Learn effective and less predictable Updraft spots through guides and experimentation. Build the muscle memory for pre-activating Tailwind. Consciously practice the mid-dash clearing technique, focusing on the minimap. Use Blade Storm proactively on save/eco rounds or when it provides a clear advantage. Internalize the optimal ranges and situations for Blade Storm's left-click (precision, refresh) versus right-click (close-range burst, no refresh).
5.3 Neglecting Team Play:
Mistake: Operating in a vacuum. Failing to communicate entry plans, dash timings, or requests for support utility. Dashing in far ahead of the team without waiting for smokes or flashes, leading to an isolated death. Focusing solely on individual kills rather than creating space or playing for trades. Baiting teammates by using them as distractions without intent to capitalize.
Correction: Use voice comms proactively and clearly ("Dashing Catwalk smoke in 3," "Need Sova dart A Main before dash"). Wait for the visual/audio cues of friendly utility before executing. Understand that Jett's primary role as an entry is to enable the team push, even if it means dying to secure a trade. Play with the team, not just ahead of them.
5.4 Movement & Aim Incoordination:
Mistake: Difficulty hitting shots accurately during or immediately after using movement abilities. Panicking in close quarters and spraying inaccurately with Blade Storm instead of relying on its precision. Failing to stop movement completely before firing standard weapons, leading to inaccuracy. Allowing Jett's own rapid movement to disrupt personal crosshair placement and aim.
Correction: Practice fundamental shooting mechanics like counter-strafing (tapping the opposite movement key to stop instantly before shooting). Drill Blade Storm aim specifically while incorporating movement (strafing, jumping, gliding) in the range or aim trainers. Maintain focus on crosshair placement even during high-speed maneuvers. Build hand-eye coordination through consistent practice.
5.5 Over-Rotating / Poor Game Sense:
Mistake: Leaving a site undefended based on minimal information or sound cues from the other side of the map (over-rotating). Mindlessly pushing through enemy smokes without information or support. Failing to utilize the minimap effectively to track teammate positions, spotted enemies, and ability usage.
Correction: Exercise patience on defense. Wait for confirmed enemy presence (visual contact, multiple ability uses, spike plant) before committing to a full rotation. Use Jett's mobility for quick, safe information peeks (jump peeks, quick dash peeks) before deciding to rotate. Constantly reference the minimap for crucial game state information and make decisions based on the broader tactical picture.
"They call me a prodigy. But no one knows about the hours I spent training in my nation's air force. The endless academy drills. The trial and error learnings. Hard work pays off. And now, I can catch 'em in the wind."
Conclusion
Jett remains one of Valorant's most electrifying and impactful agents. Her kit offers unparalleled mobility, potent entry fragging capabilities, and a high skill ceiling that rewards mechanical mastery and strategic thinking. From the subtle control of Glide to the explosive potential of a well-executed Tailwind entry or the fight-turning power of Blade Storm, Jett provides the tools to dictate the pace of a match.
However, true mastery extends beyond flashy mechanics. It demands a deep understanding of ability nuances – the critical timing of Tailwind activation, the strategic value of the single Updraft charge, the precise application of Cloudbursts for cover or one-ways, and the distinct roles of Blade Storm's firing modes. It requires integrating Jett's individual power with team strategy, coordinating entries, leveraging synergies, and navigating counter-picks effectively. Most importantly, it necessitates embracing calculated aggression over reckless abandon, using mobility as a tool for intentional, impactful plays rather than chaotic solo endeavors.
The path to mastering Jett is demanding, requiring dedicated practice in movement, aim, and tactical application. Yet, the reward is the ability to embody one of Valorant's most dynamic and game-changing playstyles. Embrace the challenge, refine the mechanics, sharpen the game sense, and coordinate with the team. Take the calculated risks, control the tempo, harness the gale – and become the storm your opponents fear.