
Valorant's roster boasts a diverse array of agents, each bringing unique tactical advantages to the battlefield. Among them stands Skye, the Australian Initiator whose connection to the natural world translates into potent abilities for both scouting and supporting her team. Mastering Skye requires a deep understanding of her multifaceted kit and the strategic flexibility to leverage her powers effectively across various scenarios.
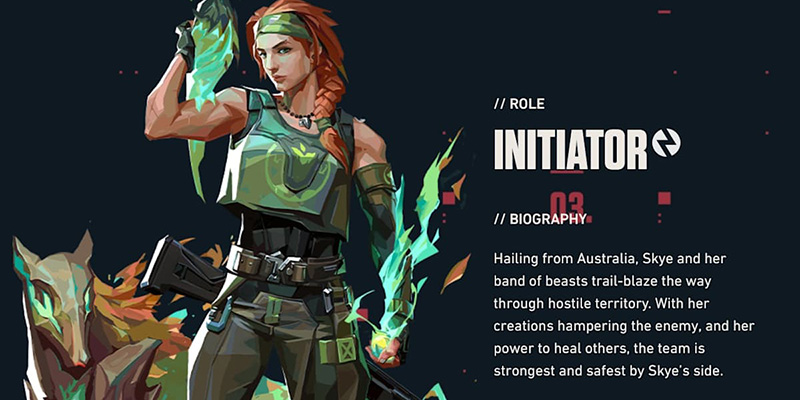
Skye's Origins: The Australian Eco-Warrior Initiator
Hailing from the woods of Nimbin, Australia, Skye, also known as Kirra Foster, enters the Valorant Protocol as its 14th Agent. Her official description paints a picture of an agent leading her "band of beasts" to "trail-blaze the way through hostile territory," using her creations to hamper enemies while simultaneously possessing the power to heal her allies, making the team "strongest and safest by Skye's side".
Described by developers as an "Australian eco-warrior", Skye's design is deeply rooted in nature. She utilizes hand-carved wooden totems or trinkets, seemingly activated by Radiant powers, to summon her animal companions: a hawk ('Hawko', likely a Brown Goshhawk), a Tasmanian tiger, and jellyfish-like Seekers. Her voice lines suggest a past spent isolated in the wilderness, relying on her pack and honing tracking skills, reflected in her callouts like "time to hunt" and "I've got your trail". This lore paints a picture of self-sufficiency and a deep connection to the wild, further reinforced by player cards depicting her reclaiming Australian land from the Kingdom Corporation.
Hybrid Power: Understanding Skye's Unique Role (Initiator/Healer/Info-Gatherer)
Skye is classified as an Initiator, a role defined by agents who excel at starting engagements, gathering information, and disrupting enemy positions to create advantages for their team. She fulfills this role primarily through her Trailblazer ability, which scouts ahead and concusses enemies, and her Guiding Light flashes, which blind opponents and provide auditory confirmation of their presence.
What sets Skye apart is her unique hybrid nature. Unlike other primary Initiators like Sova or Breach, Skye possesses a significant area-of-effect healing ability, Regrowth. This places her in a distinct category, blending the proactive engagement tools of an Initiator with the reactive sustain typically associated with support agents or Sentinels like Sage.
This duality has sparked debate within the player community regarding her primary function. While some players might fixate on her healing, it's crucial to understand that her official classification and core design revolve around initiation. Her flashes and scouting tool are paramount for taking space and setting up plays. Regrowth, while powerful and capable of healing multiple allies simultaneously, is a secondary, albeit highly valuable, aspect of her kit. Its use is often situational, best deployed after engagements or during safe moments, unlike the constant pressure applied by her initiation tools.
This hybrid kit introduces a unique resource management challenge inherent to playing Skye effectively. Players must constantly weigh the allocation of credits and ability usage between initiating plays (costly Trailblazer and Guiding Light charges) and providing support (cheaper Regrowth). A full initiation loadout (two flashes, one Trailblazer) costs 800 credits, significantly impacting weapon and armor purchases compared to prioritizing the heal. This economic and tactical balancing act forces Skye players to make critical decisions based on team composition, the current round's economy, the state of the game (attack vs. defense, execute vs. default), and communication with their team.
Why Master Skye? Her Impact and Versatility
Skye's comprehensive toolkit makes her one of Valorant's most flexible and impactful agents. Her strengths lie in:
- Information Gathering: Trailblazer provides safe scouting, while Guiding Light's audio cue confirms enemy presence.
- Enemy Disruption: Guiding Light flashes blind opponents, Trailblazer concusses them, and Seekers apply nearsight, breaking defensive setups and creating openings.
- Team Sustain: Regrowth offers significant area-of-effect healing, keeping teammates in the fight longer.
- Ultimate Power: Seekers provide invaluable information and disruption for site executions and retakes.
Her high pick rate on maps like Bind and her synergy with various agent compositions highlight her value. However, unlocking Skye's full potential demands more than just understanding her abilities; it requires mastering the nuances of utility deployment, making astute tactical decisions under pressure, and coordinating effectively with teammates. This guide aims to provide the knowledge and strategies necessary to achieve that mastery.
Skye's Arsenal: A Detailed Ability Breakdown
Understanding the precise mechanics, costs, and optimal uses of each ability is fundamental to playing Skye effectively.
| Ability Name | Key (Default) | Cost | Max Charges | Key Stats | Primary Use |
|---|---|---|---|---|---|
| Regrowth | C | 150 Credits | 1 | 100 HP Heal Pool (AoE, LOS), Channeled, Cannot Self-Heal | Team Healing (Post-Fight/Retake Prep) |
| Trailblazer | Q | 300 Credits | 1 | 80 HP, 6.5s Duration, 2250 Vision Radius, Leap -> 4s Concuss AoE (+ Direct Hit Damage), Controllable | Scouting, Clearing Corners, Initiating, Stunning |
| Guiding Light | E | 250 Credits | 2 | 2s Hawk Duration, 1-2.25s Scaled Flash Duration (0.3s windup), Controllable Flight, Audio Confirmation Cue | Flashing, Information Gathering, Initiating |
| Seekers | X (Ultimate) | 8 Points | 1 | 3 Seekers, 120 HP each, Track Closest 3 Enemies, Nearsight on Contact, Destructible | Site Executes, Retakes, Information Gathering |
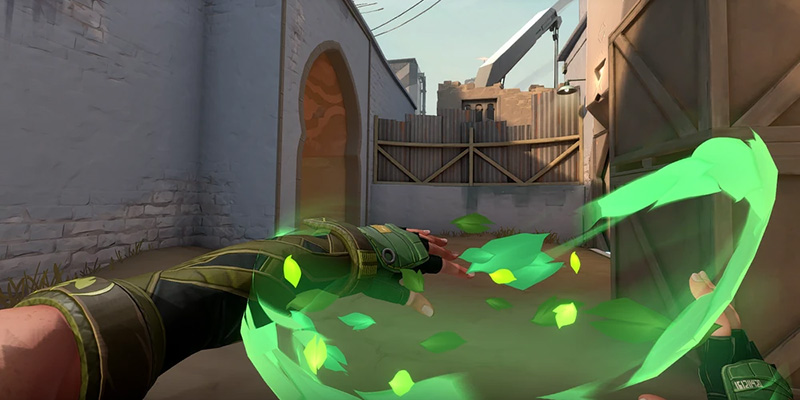
Guiding Light (E): Mastering the Hawk
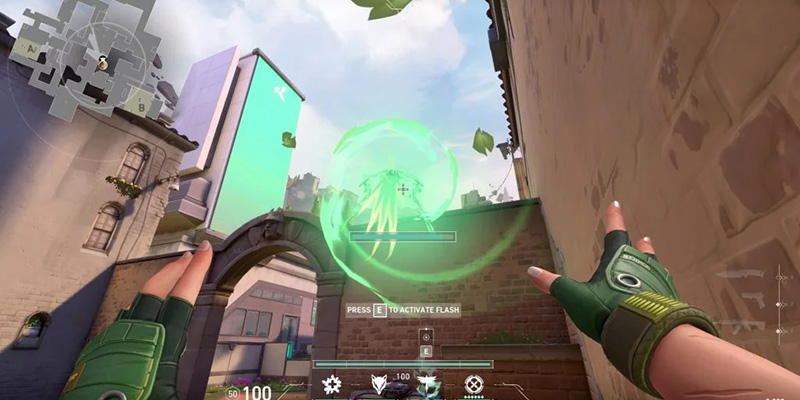
Skye's signature ability, Guiding Light, is a versatile tool used for both blinding enemies and gathering crucial information.
Mechanics: Pressing 'E' equips the hawk trinket. Firing sends the hawk forward in a straight line, but holding the fire button allows the player to guide its flight path towards their crosshair. Re-pressing 'E' while the hawk is airborne transforms it into a blinding flash. Skye carries a maximum of two charges, each costing 250 credits. The hawk itself lasts for 2 seconds in the air. The flash duration scales based on flight time before detonation, reaching a maximum duration (potentially 2.25s, based on patch 5.07 data, though verification is advised) after a brief charge-up. There's a 0.3s windup before the flash activates after re-pressing 'E', and an unequip delay of 0.85s before Skye can fire her weapon. A significant change in patch 5.07 made the hawk indestructible.
Audio Confirmation Cue: A key feature is the distinct audio cue that plays if the flash successfully blinds an enemy within its line of sight and range. This sound confirmation is invaluable for gathering intelligence – hearing the cue confirms enemy presence, while silence suggests the flashed area was clear (at least within LOS of the flash detonation).
Techniques:
- Pop-flashing: This involves detonating the flash almost immediately after it clears a corner or obstacle, giving opponents minimal time to react or turn away. Standing close to the angle being flashed allows Skye or her teammates to peek sooner after the detonation. Pop-flashes are essential for aggressive entries, clearing close angles, and flashing out of smokes.
- Curving for Angles: The ability to guide the hawk is paramount. Skilled players maneuver the hawk around corners, over high cover, through windows (like B Main on Ascent), or via ceiling openings (like Showers on Bind) to flash specific, often hard-to-reach spots without exposing themselves. Utilizing the minimap to track the hawk's icon is crucial for precise timing and placement, especially for flashes over longer distances or complex paths.
- Information Flashes: Leveraging the audio confirmation cue is a core Skye skill. Sending a flash into a suspected area (e.g., checking A Main early, scouting a flank) primarily to listen for the "blinded" sound provides confirmation of enemy presence without requiring a visual peek.
- Faking Flashes (Obsolete): Prior to Patch 8.01, Skye could send the hawk out and not detonate it, baiting enemies into turning away prematurely. This technique is no longer possible. The automatic detonation at the end of the hawk's flight removed this layer of mind games. Any mention of "fake flashes" refers to this now-removed mechanic.
- Coordination: Effective Guiding Light usage demands communication. Announcing flash intentions ("Flashing Haven C Long!") prevents blinding teammates and allows them to coordinate pushes. Flashing for teammates, often using off-angles or high paths to hit enemies while allies push safely, is a primary function.
Consequently, the trade-off between using a flash for pure information versus saving it for a blinding engagement becomes more pronounced. While the audio cue remains a powerful info tool, expending one of only two charges just to check an area might be less efficient compared to pre-patch Skye or other initiators like Sova or Fade with rechargeable info tools. Players must carefully evaluate if confirming presence with a flash is worth potentially lacking blinding power later. This might lead to increased reliance on Trailblazer for initial scouting, reserving Guiding Light for moments where its blinding effect is most needed.
Trailblazer (Q): Unleashing the Predator
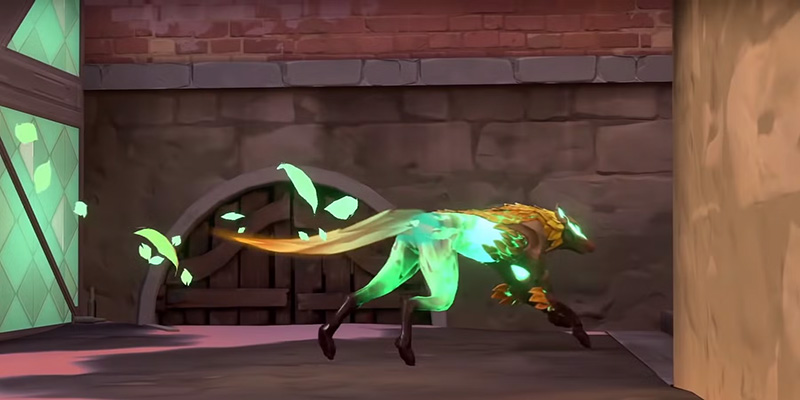
Often referred to as the "dog" or "wolf," Trailblazer is Skye's primary scouting and disruption tool.
Mechanics: Activating 'Q' equips the Tasmanian tiger trinket. Firing sends the predator forward, and Skye takes control in a first-person perspective with somewhat limited, stylized vision. The Trailblazer lasts for 6.5 seconds and has 80 HP. It costs 300 credits and Skye can hold one charge. While controlling the tiger, pressing 'Fire' initiates a forward leap, causing an explosion upon impact that concusses enemies in an area for 4 seconds. A direct hit with the leap itself also deals minor damage (historically 30 HP, requires confirmation). Only one leap is possible per use. Enemies can destroy the Trailblazer, but it is immune to allied damage. Patch 7.12 introduced several key changes: Trailblazer now concusses allies caught in the blast radius, camera movement is disabled during the leap, and it no longer explodes if destroyed mid-leap. Its vision radius is 2250 units.
Scouting Strategies: The primary function of Trailblazer is to gather information without risking Skye or her teammates. It excels at clearing close corners, checking common hiding spots (like U-Haul on Bind or Generator on Ascent), and navigating tight corridors where direct peeking is dangerous. Effective pathing is crucial to cover maximum ground before the timer expires or the tiger is destroyed. Jumping while controlling the tiger can sometimes help maintain forward momentum to clear deeper areas. Aiming the Trailblazer towards the ground or enemy feet can make it a slightly harder target to hit quickly.
Aggressive Use: The leap and subsequent concussion provide potent initiation potential. Stunning an enemy allows teammates (or Skye herself, if positioned closely) to swing for an easier kill. It can effectively disrupt defenders holding angles or flush them out of position. Combining Trailblazer with Guiding Light is common: flashing first can make the dog's approach safer, while dogging first can confirm a target for a follow-up flash and push.
The addition of allied concussion in Patch 7.12 significantly impacts Trailblazer's usage, particularly in aggressive scenarios. Previously, Skye could leap into a site relatively recklessly near teammates. Now, a misplaced leap intended for an enemy can easily concuss nearby allies pushing alongside the Trailblazer, potentially losing the engagement. This necessitates much greater spatial awareness and clearer communication regarding the Trailblazer's path and intended leap target, especially when coordinating close-quarters pushes.
Compared to Sova's Owl Drone, often seen as the benchmark for initiator scouting tools, Trailblazer offers distinct advantages and disadvantages. The drone typically has a longer duration, higher vantage points, and tagging capability for passive info gathering over larger areas. Trailblazer, however, is faster, though more fragile and with a shorter duration and more limited vision. Its key differentiator is the concussive leap. This makes Trailblazer far more effective at actively forcing enemies out of common angles and initiating contact, whereas the drone primarily gathers information passively. The choice between Skye and Sova often hinges on whether the team needs the active disruption and close-corner clearing of Trailblazer or the safer, longer-range reconnaissance of the Owl Drone.
Regrowth (C): Sustaining the Pack
Regrowth is Skye's unique healing ability, providing valuable sustain for her team.Mechanics: Equipping the 'C' trinket allows Skye to channel a healing aura by holding the fire button. This heals all allies within a circular radius and within her direct line of sight. The ability has a total healing pool of 100 HP per charge. The heal rate is reportedly 20 HP per second. Crucially, the pool depletes at a constant rate whether healing one ally or multiple allies simultaneously. Skye can hold one charge, costing 150 credits, and can continue channeling until the pool is empty. Skye cannot heal herself with this ability. Channeling Regrowth requires Skye to holster her weapon, leaving her vulnerable. It is generally considered slower than Sage's Healing Orb. Using Regrowth to heal a teammate who subsequently gets a kill grants Skye an assist.
Strategic Healing:
- Timing: The vulnerability during channeling makes timing critical. Regrowth is best used during lulls in the action: after a fight concludes, while rotating between sites, or specifically when preparing for a site retake. Healing during an active gunfight is highly risky and generally discouraged. There might be a short delay before healing can affect an ally who just took enemy damage, further emphasizing its use outside direct combat.
- Positioning: To maximize the efficiency of the 100 HP pool, Skye should position herself to encompass as many injured allies as possible within her line of sight and the circular range. Since she is defenseless while healing, doing so from cover or having teammates provide protection is essential.
- Pool Management: The fixed 100 HP pool requires tactical decisions. Is it better to fully heal one low-HP teammate or distribute the healing to top off several allies with moderate damage? While maximizing output is ideal, delaying heals excessively can mean lost opportunities; using it whenever safely possible to mitigate chip damage is often advised.
- Economic Value & Prioritization: At 150 credits, Regrowth is relatively inexpensive. It offers particularly high value during pistol rounds, where armor is less prevalent and chip damage is common. However, its purchase often competes with the desire for full initiation utility (Trailblazer), especially on attack rounds where information and entry tools might be deemed more critical. Skye's primary role remains initiation; healing is a powerful, but secondary and situational, benefit.
Comparing Regrowth to Sage's Healing Orb highlights their different strengths. Sage offers reliable, instant, single-target healing that can be used on herself, recharges over time, and potentially works through obstacles. Skye provides efficient multi-target healing from a limited pool, requires channeling and line of sight, and offers no self-sustain. Skye's vulnerability while channeling is a significant drawback. Therefore, Skye excels at topping off multiple teammates after an engagement, maximizing the value of her heal pool, while Sage is superior for clutch single-target saves and personal survivability. They fill distinct healing roles rather than being direct replacements.
Beyond the raw numbers, the mere presence of Skye's Regrowth can have a psychological impact on team play. Knowing that chip damage can potentially be healed might encourage teammates to take more calculated risks, hold angles longer, or engage in trades they might otherwise avoid. Even if the heal isn't used every round or doesn't prevent lethal headshots, the possibility of sustain alters the team's risk assessment and can enable slightly more aggressive positioning or health trading.
Seekers (X): Hunting Down the Enemy
Skye's ultimate ability, Seekers, unleashes a trio of trackers that hunt down opponents, providing valuable information and disruption.
Mechanics: Costing 8 ultimate points, activating 'X' equips the Seeker trinket. Firing releases three autonomous Seekers that automatically track the three nearest enemies to Skye's location at the time of casting. If fewer than three enemies are alive, only one or two Seekers will be deployed accordingly. Each Seeker has 120 HP and can be destroyed by enemy fire or abilities. They are, however, immune to damage from allies. If a Seeker successfully reaches its target, it detonates, applying the Nearsight effect (similar to Omen's Paranoia) for approximately 3-4 seconds. Targeted enemies receive a yellow directional warning indicator on their screen when a Seeker gets close, alerting them to the incoming threat. Recent patches have improved the Seekers' ability to navigate around obstacles to reach their targets more reliably. While initially invisible, they become visible as they close in on a target and are not revealed on the minimap while invisible unless an enemy has direct line of sight to their hidden location.
Deployment Tactics:
- Site Executes: Seekers are a powerful tool for initiating attacks onto bombsites. They force defenders to choose between shooting the incoming Seeker (revealing their position) or repositioning and potentially suffering the Nearsight effect. Coordinating the team's push to follow closely behind the Seekers maximizes pressure.
- Retakes: Seekers are exceptionally valuable during retake scenarios. Deploying them before entering the site reveals the locations of entrenched defenders, allowing for a more organized and less chaotic retake attempt.
- Mid-Round Information: In situations where enemy locations are unknown, Seekers can provide crucial mid-round intelligence. This information can inform rotations, flank watches, or late-round strategies. For maximum value, it's best used when at least three enemies remain alive.
- Post-Plant Control: After planting the spike, deploying Seekers can help locate defenders attempting to rotate for the retake, revealing their approach paths and numbers.
Seekers fulfill a dual role of information gathering and disruption. The information comes from tracking the path of the Seekers, revealing the general direction and location of the three closest enemies. The disruption stems from forcing enemies to react – either by shooting the Seekers (which reveals their precise location and diverts their attention) or by suffering the Nearsight effect, which severely hinders their combat effectiveness. The primary value shifts depending on the game state. In a slower mid-round, the information might guide a strategic rotation. During a chaotic site execute, the disruption caused by forcing multiple enemies to deal with Seekers while simultaneously dodging flashes and utility is the main objective.
As player skill increases, opponents become more adept at quickly identifying and destroying Seekers. This means that at higher levels of play, simply casting the ultimate in isolation is often insufficient. Effective Skye players must actively support their Seekers by layering them with other abilities, particularly Guiding Light flashes. This forces enemies into a difficult dilemma: turn to dodge the flash and risk being hit by the Seeker, or focus on shooting the Seeker and get fully blinded. This synergy significantly increases the ultimate's success rate and impact against experienced opponents.
Strategic Playbook: Excelling as Skye
Mastering Skye goes beyond knowing her abilities; it requires understanding how to apply them strategically and dynamically throughout a match.
The Initiator's Balance: Aggression vs. Support Decision-Making
Skye's core function as an Initiator is to create advantageous engagements for her team by gathering information, disrupting enemy positions, and providing support. Her hybrid kit, however, necessitates a constant balancing act: when should utility be used aggressively to secure kills or space, and when should it be reserved for information, healing, or safer plays?
The optimal decision hinges on several factors:
- Team Composition: Is Skye the sole initiator, requiring her to handle most info-gathering and entry flashing? Or is she paired with another initiator (like KAY/O or Breach), allowing for layered utility and potentially more specialized roles? Does the team have aggressive duelists (like Jett or Raze) who can capitalize immediately on pop-flashes?
- Game State: Early round might prioritize info flashes or cautious Trailblazer scouting. Site executes demand coordinated flashes and potentially Seekers. Retakes call for healing, Seekers for info, and flashes/dogs for clearing. Clutch situations might require using utility selfishly for kills.
- Economy: Can the team afford full utility buys? Is saving Regrowth for a crucial heal more valuable than buying Trailblazer on a tight budget?
- Communication: Can complex plays involving multiple pieces of utility be effectively coordinated with teammates?
Ultimately, the "correct" balance between aggression and support isn't static; it's a dynamic assessment based on real-time factors. A frequent pitfall observed in gameplay analysis is the use of utility without clear intent or coordination. True mastery of Skye involves developing the game sense to understand the purpose behind each ability use – whether it's for aggressive space-taking, information gathering, or team sustain – and communicating that purpose effectively to enable coordinated team play. This elevates Skye play beyond mere mechanical execution.
Attacking with Skye
On attack, Skye's primary objective is to facilitate her team's entry onto sites and secure control.
Leading the Push: Skye typically positions herself slightly behind the initial entry fraggers. From there, she uses Trailblazer to scout ahead, clearing immediate corners and potential ambush spots in chokepoints like A Main on Ascent or Bind's Hookah entrance. This initial scout is often followed by a well-placed Guiding Light flash, curved around the entry corner or popped high over cover, to blind defenders holding common angles and create space for duelists to push in. Clear communication ("Flashing site!") is essential to time the team's push with the flash detonation.
Executing Sites: For full site executes, Skye's ultimate, Seekers, is a powerful initiator. Deploying Seekers forces defenders to react, revealing their positions or suffering nearsight as the attacking team floods the site. Layering utility is key: combine Seekers with Guiding Light flashes and potentially allied smokes or damaging abilities to overwhelm the defense. Trailblazer can be used during the execute to specifically clear stubborn corners or concuss defenders pushed off angles by other utility. Regrowth should generally be saved for after space is secured or during pauses in the execute, allowing Skye to remain combat-ready during the initial push.
Post-Plant Scenarios: Once the spike is planted, Skye's utility remains valuable. Seekers can be deployed to hunt down remaining defenders attempting to retake or flank, providing crucial information on their location and numbers. Guiding Light can be used as an info flash towards common retake paths (like CT spawn or the opposite site's connector) to gain early warning. Trailblazer can scout these paths or potentially concuss an enemy attempting to defuse the spike. Regrowth can sustain teammates holding post-plant angles who may have taken damage during the execute.
Skye's attacking role is fundamentally about enabling her team. Her information gathering and disruption tools make it safer and easier for duelists and other teammates to take control of sites. While she is capable of securing kills off her own utility, especially well-placed pop-flashes, her primary contribution on attack is facilitating the team's success rather than being the main fragger herself.
Defending with Skye
Early Information & Map Control: At the start of defensive rounds, Skye can use Guiding Light to gain early information about attacker presence in key areas like Ascent A Main or Bind B Long, listening for the audio cue. This intel allows the team to make informed decisions about rotations or setting up crossfires. Trailblazer can be used proactively to scout potential pushes (e.g., down Split A Main) or contest early map control, forcing attackers to reveal their intentions or expend utility. However, care must be taken not to waste utility reacting to fake pressure or predictable plays. Varying starting positions each round prevents Skye from becoming predictable.
Stalling Pushes & Site Holds: When attackers commit to a push, Skye's utility can significantly slow their advance. Trailblazer sent into a chokepoint can concuss the lead pushers, buying valuable time for rotations. Well-timed Guiding Light pop-flashes can punish attackers as they exit smokes or round corners, either securing kills or forcing them back. Skye should aim to play from relatively safe positions during site holds to avoid being traded early and preserve her utility for later in the round or for a retake. Regrowth can be used to heal teammates holding angles who have absorbed chip damage, increasing their longevity.
Retake Mastery: Skye is arguably one of the strongest agents for orchestrating site retakes. Before initiating the retake, she can use Regrowth to heal damaged teammates, ensuring they enter the fight with more health. Deploying Seekers as the retake begins provides critical information on enemy locations within the site, reducing the guesswork and allowing for a more coordinated push. Guiding Light flashes, often curved over site walls or sent through high openings like Rafters doorways, can blind defenders as the retaking team enters. Trailblazer can then be used to clear specific dangerous corners (like behind boxes or in cubbies) that flashes might miss during the retake push. Effective retakes rely heavily on coordinating this sequence of utility with the team's movement.
Skye's defensive prowess stems from her ability to deny information and disrupt attacker plans. Proactive use of flashes and Trailblazer can make it difficult for attackers to gain map control easily, forcing them to use their own utility prematurely. Her exceptional retake potential, combining healing, site-wide information gathering via Seekers, and targeted disruption with flashes and Trailblazer, makes her a formidable anchor and a key component of many successful defensive strategies.
Map Mastery: Skye Across the Battlefields
While Skye is versatile, her effectiveness can vary depending on the map's layout. Understanding map-specific strategies is key to maximizing her impact.
Key Flash & Trailblazer Spots/Paths (Attack & Defense Focus)
| Map | Guiding Light (Flash) Spots | Trailblazer Paths |
|---|---|---|
| Ascent |
Attack: Pop-flash A Main entry, flash B Main through window, flash high over A site boxes from Short, flash B site from Long or Hookah, flash Mid from Market. Defense/Retake: Flash A Main push from Pyramid, flash Mid push from Tree, retake flashes for A from Link/Spawn/Stairs/Screens, retake flash for B from Defender Spawn or backsite/Fence. Info flashes for B Heaven or deep A Main through Halls. Flash A Backsite for info. Flash Mid Doors towards A. |
Attacking A: Path from A Main corner to clear close left/right, Generator, and Hell. Attacking B: Path from back B Main to clear close angles, Logs, Boathouse, and onto site. Attacking Mid: Path from Mid corner towards Catwalk to clear Mail, Heaven, and potentially CT stairs. Scouting A site from Drop. Clearing Tree area when splitting A. |
| Bind |
Attack: Flash high around A Short corner from Lobby, flash through Showers ceiling hole or curve around corner. Flash high over B site from Long, flash through Hookah window or over the right wall. Defense: Check B Short from Hookah or B Window, check Hookah push from Market. Info flashes/checks via TPs (A Lobby from B TP, Bath from B TP, A TP exit). |
Attacking A: Path from A Short corner to clear Cubby, U-Haul, and site entry. Path through Showers to clear corners towards site. Attacking B: Path from B Long to clear TP entrance and Garden cubby. Using Trailblazer through TP can apply pressure or gather info on the other side (e.g., Dog from B Long TP towards Bath/Hookah). |
| Haven |
Attack: Flash A Long entry, flash A Site. Flash B Main/Long. Flash C Long for info or entry. Defense: Early info for A Main/Root, B Main, C Sand/Mound. Retake flashes for A Site (from various angles like Dugout, Secret), B Site (from Link, through window). Flash B Rope area from Arcade. |
Attacking A: Path from A Main corner to clear close angles, flower pot, and Elbow. Combine with flash to clear A Site/Tree. Attacking C: Path from C Long to clear close left, site corner, and towards Boba. Defense: Defensive B Main info dog. |
| Split |
Attack: Flash over boxes near Pillar to peek Top Mid. Flash B Tower/Heaven. Flash A Ramp or flash from A Lobby into Site. Defense: Flash from Under Tube high over Tube or flash upwards from Mid Doors. Info flash A Lobby. |
Attack: Clear towards B Heaven or Vents from Mid. Path from A Main. Path from B Main onto site. Defense: Scout A Halls/Main from Rope. Scout B Bench/Main from Tower. Clear A Halls from Halls Doors. |
| Lotus | General: Excellent for flashing through Viper/Harbor walls. Fast site entries and retakes. Specific flashes for C site/link. | Site Clearing: Effective for clearing C Site including Waterfall and behind boxes. Can clear A Site and check Tree. Essential for checking corners on site pushes. Scout key areas like A Main/Rubble and C Mound. Path from B Main to clear site. Execute variations for C site. |
Synergies and Counters: Team Dynamics
Skye's effectiveness is amplified when integrated thoughtfully into a team composition, and understanding how to play against her counters is equally important.
Building the Pack: Effective Agent Pairings and Team Compositions
Skye's flexibility allows her to fit into various team structures:
Aggressive Duelists (Jett, Raze, Reyna, Phoenix, Iso): Skye excels at setting up aggressive duelists for entry kills. Her Guiding Light flashes can blind defenders deep in sites or around corners, creating openings for duelists to dash, satchel, or peek safely. Trailblazer can clear initial angles or stun opponents for easy follow-up kills by these fraggers. Specific pairings like Skye/Reyna or Skye/Phoenix combine Skye's setup potential with the duelist's self-sufficient fragging power. Skye/Yoru combos, particularly on maps like Bind, use coordinated flashes and teleports for surprise attacks.
Wall Controllers (Viper, Harbor): Skye synergizes exceptionally well with agents who create large vision blockers. Guiding Light can be flown through Viper's Toxic Screen or Harbor's High Tide, blinding enemies on the other side without the hawk being visible beforehand. This interaction became a cornerstone of double controller compositions, and Skye's strength in these comps contributed to her high pick rate. Even with nerfs to Skye, this synergy remains potent.
Other Initiators (KAY/O, Breach, Fade, Sova): In double initiator compositions, Skye provides valuable healing and versatile info/flashes that complement the strengths of others. For example, she can flash alongside Breach's stuns or follow up Fade's Seize with Trailblazer. Pairing Skye with KAY/O offers both potent flashes and suppression/information denial. Combining with Sova provides both close-range (Trailblazer) and long-range (Recon Bolt) scouting options.
Sentinels (Killjoy, Cypher): While less direct synergy exists, Skye's utility can support Sentinel setups. Trailblazer can clear areas near Killjoy/Cypher utility to ensure safe placement or check for enemies attempting to destroy traps. Guiding Light can flash enemies revealed by Cypher's Spycam or Killjoy's Turret/Alarmbot. Skye's heal keeps these anchors healthy. In turn, Sentinels provide flank security, allowing Skye to focus her utility forward.
The viability of certain compositions, particularly double controller featuring Skye, has been impacted by nerfs (like the removal of Guiding Light recharge). Teams may need to adapt by running double initiator setups or relying more heavily on agents like Gekko or Fade if Skye's flashing consistency is reduced.
Facing the Hunt: Countering Skye and Adapting
Despite her strengths, Skye's utility has counterplay:
| Ability | Counter Strategies |
|---|---|
| Guiding Light | Although indestructible since patch 5.07, the flash itself can be dodged by turning away quickly. Skilled players anticipate common flash timings and angles. Playing further back on site or behind cover can mitigate the flash's impact, allowing players to reposition safely even if partially blinded. The auto-pop mechanic makes timing more predictable; players know a flash will come if the bird reaches its max duration. Counter-flashing with agents like Omen or KAY/O can disrupt Skye or her team attempting to follow up. |
| Trailblazer | The tiger has relatively low health (80 HP) and can be destroyed quickly with focused fire. Agents with rapid-fire weapons or shotguns can dispatch it easily at close range. Utility like Raze's Paint Shells or Sova's Shock Darts can also destroy it. Being aware of common Trailblazer paths allows players to pre-aim and destroy it before it gets close enough to leap or gather significant information. Since it now concusses allies, forcing Skye to use it near her teammates can sometimes work against her team. |
| Regrowth | The main counter is aggression. Pushing Skye while she is channeling leaves her defenseless. Preventing her from finding safe moments to heal minimizes Regrowth's impact. Since she cannot heal herself, focusing damage on Skye removes the healing threat entirely. |
| Seekers | The ultimate can be countered by destroying the individual Seekers before they reach their targets. Each Seeker has 120 HP. Spreading out makes it harder for multiple Seekers to be destroyed by a single spray. Quick repositioning upon hearing the ultimate's cast sound or seeing the warning indicator can cause Seekers to take longer paths or get stuck, buying time to shoot them. Agents with high mobility (Jett, Raze, Neon) can often outrun or quickly reposition away from Seekers. |
Positional Play: Against a strong Skye, avoid holding predictable, easily flashed angles. Play off-angles, deeper positions, or positions with immediate cover to turn away from flashes. Playing for retake rather than holding aggressively on site can sometimes be effective, forcing Skye to use utility to clear the site back.
Anticipation: Learn common Skye utility timings and locations on different maps. Anticipate flashes when pushing common chokepoints or hearing the Trailblazer approach.
Utility Trading: Use your own utility to counter Skye's. Smoke off common flash points, use mollies or damaging abilities to destroy Trailblazer or deny healing opportunities, and use counter-initiator tools (like KAY/O's knife or Sova's drone) to gain information before Skye does.
Punish Predictability: If a Skye player repeatedly uses the same flash or Trailblazer path, adapt by pre-aiming that spot or setting a trap.
Advanced Techniques and Pro Insights
Moving beyond basic mechanics, mastering Skye involves incorporating advanced techniques and adopting the mindset observed in professional play.
- Flash Timing and Placement: Pro Skyes exhibit exceptional timing with Guiding Light, often coordinating pop-flashes precisely with teammate peeks. They utilize map geometry creatively, finding unexpected angles to curve flashes over walls or through small openings, maximizing surprise. Understanding the flash duration scaling (if still applicable) and the 0.3s detonation delay allows for precise timing to catch enemies mid-turn or just as they commit to an angle. Flashing for information requires interpreting the audio cue instantly to make quick decisions.
- Trailblazer Pathing and Leap: Advanced Trailblazer usage involves efficient pathing to clear multiple angles quickly within the 6.5s duration. Pros often use the leap not just for the concuss, but also to gain a final burst of speed and vision around a corner just as the duration expires. Knowing exactly which angles are most critical to clear on each site push or retake is key.
- Seekers Combination Plays: As mentioned, simply using Seekers alone is often insufficient at high levels. Pros consistently combine Seekers with other utility, most commonly Guiding Light. Timing the flash to detonate just as Seekers become visible forces opponents into unwinnable situations. Layering with teammate utility (smokes, stuns, damage) further increases effectiveness.
- Coordination and Communication: Professional VOD reviews consistently highlight the importance of communication for Skye players. Calling out flash timings, Trailblazer paths and findings, Seeker targets, and healing intentions is non-negotiable. Setting up plays by asking teammates to bait for flashes or coordinating pushes off utility requires clear and concise comms. Poor communication is often cited as a major weakness in reviewed gameplay.
- Adaptability and Mind Games (Pre-Patch Context): While direct flash faking is gone, the principle of adaptability remains. Pros constantly vary their utility usage and positioning to avoid becoming predictable. They read opponent tendencies – if an enemy consistently dodges flashes, they might adjust timing or angles. Understanding when to play aggressively versus supportively based on the flow of the game is a hallmark of high-level play.
- Positioning and Survival: Top Skye players understand their value lies in their utility uptime. They position themselves safely to deploy flashes and dogs without immediate risk, and prioritize survival to ensure Regrowth and late-round utility are available. They avoid unnecessary aggression that could lead to an early death, recognizing that a living Skye provides constant value.
Conclusion: Embracing the Wild
Skye stands as a uniquely powerful and flexible agent in the Valorant roster. Her ability to seamlessly blend initiation, information gathering, and team sustain makes her a valuable asset across a wide range of maps and team compositions. From leading aggressive site executes with perfectly timed flashes and disruptive Trailblazer leaps, to anchoring defenses with crucial early information and orchestrating game-changing retakes with Seekers and Regrowth, Skye offers a toolkit capable of significantly impacting the outcome of any round.
However, her high skill ceiling demands more than just mechanical proficiency. Mastering Skye requires a nuanced understanding of strategic balance – knowing precisely when to prioritize aggressive plays versus supportive actions, when to conserve utility versus deploying it proactively, and how to best allocate resources round by round. Effective communication and coordination are not just beneficial, but essential for unlocking her full potential, transforming her individual abilities into cohesive team plays.
Recent changes, particularly to Guiding Light, have shifted her dynamics, emphasizing deliberate, high-impact utility usage over previous mind games and recharge-based plays. This further underscores the need for strategic foresight and precise execution.
For players willing to invest the time to learn her intricate mechanics, map-specific nuances, agent synergies, and the critical decision-making processes involved, Skye offers immense rewards. She is an agent capable of not only setting up her team for success but also actively sustaining them through the fight. By embracing the call of the wild and mastering the balance within her kit, players can truly embody the strength and adaptability of Valorant's premier eco-warrior initiator.