
Standard Valorant advice often covers the fundamentals: aim practice, basic ability usage, and map callouts. While essential, climbing the ranks and truly understanding competitive play requires delving deeper into the strategies, mechanics, and mental approaches that distinguish professional players. Many high-level techniques aren't explicitly shared in beginner guides because they demand significant game sense, coordination, and dedication to master.
This report aims to bridge that gap, revealing 20 game-changing tips that reflect the nuanced thinking and execution seen in professional Valorant. Moving beyond rudimentary mechanics necessitates grasping the why behind pro actions – the subtle optimizations, the calculated risks, the intricate teamwork, and the unwavering mental fortitude. These insights, often overlooked or assumed, are crucial for players seeking a significant competitive edge. The following tips cover advanced mechanics, sophisticated strategy, intricate agent usage, coordinated team play, performance optimization, and the vital mental game, providing a roadmap toward understanding and emulating pro-level play.
Section 1: Mechanical Mastery: The Pro Precision Edge
Achieving mechanical excellence in Valorant involves more than just raw aiming skill. It encompasses refined movement, disciplined shooting habits, and optimized settings that collectively provide a crucial edge in gunfights. Professionals dedicate significant effort to honing these aspects beyond the surface level.
Tip 1: Master Counter-Strafing for Perfect First-Shot Accuracy
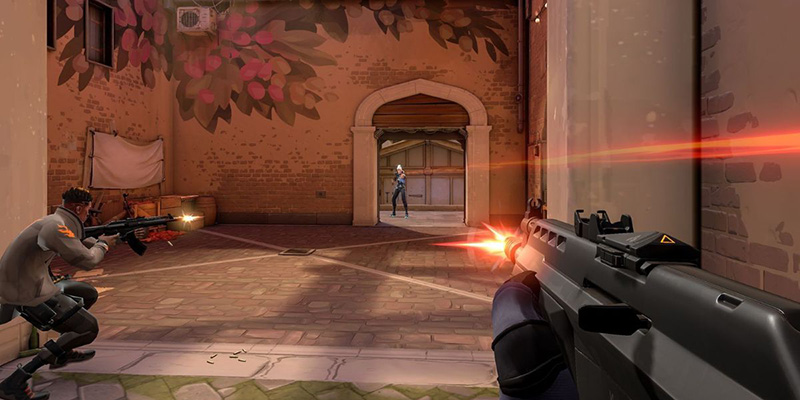
Basic guides correctly emphasize that standing still significantly increases shooting accuracy, as movement drastically increases weapon recoil and makes bullet patterns harder to predict. However, simply stopping isn't enough at higher levels. Strafing side-to-side makes players a harder target, creating a dilemma: move to evade or stop to shoot accurately. Professionals resolve this by mastering the transition between movement and stillness through counter-strafing.
Counter-strafing involves tapping the movement key opposite to the direction of travel (e.g., tapping 'A' while moving right with 'D') to achieve an instantaneous halt in momentum. This allows a player to maintain evasive movement but stop precisely the moment they decide to fire, maximizing first-shot accuracy. In a game with a low Time-To-Kill (TTK) like Valorant, where the first accurate shot is often decisive, this micro-skill is critical. It minimizes the window of vulnerability while ensuring the crucial first bullet goes exactly where intended. The subtle difference isn't just that pros stop to shoot, but how quickly and precisely they achieve that stop, a micro-optimization often assumed rather than explicitly taught.
Tip 2: Utilize Advanced Peeking Techniques Beyond Simple Strafing
Checking corners effectively is fundamental, but pro players employ a diverse toolkit of peeking techniques tailored to specific situations, going far beyond simple side-steps. These advanced methods include:
Wiggle Peeking: Rapidly peeking in and out of cover by quickly strafing back and forth. This is useful for baiting shots, gathering quick information, or taking potshots with minimal exposure.
Wide Swinging: Strafing out wide from cover, often moving backward slightly while keeping the cover in the line of sight. This provides a wider field of view for clearing multiple angles or challenging operators but increases vulnerability from flanking angles.
Jump Peeking: Jumping while peeking around a corner, often changing direction at the peak of the jump to land back behind the initial cover. This offers a very quick glimpse of an angle while minimizing exposure, particularly effective against players holding a single, predictable angle.
The choice of peek is a calculated risk assessment based on factors like the suspected enemy position, potential enemy weaponry (e.g., an Operator), the information required, and the acceptable level of risk. Mixing these techniques keeps movement unpredictable. This adaptability and intentionality in how information is gathered and duels are initiated marks a significant step up from basic corner-clearing methods.
Tip 3: Cultivate Crosshair Discipline: Focus on the Target, Not Just the Crosshair
Effective crosshair placement—keeping the crosshair positioned at head height where enemies are likely to appear—is a cornerstone of good aim. However, advanced players develop a further refinement: focusing their visual attention primarily on the potential target area or the target itself, rather than fixating solely on their own crosshair graphic.
This represents a subtle but important cognitive shift. While the crosshair serves as the aiming reference point, staring intently at it can create tunnel vision and slightly delay reactions to targets appearing or moving unexpectedly. By learning to focus through the crosshair onto the environment and potential threat zones, players can improve their reaction times and tracking ability. It requires conscious effort to overcome the natural instinct to stare directly at the crosshair UI element, but mastering this allows for broader awareness and faster processing of visual information when targets appear.
Tip 4: Optimize Sensitivity and Settings for Consistency (Beyond Copying Pros)
Examining professional player settings provides a useful starting point for optimization. Data shows that the average pro Effective Dots Per Inch (eDPI), calculated as DPI×in-game sensitivity, is around 267, typically requiring about 45 cm of mouse movement for a 360-degree turn. Most pros utilize a DPI between 400 and 800, with in-game sensitivity commonly ranging from 0.35 to 0.45. A scoped sensitivity multiplier of 1 is frequently used for consistency between scoped and unscoped aiming.
However, blindly copying these numbers is less effective than understanding the underlying principles and finding settings that suit individual physiology and equipment. The prevalence of lower sensitivities among pros stems from the need for fine motor control and precision in tactical shooters. The real "pro tip" is the process of optimization: methodically testing sensitivities to find a balance that allows for comfortable and consistent flicks, tracking, and micro-adjustments.
Beyond sensitivity, performance optimization is key. Utilizing fullscreen display mode, ensuring high monitor refresh rates (at least 144 Hz recommended), minimizing graphics settings (like Material Quality) to maximize frames per second (FPS), and enabling technologies like Nvidia Reflex Low Latency contribute to smoother gameplay and reduced input lag. Experimenting with enemy highlight colors, such as Yellow (Deuteranopia), can also significantly improve target visibility for some players. The ultimate goal is not mimicry, but achieving a personalized setup that fosters consistent, comfortable control and maximizes system performance.
| Setting | Typical Range | Average (Approx.) | Notes |
|---|---|---|---|
| DPI | 400 - 1600 | 800 | Dots Per Inch; sensor hardware setting |
| In-Game Sensitivity | 0.20 - 0.60 | 0.35 - 0.45 | Valorant specific setting |
| eDPI (DPI * Sens) | 200 - 400 | 267 | Effective sensitivity; lower values common |
| Scoped Sensitivity Multiplier | 0.80 - 1.00 | 1.00 | Multiplier for scoped weapons; 1.0 ensures consistency |
Section 2: Cerebral Combat: Advanced Game Sense & Strategy
Success in Valorant hinges significantly on strategic thinking and game sense. Professionals excel not just mechanically, but through sophisticated map awareness, efficient communication, and a deep understanding of the game's economic layer.
Tip 5: Develop Predictive Minimap Awareness, Not Just Reactive
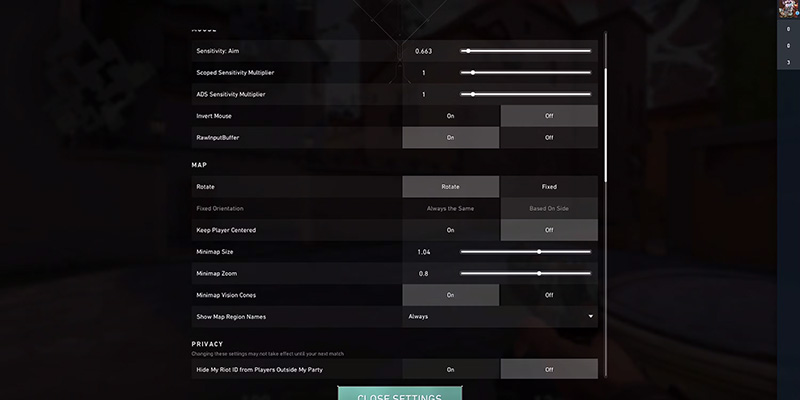
Basic minimap usage involves reacting to visible information, like enemy icons appearing. Pro-level minimap awareness, however, is predictive. By constantly observing the minimap, players gain crucial information about both enemy movements and teammate actions. Knowing map zone names enhances communication based on this awareness, and using pings effectively highlights specific points of interest.
Professionals configure their minimap for optimal information intake, often setting it to 'Rotate' with 'Keep Player Centered' turned off, allowing for easier orientation relative to the action at a glance. Keeping 'Vision Cones' on is also highly recommended, as it shows the field of view teammates are covering, even when they aren't directly visible. By cross-referencing teammate positions (indicated by vision cones), last known enemy locations, ability usage patterns, and the game timer, experienced players can anticipate likely enemy rotations, identify gaps in map control, and predict pushes before they occur. The minimap transforms from a simple radar into a strategic forecasting tool, enabling proactive positioning and decision-making based on inferred enemy intentions, a cornerstone of high-level game sense.
Tip 6: Master Concise, Actionable Communication Beyond Basic Callouts
Effective communication is universally acknowledged as essential for team success in Valorant. While basic callouts naming locations are necessary, professional communication is characterized by its efficiency, clarity, and focus on actionable information. Communication should begin as early as agent selection to establish team composition.
Pros also communicate their own intent ("Smoking mid choke") and make specific requests ("Breach, flash elbow for my peek"). This level of detail facilitates coordinated utility usage and pushes. Furthermore, maintaining a positive and constructive tone is vital. Toxicity and passive aggression actively hinder team performance and morale, whereas positive reinforcement can significantly improve team dynamics and resilience. The goal of advanced communication is to reduce unnecessary noise, maximize the impact of each callout, and enable synchronized team play.
Tip 7: Weaponize Economy: Target Enemy Buys and Force Awkward Rounds
Understanding Valorant's economy system—including win/loss bonuses, spike plant bonuses, and kill rewards—is fundamental. Knowing the approximate credit thresholds for different buy types (Full Buy: 3900-4500+, Force Buy: 2500-3800, Eco: <2000) allows teams to manage their own resources effectively. However, professionals elevate economic play by actively tracking and manipulating the enemy's economy.
This involves anticipating the enemy team's likely buys based on their current credits and the round history. High-level teams may strategically target specific enemy players known to be low on credits to keep them economically disadvantaged for subsequent rounds. Decisions about whether to force buy, half buy, or eco are often made not just based on the team's own funds, but also on the perceived economic state of the opponents. For instance, forcing up with cheaper but effective weapons like Spectres or Stingers after a pistol round loss can be a calculated risk aimed at punishing an expected enemy save or bonus round, potentially resetting their economy if successful. Securing the spike plant, even if the round is ultimately lost, is consistently prioritized due to the crucial 300-credit bonus it provides to every attacker, significantly impacting future buy potential. This proactive economic warfare, focused on exploiting enemy weaknesses rather than just managing one's own resources, is a powerful, often underappreciated, strategic layer of the game. Chaining unsuccessful force buys, however, should be avoided as it can cripple a team's economy for an entire half. Effective communication regarding the team's and the enemy's economic status is crucial for making these coordinated decisions. Econ rating, which measures damage dealt per 1,000 credits spent, can be a useful metric for evaluating individual economic efficiency.
| Round Type | Min. Creds (Approx.) | Typical Purchases | Strategic Goal |
|---|---|---|---|
| Full Buy | 3900+ | Rifle (Vandal/Phantom), Heavy Armor, Full Utility | Maximize round win probability with optimal loadout |
| Force Buy | 2500 - 3800 | SMGs (Spectre), Light Rifles, Light/Heavy Armor | Contest a crucial round despite suboptimal economy, often high-risk |
| Half Eco / Light Buy | ~2000 - 2500 | Upgraded Pistols (Sheriff/Ghost), Light Armor | Preserve economy while maintaining some fighting chance; bridge to full buy |
| Full Eco | < 2000 | Classic, Shorty, Sheriff (minimal investment) | Save maximum credits for a guaranteed full buy in the next round(s) |
| Pistol Win Follow-up | N/A (Post-Win) | SMGs, Shotguns, Light Rifles, Light Armor | Leverage economic advantage ("Bonus Round") against likely enemy eco |
| Pistol Loss Follow-up | N/A (Post-Loss) | Eco, Half Eco, or Force Buy (see above) | Decision based on risk tolerance and strategy (save vs. contest bonus) |
Tip 8: Understand "Bonus Round" Nuances and Counter-Strategies
The second and third rounds following the initial pistol round possess a distinct strategic meta heavily influenced by the pistol round's outcome. Typically, the team that wins the pistol round enters the second round with an economic advantage, often opting for a "bonus round" strategy. This involves leveraging their superior economy by purchasing SMGs (like the Spectre), shotguns, or light rifles (like the Marshal) along with light shields, aiming to secure another round win against the opponents who are likely saving credits (on an "eco" round).
Conversely, the team that loses the pistol round faces a critical decision. The standard approach is a full eco (saving credits, buying minimal equipment like pistols) or a half-eco (upgrading pistols like the Sheriff or Ghost, possibly adding light shields) to ensure a full buy in the third or fourth round. However, professionals often consider a more aggressive counter: the second-round force buy. This involves investing significantly in weapons like Spectres, Stingers, or Marshals, coupled with light armor, despite the economic disadvantage. The objective is to catch the pistol round winners off-guard during their bonus round, potentially securing rifles and resetting the economic balance. This is a high-risk, high-reward play. Successfully executing a second-round force can swing momentum dramatically, while failure can lead to a deeper economic deficit. Understanding these nuances and making calculated decisions—whether to play standard, force buy, or half-eco based on the specific context and perceived enemy strategy—is a key differentiator in higher-level play, requiring a deeper economic understanding than simply saving when broke.
Section 3: Agent & Utility Wizardry: Beyond the BasicsMastering an agent in Valorant extends far beyond knowing the basic function of their abilities. Professionals leverage subtle mechanics, powerful synergies, and unconventional utility applications to gain advantages often missed by less experienced players.
Tip 9: Master Agent-Specific "Hidden" Mechanics and Interactions
While ability descriptions outline primary functions, true agent mastery involves understanding and exploiting less obvious mechanics and interactions. Pros constantly seek ways to maximize utility value through niche applications:
- Synergistic Exploits: Combining abilities in ways that guarantee impact, such as Astra's Gravity Well pulling enemies into Killjoy's Nanoswarm for unavoidable damage, or Fade's Seize locking opponents in place for Raze's Paint Shells or Showstopper.
- Movement Tech: Utilizing abilities for enhanced mobility or positioning, like Raze's satchel jumps for momentum and surprising angles, or Jett's updrafts to reach unexpected high ground.
- Animation Cancels/Exploits: Using one ability to cancel the animation of another, like Jett's Tailwind dash canceling her reload animation to ready her weapon faster.
- Deceptive Utility: Employing abilities for misdirection, such as faking a site push with smokes or faking a Raze satchel entry before peeking normally.
- Reactive Play: Using utility based on teammate actions or information, like Cypher swinging off his turret's contact to catch an enemy off-guard, or using utility like a Skye molly to bait an enemy peek.
- Unique Interactions: Leveraging specific ability properties, like Jett being able to look down through an Omen Paranoia flash while updrafting, catching blinded enemies unaware.
Learning these hidden depths requires dedicated practice, VOD review, and experimentation beyond simply reading ability tooltips. This deeper knowledge provides unexpected advantages and elevates agent control to a professional standard.
Jett's Tailwind dash can be used to cancel weapon reload animations, allowing for quicker readiness in combat situations. Combine Updraft with Tailwind for unexpected vertical flanking routes that bypass common defensive setups. When using Blade Storm ultimate, right-clicking for the burst throw consumes all remaining knives, so save it for guaranteed kill opportunities.
Tip 10: Leverage Powerful Utility Combos for Guaranteed Impact
While individual ability usage is important, professional teams excel at layering utility through timed coordination for significantly higher impact. These aren't random acts but deliberate, often practiced plays designed to guarantee kills, secure space, or deny objectives. Examples include:
Damage Confirmation: Fade's Seize (tether + decay) followed by Raze's Paint Shells ensures enemies caught cannot escape the grenade's damage.
Area Denial Synergy: Breach's Rolling Thunder (concuss + knockup) combined with Brimstone's Orbital Strike makes escaping the ultimate's high-damage zone nearly impossible due to the movement impairment.
Information into Aggression: Initiators like Sova or Fade revealing enemy positions with recon abilities, allowing Jett to immediately dash onto the located target for an aggressive play.
Flash-Assisted Entry: Coordinating Jett's entry with flashes from agents like Skye, KAY/O, or Reyna to blind defenders as she dashes onto site.
Post-Plant Lockdown: Combining Astra's Gravity Well (pull + vulnerable) with Killjoy's Nanoswarm near the planted spike makes defusal attempts extremely difficult and damaging.
Understanding which abilities complement each other and mastering the timing required for execution transforms individual actions into potent, coordinated team plays. This synergistic approach is far more effective and characteristic of high-level strategy than relying solely on isolated utility usage.
| Combo | Agents Involved | Key Interaction | Strategic Use Case |
|---|---|---|---|
| Fade Seize + Raze Paint Shells/Ult | Fade, Raze | Seize tethers & decays enemies, guaranteeing nade/ult hit | Clearing corners, breaking site holds, securing kills |
| Astra Gravity Well + Killjoy Nanoswarm | Astra, Killjoy | Gravity Well pulls enemies into molly & makes vulnerable | Post-plant denial, choke point control, trap setups |
| Brimstone Orbital Strike + Breach Thunder | Brimstone, Breach | Rolling Thunder concuss slows escape from Orbital Strike | Site clears during execute/retake, punishing grouped enemies |
| Omen Paranoia + Jett Updraft/Dash | Omen, Jett | Jett can see over/through Paranoia from updraft angle | Aggressive site entry, catching blinded enemies off-guard |
| Initiator Recon + Jett Dash | Sova/Fade, Jett | Recon reveals enemy location for immediate Jett engage | Aggressive entry fragging, punishing isolated players |
| Flash Agent + Jett Dash | Skye/KAY/O/etc., Jett | Flash blinds defenders as Jett dashes onto site | Coordinated site executes, creating entry space |
Tip 11: Think Counter-Meta with Agent Select and Strategy
Staying informed about the current meta—the popular agents, weapons, and prevailing strategies—is crucial. However, simply mirroring the meta can make a team predictable. Professionals often analyze the meta to find ways to counter it effectively. This involves strategic thinking beyond just playing what's popular:
- Targeted Agent Picks: Selecting agents whose abilities directly counter the strengths of meta agents. Examples include using Cypher's Tripwires to halt a fast-pushing Neon, employing KAY/O's suppression knife to disable ability-reliant agents like Tejo before they can use key utility, or using Sova's Recon Bolt or Breach's flashes to dismantle common Killjoy setups.
- Unconventional Choices: Experimenting with less popular or "off-meta" agents whose unique kits might disrupt expected enemy strategies or create unforeseen problems. The element of surprise can be a powerful tool.
- Strategic Exploitation: Developing team strategies designed to exploit the weaknesses inherent in common meta setups. If the meta favors passive site holds, implementing aggressive, coordinated pushes can overwhelm defenders. If it relies heavily on specific utility, baiting out that utility before committing can be effective.
- Adaptability: Being prepared to adjust agent picks and strategies based on the enemy team's composition and observed playstyle during a match.
High-level play involves a dynamic interplay with the meta. Professionals understand it deeply, which allows them to either execute it flawlessly or, more strategically, anticipate and dismantle it. The ability to effectively play against the meta, rather than just conforming to it, is a significant indicator of advanced tactical understanding.
KAY/O's suppression abilities directly counter ability-dependent meta agents. His ZERO/POINT knife can prevent crucial ultimates and abilities during site executes or retakes. Use his FLASH/DRIVE to clear common defensive positions and his FRAG/MENT to force enemies off tight angles. His ultimate NULL/CMD creates zones where enemies are forced into pure gunfights, neutralizing agent ability advantages.
Tip 12: Master Utility for Information Denial and Psychological Pressure
Valorant utility serves purposes beyond direct damage, vision obstruction, or crowd control. Professionals strategically deploy abilities to manipulate information flow and exert psychological pressure on opponents:
Information Denial: Using smokes or walls to block common lines of sight or entryways, even if no immediate push is planned. This forces opponents to guess intentions, potentially waste their own utility investigating, or hesitate in their rotations.
Forcing Movement: Deploying damaging abilities like mollies or reconnaissance tools like Sova darts or Fade Haunts into common holding spots. This compels enemies to reposition, potentially exposing them or forcing them out of advantageous angles.
Creating Uncertainty: Faking site executions by using significant utility (e.g., multiple smokes, flashes) on one site while the team prepares to hit the other. This can draw enemy rotations and thin out defenses on the actual target site.
Stalling and Delay: Using abilities during post-plant scenarios (like controller smokes/walls or sentinel utility) or retakes to slow down enemy pushes, delay spike defusals, or prevent enemies from reaching critical positions.
This sophisticated use of utility targets the opponent's decision-making process. By controlling what information the enemy receives, creating false threats, forcing uncomfortable choices, and manipulating the tempo of the round, teams can create advantages without necessarily needing the ability to land a direct hit. It's about playing the mental game as much as the mechanical one.
Section 4: Tactical Supremacy: Coordinated Plays & Positioning
Individual skill is vital, but Valorant is fundamentally a team game. Professional success relies heavily on coordinated execution, intelligent positioning, and a deep understanding of how to play off teammates effectively, particularly during crucial retake and post-plant situations.
Tip 13: Implement Coordinated Retake Strategies (Not Just Running In)
When defenders lose control of a bombsite, simply trickling back in one by one is a recipe for failure. Professional teams approach retakes with structure and coordination, treating them almost like an offensive site execute. Key elements include:
- Synchronized Pushes: Attacking the site from multiple angles simultaneously to divide the defenders' attention and create crossfires.
- Combined Utility: Layering abilities (flashes, smokes, recon, damage) to clear dangerous angles, isolate defenders, and create safe passage onto the site.
- Clear Communication: Calling targets, coordinating utility usage, and ensuring everyone commits together.
- Strategic Pathing: Choosing entry routes carefully to minimize exposure to multiple angles and maintain awareness.
- Decisive Action: Quickly assessing the situation (time remaining, player count, available utility, known enemy locations) to decide whether a retake is feasible or if saving weapons for the next round is the better economic play.
- Flood Retakes: On certain maps like Haven or Lotus, teams might employ a "flood retake" strategy, positioning players centrally for rapid rotation and overwhelming a site together once the attackers commit.
Successful retakes require discipline and teamwork to overcome the inherent disadvantage of attacking entrenched defenders. The ability to execute these coordinated assaults, or make the calculated decision to save, distinguishes high-level team play from disorganized scrambles.
Tip 14: Master Trading and Playing Off Teammates
In high-stakes gunfights, professionals prioritize team success over individual glory. They rarely take isolated 1v1 duels if a coordinated approach is possible, focusing instead on maximizing the team's chances through effective trading. This involves:
- Proactive Crossfire Setups: Positioning deliberately so that if one player is eliminated, a nearby teammate has an immediate line of sight to trade the kill. Common examples exist on maps like Haven (A Long/Graffiti crossfire, Spawn Cubby/Short crossfire).
- Pacing and Synchronization: Moving together as a unit during pushes or executes. Players who lag behind disrupt the timing needed for immediate trades.
- Strategic Baiting (Contextual): Recognizing situations where it's advantageous for one player to draw fire first. This might involve letting a low-health teammate or an initiator take initial contact, or protecting a controller who needs to stay alive to deploy crucial post-plant utility. This requires careful judgment and should not be the default approach.
- Playing Off Utility: Coordinating movements with teammate abilities, such as pushing behind a controller's smoke or capitalizing on an initiator's flash.
Thinking in terms of "team fights" rather than isolated duels is crucial. Pros constantly adjust their positioning to support teammates and ensure that enemy aggression is punished swiftly, aiming to get kills without being traded or securing the follow-up kill themselves. Recognizing when not to peek and instead wait for a teammate to create a safer engagement or trade scenario is also a vital aspect of this tactical discipline.
Tip 15: Proactive Map Control: Take Space, Don't Just React
Effective map control extends beyond passively holding bombsite angles. Professional teams, particularly on defense, often adopt a proactive approach by pushing out early in the round to contest and secure key areas of the map. This strategy offers several advantages:
- Information Gathering: Early pushes into areas like Mid, attacker-side lobbies, or connector routes can provide valuable information about enemy intentions and presence.
- Disrupting Attacker Plans: Controlling forward territory limits the attackers' options, potentially forcing them into less favorable routes or delaying their executes.
- Creating Early Advantages: Aggressive map control can lead to opening picks, creating an immediate numbers advantage for the defending team.
- Facilitating Rotations: Holding central map areas allows for quicker and safer rotations between bombsites.
This proactive stance is particularly important on maps where passive site holds are easily overwhelmed, such as Haven or the former map Fracture. The decision to push aggressively depends on factors like map layout, team composition (e.g., presence of info-gathering agents on either team), and known enemy tendencies. Double controller compositions are often favored for their ability to establish and maintain extensive map control with layered smokes and utility. Even on attack, securing intermediate map control before committing to a site execute is a common high-level tactic. Professionals understand that controlling the space between the sites is often the key to controlling the round, allowing them to dictate the pace rather than merely reacting to enemy initiatives.
Tip 16: Use Off-Angles Strategically, With Purpose and Escape Routes
Holding an unexpected position, or "off-angle," can catch opponents completely by surprise, often leading to easy kills. However, these positions usually lack good cover or clear escape routes, making them inherently risky. Professionals use off-angles judiciously, employing them as calculated risks rather than random hiding spots:
Unpredictability: Off-angles are most effective when used sparingly and unexpectedly. Pros often establish a pattern of holding standard angles for several rounds before suddenly switching to an off-angle to exploit the enemy's expectations.
Escape Potential: The viability of an off-angle heavily depends on the agent holding it. Duelists with escape abilities like Jett (Tailwind) or Chamber (Rendezvous) can take aggressive off-angles and disengage safely after getting a pick. Agents without mobility (e.g., Brimstone, Sova) are far more vulnerable and generally require teammate support or a clear fallback path if playing such a position.
Calculated Traps: Even low-mobility agents can sometimes use an off-angle effectively as a one-time trap play, especially if coordinated with a teammate, capitalizing on an enemy's predictable pathing. After the surprise is sprung, it's usually wise to revert to safer positioning.
Off-angles are tools for calculated aggression. Their strength lies in surprise, but their risk must be managed through timing, unpredictability, and careful consideration of escape options or available team support.
Section 5: The Intangibles: Pro Mindset & Optimization
Beyond mechanics and strategy lie the crucial elements of mental fortitude, effective learning habits, and subtle optimizations that contribute significantly to consistent high-level performance.
Tip 17: Cultivate Mental Fortitude: Handle Pressure and Avoid Tilt
The psychological aspect of competition is paramount in Valorant. High-pressure scenarios like clutch situations or critical rounds naturally amplify stress, potentially impacting decision-making and aim. Professionals actively cultivate mental resilience as a trainable skill:
- Pressure Simulation: Practicing high-stakes scenarios in custom games or drills helps players become accustomed to performing under stress.
- Developing Routines: Establishing consistent in-game routines or mental checklists for intense moments can provide structure and grounding.
- Maintaining Calmness: Utilizing techniques like deep breathing or positive self-talk helps maintain composure and clarity during high-stress situations. Calm aiming is a recognized benefit.
- Emotional Regulation: Avoiding tilt, frustration, and passive-aggressive behavior is crucial. Negativity harms individual performance and team morale, while positivity and constructive communication actively increase the chances of success. Taking breaks when feeling overwhelmed or frustrated is essential for mental resets.
- Focus on Improvement: Shifting focus from blaming teammates or external factors towards self-improvement and learning from mistakes fosters a healthier, more productive mindset.
Professionals understand that their emotional state directly influences their performance. By actively managing pressure, avoiding tilt, and maintaining a constructive attitude, they treat mental fortitude not just as a personality trait, but as a competitive advantage honed through practice and discipline.
Tip 18: Embrace Rigorous VOD Review (Your Own and Pros')
Simply grinding matches is often insufficient for significant improvement. A critical component of professional development is the rigorous analysis of gameplay footage (VODs):
- Self-Analysis: Recording and reviewing one's own matches allows for objective identification of recurring mistakes, poor decision-making, positioning errors, and missed opportunities. Analyzing particularly poor performances (e.g., games with a Kill/Death ratio below 0.5) can be especially insightful.
- Learning from Losses: Treating losses not as failures but as learning opportunities is key. Understanding why certain outcomes occurred helps players adjust their gameplay effectively.
- Studying Professionals: Watching high-level players and analyzing their decision-making, utility usage, rotations, and positioning provides valuable insights and strategies to emulate.
- Seeking Feedback: Having a coach or more experienced player review VODs can offer a crucial third-person perspective, helping to identify blind spots and overcome performance plateaus.
Pros treat VOD review as an essential part of their training. This deliberate analysis allows them to understand the root causes of successes and failures, identify specific areas needing improvement, and accelerate their learning curve far beyond what simply playing more games can achieve.
Tip 19: Prioritize Consistency Through Focused Practice and Simplicity
While highlight reels showcase flashy plays, consistent performance is the true bedrock of success in competitive Valorant. Professionals achieve this reliability through disciplined practice and often by simplifying their approach:
Structured Practice: Engaging in regular, focused aim training routines helps maintain sharp mechanics. Consistency is key; short daily sessions are often more effective than infrequent marathon sessions. Warming up properly using tools like the practice range or Deathmatch before jumping into ranked queues is also standard practice.
Mastering Fundamentals: Continuously reinforcing core skills like aim, movement, crosshair placement, and fundamental game sense provides a solid foundation.
Reducing Variables: Many pros find consistency by mastering a small pool of agents within a specific role, rather than trying to be proficient with everyone. Similarly, learning specific positions and developing reliable weapon purchase patterns for different economic situations helps make gameplay more predictable and repeatable.
Finding Joy in Improvement: Shifting the source of enjoyment from constant novelty or flashy plays towards the satisfaction of incremental improvement and consistent execution helps maintain motivation for the necessary disciplined practice.
High-level play often emphasizes the near-perfect execution of fundamentals and core strategies over constant, risky innovation. By reducing unnecessary variables and dedicating time to reinforcing reliable patterns, pros build the consistency required to perform under pressure and climb the ranks effectively.
Tip 20: Optimize Audio Settings for Maximum Information
Audio cues provide a wealth of critical information in Valorant, including enemy footsteps, ability activations, weapon reloads, and the spike defuse sound. Professionals treat audio optimization as seriously as visual settings to gain every possible informational advantage:
- Directional Accuracy: Ensuring speaker configurations are set correctly (typically "Stereo" or enabling HRTF - Head-Related Transfer Function, if available) is crucial for accurately pinpointing the direction and distance of sounds.
- Minimizing Distractions: Many pros turn off in-game background music to avoid masking subtle but important sound cues. Some may also adjust voice-over settings to reduce less critical agent announcements, while ensuring essential gameplay callouts remain audible.
- Prioritizing Key Sounds: The goal is to create an audio environment where crucial sounds like footsteps, ability casts (like teleports or ultimates), spike plants/defuses, and weapon sounds are clear and easily distinguishable.
Neglecting audio settings means missing out on vital information that can dictate rotations, alert players to flanks, or signal crucial moments like a spike defuse attempt. Pros optimize their soundscape to maximize clarity and ensure they perceive every auditory cue the game provides.
// Recommended Audio Settings for Competitive Play

Audio Output Configuration: Stereo
HRTF: Enabled (if available)
Master Volume: 100%
Sound Effects: 100%
Voice-Over: 30-50% (retain important callouts)
Music: 0% (eliminates distraction)
Voice Chat (Team): 80-100% (prioritize communication)
Agent Voice Lines: 20-30% (retain ability cues)
Gameplay Sounds to Focus On:
- Footsteps (enemy vs friendly distinction)
- Ability activations/deactivations
- Spike plant/defuse sounds
- Weapon reloads
- Ultimate activation callouts
Conclusion
The journey to mastering Valorant extends far beyond the commonly shared advice. The 20 tips outlined in this report highlight the shift towards a professional mindset, emphasizing advanced mechanical nuances like counter-strafing and refined peeking, sophisticated strategic depth involving predictive map awareness and economic warfare, intricate utility usage focusing on synergy and psychological pressure, highly coordinated team plays for retakes and trading, and the often-underestimated importance of mental fortitude and meticulous optimization.
These elements represent a focus on consistency, calculated risk-taking, deep game knowledge, proactive teamwork, and a commitment to continuous learning through methods like VOD review. Achieving proficiency in these areas requires dedication, deliberate practice, and critical self-analysis that goes beyond simply playing more matches.
Players seeking significant improvement should consider focusing on a few of these tips that resonate most with their current weaknesses or goals. Implementing even a subset of these advanced techniques and adopting the underlying principles of consistency, coordination, and analytical learning can lead to substantial gains in performance and a deeper understanding of competitive Valorant. Remember that adaptation is also key; the meta evolves, and the ability to learn and adjust strategies remains crucial at all levels of play.