
Welcome to Ascent, one of Valorant's foundational battlegrounds. Imagine a slice of Venice, Italy, torn from the earth and suspended in the sky – a testament, according to Valorant lore, to a Spike detonation gone wrong. This floating island, littered with classical ruins and fractured architecture, forms the backdrop for intense tactical combat. Ascent is often lauded, and sometimes lamented, for its classic three-lane tactical shooter layout, reminiscent of maps found in Counter-Strike: Global Offensive. Its structure features two distinct bomb sites, A and B, connected by a wide, crucial central Mid area.
While generally considered a defender-favored map, Ascent places a premium on technical skill, meticulous planning, and coordinated team play. It's a map where fundamentals shine, making it both a challenging competitive arena and an excellent training ground for core Valorant mechanics. Its relatively straightforward design, compared to maps with more unique gimmicks like teleporters or three sites, makes it a popular choice among professional players. However, its perceived simplicity belies strategic depth, particularly concerning control of the central Mid courtyard and the unique mechanical blast doors guarding entry points to each site.
This guide aims to dissect Ascent's complexities, offering a comprehensive breakdown for players looking to elevate their game. We will delve into the critical importance of Mid control, explore the strategic nuances of the mechanical doors, detail essential callouts, outline effective attack and defense strategies for both sites, analyze key agent roles, and provide practical tips to help players of all skill levels conquer this floating Venetian fortress.
Mastering the Lingo: Ascent Callouts
In the fast-paced environment of Valorant, clear and concise communication is paramount to success. Effective callouts save precious seconds and ensure the entire team shares a common understanding of enemy positions and unfolding situations. Instead of vague descriptions like "the high place near A," using standardized terms like "Heaven" allows for instant comprehension and reaction. Knowing the specific names for Ascent's numerous locations is fundamental to coordinating pushes, defenses, rotations, and utility usage.
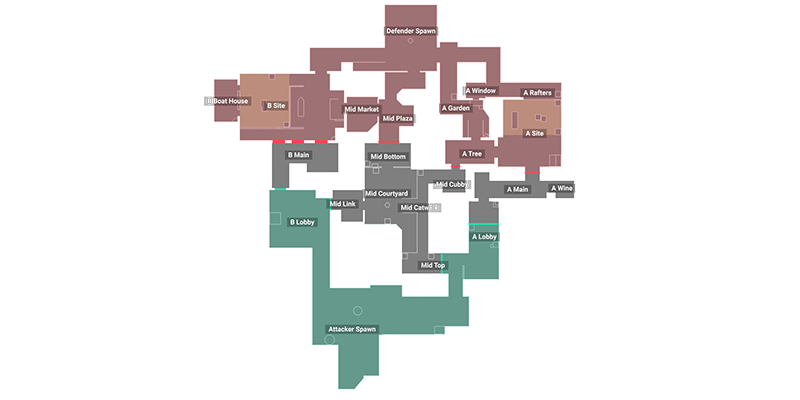
Below is a detailed breakdown of the essential callouts for Ascent, crucial for effective team communication. Many of these are official terms visible on the in-game map, while others are community-adopted names providing greater precision.
A Site & Surroundings:
- A Main: The primary corridor attackers use to approach A Site from their spawn.
- A Peek / Long Cubby / Bracket: The initial corner or cubby inside A Main that defenders often hold to get early information or picks.
- Wine: A small, recessed area within A Main, often used as cover or a hiding spot that needs careful clearing.
- Generator: The large, central structure on A Site. A very common spot to plant the Spike. Callouts often distinguish between "Front Gen" (side facing A Main) and "Back Gen" (side facing Heaven/Defender Spawn).
- Dice / Green Box / Tetris: The stack of green boxes next to Generator on the site itself.
- Hell: The low-ground area directly underneath the Heaven platform. Often specified as "Left Hell" or "Right Hell" relative to players looking from site towards Heaven.
- Heaven / A Rafters: The elevated wooden platform overlooking A Site, accessible from Defender Spawn/Garden/Window. Also includes Heaven Pillar, a support column providing cover on the platform.
- Heaven Stairs: The staircase leading up to the Heaven platform from the Defender Spawn side.
- Window / White Room: The room connecting Garden/Tree area to Heaven. Features a breakable glass window. Shattering the glass creates an additional pathway but generates significant noise.
- Garden: The grassy outdoor area connecting Tree/Window to Defender Spawn and the back of A Site.
- Tree: The small room connecting Mid Catwalk to Garden and A Site. Contains the switch for the A Site mechanical door.
- A Switch: The interactable button near the Tree room doorway or the A Main doorway that controls the mechanical blast door.
- Pillar: A small, standalone pillar near the A Main entrance onto the site, offering minimal cover.
- Jump Up: Boxes located on site that allow players to jump onto the Heaven platform without using abilities.
B Site & Surroundings:
- B Main: The primary narrow corridor attackers use to approach B Site from their spawn.
- B Lobby: The area just outside B Main where attackers typically group before pushing.
- Lane / Alley: The narrow pathway leading directly onto B Site from B Main. A common spot for defensive Sentinel utility.
- Boathouse / Workshop: The structure tucked in the back-left corner of B site (from defender perspective), offering significant cover. Contains the B Site door switch.
- Market: The area connecting Mid Courtyard/Pizza to B Site and the Defender Spawn connector. Contains the mechanical door leading to B Site. Includes Market Doors and Market Stairs / Platform.
- Logs / Wood Cubby: Stacked logs near the Market entrance onto B site, providing cover.
- Stairs: The staircase leading up from the lower B site area towards Market and Defender Spawn.
- CT / Spawn: The pathway connecting Defender Spawn towards B Site, intersecting with Market. Often used as a callout for the general direction of Defender Spawn from B.
- Triple Box / Default: The stack of three boxes on B site, a very common default plant location.
- Camp Pillar / Long Boxes: Tall boxes situated along the back wall of B site, opposite B Main.
- Spam Box: A specific box near the B Main entrance onto site that is frequently wallbanged due to its position and material.
- B Switch / Button: The interactable button near Boathouse that controls the Market mechanical door.
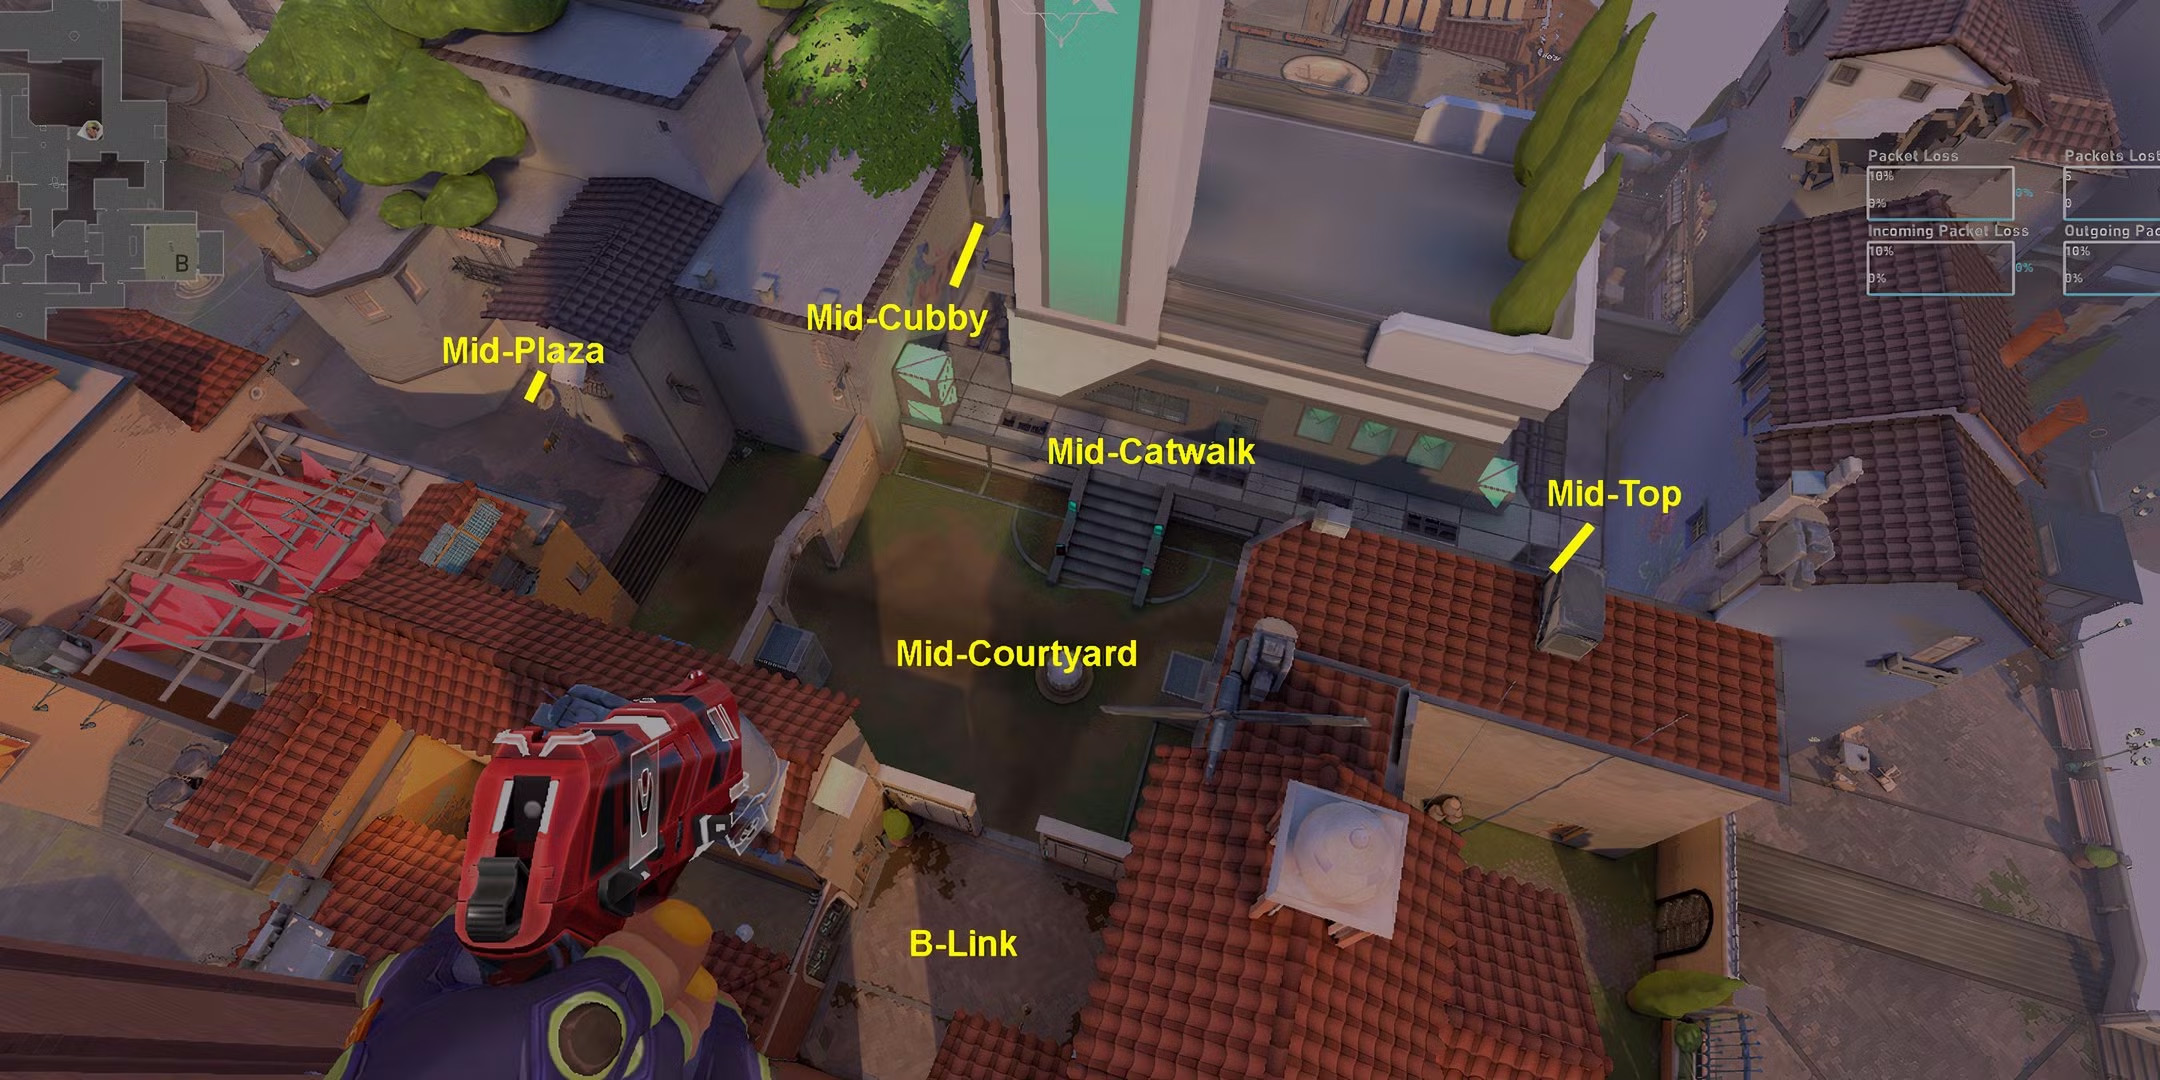
Mid Area:
- Mid Top / Top Mid: The elevated area attackers first encounter when pushing Mid, overlooking Courtyard.
- Catwalk: The elevated walkway connecting Mid Top towards A Site (leading to Tree/Window).
- Mid Cubby / A Cubby: A small enclosed room accessible from Mid Courtyard, providing cover and an angle towards A-Tree/Link.
- Courtyard: The large, open central space in Mid, connecting Mid Top, Pizza, Cubby, and the path towards Market.
- Pizza: The corner and short corridor connecting Courtyard towards Market and the B Site approach.
- Market: (See B Site Callouts) Connects Mid Courtyard/Pizza to B Site.
- Tiles / Mid Link / B Link / Mid Connector / Double Doors: The area connecting B Lobby/Attacker Spawn side towards Mid Courtyard. Known by many names, "Tiles" or "Link" are common.
- Screens / Subroza / Library: A small cubby or room near Mid Top/Tiles, sometimes called "Subroza" after a notable play by the professional player Subroza. Contains bookshelves, hence "Library".
- Mid Bottom / Bottom Mid: The lower ground area in Mid, encompassing Pizza, Cubby entrance, and the space beneath Catwalk/Mid Top.
- Mid Doors / Destructible Panels: Breakable wall panels separating Courtyard from Tiles/Link. These are not the mechanical site doors. They have 400 HP.
- Mid Archway: The arch structure leading from the Attacker side of Mid towards Courtyard/Mid Top.
| Area | Callout Name | Common Aliases / Specifics |
|---|---|---|
| A | A Main | - |
| A | A Peek | Long Cubby, Bracket |
| A | Wine | - |
| A | Generator | Front Gen, Back Gen |
| A | Dice | Green Box, Tetris |
| A | Hell | Under Heaven, Left/Right Hell |
| A | Heaven | A Rafters |
| B | B Main | - |
| B | Lane | Alley |
| B | Boathouse | Workshop |
| B | Market | B Mid Connector |
| Mid | Mid Top | Top Mid |
| Mid | Catwalk | - |
| Mid | Courtyard | Mid Yard |
| Mid | Pizza | - |
Mastering these callouts is the first step towards effective team play on Ascent. Consistent use ensures everyone is on the same page, enabling faster reactions and more coordinated strategies.
The Heart of Ascent: Dominating Mid Control
On Ascent, perhaps more than any other standard two-site map in Valorant, control of the Mid area is paramount. It serves as the central artery of the map, offering pathways and strategic advantages that heavily influence the outcome of rounds for both attackers and defenders. Understanding why Mid is so crucial and how to contest it effectively is key to unlocking consistent success on this map.
Why Mid is King:
The strategic value of Mid stems from its connectivity. Holding Mid grants access to virtually the entire map: A Site via Catwalk and Tree, B Site via Market, and even direct routes towards the Defender Spawn area. This centrality translates into significant advantages:
Attacker Benefits:
- Enables powerful split pushes, forcing defenders to stretch their resources thin
- Allows for rapid rotations between A and B, exploiting weaknesses
- Opens flanking routes, catching defenders focused on main chokepoints off guard
- Can mask the attackers' true target site, creating confusion
- Denies defenders the ability to rotate quickly and gather information
Defender Benefits:
- Enables swift responses and rotations between sites
- Provides valuable early information on attacker movements
- Allows interception or delay of attacker pushes through central routes
- Enables flanks against attackers committed to pushing A Main or B Main
- Prevents isolation of defenders on sites and difficult retake situations
Key Mid Battlegrounds:
The fight for Mid revolves around several key areas and the angles connecting them:
- Mid Top/Catwalk vs. Mid Bottom/Cubby/Tiles: This is a primary axis of conflict. Defenders often use Operators from Mid Top or Tiles to control the long sightline towards the attacker approach. Attackers contest this with smokes on the Mid Archway or Catwalk entrance, utility to clear angles, and coordinated peeks.
- Courtyard Control: This open area is the crossroads of Mid. Controlling Courtyard is particularly important for attackers planning a B split through Market. The destructible wall panels can be broken for sightlines or left intact for cover.
- Pizza/Market Entry: This corridor is the main chokepoint from Mid towards B Site. Attackers need to clear Pizza carefully, often using utility like Sova darts or flashes, before pushing into Market.
Attacking Mid:
Successfully attacking Mid requires coordination and effective utility usage. Common approaches include:
- Smoking Key Angles: Using controller agents like Omen or Astra to smoke off defensive sightlines, typically the Mid Archway, the Catwalk entrance, and potentially the connector towards Defender Spawn/Market.
- Initiator Utility: Employing agents like Sova (Recon Bolt, Owl Drone), KAY/O (ZERO/point, FLASH/drive), Skye (Trailblazer, Guiding Light), or Fade (Haunt, Prowler) to gather information and clear corners.
- Coordinated Pushes: Executing synchronized pushes with flashes and entry abilities to overwhelm defenders holding specific angles.
- Defaulting/Playing for Picks: Spreading out initially, holding flanks, and using utility to probe Mid for an opening kill before deciding on a site commit.
- Flank Security: Ensuring players watch the flanks from A Main and B Main while the main group contests Mid.
Defending Mid:
Defending Mid effectively involves a mix of holding ground, delaying attackers, and gathering information:
- Early Aggression: Utilizing mobile agents like Jett, often paired with an Operator, to take early peeks from Mid Top or Tiles for information or an opening kill.
- Passive Holds & Delay: Employing utility to slow down attacker pushes, such as Sage's Barrier Orb, controller smokes, or Sentinel utility.
- Common Positions: Holding angles from Mid Cubby, Bottom Mid near Pizza, the top of Market stairs, or within Tiles/Link.
- Coordination: Setting up crossfires between different Mid positions or coordinating utility usage (e.g., flash followed by a peek).
- Operator Angles: Mid offers strong defensive Operator angles from Mid Top looking towards the attacker approach or from Tiles/Market stairs looking towards Courtyard/Catwalk.
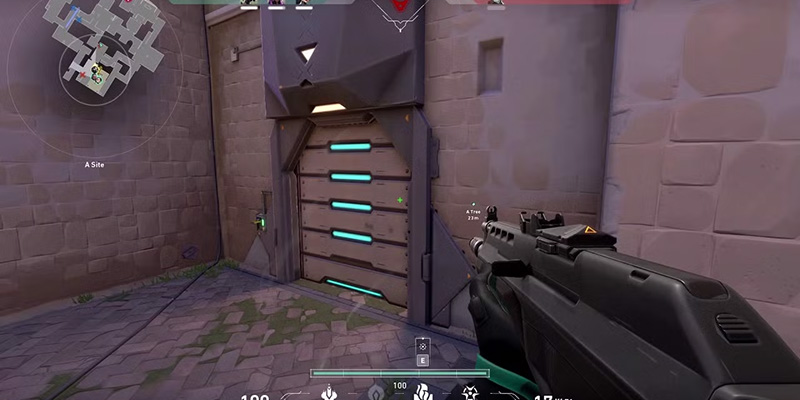
The Gates of Ascent: Strategic Door Play
Ascent features a unique map mechanic: two sets of large, mechanical blast doors that guard secondary entrances to the bomb sites. One set is located between the Tree room and A Site (near A Main entrance), and the other is between Market and B Site (near Boathouse). These are distinct from the smaller, breakable wall panels found in Mid. Mastering the strategic use of these doors is crucial for both attacking and defending teams.
Mechanics Explained:
- Activation: The doors are operated by switches located nearby, typically on the defender-favored side of the passage (near Tree for A, near Boathouse for B). Pressing the switch closes the door.
- Irreversibility: Once closed, these doors cannot be manually reopened during the round. The only way through is to destroy them.
- Durability: Each door possesses 500 health points (HP), requiring significant sustained gunfire or specific ability damage to break. They can be damaged and eventually destroyed by any weapon. Certain abilities, like Phoenix's Blaze wall, reportedly deal increased damage.
- Visual and Audio Cues: As the doors take damage, they glow progressively redder, indicating their remaining integrity. The act of closing the door, and especially breaking it, generates loud, distinct audio cues that can be heard from a considerable distance, revealing activity in that area. The control switch itself provides a visual cue: glowing green when the associated door is closed, and orange when it's open.
Attacking Uses:
Attackers can leverage the doors in several ways:
- Early Denial: Breaking a door early prevents defenders from using it later, but the noise immediately gives away your presence.
- Post-Plant Security: After planting the Spike, close the corresponding door to block a primary retake path, force defenders to waste time destroying the door, create loud audio cues when they attempt to break it, and allow you to set up crossfires aimed directly at the door.
- Fakes and Rotations: Closing a door could potentially be used to fake commitment to one site while rotating elsewhere, or provide temporary safe passage through Mid.
Defensive Uses:
Defenders can utilize the doors to control space and timing:
- Early Round Delay: Closing a door at the start of the round can effectively slow down or deter fast pushes coming from Mid towards a site, buying time for defenders to establish positions.
- Isolating Pushes: If attackers are pushing via Market or Tree, closing the door cuts off that route, isolating the attackers already pushing and preventing further reinforcements.
- Retake Strategies: During a site retake, closing the door can cut off potential escape routes for attackers or isolate sections of the site, allowing defenders to clear areas incrementally.
Door Interactions:
Beyond simply opening or closing, players interact with the doors tactically:
- Utility Usage: Flashes can be thrown through the doorway just before it closes. Mollies or other area-denial abilities can be placed behind a closed door to punish breaches.
- Sound Play: Experienced players listen for the sound cues of doors closing or breaking to gain information about enemy location and intent.
- Wallbanging: Knowing common positions players hold directly behind the doors allows for potential wallbang kills, especially as the door weakens.
Attacking Ascent: Breaching the Defenses
Attacking on Ascent presents a unique set of challenges and opportunities. While the map is often considered defender-favored, well-coordinated attacks leveraging Mid control and smart utility usage can consistently break through the defenses. Success hinges on understanding the map's layout, attacker pathing options, and common defensive setups.
General Attacking Principles:
- Mid Control is Key: As established, dominating Mid is often the cornerstone of a successful attack. It unlocks split pushes, enables faster rotations, provides flanking opportunities, and generally keeps the defense guessing.
- Pacing Matters: Attacks can range from explosive, fast executes to slower, methodical defaults. Choosing the right pace depends on team composition, economy, and reads on the enemy's defense.
- Split Pushing Power: Ascent's layout heavily encourages split pushes. Attacking a site from two different angles simultaneously stretches the defense thin.
- The Art of the Fake: Applying pressure towards one site with noise and utility can draw defensive rotations, creating an opportunity to quickly pivot and attack the weakened site.
Attacking A Site:
A Site is often perceived as the slightly easier site to attack due to its more open nature compared to B, and the direct access from Mid via Catwalk.
Common Executes:
- A Main Rush: A straightforward push through A Main. Requires clearing A Peek/Wine early and dealing with multiple angles from Generator, Hell, Heaven, and potentially Tree/Garden. Heavy utility usage is necessary.
- A Split (Catwalk + Main): A highly common and effective strategy. Typically involves 2-3 players pushing through A Main while the remaining 2-3 push through Mid Catwalk, converging from two directions.
- Garden Push (via Catwalk): Taking control of Tree and Garden first, potentially pushing into Heaven to clear it or applying pressure onto the site from the flank.
Utility Usage:
- Essential smokes typically cover Heaven (often the left side) and the Tree doorway.
- Flashes are used to clear common defensive spots like under Heaven (Hell), behind Generator, and Heaven itself.
- Initiator utility like Sova's Recon Bolt (the Heaven pillar dart is very common) provides crucial site information.
- Clearing tight corners like Wine and Hell requires careful utility use or coordinated peeks.
- Ultimates like Killjoy's Lockdown or Breach's Rolling Thunder can spearhead an execute.
Post-Plant Setups:
- Common plant locations include the default spot behind Generator or safer plants towards A Main.
- Holding post-plant often involves players positioned in A Main, Hell, and potentially controlling Tree/Garden.
- Utilizing lineups from safer locations (like A Main or Lobby) for agents like Killjoy, Sova, or Viper is common.
- Closing the A-Tree door can help secure the site post-plant.
Attacking B Site:
B Site presents a tougher challenge due to its tighter chokepoints, numerous close angles, and prevalence of strong Sentinel defensive setups.
Common Executes:
- B Main Rush: A fast, aggressive push directly through the narrow B Main corridor. Highly vulnerable to defender utility, especially Sentinel traps. Success often relies on breaking utility quickly or using overwhelming flashes and stuns.
- Mid-to-Market Split: Taking Mid control (Courtyard, Pizza), smoking off the CT/Spawn connector, and pushing onto B Site through Market, often with players applying pressure from B Main simultaneously.
Utility Usage:
- Standard smokes block the Market entrance (from the site side) and the CT/Spawn connector.
- Clearing deep corners like Boathouse and Lane requires careful droning or flashing.
- Dealing with Sentinel setups is a major hurdle; Sova's Shock Darts can destroy Killjoy utility, KAY/O's knife can suppress it.
- Flashes and stuns are vital for pushing through the B Main choke.
- Wallbanging common defensive spots through the thin B Main walls is a frequent tactic.
Post-Plant Setups:
- Common plant spots are the default Triple Box or safer plants closer to Lane/B Main.
- Holding post-plant effectively involves maintaining control of B Main, holding angles from Lane, or playing from Market.
- Lineups (Killjoy Nanoswarms, Sova Shock Darts, Viper Snake Bite) are very effective due to the site's layout.
- Closing the Market door is almost always recommended post-plant.
- Playing off the penetrable walls near B Main is a viable tactic.
Defending Ascent: Holding the Fort
Ascent's reputation as a defender-sided map stems from its layout, which offers defenders strong initial positions, controllable chokepoints, and advantageous angles. However, a successful defense requires more than just holding static positions; it demands proactive information gathering, strategic utility usage, timely rotations, and well-coordinated retakes.
General Defensive Principles:
- Leveraging Positional Advantage: Understanding the map's natural defensive strengths is key. Setting up crossfires in common attacker paths and utilizing high ground (like A Heaven) are fundamental.
- Information is Power: Early information about attacker intentions is crucial for deploying utility effectively and rotating reinforcements to the correct site.
- Rotations and Timing: Defenders need to rotate quickly and efficiently between sites, often utilizing Mid or the spawn connectors. Over-rotating based on initial pressure can leave the other site vulnerable.
- Playing for Retakes: It's often more advantageous to play for information and delay attackers, falling back to safety and coordinating a full team retake with utility, rather than dying trying to hold a site against overwhelming numbers.
Defending A Site:
A Site defense often involves controlling Heaven and the main entrance while watching the Mid push via Tree/Garden.
Common Setups:
- Heaven Control: Playing on the Heaven platform provides a powerful overview of the site and A Main approach. Often utilized by Operator players or agents with easy access/escape.
- Generator Play: Using the large Generator structure for cover, playing close angles against attackers pushing from A Main or Tree.
- Hell Position: Holding the low ground beneath Heaven offers an off-angle that can catch attackers focused on Heaven or Generator.
- Garden/Tree Anchor: Positioning in or near Garden/Tree allows control over the Catwalk push and provides a fallback position towards spawn.
- Wine Hold: An aggressive position within A Main to gain early information or contest the attackers' initial approach.
Early Aggression & Information:
- Defenders might peek A Main aggressively using Jett's dash, Omen's teleport, or coordinated flashes.
- Early Sova recons towards A Main or Mid can reveal attacker defaults or pushes.
- Breaking the glass in Window early can provide sound cues or allow quicker rotations/peeks from Garden to Heaven.
Retake Strategies:
- Retaking A often involves smoking off A Main and the Tree entrance to isolate the site.
- Flashes help clear common post-plant positions like Hell, behind Generator, and default plant spots.
- Coordinated pushes from Heaven, Defender Spawn connector, and potentially Garden are common.
- Ultimates like Killjoy's Lockdown or area-denial abilities are highly effective.
Jett is particularly strong for A Site defense, especially when playing from Heaven. Her Updraft allows her to reach unexpected angles, and her Tailwind (dash) provides a quick escape after taking an Operator shot or if overwhelmed by attackers.
Defending B Site:
B Site defense is notoriously strong, often anchored by a Sentinel agent due to the tight chokepoints and predictable push paths.
Common Setups:
- Boathouse Hold: A deep, relatively safe position offering cover and angles onto the site entrance from Lane.
- Market Control: Holding Market is vital not just for B defense but also for Mid control and rotations.
- Lane Lockdown: Utilizing utility (especially Sentinel traps) to heavily contest the narrow Lane entrance is a cornerstone of B defense.
- Stairs/Platform Angles: Using the elevated stairs near Market provides angles onto attackers pushing Lane or planting default.
Killjoy is exceptionally strong on B defense. Her turret provides invaluable early warning from positions like back site boxes or Market stairs. Her iconic Alarmbot + Nanoswarm combo at the Lane entrance can halt pushes or secure kills. Variations include placing traps on the default plant spot or covering the path towards Stairs/Switch.
Sova is a potent B site anchor. His strategy often involves early Recon Bolts into B Main to detect pushes, wallbanging through the thin B Main walls using information from Recon Bolts or sound cues, and using Shock Darts to clear hiding spots or deny plants/defuses.
Operator Usage:
- Holding the long angle down B Main from back site (near Boathouse) or from Market stairs is a high-risk, high-reward play.
- It's vulnerable to attacker utility like flashes but can shut down pushes instantly if successful.
Retake Strategies:
- Retaking B involves clearing Lane and Boathouse carefully.
- Utility is needed to force defenders off strong post-plant angles (like behind Triple Box or Logs).
- Breaking or strategically using the Market door is often part of the retake plan.
- Utilizing wallbangs based on sound or known plant spots can be effective.
Agent Meta & Synergies on Ascent
While individual skill is always a factor, team composition plays a significant role in unlocking Ascent's strategic potential. Certain agents synergize particularly well with the map's layout, leading to a relatively stable and well-defined meta, especially at higher levels of play. Understanding these key agents and how they work together is crucial for building effective teams.
Key Agents Deep Dive (Focus on Synergy):
Often considered a must-pick, Killjoy excels at anchoring the B site defense. Her Turret provides invaluable information and passive pressure, while her Alarmbot/Nanoswarm combinations create lethal traps that can single-handedly stop pushes through B Lane. On attack, her utility is crucial for watching flanks and her Nanoswarms provide powerful post-plant denial. Her ultimate, Lockdown, is a game-changer for both retaking sites and executing site takes.
The undisputed "king of info" on Ascent. His Recon Bolt is perfectly suited for Ascent's layout, capable of scanning large portions of sites or detecting pushes through B Main. This information directly enables the potent wallbang strategy through Ascent's thin walls. His Owl Drone provides safe clearing of close angles, while Shock Darts can destroy utility, clear corners, or deny defuses post-plant. Hunter's Fury is excellent for clearing entrenched positions or securing post-plant kills.
A highly favored Controller on Ascent due to his rechargeable, precisely placeable Dark Cover smokes. He can deploy smokes across the map, enabling flexible strategies and Mid control. Ascent offers numerous spots for effective one-way smokes. His Paranoia flash is potent for blinding enemies in chokepoints, and Shrouded Step allows him to reach unexpected high ground or make aggressive plays. His ultimate, From the Shadows, facilitates fast rotations, flanks, or information gathering.
The premier Duelist for Ascent, primarily due to her unparalleled entry and repositioning capabilities. Her Tailwind (dash) combined with Cloudburst smokes allows her to create space and break through chokepoints. Updraft provides access to key high-ground positions like A Heaven or Generator top. Critically, Jett is the ideal agent for wielding the Operator on Ascent. The map's long sightlines are perfect for Operator angles, and Jett's dash provides an essential escape mechanism after taking a shot.
Frequently paired with Sova in a double-initiator setup, KAY/O brings disruption and supplementary information gathering. His ZERO/point knife suppresses enemy abilities while providing information on enemy presence. His FLASH/drive pop flashes are excellent for initiating pushes, and FRAG/ment provides area denial. His ultimate, NULL/cmd, is incredibly powerful for large-scale site takes or retakes, suppressing all enemies in a wide radius and providing combat stims.
Operator Usage:
The Operator sniper rifle finds significant value on Ascent due to the map's design:
- Defense: Operators are commonly used to hold long sightlines: A Main (often from Heaven), Mid Top looking towards Attacker Mid spawn, or B Main (from back site near Boathouse or Market stairs). Jett is the preferred Operator agent due to her Tailwind allowing her to take aggressive peeks and dash back to safety.
- Attack: While less common than on defense, Operators can be used by attackers to hold flanks against aggressive defender pushes or to lock down long angles during post-plant situations. They can also be used to counter opposing Operators.
Common Compositions:
While variations exist, one composition stands out as the standard meta on Ascent:
Common Variations:
- Astra: Sometimes replaces Omen, offering global smoke presence and different utility (Gravity Well, Nova Pulse).
- Cypher: Can replace Killjoy, providing different information tools (Spycam, Tripwires) and flank control, though less common currently.
- Fade/Skye: Occasionally replace Sova or KAY/O, bringing different types of information gathering and utility.
- Double Controller: Less meta but seen occasionally, often involving Viper paired with Omen or Astra for enhanced site control and post-plant potential.
| Composition | Key Strengths | Primary Strategy |
|---|---|---|
| Jett, KAY/O, Sova, Omen, Killjoy | Strong Info Control (Sova/KAYO/KJ), Reliable Entry (Jett), Site Lockdown (KJ) | Balanced Default/Execute |
| Jett, Sova, Omen, Killjoy, Cypher | Enhanced Flank Watch (Cypher), Strong Info, Site Lockdown (KJ) | Info-Heavy Defense |
| Jett, Skye, Viper, Omen, Killjoy | Strong Denial (Viper/KJ), Close-Range Info/Flashes (Skye), Flexible Smokes | Site Control / Denial |
Advanced Tactics & Tricks
Beyond standard strategies and agent picks, mastering Ascent involves understanding and executing more nuanced tactics, clever utility usage, and exploiting the map's unique features.
Lurking Paths:
Effective lurking on Ascent can dismantle defenses by creating pressure from unexpected angles and catching rotating players off guard.
Common Routes:
- Quiet Main Push: While the main team applies pressure in Mid or towards the opposite site, a lurker slowly walks up A Main or B Main, listening for information and aiming to catch defenders rotating or holding passive angles.
- Mid Sneak: After initial Mid control is established by the team, a lurker can quietly push through Catwalk towards A Garden/Heaven or through Market towards B/CT Spawn.
- Rotation Cut-off: Holding a position like B Main while the team executes onto A (or vice-versa) specifically to intercept defenders attempting to rotate through spawn or main pathways.
Suitable Agents: Agents with escape tools (Omen's Shrouded Step, Jett's Tailwind) can lurk more aggressively. Sentinels like Killjoy or Cypher can use their utility to watch their own back while lurking, making it safer.
Wallbang Wonders:
Ascent's notoriously thin walls create numerous opportunities for wallbang kills, punishing predictable positioning.
Key Spots:
- B Main Walls: The walls on both sides of the B Main corridor are highly penetrable. Attackers can spam common defender angles, and defenders can spam attackers pushing through the choke.
- A Generator: The sides and potentially top of the Generator structure can be shot through.
- Heaven Floor / Hell Ceiling: Shots can penetrate between these two levels.
- Market Walls: Certain walls within Market and leading towards B site are spammable.
- Site Boxes: Some default plant boxes or cover boxes on both sites have penetrable sections.
Execution: Wallbanging is most effective when combined with information – Sova's Recon Bolt, Cypher's Spycam tags, Fade's Haunt, KAY/O's knife, or clear audio cues. High-penetration weapons like the Odin, Ares, Guardian, or even the Sheriff are necessary. Knowing common angles players hold behind these surfaces allows for effective pre-firing.
Utility Combos:
Combining agent abilities synergistically allows for faster, more effective plays than using utility in isolation.
Execute Examples:
- Omen Smoke + KAY/O Flash + Jett Dash: Classic entry combo. Smoke blocks vision, flash blinds defenders, Jett dashes in to take space.
- Sova Recon + Follow-up Utility: Sova dart reveals positions, followed immediately by flashes, drone/dog clearing, or damaging utility to capitalize on the revealed locations.
- Killjoy Lockdown + Coordinated Push: Lockdown forces defenders off site or detains them, allowing the attacking team to push onto the cleared site relatively safely.
Defensive Examples:
- KJ Alarmbot + Nanoswarm Trap: A deadly defensive combo, especially in B Lane. Alarmbot provides the trigger, Nanoswarms provide the damage/denial.
- Sova Recon + Wallbang: The quintessential Ascent defensive play. Recon detects enemies in B Main, high-penetration weapon fires through the wall.
- Smoke + Trap: Controller smokes a chokepoint, Sentinel places a trap just behind or inside the smoke to catch enemies pushing through blindly.
- Omen Blind + Swing: Omen uses Paranoia to blind a key angle, allowing a teammate to swing out and take an advantageous fight.
Level Up Your Ascent Play: Tips for All Ranks
Mastering Ascent is a journey, not a destination. Improvement comes from layering knowledge and refining execution. Here are some tailored tips for players at different stages of their Valorant journey:
Beginner Focus (e.g., Iron - Gold):
- Learn Core Callouts: Focus on memorizing the main callout for each site (A Site, B Site), the key structures on them (Generator, Boathouse), and the central Mid areas (Mid, Catwalk, Market). Use the in-game map frequently (default key 'M') to orient yourself.
- Understand the Doors: Know where the two mechanical site doors are (A-Tree, B-Market) and how the switches work. Practice the crucial post-plant tactic: after planting the Spike, find the switch and close the door to help defend it. Know that they can be broken with enough shooting.
- Simple Site Executes: Coordinate basic 5-person pushes onto A Main or B Main. If playing a Controller, practice smoking the main entrances defenders peek from (e.g., smoking Heaven on A, or Market/CT on B).
- Basic Defense: On defense, choose a site (A or B) and try to hold common angles without pushing out too aggressively. Wait for the attackers to come to you. Communicate enemy sightings clearly. Avoid rotating instantly just because noise is heard elsewhere.
Intermediate Focus (e.g., Gold - Diamond):
- Grasp Mid Control Fundamentals: Understand why controlling Mid is so important. Learn basic smokes and utility usage needed to contest or take Mid control (e.g., smoking Catwalk and Mid Archway).
- Coordinate Basic Utility: Start actively communicating utility usage. Ask Controllers for specific smokes. Request flashes from Initiators before peeking dangerous angles. If playing Sova, learn and communicate effective Recon Bolt placements.
- Learn Basic Split Pushes: Practice coordinating attacks hitting a site from two directions, like A Main + Catwalk or B Main + Market. Understand the timing involved.
- Agent-Specific Basics: If playing Killjoy, learn a reliable B site setup. If playing Sova, practice the B Main wallbangs based on Recon Bolt information.
- Post-Plant Principles: Understand the goal is often to play for time, not just kills. Hold crossfires with teammates. Learn basic post-plant lineups and practice playing from safe positions while denying the defuse.
Advanced Focus (e.g., Ascendant+):
- Execute Complex Strategies: Master advanced tactical concepts like multi-layered defaults, sophisticated fakes involving utility and sound cues, and precise timings for split pushes and lurks.
- Master Advanced Utility: Learn specific, pixel-perfect lineups for mollies, recon darts, etc. Identify and utilize effective one-way smokes. Practice complex ability combinations for maximum impact.
- Sophisticated Lurking: Develop unpredictable lurk paths and timings based on reading the enemy team's patterns and rotations. Understand how to use lurking pressure to create specific advantages for the main team.
- Counter-Stratting: Analyze the enemy team's agent composition and observed playstyle tendencies to adapt your team's strategies accordingly. Know common setups for meta agents and how to counter them.
- Optimize Communication: Refine team communication for high-level coordination, including concise mid-round calls, ultimate tracking, and precise utility requests/confirmations.
Conclusion: Conquering Ascent
Ascent, with its Venetian charm and classic tactical layout, remains a cornerstone of the Valorant map pool. While its structure may seem straightforward initially, consistent success demands a deep understanding of its strategic nuances. This guide has illuminated the critical elements that define high-level play on this floating island.
The absolute key takeaway is the paramount importance of Mid control. Dominating this central area unlocks unparalleled flexibility for attackers – enabling split pushes, rapid rotations, and effective fakes – while providing defenders with crucial rotation paths and early warning systems. The battle for Mid is often the battle for the round itself.
Secondly, the mechanical doors are far more than simple obstacles. They are tactical tools used for delaying pushes, securing post-plants, signaling intent, and forcing resource expenditure. Understanding how and when to use these doors – both offensively and defensively – adds a significant layer to strategic planning.
The agent meta, while potentially shifting slightly over time, consistently favors agents who excel at information gathering, disruption, and site control. The synergy between Sova, Killjoy, Omen, Jett, and KAY/O provides a potent combination of recon, lockdown potential, map control, entry fragging, and ability denial that is perfectly suited to Ascent's demands. The map's thin walls also elevate the importance of information agents like Sova and high-penetration weapons, creating unique wallbang opportunities.
Ultimately, conquering Ascent is an ongoing process. It requires diligent practice of the strategies outlined, clear and concise communication with teammates, and the willingness to adapt based on the flow of each round and the specific tendencies of opponents. By internalizing the principles of Mid control, mastering door mechanics, leveraging agent synergies, and continually refining execution, players can significantly elevate their performance and truly ascend on this iconic Valorant map.