
Haven stands as one of Valorant's original battlegrounds, presenting a unique tactical challenge with its distinctive three-bombsite layout (A, B, and C). Set against the backdrop of Thimphu, Bhutan, its Eastern-style architecture houses a complex network of pathways and chokepoints. Unlike the more common two-site maps, Haven's structure fundamentally alters the flow of gameplay, demanding exceptional coordination, strategic flexibility, and meticulous map control from both attacking and defending teams.
While the presence of three objectives often leads to the perception that Haven favors the attacking side by stretching defensive resources thin, this perceived advantage can be misleading. A well-coordinated defense, leveraging intelligent rotations, effective utility usage, and strong communication, can effectively counter the map's inherent challenges. This guide provides a comprehensive roadmap, equipping players with the knowledge and strategies needed to navigate Haven's complexities and achieve dominance on this unique battlefield.
Decoding Haven: Essential Callouts & Layout
A foundational element of success on any Valorant map, particularly one as expansive and intricate as Haven, is clear and efficient communication. The map's size and the critical importance of rapid rotations mean that precise callouts are non-negotiable. Utilizing standardized, concise terms—"Heaven" instead of "that high place on A"—saves precious seconds in high-pressure situations and ensures teammates instantly understand the location being referenced. Effective communication involves finding a balance: avoiding information overload during tense moments while ensuring crucial details about enemy positions and movements are relayed promptly. On Haven, where a teammate might be rotating from the opposite side of the map, ambiguity in callouts can directly lead to lost rounds due to delayed support or incorrect positioning.
The language of Valorant maps evolves, with community usage often shaping standard terminology (e.g., "A Sewer" becoming more common than its original name "A Short", or the use of "Gong" or "Shield" for the structure at Back B). While player-driven alternatives exist and debates continue over less common names like "Dragon", adhering to the most widely recognized and officially supported callouts promotes maximum clarity. Standardized terms reduce the mental effort required to process information, allowing for faster reactions—a critical factor when managing Haven's complex rotation paths and three potential points of conflict.
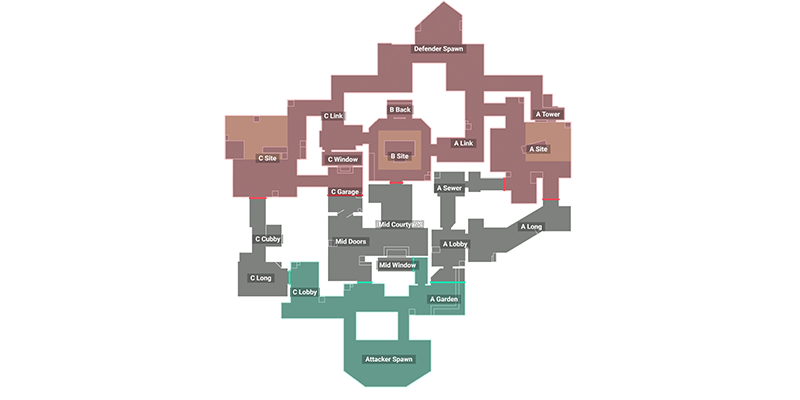
To facilitate clear communication, the following glossary details the essential callouts for Haven:
| Location/Area | Common Callout(s) | Description |
|---|---|---|
| A Site Area | A Site, Default | The main spike planting area on A. |
| Raised Platform | A Heaven, Heaven, A Tower | Elevated platform overlooking A Site, accessible from Defender Spawn. |
| Under Platform | Hell | Area directly beneath A Heaven. |
| Long Approach | A Long | The long, straight pathway approaching A Site from Attacker side. |
| Short Approach | A Short, A Sewer | The shorter, winding pathway approaching A Site from Attacker side. |
| Attacker Entrance Area | A Lobby | Initial area for attackers approaching A Long/Short. |
| Connector to B | A Link | Corridor connecting A Site area to B Site. |
| B Site Area | B Site | The central spike planting area. |
| Back Structure | B Back, Back B, Gong, Shield | Area behind the large structure/panel at the back of B Site. |
| Window Overlooking Mid | Mid Window, B Window | Window connecting Mid Courtyard to an elevated position overlooking B. |
| Area Outside Window | Mid Courtyard | Open area between Mid Window and B Site entrance. |
| Corner Near Window | Mid Cubby | Small corner alcove directly outside Mid Window. |
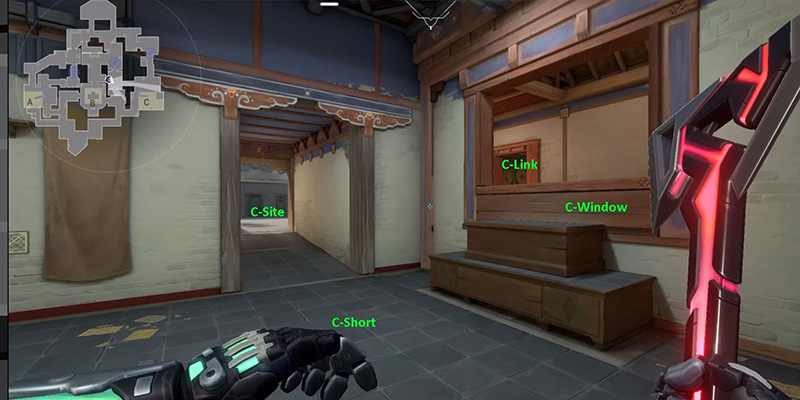
| C Site Area | C Site | The main spike planting area on C. |
| Long Approach | C Long | The very long, open pathway approaching C Site from Attacker side. |
| Mid Connector Doors | C Short, Mid Doors, Double Doors | Doors connecting Mid Courtyard to Garage/C Short area. |
| Connector to B/Mid | Garage | Area connecting C Site, C Short (Double Doors), and B Link/Window. |
| Raised Area on Site | Platform, Plat | Slightly elevated stage area on the side of C Site. |
| Stacked Materials | Logs | Stack of materials near Defender Spawn entrance on C Site. |
| Alcove in C Long | Cubby | Small indented area along C Long providing minimal cover. |
| Connector to B | C Link, B Link | Corridor connecting Garage/C Site area to B Site. |
| Attacker Start | Attacker Spawn, T Spawn | Starting zone for the attacking team. |
| Defender Start | Defender Spawn, CT Spawn | Starting zone for the defending team. |
| Defender Path | CT Connector, CT | Path connecting Defender Spawn towards A, B, and C. |
The Heart of Haven: Dominating Mid Control
On Haven, the central area—encompassing Mid Courtyard, Mid Window, and the crucial Garage/Double Doors complex—transcends its role as merely a pathway to the B site. It functions as the strategic nexus of the map, the control of which dictates the flow of the entire round. Gaining and maintaining control over this central territory unlocks unparalleled flexibility in rotations, enables potent split-pushes, and creates opportunities for game-changing flanks across all three sites. Consequently, neglecting mid control is one of the most fundamental and costly strategic errors a team can make on Haven, regardless of whether they are attacking or defending.
From the attacker's perspective, seizing mid control is paramount for several reasons. It allows for rapid rotations between A, B, and C, keeping the defense guessing and preventing attackers from being funneled into predictable long-lane pushes. It facilitates split attacks, such as pressuring B through Mid Window while simultaneously pushing Garage towards C, or using Garage access to split onto the C site from multiple angles. Furthermore, mid presence creates pressure that can force defenders to rotate prematurely, opening up vulnerabilities elsewhere. It also serves as a prime staging ground for lurkers aiming to catch rotating defenders off guard. Achieving this control typically involves using smokes to block vision from Mid Window and the Garage connector, coupled with flashes or reconnaissance abilities (like Sova darts or Fade Haunts) to clear defenders from Window, Garage itself, and the Mid Cubby. Early contention for Garage control is often a key objective. However, attackers must remain vigilant against potential early aggression from defenders pushing out from B site or peeking C Short.
For defenders, the objective shifts to denying attackers this crucial central territory. Effective mid denial severely limits the attackers' rotation options, forcing them into the longer, more easily defensible A Long or C Long approaches. Holding mid allows defenders to gather vital early information about the attackers' intentions, enabling proactive adjustments to the defensive setup. A strong mid presence also facilitates faster defensive rotations, allowing reinforcements to reach threatened sites more quickly. Defensive tactics often involve positioning players actively in Mid Window or within Garage to contest space. Sentinel utility, such as Killjoy turrets or Cypher tripwires/cameras, is invaluable for delaying pushes, gathering information, and securing the area. Smokes can block attacker sightlines, while reconnaissance abilities can scout for pushes. Calculated aggressive peeks, potentially supported by flashes, can disrupt attacker plans but require coordination and should not be overextended.
Within the broader mid-complex, Garage functions as a distinct but equally vital control point. It serves as the primary link between the B and C sites and offers a covered alternative to the more exposed Mid Courtyard. For attackers, controlling Garage provides a relatively safer route to execute C-site splits or apply pressure towards B Window and C Link. For defenders, holding Garage is essential to prevent these C splits and maintain control over the critical B-to-C rotation pathway. Its strategic importance makes Garage a frequent hotspot for early-round engagements and pick-offs.
Attacking Haven: Breaching the Defenses
Successfully attacking Haven requires a blend of strategic planning, adaptable execution, and effective utility usage to overcome the challenges posed by its three-site layout.
Core Attacking Principles:
- Default Setups: Begin rounds by spreading forces to gain initial map control and gather information. Common defaults include a 2 A Long, 1 Mid, 2 C Long split or a 1 C Long, 2-3 Mid, 1-2 A Long/Short presence. This allows the team to probe defensive weaknesses and adapt the attack plan based on defender utility usage, positioning, and economic status.
- Mid Control Priority: Whenever feasible, securing control of Mid Courtyard and Garage should precede a full site commitment. This provides crucial flexibility and opens up more attack vectors.
- Split Pushes: Exploit the three sites by pressuring multiple points simultaneously. Examples include coordinated pushes on A and Mid, C and Mid, or using Garage access for C splits. This stretches the defense thin and can overwhelm isolated defenders.
- Fakes and Pivots: Utilize utility (smokes, flashes) and player presence to simulate a heavy commitment to one site, drawing defensive rotations. Once rotations occur, quickly pivot to attack a weakened site. Effective fakes rely on timing and coordination, with later-round fakes often proving more convincing.
- Pacing Variation: Avoid predictability by mixing fast, decisive executes (like a five-player C Long rush or a rapid B site hit) with slower, information-driven default plays.
- Ultimate Orbs: Actively contest the ultimate orbs located in A Long and C Long. Use utility like smokes or Sage walls to secure these valuable resources safely.
Executing the A Site Attack:
Approaches: Attackers typically push from A Long or A Short (Sewer). A Long offers more direct engagement but is vulnerable, especially against Operators or strong Heaven holds. A Short provides a potentially safer, albeit slower, route. Splitting the push between Long and Short is a common and effective tactic.
Key Objectives: The primary obstacle is neutralizing defenders in A Heaven. Clearing Hell underneath Heaven, the cubby in A Short, and the various boxes on site used for cover is also crucial.
Utility Usage: Smoking off A Heaven is standard practice. Smoking the CT connector entrance is also vital. Reconnaissance abilities like Sova's Recon Bolt or Fade's Haunt are essential for clearing angles before entry. Initiator utility such as Breach's Fault Line/Flashpoint, Phoenix flashes, or Neon stuns facilitates safer entry. Controller ultimates like Astra's Cosmic Divide can effectively split the site for planting.
Post-Plant: Common holding positions include A Long, Hell, default boxes, A Link, and potentially Heaven if control is secured. Defenders will likely rotate from Defender Spawn and A Link, and potentially flank through A Long or Sewer. Numerous ability lineups exist targeting the default plant spot behind the main boxes.
Executing the B Site Attack:
Approaches: B site is primarily accessed through Mid Courtyard, either via Mid Window (often leading to early engagements) or through Double Doors/Garage (allowing a more controlled approach, especially if mid control is established). Due to its central location and relatively small size, B can be vulnerable to fast, coordinated pushes, often catching a lone defender.
Key Objectives: Clear immediate site corners and the Back B (Gong/Shield) area. Gaining control of the entry points from A Link and C Link/Garage is critical for securing the site and preparing for retakes.
Utility Usage: Essential smokes include blocking vision from A Link and C Link/Garage. Flashes (like Yoru's Blindside) and stuns (like Breach's Fault Line) are vital for clearing the tight angles within B site. Sova's Recon Bolt can provide valuable site information before entry. Astra's Cosmic Divide can isolate the front portion of the site for a safer plant.
Post-Plant: Holding B after planting is notoriously difficult due to the multiple wide entry points. Common post-plant positions include holding angles from Mid Courtyard (using boxes for cover), Garage Window, A Link, or C Link. Attackers must anticipate swift retake attempts from defenders rotating through these connections. Lineups typically target the central open plant area.
Executing the C Site Attack:
Approaches: The two main routes are down the extremely long sightline of C Long or through Garage/C Short. C Long is direct but highly exposed, especially to Operators. Pushing C Long as a coordinated five-player group can sometimes overwhelm a single defender holding the angle. Attacking via Garage/C Short requires gaining mid control first but allows for powerful split pushes onto the site.
Key Objectives: Clear the C Long cubby, the elevated Platform (Plat), the Logs position near CT, the Backsite area, and the Garage connector entrance.
Utility Usage: Standard smokes block the CT/Spawn connector and the Garage entrance. Reconnaissance from Sova or Fade is crucial for identifying defenders holding C Long or on-site positions. Flashes and stuns from agents like Breach or Astra help clear corners and initiate entry. Astra's Cosmic Divide can effectively partition the site during an execute.
Post-Plant: Strong post-plant positions include holding the angle from C Long, playing from Backsite, Platform, Logs, or the Garage entrance. Lineups frequently target the default plant spot near the large green boxes at the front of the site.
Haven's design inherently rewards attacking teams that remain flexible and adapt their strategy based on real-time information and defender responses. Rigidly committing to a single pre-planned execute round after round is less effective than employing defaults to probe, using mid control to enable options, and leveraging fakes to manipulate defender rotations. Because defenders must spread thin across three sites, predictable attacks allow them to concentrate their forces effectively. In contrast, adaptable attacks that exploit gaps created by rotations maximize the inherent attacker advantage on this map.
Furthermore, successful site executions are rarely achieved through raw aim alone; they depend heavily on the synergistic layering of utility. Haven's sites present defenders with numerous advantageous angles (like Heaven/Hell on A, or Plat/Logs/Backsite on C). Pushing these sites without proper utility coordination often results in attackers being eliminated piecemeal. Smoking off critical sightlines, using reconnaissance to confirm enemy locations, and initiating entry with well-timed flashes or stuns creates crucial windows of opportunity for entry fraggers to secure space safely and effectively breach the site's defenses.
Defending Haven: Holding the Fort
Defending Haven effectively demands proactive information gathering, strategic utility deployment, and disciplined rotations to counter the map's inherent attacker advantages.
Core Defensive Principles:
- Information Supremacy: Due to the three potential attack points, obtaining early information regarding the attackers' intentions is paramount. This involves proactive use of Sentinel utility (Killjoy turrets, Cypher cameras/tripwires), Initiator reconnaissance (Sova darts/drone, Fade Haunts), or calculated peeks (e.g., Jett with Operator) to scout key areas like A Long, C Long, and Mid.
- Delay, Delay, Delay: The primary goal of initial defensive holds is often to slow down attacker pushes, buying crucial time for teammates to rotate and reinforce the threatened site. This is achieved through smokes, mollies, Sage slows/walls, and Sentinel traps/turrets.
- Calculated Aggression: While generally playing for time is advised, coordinated aggressive plays can disrupt attacker defaults and secure early advantages. Pushing areas like A Long, C Long, or Garage early can catch attackers off guard, but these plays must be well-supported and players should avoid overextending without backup.
- Playing for Retake: Recognizing when a site hold is untenable is crucial. Especially on B site or when facing a numbers disadvantage, defenders should prioritize survival, give up the site, and regroup for a coordinated retake. Saving key utility like ultimates or multiple flashes/stuns specifically for retake scenarios is often the optimal strategy.
- Mid Control Contestation: Actively denying or contesting attacker control of Mid Courtyard and Garage limits their rotational freedom and forces more predictable attacks down the outer lanes.
Common Defensive Setups:
2A - 1B - 1 Garage - 1C (Standard): This is a widely adopted default setup that aims for balanced coverage across all initial chokepoints.
Rationale: Two players on A cover the dual threats of A Long and A Short. One player anchors C, typically watching C Long. A dedicated player in Garage addresses the critical mid-control element and potential C splits. The solo B player focuses on delaying pushes through Mid Courtyard, often relying on utility or playing safer angles. This setup relies heavily on the B and Garage players to provide early information and delay effectively, allowing the A and C players time to rotate if needed.
Variations (e.g., 3A/3C Stacks, Heavy Mid): Teams may adjust this default based on reads of opponent tendencies or specific round strategies. For instance, stacking three players on A or C might counter an anticipated fast rush, while committing more resources to Mid aims for early map control dominance. However, over-stacking one area carries significant risk, leaving other sites extremely vulnerable to splits or quick rotations.
The Role of Sentinels: Agents like Killjoy and Cypher are instrumental in making these setups viable. Their abilities allow them to effectively cover multiple angles, watch flanks, or delay pushes with minimal player presence, thereby freeing up teammates to adopt more flexible or aggressive positioning. For example, a Cypher setup with trips covering B site entrances and a camera watching Garage allows the nominal "B player" to play more passively or rotate sooner. Similarly, a Killjoy turret providing early warning and chip damage down C Long allows the C anchor to play safer positions.
Holding Site A:
Key Positions: A Heaven offers the strongest initial vantage point. Other common spots include Hell, behind the site boxes, and holding angles towards A Short/Sewer.
Tactics: Utilize Heaven for early information and potential picks, but be mindful of vulnerability from attackers pushing A Link. Employ delaying utility like Sage walls/slows, smokes on Long/Short entrances, or Sentinel setups. Consider using unexpected off-angles to catch attackers off guard. Omen can utilize a one-way smoke on the A Short boxes for an advantage.
Place tripwires at both A Long and A Short entrances. Position your camera in a hidden spot with view of A Site and Heaven. Use Cyber Cages to create one-ways or delay pushes. This setup allows you to effectively anchor the site alone or provide early warning for rotations.
Holding Site B:
Key Positions: Common defensive spots include Back B (Gong/Shield), holding angles from Mid Window, playing behind site boxes, or anchoring near the A/C Link entrances.
Tactics: B site is often conceded for a retake due to its multiple entry points. The primary focus is delaying pushes originating from Mid Courtyard using smokes or Sentinel utility. Holding angles from the Links or Back B are common defensive postures. An Operator positioned in Mid Window can be highly effective at controlling the Courtyard approach. Setting up crossfires between players on site and in the links is a potential strategy.
Holding Site C:
Key Positions: The C Long angle is a primary defensive focus, often held by an Operator. Garage control is critical. Other positions include Platform, Logs, and Backsite.
Tactics: Control C Long aggressively with an Operator or passively with delaying utility. Sentinel setups are particularly potent here, with Killjoy turrets/Alarmbots or Cypher trips/cameras effectively covering Long and Garage entrances. Use smokes and other utility to stall pushes down C Long or through Garage. Actively fighting for Garage control can prevent C splits.
Place your turret in a position covering C Long with line of sight to the site entrance. Set Alarmbot near Garage entrance to watch for flanks or splits. Use Nanoswarms on common plant spots or entrances. This setup creates excellent site control while providing crucial information about enemy movements.
Successful defense on Haven hinges on being proactive with information gathering and delay tactics. Simply holding default angles and relying on aim duels often results in defenders being overwhelmed one by one. The map's layout necessitates actively seeking information about attacker movements and using utility strategically to disrupt their timing and create windows for rotations. This proactive approach mitiates the inherent disadvantage of defending three separate sites.
In this context, Sentinels act as crucial force multipliers. Agents like Killjoy and Cypher don't just provide passive information; they actively enable defensive flexibility. By reliably covering multiple angles or flank routes with their utility, they allow the rest of the team to adopt more dynamic positioning. A single Sentinel can effectively manage a larger portion of the map (e.g., Cypher covering B and Garage, Killjoy handling C Long and Garage), freeing up teammates to contest mid more aggressively, stack a different site based on intel, or position themselves for faster rotations. This makes the overall defense less predictable and more resilient against the complex attack strategies Haven invites.
The Haven Rotation Game: Outmaneuvering Your Opponents
Haven's defining characteristic—its three bomb sites—makes rotations not just important, but the very core of its strategic gameplay. Rotations are inherently longer and more critical than on standard two-site maps, and victory often hinges on a team's ability to rotate faster, smarter, and more decisively than their opponents. Slow or poorly timed rotations are severely punished, often leading to site losses or failed retakes.
Attacker Rotation Plays:
- Faking and Rotating: A cornerstone of Haven attack involves manipulating defender positioning. Attackers apply pressure to one site (e.g., using smokes, flashes, and showing presence on A Long/Short) to bait defenders into rotating. Once defenders commit, the attackers quickly and quietly disengage, rotating through Mid or Spawn to execute onto a now less-defended site (e.g., C).
- Mid Control for Rotations: As established, controlling Mid Courtyard and Garage provides attackers with the fastest and most flexible rotation paths, allowing seamless shifts in pressure between A, B, and C.
- Lurkers Catching Rotations: Positioning a lurker (often a Controller like Omen or a Sentinel like Cypher) in mid or along common flank routes allows attackers to intercept defenders attempting to rotate through predictable pathways like B site or the CT connector. This can secure crucial kills and disrupt defensive coordination.
Defender Rotation Strategies:
- Information-Based Rotations: The cardinal rule for defenders is to rotate based on reliable information confirming a committed push, not just initial contact or stray utility. Early warning systems like Sentinel utility or Initiator recon are vital for distinguishing real threats from fakes.
- Rotation Paths: Defenders primarily use Mid (if controlled), the CT connector paths, and Defender Spawn to move between sites. Agents possessing mobility abilities, like Jett's Tailwind or Omen's Shrouded Step, can naturally rotate faster than others, making them valuable for rapid reinforcement.
- Flank Awareness: During rotations, defenders must remain acutely aware of potential attacker flanks attempting to cut them off or attack from behind. Designating a player to watch the flank during a rotation is often necessary. Sometimes, proactively pushing out the "abandoned" site during an enemy rotation can catch attackers moving across the map.
Common Pitfall: Avoiding Over-Rotation (Defense):
The Problem: A frequent defensive error is committing too many players too early to a site based solely on initial contact or suspected pressure. This premature mass rotation leaves the remaining two sites dangerously exposed to splits or simple takeovers.
The Solution: Defenders must exercise discipline. Wait for confirmation of a genuine site execute. On-site players should prioritize survival and play for time or a potential retake rather than taking unfavorable fights. Players holding adjacent areas (like B or Garage in a 2-1-1-1 setup) should initially hold their positions to maintain map control and flank watch, only rotating once the threat is confirmed. Clear communication regarding the scale and certainty of the threat is essential to prevent unnecessary rotations.
The rotational dynamics on Haven elevate the map beyond simple execution into a complex mind game. Because rotations consume significant time, the interplay revolves around prediction, deception, and information control. Attackers constantly seek to bait defenders into incorrect rotations, creating numerical advantages on their true target site. Defenders, conversely, strive to decipher genuine threats from elaborate fakes, holding firm or rotating efficiently to counter the actual push. This strategic layer makes agents adept at information gathering (Sova, Cypher, Killjoy) and deception (Omen teleports, fake utility deployment) exceptionally valuable.
Furthermore, the Mid area serves as the critical rotation chokepoint. It offers the most direct and fastest routes between all three sites. Losing control of mid forces teams into significantly longer, more exposed, and predictable rotations through their respective spawns. Attackers who secure mid can often out-rotate defenders attempting to respond via spawn. Defenders cut off from mid are not only slower to reinforce but also become prime targets for lurkers anticipating these predictable spawn movements. This dynamic underscores why contesting and controlling mid is fundamental to achieving rotational superiority on Haven.
Assembling Your Squad: Optimal Agents for Haven
Selecting the right agents is crucial for navigating Haven's unique challenges. While individual skill is always a factor, a well-composed team with synergistic abilities significantly increases the chances of success.
Core Roles & Top Picks:
Initiator (Information / Entry Facilitation):
Given Haven's size and complexity, information gathering is paramount.
Widely considered essential. His Recon Bolt provides invaluable long-range information across the map's sprawling layout (A Long, C Long, Mid, site interiors), crucial for both attack planning and defensive reads. His Owl Drone scouts tight areas, and Shock Darts offer post-plant or clearing utility.
Excellent for enabling site executes and retakes. His flashes, stuns (Fault Line), and clearing ability (Aftershock) are potent tools for pushing defenders off angles and creating entry windows. His ultimate, Rolling Thunder, is devastating on Haven's relatively small sites. Often paired with Sova in double-Initiator compositions.
Other Viable Options: Skye (strong flashes, scouting, healing), KAY/O (suppression, flashes), Fade (close-range info, site control).
Controller (Vision Control / Rotational Support):
Managing sightlines and facilitating rotations is key.
Often cited as the ideal Controller for Haven. His rechargeable smokes offer flexibility, his Shrouded Step enables rapid rotations, aggressive plays, and fake presence, and Paranoia is a strong execute tool. His global ultimate adds further strategic depth.
Other Viable Options: Astra (global presence offers strong map control and execute potential), Brimstone (powerful execute smokes/ult, less flexible rotationally), Clove (post-death smokes provide value on a large map where early deaths can happen).
Sentinel (Site Anchoring / Flank Security):
Essential for managing the defensive spread.
Excellent for locking down sites or key areas like C Long/Garage. Her Turret provides information and delay, Alarmbot watches flanks, and Nanoswarms offer potent post-plant denial. Her Lockdown ultimate is game-changing for site takes or retakes.
Strong alternative, excelling at gathering information and holding flanks across multiple locations with Tripwires and Spycam. His Cyber Cages can stall pushes or create one-ways. Neural Theft provides crucial late-round intel.
Other Viable Options: Sage (offers healing and crucial delay with Slow Orbs and Barrier Orb).
Duelist (Entry / Space Creation):
Needed for breaking onto sites.
A popular pick due to her ability to effectively wield the Operator on Haven's long sightlines (A Long, C Long) and safely reposition with Tailwind. Her dash also facilitates aggressive site entries.
Other Viable Options: Raze (good for clearing tight spaces like Garage or site corners with explosives), Neon (fast rotations and entry potential), Phoenix (self-sufficient flashes useful for close-quarters fights like in Garage).
Example Team Compositions:
| Composition | Agents | Strengths |
|---|---|---|
| Standard Balanced | Jett, Sova, Omen, Killjoy, Breach | Strong information gathering, flexible control, reliable site lockdown, potent execute capability, and Operator potential. |
| Aggressive Double Initiator | Jett, Sova, Breach, Omen, Cypher | Sacrifices some of Killjoy's lockdown potential for enhanced information gathering and more aggressive site execution power via the Sova/Breach combination. |
| High Control | Sova, Omen, Killjoy, Cypher, Astra | Focuses heavily on map control, information denial, and strong post-plant/delay capabilities, potentially sacrificing some initial entry aggression. |
Key Agent Synergies:
- Sova + Breach: Sova's recon identifies enemy positions, setting up devastating stuns or flashes from Breach.
- Omen + Aggressive Agents: Omen's smokes provide cover for Jett dashes or Raze entries, while his teleports can create unexpected angles or coordinated pushes.
- Sentinels + Team: Killjoy or Cypher utility secures flanks and provides early warnings, allowing the rest of the team to focus resources elsewhere, contest mid, or rotate more confidently.
Key Agent Abilities & Haven Applications:
| Agent | Ability | Description | Specific Haven Application Examples |
|---|---|---|---|
| Sova | Recon Bolt | Arrow reveals enemies in line of sight | Scan A Long push; Info for C site retake; Clear Mid Courtyard; Reveal Heaven defenders |
| Sova | Shock Bolt | Arrow deals damage in an area | Deny default plant on A/C; Clear Hell/C Box camper; Damage enemies in choke points |
| Sova | Owl Drone | Controllable drone tags enemies | Scout A Short/Sewer; Clear Garage; Check C Long cubby; Gather info safely before push |
| Omen | Dark Cover | Long-lasting smoke, placeable anywhere | Smoke A Heaven/CT; Smoke B Links; Smoke C Garage/CT; Create one-ways (A Short, Garage) |
| Omen | Shrouded Step | Short-range teleport | Reposition aggressively (Heaven, site boxes); Rotate quickly (Garage to B); Fake presence; Escape danger |
| Omen | Paranoia | Blinding orb travels through walls | Blind defenders during site execute (A Short, C Long); Blind attackers pushing chokes; Enable aggressive peeks |
| Killjoy | Turret | Auto-turret detects/shoots enemies | Watch C Long; Cover A Short push; Provide info/delay Mid Courtyard; Watch flank routes |
| Killjoy | Nanoswarm | Deployable damaging grenade | Post-plant denial (A/B/C default); Delay pushes through chokes (Garage, A Short); "Microwave" setup on B |
| Killjoy | Lockdown | Ultimate detains enemies in large radius | Force enemies off site for retake (A/B/C); Secure site for plant; Zone control during executes |
| Cypher | Trapwire | Tripwire reveals/stuns enemies | Cover flanks (A Long, C Long, Mid); Delay pushes onto sites (A Short, Garage, B Links); Combo with Cages |
| Cypher | Spycam | Placeable camera provides vision/darts enemies | Watch A Heaven; Monitor Garage/Mid Courtyard; Info on C site; Spot rotations |
| Cypher | Cyber Cage | Deployable cage blocks vision/slows | Block chokepoints; Create one-ways; Combo with Tripwires for kills; Obscure defuse |
| Breach | Flashpoint | Flash through walls | Blind defenders holding angles (A Heaven, C Plat); Initiate pushes through chokes (Garage, A Short) |
| Breach | Fault Line | Stun charges through terrain | Stun common defensive spots (A Long corner, C Plat); Disrupt retakes; Initiate pushes |
| Jett | Tailwind | Short dash | Aggressive Operator peeks (A/C Long); Entry onto sites; Escape unfavorable fights; Fast rotations |
Tactical Toolkit: Essential Lineups & Setups
Mastering Haven involves more than just aim and game sense; knowing specific ability lineups provides consistent value, enabling safer plays and more effective control over the battlefield. These pre-planned ability placements allow players to influence areas without direct line of sight, crucial for post-plant scenarios, breaking defensive setups, and executing retakes.
Sova Lineups:
Recon Bolts:
Essential for gathering information. Common lineups exist for scanning:
- A Site: During executes or retakes, revealing Heaven, Hell, and site positions.
- B Site: Clearing A Link and C Link entrances before pushing.
- C Site: Scouting C Long, Platform, Backsite, and Garage entrance during executes or retakes.
- Mid: Providing early information on attacker presence or defender positioning.
- Early Round: Scanning A Long or C Long entrances for initial attacker movements.
Shock Darts:
Primarily used for clearing common spots or denying actions.
- Post-Plant Denial: Targeting default plant spots on A (behind boxes) and C (near front boxes) from safe positions.
- Clearing Angles: Flushing out defenders hiding in common spots like behind the C site box (effective in pistol rounds) or under Heaven (A Hell).
Controller Smokes (Omen/Astra Focus):
Attacking Smokes:
- A Site: Blocking A Heaven, CT connector, and sometimes the A Short entrance.
- B Site: Blocking vision from A Link and C Link/Garage entrances.
- C Site: Blocking the CT/Spawn connector and the Garage entrance.
- Mid Control: Smoking Mid Window to allow safer passage through Courtyard.
Defensive Smokes:
- Chokepoints: Smoking off A Long, A Short, C Long, or Garage entrances to delay pushes.
- Mid Control: Smoking Mid Window or Double Doors to contest attacker control.
- One-Ways: Utilizing geometry (like A Short boxes or Garage ledges) to create smokes that allow defenders vision while obscuring attacker vision.
Sentinel Setups (Killjoy/Cypher Focus):
Killjoy:
- A Site: Turret watching Long or Short, Nanoswarms covering plant spots or entry paths.
- B Site: Turret watching Mid Courtyard, "Microwave" setup with Alarmbot and Nanoswarms to deny pushes through Mid.
- C Site: Turret watching C Long or Garage cross, Alarmbot on Long/Garage entrance, Nanoswarms for plant denial or choke control.
- Lockdown Placements: Strategic spots for retaking or defending each site, forcing enemies into predictable retreat paths.
Cypher:
- A Site: Tripwires across Long and Short entrances, Spycam watching Heaven or common plant spots.
- B Site: Tripwires covering A/C Links and Mid entrance, Spycam providing Courtyard information.
- C Site: Tripwires across Long and Garage entrances, Spycam watching site or Garage.
- Post-Plant: Utilizing Cages for one-way vision or combining trips and cages on planted spike.
Post-Plant Positions & Denial Lineups:
Common Plant Spots: A default (behind large boxes), B center (open area), C default (near front green boxes).
Attacker Holding Positions:
- A: A Long, Heaven (if controlled), Hell, A Link.
- B: Mid Courtyard (behind boxes), Mid Window, A Link, C Link.
- C: C Long, Backsite, Platform, Logs, Garage.
Denial Lineups: Numerous lineups exist for agents like Sova (Shock Darts), Killjoy (Nanoswarms), Brimstone (Incendiary), Viper (Snake Bite), and KAY/O (FRAG/ment) to damage players attempting to defuse the spike from common holding positions. Gekko's Wingman can also plant or defuse remotely.
// Standard Plant Spots (for reference when practicing lineups)

- A Site: Default plant behind main boxes (corner)
- B Site: Center of open area
- C Site: Near front green boxes (visible from Long)

// Essential Lineup Tips

- Find safe positions that provide good angle but remain protected
- Learn at least one lineup for each site's default plant spot
- Practice lineup timing to maximize damage during defuse attempts
- Communicate clearly to teammates when using denying lineups
Knowing and practicing these lineups elevates abilities from simple reactive tools into proactive, strategic assets. On a map like Haven, characterized by long sightlines and numerous hidden angles, lineups enable players to safely gather critical information (Sova Recon), deny crucial actions like planting or defusing (mollies/shocks), and control space (smokes) without direct exposure. This is particularly vital in high-stakes post-plant situations, for breaking through entrenched defenses during site executes, and for conducting safer retakes. Teams or players lacking lineup knowledge are forced into riskier, less efficient plays, often relying solely on aim duels in unfavorable situations.
While standard, well-known setups (especially for Sentinels like Killjoy and Cypher) provide a solid foundation, adapting these setups based on opponent behavior is key to long-term effectiveness. Predictable turret placements or tripwire locations become easy targets for experienced opponents. Regularly varying setup locations—shifting turret positions, altering tripwire heights or angles, and changing Nanoswarm/Cyber Cage placements—keeps attackers uncertain. Observing how opponents approach sites and counter specific utility allows defenders to tailor their setups round-by-round, maximizing their disruptive potential and defensive resilience.
Regaining Control: Mastering Haven Retakes
Successfully retaking a lost bombsite on Haven is a complex operation that demands patience, coordination, and intelligent utility usage. Rushing in blindly is rarely effective against attackers established in post-plant positions.
General Retake Principles:
- Information First: Before committing to the retake, gather as much information as possible about the number of enemies on site, their likely locations, and any remaining utility they might have. Initiator abilities like Sova's Recon Bolt or Fade's Haunt are invaluable for this.
- Coordination is Key: Avoid trickling onto the site one by one, which allows defenders to isolate and win individual duels. Communicate the plan clearly and push together from multiple angles simultaneously whenever possible to overwhelm the defenders' crosshairs.
- Strategic Utility Usage: Retakes are often decided by the effective use of saved utility. Key ultimates like Killjoy's Lockdown, Breach's Rolling Thunder, or supportive abilities like flashes, smokes, and stuns should be conserved and deployed strategically during the retake push. Utility should be used to isolate fights, clear common post-plant angles, and create safe passage onto the site.
- Playing the Clock: Always be mindful of the spike timer. If time is low or the situation unfavorable, eliminating the remaining attackers to secure the round win might be a better objective than forcing a risky defuse attempt.
Site-Specific Retake Approaches:
A Site Retake:
Gaining control of A Heaven is often the first priority, as it provides a powerful vantage point. Coordinate pushes from the CT connector, Heaven, and potentially A Link. Use smokes to block vision from default plant spots or A Long. Employ utility (recon, flashes, stuns) to systematically clear Hell, A Short cubby, site boxes, and the A Long angle. Sova or Fade recon is highly effective here. Omen's smokes and teleports can create advantageous openings or repositioning opportunities.
B Site Retake:
Often considered the most challenging retake on Haven due to its multiple open entrances. Coordinate pushes from A Link, C Link/Garage, and potentially through Mid Window. Use smokes effectively on the entry points to limit angles. Methodically clear Back B/Gong and the various site corners. Area-denial ultimates like Breach's Rolling Thunder or Killjoy's Lockdown are particularly impactful for forcing defenders out of position.
C Site Retake:
Typically involves pushing from the CT/Spawn connector and Garage simultaneously. Key areas to clear include Platform, Logs, Backsite, and the C Long angle. Smokes are crucial for isolating angles, such as deploying one to divide the site horizontally. Given the long sightlines, reconnaissance from Sova or Fade is vital. Breach's Fault Line or Aftershock can effectively clear common hiding spots like Platform or behind boxes.
Breach's utility is exceptionally powerful for retakes on Haven. Use Fault Line to stun enemies behind common cover spots. Follow up with well-timed Flashpoints through walls to blind defenders as your team pushes. Rolling Thunder can clear entire sites, particularly effective on the confined space of B site or the linear layout of C site.
Retakes on Haven demand patience and precision. Attackers typically establish strong post-plant positions with crossfires. Simply running onto the site without a plan usually results in defenders being eliminated sequentially as they challenge multiple angles. A structured approach is far more effective: gather information, use utility like smokes, flashes, and stuns to isolate angles and create entry opportunities, and execute coordinated pushes from multiple directions. This systematic approach disrupts the post-plant setup and significantly increases the probability of successfully regaining control and defusing the spike.
More than raw aiming skill, the effective deployment of saved utility often dictates the outcome of a retake. Abilities function as crucial enablers. Ultimates like Killjoy's Lockdown or Breach's Rolling Thunder can forcibly displace defenders. Reconnaissance abilities like Sova's Recon Bolt reveal hidden threats. Smokes from Omen or other controllers block critical sightlines, while coordinated flashes create windows for engagement. This utility combination provides the necessary space, time, and information advantage required to overwhelm the post-plant defense. Teams that misuse or exhaust their key utility before the retake phase, or fail to coordinate its use during the retake itself, face a significantly harder battle.
Conclusion: Key Takeaways for Haven Dominance
Haven's unique three-site design presents a distinct set of tactical puzzles compared to other maps in Valorant. Mastering its intricacies requires a deep understanding of map control, rotational dynamics, and coordinated team play. The core challenges revolve around managing the defensive spread across three objectives, leveraging the map's layout for effective rotations, and establishing control over the pivotal Mid area.
Success on Haven is built upon several key pillars:
- Communication: Clear, concise, and standardized callouts are essential for coordinating actions across the map's large distances.
- Mid Control: Dominating Mid Courtyard and Garage unlocks rotational flexibility and dictates the pace of the game for both attackers and defenders.
- Flexibility & Adaptation: Rigid strategies often fail. Teams must adapt their attacks and defenses based on information, opponent tendencies, and the flow of the round, utilizing fakes, splits, and varied pacing.
- Information Gathering: Proactive use of reconnaissance abilities and Sentinel utility is crucial for making informed decisions, anticipating enemy movements, and avoiding traps.
- Strategic Utility Usage: Layering smokes, flashes, stuns, mollies, and recon abilities effectively is vital for executing site takes, delaying pushes, securing post-plants, and executing successful retakes.
- Rotation Management: Understanding rotation timings, avoiding premature over-rotations on defense, and exploiting opponent rotations on attack are defining skills on Haven.
- Agent Synergy: Selecting agents whose abilities complement each other and address Haven's specific challenges (information, control, site anchor, entry) is critical. Sova, Omen, and a reliable Sentinel like Killjoy or Cypher form a powerful core.
Ultimately, dominating Haven requires more than just individual skill. It demands a commitment to strategic thinking, team coordination, and continuous adaptation. By internalizing the principles outlined in this guide—mastering callouts, prioritizing mid control, executing flexible strategies, leveraging agent abilities effectively, and practicing disciplined rotations and retakes—players can significantly elevate their performance and consistently secure victories on this complex and rewarding battlefield.