
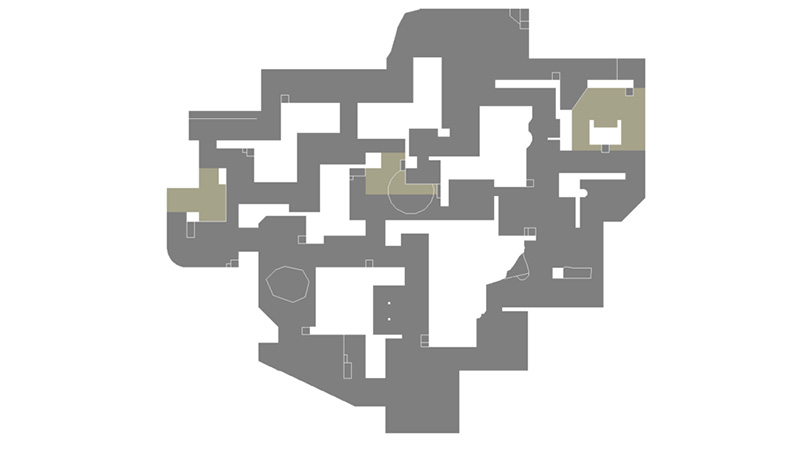
Valorant's ninth map, Lotus, transports players to a lost city nestled within the lush jungles of the Western Ghats mountain range in Omega Earth's India. Introduced in Episode 6, Act I, this battleground presents a unique challenge with its three distinct bomb sites (A, B, and C), drawing immediate comparisons to the established map, Haven. However, Lotus quickly distinguishes itself through innovative mechanics and a complex, interconnected layout.
The map's aesthetic draws heavy inspiration from traditional Indian stepwells and rock-cut Dravidian architecture, featuring ancient temple ruins overgrown with vibrant flora. According to lore, these ruins house ancient technology, with radianite-infused plants and giant lotus flowers powering mechanisms like the map's signature rotating doors.
Despite the defender spawn being relatively close to all three sites, Lotus is generally regarded by the community and professional players as a well-balanced map. Its design fosters dynamic, fast-paced gameplay, often leading to exciting comeback scenarios in competitive matches. Success on Lotus hinges on a deep understanding of its layout, mastering early map control, anticipating engagements, and effectively utilizing its unique interactive features.
Navigating the Ruins: Lotus Map Callouts
In the high-stakes environment of Valorant, clear, concise, and standardized communication is the bedrock of effective team play. On a map as complex and feature-rich as Lotus, with its three sites and numerous interconnected pathways, precise callouts become even more critical. Accurate communication enables teams to coordinate intricate site executions, establish robust defensive setups, execute timely rotations, and orchestrate successful retakes.
A Site Callouts
The A Site area is the largest of the three and features several distinct landmarks and pathways:
- A Main: The primary approach route for attackers towards A Site from their spawn side.
- A Rubble: An area near A Main characterized by scattered debris, often used for initial engagements or cover.
- A Root: A pathway near A Main defined by large roots, another entry vector for attackers.
- A Door: Refers to the rotating door mechanism connecting A Main and A Tree.
- A Tree: The small room situated between A Main and A Site, accessible via the rotating door.
- A Stairs: The staircase leading up onto the main A Site platform from the A Main side.
- A Site: The main bomb planting area on A.
- A Pillar: The large central pillar within A Site providing cover.
- A Hut / Midsight: The structure located in the middle of A Site, sometimes called Hut or Midsight.
- A Cubby / Squeaky: A small, enclosed space near A Stairs, often used defensively or for surprise plays.
- A Cubby Box / High Box: Boxes within or near the Cubby area, potentially offering cover or elevation.
- Double Box: Two adjacent boxes on site providing cover.
- A Backsite: The area at the rear of A Site, towards the defender side connection.
- A Top / Heaven: The elevated area overlooking A Site, accessible via a rope ascender from Backsite.
- A Drop / Silent Drop: The drop-down point from A Top/Heaven leading towards the Defender Spawn/Waterfall area.
- A Default: The common or default plant spot on A Site, often near Pillar or for A Main/Tree visibility.
- A Link: The corridor connecting A Site (near the destructible wall) towards B Site.
B Site Callouts
The B Site is the central and smallest of the three sites, acting as a crucial junction:
- B Main: The primary narrow corridor entrance for attackers pushing B Site.
- B Pillars: Often used interchangeably with B Main or referring to the initial approach area with pillars.
- B Main Box: A box within or near B Main providing cover.
- B Site: The main planting area of B. Features sunken stairs/pit.
- B Door: Often refers to the opening created by the destructible wall connecting from A Main via A Link. Note: Distinct from the rotating doors.
- B Default Box: The common or default plant spot on B Site, often near the central structure or stairs.
- A Link (B Side): The connection point from A Link entering B Site.
- C Link (B Side): The connection point leading from B Site towards C Site, often involving the rotating door near C Mound.
- B Platform: An elevated platform within or overlooking B Site.
- B Lower: The lower area within B Site, often near the sunken stairs.
- B Upper: The defender-side approach/holding area connecting towards B Site, often overlooking B Main.
C Site Callouts
The C Site features unique geometry with an elevated plant area and connections towards spawn and B:
- C Lobby: The initial area attackers pass through approaching C Main.
- C Mound: The area just outside C Main, near the rotating door connecting towards B Main.
- C Main: The primary attacker entrance pathway onto C Site.
- C Site: The main planting area, characterized by an elevated platform.
- Platform: Often refers to the elevated planting area on C Site.
- C Bend: The curved section on the right side of C Site (from attacker perspective).
- Waterfall: The area connecting C Site back towards A Drop / Defender Spawn, featuring a waterfall.
- C Hall: The corridor connecting C Site towards Defender Spawn/C Link.
- C Link: The pathway connecting from Defender Spawn towards C Hall/Waterfall.
- CT / Upper: General term for the defender-side high ground or approach to C Site from spawn.
- CT Box: A specific box providing cover for defenders near the CT/Upper approach.
- C Gravel: An area near C Site, potentially towards C Link/Spawn.
Connecting Areas & Spawn Callouts
Beyond the main sites, clear communication requires standardized terms for spawn areas and key connectors:
- Attacker Spawn: The starting zone for the attacking team, near a lake.
- Defender Spawn / CT Spawn: The starting zone for the defending team, near the Waterfall area.
- Links (A Link, C Link): These corridors are crucial rotation paths connecting the sites.
Consolidated Lotus Callout Glossary
| Area | Callout Name | Description/Location Reference |
|---|---|---|
| A Site | A Main | Primary attacker approach path to A Site |
| A Rubble | Debris area near A Main, initial contact point | |
| A Root | Path near A Main with large roots | |
| A Door | Rotating door between A Main and A Tree | |
| A Tree | Small room connecting A Main and A Site via rotating door | |
| A Stairs | Staircase leading onto A Site platform from A Main | |
| A Site | Main bomb planting area on A | |
| A Pillar | Large central pillar on A Site | |
| A Hut / Midsight | Structure in the middle of A Site | |
| A Cubby / Squeaky | Small enclosed space near A Stairs | |
| A Cubby Box | Box within A Cubby | |
| Double Box | Two adjacent boxes on A Site providing cover | |
| A Backsite | Rear area of A Site towards A Top/Drop | |
| A Top / Heaven | Elevated area overlooking A Site, accessed via rope | |
| A Drop/Silent Drop | Drop-down from A Top towards Defender Spawn/Waterfall | |
| A Default | Common plant spot on A Site | |
| A Link | Corridor connecting A Site towards B Site | |
| B Site | B Main / Pillars | Primary narrow attacker entrance to B Site |
| B Main Box | Box near B Main entrance | |
| B Site | Central bomb planting area on B, features sunken stairs/pit | |
| B Door | Opening created by the Destructible Wall from A Link | |
| B Default Box | Common plant spot on B Site | |
| A Link (B Side) | Entrance into B Site from A Link | |
| C Link (B Side) | Connection from B Site towards C Mound | |
| B Platform | Elevated platform within or overlooking B Site | |
| B Lower | Lower area/pit within B Site | |
| B Upper | Defender-side approach/holding area connecting to B Site | |
| C Lobby | Initial attacker approach area before C Mound/Main | |
| C Site | C Mound | Area outside C Main, near rotating door connection to B Main |
| C Main | Primary attacker pathway onto C Site | |
| C Site | Main bomb planting area on C, features elevated platform | |
| Platform | Elevated planting area on C Site | |
| C Bend | Curved section on the right side of C Site (attacker POV) | |
| Waterfall | Area connecting C Site back towards A Drop / Defender Spawn | |
| C Hall | Corridor connecting C Site towards C Link / Defender Spawn | |
| C Link | Path from Defender Spawn towards C Hall/Waterfall | |
| CT / Upper | General defender-side high ground or approach to C Site | |
| CT Box | Specific box cover near the CT/Upper approach | |
| C Gravel | Area near C Site, potentially towards C Link/Spawn | |
| Attacker Spawn | Attacking team starting zone | |
| General | Defender Spawn/CT | Defending team starting zone |
| Links | Corridors connecting the sites (A Link, C Link) |
Mastering the Mechanisms: Unique Map Features
Lotus's identity is defined by its three unique interactive elements: the Rotating Doors, the Destructible Wall, and the Silent Drop. Understanding the mechanics and strategic implications of each is non-negotiable for effective play.
The Rotating Doors: Strategy and Nuance
Location & Mechanics: These doors are activated by pressing a switch located on either side. Upon activation, the door rotates 180 degrees over a period of 10 seconds, creating a temporary passage. This rotation generates significant noise, audible across a large distance, and its progress is visually indicated by an icon on the minimap, visible to all players regardless of location. Crucially, any deployable agent utility (such as Sage's Barrier Orb, Killjoy's Lockdown or Turret, Cypher's Trapwires, Sova's Recon Bolt, etc.) placed within the door's rotation path will be instantly destroyed. The central portion of the door can be penetrated by weapons with high penetration capability.

Strategic Implications: The rotating doors introduce a complex layer of map-wide information dynamics and strategic trade-offs.
- Rotations & Information: They offer significantly faster rotation paths compared to traversing through the respective spawns, which is particularly vital for defenders needing to cover three sites. However, this speed comes at the cost of broadcasting movement intentions globally via noise and the minimap icon. Defenders can use these cues as valuable early warnings of pushes or rotations.
- Fakes & Misdirection: The global audio and visual cues can be deliberately triggered to create fakes, drawing enemy attention or causing premature rotations. However, overuse diminishes the effectiveness of this tactic.
- Utility Denial & Placement: The destruction of utility forces players, especially Sentinels like Killjoy, to place their gadgets strategically away from the doors' paths. This can create exploitable gaps in defensive setups.
- Timing & Vulnerability: The 10-second rotation duration creates a window of vulnerability where players can be caught mid-transit or ambushed as the door opens or closes. The doors also slow down during mid-rotation, requiring caution when peeking.
The Destructible Wall: Breaching and Defending
Location & Mechanics: Positioned between A Main and A Link, this breakable barrier provides a potential shortcut towards the B site area. It has 400 health points and absorbs damage, visually indicating its remaining integrity by changing color from blue (full health) to yellow, then red (low health). It can be destroyed by weapon fire or knife attacks. Upon destruction, it creates a loud noise audible in the immediate vicinity and remains open for the rest of the round, creating a permanent new passageway. Recent map updates adjusted this area, adding defensive boxes near A Link and creating an extra corner that becomes accessible once the wall is broken. Players can also shoot through the solid wall adjacent to the breakable section.
Strategic Implications: The destructible wall functions as a dynamic modifier for the A-to-B connection.
- Attack: Breaking the wall opens up a crucial alternative route from A Main into A Link and towards B Site. This enables split pushes onto A or B, bypasses the A Tree chokepoint, and facilitates faster rotations between the two sites. The timing of the break is a tactical decision – breaking it early applies pressure but gives away intent, while breaking it mid-round can create surprise flanks.
- Defense: The loud breaking sound serves as a clear audio cue, alerting defenders to enemy presence and activity in A Main or A Link. Defenders must remain aware of the wall's status and adjust their positioning and utility placement accordingly, especially with the addition of new defensive angles post-update.
- Mid-Round Impact: For both teams, opening the wall mid-round can drastically alter rotation options, enabling faster flanks or retake paths.
The Silent Drop: Stealth and Surprise
Location & Mechanics: This feature connects the elevated A Top (Heaven) area on A Site down to A Drop, located near the Defender Spawn and Waterfall area. Access to A Top from A Site is via a rope ascender, which makes noise when used. Descending from A Top via the drop can be done silently, but requires specific technique: players must hold the forward movement key ('W') to initiate the fall and then briefly tap the backward key ('S') or hold Shift just before landing to cancel forward momentum and latch onto the bottom edge without making a sound. Running during the drop, landing too far from the base, or failing the latching technique will result in audible landing sounds.
Strategic Implications: The silent drop offers a unique, high-skill avenue for stealthy maneuvers.
- Defense: Provides a quiet and rapid repositioning tool for defenders holding A Site, allowing them to fall back towards spawn for rotations or retakes without alerting attackers holding A Main or Tree. It can also enable sneaky defensive plays, like holding post-plant from A Drop.
- Attack: If attackers secure A Top, the silent drop allows for unexpected flanks towards Defender Spawn or C Link, potentially catching rotating defenders off guard. It also offers a safer disengagement path after planting on A Site.
- Risk vs. Reward: Successfully executing the silent drop provides a significant stealth advantage. However, failure immediately gives away the player's position due to the noise.
// Silent Drop Technique
W (Forward) → Initiate fall
S (Back) or SHIFT → Tap just before landing
↓ Successful silent landing if executed perfectly
↓ Audible landing if technique fails
Assembling the Optimal Squad: Agent Compositions
Selecting the right mix of agents is crucial for conquering Lotus's unique challenges. The three-site layout demands strong map control, efficient information gathering, rapid rotation capabilities, and reliable site anchors or retake specialists. Furthermore, the map's specific features – tight chokepoints, the relatively open A site, and the utility-destroying rotating doors – heavily influence agent viability and synergy.
Agent Roles and Importance on Lotus
Essential for blocking sightlines during executes, controlling space, and enabling post-plant scenarios. Given the map's size and three sites, agents with global or rechargeable smokes (Omen, Astra, Viper, Harbor) are often preferred over those with limited charges (Brimstone). Double controller compositions are very common in professional play.
Vital for gathering information, clearing tight angles, and enabling site entries with flashes or stuns. Agents effective in confined spaces (Breach, Fade, KAY/O, Skye) tend to excel. Information gathering is particularly important due to the map's complexity and lurking potential.
Crucial for anchoring sites, watching flanks, and providing passive information, alleviating the pressure on defenders spread across three sites. Killjoy is often considered a top pick, though her utility placement must account for the rotating doors. Cypher is also a strong contender.
Needed for entry fragging and creating space. Agents with explosive utility (Raze) or high mobility suitable for the map's structure (Jett, Neon) are favored.
Top-Tier Agent Picks
Based on common strategies and agent strengths tailored to Lotus:
Duelists:
- Raze: Excellent for clearing tight corners and chokepoints with Paint Shells and Boom Bot. Her Blast Packs provide mobility for fast site takes. Often paired with Fade for potent combos.
- Jett: Mobility excels on the larger A site and for holding angles with the Operator. Can entry or lurk effectively across the map.
- Neon: Fast rotations are valuable on a large map. Relay Bolt stuns are effective in narrow hallways and small sites.
Controllers:
- Omen: Shrouded Step and From the Shadows provide excellent mobility for rotations, lurks, and aggressive plays, bypassing noisy doors. Paranoia is strong for entry. Rechargeable smokes offer flexibility.
- Viper: Toxic Screen can split large sites or control long corridors. Poison Cloud is effective in chokepoints. Viper's Pit is exceptionally strong for post-plant denial, especially on B and C. Often used in double controller setups.
- Astra: Global presence allows her to impact any site from anywhere. Gravity Well and Nova Pulse are strong for controlling chokepoints and executing/stopping pushes. Cosmic Divide can enable large-scale executes or retakes.
- Harbor: High Tide wall is effective for taking site control on A and C. Cove provides temporary safe spots. Pairs well with other controllers, especially Viper or Astra. Strong retake potential with Reckoning.
- Clove: Versatile kit with self-healing and post-death smokes allows for aggressive plays and flexible site holds.
Initiators:
- Fade: Excellent info gathering with Haunt and Prowlers (good for clearing tight corners). Seize combos effectively with Raze's Paint Shells in chokepoints. Nightfall ultimate is powerful for site executes and retakes. Often preferred over Sova due to map geometry.
- Breach: Kit excels in Lotus's narrow corridors and tight site entrances. Flashpoint, Fault Line, and Rolling Thunder are devastating when enemies are funneled.
- Skye: Versatile pick offering info (Trailblazer), flashes for entry (Guiding Light), and heals. Seekers ultimate helps locate enemies across the large map. Trailblazer is good for clearing many 50/50 angles.
- KAY/O: ZERO/POINT knife provides crucial info and suppression, especially valuable against Sentinel setups. FRAG/MENT is good for clearing corners and post-plant. NULL/CMD ultimate disables abilities for site takes/retakes. Considered strong, potentially must-pick by some.
Sentinels:
- Killjoy: Often considered the premier Sentinel for Lotus. Turret and Alarmbot provide vital flank watch and site information. Nanoswarms excel at denying pushes through tight chokes and securing post-plants. Lockdown ultimate is extremely powerful for clearing one of the three sites for executes or retakes, though vulnerable to rotating doors.
- Cypher: A strong alternative, providing global information presence with Spycam and flank control with Trapwires. Cyber Cages can act as temporary smokes. Effective lurker potential.
- Deadlock: Potentially strong due to narrow chokepoints funneling enemies into GravNet and Sonic Sensors. Barrier Mesh can block pathways.

Attacking Composition Strategies
Common attacking approaches leverage specific agent synergies:
- Raze + Initiator Aggression: Centered around Raze's explosive entry capabilities combined with an initiator like Fade or Breach. Fade's Seize sets up Raze's Paint Shells perfectly in chokepoints, while Breach's stuns and flashes clear the path for Raze to push aggressively. Often supported by KAY/O or Skye for additional flashes and info.
- Information-Driven Executes: Compositions prioritizing information gathering with agents like Fade, Sova, Skye, or KAY/O. The goal is to gain comprehensive knowledge of defender positions before committing to a site execute, allowing for more calculated pushes and adaptations.
Defending Composition Strategies
Defensive setups need to account for three sites and the map's unique features:
- Sentinel-Anchored Defense: Relying heavily on Killjoy or Cypher to passively hold one or two sites, gather information on pushes, and watch for flanks. This frees up other players to hold more actively or prepare for rotations. Killjoy is frequently preferred for her potent site-denial capabilities.
- Retake-Oriented Setups: Prioritizing agents with powerful retake ultimates (Killjoy Lockdown, Breach Rolling Thunder, Fade Nightfall, KAY/O NULL/CMD, Harbor Reckoning) and abilities suited for clearing entrenched attackers (Raze grenades, Breach stuns, Skye flashes). Given the difficulty of holding sites against coordinated pushes, playing for retake is a common defensive philosophy. Harbor is noted as particularly strong for retakes.
- Early Map Control Focus: Utilizing agents capable of safely contesting A Main or C Mound early in the round (Omen, Jett, KAY/O, Breach) to gain information, delay pushes, and secure advantageous positioning.
Sample Meta Team Compositions
| Composition Name | Core Agents | Key Strategy | Potential Flex Picks |
|---|---|---|---|
| Pro Meta Standard | Raze, Fade, Omen, Viper, Killjoy | Balanced attack/defense. Strong entry (Raze/Fade), flexible smokes/lurk (Omen), site control/post-plant (Viper/KJ) | Fade → Skye/KAY/O/Breach |
| Aggressive Initiator | Raze, Breach, KAY/O, Omen, Killjoy | Heavy focus on initiator utility (stuns/flashes/suppression) to enable fast, forceful site takes with Raze. | Omen → Astra/Viper |
| Double Controller Hold | Jett, Skye, Omen, Viper, Killjoy | Emphasizes map control via smokes/walls, strong post-plant denial, Jett for Operator/entry, Skye for info/flex. | Jett → Raze/Neon |
| Harbor Variant | Raze, Fade, Harbor, Astra, Killjoy | Utilizes Harbor's walls for executes/retakes, combined with Astra's global presence and Raze/Fade aggression. | Astra → Omen/Viper |
These compositions demonstrate recurring patterns: the synergy between Raze and info/combo initiators like Fade, the prevalence of double controller setups for map-wide influence, and the near-ubiquitous inclusion of Killjoy for her anchoring and ultimate power. Adapting these templates based on team playstyle and specific opponent tendencies is key.
Tactical Blueprints: Site-Specific Strategies
Lotus's three bomb sites each possess distinct layouts and strategic nuances. A uniform approach is insufficient; teams must tailor their tactics – executes, defenses, post-plants, and retakes – to the specific challenges and opportunities presented by A, B, and C sites.
A Site
Layout Analysis: A Site is the largest of the three, featuring a relatively open central planting area dominated by a large pillar and the "Hut" (or "Midsight") structure. Key access points include A Main (leading to A Stairs and A Cubby/Squeaky), the A Tree room connected via the rotating A Door, and the A Link corridor connected via the destructible wall. Defensively, A Top/Heaven provides a powerful high-ground position accessible via a rope from A Backsite, which also connects down to A Drop/Silent Drop near Defender Spawn. Due to its wider entry points compared to B and C, A Site is often considered the easiest to attack initially, but its size allows defenders to set up formidable crossfires and heavy utility defenses.
Attacking Executes:
- A Rush/Split: A common tactic involves a coordinated push, often splitting forces between A Main and A Tree. This requires initiators to secure A Main control using utility while controllers smoke off key defensive angles like A Stairs and A Cubby. A typical split might send three players through A Main/Stairs and two through the A Tree door. Faking pressure elsewhere before committing to a fast A hit can also be effective.
- A Main Control: Securing A Main is paramount and often heavily contested early in the round. Utility combinations like Breach stuns followed by Raze grenades, or strategic smokes (like an Astra fake smoke) are used to gain control.
- Entry Path Variety: Attackers can choose between the direct A Main/Stairs push, the A Tree door route (which gives away position via noise but offers cover), or potentially breaking the A Link wall for a split towards B/Link.
Defensive Setups:
- Heavy Presence: Defenders often commit multiple players (typically two) to A Site, utilizing the space for layered defenses, turret placements, and crossfires.
- Contesting A Main: Aggressive setups aim to halt pushes in A Main or Rubble using utility and early peeks. An Omen might blind A Main from A Link to enable teammates to push forward.
- Playing for Retake: A more passive approach involves holding positions deeper on site (around Pillar, Hut, Backsite, Heaven) using utility primarily for delay, conceding initial entry but preparing for a coordinated retake with rotated teammates. A Site is often considered the most straightforward site to retake.
- Sentinel Utility: Killjoy setups typically involve a Turret watching A Main or Tree, an Alarmbot on an entry path, and Nanoswarms placed to deny plants or choke entries. Cypher can use Tripwires across Stairs or Tree entrance and Cages for vision denial. Utility must be placed carefully to avoid the rotating door's path.
Retake Plans (Defense): Coordinated utility usage is essential to clear multiple angles. Securing control of A Top/Heaven and A Stairs is often critical before pushing onto the site proper. Sending one or two players on a wider flank (looping through spawn or links) can catch attackers off guard. Utilizing powerful retake ultimates (KJ Lockdown, Breach Rolling Thunder, Fade Nightfall) can significantly increase success chances. Avoid simply funneling players down from Heaven one by one.
B Site
Layout Analysis: B Site is the smallest and most central site on Lotus, acting as a nexus between A and C. It features a distinctive sunken pit/stair area in the center providing some cover. Attackers have multiple potential entry points: the narrow B Main corridor, A Link (accessible after breaking the destructible wall), C Link (often involving the rotating door near C Mound), and drops from B Upper. Its confined nature makes initial entry difficult for attackers, but also challenging for attackers to hold post-plant against coordinated retakes. Consequently, B Site rounds often become heavily focused on retake scenarios.
Attacking Executes:
- B Rush (Eco/Force Buy): Due to the closer proximity of Attacker Spawn to B Main, a fast, coordinated rush down B Main can be effective, particularly on rounds with limited buys. Success relies heavily on overwhelming the defender(s) quickly and trading effectively, as pushing alone is risky.
- Split Push: More standard executes involve coordinating pushes from multiple angles, such as B Main combined with pressure from A Link (if wall is broken) or C Link (if door is used).
- Utility Focus: Entering B requires significant utility to clear tight angles, potential defenders holding B Upper, or players in A/C Link. Common smokes block B Upper and C Link to isolate the site during entry.
Defensive Setups:
- Chokepoint Control: Defenses often focus on holding the primary B Main chokepoint, using stalling utility like Sage walls, Viper orbs, or Killjoy setups to prevent fast pushes. Vigilance towards potential pushes from A Link or C Link is also necessary.
- Playing Elevated/Off-Angles: Utilizing B Upper provides a height advantage over B Main. Holding positions within A Link or C Link allows control over rotation paths and potential flanks.
- Sentinel Utility: Killjoy can place a Turret/Alarmbot watching B Main, with Nanoswarms ready for the choke. Viper setups often involve an Orb in B Main or a Wall cutting across the site. Cypher can place trips across B Main or link entrances.
Post-Plant Positions (Attack): Holding B post-plant is notoriously difficult due to the multiple entry points defenders can use for retakes. Attackers must proactively control B Main, A Link, C Link, and B Upper to avoid being overwhelmed by utility and crossfires. Common holding spots include playing back in B Main or C Link. Post-plant lineups (e.g., Viper Snakebites) are highly valuable here.
Retake Plans (Defense): Successful retakes require converging on the site from multiple angles simultaneously (e.g., B Upper, Defender Spawn via C Link/A Link). Heavy utility usage is typically needed to clear the pit and other hiding spots. Shotguns can be effective tools for close-quarters retake fights.
C Site
Layout Analysis: C Site is characterized by its elevated main planting platform, a large central pillar, and connections back towards Defender Spawn via C Hall/C Link and the Waterfall path (which also links towards A Drop). The primary attacker approach is through C Lobby and C Main, passing the C Mound area which connects to B via a rotating door. The site features tight angles and chokepoints, particularly the C Main entrance. Recent map changes adjusted the boxes on the elevated platform and modified the safe planting area, discouraging deep corner plants and forcing attackers towards the more exposed bend. The lower ground around the site features water, which creates footstep audio cues.
Attacking Executes:
- Default Push: The standard approach involves pushing through C Main/Lobby, using smokes to block vision from C Waterfall and C Hall/CT. Attackers must then methodically clear the site, including the elevated platform and pillar angles.
- Fast Execute: Coordinated pushes using initiator flashes (Skye, KAY/O) and fast entry agents (Raze, Neon) can quickly overwhelm a lone defender. Pro team Evil Geniuses demonstrated effective fast C site hits against LOUD.
- Rotating Door Play: Attackers can use the C Mound rotating door to pressure B Main, potentially splitting defender attention or enabling a rotation through B site.
Defensive Setups:
- Single Anchor Strategy: Due to the map layout, C Site is often defended by a single, strong anchor agent capable of stalling pushes with utility. Sentinels like Killjoy (Turret/Nanoswarms), Cypher (Trips/Cages), or even Deadlock (Vines/Sensor) are common choices. Controllers like Viper (Orb/Wall) or Omen (Paranoia/Smokes) can also anchor effectively. Sage's Wall and Slow Orbs are also viable stalling tools.
- Contesting C Mound: Some defenses involve actively contesting C Mound early to gain map control and information.
- Site/Backsite Holds: Defenders typically play around the central pillar, the boxes on the platform (modified post-update), or deeper towards Waterfall and C Hall.
- Crossfires: Setting up crossfires between players on the platform and those holding from CT/Hall can be effective.
Post-Plant Positions (Attack): Common post-plant positions include holding from C Main/Mound, playing from Waterfall, or pushing into CT/Hall for deeper control. Lineups are crucial for denying defuses, especially given the changes forcing more open plants. Examples include Viper molly lineups or KAY/O FRAG/MENT lineups.
Retake Plans (Defense): Information gathering utility (Fade Haunt) and powerful retake ultimates are essential. Attacking from multiple angles simultaneously is crucial, with defender-side utility usage necessary to clear entrenched positions.
The distinct characteristics of each site underscore the need for strategic flexibility. A Site demands control over larger spaces and unique features like the Drop and Tree. B Site revolves around explosive action in tight confines, often boiling down to retake scenarios. C Site tests the strength of defensive anchors and the coordination required for difficult retakes, with recent map changes adding complexity to post-plant situations. True mastery of Lotus involves recognizing these site personalities and adapting agent selection, utility deployment, and tactical pacing accordingly.
Dominating the Map: Advanced Control and Rotations
Beyond site-specific tactics, controlling key map areas and executing timely rotations are fundamental to success on Lotus. The map's three-site structure and unique mechanics place a premium on strategic movement and map awareness.
Winning the Early Fight: A Main and C Mound Control
A Main grants access towards both A and B (via A Link), while C Mound controls paths to C and B (via B Main/rotating door). For defenders, holding these forward positions severely restricts attacker options, provides valuable early information, and enables faster rotations between the outer sites and B.
Strategies for contesting these areas involve deploying potent utility combinations (like Breach stuns paired with Raze grenades in A Main), taking calculated aggressive peeks, or establishing Sentinel setups designed for information gathering and delay. Gaining dominance in A Main or C Mound early can set the tone for the entire round.
The Importance of Mid-Map Presence (B Site and Links)
While Lotus lacks a traditional, open "Mid" area like maps such as Ascent or Split, control over the central B Site and its connecting pathways (A Link and C Link) fulfills a similar strategic function. Dominance in this central zone is vital for facilitating rotations and preventing attackers from easily splitting between sites or cutting off defender movement.
Defenders holding B can react more swiftly to pressure on A or C by utilizing the destructible wall (A Link) or the rotating door (C Link/Mound). Conversely, attackers who secure B gain a powerful pivot point from which to threaten multiple sites simultaneously.
Strategic Rotations: Timing and Execution
The three-site layout inherently makes rotations a core strategic element on Lotus. Teams must constantly evaluate the fastest and safest ways to shift players across the map.
Defender Rotations:
Defenders face a critical choice: rotate through their spawn, which is slower but safer and conceals their movement, or utilize the faster routes involving the rotating doors (A Door, C Mound door) or the destructible wall (A Link). These faster paths, however, generate significant noise and visual cues on the minimap, potentially revealing the rotation to attentive opponents.
Effective defense relies on rapid communication of enemy locations to trigger timely rotations, while avoiding impulsive, full-team rotations based on initial contact alone. Understanding the time required for rotations (e.g., ~16 seconds from A to C via spawn) is crucial for defenders to arrive before a site is lost.
Attacker Rotations:
Attackers can leverage the rotating doors for rapid site pivots, potentially catching defenders mid-rotation, or use the door sounds for elaborate fakes. Breaking the A Link wall opens another key rotation path between A and B. Agents like Omen, with map-wide teleportation capabilities, are particularly valuable for executing unexpected cross-map rotations or lurks.
Timing Windows:
A deep understanding of typical rotation timings allows players on both sides to identify opportunities. Catching rotating players in transit, exploiting a numbers advantage created by a slow rotation, or executing a flank during a predicted enemy shift are hallmarks of advanced Lotus play.
Lurking and Flank Awareness
Lurking Strategies:
Executing successful lurks on Lotus presents challenges. The map's size means lurkers can be far from their team, common Sentinel utility setups often cover flank routes, and the noise generated by rotating doors can easily give away a lurker's position. Sticking with the main group is often advised.
However, opportunities for lurking do exist, particularly by exploiting rotation timings, using quieter paths like A Stairs or C Waterfall, or utilizing agents adept at stealthy movement or repositioning like Omen or Cypher.
Flank Security:
Given the multiple pathways and rotation options, maintaining flank security is paramount for both attackers and defenders. Sentinels play a critical role here. Utility like Killjoy's Turret/Alarmbot or Cypher's Tripwires/Spycam should be strategically placed to cover common flank routes, ideally away from the rotating doors (e.g., in A Lobby, C Lobby, or near Attacker Spawn).
Additionally, paying close attention to audio cues from the rotating doors and the destructible wall provides crucial information about potential flanking threats.
The overarching theme of map control on Lotus extends beyond simply holding territory. It involves actively managing the flow of information generated by the map's unique mechanics. The constant tension between choosing fast, informative rotations via the doors/wall versus slow, stealthy rotations through spawn defines the strategic landscape. Teams that excel at reading these cues, executing fakes, coordinating utility around map features, and timing their movements precisely will consistently find success on Lotus.
Professional Playbook: VCT Insights and Advanced Tactics
Analyzing how professional teams approach Lotus in the Valorant Champions Tour (VCT) offers invaluable insights into high-level strategies, optimized setups, and meta trends.
Common Pro Strategies and Setups on Lotus
Professional play on Lotus frequently showcases specific patterns:
- Agent Compositions: VCT teams often gravitate towards compositions featuring double controllers (commonly Omen/Viper, sometimes involving Astra or Harbor) for map-wide smoke control and post-plant strength. Raze is a highly popular duelist choice, paired with initiators like Fade or Breach for explosive site entries. Killjoy remains the dominant Sentinel pick due to her powerful site anchor and retake capabilities via Lockdown.
- Coordinated Utility: Pro teams exhibit exceptional coordination in layering utility for both site executes and retakes. This includes combining initiator abilities (e.g., Fade Seize + Raze Paint Shells, Breach stuns/flashes) with controller smokes and Sentinel denial tools.
- Early Map Control: Fighting for early control of A Main and C Mound is a consistent priority in pro matches, recognizing the strategic value these areas provide.
- Strategic Pacing: Teams demonstrate adaptability in pacing, sometimes opting for slow, methodical map control leveraging double controller setups (seen in Cloud9 strategies), and other times executing extremely fast, decisive site hits to counter defensive reads (as shown by Evil Geniuses against LOUD).
- Exploiting Mechanics: Pros actively use the rotating doors for fast rotations and fakes, and coordinate breaks of the destructible wall for timed pushes or flanks. Lurk plays, often facilitated by Omen, are carefully timed to exploit rotations.
Exploitable Angles and Wallbang Opportunities
Lotus offers numerous opportunities for players with good crosshair placement and knowledge of material penetration:
Identified Wallbang Spots:
- Standard wooden crates found across the map (Medium penetration).
- The central, non-reinforced part of the Rotating Doors (Heavy penetration required).
- The wall between A Tree and A Main, particularly near the door switch (Medium/Heavy penetration).
- The thin wall separating A Tree and A Site (Heavy penetration required).
- The side of A Hut facing A Top/A Drop (All weapons potentially effective).
- The corner cover at the top of A Stairs (Medium/Heavy penetration).
- Sections of the wall in A Lobby (Heavy penetration required).
- The solid wall adjacent to the A Link Destructible Wall (Heavy penetration required).
- The thin lip of the elevated C Site platform (All weapons potentially effective).
- The broken wall structure in the middle of C Site (Heavy penetration required).
Pros often hold tight angles facilitated by controller smokes or utilize off-angles created by initiator flashes or stuns to catch opponents off guard. Pixel peaks and specific headshot angles (like from B Site pit) are commonly contested.
Key Agent Utility Lineups (Examples)
Mastering specific ability lineups provides consistent value. Here are examples for common Lotus agents:
| Agent | Utility Type | Key Lineups/Placements |
|---|---|---|
| Viper | Post-Plant | Snake Bite lineups for default plant spots on A (from Rubble/Main), B (from B Main/Links/Spawn), and C (from C Main/Mound). |
| Site Control | Toxic Screen walls to split A Site (covering Tree/Main), B Site (blocking entries), or C Site (blocking Hall/Waterfall). Poison Cloud orbs for chokepoints like B Main, A Link, C Hall, Waterfall, A Tree. | |
| Ultimate | Viper's Pit is extremely effective for locking down B or C sites post-plant. | |
| Killjoy | Post-Plant | Nanoswarm lineups onto default plant spots (e.g., A Default from Rubble). |
| Setups | Turret placements for early info on A Main/C Mound or flank watch (A Lobby, C Lobby, B Link). Alarmbot placement on entry paths. Nanoswarms pre-placed on chokepoints or default plants. | |
| Ultimate | Lockdown placements need to cover the desired site effectively while avoiding the paths of rotating doors. Effective for both site takes and retakes. | |
| Sova | Recon | Lineups to reveal A Main, A Tree, A Site, B Site, C Main, C Site from various positions (Attacking/Defending). |
| Shock Darts | Useful for clearing common angles or post-plant denial. | |
| Fade | Haunt | Numerous lineups exist for gathering info on A Main, C Main, B Site, or for retaking sites (e.g., C Retake from Hall/Gravel, A Retake from Hut/Top). |
| Prowlers | Effective for clearing close corners in A Tree, B Upper, C Hall, etc. | |
| Seize | Used to trap enemies in chokes (A Main, B Main, C Main) often combined with Raze utility. | |
| KAY/O | ZERO/POINT | Knife placements to suppress key defensive positions or gather info on pushes (e.g., into A Main, C Main). |
| FRAG/MENT | Lineups for post-plant denial or clearing common holding spots (e.g., C default plant from mid). | |
| Other Agents | Sage | Walls can block chokes or create elevated angles. |
| Omen | Can use one-way smokes or aggressive teleports. | |
| Breach | Can use abilities through walls to clear angles or initiate pushes. |
The consistent patterns observed in professional Lotus play highlight the map's strategic demands. The emphasis on specific agent archetypes (strong controllers, info initiators, explosive duelists, reliable sentinels), the meticulous coordination of utility, and the constant battle for early map control demonstrate optimized approaches learned through high-level competition. Understanding why these strategies are effective – how they counter the map's layout and leverage its unique mechanics – is key to applying these lessons to your own gameplay.
Conclusion: Achieving Mastery on Lotus
Lotus stands as one of Valorant's most intricate and strategically demanding battlegrounds. Its three-site configuration, coupled with unique interactive mechanics, creates a dynamic environment that rewards adaptability, coordination, and deep map knowledge.
Key Principles Recap
Mastering Lotus requires internalizing several core principles:
- Mechanics Mastery: Understanding the function, timing, audio/visual cues, and strategic implications of the Rotating Doors, Destructible Wall, and Silent Drop is fundamental. These features dictate rotation options, information flow, and utility placement.
- Map Control Focus: Early and sustained control over key corridors, particularly A Main and C Mound, is crucial for dictating the pace of the round, enabling rotations, and limiting enemy options. Control over B Site and its links is vital for central map presence.
- Precise Communication: Utilizing clear, concise, and standardized callouts for every map location is non-negotiable for effective team coordination on this complex layout.
- Synergistic Compositions: Selecting agents whose abilities complement each other and effectively address the specific challenges of Lotus (tight chokes, large sites, rotation needs, anchor requirements) is essential. Adapting compositions based on attack or defense is often necessary.
- Site-Specific Strategies: Recognizing the distinct "personalities" of A, B, and C sites and tailoring executes, defensive setups, post-plant holds, and retake plans accordingly is critical for consistent success.
Final Recommendations for Improvement
Players seeking to elevate their performance on Lotus should focus on several areas:
- Dedicate time in custom games learning callouts until they are second nature. Practice executing the silent drop mechanic reliably. Experiment with agent ability lineups (smokes, recons, mollies) to build a personal arsenal.
- Actively watch VCT matches played on Lotus. Pay attention to agent compositions, default setups, specific site executes, retake coordination, and how teams utilize the unique map mechanics. Analyze why certain strategies succeed or fail.
- Work with teammates to standardize callouts and improve the clarity and timeliness of information sharing regarding enemy positions, utility usage, and rotation intentions.
- Be prepared to adjust strategies mid-game based on opponent tendencies, economic situations, and the flow of the match. Rigidity is often punished on a map as dynamic as Lotus.
Lotus offers a deep and rewarding challenge for players willing to invest the time in understanding its complexities. By mastering its unique mechanics, controlling key map areas, communicating effectively, choosing synergistic agents, and applying nuanced site-specific strategies, players can unlock the secrets of this lost city and significantly improve their chances of victory.
"Understanding the rhythm of Lotus's rotating doors and destructible wall is like learning to read the pulse of the map itself."