
Welcome, agents, to the definitive guide for mastering Split, one of Valorant's most iconic and strategically demanding battlegrounds. Set in a dense, futuristic Japanese megacity, Split stands out with its significant verticality, tight corridors, and a pivotal Mid area that dictates the flow of almost every round. It's a map that has been part of Valorant since the early days, known for its complex layout featuring multiple levels connected by ropes, often called ascenders or ziplines.
Split has a reputation for being defense-weighted, primarily due to the advantageous high ground positions defenders can hold and the narrow chokepoints attackers must navigate. However, this perceived bias isn't solely about angles; it's deeply intertwined with the rapid rotation capabilities defenders possess, especially through the central Mid area, allowing them to reinforce sites quickly. The map constantly forces players into a tense dynamic, balancing the need to watch vertical angles from elevated positions like A Heaven and B Heaven against the necessity of clearing claustrophobic ground-level corridors. Success here demands more than sharp aim; it requires intricate map knowledge, precise utility usage, clear communication, and highly coordinated teamwork. Players must constantly adapt, ready for long-range duels initiated from Heaven or sudden close-quarters brawls within seconds.
This guide will dissect every facet of Split, equipping agents of all skill levels with the knowledge to navigate its complexities. We'll cover essential callouts, delve into attack and defense strategies for both A and B sites, emphasize the critical importance of Mid control, explore optimal agent compositions, detail post-plant and retake tactics, highlight common mistakes, and provide lineup examples for key agents. Ready to rappel into Split strategy? Let's get started.
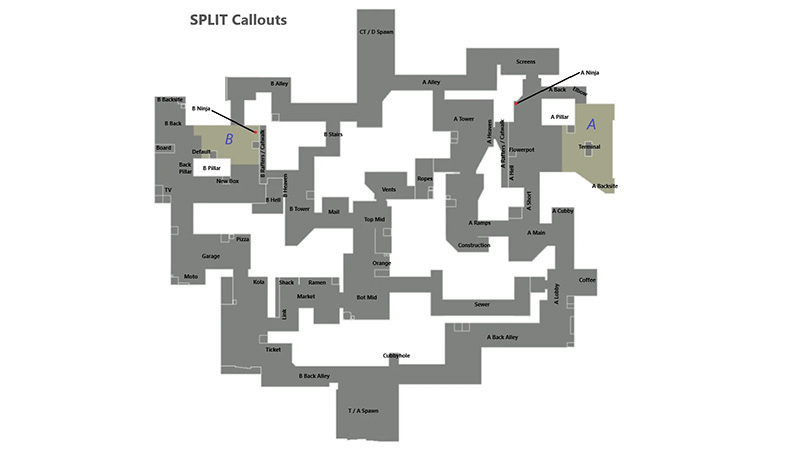
Decoding Split: Map Layout & Essential Callouts
Understanding Split's layout is the first step towards mastery. It's a compact map defined by its vertical layers and constricted pathways. Let's break down the key areas:
A Site Deep Dive
- A Main: The primary corridor attackers use to approach A Site. It's a narrow chokepoint often requiring utility like smokes or flashes to push safely.
- A Ramps: The inclined pathway connecting A Main up towards A Tower/Heaven. Control of Ramps is often contested for access to the high ground.
- A Tower / A Heaven: The critical elevated platform overlooking A Site and Ramps. It connects to Mid via the Mid Vent rope. Holding this position provides a significant defensive advantage or a powerful attacking platform.
- A Rafters: An adjacent platform connected to A Heaven, offering slightly different sightlines onto the site below.
- A Screens: A defensive position near the Defender Spawn entrance to A Site, offering a long angle towards A Main and Ramps. Attackers frequently use smokes to block vision from this spot during executes.
- A Site: The designated Spike planting area. It's relatively small and includes common callouts like Elbow (a corner angle), Under Heaven (the area directly below A Heaven), and Platform (an elevated section on site). Default refers to the standard plant spot, usually behind the central structure.
- A Back: The rear portion of A Site, offering cover and potential hiding spots for defenders or post-plant positions for attackers.
- A Sewer: A lower pathway connecting the Attacker side near A Main to Mid Bottom and the entrance to Mid Vent. It contains a rope for vertical movement.
B Site Deep Dive
- B Garage / B Main: The primary attacker entrance to B Site, another tight corridor. Often heavily contested with defensive utility like Sage walls, Cypher trips, or Viper setups.
- B Tower / B Heaven: The vital high ground overlooking B Site and Garage. It's connected to Mid via the Mail Room stairs. A rope descends from B Heaven to the site level near B Hell.
- B Rafters: An annex platform connected to B Heaven, providing alternative angles.
- B Site: The planting zone, dominated by a large central pillar/box structure. Common callouts include Default (standard plant behind the pillar), Double Box (stacked boxes near Rafters), and Platform (an elevated section).
- B Back / Backsite: The area behind the main site structure, a common defensive hiding spot and post-plant position.
- B Alley: A narrow corridor connecting B Site directly to the Defender Spawn side. Frequently smoked off by attackers during executes.
- B Link: A connector route from Attacker Spawn leading towards Mid and B Garage.
Mid Area Exploration
- Mid Top: The central elevated platform in Mid, offering crucial sightlines towards the Mail Room and Vent entrances, as well as approaches from Attacker side. This is often the most contested ground in Mid.
- Mid Mail / Mail Room: The enclosed room connecting Mid Top/Bottom to the stairs leading up to B Tower/Heaven. A frequent target for smokes and utility.
- Mid Vent / Vents: A narrow passage connecting Mid Bottom up to A Tower via ropes. A critical rotation and flanking path.
- Mid Bottom: The lower level of the Mid area, connecting the Attacker side entry points (Sewer, B Link) to the entrances of Vents and Mail.
- Mid Cubby: A small alcove or hiding spot located in Mid Bottom, often near the Vent entrance.
Unique Mechanics: Ropes and Corridors Explained
- Ropes (Ascenders): Split features several vertical ropes, located in Mid Vent (leading to A Tower), B Tower (leading down to B Site/Hell), and A Sewer. These allow for relatively quiet vertical movement compared to jumping, enabling surprise plays, quick access to high ground, and faster rotations. However, using ropes isn't without risk. Players are highly vulnerable while ascending or descending and can be easily shot if anticipated. Furthermore, ropes emit distinct audio cues when used, potentially alerting nearby enemies. Mastering ropes involves more than just pressing the interact key; it requires understanding timing, audio discipline, and risk assessment, making it a mechanic with a surprising depth.
- Tight Corridors: The map is characterized by its numerous narrow passages and confined spaces (A Main, B Garage, Mid Vent, B Alley, A Screens, etc.). These corridors severely limit maneuverability, often forcing close-range engagements. This architectural feature significantly amplifies the effectiveness of area-denial and vision-blocking utility. A single smoke can completely obstruct a chokepoint, while abilities like Raze's grenades, Sage's Slow Orbs, or Sentinel traps become exceptionally potent for controlling space and halting pushes. Consequently, information denial through smokes and information gathering via recon abilities or Sentinel utility become disproportionately powerful compared to maps with more open areas.
| Callout Name | Area | Description |
|---|---|---|
| A Main | A | Primary attacker entrance corridor to A Site. |
| A Ramps | A | Sloped path leading from A Main up to A Tower/Heaven. |
| A Tower/Heaven | A | Elevated platform overlooking A Site and Ramps; connects to Mid Vent. |
| A Rafters | A | Platform adjacent to A Heaven, offering different angles onto A Site. |
| A Screens | A | Defensive position near Defender Spawn entrance to A, long sightline. |
| A Site | A | The Spike planting area on A. |
| Elbow | A | A corner/angle on A Site, often near Screens or Ramps exit. |
| Under Heaven | A | Area directly beneath the A Heaven platform on A Site. |
| Platform | A | An elevated section within the A Site planting zone. |
| Default (A) | A | Standard Spike plant location on A, usually behind the central structure. |
| A Back | A | Rear area of A Site, behind the main structure. |
| A Sewer | Mid | Lower path connecting Attacker side near A Main to Mid Bottom/Vent entrance. |
| B Garage/Main | B | Primary attacker entrance corridor to B Site. |
| B Tower/Heaven | B | Elevated platform overlooking B Site and Garage; connects to Mid Mail. |
| B Rafters | B | Platform adjacent to B Heaven. |
| B Site | B | The Spike planting area on B. |
| Pillar / Box (B) | B | Large central structure on B Site used for cover/planting behind. |
| Default (B) | B | Standard Spike plant location on B, usually behind the central Pillar/Box. |
| Double Box | B | Stacked boxes on B Site, often near Rafters. |
| Platform (B) | B | An elevated section within the B Site planting zone. |
| B Back/Backsite | B | Rear area of B Site, behind the Pillar/Box. |
| B Alley | B | Narrow corridor connecting B Site to Defender Spawn side. |
| B Link | Mid | Connector route from Attacker Spawn towards Mid/B Garage. |
| Mid Top | Mid | Central elevated platform in Mid, overlooking Mail and Vent entrances. |
| Mid Mail | Mid | Enclosed room connecting Mid Top/Bottom to B Tower stairs. |
| Mid Vent | Mid | Narrow passage with ropes connecting Mid Bottom up to A Tower. |
| Mid Bottom | Mid | Lower level of Mid, connecting Attacker side entries to Vent/Mail. |
| Mid Cubby | Mid | Small alcove/hiding spot in Mid Bottom, often near Vent entrance. |
| CT / Spawn | N/A | Refers to the Defender Spawn area (CT = Counter-Terrorist). |
The Heart of Split: Why Mid Control is Non-Negotiable
On Split, perhaps more than any other map in Valorant, the battle for the central Mid area is paramount. It's not just a pathway; it's the strategic fulcrum upon which rounds pivot. Controlling Mid grants teams unparalleled advantages in rotations, pressure application, and information gathering, making it an essential objective for both attackers and defenders.
The Strategic Value of Mid: Rotations, Pressure, and Information
Mid's central location physically connects the A and B bombsites via two key routes: A Tower (accessible through Mid Vent's ropes) and B Tower (accessible via the Mid Mail stairs). This connectivity translates directly into strategic power:
- Faster Rotations: The team controlling Mid can rapidly shift players and pressure between A and B, keeping the opposition guessing and reacting.
- Pincer Attacks: Mid control unlocks the ability to execute devastating split pushes, attacking a site simultaneously from its main entrance (A Main/B Garage) and from the Mid connector (A Heaven/B Heaven). This forces defenders to divide their attention and resources.
- Pressure & Map Control: Holding Mid inherently applies pressure across the map, forcing defenders to spread thinner and opening potential flanking routes through Vents or Mail.
- Information Control: Dominating Mid denies the enemy team easy rotation paths and provides valuable intelligence on their movements. Defenders holding Mid get early warnings; attackers controlling Mid mask their final intentions.
- High Ground Access: Critically, Mid control directly translates to access to the powerful Heaven positions overlooking both A and B sites. The architectural link is direct: lose Mid, and you often lose Heaven simultaneously.
Because of these factors, the team that controls Mid gains significant leverage, dictating the round's tempo and forcing the opponent into reactive, often disadvantageous, positions.
Attacker Playbook: Seizing Mid Control
For attackers, establishing Mid control should often be the primary objective, even before considering a direct site hit. Common tactics include:
- Utility Investment: Taking Mid requires a significant utility investment. Smokes from agents like Omen, Brimstone, Clove, or Viper are crucial to block defender sightlines from the Mail Room entrance and the Vent entrance. Follow up with flashes or stuns from Initiators (Skye, Breach, KAY/O) to clear angles and push defenders off aggressive positions. Recon abilities (Sova dart, Fade haunt, Skye dog) help identify defender locations before committing.
- Coordinated Pushes: Avoid trickling into Mid one by one. Push with multiple players simultaneously to trade effectively and overwhelm defenders holding crossfires. Peeking aggressively from the A Sewer side can sometimes catch defenders off guard.
- Lurking & Diversion: While the main group pushes Mid, a lurker can apply pressure elsewhere (A Main or B Main) or watch for flanks. This splits defender attention.
- Close-Range Dominance: Given the tight angles in Mid, weapons like the Judge or Frenzy can be surprisingly effective, especially on eco rounds or force buys, to quickly take control of areas like Mail Room or Vent entrance.
Defender Playbook: Holding and Contesting Mid
Defenders cannot afford to simply concede Mid control. Preventing attackers from establishing a foothold here is vital. Defensive strategies often involve:
- Aggressive Setups: Positioning players early in Mid Vent and near the Mid Mail entrance (often using the Mid Box for cover) allows for strong crossfires to contest attacker pushes. Taking aggressive angles early can yield valuable information.
- Utility Denial: Use Controller smokes early to block attacker vision into Mid. Sage walls across Mid Top or Slow Orbs in the chokepoints are highly effective at delaying pushes. Sentinel utility like Cypher tripwires or Killjoy turrets/alarmbots placed in Vent or Mail provide early warnings and stall attackers.
- Calculated Retreats: Avoid taking isolated, aggressive fights in Mid. Defenders should play with support and understand when Mid control is lost. If overwhelmed, falling back towards the sites and playing for a retake is often the smarter play, rather than dying unnecessarily trying to hold Mid.
Attacking Split: Strategies for Breaching the Fortress
Attacking on Split is often perceived as the more challenging side due to the map's inherent defensive advantages: strong high-ground positions and narrow, easily controllable chokepoints. Overcoming this requires meticulous planning, precise utility execution, strong team coordination, and, crucially, leveraging Mid control whenever possible. The map's name itself hints at the most effective approach: splitting the attack to pressure sites from multiple angles simultaneously, often involving a push from Mid. Predictable, single-lane rushes are heavily punished.
A Site Execution
Taking A Site typically involves dealing with defenders in A Heaven, Screens, and potentially holding angles on Ramps or site itself.
Standard Pushes (Main, Ramps):
- A direct push requires significant utility investment. Key smokes must block vision from A Heaven and A Screens.
- Before entering, use clearing utility: Raze's Boom Bot or Paint Shells, Skye's dog or flashes, or Breach's stuns/flashes are essential for checking corners in A Main and forcing defenders off angles on A Ramps.
- Coordinate the entry, with some players pushing up Ramps towards Heaven while others clear the ground level site.
- A fast Neon execute might involve using her Fast Lane wall to block crossfire from site and Heaven, combined with a Relay Bolt concuss to clear a specific side like Screens or Elbow.
Executing the Mid-to-A Split (Pincer Attack):
- This strategy requires securing Mid control first.
- The team splits: one group pressures A Site via A Main and A Ramps, while the other group pushes from Mid Vent, using the rope to ascend directly into A Tower/Heaven.
- The key is timing the pushes simultaneously to overwhelm defenders caught between the two advancing groups. Utility must support both angles of attack.
B Site Execution
B Site presents its own challenges, primarily the narrow Garage entrance and the dominant B Heaven position.
Standard Pushes (Garage):
- Attempting a full B Site take solely through B Garage without Mid control is extremely difficult and utility-intensive. Attackers must use multiple abilities and win crucial aim duels quickly.
- Essential smokes block vision from B Heaven and B Alley.
- Flashes, stuns, or clearing utility (Raze Boom Bot, Skye Dog) are needed to push through the Garage chokepoint and clear immediate site angles.
- A Sage wall placed across B Main can provide temporary cover for attackers crossing towards the site pillar.
- Viper can be particularly effective here; her Toxic Screen can slice across the site, blocking vision from Heaven and other defensive angles simultaneously.
- If the initial push through Garage is delayed significantly by defender utility (Cypher cages, KJ Nanoswarms, Sage slows), it's often better to disengage and rotate, as defenders can reinforce B very quickly from Mid.
Executing the Mid-to-B Split (Pincer Attack via Mail/Heaven):
- This is generally considered the more reliable way to attack B, but requires Mid control.
- The team splits: one group applies pressure through B Garage, while the other pushes from Mid Mail up the stairs into B Tower/Heaven.
- A coordinated push from both directions pinches defenders on site and, crucially, those holding the powerful B Heaven position. This forces defenders into difficult crossfire situations.
The core takeaway for attacking Split is that utility isn't just for blocking vision; it's essential for forcing defenders off powerful angles and creating safe passage through the map's extremely narrow chokepoints. The map heavily rewards coordinated, multi-pronged attacks that leverage Mid control, while punishing predictable, single-entry rushes. Securing the Heaven positions during the execute phase is often fundamental to success.
Defending Split: Building an Impenetrable Hold
Defending Split successfully revolves around leveraging the map's inherent strengths: the powerful high-ground positions in A and B Heaven, and the ability to control narrow entry points with well-placed utility and coordinated crossfires. Effective defense combines proactive control of these key areas, particularly the Heavens, with reactive delays using utility at the main chokepoints. Mid control remains crucial for gathering information and preventing attackers from executing easy rotations or split pushes. Strong communication and timely rotations are essential to adapt to attacker strategies.
A common and effective default defensive setup is the 2A - 2Mid - 1B split. This prioritizes contesting the vital Mid area with two players, allowing for crossfires and early information, while still maintaining an anchor on the typically less-pressured B site and a solid presence on A. This structure allows the Mid players to rapidly rotate and reinforce either A or B site within seconds if a heavy push is detected, providing crucial flexibility on this compact map.
A Site Defense
Holding A involves controlling pushes from A Main/Ramps and potential pressure from Mid Vent.
- Key Positions: A Heaven/Rafters is the primary power position, offering wide views. A Ramps needs to be watched to prevent attackers from easily accessing Heaven. Screens provides a long angle, often held by a sniper. Site Anchors play behind the default boxes or in corners like Elbow.
- Common Setups & Crossfires: A player in Heaven often coordinates with a teammate playing on Ramps or site level to create crossfires against attackers pushing A Main. Setting up bait-and-switch plays between Heaven and site can be effective.
- Utility for Delay and Information: Use smokes, blinds, or stuns reactively to slow down pushes coming through A Main. Sentinel utility is crucial here: Cypher trips across Ramps or A Main entrance, cameras watching pushes, and cages for delay or one-ways. Killjoy turrets in Heaven watching Ramps/Main, Alarmbots at choke points, and Nanoswarms for common plant spots or entry denial. Sage walls can block Ramps or Main entirely, while Slow Orbs buy significant time. Recon utility like Sova darts can provide early warning of attacker presence in A Main/Lobby.
B Site Defense
Holding B primarily focuses on controlling the B Garage chokepoint and leveraging the B Heaven advantage.
- Key Positions: B Heaven/Rafters offers the dominant high ground overlooking the site and Garage entrance. Controlling B Garage often involves playing angles just inside or using utility to prevent pushes. Site Anchors typically play behind the central pillar, in B Back, or other site corners.
- Common Setups & Crossfires: A player in Heaven works in tandem with a player on site or holding Garage. Crossfires can be established between Heaven and B Back/Alley against attackers pushing onto site.
- Utility for Delay and Information: Use utility proactively to stall pushes through B Garage. Sentinel utility shines here: Cypher trips across Garage entrance or site pathways, cameras watching Garage or Heaven, and cages for one-ways or delays. Killjoy turrets on Rafters watching Garage/Heaven, Alarmbots in Garage, and Nanoswarms on default plant or chokepoints. Sage walls/slows are very effective at blocking the narrow Garage entrance. Viper one-way smokes or walls can completely shut down Garage pushes if placed correctly.
Optimal Agents & Team Compositions for Split (2024 Meta)
Choosing the right agents is crucial for unlocking Split's strategic potential. The map's unique blend of tight corridors, verticality, and critical chokepoints heavily favors agents whose abilities can effectively control space, gather information in confined areas, or exploit vertical angles. Agent viability on Split is often less about raw power and more about specific map synergy.
Agent Roles on Split: Who Does What?
- Duelists (Raze, Jett, Neon, Yoru): Their primary role is to create space, take initial engagements, and break through defensive setups. Raze is frequently cited as the premier Duelist for Split due to her explosive kit perfectly matching the map's close-quarters nature. Jett offers high mobility for aggressive plays or holding angles with the Operator. Neon's speed is seeing increased consideration for fast-paced executes, potentially disrupting traditional defensive holds. Yoru can enable tricky plays and double duelist compositions.
- Sentinels (Sage, Cypher, Killjoy, Chamber, Deadlock): Essential for anchoring sites, controlling flanks, providing crucial information, and delaying enemy pushes through chokepoints. Sage is invaluable for her Mid wall and Slow Orbs. Cypher and Killjoy excel with their traps and information tools in Split's confined spaces. Chamber and Deadlock are currently seen as more niche or potential wildcard picks.
- Controllers (Omen, Viper, Clove, Brimstone, Astra): Absolutely vital for blocking sightlines in the numerous corridors and Heaven positions, enabling site executes, and controlling defensive chokepoints. Omen is often favored for his rechargeable, precisely placeable smokes, teleportation for vertical plays, and effective blind. Clove offers an aggressive alternative with post-death smoking capabilities. Viper provides powerful static control with her wall and orb, especially strong in post-plant scenarios. Brimstone is a simpler, reliable option, while Astra offers global presence but can be complex to utilize effectively on this compact map.
- Initiators (Skye, Breach, Gekko, KAY/O, Sova): Their role is to gather information, clear dangerous angles, and set up pushes with flashes and stuns. Skye and Breach are particularly effective due to their ability to flash/stun through walls and around tight corners. Gekko's Wingman offers unique utility for remote planting or defusing. KAY/O provides ability suppression and info. Sova is generally considered less optimal here compared to other maps, as his long-range recon darts can be difficult to use effectively in the multi-level, confined spaces, though dedicated lineups exist.
Raze consistently ranks as a top-tier Duelist on Split for several compelling reasons directly tied to the map's design. Her Paint Shells (grenades) are perfect for clearing out the numerous tight corners, cubbies, and elevated Heaven spots where defenders love to hide. The Boom Bot excels at scouting narrow corridors like A Main, B Garage, or Mid pathways, forcing enemies to reveal their position or retreat. Crucially, her Blast Packs provide unparalleled vertical mobility, allowing her to quickly boost onto boxes, traverse gaps, or explode onto sites, perfectly complementing Split's multi-level layout. Finally, her Showstopper ultimate is devastating on Split's relatively small bomb sites, capable of securing multiple kills during an execute or retake.
Essential Sentinels: Sage's Control, Cypher/Killjoy's Intel
Sentinels play a vital role in controlling Split's chokepoints and gathering information.
- Sage: Her Barrier Orb is arguably one of the most impactful abilities on the map, capable of completely walling off Mid early in the round, forcing attackers down predictable paths, or creating safe passage for attackers during site executes. Her Slow Orbs are exceptionally strong for delaying pushes through narrow corridors like B Garage or A Main. Combined with her healing and resurrection, Sage provides immense defensive control and team sustain.
- Cypher/Killjoy: These info-gathering Sentinels thrive in Split's environment. Their tripwires (Cypher) and Turret/Alarmbot (Killjoy) are perfect for locking down narrow pathways, providing early warnings of enemy presence, and delaying pushes. Cypher's Spycam can gain valuable vision over key areas, while his Cyber Cages can create one-ways or obscure vision. Killjoy's Nanoswarms provide potent area denial, especially for post-plant scenarios or common chokepoints, and her Lockdown ultimate is incredibly strong for clearing Split's small sites during retakes.
Crucial Controllers: Omen, Viper, Clove - Mastering Smokes
Controllers are non-negotiable on Split due to the necessity of blocking numerous sightlines.
- Omen: Often considered the premier Controller for Split. His Dark Cover smokes recharge and can be placed precisely across the map, even through walls, offering immense flexibility for blocking Heaven positions or chokepoints. His Shrouded Step teleport allows him to exploit verticality, take unexpected off-angles, or quickly reposition. His Paranoia blind is effective for pushing through narrow corridors.
- Viper: While potentially more complex, Viper offers powerful static control. Her Toxic Screen can slice across entire sites or Mid, blocking multiple angles simultaneously. Her Poison Cloud can create one-way smokes or deny specific spots. She excels in post-plant situations with her Snake Bite mollies and site-locking Viper's Pit ultimate.
- Clove: A strong pick, particularly in ranked play, Clove brings an aggressive edge. Their Meddle decay helps clear corners, Pick-me-up provides sustain after kills, and crucially, they can deploy Ruse smokes even after death, maintaining map control for their team. Their Not Dead Yet ultimate offers powerful clutch potential.
The choice between these controllers often depends on the team's overall strategy and player preference. Omen provides the most flexibility and playmaking potential. Viper offers strong, long-lasting area denial ideal for slower executes or post-plant. Clove enables more aggressive strategies and provides utility even when downed. Brimstone offers simplicity and reliability.
Effective Initiators: Skye/Breach for Close Quarters
Initiators help break open sites and gather information.
- Skye/Breach: These agents excel on Split because their flashes (Guiding Light / Flashpoint) and stuns (Fault Line) can be deployed through walls and around the tight corners prevalent on the map, effectively blinding or displacing defenders holding common angles. Skye additionally offers healing and her Trailblazer dog for scouting confined spaces. Breach's abilities synergize well with fast-moving Duelists like Neon.
Example Team Comps & Synergies
While many combinations can work, here are some common archetypes seen on Split:
| Comp Name | Agents | Key Strategy/Strengths |
|---|---|---|
| Classic Control | Raze, Omen, Skye, Cypher, Viper/Sage | Balanced attack/defense. Strong Mid control, site holds, and execute potential. |
| Aggro Double Duelist | Raze, Neon/Yoru, Omen/Clove, Breach/Skye, KJ/Cypher | Fast-paced site executes, overwhelming defenders with speed and coordinated utility. |
| Standard Balanced | Raze, Omen/Clove, Sage, Cypher/KJ, Skye/Breach | Flexible composition adaptable to various strategies. Strong core of control and info. |
| Heavy Defense/Stall | Sage, Cypher, Killjoy, Viper/Omen, Raze/Jett | Focuses on heavy utility denial at chokepoints, strong site anchors, playing for retakes. |
Meta Watch: Neon, Sage Buffs, and Other Considerations
The Split meta is not entirely static. Recent trends and potential changes include:
- The Rise of Neon: There's growing discussion and experimentation with Neon on Split. Her speed offers a way to quickly break through chokepoints and disrupt defensive setups, potentially shifting the meta towards faster, more aggressive attack strategies to counter the map's defensive reputation.
- Potential Sage Buffs: Sage has always been strong on Split, but any significant buffs (as have been discussed by developers) could further solidify her position or even make her a near-mandatory pick, especially for controlling Mid.
- Wild Cards: Agents like Chamber (with recent buffs) or Deadlock might see niche play, depending on specific team strategies or individual player strengths.
Mastering Post-Plant and Retake Scenarios
Winning the round doesn't end when the Spike is planted. Effectively defending the Spike or executing a successful retake requires specific knowledge of plant locations, common hold positions, and coordinated strategies.
Post-Plant Playbook
Best Spike Plant Locations (A & B Sites: Safe vs. Open/Strong):
The choice of where to plant the Spike involves a crucial trade-off between safety during the plant and defensibility afterward.
A Site:
- Safe/Standard (Behind Default Box/Transit): This is the most common plant. It offers cover from A Main and Ramps during the plant animation. However, it's vulnerable to utility spam (like Killjoy Nanoswarms) and difficult to defend from multiple angles simultaneously, especially if defenders retake Heaven or push from Screens/Backsite.
- Safe/Alternate (Towards A Back): Planting deeper towards A Back is very exposed during the plant and requires teammates to cover multiple angles. Post-plant defense is challenging as it can only be effectively watched from close range in A Main or A Back.
- Strong/Dangerous (Open in Front of Default/Transit): Planting in the open is extremely risky and requires complete site control beforehand. Its strength lies in its visibility; it can be defended from A Heaven, A Main, A Back, and Ramps, forcing defusers into deadly crossfires. High risk, high reward.
- Strong/Alternate (Corner near Ramps): Slightly safer than fully open, this plant is still exposed to Heaven and A Back. It's a good spot for denying defuses with lineup utility (mollies, grenades) and can be watched from Ramps and Heaven.
B Site:
- Safe/Standard (Behind Pillar/Box): The most popular B plant. Offers cover from Rafters/Heaven during the plant. Downsides include the box being easily spammable, difficulty watching the Spike from multiple post-plant positions (mainly defendable from B Back), and vulnerability to common Killjoy Nanoswarm placements.
- Strong/Dangerous (Open Site, towards Garage/Alley): Theoretically the strongest plant. It's visible from B Back, B Rafters/Heaven, B Ramp (attacker side of Garage), and B Alley. Planting here is highly dangerous and requires absolute site control. However, it forces defusers to worry about angles from all directions.
- Strong/Alternate (Near Double Boxes under Rafters): A safer alternative to the fully open plant. It's more hidden during the plant but still defendable from B Ramp, B Back, and crucially, B Rafters/Heaven. It's also well-suited for utility denial due to its cornered position.
Defending the Plant: Key Angles and Positions:
- General Principles: After planting, attackers should spread out to hold multiple angles and avoid clumping together on the site, which makes them vulnerable to utility. Establishing crossfires is key. Players should play off teammates' contact and swing together. If Heaven was secured during the execute, holding it post-plant provides a massive advantage. Use molly/grenade/smoke lineups to delay or prevent the defuse.
- A Site Holds: Common positions include A Heaven, A Ramps, Screens (if pushed through), A Main, and site corners watching common retake paths.
- B Site Holds: Common positions include B Heaven/Rafters, B Back, holding B Main/Garage entrance, and B Alley entrance.
Retake Essentials
Retaking a site on Split after the Spike has been planted is challenging due to the map's layout favoring the team holding the site. Success hinges on coordination, timing, and effective utility usage.
Principles of a Successful Retake:
- Coordination is King: Retakes require teamwork above all else. Players must push together, trade effectively, and communicate clearly.
- Timing is Crucial: Avoid rushing in one by one. Waiting too long allows attackers to solidify positions, but pushing too late risks running out of time. Coordinate the push. Hitting the site from multiple angles simultaneously splits attacker focus.
- Utility Usage: Save utility specifically for retakes. Smokes block common attacker hold spots, flashes initiate entry, and damaging utility can clear corners or delay defuses.
- Clear Heavens First: On both sites, neutralizing or clearing the Heaven position is almost always the first priority, as attackers holding high ground have a significant advantage.
- Speed and Precision: Once the push begins, clear angles quickly but methodically, avoiding exposure to multiple angles at once.
Retaking A Site:
- Priority: Gain control of A Heaven. Attackers often play here post-plant. Use flashes, stuns, or coordinated pushes to clear it.
- Multi-Angle Push: Coordinate pushes from the main CT spawn entrance, from A Heaven (if controlled or retaken), and potentially rotating through Mid Vent/Ropes for a flank. Avoid funnelling everyone through the single main entrance, as this leads into crossfires.
- Utility: Use smokes or walls (like Astra's Cosmic Divide) to block vision from Screens, Backsite, Ramps, or default hold spots. Use flashes (Skye, Breach, KAY/O) and recon (Sova, Fade) to clear the site. Lineup utility (Raze nades, KJ mollies) can target the default plant spot.
Retaking B Site:
- Priority: Clear or contest B Heaven. If possible, using the rope from site level up to Heaven can provide a high-ground advantage for the retake push.
- Multi-Angle Push: Coordinate pushes from the CT spawn/Alley entrance, from B Heaven (accessed via Mail stairs or the rope), and potentially flanking through B Garage if map control allows.
- Utility: Use smokes or walls to block common hold angles like Garage entrance, Backsite, and around the pillar. Use flashes and recon to clear site corners. Lineup utility can target the default plant behind the pillar.
Must-Know Lineups for Key Agents
While raw aim and game sense are crucial, knowing specific ability lineups can provide significant advantages on Split, helping to clear angles, deny plants/defuses, or secure post-plant situations. Here are some essential lineup concepts for key agents, focusing on common scenarios.
- Attack A (Post-Plant): A common lineup involves throwing Paint Shells from A Main or Ramps to land on the default plant spot behind the central structure, forcing defenders off the defuse.
- Attack B (Post-Plant): Bounce Paint Shells off the wall under B Rafters/Heaven to land precisely on the default plant spot behind the pillar.
- Clearing Utility: Use Boom Bot to scout tight corridors like A Main, B Garage, or Mid pathways before pushing. Throw Paint Shells into common defensive corners like Screens, Elbow, B Backsite, or Mid Cubby to clear them.
- Defense Mid Wall: The standard Barrier Orb placed across the Mid Top entrance early in the round is fundamental for controlling Mid.
- Attack A Wall: Use Barrier Orb to block vision from Screens and/or Heaven, allowing a safer push onto site. Post-plant, walling off the Heaven entrance or Ramps can secure the site.
- Attack B Wall: Place Barrier Orb across the B Main entrance (often angled towards the pillar) to allow safe crossing onto the site. Post-plant, walling off the B Tower exit can trap defenders or delay retakes.
- Slow Orbs: Learn simple Slow Orb throws to land in chokepoints like A Main entrance, top of A Ramps, B Garage entrance, or Mid Vent/Mail entrances to stall pushes.
- Standard Attack Smokes: Omen/Clove should smoke A Heaven and A Screens for A executes; B Heaven and B Alley for B executes. Viper's Toxic Screen can often cover multiple angles with one wall.
- Mid Control Smokes: Smoke the entrances to Mid Vent and Mid Mail from the Attacker side to take control.
- Defensive Smokes: Place early smokes on A Main, B Garage, and Mid entrances to deter pushes or gather information.
- One-Ways: Omen and Viper have specific lineups for one-way smokes (where they can see out but enemies can't see in) in locations like Mid Mail, A Screens, or B Garage. Cypher Cages can also be used for one-ways.
- Viper Post-Plant: Learn Snake Bite lineups from safe positions (like A Main, B Main, or Mid) that land on common plant spots to deny the defuse.
- Focus: Place utility to cover key chokepoints, gather information, and delay pushes. Consistency is often better than overly complex setups.
- KJ Examples: Turret in Heaven watching main entrance/site; Alarmbot at chokepoint; Nanoswarms on default plant or entry path. Retake Lockdown placed safely in CT or Main.
- Cypher Examples: Camera high up in Heaven/Rafters or hidden watching main entry; Tripwires across chokepoints (Ramps, Garage, Alley, Mid stairs); Cages for one-ways or to cover trips. Post-plant cage lineups exist.
- Skye Flashes: Practice pop flashes that curve around corners for A Main, B Garage, or Mid pushes, blinding defenders without blinding teammates. Use Trailblazer dog to clear close angles safely.
- Sova Recon: Learn defensive Recon Bolt lineups for early info in B Lobby/Main or A Long. Retake darts require specific bounces or angles to reveal site holds. Attack darts are less common but possible with practice.
- KAY/O Knife/Molly: Learn ZERO/point knife throws to suppress key defensive positions (Heavens, Screens). FRAG/ment molly lineups can deny plants or clear default spots.
// Essential Raze Post-Plant A Site Lineup
- Stand at the outer corner of A Main entrance
- Aim at the middle pipe on the ceiling
- Add 1 bar of power to the grenade throw
- Lands exactly on default plant spot
Avoiding Common Pitfalls: Mistakes on Split
Split's demanding layout makes it easy to fall into common traps. Recognizing and avoiding these mistakes is crucial for consistent success. Many errors stem directly from failing to respect the map's core design principles: the importance of Mid control, the impact of verticality, and the danger of tight chokepoints.
Attacking Blunders
- Ignoring Mid Control: Repeatedly attempting 5-man rushes through A Main or B Garage without making any effort to contest or control Mid is a recipe for disaster. This makes attacks predictable and easy for defenders to counter by stacking the threatened site or using utility in the chokepoint.
- Poor Utility Usage: Wasting crucial smokes or flashes too early, misplacing them so they don't cover key angles like Heaven or Screens, or failing to use utility (like Raze nades or Skye flashes) to clear dangerous close angles before entry.
- Ignoring Ropes: Failing to utilize the ropes for potentially faster rotations, unexpected flanks into Heaven positions, or vertical repositioning denies key strategic options the map offers.
- Pushing Too Fast/Blindly: Rushing into sites or narrow corridors without properly clearing corners, checking common angles, or waiting for teammates and enabling utility. This often leads to getting caught by defenders holding angles.
- Neglecting Flank Watch: Executing onto a site without a Sentinel tripwire (Cypher/KJ) or a designated player watching the flank leaves the team vulnerable to defenders pushing through Mid or rotating behind.
- Getting Stalled: Allowing defender utility (Sage slows/walls, KJ swarms, Cypher cages) to halt a push in a chokepoint for too long. This gives defenders ample time to rotate and reinforce the site, turning an advantageous situation into a difficult one. Attackers need to either commit quickly through the utility or adapt and rotate elsewhere.
Defensive Errors
- Overextending in Mid: Aggressively pushing Mid solo without backup or a clear plan often results in an early death, giving attackers easy Mid control and an advantage.
- Giving Up High Ground Easily: Not properly contesting or prematurely abandoning the powerful A Heaven or B Heaven positions. Losing high ground makes holding the corresponding site significantly harder.
- Poor Utility Timing/Placement: Using defensive smokes, slows, or Sentinel utility too early (before confirming a push) or placing it ineffectively, allowing attackers to easily bypass or destroy it.
- Over-Rotating: Committing too many defenders to one site based on initial noise or pressure. Split's fast rotation times work both ways; attackers can quickly fake and switch sites if defenders overcommit. Maintaining Mid presence helps prevent this.
- Excessive Passive Play: Consistently giving up map control, especially Mid, without any contest allows attackers to dictate the round and execute split pushes easily.
Universal Mistakes
- Lack of Communication: Failing to provide clear and concise callouts regarding enemy locations, utility usage, rotations, or intentions for pushes/retakes. On a map requiring such tight coordination, poor communication is often fatal.
- Poor Timing: Mis-timing ability usage relative to teammate actions (e.g., flashing too early/late), pushing angles alone, or staggering retake pushes. Due to Split's compact size and fast rotations, even small timing errors can be severely punished.
- Not Adapting: Stubbornly repeating the same strategy round after round, even when it's clearly not working. Failing to adjust based on enemy tendencies, agent composition, or economy is a common mistake. Predictability is heavily punished on Split.
Split in 2024: Evolution and Current Standing
As one of Valorant's original maps, Split has seen its share of changes and time in and out of the active competitive map pool. As of late 2024, Split is currently in the active rotation for Competitive and Premier modes.
The map has historically had a somewhat divisive reputation within the community. Some players appreciate its unique verticality and the tactical depth required to master its complex architecture. Others have found it frustrating, often citing the perceived defensive advantage and the difficulty of attacking its tight chokepoints. Despite periods where it was removed from the pool (often to make way for newer maps or undergo adjustments), Split tends to be brought back relatively quickly compared to some other maps, suggesting it remains popular or strategically important in Riot Games' view. The developers aim to maintain a 7-map pool for competitive play to balance variety with learnability, especially for newer players.
While no major structural changes were made to Split itself upon its most recent return in 2024, the evolving agent meta significantly impacts how the map is played compared to previous iterations. Key considerations for the 2024 Split meta include:
- The Rise of Neon: As discussed previously, Neon is seeing increased experimentation and pick rates. Her high speed and wall-piercing stuns offer a potential counter to entrenched defensive setups, enabling faster, more aggressive site executes that aim to overwhelm defenders before they can fully react. This could lead to more double-duelist compositions featuring Neon alongside Raze or even replacing Raze in some strategies.
- Potential Sage Adjustments: Confirmed upcoming changes to Sage could further influence her role. Given her existing strength on Split (Mid wall, slows), any significant buffs might make her an even more dominant force in controlling key areas.
- Controller Dynamics: The addition and balancing of Controllers like Clove continue to shape strategies. Teams now have more options beyond the traditional Omen/Viper picks, allowing for different playstyles (e.g., Clove's aggression vs. Viper's static control).
Conclusion: Rappelling to Victory
Split remains one of Valorant's most intricate and rewarding maps to master. Its identity is forged in the constant tension between its commanding vertical sightlines and its claustrophobic, dangerous corridors. Success on this map is rarely accidental; it's the product of deep strategic understanding, precise execution, and seamless teamwork.
The key takeaways are clear: Mid control is non-negotiable. It is the heart of the map, granting the controlling team rotational superiority, diverse attack angles, and crucial information denial. Attacks are most effective when executed as coordinated, multi-pronged pushes, typically leveraging Mid control to create pincer movements that overwhelm defenders. Predictable, single-lane rushes are easily punished. On defense, leveraging high ground (A and B Heaven) and controlling narrow chokepoints with well-timed utility are paramount. The map heavily favors agents whose kits synergize with its unique geometry – Raze for explosive clearing and mobility, Sage for unparalleled chokepoint denial, Omen for flexible smokes and vertical plays, and information-gathering Sentinels like Cypher and Killjoy thrive in the confined spaces.
Avoiding common pitfalls – such as ignoring Mid, poor utility management, neglecting flank watch, over-rotating on defense, or simply failing to communicate – is just as important as executing good strategies. Split punishes predictability and rewards adaptation.
Mastering Split is a journey that requires more than just mechanical skill. It demands practice, critical thinking about positioning and timing, clear communication, and a willingness to learn from both successes and failures. By understanding its layout, embracing its unique mechanics, and applying the strategies outlined in this guide, players can significantly elevate their performance and confidently rappel towards victory on this challenging vertical battleground. Good luck, agents.