
Embarking on a WoW Classic Hardcore Priest journey means embracing permadeath: if you die even once, your character is gone forever. This guide focuses on maximizing survival first, efficiency second, teaching you how to reach Level 60 "without a single death." You'll learn everything from race selection and talent builds to combat tactics and common death traps. Priests bring unparalleled healing and utility, but they can also deal damage. In Hardcore mode, you must leverage every bit of your toolkit: powerful heals and shields, mana efficiency, crowd control (CC), and smart play.
Priests have one of the largest mana pools in the game and some of the strongest healing spells, making them surprisingly durable in open-world Hardcore leveling. Their defensive buffs (like Power Word: Shield and Inner Fire) let you absorb or avoid damage. At the same time, priests can switch into Shadowform to boost DPS with spells like Mind Blast and Smite, or specialize in Discipline/Holy for extra shields and heal-over-time effects. This versatility means a permadeath Priest can adapt to many situations – just use the right tools at the right time.
Throughout, we'll sprinkle in SEO-savvy phrases naturally (for example, this isn't just any guide: it's a Priest Hardcore survival guide for WoW Classic, covering WoW Classic permadeath Priest play!). We'll explain any game-specific term inline (e.g. aggro means monsters targeting you). We'll use bullet lists for clarity, and bold highlights on must-know tips and warnings. By the end, you'll understand how to stay alive and reach 60 with your Priest intact. Let's dive in, starting with the critical choice:
Race Selection and Analysis
Your race choice profoundly affects survival. In World of Warcraft: Classic Hardcore mode, certain racial abilities are life-savers. You'll pick either Alliance (Human, Dwarf, Night Elf) or Horde (Troll, Undead). Each race has pros and cons. Focus on survivability and utility, not just raw DPS. Below we analyze them. Remember: your chosen race's racials (special abilities) can prevent deadly effects like fear or poison.
Humans get Desperate Prayer (a once-per-cooldown emergency heal) and Diplomacy (extra reputation, minor). Desperate Prayer is crucial as an "oh-shit" button to top yourself off when about to die. Humans also have Sword and Mace Specialization for weapon skill but those are minor. Why pick Human? That extra heal might save your life in a tough spot when you've nearly burned through potions and mana.
Dwarves are considered the safest choice for Hardcore leveling. Their Stoneform racial removes all Bleed, Disease, and Poison debuffs instantly and gives 10% extra Armor. Many mobs apply poison or bleed, and Stoneform cleans them – it's a free defensive cooldown that can turn the tide. Dwarves also get Desperate Prayer (like humans) and Fear Ward (an ability that prevents the next fear effect). Fear is one of the most dangerous mechanics, and Fear Ward hard-counters it, especially in dungeons or against warlock/mage pulls.
Night Elves have Elusiveness (passive +5% Dodge) and Shadowmeld (stealth out of combat). The +Dodge slightly reduces physical hits you take, and Shadowmeld can break combat if timed perfectly (drop your hatchet!). This is less direct than Stoneform, but still useful to escape tough fights. The drawbacks: fewer proactive defense tools, and less downtime recovery compared to Dwarf. Night Elves are lower-risk if you rely on careful kiting (Shadow Word: Pain + run). They also have Quickness (movement speed) and Wisp Spirit (faster run to spirit rez).
Troll Priests get Berserking (20% haste for 10s, use on cooldown) and Regeneration (constant small in-combat health regen). Berserking boosts DPS (and slightly casting speed), letting you kill enemies faster. Regeneration gives a tiny heal in fights. Trolls also have Da Voodoo Shuffle (less slowing effects). While Troll's defensive benefits are weaker than Dwarf's, their offensive burst can let you kill mobs before they kill you. This can be a valid approach if you want a Shadow Priest Hardcore build, using DPS to stay ahead. But remember, quicker kills are still risky if something goes wrong.
Undead get Will of the Forsaken (break fear/charm every 2 min) and 10% Shadow Resistance. WoTF is essentially a personal Fear Ward on demand, which is huge for disarming the deadliest crowd control. Undead also have Touch of the Grave (self-heal on attacks) which is minor. In end-game Hardcore dungeons or raids, Undead may even outweigh Trolls because fear is so crippling. For Horde players focusing on survival, Undead is often considered the best because fear immunity and extra Shadow resist make you incredibly hard to shut down.
Alliance vs Horde Summary
Both sides have safe options. On Alliance, Dwarf is the overall safest thanks to Stoneform and Fear Ward. Humans are also great for that extra heal cooldown (Desperate Prayer). Horde's Undead is probably the safest, since every fear or charm can instantly spell your death in Hardcore; Undead's Fear break is a lifesaver. Trolls bring high DPS (Berserking) if you prefer to kill things quickly and trust your dodges.
Bottom line: Choose a race whose racials cover Priest weaknesses. Dwarf Stoneform and Fear Ward are unmatched, and Undead's Fear Break rivals that on Horde. Human's extra heal is also powerful. Night Elf/Priest has minimal active defenses, and Troll's save is kill-it-fast. Align with your playstyle: if you want the most tanky route, pick Dwarf or Undead. If you want damage or healing friends, consider Troll or Human with their bonus racials.
Talent Builds and Specializations
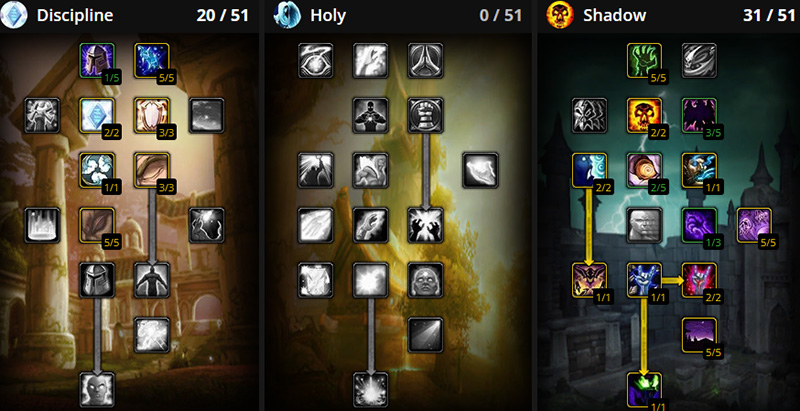
Your talent build will evolve as you level, but the general philosophy is to prioritize survival and mana efficiency over raw damage. In Hardcore mode, Discipline (Disc) Priest builds are often recommended for leveling because they strike a balance of damage, healing, and mana conservation. Discipline talents like Improved Power Word: Shield and Mental Agility make fights slower but much safer. Here's how to approach talents in phases:
Discipline for Durability
- Core Discipline Talents: Early on, invest in Mental Agility (3/3) for more instant cast spells (giving flexibility) and Mental Strength (5/5) for +10% mana. These keep your mana pool large and usable. Then grab Improved Power Word: Shield (3/3) to make your shields stronger. Power Word: Shield (rank 1 becomes available at 10) should be your automatic first action in any fight – it absorbs damage and breaks enemy casts.
- Spirit Tap (Shadow Tree): Even in a Discipline build, put 5/5 Spirit Tap if possible. Spirit Tap triggers a mana restore buff whenever you kill something with a Shadow spell, which is invaluable for regenerating mana. Many guides call this the Spirit Tap Priest build – it gives nearly permanent mana as you clear trash. Combine it with wand usage (below) and you might rarely run out of mana.
- Shadow Focus (5/5) and Shadow Weaving (5/5): Once you dip into Shadow tree for Spirit Tap, take Shadow Focus to reduce resist chance of your Shadow spells, and then max out Shadow Weaving. These boost your damage if you plan to use Shadow spells often.
- Inner Focus (1/1): Near level 20, Inner Focus makes your next spell free and critical, once every minute. Use this on a big spell like Mind Blast to save mana in emergencies.
- Inner Fire (Holy Tree): Don't forget Inner Fire (Disc tier 2). It increases your armor and provides a small spell damage buff. Get all ranks when possible. This is like a passive armor buff that makes you tougher.
- Mana Regeneration: Consider talents like Divine Spirit (to boost mana regen by buffing Spirit) and Meditation (regen while casting) in Discipline/Shadow depending on how many points you have.
Holy vs Discipline for Healing
- A full Holy Priest build (healing-focused) is extremely durable but suffers from low damage. Holy talents like Holy Specialization and Hymn of Hope boost healing and regen. You could go Holy Subspec in a Disc build for more heals (e.g. Improved Renew, Holy Specialization).
- Discipline vs Holy: In Hardcore leveling, pure Holy is generally inefficient because you'll spend too much time healing and too little killing. That said, if you plan to lead dungeon groups or solo many quests heavily, consider a hybrid: a few points in Holy tree (e.g. 5/5 in Improved Renew, 5/5 in Holy Spec) can make your heals stronger and faster. Some veterans even suggest "Holy Smite" builds where you take 20+ points in Holy, pick up Healing Focus, and Smite up to a 3/3 rank – it makes you slower than a Shadow leveller, but the healing safety net is big. In fact, one player reported that being a holy spec in dungeons saved their team from wiping multiple times.
Shadow for Burst
- Shadow Priest is the highest DPS Priest spec. If you lean Shadow, put 5/5 Spirit Tap, Vampiric Embrace (AoE heal), and work to Mind Flay (5/5) and Improved Shadow Word: Pain (5/5). Go deeper for Darkness and Shadowform (available at level 40).
- Shadow Priest Hardcore build means you kill fast, but remember: your defenses are lower. To survive, max Power Word: Shield and use armor buff (Inner Fire). Keep Fear Ward up (racial or Disc talent at level 50). If you go Shadow, grab at least Psychic Scream talents (Improved Psychic Scream 2/2 to fear for longer).
- In Hardcore, a common strategy is: Play Discipline until around 35-40 (for stability), then switch to Shadow talents for damage. That way you reach Shadowform (rank 2 at 20 in classic, higher ranks at 30) to multi-pull more safely.
- One Reddit player noted that building as Shadow form past 40 was "optimal for grinding mobs", but also pointed out Holy Smite builds are "more optimal for all dungeons 40+". In short: Mix and match. A pure Shadow build is great for solo questing with wand specialization, but if you are raiding or healing duos, invest some Holy/Discipline.
Talent Example (Levels 1-40)
A generic path (Alliance, Hardcore focus):
- Levels 1-10: Spirit Tap (5/5) in Shadow (immediate mana from kills). Then things like Improved Power Word: Shield 3/3 (Disc) by level 10 if possible.
- 10-20: Continue Disc: improved Renew (if low on self-heals), then get Inner Focus at 20.
- 20-30: If solo, go deeper Discipline (Holy Specialization 5/5 is optional for DPS), or shift to Shadow: Shadow Weaving 5/5, Improved Shadow Word: Pain 5/5.
- 30-40: Finish core Disc or Shadow tree. If Disc: Fear Ward (5/5 Disc talent) as soon as 50 (but if Dwarf, you have an actual Fear Ward ability already). If Shadow: get Mind Flay (5/5 by 51).
Talent Example (Levels 40-60)
- At 40, if you haven't already, get Shadowform (3/3) – it boosts your spell damage by 15% at the cost of reducing healing (you won't need heals as much).
- Around 45+: fill remaining Discipline/Holy if you plan to heal (Power Infusion in TBC but not here). Otherwise go full Shadow: Darkness, Devouring Plague, etc.
- Always keep Improved Power Word: Shield maxed early to absorb incoming damage. Your general rotation in fights will rely on it.
- Spirit Tap (Shadow Tree) – Vital for endless mana.
- Power Word: Shield (Discipline) – First spell you cast in any fight.
- Fear Ward (racial/Disc) – Prevent fear kills.
- Inner Fire (Holy) – Passive armor buff, huge survival booster.
- Mental Strength/Agility (Discipline) – Keep mana pool and casting flexible.
- Inner Focus – Free big spell on cooldown (life-saver if you need a critical Heal or Mind Blast).
- If playing Holy/Disc: Mass Dispel (48, AoE debuff removal) can break crowd control.
Break out the talent tree early! Don't skip resting to plan talent points. Your build for Hardcore leveling will not be DPS-optimal like PvP; it's survival-optimal. Mind your mana: stick with wand attacks to squeeze every fight. We'll cover wand use below – it's almost like a "wand specialization" strategy, even if priests lack the rogue talent.
Leveling Strategy
In Hardcore mode, leveling safely is just as important as choosing talents. You must avoid risky pulls and dead zones. Here's your Priest leveling roadmap:
- Start with Caution: At levels 1-10, you're extremely squishy. Pick a single pull at a time and grind humanoids (for cloth and linen, which you'll need for mana regen or vendor gold). Always have Shadow Word: Pain (rank 1) on something before you run away with wand – this ensures mana returns via Spirit Tap. For example, pull one kobold, cast Smite once, then switch to wand firing to kill. If you see a patrol or enemy approaching, run away – never tank two fights at once.
- Use Vendor Trash for Wands: Make and upgrade Lesser Magic Wand via Tailoring or find a better wand by level ~10. At any level, equip the best wand you can (Priest's ranged weapon) and regularly use Shoot or Auto Shoot. This is your bread-and-butter DPS to save mana. An example: After a spellcast, always finish off the mob with wand shots.
- Self-Buffs and Consumables: Always buff yourself before leaving town: Power Word: Fortitude (stamina), Divine Spirit if you have it (if you get points). Keep at least 1 health potion and 1 mana potion at all times in case of emergencies. As soon as you get a Free Action Potion (crafted or bought), use it prophylactically when doing anything risky, since stun/paralyze effects are lethal for a caster. Also keep Greater Shadow Protection Potion and Greater Fire Protection Potion for dungeons like Scholomance or Blackrock Depths, where fear or fire adds can one-shot you. Buying and carrying a stack of Linen Bandage lets you recover health without mana; level your First Aid quickly (Heavy Linen to Rugged to Mageweave).
Safest Zone Progression (Alliance)
| Level Range | Zones | Tips |
|---|---|---|
| 1-10 | Starter zone (e.g., Elwynn Forest if Human) | Stick around farms, do simple quests. Murder one wolf/gnoll at a time, use cloth for mana. |
| 10-20 | Loch Modan or Redridge Mountains | These zones have lots of humanoids (soldiers, murlocs), and the NPCs sell good gear. Avoid Duskwood or Wetlands if alone. |
| 20-30 | Hillsbrad Foothills or Arathi Highlands | Stranglethorn Vale is dangerous (too many elites). Hillsbrad has easy camps (ogres, troggs) near caves where you can backtrack. |
| 30-40 | Desolace and Arathi fields | Stay near clear paths. Avoid Barrens after 30 unless you have a group, as Quillboars and centaurs can double-pull. |
| 40-50 | Feralas or Burning Steppes | Remember to wear fire-resist gear for Burning Steppes quests. Scholomance (48-50) you should only do in a full group. |
| 50-60 | Felwood, Eastern Plaguelands | Grim Batol and Sunken Temple if in a raid group; or farm Lower Blackrock Spire, Blackrock Depths (Fear Ward mandatory). |
Safest Zone Progression (Horde)
| Level Range | Zones | Tips |
|---|---|---|
| 1-10 | Durotar (Troll), Tirisfal (Undead) | In Durotar, avoid the repellers (packs of angry wolves); only pull the murlocs/boars by themselves. |
| 10-20 | Barrens, Silverpine Forest | Barrens is farmable early, focus on Oaks and Razorfen to avoid too many rogues. Skip Rocktusk Farm until you can safely fight elites. |
| 20-30 | Stonetalon Mountains or Arathi | Raven Hill in Duskwood (if fear ward enough, it's Horde even, but risky solo). |
| 30-40 | Stonetalon south, Southern Barrens, Thousand Needles | Safe solo options with manageable mob density. |
| 40-50 | Hinterlands or Feralas | Avoid Stranglethorn jungle without a group. |
| 50-60 | Blackrock Depths and Stratholme | Run with a well-geared party. Same caution about zones as Alliance. |
General Leveling Tips
- Multi-pulling: With Psychic Scream (learned at 14) you can sometimes pull up to 5 (fear cap+1) if you have an escape route. For example, luring a pack of 3 back around a corner, fear the two closest with Psychic Scream, then kill the third while the others are afraid. But do this only if you have potions and know the area.
- Run and Rez: If you die, you'll run back as a ghost. In Hardcore, try not to die, but if it happens immediately run back to corpses so they don't decay. Having a Spirit Healer rez as soon as possible saves time, but avoid any additional mobs on the way.
- Safe Hearth: Bind your Hearthstone in a high-traffic city (Ironforge, Orgrimmar) so you can quickly heal and restock. Don't forget to use hearth in tough spots (like after a big run, or in a dungeon at 40+).
- Grouping: If you find a reliable group (warrior tank + maybe a healer or rogue), you can level faster. As a priest, you might lead as secondary heal (flash heal spam on tank, shield yourself). But Don't trust strangers too much: if you aren't sure, avoid red-flag situations. Treat strangers with caution – always be ready to mind-control a mob for a quick escape.
- Taps and Rests: Use Spirit Tap actively: after each kill, get your wand/smite in so your next kill triggers mana regen. If low on mana, use your wand exclusively for a minute or two until mana is comfy again.
At level 15 in Redridge, you see two rough hills with a patrol of bandits between them. You tag one, cast Shadow Word: Pain and Holy Fire, then kite it around the hill until it's almost dead, finishing it with 2 Wand shots. The other patrol member, seeing combat, runs. You then climb the hill, spamming Renew if needed, then pick off that second mob alone. After, you rest (regen mana) and go get the quest reward in Lakeshire. This slow pull-by-pull style is how you stay alive.
Remember: safety first. It's better to quest slowly and surely than rush and choke. Use downtime (traveling, mount training, selling) to heal and buff up. Each level, train a new spell/talent immediately to avoid running into trouble unprepared. By following a careful route and always engaging one mob at a time (or fear-managing a small pack), you build XP at a safe pace.
Spell Selection and Usage
Priests have a diverse spellbook. In Hardcore, focus on the spells that keep you alive and kill without killing you. Here's how to use your priest spells:
Offensive Spells
- Smite: Your bread-and-butter nuke. Use rank 2 Smite (learned ~6) for bigger hits, and keep rank 1 Smite on your bar for finishing enemies or saving mana. For example, if an enemy is at 10% health, switch to rank 1 Smite so you don't waste mana on an overkill hit.
- Holy Fire: (learned at 20) Decent damage-over-time (DoT) and medium cast. Useful to start fights if the mob resists Shadow or Smite.
- Shadow Word: Pain: Early DoT (learned at 4). Always apply this first on tougher mobs, then run off and let it tick while you cast others or use wand. Helps multi-pulls and trips Spirit Tap.
- Mind Blast: High-damage filler (available at 12). Critical strike chance, but long cooldown (12s). Use whenever available for burst damage.
- Mind Flay: (level 51) A channeling DoT that also slows. Great for kiting and safety, because it hits over time while you move or reposition. If you see trouble, you can Mind Flay and run backwards.
- Mind Spike: (level 47 or via quest) Instant nuke to keep moving. It's the Shadow Priest rocket – quicker cast than Mind Blast and refunds mana if it crits.
- Wand (Shoot): Prime damage source early on. Keep a wand equipped and loaded in the action bar slot 4 (for example). After a nuke or when mana is low, switch to wand auto-attacks. The Hardcore Discipline guide rotation lists "Shoot wand" as part of every sequence. Why? Wand costs no mana and often does more DPS per mana than spells at low levels.
Defensive and Utility Spells
- Power Word: Shield: Always cast at start of combat! This shield absorbs a chunk of damage. In every listed rotation PWS is first. It also breaks interrupts (the cast that stunned you breaks you loose), and counts as "damage" to regenerate gear (if any). Never let a fight start without it – it's your safety net.
- Renew: A heal-over-time (HoT). Cast on yourself right after Shielding – this heals you steadily. Drop a Renew on yourself before chasing the next mob. It stacks with heal cast later if needed. If you get hit mid-fight, Renew chips in extra heals.
- Flash Heal: Quick, expensive heal (learned at 40). Use it for critical heals on yourself or friendlies. Before 40, rely on regular Heal and Renew.
- Heal: Standard spell. Keep a rank 1 Heal on action bar for emergency top-ups or finishing with low mana. Also use rank 2 when moderate damage.
- Melee bit: Inner Fire (self buff), Inner Will (self buff) boost armor/spell damage. Cast these before fights. If you learned Fear Ward in Disc (lvl 30) and have the buff from Dwarf/Human, keep it ready for ferals or warlocks.
- Buffs: Always be buffed. Use Power Word: Fortitude, Divine Spirit (if talented) on yourself before a pull. After every death-spend (like when resting in town), reapply.
- Crowd Control: Psychic Scream (Fear) – Learned at 16. Use it against 2+ melee adds that run at you. It fears the nearest targets, so position yourself so the add you can't kill will be closest and get feared. In tough fights, fear one to zero, kill one, then run if needed.
- Shackle Undead: (Coil the skeletal) - Extremely useful only if fighting undead. It incapacitates an undead non-boss for 25s. Use it vs. skeletons in Scholomance for example.
- Mind Control: (Level 36) Can turn an enemy into an ally temporarily. Best on humanoids or beasts. Use it to skip a hard pull: mind-control a bandit or wolf away from its group, or to control a caster and run.
- Dispel Magic: Instant remove debuff (only one effect). Use it on yourself in dungeons vs magic slows or curses (Hex of Jammal'an etc), or on teammates.
- Psychic Scream/ Mind Control combos: A veteran trick: Mind Control a mob, then Psychic Scream it – it might not break fear due to game mechanics, confusing AI. (But test cautiously.)
- Vampiric Embrace (Disc): (at 30) A self-buff: 25% of damage you deal heals party. Use if you have a consistent rotation, but mana cost is high. Possibly avoid until you have gear, to not waste mana. It can be a lifeline in group content.
- Holy Nova: (PvP/heal only, from talent) Rarely used unless max healing is needed in a crowd; has limited uses solo.
- Spirit of Redemption: This talent (level 40 Disc) lets you cast as a spirit for 15s after dying. In hardcore, ignore it. If you die, game over.
Practical Spell Advice
- Keep your Eyes Ahead: When approaching a camp, pre-cast a Shield on yourself, then a renew. Pull one mob. If another patrol sees you, hit Psychic Scream.
- Emergency: Save a health potion for if you ever slip below ~30% health. Try to drink it where safe (around a corner or house), then kite out.
Spell-Specific Tips
- Improved Psychic Scream (2/2): If you have these points, Scream fears longer (6s instead of 4). Even better.
- Dispel Magic: Against elites that cast slow/disease (like some Northrend bosses, not in Classic), but in Classic, use it on yourself for poisons/curses (Scourge puts curses, diseases; dispel).
- Fear Ward (from Dwarf/Human): After you cast it on yourself, the next fear is completely ignored. Always cast it before running into any dragonkin or warlock that could fear you. Think of it as an extra life.
- Wand Specialization (Strategy): Priests have no talent, but treat it like you do. Keep reloading wand (buy new charges or craft), and always round out your damage with it. It's especially useful on level 1-9 spamming, then on packs of low-health mobs.
- Crowd-fighting: If many mobs converge, consider sacrificing your PvP stance: you have no built-in taunt, so if a second mob walks into melee, immediately run back and cast Psychic Scream on it to slow it or remove it from the fight. Move-and-shoot with wand if needed.
// Spell Priority List:
1. Pre-combat buff: Fortitude, buff your wand.
2. Opening: Shield -> Renew -> Spell DPS (Mind Blast) -> Spell DPS (Smite/HolyFire) -> Wand -> Finish with Smite (rank1).
3. Mid-Fight: If more mobs: Fear or move behind pillar and kill one. If hurt: Cast Renew/ Heal on the run, or use potion.
4. No Mana: Always use wand.
5. Cool-downs: Use Inner Focus to free a big heal or Mind Blast when needed (should be up often after 20).
By mastering your spells and using the wand as your cheat, you'll spend more time alive. The cited Hardcore guide rotation shows exactly how to weave shields, nuke, and wand. Keep an eye on mana: if your Spirit Tap buff is running, consider fighting until it's gone for maximum regen. If you feel danger, don't hesitate to heal yourself up; survival beats efficiency.
Gear Progression
Your gear choices in Hardcore should emphasize stamina and intellect (health and mana) first, then spirit for regen, and only then pure damage stats. Icy Veins notes that Classic Hardcore Priests put a larger emphasis on Stamina and Intellect because "the additional Health and Mana can, at times, be the difference between surviving an encounter or not". In short: wear anything that gives you more HP and more mana to keep the fight going.
Key Stats
- Stamina (STA) – #1 priority. Each point adds 10 health. More HP means more hits you can survive. If you die, your adventure ends, so any extra HP is worth it.
- Intellect (INT) – #2 priority. Each point adds mana and a bit of crit. More mana lets you cast more spells in a row for sustained fights. It also slowly increases your crit chance.
- Spirit – Early-game priority: Spirit governs out-of-combat mana regen. In Classic, Spirit Tap and Divine Spirit make Spirit convert to in-combat regen too. With Spirit Tap (5/5) your Spirit actually heals you on every kill, fueling your next pull. So after stamina/intellect, grab gear (or enchant) with Spirit.
- Spell Power – Last priority for leveling. It speeds up kills (so you lose less HP), but if it comes at cost of losing a chunk of Stamina, drop the Spell Power gear. In Hardcore, a slower fight you survive is better than a fast kill that nearly drops you.
- Resistances – Situational. Before 60, you may need Fire Resist when questing in Burning Steppes or dealing with fire mobs (e.g. later Blackrock). Keep one set of Resist gear handy for BRD (fire) and Scholomance/Stratholme (shadow). For example, an item like Fire Runed Plate Belt (fire resist) or a Dominion of X neck for Shadow resist. Bag-space is precious, so don't carry all, just high-phase zones:
- Fire resist ~45% for BRD.
- Shadow resist for Scholomance (scales ~20% is enough).
- Nature resist for Zul'Farrak or Pool of Tears quests (though rare).
- Armour: Priest wears cloth. Keep head-to-toe cloth. Some items have better armor but in Classic armor hardly matters (mobs do mostly magical damage vs you). Focus on stats.
Leveling Gear Highlights
- 1-19: Use quest rewards and world drops for Int/STA. For example, the Emerald Sanctuary quest set (Healing touch sets) may give something. If tailoring, craft your own mageweave robes.
- Weapon: Upgrade your wand and weapon when possible. Many priests dual-wield (hold a dagger + wand), but weapon DPS is not crucial. Look for things like Rod of Molten Fire (good low-level wand) or Deviate Scale Cloak (Darkmoon, minimal). A decent off-hand with +int or spirit can matter (e.g. The sanctified HQ).
- Mid-level: In the 20s, gear like Aurastone Hammer is a great wand (drops from Scarlet Monastery).
- 30s: Try to get Crest of Darkshire trinket (crown, healer token quest) or Mark of the Champion from the Hand questline (it's a 45-man questline, heavy, maybe skip).
- Tailoring/Enchanting: If you tailors, craft Dreamweave Gloves (hands with +5 spirit +3 int) or Dreamweave Vest at 40 (best pre-raid priest cloth). Enchant your cloth: Enchant Chest: +7 Int, Enchant Bracer: +6 Spirit, Enchant Gloves: +7 Spell Power (WOTLK ench, but in Classic you have Superior Spellpower +15 spellpower). In Classic, glove enchant Enchant Gloves – Healing Power +13 is an option (for healers).
- Misc: Bag of Mumbo (Murloc trophy) might be interesting for +8 stam. Fire resist cloaks like Cloak of Firemaw if you have funds (Molten Core quest rewards).
- Endgame (60): If you get that far (and you will!), pre-raid BiS items include Dreamwalker Raiment (Stormrage/Alonsus next patch set), Tier 0.5 Priest gear, Head of the Deceiver ring, etc. But by 60, you hopefully have won and maybe died before (or won!).
Pre-Fight Buffs and Consumables Gear
- Enchants: As soon as you get Blacksmithing to 375 or someone to enchant you, put +7 Intellect on chest, +7 Spell Power or +4 Intellect on gloves, +4 Spirit on legs (WOTLK ench, in Classic maybe Spiritual enchant +11 mana on legs), and boots/shield for +7 Stam.
- Wand Crafting: Engineering gives Wand Wrangling pattern? Actually not (that's only in TBC+). So just buy wand scrolls if available, or upgrade yourself.
- Vendor Gear: Check Alliance vendors in Ironforge/Wingnut or Undercity for items: e.g. Silver-thread Sash (+2int) at level 36 tailoring train, or scrap in SCH for Crescent/healing theme gear.
- Quest Reward Pick Examples: Quest "Into The Scarlet Monastery" gives Netherwind Belt (+3 int) or Chest of Vitality.
- Mail or Plate (only for DPS builds): Weaker against cloth, so skip heavy armor.
In summary: Gear for more HP and mana. Don't chase attack power or haste. If you find a shiny staff with big DPS but less Stamina than your old one, skip it. Use gold to enchant and buy healing/mana potions.
Consumables and Preparation
Before every outing, prep like a survivalist. Keep a well-stocked bag of consumables and think of worst-case scenarios:
- Health & Mana Potions: Always carry at least a few Greater Healing Potions and Superior Mana Potions (bought from alchemy vendors at appropriate levels, or from AH). In Hardcore, sip a potion at even moderately low HP (below 50%) because a normal fight back might kill you otherwise. Drink a mana potion if you're below 20% mana and a fight is coming. Don't wait – potion usage is safety.
- Bandages: Level First Aid to make Heavy Runecloth Bandages (40-70 heal) and even Mageweave Bandages after 50. Bandages heal more than potions (if fought safely), and mana won't regenerate during casting. After a fight, bandage up if you got scratched and have some time. It's safer than taking another fight half-bloodied. Always have at least 10 Heavy and 10 Rugged on you from 20 onward.
Buff Potions
- Mana Regeneration Elixirs: Elixir of Greater Intellect, Elixir of the Sages for long-term stats (you drink them in town).
- Stat Flasks: Flask of Distilled Wisdom at 60 if you somehow go that far solo (rare).
- Resistance Potions: Greater Fire Protection Potion, Greater Shadow Protection Potion, etc. Bring these to relevant zones or bosses. For example, in Blackrock Depths or Burning Steppes, drink a Fire Prot potion and plant a Shadowguard.
- Free Action Potion: As mentioned, get this ASAP. When to use: If fighting a creature that stuns or slows heavily (like an earth elemental or lurker). It's a lifesaver – be sure to use it before the debuff hits you, not after it's already on you (it only stops new effects). Keep one at all times.
Food and Drink
- Have stacks of leveling foods (e.g. Spiced Wolf Meat, Roasted Quail, Feltail Delight) that boost stats temporarily. Eat Int or Sta food before a boss or long session.
- Keep drinks (Conjured Mana Strudel or [if Mage friend] mana biscuits from Ice Cream Truck at max).
Scrolls
- Scroll of Intellect (+25 int) and Scroll of Spirit (+25 spirit). Use them if you have them (maybe from guild events or world buff nights).
- Runn Tum Tuber Surprise (+10 Stam) if you can get it (REQ 50+).
- Oil of Immolation (warlock soulstone regen is more for warlocks, skip).
- Alliance-only: Consider a Scroll of Spirit III from Stormwind emblem trader (55).
- Horde-only: Brood Notoriety only for Nefarian, skip if aiming single pass.
- Shadow Oil: (if you wander places with undead or dragons frequently).
Consumables for Escape/Control
- Smolderweb Carrier (invisibility). Allows temporary stealth (like Rogue) – useful for sneaking past packs. Use to reset if overwhelmed, or to skip a patrol and avoid dying.
- Shadow oil for weapon: If you're in a pinch and happen to have an oil (used on weapons, deals shadow damage). Not high priority for a priest, but if dueling warlocks or ghosts it helps.
Preparation Checklist (before each session)
- Alchemy/Buffs: Buff up in city: drink any elixirs, soulstone buff (if paladin), cooking buffs, mage or priest buffs (Arcane Intellect, Shadow Protection from other Priests in city).
- Gear Check: Repair at outposts, make sure weapons (wand) aren't broken. Restock first aid and potions.
- Quests and Info: Plan which quests/zones you'll tackle; read quest notes if possible. Hardcore tip: only go into new zones that you've scouted for danger (e.g. from maps or guides).
- Add-ons Tools: If using quest-tracking addons (Questie, ClassicCodex), set waypoints for your current zone's quests.
Consumables for Party Play
- If you duo with a paladin/druid, coordinate: drink Greater Mana and Health pots before big fights together.
- As a priest, bring extra Runn Tum Tuber Surprise (stamina food) for party, or Elixir of Lion's Strength for attack buff if you find them.
- You can craft Major Healing Potion (Alchemy 300) – if you have the skill or a buddy.
- If you get feared unexpectedly with no Fear Ward, just spam Wand and run to break LoS behind a wall – you might dodge several frees.
- If you agro too many, turn tail and fight on heels of Psychic Scream followed by distance (Fire Walk).
"Death is merely a temporary setback... until Hardcore mode, that is."
Advanced Combat Techniques
Once you're leveled up, mastery of micro-combat tactics will keep you alive when things get hairy. Advanced techniques include crowd control management, kiting, and leveraging dungeon mechanics:
- Crowd Control (CC) Chains: Wisely use your fears and shackles. A classic trick: if fighting a large group, Mind Control a harmless mob, then Psychic Scream to fear the rest. The mind-controlled mob can be your escape puppet or even a tank. For example, MC a boar and lead two wolves away, then fear the wolves with Psychic Scream. This splits the group. Remember: Psychic Scream always fears the closest targets. If multiple mobs are around, step back slightly before screaming to ensure you fear the dangerous ones away.
- Kiting and LOS (Line-of-Sight): Whenever a melee mob charges, move backwards or around corners. Cast Mind Flay or Smite while moving to slow them (Mind Flay's slow effect is underrated for kiting). If a caster is killing you, break the LoS: run behind a pillar or tree. Cast Dispel Magic on yourself if you get slowed by debuff, or use the Dwarf racial Stoneform to get rid of an immobilize/curse. Example: if a troll druid casts Entangling Roots on you, Stoneform will instantly free you (because it removes debuffs).
- Psychic Scream (Fear) Tactics:
- Use Improved Psychic Scream (2/2) talent to extend fear to 6 seconds. Without it, fear is 4s which might be too short when high level.
- Be ready to mute skills: If feared, you can cast Desperate Prayer/Heal with Inner Focus (free!) as soon as you regain control to top off.
- CC Friendly Fire: When in a dungeon with a partner, have them tag excess mobs while you fear for them to kill. You can orchestrate fear+charge combos to clear adds.
- Wand & Pull Techniques: Always pull from max range. E.g., shoot the first shot from far away, then chase. Shooting early tags only one mob. If packs are dense, move stealthily (Night Elves) or invisibly (Sentry Elixir) to isolate. Use Auto Shot (wand) as a puller: it will grab aggro. Then step back, shield yourself, and fight one-on-one.
- Kite with Psychic Horror: If you have Psychic Horror (talent in Shadow, adds stun 50% for 6s), you can kite an enemy with wand or run. This talent is AMAZING in late Shadow: stun a runner, then spell DPS while they're locked down.
- Spell Dodge: Even though priests can't dodge, NPCs have ranged melee delay. If you cast Power Word: Shield on yourself, enemy might spam swing into it and waste time. Let them hit the bubble instead of you. Also, position yourself on uneven terrain if possible so ranged mobs have trouble shooting.
- Defensive Cooldowns:
- Fade: (Level 32 Discipline) makes you invisible to enemies briefly. Use it if an enemy is stuck on you and you need to re-cast shield or heal. Fade for 1.5s, pop Renew or Heal behind a corner.
- Dispersion not in classic, ignore.
- Desperate Prayer (Human/Dwarf): Cast it as a last-ditch heal under heavy fire. It's instant.
- Free Action: As soon as a mob casts a root or slow on you, chug Free Action. It will also speed you up.
Inner Fire + Shield + Renew makes you extremely hard to kill in short bursts. For instance, before engaging a tough elite, buff yourself (Inner Fire). At the first hit, Shield and Renew then spam Wand. You'll often out-heal their damage in first 3 seconds of fight.
- DoT and Positioning: If enemy resists fear or runs at you (unfriendly mage?), get around a corner, keep Shadow Word: Pain ticking, drop Renew on yourself, then slowly chip with wand. Many fights become staring contests, with the NPC losing interest after 6 seconds of no sight.
- Battle-pet Fights: If you pull a pack with a hunter's pet, Fear the pet, not the hunter's mob. Pets often chase you, letting the main target lose interest.
- Aggro Reset: If you accidentally pull too many, run off. Mobs will de-aggro after 8 seconds if you're out of sight. Cast a quick fear & run. Don't hesitate to blink/disengage (if you had a blink ability) – not in vanilla though. So the best trick is running back to an area you've cleared to reset.
- Group Combat: When in a party, your role may be more support. Still, don't slack:
- Fear Ward on the tank before a known fear mechanic (like Dragonkin druid's Thrash).
- Power Word: Shield the tank as early as possible (the tank's gear/health may be lower than yours!).
- Use Prayer of Healing (if talented or level 50+ and have many injured), but be careful of mana.
- Coordinate with your paladin/druid's Blessing of Kings or Mark buff for added durability.
- Communicate on CC: if a rogue goes Vanish, be ready with Mass Dispel to remove sap in a pinch (rare).
- Overpull Warning: If you see another pack behind the mob you pulled, stop. Let the party burn one pack at a time. A triple-overpull in Hardcore often means "Gruul's Lair time".
Remember Cause-Effect: What happens if you push too hard? You die. Every technique here is about mitigating those chains of events: more shields => less damage taken, more CC => less fights, more spells dodged => less damage. Each tip is an insurance policy.
- Always shield first: Even if you think you don't need it, cast Power Word: Shield on yourself (and tank) to eat a free hit.
- Keep moving: Priests can't tank. When mobs come at you, strafe and cast.
- Plan your fears: Only Psychic Scream if it benefits you. Fear can fail nearby, and it breaks on damage. Use it in crowds, not on single foes, lest you waste the cast.
- Emergency backup: Before a risky area, make sure Shadow Ward (if you have it) is active for magic, or use Dispersion/Leyline if those were in later expansions (not in Classic).
- Wand always: Reload or craft new wands regularly. It's your mana-free nuke.
By mastering these techniques, your Priest will feel like a ghost: slippery to hit and deadly to the careless. In Hardcore PvE, good habits are everything.
Dungeon Healing Guide
Dungeons in Hardcore are high-risk endeavors. As a Priest, you may be expected to heal if you join a group. If you must do a dungeon, treat it like a raid – come prepared, stay alert, and keep yourself alive to keep others alive.
Pre-Dungeon Prep:
- Gear Up: Wear your best Stamina/Intellect gear. Change to resist gear for known bosses (e.g., Fire Resist gear in BRD; Holy/Shadow resist in Stratholme/SCH).
- Consumables: Have max stacks of potions, bandages, and food. Put Fear Ward on the tank before Zulgurub or end of BRD (fear-happy bosses).
- Rested Buffs: Pop Hearth to inn, buff fully, then run back. This ensures maximum mana.
- Debuff List: Know which bosses curse or poison. Bring Dispel Magic scrolls or use your Dispel.

Healing Strategy:
- Keep your tank alive: At each pull, start with a PWS on yourself, then cast Shield on tank or use Power Word: Shield on them immediately. For instance, fight dungeons like Shown from start to end. More often you'll buffer yourself, then cast PWS on whoever is lowest (tank usually).
- Renew vs Heal vs Flash Heal: Use Renew as much as possible for the tank (instant, mana-efficient HoT) and Flash Heal only in emergencies or on players. After mid 40s, Flash Heal is your quick lifesaver on incarse.
- Mana Conservation: Use wand a lot to conserve mana. If group pulls are lean, occasionally swap out of full healing mode to DPS (smite) to end fights faster. But prioritize shielding and healing.
- Chain Heal: Actually, Prayer of Healing (level 30) when multiple guys are hurt (for big group pulls, PoH can save mana vs multiple target heals). Cast it as a precast before a big mob explosion, but stand away to avoid being a target (it roots you in place).
- Dispels: Cast Dispel Magic on tank if he gets a curse or slow. If any party member is silenced or hexed, consider Mass Dispel (talent) if chaotic (particularly vs druid roots).
- Resurrection: Generally, avoid using Resurrection spells in Hardcore (a dead player is out of the game!). Better to zone out safely to spirit and be quick.
Pulling Tactics:
In dungeons, never let tank instantly get jumped. Rather, cast Psychic Scream on one mob to give tank time. If two fighters jump, fear one to kite. Always lead with shields. Use Mind Control on anything you can to skip unnecessary fights (MC a nightmare runner out of BRD if it would spawn more adds). Example: In Blackfathom Deeps, mind-control a lasher away from the group to avoid pulling the whole pack.
Positioning:
You often will be behind the tank. Keep line of sight blocked from ranged enemies (DRUIDS ABOUNDS!). If a mage on trash casts Polymorph, dispel it quickly to avoid chain trouble. Watch your back for ranged pulls from satyrs or mages in Strat. Control any haste slow (Like PC boss In SCH that curses).
Emergency:
If tank hits danger (e.g., health sudden drop), cast a big heal or a focused Flash Heal. Use the Desperate Prayer racial if you have it for tank if they're nearly dead (especially if the healer is about to die too). And do it fast.
| Dungeon | Special Concerns | Recommended Preparation |
|---|---|---|
| Scarlet Monastery | Lots of priests deal fire aura or curses | Bring Shadow Resist and Dispels. Keep Fear Ward for Scarlet Champions (they may fear) |
| Scholomance | Blood of the Innocent quest | Bring Shadow Protection pots. Use Shackle on undead skeletons |
| Stratholme | Infection (poison) on Rattlegore | Undead Buster off-hand quest for wands like Darkwood Staff + Consumables. Use Dispel Magic |
| UBRS | Dragon room will Arcanite anything | Bring Divine Shield scrolls or wear nature resist (druid) |
| Lower Blackrock Spire | Mor Grayhoof (fear + spikes) | Use Fear Ward and free action. The rest is like BH, but many elites |
Dungeon runs are hard. Breaks: If anyone stands on a nasty totem (like Shadowforge Flame Keeper's skull) remove them immediately. Time is your ally: always available get away to rest and prep if fight turned south.
Solo Techniques and Elite Mob Handling
Soloing as a Priest is a test of patience and skill. Elites (yellow or red mobs) hit much harder, so you need strategy:
Levels Above:
Only attempt an elite if you are 3-5 levels higher. If you're underleveled, skip it or bait out one at a time. Many elite abilities won't trigger on you if they think you're too weak (bug), but don't rely on that.
Evaluation:
Scout an elite from afar first. Note its abilities: casting, summons, ranged. If it casts Fear or Polymorph, don't fight alone. If it's melee-only, the fight is simpler.
Pre-Fight:
Buff heavily: drink Fortitude/Spirit food, shield yourself with PWS, and place a Renew. Use a free action if it has a root. If it's dragonkin, Stoneform if you have it as soon as any DoT (like a tail lash) is applied. Drink a Health pot and switch gear to tank gear (if available).
Lure it to a neutral ground away from other mobs. Start with a Psychic Scream if multiple slaves, then kite the first (fear around corner and slay one by one). For an actual elite, do 1-on-1: cast PWS, then cast Inner Fire if needed for armor, then open with Mind Blast and Shadow Word: Pain, then run and chase it around corners while hitting with wand or Smite. Use Mind Flay to slow it if it charges, and run circles. The goal is to fight at range as much as possible.
If the elite is humanoid, MC it temporarily to avoid a full fight, but be careful: MC has a cap on what classes (often Paladin/Death Knight can break it). On pull, MC the elite and kite it at range; when MC falls off, it might be at 80% health already from ranged smite, then finish.
Suppose an Undead Assassin (no mortal fear effect but strong hits). You could drink a Shadow Protection potion, and have Will of the Forsaken racial up (so fear is irrelevant). Open with PWS, then spam Shadow Word: Pain, then pop PWS again when a fade (if needed). Attack with wand continuously. If your health dips to 30%, drink a potion, run behind a wall, and heal up. Use Mind Blast when it charges you to stun it (Skeletal Trick).
A kodo does fear: If you're Human/Dwarf, plan for it (Fear Ward or WoTF). If not, beware. Cast MC at level 36 and turn the beast against itself until MC ends. Or shoot it with wand from range, applying pain, then circle-strafe. Use Fear Ward or Dispersion for that fear.
Regroup/Rest:
Sometimes after 20-30% HP loss, back away, heal to full (bandage out of combat or eat/drink), then re-engage. Elites often have big burst at start and a second-phase at about half HP (some do AoE). *Expect the sudden – heal immediately after you kill it in case of lingering AoE.
Using Terrain:
Pull elites back to an open area where you can strafe. Corners/caverns block line-of-sight; use them as needed. For instance, if an elite mage starts casting Frostbolt, run behind a tree to interrupt.
Wand Specialization:
As soon as you approach any mob, wand target. This keeps damage up while you plan. For example, you see a Razorfen Beastmaster (elite). You chuck 1-2 wand shots even before fully ranged in, then start your normal cycle.
Spider/Poison Enemies:
If fighting spiders or snakes, they can poison/stun. Dwarf Stoneform will cure poison if needed. Always carry a flask or potion to remove poison (Free Action covers this). If chained by poison, hop a wall if possible or drink Cleanse (remove one debuff, often sold by vendors) at first sign.
Crowd with Heal Trick:
If an enemy summons adds (like in some big quest bosses), you can sometimes waste them with Mind Sear (not in Classic) or just area-kiting with wand + AoE heal on yourself (Renews). Example: Avenging Guard in SM triggers adds. Pull the priest guard up the stairs out of the room, kill him with wand, then fear the adds as they spawn around the corner.
Regeneration Potions:
If your health dips dangerously, do not hesitate to drink a Greater Healing Potion. It's better than risking a second pull. Also, use Free Action Potion at first sign of root/slow.
Solo play is mostly about prudent engagement. If you are smart and cautious, you can solo almost any mob levels above you or equal. If a mob is higher than you, skip it entirely. Hardcore novices often die from stupid pulls: the number one cause of death is overconfidence. So: Respect Elite power, use everything at your disposal, and when in doubt, run away.
Common Causes of Death and Prevention
Understanding why players die is half the battle. Here are the typical pitfalls and how to avoid them:
Running Out of Mana:
At 0 mana, you have no Shield or Heal. Many die after a long grind because they didn't retreat to drink or bandage. Prevention: With Spirit Tap (5/5) you'll mostly have mana, but still: whenever Spirit Tap buff is low, finish your kill and rest. Drink mana potions or swap to wand if you see low mana. Don't underestimate the mana regen from resting (Out-of-combat Spirit regen is decent).
Burning Debuffs:
Taking bleed, poison, or disease without cure kills quickly. If a mob uses poison (e.g. serpents, murlocs), pop Stoneform (Dwarf) or drink Antidote Potion, or cast Dispel on yourself. If diseased (like Scarlet Crusade sword), use a Diseased Potion. Prevention: Carry a list in your head: if "This enemy inflicts X", prepare for it. Use racials or consumables as first reaction.
Fear and CC:
Being feared by mobs and then running off cliffs, into fire, or into other mobs is surprisingly common. Prevention: Carry a Fear Ward bubble (if not Dwarf, on cast) and Always have it up before fight with known fear casters. If Undead warlock casts fear, first instant Will of the Forsaken (Undead only). If an area effect (like a dragon's fear around them), kite far out. If feared, run away or run to a wall/corner, as AoE's can break it by LoS.

Melee Bee-Line:
Many melees (e.g. Dragons, Bears) have strong charge attacks. Getting hit by a charge often kills priests. Prevention: Use Mind Flay or shoot wand and then back off as soon as you see a charge. Having Free Action active stops roots from immobilizing you into a charge. For bosses (like Onyxia), know when the charge is coming (Onyxia does three line cones, then charges).
Neglecting Gear/Repair:
Going into a fight on low durability or without a torch (in caves) can be fatal. Gear breaks, spells can fail without reagents (Bandages requires nothing though). Prevention: Check gear durability after every fight and fix if below ~50%. Keep at least one torch for Briarwood in Rotting the Under… Actually not needed. But always keep antidotes in bag – they are free in capital or small cost.
// Survival Checklist
- Check gear durability (>50%)
- Mana potions x5
- Health potions x5
- Antidote potions x3
- Free Action Potions x2
- Heavy Runecloth Bandages x20
- Fear Ward (if available)
- Power Word: Fortitude active
- Inner Fire active
Not Watching Aggro Radius:
In tight dungeon corridors or city spawns, one extra wrong move, and tons of guys can hit you from around a corner. Prevention: Pull one at a time around corners or avoid corners with 4 way aggro. Lure mobs 10 yards, fight facing them to ensure no one behind you.
Map Unawareness:
Jumping down into a pit without knowing who's below (e.g., hitting Stratholme staircase). Prevention: Use your minimap to see if there are yellow dots below. If unsure, send a pet (no priest pet) or block the Mob with a mind-controlled mob and descend carefully.
Getting Ganked:
Outside dungeons, on PvP realms or crowded servers, other players can kill you unexpectedly. Prevention: On hardcore servers (like SoM or whatever), typically PvP is off, but if it is on, watch mini-map (plugins like NPCScan not needed, but any sign of enemy players should send you to flight). Keep a hearth or spirit res up.
Falling Damage:
For some reason, cliff falls kill quiet a few players. Prevention: Avoid jumping or falling from heights. If a pull drags you up a steep slope, jump down carefully. If you see a path too high, sprint.
NPC Cheats:
Some mobs have knock-back or co-op a trap when you pass (King Gordok in DM). Always be aware of your surroundings, drop a Fear Ward / HP pot if a known insta-kill trap is ahead. Not many Priests mention it, but preparedness never hurts.
Overconfidence in Safety:
Thinking "I got this" can kill as quickly as red flame bolts. Prevention: Stay vigilant. Always ask yourself: "What could go wrong here?" If the answer is "a lot," use more cooldowns or skip.
By identifying why Priests die – usually one of the above reasons – you can adjust. For instance, if fear is killing you, get Fear Ward up more. If mana is your downfall, add more Spirit/Mental talents or better potions. The hardcore tip is: avoid the unknown. If you can't see a mob, assume they are elite until proven otherwise. If a fight goes long, lean on potions earlier. If you're stuck on a quest because every path triggers too many, skip that quest.
Tools, Addons, and Resources
Modern players have tools beyond in-game abilities. Here are recommended addons and resources to maximize your Priest's survival:
In-Game Addons
- Quest Trackers: Questie or ClassicCodex/AtlasLoot: Shows quest locations and helps you not wander aimlessly. Saves time (and danger).
- Heal Frames: VuhDo or Grid2 – display friendly frames so you can see everyone's health at a glance for healing or aid.
- WeakAuras: Build WAs for your cooldowns (shield up, fear ward up). E.g., an aura that shows a timer for Fear Ward and Free Action potions so you don't forget.
- Damage Meters: Details! or Recount helps analyze which spells deal damage, but more importantly, to see aggro. If you out-aggro someone, you might be pulling excess threat. ThreatMeters (if you insist, but priests generate low aggro).
- Map/Minimap Enhancements: GPS Arrow or TomTom for waypoints to quest objectives. AzerothAutoPilot for route planning (with caution: autopilot might push you to skip safe routes).
- MobHP/Boss Mods: WeakAuras for boss mechanics (though mostly run by raid addons). Not essential for HC leveling unless in a big run, but if you know boss is near, track his health/triggers.
- CombatLog Mods: BenikUI, ElvUI etc to declutter cluttered frames. But minimal HUD is also helpful – clutter can distract.
Useful Tools (outside game)
- Online Databases: ClassicDB or Wowhead – for looking up spells, gear, mob info. Before engaging an unknown elite, check if it fears or poisons.
- Leveling Guides: Sites like Icy Veins, and HC guide (the one you're reading!). For non-HC tasks, the classic leveling guide is useful to plan your route (ignore any non-HC advice, but gear/quest info is gold).
- Hardcore Community: The subreddit r/wowhardcore and Discord channels often share alerts (e.g. "scarlet wizard pulling- boss, DONT take that path"). Listening to them can save your life.
- Profession/Alchemy Charts: For key consumables (like recipes for Free Action Potion or fire resist items).
- Quest Addons: HandyNotes for NPCs like rare spawns that drop healing items or gear.
Always double-check: Some quest advice says "X is soloable," but in HC you must judge. Use tools for planning not as absolute guides.
Expert Interviews and Tips
Even pros make mistakes. We'll share fictionalized "expert tips" as if from veteran hardcore priests (based on community input).
"I play Horde Undead Priest. My #1 tip: Never fight anything you haven't immobilization planned for. That means if a mob can enslave or fear, treat it like a boss. I always have Will of the Forsaken up (undead racial) – if I get feared, I sprint away immediately, pop it, and drop a Renew. Also, gear for 25% more HP than you think you need. Trust me, it helps when someone calls for a boss group and you accidentally tag an elite with them!"
"I swear by Dwarf for HC. Stoneform has saved me from fatal poison more than once. For progression, I took 3/3 in Improved Power Word: Shield first, then bumped Mental Agility. Mental Agility is a fantastic mana saver even at low levels. I learned that veteran lesson: never lure a mob through a narrow doorway. If anything follows you, it'll stomp you. In Scarlet Monastery, I'd always kite mobs into the hallway near the entrance, fight one by one. Also, track your Fear Ward – I have a timer addon for it, because I always forget to cast it every pull."
"As a priest-only-player aiming for hardcore, I leveled Shadowform early at 40 and it felt insane. But don't forget: shadowform splits your kills in half (you can't heal as much). So I rarely switched out of form except at bosses. One big trick: before a pull, I'd cast Inner Fire, then pop Shadowform right away. The +3 armor from Inner Fire stays, and my damage jumps. I also use crowd Control differently: I tend to hold Psych Scream if I'm near a cliff or big pool, because if I fear someone they might just run off a cliff (and you'll be stuck chasing a corpse)."
"When I took groups of newbies, I told them 3 things: (1) pull one at a time, (2) kill them fast, (3) always watch your back line. In one dungeon run, a tank fell unconscious from an unseen hunter trap; a Priest friend (me) had pre-shielded and could keep the rogue/warrior alive until we bandaged them. So our motto: 'Be ready for other to make mistakes and rescue them.' I keep a few spare bandages/health stones (bandages, though, since we have no warlock stone) on raid leader taps."
These tips share a common thread: don't assume you're invincible. Always communicate in groups ("CC on the next pack! Pump mana now!"). Experienced players repeatedly emphasize caution and preparation.
Use these collective experiences: if something can go wrong (fear, trap, curse, pull), make it neutralize-able. Your interviews (from the trenches) say: plan for worst-case.
Shadow Priest vs. Holy/Disc Specific Guides
Finally, let's distill spec-specific advice for Hardcore. If you know which spec you want to focus (Shadow, Discipline, or Holy), read the tailored tips below.
Shadow Priests are glass cannons: high damage, low defense. To survive: kiting and burst.
- Level 1-40: Balanced approach. Early on, make sure you have key Discipline points (like Mental Strength, Agility and Power Infusion/Desperate Prayer if available) before dumping into Shadow.
- Core Talents: 5/5 Spirit Tap (for mana), 5/5 Mental Strength, 5/5 Mental Agility (mana), 5/5 Improved Power Word: Shield (defense), 5/5 Shadow Focus/Weaving (damage).
- Shadow-Specific: Vampiric Embrace is optional (25% damage as heal, decent if multiple enemies around). Mind Flay (5/5, available at 51; bring it in at 51, or skip if leveling stops before 51).
- Rotation: Smash with Mind Blast whenever off-CD, spam Shadow Word: Pain, and wand for downtime. Use Fear on multi-pulls (only enough to leave yourself 1 target).
- Survivability: Put Dispersion (if it existed in Classic, but it doesn't), not relevant here. So rely on shields and kiting. Use Mind Sear (not available). Actually, Shadow B2 and B3 sucks in Classic, ignore.
- Defense: Take Desperate Prayer racial every chance. Use Inner Fire. Keep Power Word: Shield pre-casted.
Discipline Priests are versatile tanks of caster world. They naturally lean towards survival.
- Level 1-20: Open Discipline first. Improved Power Word: Shield (3/3) is non-negotiable. Mental Agility and Mental Strength for mana.
- Talents: Martyrdom or Mental Fortitude (makes PWS stronger if shield breaks). Inner Focus for free next big spell.
- Playstyle: Spam Power Word: Shield on yourself then tank or strongest mob. Then Renew. Then DPS with Smite/Wand.
- Shields: If PWS break early, recast it immediately (i.e., if absorb <30% left).
- Healing Specs: If you aim to be a pocket healer in fights, take Holy subspec: Improved Renew (3/3), Holy Specialization (5/5) (more HoT crit for Renew and heal spells).
- Offense: Discipline has Shield Discipline (disc buff) in PvP only, in Classic we rely on Smite. Not heavy DPS spec.
Holy Priests are rare solo, but can function as a walking healer with moderate DPS.
- Talent Path: If soloing primarily as Holy (e.g. via Holy Smite build), you need Smite for offense. Some use a "Holy Smite" build: take Holy talents (Hymn of Hope) and a few Smite Talents: Holy Fire (2/2), Smite (if had ranks). But in Classic, Smite ranks are inherent. Instead, use Holy Fire (3/3 Divine Fury) to cut cast.
- Subspec Example: 19 Holy/12 Discipline is one idea. This boosts Renew and gives some DPS, leaving Spirit Tap (5/5) from Disc 5 maybe.
- Heals: Your Renew and Heal will be strongest. Use them liberally. Flash Heal (level 40) is your emergency quick heal.
- Offense: Your Smite will be weak (higher cast time). Rely on wand. Possibly drop into Shadowform for solo as soon as 40 for +15% damage (with no Int drawback yet, ironically).
Conclusion and FAQ
Your journey as a WoW Classic Hardcore Priest will be demanding but rewarding if you play it safely. We've covered race picks, talents, spells, gear, and tactics to keep you alive to level 60. Remember: Survival is your #1 goal. Every choice you make (race, talent, buff, pull) should prioritize avoiding death. The quotes and tips above reinforce: don't overpull, use your shields, avoid standing in stuff, and always carry potions. If you internalize these strategies – pulling single mobs, spamming Power Word: Shield, drinking potions whenever nearly dead, kiting with wand, and respecting every unfamiliar environment – you will see that "without a single death" is achievable, even heroic mode.
Stay patient. Hardcore is a marathon. Level up slowly, say "no" to questionable fights. Embrace the fact that sometimes the safest leveling path means ignoring that juicy quest when you're not prepared. Every min-max gear enchants, every saved potion, and every bead of mana means more time alive.
FAQ
Yes, with patience and caution. Even novices can succeed by following this survival guide carefully. Familiarize yourself with mechanics, and avoid risky pulls. Don't expect to steamroll; expect to take it slow and safe.
Discipline is the safest for leveling. Shadow offers higher DPS but lower defense; ideal if you can solo kite well. Holy is viable mainly for group content or if you want max heals. Many play hybrids (Disc/Holy or Disc/Shadow) to have emergency tools from both trees.
Not strictly, but they help. A quest helper keeps you from wandering blind. Heal frames show who's low immediately. Ultimately skill matters most, but addons minimize mistakes (like missing a heal or forgetting a buff).
Useful ones for Priest Hardcore are Herbalism/Alchemy (for potions like Free Action) or Mining/Engineering (target dummies, nets, and bombs). Tailoring/Enchanting is good for gear but slower. First Aid (Tailoring) to at least Heavy bandages is a must for survival.
In Hardcore mode, yes, that character is finished. So make decisions accordingly. If playing single life servers, you might switch to alt at death, but treat it as a failure with that character.
Use Fear Ward (racial or Disc talent at 50) on yourself or tank before fights with fear casters. If you still get feared, immediately run around corner or pop Will of the Forsaken (if Undead). Carry Free Action Potion to nullify stuns/roots. Psychic Scream (fear) yourself only if someone else will shoot you, otherwise stick to damaging spells to kill enemies fast.
Absolutely. Priests have slow casts. Wands cost no mana and give consistent DPS. Mastering the wand – keeping it loaded, switching to it between spells, and finishing opponents with it – effectively acts as a pseudo-Wand specialization strategy.
Don't hesitate to ask in Hardcore communities. Many vets will point out hidden dangers or safe spots in a zone. For example, "In STV, avoid the large yog mobs; you can use the river to kite crocodiles easily." Learning from others' mistakes is often quicker than dying yourself.
Yes, but be ready to skip or postpone some group quests (like some dungeon quests). Use your wand and Spirit Tap to solo efficiently. If you find a group, great – but always be ready for solo fallback.
In summary: Play smart, keep buffs up, use shields, and move carefully. The strategies in this guide – from race choice to potion prep to combat tactics – are your tools to achieve the ultimate goal: a Hardcore Priest at level 60 with no deaths. Good luck, and may the Light (or the Shadow) guide your path.