
Welcome to the ultimate Warrior guide for WoW Classic Hardcore mode. In this long-form guide, we'll cover everything you need to know to master the Warrior class in the unforgiving Hardcore Classic environment – where death is permanent and every decision counts. Whether you're a new player learning the fundamentals or a seasoned veteran looking for advanced techniques, this guide will help you survive and excel as a Warrior. We'll explore all three specializations (Arms, Fury, Protection) and discuss how each performs in Hardcore Classic WoW, covering solo leveling, duo/group play, dungeons, and raiding. You'll find strategic insights, leveling tips, gear progression, talent builds, survivability tricks, key abilities breakdowns, profession recommendations, and answers to common questions. Let's charge into battle – and remember, strength and vigilance are your best allies in Hardcore!
Warriors in Hardcore Classic WoW – Overview
Playing a Warrior in WoW Classic is an adventure in any scenario, but in Hardcore mode (one-life Classic WoW) it becomes the ultimate challenge. Warriors are widely considered the most difficult class to level in Hardcore due to their lack of self-healing, limited escape tools, and gear dependence. In the early levels especially, a Warrior has no healing, no crowd control, and must rely on careful pulls and efficient use of Rage. Mistakes can be fatal. Despite this, Warriors are immensely popular in Hardcore – many players enjoy the added thrill of mastering WoW's hardest class under Hardcore's high stakes.
Strengths and Weaknesses
In endgame, Warriors truly shine. They are the best tanks in Classic and almost mandatory for raid content, and they also scale incredibly well with gear, becoming top-tier melee DPS at level 60. Every weapon or armor upgrade has a noticeable impact on a Warrior's performance, making progression very satisfying. Warriors also have high burst damage potential with abilities like Mortal Strike or Bloodthirst, and they bring valuable group buffs/debuffs (like Battle Shout for attack power and Sunder Armor on targets). A well-played Warrior is a powerhouse and highly sought in dungeons and raids.
On the flip side, Warriors in Classic are very weak in the early game and when under-geared. Leveling solo is slow and unforgiving – Warriors have no inherent heal or sustain, very few "oh crap" buttons to escape danger, and rely on gear drops more than any other class. They also struggle if facing multiple mobs alone, especially before getting certain talents. In Hardcore, these weaknesses are amplified: a bad pull or an ambush can spell instant death if you can't escape or mitigate in time. Managing Rage (the Warrior's energy resource) is another complexity – if you end a fight with excess rage that doesn't carry to the next fight, it's wasted, but if you don't generate enough rage, you can't use your abilities when needed. Summary: Warriors are a high-risk, high-reward class in Hardcore. They start weak, but if you can survive to 60 and gear up, you'll become one of the strongest assets to any dungeon or raid team.
Why Play a Warrior in Hardcore?
Given the challenges, why do so many Hardcore players choose Warrior? Simply put, the class is incredibly fun and rewarding for those who enjoy a challenge. Every victory feels earned. The thrill of surviving tough encounters with only your armor and blade (and maybe a clutch potion) is unlike any other class. Warriors also offer unparalleled impact in group content – you can be the stalwart tank saving your party from disaster, or the furious DPS topping the meters when geared. In Hardcore servers (official Blizzard Hardcore realms), Warriors are the most popular class despite the difficulty. The added difficulty itself is a draw for many; playing "the hardest class in the game" in a one-life mode is seen as the ultimate test of skill. Additionally, a Warrior's power progression is very steady – they get stronger every level all the way to 60, with noticeable improvements each time you gain a key ability or talent point. In the endgame, Warriors are the dominant class in vanilla WoW: they out-scale others in DPS and are the go-to tanks. For Hardcore players planning to do endgame dungeons or even raids, investing in a Warrior can be worthwhile, as you'll be in high demand at level 60. If you love the idea of being a plate-clad juggernaut and you don't mind a slower, more methodical leveling journey, Warrior in Hardcore can be an incredibly fulfilling experience.
Race Choices for Hardcore Warriors
Your choice of race in Classic can subtly affect your Hardcore Warrior's journey. All vanilla races except Blood Elves/Draenei (not in Classic Era) can be Warriors. The differences come from racial abilities, which can impact your survivability or damage. In Hardcore, survivability is king, but if you plan to reach 60 and do endgame, you might also consider racial perks for DPS or tanking. Below we break down the best race choices for Alliance and Horde Warriors in Hardcore:
Alliance Races
| Race | Key Racials | Hardcore Benefits |
|---|---|---|
| Human | Sword/Mace Specialization (+5 weapon skill) Perception (increased stealth detection) |
Best for endgame DPS due to weapon skill bonuses. Minimal survival benefits while leveling, but top choice for raiders. |
| Gnome | Escape Artist (breaks roots/snares) Engineering Specialization (+15 skill) |
Considered the safest Alliance race for leveling due to Escape Artist's ability to help you flee danger. Lower base Strength/Stamina is the only drawback. |
| Dwarf | Stoneform (removes bleeds/poisons, +10% armor) Gun Specialization (+5 skill) |
Great defensive racial with Stoneform. Can save your life by clearing deadly debuffs or reducing damage long enough to bandage. |
| Night Elf | Shadowmeld (stealth when stationary) Increased dodge chance |
Higher base Agility and dodge chance provide some passive mitigation. Shadowmeld can help avoid patrols but is less valuable than other racials for survival. |
Horde Races
| Race | Key Racials | Hardcore Benefits |
|---|---|---|
| Orc | Axe Specialization (+5 weapon skill) Blood Fury (AP boost) Hardiness (25% stun resist) |
Best overall Horde warrior. Hardiness helps survive stuns, and Axe Specialization makes them top for endgame DPS. Blood Fury provides a combat boost but reduces healing. |
| Troll | Berserking (attack speed increase) Regeneration (health regen) Beast Slaying (+5% vs beasts) |
Well-rounded with Berserking as a strong on-demand boost. Regeneration provides minor sustain, and Beast Slaying helps when leveling in beast-heavy zones. |
| Tauren | War Stomp (2-second AoE stun) Endurance (+5% max health) |
Arguably the safest Horde race with War Stomp providing emergency crowd control and Endurance giving a permanent health boost. No offensive racials, but excellent for survival. |
| Undead | Will of the Forsaken (breaks fear/charm/sleep) Cannibalize (regen health from corpses) |
More PvP-oriented racials, but Will of the Forsaken can save you if fear would send you into additional enemies. Cannibalize provides occasional free healing. |
Warrior Specializations in Hardcore
Warriors have three talent specializations: Arms, Fury, and Protection. Each spec has a distinct playstyle and purpose. In a normal setting, you might level as one spec and respec for endgame; in Hardcore, you'll want to choose the spec that gives you the best chance to survive leveling, but also plan for what you'll do at 60 (since respec costs gold and some risk if done late). We will cover how each spec fares for leveling vs endgame in Hardcore:
Arms (Two-Handed) in Hardcore
Arms focuses on two-handed weapons, big hits, and battlefield control. It's widely considered the best leveling spec for Warriors, including in Hardcore. The Arms tree offers sustainability and multi-target damage which are crucial for the leveling phase:
- At level 30, Arms gets Sweeping Strikes, a talent that causes your next 5 attacks to hit an additional target. This ability alone lets an Arms Warrior handle 2 mobs at once much more safely – for 30 Rage you effectively double your damage for 5 hits. In Hardcore leveling, being able to kill two enemies together (especially when inevitable double-pulls happen) is a game-changer. Sweeping Strikes is "the perfect mix of kill speed and durability" for leveling. It greatly improves efficiency when you can find safe multi-pulls, and more importantly, it provides an answer to accidental adds (instead of panicking, you pop Sweeping Strikes and burst them down).
- Arms also provides Tactical Mastery (retain rage when stance switching) and Anger Management (slowly generate rage) talents which are very helpful for maintaining rage between fights. More rage = more abilities = faster and safer kills.
- The Mortal Strike ability (top of Arms tree, unlocked at level 40 with 31 points) is a strong instant attack that also reduces healing on the target. While the healing debuff isn't too useful in PvE, Mortal Strike deals hefty weapon damage and becomes your main attack when you get it. However, note that Mortal Strike should NOT be used in raids because its debuff can take up a debuff slot on the boss (Classic raid bosses have a debuff limit of 16 in early patches). In Hardcore raids, you generally avoid MS to not waste a slot – but for leveling and dungeons it's fine.
- Two-Hander vs Dual-Wield (Arms vs Fury) for leveling: Using a two-handed weapon is preferred while leveling because dual-wield has severe damage penalties for off-hand hits and suffers from high miss chance until you get lots of hit rating. Arms spec capitalizes on slow, strong two-handed swings which are more efficient per hit and per point of Rage spent. Several Arms talents (e.g., Two-Handed Weapon Specialization, Sweeping Strikes, Mortal Strike) emphasize big weapon hits.
At endgame, Arms is less commonly used in PvE because Fury out-damages it when gear is equal. However, Arms can still be viable in dungeons (especially 5-mans) if you have a strong 2H weapon – Sweeping Strikes + Whirlwind can be great for trash packs. In raids, an Arms Warrior might be brought for the Trauma debuff… except Classic Arms doesn't have Trauma (that was a later expansion). Instead, one possible raid utility of Arms in a non-hardcore setting was to provide Improved Battle Shout (from the Commanding Presence talent) or Blood Frenzy (TBC talent). In Classic, those aren't relevant. The biggest issue is Mortal Strike's debuff slot; in Hardcore raids, since survival > max DPS, you likely won't see many pure Arms Warriors. Most DPS warriors will be Fury or a Fury/Arms hybrid. Still, if you love Arms playstyle, you could DPS in raids with a 31/20 Arms/Fury build (skipping MS actually to avoid debuff, taking Sweeping and then going into Fury for Enrage/Flurry). But be aware you might do a bit less damage than Fury and need to coordinate not applying MS on bosses.
In summary, for Hardcore: Arms is your best friend while leveling. It provides the tools to survive and adapt to the unpredictable leveling environment. Once you hit 60, you'll likely respec to Fury or Protection depending on your role, but the Arms journey will have gotten you safely through the toughest part – leveling.
Fury (Dual Wield) in Hardcore
Fury specialization is known for dual-wielding one-handed weapons and a focus on attack speed and crits. Fury is the premier DPS spec for Warriors at max level, but how does it fare in Hardcore leveling? It's certainly viable to level as Fury, but it comes with some caveats:
- Fury's key leveling talents include Enrage (damage boost after getting crit) and Flurry (attack speed boost after you crit). These provide burst of damage, but they rely on you being crit or dealing crits – which can be random. At low gear levels, your crit chance is low, making Flurry uptime inconsistent. Also, getting crit by a mob (Enrage triggers from you taking a crit) is a double-edged sword: yes your damage increases, but you just took a big hit – in Hardcore, taking crits is dangerous. Essentially, Fury leveling can feel spiky and RNG-dependent. Sometimes you'll shred through mobs with lucky crits and extra attacks; other times you'll be starved of rage if you miss too many dual-wield attacks.
- Dual-Wield Miss Penalty: When dual-wielding, your auto-attacks have a 24% miss chance (compared to 5% with a 2H vs same-level target). Until you get +hit gear (mostly an endgame thing), dual-wield can be very rage-inefficient due to misses. You might find your abilities are harder to use on cooldown because you aren't generating rage smoothly. This is why many guides state dual wielding is weak until high levels. Fury Warriors leveling often use a two-hander until a certain point, effectively playing as "2H Fury" for a while, then switch to dual-wield later when they have Flurry and perhaps some hit gear.
- On the positive side, Fury has Bloodthirst at level 40 (their equivalent of a top-tier talent, an instant attack that scales with attack power). Bloodthirst does consistent damage regardless of weapon damage (unlike Mortal Strike, which depends on your weapon's top end). This means if your weapons are a bit underpowered, Bloodthirst still hits okay as long as you have decent strength. Fury also has talents like Dual Wield Specialization (more off-hand damage) and Precision (+hit chance) in later patches, which help mitigate the dual-wield drawback (Precision wasn't in original WoW Classic at launch but was added in Season of Mastery / later versions – check if Hardcore uses the 1.14 client with it). Assuming you have those, Fury can become smoother in the 40s+.
- Many Hardcore warriors actually do a hybrid approach: e.g., put initial points into Fury for Cruelty (+5% crit chance) then swap to Arms (we will detail this in talent section). Or level Arms until about 50, then switch to Fury if you've acquired a good off-hand like Thrash Blade (a level 50-ish weapon with an extra hit proc). In fact, one Hardcore guide suggests "once you have completed Maraudon and acquired Thrash Blade, Fury becomes viable", and the author personally prefers switching to Fury at 50-59 for leveling. With a proccing off-hand (Thrash Blade) and talents like Flurry, Fury can really speed up killing in the late game levels.
Fury at Endgame: If you make it to 60, Fury is the go-to DPS spec. A Fury Warrior dual-wielding good weapons is one of the highest DPS outputs in WoW Classic. In raids, Fury Warriors typically spec deep Fury and grab some key Arms talents (like 5/5 Deflection, 2/2 Impale for +20% crit damage, etc.) – a common raid build is 17 Arms / 34 Fury, often called "Fury Impale" build. In Hardcore raids, the focus might shift slightly to survivability (for example, some warriors might skip reckless damage talents if they feel too risky), but generally Fury offers the best sustained DPS. Fury spec also allows you to offtank or tank 5-mans if you gear for it (a Fury Warrior with a shield can tank most dungeons, though not as safely as Prot).
Protection (Tank) in Hardcore
Protection spec is centered on maximizing a Warrior's tanking ability – damage mitigation, threat generation, and defensive cooldowns. The Protection tree gives access to talents like Shield Specialization, Toughness (more armor), Defiance (more threat), and the ultimate Shield Slam ability. In normal WoW Classic, most Warriors do not level as full Prot because the kill speed is much slower and it's hard to quest solo. This holds true (even more so) in Hardcore: Protection is the slowest leveling spec. Your damage output is lower, meaning fights last longer – a dangerous prospect when any additional patrolling mob could wander into a prolonged fight. Additionally, Prot relies on having a shield and one-hand weapon, which typically yields lower DPS than a 2H.
That said, Protection has one big benefit: survivability. If you talent deep Prot, you become much sturdier:
- You take less damage due to talents and you have abilities like Shield Block (to prevent crits) improved, etc.
- You generate high threat, which isn't useful solo, but if you're leveling in a duo or group, being Prot means you can secure aggro on mobs and let your partner (e.g. a Mage or Hunter) safely kill them. For example, in a dedicated duo where one is a healer and you are the tank, going Prot could make sense to play the "tank/healer" tandem from early on.
- Protection Warriors also get Improved Taunt (faster taunt CD), which isn't needed solo, but in dangerous elite fights or dungeons it can be life-saving to quickly grab aggro off someone.
One approach is a hybrid "Fury Prot" during leveling: some Warriors go partway into Prot to get Last Stand (if using talents from SoM era, Last Stand was added as a talent) or just to get Improved Shield Block, but also take Cruelty in Fury. However, these are niche. Generally, you'd level Arms or Fury, not Prot.
At Level 60, however, Protection becomes very relevant. If your aim is to be a main tank for Hardcore raids or high-level dungeons, you will want to spec deep Prot. In raids, survivability and threat control are paramount. A deep Prot build (e.g., 11 Arms into Deflection and tactical mastery, rest 40 into Prot) gives you Vital defensive talents like Shield Slam, Last Stand (if present), and improved defensive stance (reduces spell damage taken). Many raid tanks in Hardcore will choose a full Prot spec because safety > speed in this mode. Unlike in softcore Classic where "Fury/Prot" hybrid (a mix of Fury and Prot for maximizing threat/damage) was popular, Hardcore tanks are likely to favor Deep Prot for maximum survivability. With careful DPS players, threat is manageable even if your damage is lower, as everyone will be cautious not to pull aggro (nobody wants to die from pulling threat).
In Hardcore raids (which very few will attempt, but it's growing), expect Warrior tanks to gear and spec very defensively. The consensus is "a dead DPS does zero DPS" – so taking a bit longer to kill a boss is fine as long as nobody dies. Prot spec helps ensure the tank doesn't go down and can handle unexpected damage spikes.
Core Mechanics & Key Abilities
Before diving into leveling and strategies, it's crucial to understand the core mechanics of playing a Warrior and the key abilities you'll be using. Mastering these fundamentals is especially important in Hardcore where every combat engagement must be handled wisely. Here we cover Rage and Stances, then highlight important offensive and defensive abilities in a Warrior's toolkit, with special notes on how to use them effectively in Hardcore mode.
Rage Management and Stances
| Stance | Benefits | Key Abilities | Hardcore Usage |
|---|---|---|---|
| Battle Stance | Default stance with no penalties or bonuses | Charge, Rend, Overpower, Mocking Blow | Your main leveling stance. Use for most fights and when you need mobility (Charge) |
| Defensive Stance | -10% damage taken, -10% damage dealt, increased threat generation | Taunt, Shield Bash, Disarm, Shield Block | Switch to when things get dangerous or when tanking. The damage reduction can save your life in emergencies |
| Berserker Stance | +10% damage taken, +3% crit chance | Berserker Rage, Intercept, Whirlwind, Pummel | High-risk, high-reward stance. Use for burst damage when safe or for Intercept to catch fleeing mobs. Avoid in dangerous situations |
You will often stance-dance as a Warrior – switching stances mid-combat to use a specific ability. For example, you're in Battle stance fighting and the mob dodges you, triggering Overpower; if you were not in Battle, you'd have to switch to use Overpower. Or you might open in Berserker for an Intercept, then immediately switch to Defensive when you have aggro on multiple mobs. Each switch drops your current rage by up to 10 (or all if un-talented and not Berserker stance which always drops to 0). The talent Tactical Mastery in Arms lets you retain up to 25 rage when switching – highly recommended for smooth stance dancing. We'll include macros in the advanced section to help combine stance swaps with abilities (so you can one-button Overpower, etc.).
Core Mechanics & Key Abilities (Continued)
Offensive Abilities
- Auto-Attack (White hits): Your basic melee swings are your main source of damage and rage. Keep an eye on your swing timer (addons can help) especially for techniques like hamstring kiting (described later). Getting a rhythm of hit -> move -> hit can reduce how much damage you take.
- Sunder Armor: Level 10. Sunder Armor reduces the target's armor, stacking up to 5 times. It's low damage itself, but very high threat. While leveling solo, you won't use Sunder much on normal mobs (they die too fast for stacking sunders to matter). However, Sunder is crucial for any extended fights (elites) or when tanking. If you are fighting a high-HP target, keep sunder stacks up to kill it faster – the armor reduction significantly increases your overall damage done over time. In Hardcore, if you engage something like a skull-level elite or world boss (hopefully not alone!), sunder early and often. It should often be your opening ability on tough enemies (pull with a ranged weapon then immediately sunder) to start the armor debuff uptime. Note: Sunder costs a fair bit of rage; don't spam it on low HP mobs.
- Heroic Strike / Cleave: Heroic Strike (available from level 1) and Cleave (level 20) are "next melee" attacks – when you activate them, your next autoattack is replaced with a bonus-damage strike (Heroic Strike single-target, Cleave hits 2 targets). These are great for dumping excess rage when you're high on rage and want to convert it to damage. Heroic Strike adds a solid amount of threat too. However, spamming Heroic Strike can rage-starve you if overused, because you lose the normal rage you'd have gained on that swing. The concept of Heroic Strike Queueing is an advanced DPS trick: by timing HS in between swing timers, you can game the dual-wield hit penalty. But as mentioned, in Hardcore this is usually not worth the extra attention – focus on situational awareness over squeezing every bit of DPS. Use HS/Cleave when you have >50 rage and want to burn some for extra damage, or to generate additional threat as a tank. Cleave is very useful in leveling when you have 2 mobs – pop Cleave to damage both (especially combined with Sweeping Strikes for double-whammy hits). Just be cautious not to accidentally Cleave a neutral or extra mob in proximity.
- Rend: Level 4. Rend is a bleed DoT (damage over time) you can apply in Battle Stance. Honestly, Rend's damage is quite low and it doesn't scale with gear. It's useful at very low levels when you have nothing else to spend rage on, but you largely stop using Rend around level 30-40 in most cases. In Hardcore specifically, do NOT use Rend if you plan to use Intimidating Shout (AoE fear) to escape, because the bleed can break the fear effect early. Many warriors un-train rend later so that if they accidentally right-click it doesn't mess up a fear. Rend can also break crowd control like Polymorph if a mage is helping. So, while leveling: use Rend only in early game or on very high armor targets where a bit of bleed helps. Otherwise, conserve that rage for Sunder or a bigger hit. (If you take the Improved Rend talent early on, note that it's generally considered underwhelming for leveling – better to put points into damage talents or utility).
- Thunder Clap: Level 6. This is an AoE ability (Battle Stance) that deals a little damage to all enemies around you and reduces their attack speed by 10%. It's effectively a defensive debuff (less incoming DPS on you) with a small threat & damage component. In the early levels, Thunder Clap is great when you fight 2+ mobs – the damage is minor but reducing their swing speed means you take fewer hits. It has a target cap of 4 in Classic. One important note: Thunder Clap cannot be used in Defensive Stance in Classic (weirdly, you need Battle or Berserker stance to use it). So if you're tanking in Defensive, you'd have to swap to Battle to TC, which is usually not worth it mid-fight unless you have good rage and a moment. While leveling solo, you can open with Thunder Clap if you know you'll face multiple enemies. In Hardcore, use Thunder Clap early in any multi-mob fight to maximize its defensive value. The slower they attack, the more time you have to react or the less healing you need. Improved Thunder Clap talent increases the slow %, which can be a decent one-pointer filler if needed. Also note TC only works on targets in melee range of you when cast – it's not a ranged pull.
- Overpower: Level 12. This ability lights up in Battle Stance whenever your target dodges one of your attacks. Overpower can only be used in Battle stance. It's an instant strike that cannot be blocked, dodged, or parried, and always crits if you have Improved Overpower talent (2/2). Overpower is one of your most efficient attacks – it's cheap (5 rage), does decent damage, and with talents it crits most of the time. You should practically train yourself to hit Overpower whenever it procs. Mobs dodging you is somewhat random, but humanoids and some higher-level mobs dodge a lot. In Hardcore, this is both a blessing and a curse: a mob dodging means your attack missed, slowing the kill, but it gives you a chance for a big crit in return. Keep in mind Overpower shares a cooldown with Revenge (the Defensive stance ability that triggers on block/dodge/parry) – they can't be used simultaneously, which usually isn't an issue since one is Battle stance, one is Defensive stance. The Improved Overpower talent is typically taken early in leveling because a 50% crit buff on OP is huge. Enjoy the big yellow numbers when you slam an Overpower crit – it often chunks a mob's health nicely. Also, Overpower never misses (it can be dodged if you don't have talents, ironically, but with talent it's basically guaranteed to crit if it lands), making it reliable.
- Hamstring: Level 8. Hamstring is a unique ability that deals a tiny amount of damage and slows the target's movement by 40% for 15 seconds. It's an instant attack and costs 10 rage. Hamstring has a few critical uses in Hardcore:
- Kiting and Damage Mitigation: A classic Warrior leveling tactic is "Hamstring kiting." After you land a hit or two, apply Hamstring and then run away slightly while your swing timer resets. The mob is slowed, so you can create distance to avoid some of its melee swings. This way, you buy time for maybe a bandage tick or just to not get hit until your next weapon swing is ready. Essentially you can whittle down tough enemies by repeatedly hamstringing and moving just out of their range, then stepping in to hit when your attack is off cooldown. It takes practice (don't outrange too far or mob might reset), but it's very effective to reduce damage taken.
- Escaping: If you decide to run from a fight (disengage), Hamstring the mob first then start running. The slow will help you get a head start. Just remember stop attacking after hamstring! If you keep attacking while trying to run, you stay in combat and the mob keeps chasing. Usually you hamstring and run until the mob "leashes" back. (Mobs will chase for a certain distance; a hamstrung mob takes longer to reach that distance, effectively giving you more time to escape).
- Proccing Overpower (and Windfury): A sneaky use – if you have high rage and nothing to spend it on momentarily, you can hamstring a mob even when it's already snared just to attempt to proc Overpower. Hamstring has a chance to be dodged too; if the mob dodges your Hamstring, boom – Overpower available! It's a known tactic to "Hamstring spam" when you are flush with rage to fish for Overpower crits. (Also, if duo with a Shaman, each Hamstring is an extra swing that could proc Windfury Totem – fun synergy.)
- Improved Hamstring (Talent): There's a talent in Arms that gives Hamstring a chance to immobilize the target. Not typically worth it for PvE leveling, it's more PvP-centric. You can skip that talent, generally.
- Whirlwind: Level 36 (requires Berserker Stance). Whirlwind is a powerful instant attack that hits up to 4 enemies around you. It deals your weapon damage to all those enemies. This is a staple for multi-target fighting. While leveling, Whirlwind is great for cleaving down 2-3 mobs at once (combined with Sweeping Strikes for insane synergy: if 2 mobs, WW will hit both, and Sweeping will duplicate each hit, effectively hitting each twice – 4 hits total). Even on single target, before you have MS or BT, Whirlwind is often your highest-damage ability (because it uses full weapon damage). So from 36-39, you'll WW every time cooldown is up if you have the rage. After you get Mortal Strike or Bloodthirst at 40, those typically become primary, but you can still WW whenever you have extra rage in a fight or multiple targets. Be cautious: Whirlwind requires Berserker Stance, which means you might take extra damage if you stay in that stance. The usual tactic: swap to Berserker -> Whirlwind -> swap back to Battle. If you have Tactical Mastery, you can keep some rage through those stances. Without it, you'll dump rage when swapping – so plan accordingly (maybe WW as a finishing move). Keep in mind Whirlwind hits all targets around you – make sure you don't accidentally hit something you didn't mean to (though it only hits enemies you're in combat with in Classic, IIRC).
- Mortal Strike / Bloodthirst: Level 40. These are the signature 31-point talents of Arms and Fury respectively. Mortal Strike (MS) deals 200% weapon damage (at rank 1) and applies a 50% healing reduction debuff on the target for 10s. Bloodthirst (BT) deals a flat amount of damage equal to a percentage of your Attack Power (45% at rank 1) and for 8 seconds after, your next 5 attacks restore some health (that healing effect is minor, like 10 per hit, so not a big factor). The main differences: MS scales with your weapon's damage (so a slow 2H hits very hard), BT scales purely with AP (so weapon speed doesn't matter for its damage, and it's equally good with faster weapons). While leveling, at 40 if you're Arms you'll love Mortal Strike – it hits very hard especially if you upgraded your weapon. Use it as often as rage permits on tough enemies. The healing debuff rarely matters in PvE (few mobs heal), but it can be useful if an enemy is eating or healing itself (some humanoids bandage or have heal spells). Do note: As mentioned, do not use MS on raid bosses in Hardcore raid groups, because the healing debuff might occupy a debuff slot that could be used by something more important. In 5-mans or leveling, it's fine. Bloodthirst, on the other hand, provides a consistent attack you can use every cooldown. It doesn't hit as huge as MS unless you're very high AP, but it's reliable and the small self-heal on next hits is a tiny perk (not life-saving, but hey, a bit of regen). As a Fury warrior at 40+, BT should be used on cooldown whenever you have 30 rage for it – it's your bread-and-butter move.
Both MS and BT have a 6 second cooldown. And remember, if you somehow have both (you shouldn't in one spec, but say you respec), they share a cooldown – you can't MS then BT immediately, one triggers the CD of the other. It's either/or.
Defensive & Survival Abilities
Now onto the abilities that keep you alive – these are extremely important in Hardcore. Using them correctly can prevent death when you overpull or encounter strong foes:
- Bloodrage: Level 10. This is a self-buff that immediately gives you some Rage (10 instantly, and 10 more over 10 sec) at the cost of a little health. Think of it as "life-tap for rage." Use Bloodrage whenever you're starting a fight with 0 rage and need some to get going (almost every fight, early on). The health cost is trivial (it's like 27 damage at rank1, scales a bit with level). In Hardcore, as long as you're not on the brink of death, using Bloodrage is absolutely worth it to generate rage for a Sunder or Battle Shout or whatever. It's also useful mid-fight if you suddenly need a bit more rage for a lifesaving move (e.g., to switch to Defensive and Shield Wall, etc.). Just be mindful if you're very low HP – Bloodrage will not kill you (it won't cast if it would put you below 1 HP I believe), but don't cut it too close. Typically you use Bloodrage at the start of combat, or to power stance-changes (since you lose rage when swapping, you can Bloodrage after swapping to fill back up a bit).
- Battle Shout: Level 1. This is a buff that increases the attack power of you and nearby party members for 2 minutes. It costs rage to cast. Battle Shout is a significant DPS boost – at rank 1 it's small, but higher ranks give a lot of AP (Rank 6 gives +140 AP). Always keep Battle Shout up when fighting; it's essentially a ~20% damage increase for you at low levels, tapering to ~10% at high levels. In Hardcore, one smart trick is to use Battle Shout as a rage dump at end of fights: if an enemy is about to die and you have excess rage, refresh your Battle Shout rather than letting that rage go to waste. That way you roll the buff and effectively convert leftover rage into continued damage buff. The annoyance is the short 2-min duration, so you'll be refreshing it a lot. But it is worth it – "worth keeping it up even though the duration is annoyingly short". If grouping, your party will love the extra AP too. (Note: only one Warrior's shout counts – the highest rank or highest value overwrites others.)
- Demoralizing Shout: Level 10. This shout reduces the attack power of nearby enemies for 30 seconds. It's an AoE debuff to enemies (no target limit, it's just area-based). Demoralizing Shout ("Demo Shout") is essential for damage mitigation – it can significantly lower the DPS of enemies hitting you. Especially against fast-hitting mobs or multiple mobs, this cuts each of their hits by a flat amount. Use Demo Shout early in multi-mob fights or against bosses/elites to soften their blows. At low gear, it can easily cut ~20% of incoming melee damage. Improved Demoralizing Shout talent increases the AP reduction – not a bad talent if you plan to tank a lot. Also, fun fact: in big AoE situations, spamming Demo Shout generates a lot of threat on everything (this is used in speedrun strats for AoE tanking), but in Hardcore you likely won't be doing huge AoE pulls. One clever Hardcore tip: There is a known trick for the Warrior Level 30 Berserker Stance quest (Big Will in The Affray arena) where using Demo Shout causes the NPCs to cower as if feared – effectively letting you cheese that fight. This indicates Demo Shout has some quirk as a "pseudo-fear" on certain AI; not broadly useful elsewhere, but interesting. In any case, keep Demo Shout up on any enemy that hurts – it's free damage reduction.
- Shield Block: Level 16 (learn Defensive Stance first). This requires a shield equipped. It raises your block chance by 75% for one block (two blocks if talented Improved Shield Block) and lasts a few seconds. Also, importantly, in Classic, using Shield Block guarantees you cannot be critically hit for its duration (because a successful crit requires an unblocked hit and if you block, it can't crit). Shield Block is primarily for tanking – if you know a big boss hit is coming, you use it to block and prevent a crit spike. In Hardcore leveling, you might rarely use it solo unless you're taking heavy damage with a shield out. But always have it on your bars for Defensive Stance. If you are about to Shield Wall (big CD), pop Shield Block first to ensure the Shield Wall isn't bypassed by a crit (a common tank practice). If you duo with a healer and you're tanking, weave Shield Block to smooth damage intake.
- Revenge: Level 14 (Defensive Stance). Revenge lights up after you block, dodge, or parry an attack (requires you have a shield for block, or just dodge/parry). It's a very cheap, very high-threat move that deals a bit of damage and stuns the target for 3 sec if you have Improved Revenge talent. Revenge is core to tanking rotation – you use it whenever it's available to hold aggro and (if talented) get short stuns on trash mobs. While leveling, you won't be in Defensive Stance all the time, but if you are tanking with a shield, definitely leverage Revenge procs. With talents, Revenge can be an excellent defensive tool because a 3-second stun on an enemy effectively reduces a lot of incoming damage (and potentially interrupts their casts). This stun only works on mobs up to a certain level (it won't stun bosses), but on normal mobs it's great. If you are doing Hardcore dungeons, consider taking Improved Revenge for safer runs.
- Intimidating Shout: Level 22. This is Warrior's only "panic button" CC, essentially. It's an AoE Fear: it makes up to 5 enemies around you flee in fear for 8 seconds, and causes your primary target to cower in place (not flee) for the duration. Use Intimidating Shout when you're overwhelmed and need to stop a pack of mobs from hitting you so you can either bandage, run, or pick them off. Be very careful with fearing in the open world – feared mobs run in random directions and can chain aggro other mobs if those wander into them. This can make a bad situation much worse. Ideally, use Intimidating Shout when you have some space or you're indoors (where fear may not run far due to walls). Or use it and immediately start running away, hoping to outrun the feared mobs. A known strategy: fear them, then quickly move far enough that when fear ends, they reset/evade. If you do it right, you essentially dropped combat safely. Again, avoid if there are other players around or dense mobs around – you don't want to grief others or die to a train. Also, as mentioned multiple times: do not have Rend or Deep Wounds on targets you intend to fear. Those DoTs can break the fear almost instantly. Better to avoid using bleeds entirely if you think you might need to fear as an escape. Intimidating Shout has a long cooldown (2 minutes), so it's a one-time per fight thing. Save it for true emergencies where running or surviving the next few seconds is impossible otherwise. It's your "get out of jail" card – not guaranteed safe, but often can save you.
- Berserker Rage: Level 32 (Berserker Stance).* This ability, used in Berserker stance, makes you immune to Fear and Sap effects for 10 seconds and breaks you out of those if already affected. It also generates some extra rage when taking damage. In PvE, this is mainly to break or prevent fear from enemies (like certain undead or dragonkin that fear). For Hardcore, if you know an area has fearing mobs (e.g., Undead in Andorhal cast Terrify, or some elites like Mauradon boss), you can stance into Berserker and hit Berserker Rage to avoid an unexpected fear pulling more mobs. It's situational but important. One example: if you ever attempt Onyxia in Hardcore (wow, brave soul), Berserker Rage can break her fear so you don't run into whelps, etc. Also useful on bosses like Nefarian's fear. For leveling, you won't use it much unless you specifically know a mob fears. But always good to keep in mind. It has no cost (free to use, just stance requirement).
- Disarm: Level 18 (Defensive Stance). Disarm causes the target to lose their weapon for 10 seconds, reducing their damage output significantly (most mobs do much less damage unarmed). Not all mobs can be disarmed (beasts, elementals, etc., have no weapon; many bosses immune). But for those that can, Disarm is a strong defensive move. In Hardcore, if you're facing a tough humanoid or warrior-type NPC, disarming it at the start of the fight makes it hit like a wet noodle for a while, giving you an edge. Cooldown is 1 minute. It's worth using in any challenging humanoid fight. For example, if an elite or guard is smashing you, Disarm could tilt the odds. Also handy in PvP if that ever happens.
| Long Cooldown | Stance | Effect | Hardcore Usage |
|---|---|---|---|
| Retaliation | Battle | Counterattack all melee hits for 12s (up to 30 attacks) | Use when surrounded by multiple melee mobs. Makes them damage themselves when hitting you. Keep facing them (don't turn your back). |
| Shield Wall | Defensive | Reduce all damage taken by 75% for 10s | Your ultimate survival tool. Use when about to die and no other option exists. Requires shield equipped. |
| Recklessness | Berserker | 100% crit chance on abilities for 12s, but take 20% more damage | Very risky in Hardcore! Only use when you're certain you won't take damage (enemy stunned/fleeing) or in desperate burst situations. |
All three of these share a cooldown in the sense that if you use one, it triggers the 30 min CD on all (in Classic, each is separate actually, but you cannot have more than one up at a time obviously since they require stances – but if you pop Retaliation, you can't then immediately swap and use Shield Wall; they each start 30m CD when used). So you can only use one of them in a given short period generally. Choose wisely depending on situation: Retaliation if multiple melees, Shield Wall if big damage incoming, Recklessness rarely, only if needed to push damage and confident of safety.
Stat Priority for Hardcore Warriors
What stats should you focus on as a Warrior, especially in Hardcore? The general stat priority doesn't change drastically from normal Classic, but Hardcore Warriors tend to value survivability (Stamina) a bit more than usual, since staying alive > dealing a bit more damage. Here's the typical priority:
| Priority | Stat | Benefit | Hardcore Consideration |
|---|---|---|---|
| 1 | Stamina | 10 HP per point | In Hardcore, Stamina is king. A larger health pool directly increases survival chances against burst damage and gives more time to react. Many hardcore players prioritize "of the Bear" gear (Str/Stam). |
| 2 | Strength | 2 AP per point for Warriors | Your primary damage stat. More Strength = faster kills = less overall damage taken. Also slightly increases block value when tanking. |
| 3 | Agility | Crit, dodge, and armor | A hybrid offensive/defensive stat. Crit for more damage, dodge to avoid attacks entirely. "Of the Tiger" gear (Str/Agi) is solid. |
| 4 | Armor | Physical damage reduction | Always upgrade to higher armor when possible. Plate at 40 provides a significant survivability boost. |
| 5 | Defense Skill | Reduces chance to be crit | Important for tanks at level 60, less so while leveling. Helps avoid devastating critical hits. |
| 6 | Hit & Critical Strike | Hit chance and crit damage | Offensive stats that improve kill speed. Hit is especially valuable for dual-wielding Fury, but gear with these stats is rare until endgame. |
| 7 | Spirit | Out-of-combat regeneration | Mostly unimportant once you have bandages and food, but can slightly reduce downtime in early levels. |
| 8 | Intellect | Weapon skill leveling speed | Essentially worthless for Warriors. Ignore on gear. |
(Example: A Warrior leveling might choose a +5 Stam ring over a +12 Attack Power ring in Hardcore, because 50 extra HP could save you from a lethal blow, whereas 12 AP just speeds kills slightly. But if you feel comfortable, you can mix one offensive ring and one defensive ring. It's about assessing your risk.)
Additionally, always carry a shield and one-handed weapon even if you're arms/fury – the shield's armor and chance to block can greatly reduce damage if you need to turtle up. Swapping to sword-and-board mid-fight and going Defensive stance is a viable tactic if a fight turns ugly. The stats on shield (armor, block) matter in those moments more than squeezing out DPS.
Leveling a Warrior in Hardcore (1-60)
Leveling a Warrior from 1 to 60 in Hardcore Classic is an exercise in patience, preparation, and precision. This section will guide you through the leveling process, including recommended talent builds as you level, general strategy for quests and combat, how to handle dangerous situations, and key milestones (like class quests and when to upgrade weapons). We'll also discuss the pros/cons of solo vs duo leveling and which professions help most during leveling.
Talent Build Path (10-60)
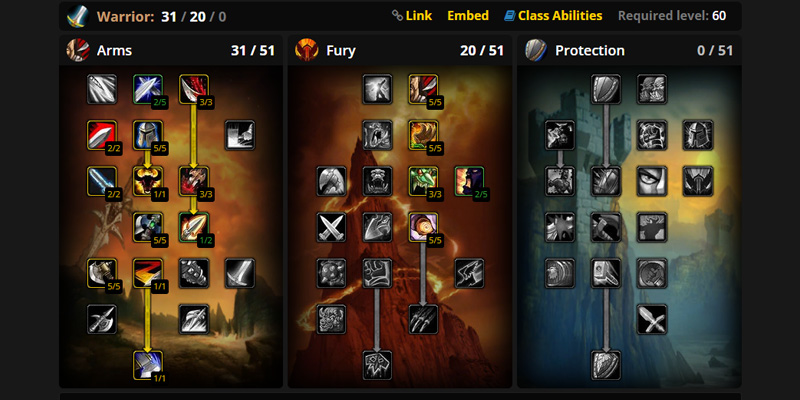
As discussed, we recommend an Arms-focused build for leveling, with a slight Fury detour at the start, then possibly a respec around level 30 or 40 to optimize Sweeping Strikes and Mortal Strike timing. Below is a common and effective talent progression for Hardcore Warrior leveling:
| Level Range | Talent Points | Key Talents to Acquire | Notes |
|---|---|---|---|
| 10-19 | Fury 5, Arms 5 | Cruelty 5/5 (Fury) Deflection 5/5 (Arms) |
Start with Cruelty for 5% crit chance, then begin in Arms with Deflection for 5% parry. Improves both damage and mitigation early. |
| 20-29 | Fury 5, Arms 15 | Improved Overpower 2/2 Tactical Mastery 5/5 Anger Management 1/1 |
Improved Overpower gives 50% crit chance on your free attacks. Tactical Mastery lets you keep rage when stance dancing. Anger Management generates passive rage. |
| 30 (Optional Respec) | Pure Arms 21 | Sweeping Strikes | Many recommend respeccing at 30 to drop Fury points and get Sweeping Strikes immediately. It's powerful for handling multiple mobs and worth the respec cost. Alternative: wait until 35 when you naturally have enough points. |
| 30-39 | Arms 30 | Two-Handed Weapon Specialization 5/5 Deep Wounds 3/3 Impale 2/2 |
Fill out Arms tree to prepare for Mortal Strike at 40. Two-Handed Weapon Spec gives 5% increased damage with 2H weapons. Impale increases crit damage by 20%. |
| 40 | Arms 31 | Mortal Strike | The capstone 31-point Arms talent. A powerful instant attack that also reduces healing effects on the target. Your primary damage ability. |
| 41-45 | Arms 31, Fury 5 | Add Cruelty 5/5 back in Fury | After getting Mortal Strike, start adding back Fury talents, beginning with Cruelty for the 5% crit chance. |
| 46-50 | Arms 31, Fury 10+ | Options include: Improved Battle Shout Enrage |
Continue filling Fury. Improved Battle Shout increases your AP buff, or you can get Enrage for 25% damage after being crit. |
| 50-60 | Final build depends on role | DPS: Arms 31/Fury 20 or Fury-focused build Tank: Protection-focused build |
At this point you can either continue as Arms, respec to Fury (especially if you have good dual-wield weapons like Thrash Blade), or go Protection if you'll be tanking dungeons/raids. |
To summarize an optimal Hardcore leveling build:
- 10-29: 5 Cruelty, rest in Arms (Deflection, Tactical Mastery, Imp Overpower, Anger Management).
- Respec at 30 for Arms 21 (get Sweeping).
- 30-39: Full Arms up to MS at 40 (Impale, 2H Spec, etc.).
- 41-45: Fury 5/5 Cruelty.
- 46-50: Mix of Fury talents (Enrage/Flurry) or Arms fillers (your preference; could do 5/5 Flurry by 50 if you go deeper Fury).
- 50: either respec Fury or continue Arms.
- By 60: If DPS role, you likely go Fury or Fury/Arms hybrid; if tank role, you go Prot or Fury/Prot hybrid. (We'll discuss 60 builds in Endgame.)
One popular level 60 DPS build in Classic is 31/20 (MS Arms build) for PvP, or 17/34 (Fury Impale) for PvE. However, in Hardcore raids, some warriors may even do 31/5/15 (Mortal Strike + some Prot) since no debuff limit on HC (if Blizzard removed it, as hinted: "no debuff cap in HC so Deep Wounds can be used"). But likely, Fury is the raid DPS king as usual.
Leveling Strategy & Tips
Now that you have your talents sorted, let's talk general leveling strategy for a Hardcore Warrior:
- Fight Green Mobs: Perhaps the most repeated advice for HC warriors: "fight primarily green mobs (3+ levels below you) and do green quests". This dramatically reduces risk. Green mobs have lower chance to hit you, you land more hits, and they deal less damage. The XP is slightly lower than fighting yellow/orange, but staying alive is worth it. Warriors can level efficiently grinding on greens if needed. You don't have to do only greens, but be cautious taking on anything above your level. When in doubt, level up once more before a tough quest or skip high-level quests until they turn yellow/green.
- Pull carefully, one at a time: Always assume you can only handle one enemy at a time in open world. Two is doable if you're prepared (Sweeping Strikes, Retaliation, etc.), but why risk it unless needed? Use line-of-sight pulls or ranged weapon (guns/bows or a thrown weapon) to pull mobs away from groups. If an area has tightly packed camps, consider skipping or coming back later. If you must fight 2, open with a plan: e.g. Pop Retaliation, or use Sweeping + a grenade, etc.
- Use a Ranged Weapon to pull: Get a bow/gun or throwing weapon as soon as possible. Warriors start with throwing (if Orc/Tauren) or a gun (Dwarf) or bow (Night Elf) depending on race. If you don't start with one, buy one. Use it to body pull mobs from distance instead of face-pulling and potentially getting adds. A common trick: pull with a ranged weapon and if more mobs aggro than intended (like you pull a pack), immediately turn and run before they reach you, this can cause them to leash back without you ever engaging. In that sense, ranged pull is like a "tester" to see what links.
- Keep your weapon updated: Weapon upgrades are massive for Warriors. A new weapon can drastically increase your damage output. Always be on the lookout for weapon quest rewards or buy a good vendor weapon if your current one is lagging. For example, at level 20 if you haven't gotten a blue from Deadmines, consider buying the Executioner's Sword (a 2H sword sold in Stormwind/Ironforge, etc.) – it's costly but worthwhile if your damage feels slow. Likewise, Horde might buy a Merciless Axe at 26 if unlucky with drops. Do your class weapon quests: Whirlwind Axe quest at 30 is famous; though dangerous, it yields a top-tier weapon for 30s. We'll cover these class quests soon. A good weapon progression list (esp. Alliance) is given in the HC guide – from Hogger's two-hand at lvl 11 to Whirlwind Axe to Bonebiter, etc.
- Always carry a shield and one-hander: Even as Arms/Fury, have a sword&board in your bags. If you get into trouble (multiple mobs or a strong elite), switching to Defensive Stance with a shield can greatly increase your survival: you can Block, you can use Shield Bash to interrupt, you can Shield Wall if needed. For example, if you accidentally body-pull a third mob, you might Weapon Swap + Defensive, pop Shield Block and Shield Wall, and try to walk out alive. Without a shield you lose those tools. Also, any time you join a dungeon group, you may end up tanking, so be ready with a shield.
- Maintain buffs and consumables: As a Warrior, every bit helps. Always keep Battle Shout up. Try to have Stamina food buff from cooking (e.g., Cooked Bear Meat for +Str and Stam early, or Rumsey Rum Black Label for +15 Stam if you find some). Elixirs from Alchemy (if you have or buy): Lion's Strength (+Str), Fortitude (+HP) are great. Use scrolls that you loot (e.g. Scroll of Protection for armor, Scroll of Strength, etc.). Hardcore leveling is about stacking small advantages.
Plan your "Oh Crap" buttons: Know what you will do if an extra mob joins or if things go south. Typically:
- Try to finish one mob quickly if it's almost dead (execute and kill it, less damage incoming).
- If 2 mobs fresh, consider Intimidating Shout to fear one and fight one solo. Kill the one you didn't target with fear (since the primary target stands in place cowering, you might actually fear the add and it runs, leaving the original mob on you feared in place – careful, that means he's not hitting you but will resume after 8s).
- Use Retaliation if being hit by 2+ melee – kills them faster and acts as some deterrent.
- Health pot early, don't wait until you're at 5% (you might get crit and die). Use bandage if you can safely (e.g. fear then bandage).
- If you need to run: Hamstring mobs and run. If multiple, Intimidating Shout then run. Or use Dummy (Engineering) or Grenade stun to give head start.
- Die with honor? – No, no, run! Remember, you can always re-level but you can't resurrect. If you have to run far, try to have a clear path. Use a swiftness potion if you have. And be mindful of "leash range" – many mobs tether back after a certain distance. You can use terrain to break line of sight which often resets casters.
- Use Rest XP: Because Warrior leveling is slowest, maximize rested experience. If you can, level in bursts and rest your character in an inn or capital to accumulate rested. This will cut down the grind significantly and there's no rush in Hardcore.
- Do your Class Quests: Warriors have important class quests: Defensive Stance at 10 (must do; unlocks Defensive Stance and Sunder Armor), Level 20 armor quests (Brutal/Fire Hardened gear – worth doing around 30+ when you can tackle RFK for the chest), and the big level 30 quest for Berserker Stance and Whirlwind weapon. Also a level 50 quest in Sunken Temple for Berserker Helm / Diamond Flask. We'll detail these in Class Quests & Key Milestones below. These quests are usually worth it, but some parts are dangerous – approach with caution or a group.
- Dungeon Leveling in Hardcore: Dungeons can be both a blessing and a curse. They yield good gear and XP, but one wrong pull and you lose your character. If doing dungeons, go in with a solid plan and team. Most Hardcore players run dungeons at slightly higher levels than usual (to be safer). As a Warrior, you'll often be expected to tank. That's fine – Warriors are best tanks. Just prepare: get a shield, know the dungeon layout (study in advance), communicate pulls, never rush. Some even do "cleave groups" where a Warrior, Rogue, etc., chain-run dungeons for XP, but in Hardcore it's less popular due to risk. If you do it, ensure everyone is on the same page about safety over speed.
- Macros: There are helpful macros for stance/abilities to make your life easier: e.g. a one-button Overpower that casts Battle Stance then Overpower (so you can use it even if in wrong stance), same for Intercept, Shield Bash, etc. The HC guide provides examples. We'll show some in Advanced section, but you can set those up to reduce keypresses.
- Avoid known Hardcore death traps: Some classic ones: Defias Pillagers (Westfall) cast nasty fireballs – they hurt, but they can be LOSed or interrupted. Don't fight multiple casters. Murloc camps – runners can chain aggro a village, careful. Stranglethorn Valley is notoriously dangerous (at 30s) with many stealth cats, etc. If something feels risky, skip it or come later. Hardcore is about survival, not completionism.
Class Quests & Key Milestones
Let's highlight Warrior-specific quests and important gear milestones during leveling:
At level 10, visit your trainer to get a quest for Defensive Stance. Each race has a variant (e.g., Human goes to Lakeshire to kill Morgan the Collector; Orc/Troll kill Zalazane on Durotar islands; etc.). Completing it grants you Defensive Stance and the abilities Sunder Armor and Taunt. It also gives a nice green weapon. Do this at 10, it's usually not too hard (may require grouping for some races). Until you do, you can't tank properly, so it's a must.
At 20, you can start a long quest chain that eventually rewards several pieces of Fire Hardened armor for Alliance or Brutal armor for Horde. These include chest, helm, leggings, etc. The catch: The early steps are doable in 20s, but one step requires killing an elite in Razorfen Kraul (~level 32 dungeon). So you likely won't finish this chain until your early-mid 30s when you do RFK. The reward chest (Fire Hardened Hauberk / Brutal Hauberk) is very good for that level – a mail chest with str/sta. The helm at end is your first headpiece usually. Absolutely do these quests, but time them with dungeon runs and have help for the tougher parts. The chain involves things like collecting items from multiple zones and then dungeon bosses.
At 30, this is the big one. The quest "The Islander" sends you to Fray Island (Barrens) to fight in an arena (The Affray). Completing that gives Berserker Stance and the ability Intercept. The Affray can be tough: a series of fighters then Big Will. But as noted, there's a trick: using Demoralizing Shout repeatedly will make the NPCs (other than Big Will) not attack you (they cower as if feared), trivializing the event. So just spam Demo Shout, then kill Big Will.
After that, you get the follow-up quest for the Whirlwind Weapon. This requires collecting: 30 Bloodscalp Tusks (STV trolls), 8 Liferoot (herb or Kurzen Medicine Men drop), and the big one: Essence of the Exile, which is made by combining charms from elemental spirits in Arathi (8 each from cresting, thundering, burning elementals). Those elementals are ~level 38 elites (very dangerous to solo). You then summon Cyclonian, a level 40 elite wind elemental, and defeat it to choose your weapon reward.
For Hardcore, the Whirlwind Weapon quest chain is high risk. Many die trying to farm the charms or fighting Cyclonian. Strategies:
- Wait until you're higher level (like 40) to attempt.
- Group up with other warriors or friends to farm the charms – elementals hit hard.
- Use the Nature Protection Potion strategy for Cyclonian: drink a nature pot before and during the fight to absorb his damage (works very well).
- Or "cheese" Cyclonian by attacking him from across a river with thrown weapons (resets his pathing, etc. – an exploit strategy some used).
The Whirlwind Axe is usually the best choice (slow 2H axe with high top damage). The Whirlwind Sword is faster (not as good for MS), and the Hammer is one-hand (not great since you want a 2H). The Axe will carry you for many levels. If Alliance, pairing that with Axe Specialization talent is nice, plus later Bonebiter at 40 also an axe, synergy.
If you decide not to do this quest due to risk, try to get an alternative weapon. But many consider it worth it – just treat it carefully, maybe ask higher levels for help.
Mid-30s Weapon Upgrades
If not Whirlwind Axe, try Scarlet Monastery: Ravager from SM Armory (2H axe with a whirl proc) is famous albeit slightly risky (the whirlwind proc can pull extra mobs if it procs at wrong time). Also Bonebiter (SM quest reward 2H axe) at 40 is very solid. Archeus (quest in Duskwood, level 28 2H sword) is another one – requires killing Mor'ladim, can be tough but doable with careful kite. These are all on the weapon progression list in the HC guide.
At 50, there is a class quest (all classes got one in ST). For Warriors, it starts at Fallen Hero of the Horde (Blasted Lands) and sends you into Sunken Temple to gather feathers and kill some stuff. The rewards: Diamond Flask trinket (on use heals you over time based on Strength – very good for soloing, a classic Warrior trick in raids too), or a helm (Fury Visor) or shoulders (Razorsteel). Diamond Flask is the must-take – it's unique in that it provides a substantial heal over 1 minute (esp if you have high Str when used). In Hardcore, that's effectively a strong self-heal CD. So definitely do this quest around 50-55 (with group, ST is a 5-man dungeon). Diamond Flask can save you in tight spots or just reduce downtime by healing after fights.
Other Notable Milestones
- Berserker Rage at 32 (small note: now you can break fears).
- Level 40 Plate Armor: At 40 you can wear plate. Upgrade your mail armor to plate when possible (even if green plate with stamina – more armor = less damage taken).
- Mount at 40: Getting a mount makes life safer (faster run from danger), try to save money or do quests like Fel Steed for Warlock if alt, etc. Even if you're short on gold due to buying skills and weapons, try to have a mount by 45-ish latest.
Solo vs Duo/Group Leveling
Solo Leveling
Most of the above assumes you're tackling content solo. Solo Warrior leveling is slow but doable with caution. You control the pace fully and only worry about your mistakes. The strategies above are mostly aimed at solo survival.
Duo Leveling
Hardcore allows grouping freely (unless you choose the Solo Self-Found flag). Leveling in a duo can significantly ease the Warrior's journey. The ideal partner for a Warrior is a healer or support class:
- A Shaman (for Horde) is arguably best: you get heals, plus Windfury Totem which is insane for Warrior DPS (extra hits), plus other totems for utility. Shaman + Warrior duo has minimal downtime and huge kill speed.
- A Priest or Paladin (Alliance) also works wonders: sustain from heals and blessings (paladin gives you Blessing of Might, heals, can off-tank; priest shields and renew saves a lot of downtime).
- A Druid could also heal and add some DPS, and even tank if needed to trade off, but no Windfury equivalent.
- Other combos: Warrior + Mage or Warrior + Warlock are less common duos because that's two squishies, but if the caster lets the Warrior tank and just supports with CC and damage, it can work. However, those casters might prefer another duo partner.
- Warrior + Warrior duo is fun but dangerous (no heals). Could be workable if both are very careful and use defensive tactics, but not recommended.
Group Leveling
You can also trio or more. But typically leveling in a full group is less efficient XP-wise unless you're dungeon grinding. In open world, tagging mobs as a group yields less per kill per person. Still, for dangerous quests (like elite quests), grouping is wise.
Dungeons in Groups
As mentioned, a coordinated group for dungeon spam (like SM, Zul'Farrak, etc.) can speed leveling. But in Hardcore, it's double-edged: more dungeon exposure = more chances for a wipe. So only do this if your group is experienced and careful. Also, Hardcore often has a "one dungeon lockout per day" rule on official servers to prevent repeat spamming – not sure if that remained, but originally Blizzard talked about it.
Finally, whether solo or duo, communication and planning save lives. If duo, discuss "what if" scenarios with your partner (e.g., if things go bad, who uses what cooldown, do we run together or split, etc.). It sounds formal, but Hardcore = you have to trust each other's decisions.
Recommended Professions while Leveling
Professions in Hardcore are not just an afterthought – the right professions can significantly increase your survival and efficiency.
The top recommendations for Warriors are:
| Profession Combo | Key Benefits | Recommendation |
|---|---|---|
| Herbalism & Alchemy | Self-healing potions, stat boosting elixirs, escape potions | Excellent for consistent buffs and emergency healing |
| Mining & Engineering | Combat gadgets, escape tools, emergency CC | Superior for active emergency tools and combat tricks |
| Skinning (temporary) | Early gold generation | Good starter profession to pair with Mining or Herbalism |
Herbalism & Alchemy
This combo provides you with a steady supply of healing potions, elixirs, and special potions like Free Action Potion and Swiftness Potion. Healing potions are a lifeline; having Alchemy ensures you can craft them as you level (Lesser Healing, then Healing, etc.). Elixirs like Lion's Strength (Str), Defense, Fortitude (HP) boost your stats. Free Action Potions (remove stuns/slows) are amazing for tricky situations (e.g., PvP gank or mobs that net you). Also, Alchemy can craft Oil of Immolation, Restorative Potions, Limited Invulnerability Potions – various niche but powerful effects. And specifically mentioned in HC guide: Alchemists make Frost Oil, needed for the quest to get the Nifty Stopwatch (trinket that gives sprint on use) – another escape tool. In Hardcore, many consider Alchemy the best overall profession for leveling for any class because of the self-reliance it gives. Herbalism will give XP when picking herbs too (nice bonus).
Mining & Engineering
Engineering shines for utility and emergency tools. Key engineering items for Warriors:
- Target Dummies – deployable objects that taunt enemies, effectively peeling them off you for a short time. These can save you if you overpull: drop a Dummy and mobs hit it instead of you while you run or bandage. Lifesaver.
- Grenades (dynamite, bombs) – deal AoE damage and stun targets for 2 seconds. You can use this to interrupt spell casters or to stun a group chasing you. The damage also helps finish things off.
- Engineering trinkets – like the Gnomish Net-O-Matic (nets a target, risky though it can backfire and net you), or Goblin Rocket Helmet (at high eng, charges and stuns an enemy).
- Explosives – Goblin Sapper Charges at 200 eng for burst damage (could also kill yourself if low HP, careful).
- Early Goggles – e.g., Green Tinted Goggles (requires 150 eng) offer +Stam and are a decent headpiece when you might not have one.
- Engineering also lets you craft guns (useful if you want a better ranged weapon) and Bullets.
- At max, Jumper Cables can attempt to resurrect a dead ally – irrelevant in solo HC (if they're dead, they're done), but in duo if you play on a community server with variant rules it could matter; official Blizzard HC doesn't allow resurrect except priest 60 ability.
Overall, Engineering = escape and utility. It doesn't directly buff you like Alchemy does, but it provides tools to survive scenarios that would otherwise kill you. Many hardcore warriors go Mining/Eng for this reason, especially if they plan to be tanking dungeons at 60 (grenades for snap aggro, etc.).
So which to choose? The HC guide explicitly states: "The two top-tier profession combinations for warriors are Herbalism/Alchemy and Mining/Engineering". You can't really go wrong with either.
- Herb/Alch = consistent buffs, potions, sustain (strong passive benefits and emergency heals).
- Min/Eng = gadgets for emergencies and added combat tricks (strong active emergency tools).
Some players actually do both across time: For example, level with Herb/Alch to 60 to benefit from potions, then at 60, drop Herb for Mining and quickly powerlevel Engineering for raid utility. But since HC has only one life, you might stick to one combo throughout leveling.
Skinning (secondary early on)
Skinning by itself doesn't give survival benefits, but it is easy to level and can generate extra gold from selling leather. One tip from HC guide: you can start with Skinning + Mining (or Skinning + Herb) to double gather while leveling, then drop Skinning later when you want to pick up the crafting profession. For instance, you could do Skinning/Mining until you've stockpiled some mats or made some money, then drop Skinning for Engineering at level 30-40. They even suggest using skinning to gather light and medium leather needed for engineering goggles, then dropping it.
Secondary Professions
- First Aid: Absolutely take First Aid and max it as you go. Buy all the manuals (e.g. Expert in Arathi, Heavy Mageweave in Theramore, Runecloth in Thistleshrub valley vendor). Bandages save lives and reduce downtime. This is non-negotiable.
- Cooking & Fishing: Cooking is great for providing stat food (Stamina/Spirit food from cooking recipes, or +Agility food, etc.). Also, fishing complements cooking by providing materials. These are nice to have – not as critical as First Aid, but if you have downtime or want a chill activity, they pay off. Also, some hardcore strategies involve fishing for good items (e.g., Rumsey Rum bottles from crates, or Nightfin Soup for mana which you can sell).
- If you like to always be buffed and prepared, go Alchemy.
- If you want mechanical toys and plan to tank at 60, go Engineering.
Dungeons and Group Content in Hardcore
Dungeons in Hardcore Classic are tense affairs: you're gathering 5 players, entering an enclosed environment full of elites that can kill you quickly if things go wrong. However, they're also rewarding: great loot, lots of XP, and class quests often send you there. As a Warrior, you will typically be the tank in dungeon groups (though sometimes you might go as DPS if another tank is present, but Warriors excel at tanking so it's usually you).
Tanking in Hardcore Dungeons
Tanking in Hardcore has the same fundamentals as normal: hold aggro, mitigate damage, control the pace. But you should emphasize safety and control even more than usual:
- Go Slow & Pull Carefully: Make sure your group is on the same page to pull one pack at a time, wait for pats, use CC (sheep/sap) if available on large packs. As the tank, you often dictate the pull speed. If a DPS is impatient, politely tell them to chill; a life is on the line. Use Line of Sight pulls and ranged weapon pulls frequently to bring mobs to a safe spot rather than charging wildly.
- Threat and Taunt: Warriors generate high threat through Sunder Armor, Revenge, Heroic Strike, etc. In Hardcore, DPS should be threat-conscious (they better be, or they risk death by pulling aggro). But still, keep an eye if something goes for a mage or healer. Taunt (instant fixate mob on you) is your friend – ensure you always have Defensive Stance up in fights so Taunt is available, and switch targets to hit each enemy a bit (tab-sunder) if multiple mobs. If you have Mocking Blow (Battle stance taunt-like attack), you can use that too on a different stance if taunt is on CD. Keep in mind: if you overgear the content or are doing dungeon at higher level, you might DPS tank in Battle Stance with 2H – but in Hardcore, it's still wise to just shield up in Defensive for bosses or big pulls to be safe.
- Use CC and Utility: Warriors themselves don't have CC besides Intimidating Shout which is risky in dungeons (fear can pull more). But use your party's CC. Mark targets (skull = first kill, moon = sheep, etc.). Encourage rogues to sap humanoids, mages to poly, etc. Use line of sight to cluster ranged mobs so they move into a position. Shield Bash and Pummel to interrupt dangerous casts (e.g., healers or casters that do big damage). If a pull goes bad, consider using a Target Dummy (engineering) to gather mobs then reset if you all run (dummy tanking while you escape).
- Defensive cooldowns: Don't hesitate to use Shield Wall on a boss if healer is overwhelmed, or Last Stand (if prot spec) if you dip low. Those abilities might be needed once in the run and that's fine. It's better to use a 30min CD than die with it unused. Also, pop smaller CDs like Bloodrage early to get rage, Demoralizing Shout on everything to reduce incoming damage, and keep Thunder Clap up if fighting multiple (if you can stance dance to do it).
- Gear for survival: In HC dungeons, wear gear that gives you stamina and defense. Aggro comes second to living; but luckily warriors naturally generate a lot of threat. Many HC tanks might even equip a mix of some DPS gear for threat but mostly tanky gear. If you have engineering trinkets like Reflector trinkets (shadow/Fire Reflect) or Goblin Rocket Helmet, etc., they can be handy for specific encounters.
- Know the dungeon: Study boss mechanics and mob abilities. For example, in SM Cathedral, the final boss Mograine calls lots of adds when Whitemane comes – be ready with Retaliation or challenging shout to hold them. In Zul'Farrak, the pyramid event can overwhelm you – plan ahead (some HC groups skip it or do tricky kiting strats). Know which mobs fear (so you stance Berserker or have Fear Ward from priest), which mobs stun, etc., and plan accordingly (e.g., carry Free Action Potions for Maraudon princess to avoid her stun, etc.). Knowledge is life.
Tanking Spec vs DPS Spec in leveling dungeons: You can tank as Arms or Fury spec just fine for leveling dungeons by using a shield and defensive stance. Prot talents make it easier, but not required until perhaps upper Blackrock Spire or raids. If you frequently do dungeons, you might consider a hybrid spec picking up Defiance (more threat) in Prot early or Improved Revenge for stun. But it's not mandatory until 60.
DPS Warrior in Groups – Tips
If you happen to be in a group as DPS (another warrior is tanking or a bear druid tank, etc.):
- Watch your threat! Warriors can pull aggro easily with big crits or using Recklessness carelessly. In Hardcore, pulling aggro from the tank could kill you (the mob turns and gibbs the squishy DPS warrior). Use /assist to attack tank's target. Hold off on full bursts until the tank has a solid threat lead. If you do pull threat, be ready to Shield Wall or Disarm the mob to survive until tank taunts off.
- Peel for healer: If something breaks loose on a healer and tank didn't catch it, as a warrior DPS you can help: hit it, hamstring kite it away, or Taunt it (taunt isn't exclusive to prot, any warrior can taunt in Defensive stance). Just be cautious and communicate.
- Utility: Even as DPS, keep Demoralizing Shout up if tank hasn't applied it and there are multiple mobs. Throw in a Thunder Clap if no one else can reduce attack speed. And always keep Battle Shout up for party.
- Cleave & Sweeping: In multi-target pulls, use Sweeping Strikes + Cleave/Whirlwind combos to contribute heavy AoE damage, but again only if you won't steal aggro on all of them. Perhaps coordinate with tank to pop big AoE after they Retaliation or so. Warriors have insane AoE burst with those combos, which can help clear packs quickly (less time in danger).
- Stay behind mobs: Reduces your chance to be parried (which could cause more damage to tank due to parry-haste, at least in some versions) and avoids cleaves if mobs cleave.
- Professions for DPS: If you took Engineering, use bombs on big pulls or boss fights to add damage and a stun (just don't break CC with them). If Alchemy, chug your offensive elixirs.
Endgame (60) in Hardcore – Dungeons & Raiding
Reaching 60 in Hardcore is a huge accomplishment. At this point, your goals might be to clear endgame dungeons (Stratholme, Scholomance, UBRS, etc.) or even attempt raids like Molten Core or Onyxia with a Hardcore raid group. The dynamic changes a bit at 60: you'll specialize into a role more firmly and gear optimization becomes key. Let's cover how a Warrior transitions to endgame in Hardcore.
Protection Warrior (Main Tank) in Raids
If you plan to be a main tank in raids (or even just high-end dungeons), you'll likely go with a Deep Protection build. This is because, unlike speedrunning where Fury/Prot is used for threat/dps, Hardcore raiding is about maximizing survivability and stability. There are no DPS checks worth dying for in early raids; it's more about not wiping.
A deep Prot build (something like 11 Arms, 5 Fury, 35 Prot) might look like:
- Arms: 5 Deflection (parry), 5 Tactical Mastery, 1 Anger Management.
- Fury: 5 Cruelty (crit).
- Prot: all the goodies – 5 Shield Spec, 5 Anticipation (if you need defense skill), Last Stand, 3 Defiance (threat), 5 Toughness, 2 Improved Taunt (if you want shorter CD taunt), 1 Concussion Blow (stun, situational), 3 Improved Shield Block (so you can block more hits in a row -> avoid crits), 5 One-Hand Spec (more threat/dmg), Shield Slam at top.
Some variations include picking Deep Wounds in Arms because HC raids supposedly have no debuff cap, making Deep Wounds + Impale a possible threat/DPS increase even as tank (there was mention: "we don't have debuff cap in HC, so you could spec Deep Wounds for threat while tanking"). But probably early on, tanks will just do the standard Prot build. A user on forums recommended: "deep prot spec will be a lot safer for you and the raid; others will watch threat. You can even spec deep wounds and drop cruelty since no debuff cap, for threat, without dropping much prot". That's an advanced idea – including Deep Wounds for threat instead of some Fury talents.
In terms of play: as a Prot Warrior, you'll be main tanking bosses. You must gear heavily for defense:
- Defense Rating/Skill to avoid crits. At level 60, level 63 bosses have 5.6% crit chance on you; you need +140 Defense (above base 300, so 440 total defense skill) to push crit chance to zero. Achieving 440 Defense in pre-raid gear is tough but you aim for as high as possible. (If no debuff limit, being crit and triggering Enrage might not be as harmful to threat because they removed world buff stuff – but still, a crit can burst you down).
- Fire Resist gear for MC/BWL as needed (especially MTing Ragnaros or Firemaw etc., you'll swap some FR gear).
- Stamina as always, more HP buffer.
- Mitigation stats: armor (near cap ~cap is 75% reduc vs 63 which is ~13k armor needed; attainable with full raid gear), and avoidance (dodge/parry/block).
- Consumeables: flasks (Flask of the Titans +1200 HP), elixirs, stoneshield potions (+armor) etc., are all used.
One interesting note: In Hardcore raids, DPS will be throttling themselves to not pull aggro, so threat is less of an issue. But you still need enough to hold off heal aggro and slow DPS. Defiance talent + Shield Slam + spamming Sunder will usually suffice. If Deep Wounds is allowed, that helps. Also, you might have multiple tanks so rotations on taunt for bosses like 4H (if anyone even dares Naxx in HC!) etc.
One crucial difference: In Softcore, sometimes tanks risk staying in berserker for more rage gen, or using Recklessness to burst threat at pull. In Hardcore, you'd rarely do that because the increased damage taken or being crittable could kill you. Slow and steady threat lead is fine.
Communication: Tanks in HC raids likely coordinate more with DPS on threat. Everyone's watching threat meters. There's possibly even an agreement like "stop at X% threat of tank".
Finally, consider "Fury-Prot" vs "Deep Prot": Fury-Prot was the meta in classic (something like 15 prot, rest fury) to maximize threat per second while still having a shield and def stance. In Hardcore, some tanks might still do Fury-Prot if they feel confident, but early on likely not. As one forum said, "no tight DPS races in Classic raids until Patchwerk, which few will attempt; so go full prot for safety". The margin of error is smaller in HC, so the extra safety net from full prot talents like Last Stand and Improved Shield Block is valuable.
Fury Warrior (DPS) in Raids
If you go the DPS route at 60, Fury is your domain. A common high-DPS build is 17 Arms / 34 Fury:
- Arms: 5 Deflection, 2 Imp Charge (or 5 Tactical Mastery if off-tanking sometimes), 3 Impale (with 3 Deep Wounds prerequisite), 2 Impale, 5 Axe or Sword Spec (depending on weapon), 1 Anger Management (or 1 Mortal Strike just to have as extra attack for certain fights – but MS isn't used due to debuff limit originally; if no debuff cap, MS still not used because you'd be dual-wielding).
- Fury: 5 Cruelty, 5 Improved Battle Shout (if no paladin, or Commanding Presence can buff either shout), 5 Enrage, 1 Death Wish, 5 Flurry, 2 Precision (if available in your patch), 3 Bloodthirst, etc. Actually an optimal might be 18/33 (taking Anger Management and Tactical Mastery too for stance dancing).
In Hardcore, DPS warriors approach fights more conservatively than usual:
- You'll want to still pump out damage, but you must avoid pulling aggro. Over-aggro could mean a one-shot. So you might hold off at start more, perhaps not use Recklessness unless it's 100% safe.
- You might not go all-in with World Buffs (HC realms likely don't have world buffs, or players don't bother since one death ends it).
- Gear: aim for "Pre-raid BiS" which is similar to normal. E.g., Lionheart Helm, Truestrike Shoulders, Hand of Justice, etc. Many pieces from UBRS, Scholo, Strat are needed. Resist gear if needed (e.g. Onyxia Scale Cloak for BWL or fire resist for MC if not tanking).
- Consumables: You'll use Elixir of the Mongoose (+Agility/crit), Juju Power/Might, etc., but maybe skip risky ones like Mighty Rage Potion unless you coordinate (Mighty Rage can spike threat). But if tank is solid, you can use them.
- Expect to possibly off-tank occasionally: Fury warriors may tank trash or offtank adds. Thus having a shield macro ready is good. The old concept of "Fury/Prot offtank" might still apply, or one of the Fury warriors picks up tanking talents enough to be second tank for 5-mans or emergencies.
One caveat: If the Hardcore raid does not have 40 people (maybe they do like 20-man MC or something if population is an issue), DPS needs might differ. But let's assume a full raid.
Warrior DPS in late game is huge, so likely you'll be top DPS if you survive. Just always keep an eye on boss threat and boss mechanics (don't eat a tail swipe into whelps on Onyxia for example – positioning and situational awareness is key).
"Fury Prot" Hybrid Builds
Fury Prot refers to the hybrid spec where a warrior takes enough Protection talents to tank (usually up to Improved Shield Block and Defiance, sometimes Last Stand) but then invests a lot into Fury for damage (Cruelty, Flurry, maybe Bloodthirst). This was the go-to for main tanks in speed clears (to hold threat vs pumping DPS).
In Hardcore, Fury Prot might still be used for offtanks or as an intermediate spec:
- If you want to both tank 5-mans and DPS in raids, you might choose a Fury-Prot spec to be versatile. For example, something like 15 Prot (enough for Defiance 3/3 and Improved Shield Block and maybe Last Stand) and 31 Fury (Bloodthirst). Such a warrior could DPS in raids but swap to tank gear and effectively tank dungeon runs or off-tank if needed. In raid, they could be an offtank who does decent DPS when not tanking.
- Some Hardcore raid groups might run 2 main tanks (both deep prot) and the rest warriors as Fury or Fury-Prot who can step in if MT dies (god forbid) or to tank trash.
One scenario: an AQ40 or Naxx attempt by Hardcore players would likely require more tanks (like 4 horsemen). Those extra tanks could be Fury/Prot builds so they are useful DPS on other fights but can tank when required.
From the HC perspective on forums: one guy suggested dropping some Fury Prot points in Improved HS and cruelty and taking Deep Wounds since no debuff cap, as an early compromise. Hard to parse, but seems like creative hybrid to maximize threat via Deep Wounds while still mostly prot.
In summary: Fury Prot is less about survival and more about threat. If DPS are going slow anyway, full Prot might be fine for threat. So I'd expect main tanks = deep prot, offtanks = fury prot or arms prot hybrids, dps = fury or arms (for PvP). Each raid will figure out their comp.
Gear Progression at 60 (Pre-Raid BiS)
Once at 60, gearing up is a major task in itself, especially if you aim to raid. You have to run high-level dungeons which are dangerous, but necessary for best gear.
Pre-raid BiS for Warrior Tank:
- Helm: Helm of the Executioner (Stratholme undead drop) or Felsteel Helm (DM West quest). Eventually Onyxia's Head quest for Onyxia Tooth Pendant (neck) and Helm of Wrath from Ony if raiding.
- Neck: Medallion of Grand Marshal Morris (Strath UD) for defense, or Strength of Mugamba (Zul'Gurub quest).
- Shoulders: Stockade Pauldrons (Strath live), or Wyrmhide Spaulders (UBRS, high stam).
- Back: Crafted Annihilator Cloak (Cloak of Warding from tailoring gives +def and armor).
- Chest: Deathbone Chestplate (Scholo set piece) or Templar Chestplate of Defense from world BoE, or Valor Chest (if one goes the Dungeon set route).
- Bracers: Bracelets of Wrath (MC) eventually; pre-raid Bracers of Heroism (quest reward from turning in Tier0.5), or Valor Bracers (Strath drop).
- Gloves: Stonegrip Gauntlets (BRD Arena), or Gauntlets of the Immovable (quest UBRS).
- Belt: Luminary Kilt (UBRS Drakkisath) or Belt of the Sand Reaver (AQ20) if you do AQ20. Pre-raid Deathbone Girdle.
- Legs: Valor Legplates (Strath, etc.), upgrade via Tier0.5 quest line to Heroism Legplates, or Dire Maul quest legs Legplates of the Eternal Guardian (DM North tribute chest if memory).
- Boots: Sabatons of the Protector (Timmy in Strath UD), or Master Cannoneer Boots (BRD quest).
- Rings: Naglering (BRD 1% chance drop for +def and dmg proc), Overlord's Crimson Band (+def from UBRS), or tank rings from Argent Dawn rep.
- Trinkets: Force of Will (BRD Arena, great tank trinket with stun resist), Smoking Heart of the Mountain (if you leveled enchanting to 300 to self-make, gives +HP and +def), or Onyxia Blood Talisman from Ony quest (if you get that far).
- Shield: Draconian Deflector (UBRS General Drakk drop) or Skullflame Shield (world BoE, situational), or Aegis of the Blood God (Hakkar ZG). Pre-raid Draconian is big one.
- Weapon: Unstoppable Force (if you PVP rank 4 and buy from AV rep, huge slow 2H for DPS; for tanking, a fast one-hander like Bloodlord's Defender from ZG or Skullforge Reaver from Strat UD). Actually tank might use Thunderfury eventually but that's raiding.
Pre-raid BiS for DPS (Fury):
Focus on high Strength/crit and hit:
- Helm: Lionheart Helm (Blacksmithing crafted BoE – pricey but best).
- Neck: Onyxia Tooth Pendant (if you kill Onyxia early), otherwise Imperial Jewel (quest UBRS) or Mark of Fordring (quest in EPL).
- Shoulders: Truestrike Shoulders (LBRS rare drop, +hit% and AP).
- Back: Cape of the Black Baron (Strath UD, +Hit/crit).
- Chest: Savage Gladiator Chain (BRD Arena chest, high Str/crit) or Breastplate of Heroism (Tier0.5).
- Bracers: Battleborn Armbraces (LBRS, +hit/crit).
- Gloves: Devilsaur Gauntlets (LW crafted, part of set with legs for +hit).
- Belt: Brigam Girdle (BRD Arena, crit/str).
- Legs: Devilsaur Leggings (LW crafted, +hit).
- Boots: Windreaver Greaves (DM West, +hit/agi) or Savage Gladiator Boots (BRD).
- Rings: Blackstone Ring (BRD quest), Band of the Ogre King (DM North Tribute), or Painweaver Band (UBRS Drakk).
- Trinkets: Hand of Justice (BRD Emperor), Blackhand's Breadth (UBRS quest reward). Also Lionheart helm effect acts like mini trinket passive.
- Weapons: Ideally dual wield good 1Hs. Dal'Rend's Sacred Charge + Dal'Rend's Tribal Guardian (set from UBRS) is a solid pair early. Or Mirah's Song (quest UBRS) + a fast offhand. Ironfoe (BRD emperor super rare). Arcanite Reaper (BS crafted 2H) if you go 2H Fury or MS, but Fury DPS will want dual wield: Persuader (BS crafted mace) could be nice if crafted.
- You'll likely spend time gearing in 5-mans and maybe 10-man UBRS/ZG before attempting big raids. Hardcore players often fully gear up to mitigate risk in raids.
- Enchant your gear if possible (e.g., +100 HP on chest, +9 Stam on bracers, etc., for tanks; +Str/Agility enchants for DPS). Ask guild enchanters.
One more Hardcore thought: Without trading AH (if SSF or just economy resets), getting all BiS might be slower. But as a Warrior, you'll want to at least hit certain defense and damage thresholds before raids.
| Slot | Fury DPS Item | Protection Tank Item |
|---|---|---|
| Helm | Lionheart Helm | Helm of the Executioner |
| Chest | Savage Gladiator Chain | Deathbone Chestplate |
| Legs | Devilsaur Leggings | Valor Legplates |
| Key Trinket | Hand of Justice | Force of Will |
Advanced Warrior Techniques (Hardcore)
Now let's discuss some advanced tactics specific to Warriors which can give you an edge in Hardcore:
Hamstring Kiting & Backpedal Jumping
We touched on Hamstring kiting earlier. To elaborate: Warriors can exploit the swing timer mechanic to avoid damage. A typical strategy for a tough melee enemy:
- You engage and attack normally to generate some rage.
- Apply Hamstring to slow the enemy.
- Turn and create distance: You can do a strafe-run or even backpedal (though backpedal is slower; many prefer jump technique).
- The idea is to get just far enough that the mob has to run to hit you, which takes them longer due to the slow, effectively causing them to miss a chance to hit you while your weapon cooldown ticks.
- Once your next auto-attack is ready (watch a swing timer or roughly time your weapon speed), step in (or turn around) and let your hit connect, then immediately move out again.
- This way, you are only in the mob's melee range at the moment you deliver your hit. The rest of the time, the mob is chasing you but not hitting (or hitting much less).
- Backpedal Jump: A trick to keep facing the target (so your swing still goes off) while increasing distance is to backpedal slightly and then jump and spin your character mid-air to land further away. Many warriors will backpedal just to keep the mob in front (to not get dazed by being hit in the back) but since backpedal is slow, they incorporate jumps. You can actually run forward, jump through the mob, turn 180 midair and land further behind the mob now facing it – a complex maneuver but effectively you're leashing it.
- Practice this on a non-threatening mob to get the rhythm. With a slow 3.5 speed weapon, you have a big window to move. With a faster weapon, less window, so easier with slow weapons.
- The goal is to significantly reduce the number of hits you take. Some warriors report killing elites or higher level mobs by hamstring kiting (hit, run out, repeat).
- Be careful: if you create too much distance and the mob resets (evades), you wasted time. If you don't create enough, they might still hit you. And if you move too far, they may start fleeing to reset (which can actually be used intentionally to leash).
- Another use is "die by leashing": If you can't kill a mob, you can try to hamstring and keep it chasing you until it resets from range. That's safer than flat out running at normal speed because hamstring ensures you keep some distance.
Stance Dancing & Macros
Warriors have a high skill cap due to stance dancing. Macros can automate some of it:
- One-button Intercept/Pummel/Overpower: These macros check your stance, switch if needed, use the ability. For example:
Intercept Macro: If you're not in Berserker, go Berserker Stance, then cast Intercept. (Add /startattack too perhaps).

Overpower Macro: If not in Battle, go Battle, cast Overpower.

Shield Bash Macro: First equip shield + one-hander, then cast Shield Bash. Very useful to quickly interrupt.

Stance+Taunt Macro: Cast Defensive Stance, then Taunt.

Stance+Mocking Blow Macro: Battle Stance then Mocking Blow.

Stance+Pummel Macro: Berserker then Pummel.
These save critical seconds. (The HC guide listed these, e.g., shield bash equip macro, and stance cast macros.)
- Cancelaura macros: If using Recklessness or Death Wish (which increase damage taken), you might have a macro to cancel them if things go bad (e.g., /cancelaura Recklessness).
- Weapon swap macros: One to equip shield+1H (for emergency, or before using Shield Wall), and one to re-equip 2H or dual wield. You can even tie them: for example, a macro that casts Shield Wall will first equip your shield (maybe need a small /wait or use /equipset if using a gear manager).
- Heroic Strike Queue macro: They provided one macro to toggle HS queue. Press once to queue HS, press again to cancel. Honestly, in HC this might be seldom used, but for those who want max DPS and can handle the extra APM safely, it's there.
Stance dancing in Hardcore mainly is for interrupts: e.g., you are tanking in Defensive but boss is not tauntable and about to fear, you dance to Berserker for Berserker Rage and back. Or in DPS role, you want to use Overpower procs from a stance you're not currently in.
Important: Tactical Mastery talent is what makes stance dancing feasible by preserving rage. Always have at least 3/5 (15 rage kept) or ideally 5/5 (25 rage) if you plan to stance dance often in combat.
Engineering Tricks (Grenades & Dummies)
We've talked about these but to recap advanced uses:
- Grenades: You can pre-cast a grenade (they have a cast time) and time it to hit right as you charge in – the mob gets stunned and you get initial rage safely. You can also jump into a pack and grenade to AoE stun them giving your healer time to breathe. Just careful not to break CC.
- Target Dummy: Higher-level target dummies (Advanced, Masterwork) have more health and taunt better. Learn how long they last (~6 seconds for Target Dummy, 10 for advanced, 15 for masterwork). Use them when you're definitely going to run so mobs hit dummy while you escape. Or in a dungeon if tank (you) is dying and healer OOM, drop a dummy and step back to bandage or pop a potion on cooldown.
- Mind Control Cap (Eng gadget): This can mind control a humanoid – could use to have one mob fight another or to stop a dangerous mob for a time. Risky (can backfire).
- Goblin Rocket Boots: gives you sprint but might malfunction and blow up; in Hardcore that's a risk (taking big damage if they fail). Possibly worth if you accept that risk for an escape tool.
- Gnomish Battle Chicken: at 230 eng, summons a chicken pet that fights for you for 2 mins. RNG to get a haste aura. Not exactly a lifesaver, but extra DPS.
Other Advanced Tips
- Leashing mechanics: Understand them. Each mob type has a reset point. Indoors, usually they follow longer. Outdoors, they have a set distance from spawn. If you're trying to reset, sometimes running through another group of players can dump aggro onto them (not nice, and in HC often disabled by tag rules). Ideally, run far or use terrain exploits (jump off a ledge, sometimes mobs path weird and reset).
- Patrol awareness: Always keep your camera panned around. Use third-person view (zoom out) to watch for wandering mobs. Many HC deaths come from a pat that comes at worst time. E.g., you're eating after a tough fight and a stealthed rogue NPC walks up behind you...
- Know enemy abilities: Some mobs do enrage at low health (do more dmg), others flee at low health (net them or save a stun for <20%). Some cast nasty spells (carry restorative potions or interrupt them).
- Consumable stacking: You can stack certain consumes: Elixir of Fortitude + Elixir of Greater Defense + Spirit/Agility scroll etc., and a food buff. Use them for tough segments. Also Lesser Stoneshield Pot (2000 armor for 2 min) is huge for a tough elite fight at mid levels.
- Kiting as tank: If a boss is unkillable, sometimes the strategy is to kite it while others dps it slowly (like kite in circles, especially if boss is slow). Warriors can use Piercing Howl (AoE slow, Fury talent) to kite multiple mobs as a last resort.
- Duel/WPvP: On PvP servers, if you're flagged or someone attacks you, hardcore becomes truly hardcore. Warriors aren't great at escaping ganks, but if you have engineering, you have a better shot (net them or grenade and run, or retaliate if melee, etc.). But ideally, avoid PvP if doing Hardcore (on official HC, it's PvE servers typically).
- Macros to target last target after fear: If you Intimidating Shout and flee, mobs drop aggro at reset, so careful if you go back too soon they might surprise you. There's not much macro needed for that, just awareness.

Frequently Asked Questions (FAQ)
Many in the community would say yes – Warriors have a very high death rate at low levels and struggle without gear or support. However, "hardest" doesn't mean "not doable". With patience and knowledge (like using all the tips in this guide), Warriors can absolutely make it to 60. The popularity of Warriors in HC shows that many take on the challenge and succeed. It just requires more caution. Classes like Hunter or Mage are easier due to pets/kiting, but Warriors can brag they leveled with pure grit.
For leveling, Arms with a two-hander is considered the best overall due to its steadiness and Sweeping Strikes for 2-mob handling. Fury is fun and can be fast if you play well and have gear, but it's riskier (due to taking more damage from dual-wield misses etc.). Protection is not recommended for solo leveling due to low damage. For endgame, Protection for tanking and Fury for DPS are the best. Many warriors level Arms then switch to Fury or Prot at 60 depending on role.
Casters can be tough because you can't mitigate spell damage with armor. Some strategies: Line-of-sight pull casters to you (so they come around a corner and you can then fight in melee, stopping their casts). Use Shield Bash/Pummel to interrupt important spells (like heals or big nukes). If multiple casters, you might need to retreat or bring a friend. Also, Los pulling multiple casters: shoot one, hide, all come in, one stays to cast you charge that one, etc. If facing a caster 1v1, consider using a shield for extra mitigation and bash. And always keep healing potions ready since their burst can catch you off-guard. You can also get Shadow Resistance gear or potions for areas heavy with shadow casters (e.g., undead zones). In dungeons, coordinate with team to CC or silence casters (e.g., priest can silence, rogue can kidney).
If your current weapon is very outdated (say 10 levels old) and you haven't gotten a drop, buying a vendor weapon is worth it. Vendors in capital cities or certain outposts sell weapons at level 6, 12, 18, 24, etc. For example, the 18/19 green weapons like Executioner's Sword or Merciless Axe can really speed up leveling. They cost some silver (or a few gold for the higher ones), but a faster kill means fewer hits taken, indirectly improving survival. So yes, investing in weapon upgrades is one of the best uses of money for a Warrior. Same goes for if you see a good BoE weapon on AH (if playing with economy) for cheap, grab it.
This is normal early on. A few tips: make sure you keep your gear (especially chest, legs) up to date for armor. Use Food with high regen (buy/make the best food you can for your level, and eat to 100% each time in HC – topping at 50% is risky). Get the First Aid skill up so you can bandage between fights; bandaging is faster than eating but has the combat cooldown. Using a bandage right after a fight, then finishing with food can optimize regen. As you get into 20s and beyond, you will kill faster (with talents and better weapons) so you won't always be so beat up every fight. Spirit helps regen out of combat; you could use a spirit buff if available (like an Elixir of Wisdom – not typical, but if you find Spirit gear it might not hurt early on). Alchemy gives elixir of fortitude (more HP) and defense potions that can reduce damage taken. But frankly, Warriors will have downtime – use that time to plan, watch surroundings, or gather (herb/skin while regening). It improves later with gear and if you duo with a healer, downtime nearly vanishes.
As discussed, Warrior + Shaman (Horde) is excellent, Warrior + Paladin (Alliance) is very safe (paladin can even tank some while you heal with bandages/potions then swap, etc.), Warrior + Priest is also great for high sustain and buffs like Power Word: Fortitude. Even Warrior + Druid (druid can DPS or heal or offtank). Basically, Warrior pairs best with a class that can heal to negate their weakness. Warrior + non-healer can work but is trickier; e.g., Warrior + Mage have good kill speed and Nova/kite tactics, but if Warrior gets low, mage has to take over while warrior bandages, kind of messy but doable. A fun duo is Warrior + Warlock: the warlock's voidwalker can off-tank or sac for shield, and healthstones for warrior, plus warlock can Lifetap and get bandaged by warrior perhaps. Still, any combo without a true healer means you still have downtime. So ideally, bring a healer or hybrid.
Warriors have power spikes and droughts. Generally:
- 1-10 is rough until you get a few abilities and a decent weapon (do your level 10 quest ASAP).
- Early teen levels get better after you get Charge, Bloodrage, etc.
- In the 20s, if you don't have a good weapon, you'll feel weak. Getting something like Whirlwind Axe at 30 will be a huge spike.
- 30-40 with Sweeping Strikes and a good 2H, you feel stronger again.
- 40 is another spike (Mortal Strike or Bloodthirst gained, plate armor).
- 40-50 can actually feel pretty good if your gear is up to par (Warrior starts to outperform many classes in pure melee damage by late game).
- 50-60, if you switch to Fury with good weapons, you start to mow down things fairly fast but still must be careful multi-mob.
So yes, there are phases. Many Warriors say 1-30 is the toughest stretch. If you feel a slump, examine your gear – often upgrading a few pieces alleviates it.
If you leveled Herb/Alch, you may choose to keep that for self-sufficiency with flasks and potions. In a raid guild, sometimes it's good multiple people have Alchemy for cauldrons etc. However, many raid Warriors in Classic switched to Engineering at 60 for the gadgets (reflectors for specific boss abilities, grenades for AQ/Naxx where you might need stun, etc.). Engineering also gives access to Goblin Sapper Charge, which is used in speed clears for burst AoE (but in HC you might not want to blow yourself up). Additionally, Engineering is almost required for tanking later content (for example, Dense Dynamite or Sappers for threat on adds, or rocket boots to reposition, etc.). So if you plan serious raiding, Engineering is amazing. If you can, you might maintain one profession and swap the other: e.g., keep Alchemy for potions, drop Herbalism at 60 and take Engineering (buy herbs from others or have alt supply). Or vice versa. Blacksmithing at 60 can craft some great gear (Lionheart helm, Titanic Leggings, etc.), but you can usually buy those from others; not worth all the time unless you prepared for it. In Hardcore economies might be smaller, so if your guild needs a dedicated BS, it's an option, but Engineering tends to trump BS in utility.
Many elite quests are not meant to be soloed at level – the safest answer is "Don't, unless you outlevel it significantly or can kite it". For example, the Cyclonian (whirlwind quest) – strategies were given like use nature protection pots, or ranged kite cheese. Another example: the group quest in Redridge (Tharil'zun and Gath'Ilzogg in Render's Valley) – you'd either skip or come back at like 28-30 solo or find a group. Hardcore is often about skipping group quests or doing them in group. If you insist on solo, use every trick: consumables, maybe kite to guard, or reset tactics. But the general advice: don't risk elite quests alone when one wrong move ends your character. The risk-to-reward is usually not worth it (the gear from those quests can be replaced by dungeon gear or just leveling beyond it).
If we're talking official HC servers, battlegrounds are enabled but death in PvP also counts as death (your char is gone). So doing BGs is super high risk (imagine dying in a casual WSG ends your PvE progression). Most hardcore players avoid PvP content until maybe they decide their char has done all PvE they wanted and want to "retire" it in a blaze of PvP glory. Duels are safer because a duel loss doesn't kill you. Some people duel to test themselves, but always be careful – a weird glitch (fire reflect trinket, engineering bomb misfire) in a duel could potentially kill someone if not careful. Ensure duel ends at 1 HP etc. I'd say, focus on PvE, treat PvP as a post-60 optional risk if you're bored or on a seasonal server nearing end.
Conclusion
Playing a Warrior in WoW Classic Hardcore is a challenging but immensely rewarding journey. From the first time you pick up a sword in Northshire or swing an axe in Durotar, to the moment you strike down Ragnaros in a one-life raid, you will have truly earned every victory. This guide has walked you through each step: choosing the right race, mastering your Warrior's stances and abilities, leveling strategically, gearing up, and tackling endgame content with the heart of a champion.
In Hardcore, your greatest enemy is often overconfidence and the unexpected; but armed with the knowledge and tips in this guide, you can anticipate dangers and react like a seasoned veteran. Always remember the core Hardcore mantra: "Stay alive!" – sometimes that means fleeing a fight, other times using a health pot at the right moment, or patiently grinding out green mobs for a level. Death is permanent, but with careful play, you can avoid it and bask in the glory of a level 60 Warrior that survived Azeroth's trials.
Whether you choose the honorable path of the tank, shielding allies from harm, or the ferocious route of a dual-wielding Fury DPS, or anything in between, the Warrior class will test your skill and resolve. But as you improve, you'll feel the class's true power unleashed – few experiences in WoW match the adrenaline of a Warrior executing a perfect play (like a clutch Shield Wall at 5% HP or a double crit Whirlwind deleting two enemies).
We hope this guide has answered your questions and provided a solid roadmap for mastering the Warrior in WoW Classic Hardcore. The road won't be easy – but then, "Victory is ours (…perhaps you'll add "Lok'tar Ogar!" or "For the Alliance!" depending on your faction) – because with preparation and courage, you will overcome the odds." Now steel yourself, sharpen your blade, and go write your own legend in the annals of Hardcore Classic. For Azeroth, Warrior!