
Equilibrium takes Guardians to Venus to confront Bael's newly formed Dredgen fleet across Imperial ships before a final showdown with Dredgen Sere. Compared to recent dungeons like Vesper's Host and Sundered Doctrine, this one's notably more forgiving for solo players. This guide covers everything you need to clear it, including builds for all three classes, full encounter breakdowns, and strategies for that coveted solo flawless emblem.
Requirements and Access
Before you can enter Equilibrium, you'll need to meet a few prerequisites.
Base Requirements
- Own the Renegades DLC
- Reach Power Level 370
- Complete "The Way Between" Pursuit from Aunor in Tharsis Outpost Cantina
- Progress through at least Step 5 of the main Renegades story quest to unlock the Pursuit
- Reach at least Step 2 of the Pursuit to access the dungeon
Finding the Dungeon
The dungeon icon shows up on Venus in the Destinations screen. You can also launch through in-game LFG. The activity went live on December 13, 2025 at 9:00 AM PST (UTC -8).

Understanding Shadow Power
Equilibrium introduces Shadow Power as the primary survival and damage tool throughout the dungeon. Getting comfortable with this system is crucial for success.
How Shadow Power Works
Shadow Power replaces your grenade ability slot when active. The system has three tiers:
- Gathering Shadow - The initial collection phase where you accumulate shadow energy
- Shadow Novice - First tier buff, unlocks basic shadow abilities
- Shadow Apprentice - Second tier buff, required for advanced mechanics
- Shadow Master - Third tier buff, used primarily in the final encounter
Collecting Shadow Energy
You gather shadow energy by:
- Picking up darkness pools scattered throughout encounter areas
- Killing certain enemies who drop darkness pools upon death
- Riding vehicles through shadow collection routes (first encounter)
The Renegade Ability Swap
This is important: while you have any Shadow buff active, your grenade slot transforms into a Shadow Force Pulse ability. You can switch between the Shadow ability and your actual grenade by pressing your Renegade abilities button (default Z on PC). This lets you keep your build's grenade functionality while still doing dungeon mechanics.
Shadow Buff Timer Management
Shadow buffs last 40-45 seconds. Collecting additional darkness pools refreshes your timer, and killing Nameless Apprentices creates a darkness pool so you can keep the buff going. If you lose your buff, you'll have to start collecting from scratch.
Build Recommendations
All three classes can complete Equilibrium solo flawless without too much trouble. The strategies are similar across classes with only minor differences in execution.
General Build Philosophy
For solo content, focus on:
- Survivability over raw damage output
- Self-healing capabilities
- Consistent damage that doesn't require complex setups
- Panic options for emergencies
Warlock Builds
This build remains one of the strongest options in the game for solo content, giving you excellent survivability and consistent damage.
Exotic Armor: Getaway Artist
- Consuming your Arc grenade converts it into an Arc Soul and makes you Amplified
- The Arc Soul provides consistent damage and triggers various buffs
Subclass Configuration
- Super: Song of Flame (provides damage resistance and synergizes with Praxic Blade)
- Grenade: Storm Grenade (required for Getaway Artist consumption)
- Aspects: Hellion - Great for overall damage through scorch and ignitions; Feed the Void - Devour provides exceptional survivability and grenade regeneration
- Melee: Arcane Needle (three charges for consistent uptime)
- Class Ability: Phoenix Dive (emergency healing)
Fragment Selection
- Facet of Dominance - Arc grenades jolt targets, so your Arc Soul constantly jolts enemies. During Transcendence, grenades become Void for weakening
- Facet of Hope - Maximum uptime on Phoenix Dive for healing
- Facet of Protection - Bonus damage resistance when surrounded by combatants
- Facet of Courage - Arc, Solar, and Void abilities deal increased damage to targets with darkness debuffs (synergizes with Arcane Needle's unraveling)
Armor Mods
Helmet: Harmonic Siphon (matches SMG element with super), Dynamo (bonus super energy on dive)
Gauntlets: Kinetic Siphon (orbs from Praxic Blade kills), Firepower (grenade final blows create orbs, works with Arc Soul and Hellion), Momentum Transfer (melee energy from grenade damage), Bolstering Detonation (class ability energy from grenade damage). Alternative: Font mods if you need help reaching 200 Grenade stat
Chest Piece (adjust per encounter):
- First Encounter: Concussive Dampener, Solar Resistance, Void Resistance
- Second Encounter: Melee Damage Resistance, Double Void Resistance
- Final Boss: Concussive Dampener, Double Arc Resistance
Boots: Double Kinetic Weapon Surge (17% damage bonus for Praxic Blade), Harmonic Scavenger
Class Item: Reaper, Powerful Attraction, Time Dilation
Artifact Perks
- Swordstorm Combo - Bonus damage
- Kinetic Rupture - Additional damage (occasionally procs with Praxic Blade)
- Combination Argent Blade - Extra damage on activation
- Singularity Blade - While you have a Void elemental buff (including Devour), melee and sword hits weaken targets. This significantly improves DPS
- Kinetic Synthesis - Sustained kinetic weapon damage generates ammo bricks, maintaining Praxic Blade ammunition
Weapon Loadout
- Kinetic: Praxic Blade (Exotic Sword) - No upgrades required for success. Balance Form (base form) works fine; Offensive Form adds roughly 10% boss damage. Impact Core (available from Tharsis Outpost for 4,000 credits) adds scorch to swings while in Song of Flame
- Energy: Any ad-clearing weapon (machine guns work well for snipers)
- Heavy: Eager Edge sword for traversal speed (optional, can use machine gun for safer gameplay)

Hunter Builds
This build provides near-permanent overshields and significant damage bonuses while keeping you alive through almost anything.
Exotic Armor: Fortune's Favor (Renegades campaign reward)
- After landing a final blow at full health or being out of combat, shields slowly recharge into an overshield
- While you have any overshield (from any source), you deal 15% bonus weapon damage and 20% bonus Heavy weapon damage
- Overshields also provide damage resistance
Subclass Configuration
- Super: Shadowshot: Deadfall (35% weaken debuff on tethered targets)
- Grenade: Grapple Grenade (mobility and strong grapple melee damage)
- Aspects: Ascension - Jolt enemies and become Amplified for damage resistance and enemy inaccuracy; Stylish Executioner - Defeating elementally debuffed targets grants invisibility (makes mechanics phases extremely safe)
- Melee: Threaded Spike (severs targets, reducing their damage by 40%)
Fragment Selection
- Facet of Purpose - Picking up orbs of power grants overshield based on super damage type (Void = overshield, which triggers Fortune's Favor)
- Facet of Blessing - Melee final blows start health regeneration (works with Threaded Spike and grapple melee)
- Facet of Protection - Increased damage resistance near multiple combatants
- Facet of Dawn - Powered melee hits grant Radiant (bonus weapon damage, stacks with Fortune's Favor bonus)
Armor Mods
Helmet: Heavy Ammo Finder, Special Ammo Finder, Siphon matching primary weapon element
Gauntlets: Heavy Handed (powered melee final blows create orbs, works with Threaded Spike and grapple melee), Focusing Strike (melee damage grants class ability energy), Impact Induction (melee damage grants grenade energy)
Chest Piece (adjust per encounter):
- First Encounter: Concussive Dampener, Double Solar Resistance
- Second Encounter: Melee Damage Resistance, Double Void Resistance
- Final Boss: Concussive Dampener, Double Arc Resistance
Boots:
- First Encounter: Double Kinetic Weapon Surge, Kinetic Scavenger
- Second/Third Encounters: Double Solar Weapon Surge, Solar Scavenger
Class Item: Reaper, Time Dilation, Powerful Attraction
Artifact Perks
- Kinetic Synthesis - Sustained kinetic damage generates ammo bricks (primarily for first encounter with Microcosm)
- Singularity Blade - While you have a Void elemental buff (overshield or invisibility from Stylish Executioner), melee and sword hits weaken targets
- Swordstorm Combo
- Void Infestation
- Combination Argent Blade
- Power from Pain
Weapon Loadout
First Encounter:
- Mida Retrograde (or any solid primary)
- Any energy weapon
- Microcosm (Exotic Trace Rifle) - With Kinetic Synthesis, you basically have infinite ammo and can safely eliminate all threats from range
Second and Third Encounters:
- Mida Retrograde (or preferred primary)
- Any energy weapon
- Wolfsbane (Exotic Axe) with Attrition Orbs catalyst
Getting Wolfsbane with Attrition Orbs
- Load into the Helios exotic mission through the portal in the Pinnacle Ops tab on Master difficulty or higher
- At the very beginning of the mission, grab the radiation shielding from the Scion
- Run through the radiation briefly
- Immediately take a hard right, there's a data pad in the corner
- Pick up the data pad
- Refresh your radiation shielding at the next Scion
- Plug the data pad into the nearby computer
- Complete the mission
This takes about 10-15 minutes and dramatically improves your solo flawless experience.
Titan Builds
The classic "bonk hammer" build provides absurd damage output and excellent survivability through Sunspot generation.
Exotic Armor: Wormgod Caress
- Defeating targets with melee or finishers grants escalating melee damage (Burning Fists)
- Stacks up to 5x, decays over time
- At 2+ stacks, Throwing Hammer one-shots most non-boss enemies
- At high stacks, provides exceptional boss DPS
Subclass Configuration
- Super: Hammer of Sol (panic option) or Burning Maul (final boss alternative)
- Grenade: Healing Grenade (emergency healing, frequently available due to Sunspot regeneration)
- Melee: Throwing Hammer
- Aspects: Sol Invictus - Solar ability final blows, Hammer of Sol impacts, and defeating scorched targets create Sunspots. Standing in Sunspots grants increased ability regeneration and Restoration; Roaring Flames - Solar ability final blows and ignitions increase Solar ability damage, stacking 3x
Fragment Selection
- Ember of Torches - Powered melee attacks against combatants make you Radiant
- Ember of Solace - Radiant and Restoration effects have increased duration
- Ember of Ashes - Apply more scorch stacks for more frequent ignitions
- Ember of Searing - Defeating scorched targets grants melee energy and creates a Firesprite (grants grenade energy when collected)
Armor Mods
Helmet: Harmonic Siphon (if using Solar energy weapon), Double Special Ammo Finder
Gauntlets: Heavy Handed, Melee Font mods as needed to reach 200 Melee stat
Chest Piece (adjust per encounter):
- First Encounter: Concussive Dampener, Solar Resistance, Void Resistance
- Second Encounter: Melee Damage Resistance, Double Void Resistance
- Final Boss: Concussive Dampener, Double Arc Resistance
Boots: Double Strand Weapon Surge (if using Mida Retrograde), Invigoration (reduces melee cooldown when picking up orbs, recovery option if you lose your hammer)
Class Item: Reaper, Time Dilation, Powerful Attraction
Weapon Loadout
First and Second Encounters:
- Mida Retrograde (long-range option for snipers and distant targets)
- Any energy weapon
- Tractor Cannon (boss DPS) or Eager Edge sword (traversal)
Final Boss Alternative Setup
Some players prefer switching to a ranged DPS strategy for the final boss to avoid getting knocked around during melee DPS. This involves:
Exotic Swap: Pyrogale Gauntlets
Super Swap: Burning Maul
Weapons:
- Mida Retrograde with Rewind Rounds and Bait and Switch (primary DPS weapon)
- Unrivaled Discourse or similar special weapon (for breaking boss's lightning hands quickly)
- Tractor Cannon
This setup provides safer DPS phases but requires more phases to complete the fight (4-5 phases vs 2-3 with Wormgod melee).
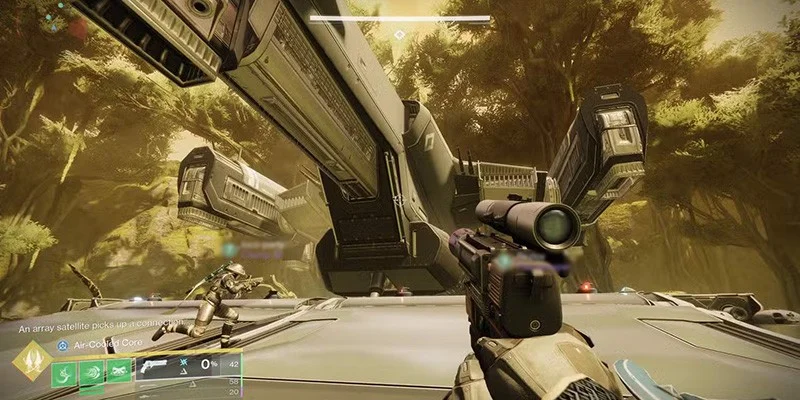
Encounter One: Harvester Boarded
The first encounter introduces Shadow Power mechanics while testing your ability to manage multiple enemy types under time pressure. The arena features a Harvester ship in the center surrounded by three locked sections.
Encounter Overview
Objective: Collect Shadow Power, defeat Nameless Apprentices, and eliminate Goliath Walkers
Enrage Timer: 5 minutes
Key Mechanics:
- Shadow Power collection via vehicle route
- Generator destruction to open pathways
- Nameless Apprentice shield mechanics
- Goliath Walker spawns
Phase 1: Initial Wave and Generator Setup
Interact with the Harvester ship in the center to start the encounter, then clear the first wave of enemies immediately. Three Cabal drop pods land shortly after, each delivering a Nameless Apprentice with an immune shield.
Phase 2: Opening the Ring Route
The arena has three sections blocked by red shield walls. To open each section:
- Position yourself near a generator
- Bait a Nameless Apprentice to use its explosion attack near the generator
- Activate the generator so its core is exposed
- The Apprentice's explosion hits the exposed core, destroying the generator
- The corresponding shield wall drops
The Nameless Apprentice explosion attack requires line of sight. If you position cover between yourself and the Apprentice, the attack deals zero damage. Use this to safely bait attacks near generators.
Phase 3: Vehicle Shadow Collection
Grab a Sparrow or Falcon vehicle and ride the outer ring, collecting darkness pools. Watch for "Creeping Shadows" since you'll die if you miss pools for too long. Continue collecting until you reach Shadow Novice.
Even after reaching Shadow Novice, keep collecting pools to refresh your timer. This gives you maximum time when you return to combat.
Phase 4: Defeating Nameless Apprentices
There are six Nameless Apprentices total. For each one:
- Wait for the Apprentice to charge its explosion attack
- Use the Shadow Force Pulse ability during the charge animation
- This staggers the Apprentice and drops its shield
- Kill the now-vulnerable Apprentice
- Collect the darkness pool it drops to refresh your Shadow Novice timer
Press your Renegade ability button (default Z) to swap between Shadow Force Pulse and your regular grenade. This lets you keep your build's grenade functionality.
Phase 5: Managing Walkers
Each Nameless Apprentice you kill spawns a standard Walker. These are manageable but can overwhelm you if ignored.
Stay on the arena's outskirts since drop pods land near the center and will one-shot you. Defeat Walkers between Apprentice kills to prevent them from stacking up. One player can ride the loop while teammates control Walkers near generators. Call out refresh pools so teammates don't accidentally take your Shadow buff.
Phase 6: Goliath Walkers
After killing all six Nameless Apprentices, three Goliath Walkers spawn. These are significantly tankier and deal much more damage than standard Walkers.
Titan Strategy: Pop your Super to quickly eliminate them. Throwing Hammer one-shots them with enough Wormgod Caress stacks. Use the opened Praxic Temple room as a safe zone to recover.
Warlock Strategy: Use Song of Flame for near-invincibility while dealing damage. You can retreat to the Praxic Temple room and use Falcons/bikes to chip damage safely. Let Arc Souls and Hellion do passive damage while staying mobile.
Hunter Strategy: Drop Shadowshot: Deadfall for the weaken debuff. Threaded Spike severs targets, reducing their missile barrage damage by 40%. Microcosm provides safe, infinite-ammo damage from range.
Class-Specific Tips
All Classes: The Praxic Blade block makes you nearly immune to all damage in this encounter. Use it if you get caught out of position. Don't rush since you have 5 minutes, and deaths reset significant progress.
Warlock: You can't swap to Shadow Force Pulse while Transcendent, so plan your Transcendence usage accordingly. Devour from Feed the Void provides excellent sustain during Walker phases.
Hunter: Stylish Executioner invisibility makes add management trivial. Threaded Spike's sever debuff dramatically reduces incoming damage.
Titan: Create Sunspots constantly for Restoration uptime. If you lose your hammer, your scorching punches with Roaring Flames active quickly regenerate it via Ember of Searing.
First Traversal Section
The path from Encounter One to Encounter Two contains several dangerous sections that have ended many solo flawless attempts. Take your time because there's no rush.
What You'll Need
For the most dangerous jump, you need ONE of the following:
- Eager Edge sword
- Grapple Grenade (Strand subclass)
- Strafe Glide (Warlock, appears to ignore the push effect, though this may be unintended)
Initial Hallways
Move forward from the first encounter completion. Climb boxes and shoot the first vent, then squeeze through small hallways until reaching a green-lit door. Stack on the door plate (solo players just approach) and it opens.
Cabal Ship Interior
Skip the large Cabal enemies since fighting wastes time and ammo. Continue forward through the linear path. Titans can use Throwing Hammer kills to create Sunspots for healing.
Three Power Coils Room
Enter the room with three small power coils. Shoot two coils on the right side and one coil above the door on the left. The windows open, revealing the ship flying through space.
The Dangerous Jump (Slipspace)
The ship's momentum pushes you to the right during the jump. Without assistance, Warlocks especially struggle to make this gap.
Solutions:
- Eager Edge Sword: Start from the far left platform, jump, then swing to cover the distance
- Grapple Grenade: Grapple to the destination platform
- Strafe Glide (Warlock): Appears to ignore the push effect (use at your own risk since it may be a bug)
Post-Jump Interior
After landing, head inside and go far left. Shoot a small power coil to drop a Cabal shield, then shoot the next exposed power coil to keep the bay door path open.
Explosive Vent Danger Zone
This section contains explosives with a massive blast radius.
Approach the vent containing explosives but do NOT enter the room. Stand outside the doorway, bait the door open, then back up. Shoot the explosives from maximum distance because the explosion range is deceptive. One player reported dying while standing what seemed like a safe distance away.
Window Hazard Room
This room has a window that can break if damaged too much. If broken, it creates suction that pulls players toward space. Skip fighting enemies here entirely and run past quickly to avoid accidentally damaging the window.
Final Approach
Continue through corridors and vents. One room has a kill window that blows out, so hug safe space and stay alert. Navigate through more vents and tight halls. Rally banner appears before the second encounter.
General Traversal Tips
You don't need to kill most enemies in traversal sections. Eager Edge sword lets you skate past dangerous rooms quickly. Keep your healing grenade ready for emergencies. Phoenix Dive (Warlock) and Throwing Hammer Sunspots (Titan) provide healing opportunities. Take your time since a jumping puzzle death is the most frustrating way to lose a flawless run.
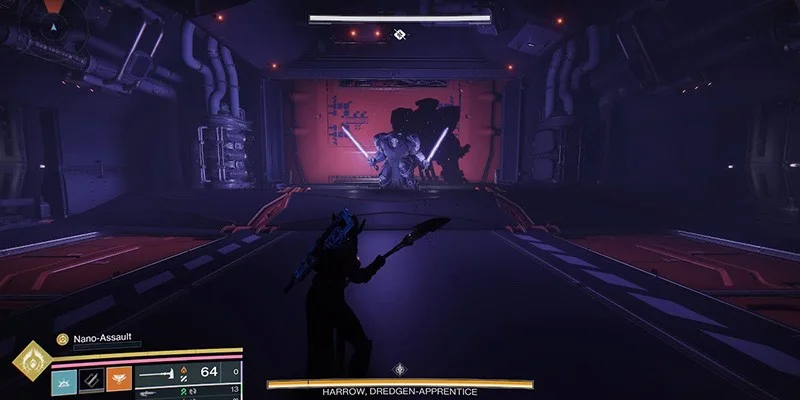
Encounter Two: Harrow's Decree
The second encounter introduces Harrow, a Cabal Dredgen wielding two blades. This fight tests your ability to manage mechanics while avoiding a mobile, aggressive boss.
Encounter Overview
Objective: Complete room switches, remove Harrow's shield, deal damage during windows
Key Mechanics:
- Shadow Apprentice requirement for switches
- Harrow's Decree teleport attack
- Floor trap and generator shield damage
- Final stand chase sequence
Phase 1: Escape the Starting Room
You begin trapped in a room with Harrow. The doors only open when Cabal enemies push through from outside.
Jump over Harrow's head since melee enemies in Destiny can't function when you jump directly over them. Wait for doors to open, then slip through quickly. Watch out for the doors though. If they close while you're passing through, they can fling you into walls and leave you one-shot. Keep your healing grenade ready.
Phase 2: Building Shadow Apprentice
The outer area contains three rooms with switches. You need Shadow Apprentice (tier 2) to activate them.
Kill Scions in the outer rooms to collect darkness pools. Kill Lackeys for additional darkness pools. Build from Shadow Novice to Shadow Apprentice and maintain the buff by continuing to kill enemies that drop pools.
Phase 3: Understanding Harrow's Decree
When "Harrow's Decree" appears at the top of your screen, Harrow is hunting you and may teleport to your location.
Survival Options:
- Keep Moving - If you stay mobile, Harrow often gives up (you'll see "Harrow evades your sight")
- Run Away - Simply outrun Harrow if he appears
- Line of Sight - Get behind cover; his explosion attack requires line of sight
- Shadow Force Pulse - Use the ability to interrupt his attack
- Praxic Blade Block - Blocks virtually all damage from his explosion
The Shadow Force Pulse interrupt can feel inconsistent. Praxic Blade blocking is the most reliable defense.
Phase 4: Completing Room Switches
Each of the three outer rooms contains three switches that must be hit in quick succession.
Enter a room with Shadow Apprentice active and locate all three switches. Hit them rapidly since the door lights only stay green when hits are close together. Switches can be hit in any order. Repeat for all three rooms. While completing switches, occasionally kill Scions to maintain your Shadow buff.
Phase 5: Central Room Generators
After completing all outer room switches, return to the center. You'll need to flip central switches to power electrical generators. Keep Shadow Apprentice active via Scion kills and prepare for the shield damage phase.
Phase 6: Removing Harrow's Shield
Harrow's shield can be damaged in two ways:
Method 1: Floor Traps (33% shield damage each)
Bait Harrow over a trap floor spot and shoot the ceiling fuses to open the floor. Harrow falls through, taking 33% shield damage. Repeat as needed.
Method 2: Generator Smash (Remaining shield)
Position near an active electrical generator. Bait Harrow into swinging at you. His swing hits the generator, dealing shield damage.
DPS Extension Option (Not Recommended for Solo Flawless): Some players activate a generator and bait Harrow into hitting it mid-DPS to extend the damage window. While effective, this adds unnecessary risk. A safe 3-phase beats a risky 2-phase.
Phase 7: DPS Phase
Once Harrow's shield is down, damage begins.
Warlock Setup: Eat your grenade for Arc Soul BEFORE Harrow exits the floor trap. After landing both Shadow Force Pulses, switch to your regular grenade (press Z). Pop Transcendence. Throw Arcane Needle for weaken. Throw grenade (becomes Void during Transcendence, applies weaken). Pop Song of Flame. Praxic Blade: Light, Light, Light, Heavy combo repeated. Song of Flame's damage resistance makes Harrow nearly harmless. If Song of Flame ends before DPS phase, Phoenix Dive or create distance.
Hunter Setup: Shadow Force Pulse twice to start DPS. Pull out Wolfsbane. Hold reload to activate Nano-Assault mode. Perform the standard Wolfsbane combo: Light, Light, Heavy (with Swordstorm Combo artifact perk). Repeat Light, Light, Heavy until Nano-Assault expires. Spam light attacks to rebuild Nano-Assault meter. Reactivate and repeat. Orbs from Attrition Orbs constantly refresh overshield via Facet of Purpose.
Titan Setup: Before DPS, prime Wormgod Caress to 4-5 stacks by killing adds. Make sure Roaring Flames x3 is active. Boop boss with Tractor Cannon. Throw hammers rapidly. Try to position in a corner to reduce knockback. Kill any nearby adds to refresh Roaring Flames and Burning Fists. Throw healing grenade if health gets low.
After DPS Phase: Harrow immediately performs his explosion attack. Counter with Praxic Blade block, line of sight (get behind cover), Shadow Force Pulse interrupt, or simply run away.
Phase 8: Final Stand
When Harrow reaches his final stand threshold, damage stops and he runs.
Final Stand Approach:
- Eliminate Scorpius Turrets first since these are the most dangerous enemies
- Use Mida Retrograde or similar to pick them off from safety
- Follow cautiously and don't rush after Harrow
- Deal some damage, and when his shield returns, don't panic
- A floor trap respawns that you can use to remove his shield again
- Out of Shadow buff? Centurions respawn to provide new darkness pools
- Repeat as needed since you can break his shield unlimited times
The shielded Centurions add danger in the confined space. Play cautiously and use all available resources. Let Harrow come to you near the floor trap. Use Tether (Hunter) or Super (Titan) if available for a quick conclusion.
Second Traversal Section
The second traversal section is longer than the first but generally less dangerous once you know the path.
Recommended Loadout Adjustments
Keep a long-range weapon (Scout Rifle works well for Scion snipers). Eager Edge sword is recommended but not required. Grapple Grenade provides emergency recovery for failed jumps.
Initial Ship Exit
Collect Shadow Apprentice buff at the start. Hit two red-lit switches. Activate the nearby console. A window opens to the exterior space.
Ship-to-Ship Jump
A second Cabal ship pulls alongside. Drop down and land on the side platforms. Move platform to platform until reaching the airlock area. Activate both airlocks to open the door and enter the ship interior.
Behemoth Room and Crane
A Behemoth blocks progress here, and this one MUST be killed. After killing it, use the central console to activate cranes. Moving platforms become available.
Crane Platform Strategy: Approach the platform to the right. Wait for it to complete one full cycle (up and down) before boarding. This prevents jumping as it rises and miscalculating. Once aboard, ride to the upper ship path. Continue through vents and tight halls.
Under the Tank
Pass under a Cabal tank. Face a confusing split in the path. The correct route is the vent that leads into a room containing another vent inside. The wrong vents lead to dead ends.
Elevated Switch Section
This is the most challenging platforming section:
Refresh Shadow Novice/Apprentice from nearby pools. Navigate the wall route quickly. Hit the switch before your timer expires. The switch opens the next passage.
Recommended Platform Path (from the bridge looking at the structure):
- Start by looking left and jump to that platform
- The hardest jump follows, so aim for the mantle
- Continue upward using visible platforms
- Turn 180° when needed
- Look up and to the right for the next platform
- Reach the clamp/switch on the left side
- Hit it to progress
Keep your sword ready since a swing can save a failed jump. Grapple Grenade provides emergency recovery. Scout Rifle helps eliminate Scion snipers harassing you. Take your time because no timer is pressuring you.
Goliath Walker Bypass
After the switch section, a Goliath Walker guards an area. Take a hard left immediately and run through the door. You don't need to fight it.
Final Approach
Pass through a green-light team door (stand near it solo). Push past large Cabal enemies. Enter the airlock. Two enemies must be killed to open the final door. Rally flag appears before the final boss.
Final Boss: Dredgen Sere
The final encounter against Dredgen Sere introduces the most complex mechanics in the dungeon, including dimension swapping and coordinated orb destruction.
Encounter Overview
Objective: Destroy five Taken Orbs in both dimensions, then damage Dredgen Sere
Key Mechanics:
- Lightning Hands interrupt
- Lure of the Dark dimension teleport
- Shadow Master and Compel mechanic
- Lightning field during and after DPS
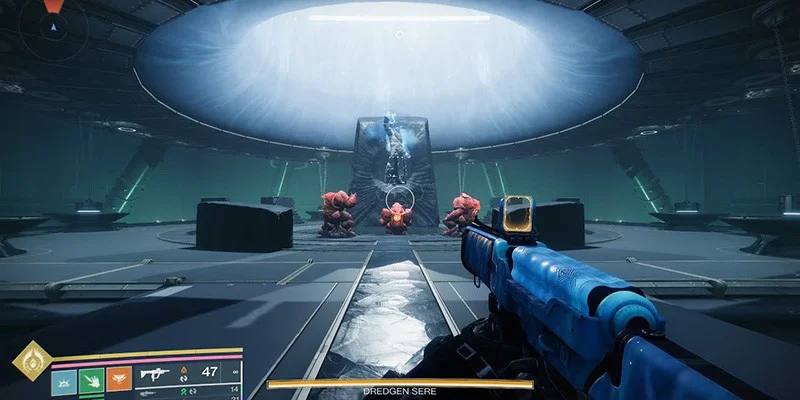
Arena Layout
The arena is circular with floating platforms. Key elements include five central orbs behind the boss (both dimensions), four front lightning pylons (must be deactivated before DPS), and additional pylons around the arena (less critical). One Blighted Shadow enemy sits on an elevated platform.
Understanding Dimension Mechanics
Normal Dimension: Where you start and where DPS occurs. Contains Nameless Apprentices with shields. Breaking all five orbs here is part of the objective.
Ascendant/Taken Dimension: You're transported here via "Lure of the Dark" timer. Contains Blighted Shadow enemies. Must destroy five shadow orbs. Can use Compel or Kill strategies.
Lure of the Dark: A timer shows when you'll be teleported. Shadow buffs carry through teleports, so plan your buff levels around teleport timing.
Lightning Hands
Dredgen Sere periodically channels lightning through his hands at a single target. This attack passes through walls, deals ramping Arc damage, and becomes lethal quickly if not interrupted.
Countering It: Watch for the animation/debuff and shoot BOTH of his hands to interrupt. Machine guns provide consistent damage for this. Mida Retrograde works well. Unrivaled Discourse (special hand cannon) can one-shot each hand. Throwing Hammer can hit hands (Titan). Interrupting this attack should be your top priority whenever it happens.
Timing: Lightning Hands occurs shortly after teleporting back to the normal dimension, at approximately 23 seconds remaining during post-DPS lightning phase, and periodically throughout the fight.
Initial Setup Phase (Normal Dimension)
Your immediate priority is finding Incendiors and collecting three darkness pools for Shadow Novice. Remove Nameless Apprentice Shield using Shadow Force Pulse during charge animation. Kill the Apprentice after shield drops and break one central orb. Watch for Lightning Hands and interrupt immediately when it occurs. Build toward Shadow Master by continuing to collect pools from kills.
Ideally reach Shadow Master (tier 3) before your first teleport for Compel access in the Ascendant realm.
Ascendant Dimension Phase
When "Lure of the Dark" teleports you, you'll encounter several Blighted Shadow enemies. For each one, you can either:
COMPEL (Requires Shadow Master):
- Walk up to the enemy and use the Compel ability
- Fills a square on the Lure of the Dark UI
- Unlocks a shot on a central shadow sphere
- Creates a darkness pool for buff refreshing
- DPS phase duration remains full
KILL:
- Simply defeat the enemy
- Faster and doesn't require high buff tier
- Removes 2 seconds from your DPS phase per kill
- Still lets you shoot the corresponding sphere
Kill vs Compel Strategy
Safe Strategy (Recommended for Solo Flawless): Kill enemies you encounter without Shadow Master. Compel when you have Shadow Master available. Don't waste time hunting for buff pools just to Compel. Accept slightly shorter DPS phases for faster, safer clears.
Aggressive Strategy: Always build Shadow Master before engaging. Compel all five enemies for maximum DPS time. Requires more time collecting buffs. More platforming and movement increases death risk.
Returning to Normal Dimension
After destroying all five shadow orbs in the Ascendant realm, you return to the normal dimension. Immediate priorities:
- Lightning Hands - Interrupt within the first few seconds (always happens after teleport)
- Rebuild Shadow Buff - Kill Incendiors for pools
- Deactivate Lightning Pylons - Use Shadow Apprentice to hit the four front pylons
- Continue Orb Destruction - Remove Apprentice shields and break remaining orbs
Pylon Information: The four front pylons MUST be deactivated before DPS. If active during DPS, they create dangerous lightning zones. You need Shadow Apprentice (tier 2) minimum to deactivate pylons. Pylons reactivate after each dimension swap.
Pre-DPS Checklist
Before breaking the final orb:
- All four front pylons deactivated
- Shadow Apprentice or Shadow Master active (preferably Master for post-DPS)
- Weapons reloaded
- Super/abilities ready
- Kill a Nameless Apprentice immediately before starting DPS
Why Kill Apprentice Last: Even after all orbs are destroyed, Nameless Apprentices continue respawning. Wait too long after killing one and another spawns with immunity shield, persisting during DPS. Very annoying.
Ideal DPS Start: Kill Nameless Apprentice (creates darkness pool). Step in pool to refresh Shadow Master timer (45 seconds). Immediately break final orb. Begin DPS with full Shadow Master duration. This lets you deactivate pylons AFTER DPS ends without needing to collect new buffs.
DPS Phase
Starting from Normal Dimension (Preferred):
Warlock: Have Arc Soul active. Break final orb. Pop Transcendence. Melee for weaken application. Void grenade (during Transcendence) for additional weaken. Pop Song of Flame. Wolfsbane: Hold reload for Nano-Assault. Light, Light, Heavy combo. When boss does Lightning Hands, swap to Mida Retrograde, break hands, resume. Watch "Sere's Weakness" timer and exit toward edges when low.
Hunter: Break final orb. Pop Transcendence. Drop Shadowshot: Deadfall (aim at ground to avoid wall collision). Melee for Radiant. Optional: Throw grenade. Pop Ascension. Wolfsbane: Activate Nano-Assault. Light, Light, Heavy combo. Break Lightning Hands with machine gun/Mida Retrograde. Exit toward edges as timer depletes.
Titan: Prime Wormgod Caress stacks and Roaring Flames x3 before DPS. Kill Nameless Apprentice to create Sunspot. Break final orb. Tractor Cannon boop. Deploy Rally Barricade. Activate Unrivaled Discourse for Bait and Switch. Mida Retrograde spam. Mix in Throwing Hammers for Radiant refresh. Reapply Tractor Cannon when damage numbers turn white. Break Lightning Hands. Exit toward edges as timer depletes.
Starting from Ascendant Dimension: If teleported before breaking the final normal orb, complete Ascendant dimension objectives. Activate/maintain Shadow buff. Upon return, handle Lightning Hands. Deactivate necessary pylons (you likely lost your buff or it's low). Then proceed to DPS. This adds time but remains manageable.
Post-DPS Lightning Phase
After DPS ends, lightning activates across much of the arena. This phase intimidates many players but is manageable.
Survival Strategy:
- Stay on the outskirts since the arena edges are safer
- Watch for Lightning Hands at approximately 23 seconds and interrupt immediately
- Avoid the Axe Knight who chases you and maintain distance
- Don't panic because you're waiting for teleport, not accomplishing objectives
- Use Phoenix Dive/Healing Grenade as needed
- If the Axe Knight catches you, Praxic Blade Block his explosion
Movement Pattern: Stick to the front section of the arena. Don't go to the back where you can't see boss's hands for Lightning Hands. Move between: front left corner, front right corner, and back edge of the front platforms. Run circles around the arena outskirts if needed.
You only need to survive one Lightning Hands attack before being teleported back to the Ascendant dimension. Handle it, then focus on survival until teleport.
Repeat Cycle
After teleporting back to Ascendant, kill/Compel the respawned Blighted Shadow enemy. Break the refreshed shadow orb. Collect buff pools (prioritize reaching Shadow Apprentice minimum). Return to normal dimension. Handle Lightning Hands. Deactivate reactivated pylons. Proceed to next DPS phase.
Pylons reactivate each time you're teleported. You'll spend part of each cycle deactivating them.
Once you deal enough damage to trigger normal DPS ending (not the lightning phase), you enter a cleaner cycle.
Platform Danger Zones
Dangerous Pylon: The pylon closest to the arena edge (usually back right) requires standing near the ledge to deactivate. Incendiors often patrol this area and can easily boop you off. Activate Stylish Executioner invisibility (Hunter) before approaching, or clear Incendiors first.
Teleport Boop: If an Incendior or boss attack hits you as you're being teleported, you can be launched off the platform in the Ascendant dimension. The platform directly behind your spawn point is always there. Activate your jump immediately upon gaining control.
Strange Orb (Post-Multiple Phases): After approximately four DPS phases, a large Taken orb with gravitational pull appears in the Ascendant realm. Avoid it entirely because it can yank you off platforms.
Three-Phase vs Four-Phase
Three-Phase Requirements: Most or all Compels (minimal kills), good DPS execution, and proper buff maintenance.
Four-Phase Reality: More realistic for safe play. Killing instead of Compelling is faster overall. Less platforming means less death risk. Still very achievable clear time.
Accept the four-phase if it means safer execution. Solo flawless is about completion, not speed records.
Expected Clear Time
Total dungeon time for solo flawless runs around 45-60 minutes depending on class and execution.
Loot Table and Rewards
Equilibrium features unique weapons and armor available only from dungeon completions.
Weapons
| Weapon | Type | Element | Notable Perk Options |
|---|---|---|---|
| Heirloom (Exotic) | Crossbow (Special) | Strand | Big Game Hunter, Bolt Thrower, Catalyst adds Scorch synergy |
| Zealous Ideal | Auto Rifle | Solar | Heal Clip, Dynamic Sway Reduction, Onslaught, Incandescent |
| Bitter End | Machine Gun | Arc | Attrition Orbs, Eddy Current, Killing Tally, Frenzy |
| High Tyrant | Pulse Rifle | Void | Destabilizing Rounds, Repulsor Brace, Headseeker, Frenzy |
| Voltaic Shade | Energy weapon | Arc | Utility focused |
| Conspiracy Honed | Special weapon | - | Burst damage |
| Sullen Claw | Close range | - | Finishing capability |
Exotic Weapon: Heirloom
The primary chase item from Equilibrium is Heirloom, a Strand exotic crossbow with explosive bolts.
Catalyst: Available through repeated dungeon clears, adds Scorch synergy to the weapon.
Armor Set: The Collective Sage
A complete armor set drops from Equilibrium with a Praxic aesthetic:
- Helmet: Praxic style helm with clean lines
- Gauntlets: Gloves with robe-inspired design
- Chest Armor: Flowing robe theme
- Leg Armor: Boots designed for temple exploration
- Class Item: Carries Praxic aesthetic elements
The armor set includes sword-based bonuses that can benefit Wolfsbane/Praxic Blade strategies, though they're not required for solo flawless completion.
Cosmetics
Emblems tied to dungeon challenges, shaders unlocked through completions, and challenge-specific rewards for advanced completions.
Titles and Triumphs
Equilibrium offers several titles tracking different achievement levels:
| Title | Requirement |
|---|---|
| Dredgen's Descent | Contest Mode completion |
| Superiorly Connected | Normal mode completion |
| Imperium Parade | Solo completion |
| Stand Alone | Solo Flawless completion |
| Arid Rambler | Flawless completion (fireteam) |
| Praxic Drape | Find all collectibles |
Triumph Tracking
Beyond titles, various triumphs track encounter completions, challenge modes, speed runs, collectible discovery, and specific mechanic completions.
Contest Mode Information
Contest Mode activates for 48 hours after dungeon launch with additional challenge and exclusive rewards.
Contest Mode Rules
Power Capping caps player power, and being under 370 results in increased damage taken. The NotSwap Rule blocks loadout swaps during the run (ammo type swapping is the stated exception). A limited gear pool restricts certain weapons and exotics. Some artifact perks, abilities, and weapons are disabled.
Contest Mode Rewards
Completing Contest Mode guarantees the Heirloom exotic crossbow drop and the exclusive Dredgen's Descent emblem.
World First Requirements
For World First eligibility, at least one fireteam member must stream with a pre-installed overlay. Standard Bungie World First rules apply.
Solo Flawless Tips
Mindset
Prioritize safety over speed. A four-phase clear beats dying on a three-phase attempt. Take breaks if frustrated and return fresh. Practice phases to learn each encounter's rhythm before attempting flawless. One failed attempt teaches more than reading guides ever will.
Universal Survival Tips
- Praxic Blade Block makes you nearly immune to most damage, so use it liberally
- Keep healing grenade accessible for emergencies
- Always interrupt Lightning Hands immediately
- Press your Renegade ability button (Z) to swap between mechanics and regular grenade
- Deactivate the four front pylons before every DPS phase
Class-Specific Reminders
Warlock: You can't swap to Shadow ability while Transcendent. Song of Flame provides massive damage resistance. Devour from Feed the Void sustains through add-heavy phases.
Hunter: Stylish Executioner invisibility trivializes mechanics phases. Threaded Spike sever reduces all enemy damage by 40%. Fortune's Favor plus Facet of Purpose creates self-sustaining overshield loop.
Titan: Bind Charged and Uncharged melee separately, not Auto Melee. Sunspots provide constant Restoration healing. Ember of Searing quickly recovers lost Throwing Hammers. Avoid Hammer of Sol during final boss DPS because it can't break Lightning Hands.
When to Restart
Consider restarting if:
- You die in the first encounter (fastest restart point)
- You're out of special/heavy ammo before a boss phase
- Your confidence is shaken by a close call
Don't restart just because:
- A DPS phase went poorly (you can recover)
- You took more phases than expected (completion matters)
- You made a mechanical mistake that didn't kill you (learn and adapt)
Conclusion
Equilibrium is one of the more accessible solo flawless dungeons in recent Destiny 2 history. Compared to Vesper's Host and Sundered Doctrine, the mechanics are forgiving, the DPS checks are reasonable, and the encounter design lets you play consistently and safely.
Success comes down to understanding Shadow Power management, respecting Lightning Hands interrupts, and keeping those pylons deactivated before DPS phases. With the builds and strategies in this guide, any dedicated Guardian should be able to claim their solo flawless emblem.
Good luck out there. Dredgen Sere awaits.