
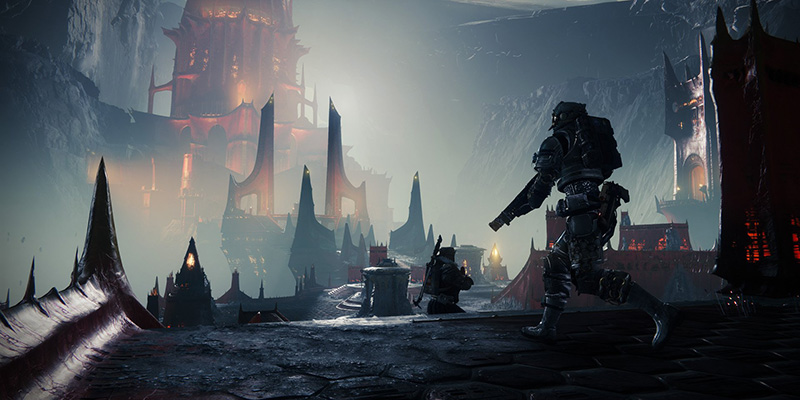
Beneath the blood-red ramparts of the Scarlet Keep, sunk deep within the Moon's tormented crust, lies a wound festering with forbidden Hive rituals and the chilling whispers of the Darkness. The Pit of Heresy is not merely a dungeon; it is a descent into the very heart of the Hive's desperation and their blasphemous pacts made in the shadow of a silent, monolithic Pyramid. Guardians are called to plunge into this abyss, to unravel the wicked rites orchestrated by the vengeful daughters of Crota, and to extinguish the heretical flame embodied by Zulmak, Instrument of Torment. This guide will illuminate the shadowed paths, decipher the cryptic runes, and steel Guardians for the trials that await within the Pit.
Whispers from the Deep: Descent into Heresy
The journey into the Pit of Heresy is intrinsically linked to the events catalyzed by the Shadowkeep expansion, demanding an understanding of the forces at play upon Luna's haunted surface.
The Shadowkeep's Call
The narrative unfurls with Eris Morn's fateful return to the Moon, a place steeped in her trauma. Drawn by unsettling whispers, she discovered a colossal Pyramid ship, an entity of pure Darkness, dormant beneath the lunar surface. Its awakening unleashed Nightmares – phantasmal echoes of past traumas and vanquished foes, given form by the Pyramid's paracausal power. In response, the Hive, specifically the Hidden Swarm led by Hashladûn, daughter of Crota, erected the imposing Scarlet Keep. This fortress served not only as a bastion but as a conduit, an attempt to harness the Pyramid's dark energies to avenge Crota's demise and empower the Hive in ways previously unimagined. Delving into the Pit, therefore, means confronting the Hive not in their traditional strength, but as they desperately claw at a new, terrifying source of power emanating from the Pyramid below.
Eris Morn's Burden
Eris Morn stands as the unwilling gatekeeper and guide to these lunar horrors. Her past is inextricably woven with the Moon's sorrows; she is the sole survivor of the Great Disaster, the ill-fated attempt to reclaim the Moon where Crota himself slaughtered thousands of Guardians, including Eris's own fireteam. She escaped the Hellmouth scarred, bereft of her Ghost and Light, her eyes replaced by Hive organs, yet possessing an unparalleled, harrowing knowledge of her enemies. Her return in Shadowkeep saw her confronting not only the resurgent Hive but also the Pyramid's insidious power, which manifested Nightmares of her fallen comrades to torment her. It is Eris who directs the Guardian against Hashladûn and the Nightmares, and it is her quest, "The Deeping Wake," that unlocks the path into the Pit. Her intimate understanding of Hive arcana and the Darkness makes her involvement deeply personal; this dungeon represents a direct confrontation with the very forces that shattered her past and continue to haunt her present. The dungeon itself is a manifestation of Hive heresy – a deviation from the established Sword Logic of Oryx towards forbidden necromancy and Pyramid-worship, possibly guided by the subtle machinations of Savathûn. Eris's later, drastic embrace of Hive magic to combat Xivu Arath casts a long, ironic shadow back upon her role here, fighting against the very nature of power she would eventually wield.
The Nature of the Pit
The Pit of Heresy plunges Guardians beneath the Scarlet Keep, deep into a Hive necropolis where dark rituals are underway. It embodies a profound shift within Hive cosmology. In the vacuum left by Oryx's defeat, factions of the Hive, particularly Crota's lineage, turned away from the rigid, Darwinian principles of the Sword Logic – survival through conquest and slaughter – towards heretical practices. They sought power not through tribute to their dead king, but through necromantic rites and direct communion with the lunar Pyramid. This heresy is the dungeon's central theme. Zulmak, the final adversary, is not merely a powerful Hive warrior but an "Instrument of Torment," a champion born from these forbidden rituals, embodying the Hive's desperate and dangerous pact with the encroaching Darkness. The Pit, therefore, represents a critical juncture in Hive history, showcasing their internal schisms and their willingness to embrace forbidden power sources in a bid for survival and vengeance, setting the stage for future conflicts and transformations within the Hive hierarchy.
Breaching the Heresy: Access and Entry
Before descending into the Pit, Guardians must meet specific prerequisites and undertake a task for Eris Morn.
Prerequisites
The Deeping Wake Quest
Upon completion of the main Shadowkeep campaign storyline, Eris Morn offers a quest titled "The Deeping Wake," which serves as the key to unlocking the dungeon. Should the quest not appear directly from Eris in Sanctuary, Guardians should check the Quest Archive Kiosk located at the Tower or the H.E.L.M.. The quest involves the following steps:
- Accept Quest: Obtain "The Deeping Wake" from Eris Morn or the Quest Archive Kiosk.
- Travel to Sorrow's Harbor: Navigate to the Sorrow's Harbor region on the Moon.
- Participate in Altars of Sorrow: Engage in the Altars of Sorrow public event, a wave-based defense activity against hordes of Hive and Nightmares culminating in boss fights. This activity itself serves as a primer for dungeon mechanics, requiring players to defeat Nightmares and utilize Hive swords against shielded Wizards, mirroring challenges found later within the Pit.
- Objective 1 - Defeat Nightmares: Eliminate 20 Nightmare enemies during the Altars of Sorrow event. These are common enemies throughout the activity.
- Objective 2 - Achieve Tier III+ Reward: Successfully complete waves until at least a Tier III reward chest is earned. Critically, the reward is granted only after the entire Altars of Sorrow cycle concludes (either through successful completion of the final Tier VII boss or failure after reaching at least Tier III). Guardians must remain in the activity until this conclusion to receive credit. Progressing to Tier V often ensures a successful reward grant. This requirement encourages sustained participation, exposing players to the mechanics and potential unique weapon drops from the Altars event itself (like Apostate, Blasphemer, Heretic).
- Return to Eris: Once both objectives are met, return to Eris Morn in Sanctuary on the Moon to complete the quest.
Location and Launch
Completing "The Deeping Wake" makes the Pit of Heresy dungeon accessible. Its icon appears on the Moon's Director map, situated near the Sorrow's Harbor fast travel point. The dungeon recommends a Power Level of 1600, which is the current base Power floor, making it readily accessible to all players who meet the expansion requirement. It is designed for a fireteam of 1-3 Guardians.
The Necropolis: Echoes of Blades
The first trial within the Pit demands mastery over Hive relics and deciphering their cryptic symbols. This encounter acts as a crucial foundation, teaching the mechanics necessary for the dungeon's climax.
Initial Descent & Arena Layout
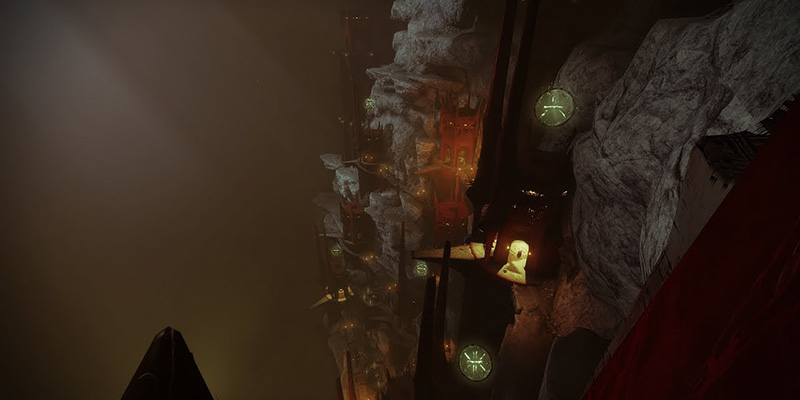
Guardians plunge into a vast chasm, a Hive necropolis dominated by towering red structures built against the cliff face. Glowing green Hive runes hover ominously above several of these towers. The objective here is twofold: first, identify a specific set of three runes, and second, locate the towers marked by these runes and vanquish the powerful Hive Disciples dwelling within.
Identifying the Runes
The path to identifying the target runes begins with a descent into the largest, most prominent tower, often found perched near the cliff edge overlooking the arena. Inside, Guardians must:
- Clear the initial contingent of Hive enemies.
- Defeat the Accursed Swordbearer, a powerful Knight guarding the inner chamber. Be aware that this Swordbearer can respawn if lingered too long in its chamber.
- Claim the Hive Cleaver relic dropped by the Swordbearer. This sword is the key to defeating the Disciples.
- Observe the three Hive runes displayed prominently within this chamber, often hanging on chains or projected on walls/pillars. It is highly recommended to take a screenshot or make a note of these three specific symbols.
Hive Rune Visual Guide
Accurate identification of the Hive runes is paramount for efficiency. Misinterpreting a symbol leads to wasted time and relic energy. The following table provides visual descriptions for the runes encountered in the Necropolis:
| Rune Visual Description | Common Name |
|---|---|
| Resembles a capital 'A' | The A Rune |
| Circle with two downward prongs/legs | The Bowl Rune |
| Three vertical lines crossed by horizontal | The Prison Rune |
| Looks like a 'T' or cross | The Cross Rune |
| Resembles an 'H' | The Gate Rune |
| Square or diamond shape with internal line | The Diamond Rune |
| Vertical line with branching top | The Tree Rune |
| Looks like a downward-pointing arrow | The Arrow Rune |
| Resembles a sideways 'E' or pitchfork | The Trident Rune |
This symbol-matching component encourages Guardians to pay close attention to their surroundings and communicate clearly, reinforcing a common puzzle element found throughout Destiny's more esoteric content.
Locating and Clearing Towers
Armed with the knowledge of the three target runes, Guardians must scan the chasm and locate the towers marked by these corresponding symbols hovering above them. To clear each tower:
- Defeat the Pit Keeper Knight guarding the entrance to the tower.
- Acquire a fresh Hive Cleaver relic by defeating one of the Accursed Swordbearer Knights patrolling the bridges and areas between towers. These Knights respawn based on player proximity, ensuring a sword is usually available. Be wary of Ogres that sometimes accompany these Knights and exercise caution on the Hive elevators, as collisions while holding the sword can cause damage.
- Enter the designated tower and confront the Disciple of the Broken Blade within.
Disciple Strategies & Sword Mechanics
Each of the three target towers houses a different Disciple, immune to conventional damage and requiring a specific Hive Cleaver technique for defeat. This encounter fundamentally serves as a mandatory tutorial for the sword mechanics required later against Zulmak. Mastering these attacks is non-negotiable:
This Disciple falls to the Cleaver's light melee attacks (standard swing). Using the block function is crucial to parry the Knight's powerful swings, creating openings for attack. The chamber also contains numerous Thrall adds that must be managed. A common solo tactic involves a rhythm of 2-3 light attacks followed by a block.
This Disciple must be damaged using the Cleaver's heavy attack, which launches a ranged energy projectile. The chamber contains additional Revenant Wizards whose arc blasts can quickly overwhelm a Guardian; eliminating these distractions first is advised. Utilizing cover and firing the projectile while airborne can help maintain momentum and safety.
This Disciple is defeated by using the Cleaver's block/guard function to reflect its own void projectiles back at it. The chamber is dangerously guarded by two Revenant Ogres. Due to their high damage output, it is strongly recommended to eliminate the Ogres using powerful weaponry (like Rocket Launchers or Heavy Grenade Launchers) before engaging the Shrieker with the sword. Reflecting projectiles consumes minimal sword energy, potentially allowing a skilled Guardian to defeat another Disciple with the same sword if timing and energy permit.
Encounter Completion
Once the Disciples in all three rune-matched towers have been slain using the correct sword techniques, the encounter concludes. A central tower exit, marked by a pillar of green light, will open, and a reward chest will materialize. Guardians should claim their loot and proceed through the newly opened passage.
The Wall of Doors
The path forward leads to a transitional area characterized by a wall lined with numerous glowing Hive doorways. Guardians must resist the temptation to enter these doors, as nearly all conceal traps designed to launch players to their doom. Instead, look carefully to the right of the platform or broken bridge upon entering this area. A small, easily missed opening or slit in the rock wall provides the true path forward. This narrow passage leads directly into the next encounter: the Tunnels of Despair.
Tunnels of Despair: Lost in Shadow
Leaving the structured towers of the Necropolis behind, Guardians descend into a claustrophobic, lightless maze that tests navigation, stealth, and situational awareness over raw combat prowess.
The Maze Environment
Players drop into a network of dark, winding caves and tunnels. The layout is intentionally confusing, featuring three main parallel tunnels (often referred to as left, middle, and right relative to the entrance) interconnected by numerous smaller passages and hidden side caves. Many entrances to these side areas are obscured by thin Hive membranes that must be shot to be destroyed. The darkness and repetitive textures make navigation challenging without external aids. Furthermore, the loading zone transition into this area has been historically prone to a bug causing instant death, particularly on PC configurations with high framerates.
The Harrowing Pariahs (Invincible Ogres)
Patrolling the three main tunnels are the Harrowing Pariahs – three colossal, invincible Ogres. These abominations cannot be damaged or killed by any means available to Guardians. They move aggressively and their eye blasts or slams can mean instant death for any Guardian caught unaware. Successfully navigating the Tunnels requires constant vigilance regarding the Ogres' positions. Strategies involve utilizing the side passages for cover and movement, communicating Ogre locations within a fireteam, employing stealth abilities like invisibility, or simply waiting patiently for an Ogre to move past a critical junction. Upon successful completion of the encounter's objective, these Ogres will despawn.
Objective: Destroying the Barriers
The goal of this encounter is to find and destroy three large, glowing Hive barriers that block passage at the far end of each of the three main tunnels.
Heretical Knights and Void Orbs
Destroying the barriers requires a specific ritual involving Void Orbs obtained from elite Hive Knights:
- Locate Knights: Within the various side caves branching off the main tunnels, Guardians will find Heretical Knights – powerful, yellow-bar enemies. Clearing the surrounding lesser Hive before engaging the Knight is often advisable.
- Defeat Knights: Eliminate a Heretical Knight. Upon death, it will drop a Void Orb (also referred to as a Void Charge).
- Carry Orb: Pick up the Void Orb. Guardians carrying an orb cannot sprint or use certain abilities.
- Dunk Orb: Navigate through the tunnels to one of the three Hive barriers located at the end of the main passageways.
- Destroy Rune: Approach the barrier and interact with the receptacle nearby to dunk the Void Orb, destroying one of the seals protecting the exit.
- Repeat: This process must be repeated three times, with one Void Orb dunked at each of the three distinct barriers.
Navigation and Map Visualization
The Tunnels' disorienting nature makes efficient navigation difficult. While experienced players may develop internal maps, referencing external resources is highly recommended, especially for solo or flawless attempts. Several community-created maps exist, often depicting the three main tunnels, side cave locations, barrier positions, and Ogre patrol routes.
A common efficient route involves minimizing time spent in the main Ogre-patrolled tunnels: Start by heading down the rightmost tunnel, enter the first side cave on the left, kill the Knight, take the orb back out and dunk it at the barrier at the end of the right tunnel. Return towards the start, enter the next cave system (often connecting middle and right tunnels), kill the Knight, navigate to dunk at the middle barrier. Return again, enter the final Knight cave system (often connecting middle and left tunnels), kill the Knight, and navigate to dunk at the left barrier. Another simplified path is starting left.
Xenophage Quest Step ("Locate Path's End")
This encounter space houses a critical step for acquiring the Xenophage Exotic Machine Gun. This requires a significant detour from the main objective:
- Navigate Left: Proceed down the leftmost main tunnel, towards the open cliff edge.
- Find the Plate: Look down and to the side for a hidden ledge below the main path. On this ledge is a plate inscribed with Hive runes.
- Activate Platforms: Interact with the plate. This will summon a series of small, ethereal platforms extending out over the abyss.
- Platforming: Carefully jump across these precarious platforms.
- Collect Orb: At the end of the platform sequence, collect a fiery orb of light, similar to those used in other Moon puzzles.
- Return and Navigate Right: Carry the orb back across the platforms and then navigate through the maze towards the far right side of the encounter area. This requires careful Ogre avoidance while carrying the orb.
- Find Secret Door: Locate a specific, otherwise inaccessible door marked by two unlit Hive lanterns or dishes flanking it.
- Light Lanterns: Use the single fiery orb to interact with and light both lanterns. This action consumes the orb and unlocks the door.
- Proceed: Enter the newly opened passage to continue the Xenophage questline, leading to the confrontation with Volmâr, the Tempted.
The integration of this quest step encourages deeper exploration of the dungeon's environment, rewarding Guardians who look beyond the immediate objective.
Troubleshooting
Common issues in the Tunnels include the aforementioned loading zone deaths. Ogres can become stuck or persistently block crucial passages, demanding patience or risky maneuvers. Void Orbs dropped upon death may despawn, potentially requiring another Knight kill, although they should eventually respawn.
Chamber of Suffering: The Annihilator's Gaze
Emerging from the claustrophobic Tunnels, Guardians face perhaps the most infamous encounter in the Pit of Heresy. The Chamber of Suffering is a brutal gauntlet, a significant spike in difficulty that serves as a stringent test of buildcrafting, coordination, and execution, particularly for those attempting solo or flawless clears. Here, the Pit demands true suffering.
The Gauntlet
The encounter unfolds in a long, rectangular chamber dominated by a large Hive Annihilator Totem positioned atop a short flight of stairs. The objective appears simple, but the overlapping threats create an intensely hostile environment.
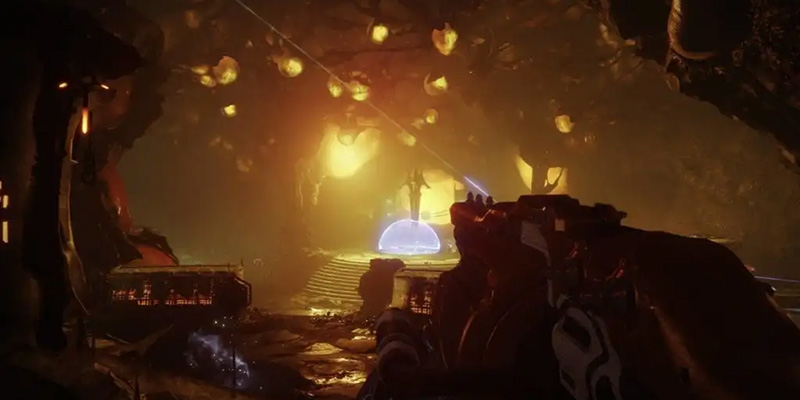
Core Mechanic: Annihilator Totem
Objective: Dunking Void Orbs
The goal is to destroy the Hive barrier blocking the exit at the far end of the room, behind the Totem. This is achieved by collecting and dunking a total of six Void Orbs into the receptacle located near this barrier.
Acquiring Orbs
Void Orbs are sourced from specific enemies:
- Heretical Knights: Powerful, yellow-bar Heretical Knights will spawn periodically throughout the encounter, typically emerging from doorways on the left, right, or central upper platforms.
- Orb Drop: Defeating one of these Heretical Knights causes it to drop a Void Orb.
The Curse Debuff (Stacking Dread)
Some earlier accounts of the dungeon mention a stacking "Curse of Suffering" debuff that increases over time, eventually causing a wipe if stacks become too high. Dunking an orb reportedly removed stacks, but only for the player who dunked it. While this mechanic may add secondary pressure, the vast majority of strategies and failure condition descriptions focus intensely on the Annihilator Totem's wipe mechanic. Therefore, managing the Totem plate should be considered the absolute primary survival requirement.
Enemy Threats
The Chamber is flooded with enemies presenting multiple layers of threat:
- Ground Adds: Waves of Thrall and Acolytes constantly swarm the central area and stairs, posing a threat through sheer numbers and grenade spam.
- Boomer Knights: The most dangerous enemies are the Hive Knights equipped with Boomer cannons, positioned on elevated balconies and ledges overlooking the arena. Their high-damage, rapid-fire arc projectiles can quickly kill Guardians anywhere in the room, especially those exposed on the central plate or running orbs. Prioritizing these Boomers is essential for survival.
Team Strategy
Success as a fireteam hinges on clear roles and efficient execution:
- Roles: Designate one player as the dedicated Plate Holder, whose sole responsibility is to stay alive on the plate and keep the Totem active. The other one or two players act as Orb Runners and Ad Clearers.
- Plate Holder: Focus on survival using Barricades, Rifts, or healing abilities. Clear adds immediately threatening the plate. Only step off momentarily if absolutely unavoidable, returning instantly.
- Orb Runners: Identify and eliminate Heretical Knights as they spawn. Kill Boomer Knights on the balconies swiftly using Sniper Rifles, Rocket Launchers, Linear Fusion Rifles, or Xenophage. Grab the Void Orb. Crucially, before running to dunk, the orb carrier must briefly step back onto the Annihilator Totem plate to reset its wipe timer. Then, proceed to dunk the orb at the far receptacle.
- Coordination: Constant communication regarding Knight spawns, Boomer locations, orb status, and Totem timer is vital.
Solo Strategy
Attempting the Chamber of Suffering solo is a formidable undertaking, often considered the crux of a solo flawless run. Success demands optimized builds and near-perfect play:
Prioritize maximum survivability. Solar Titan with Loreley Splendor or Precious Scars, utilizing Restoration grenades and Sol Invictus sunspots, is highly effective. 100 Resilience is practically mandatory.
Voidwalker Warlock using Devour (via abilities or Feed the Void aspect) and potentially Nezarec's Sin provides constant healing. 100 Resilience combined with Healing Rifts creates a strong survival platform.
Void Nightstalker Hunter leveraging invisibility (Top Tree Trapper or Bottom Tree Vanish in Smoke) allows for safe orb dunks and repositioning. Graviton Forfeit or Omnioculus can extend invisibility duration.
Loadout: Xenophage is exceptionally valuable for quickly dispatching the dangerous Boomer Knights from the safety of the plate area. A reliable ad-clearing weapon like Trinity Ghoul, or incandescent/voltshot primaries (Ammit AR-2, IKELOS SMG) is needed. Witherhoard provides excellent passive damage and area denial.
Execution Loop: The solo loop is intense: Maintain position on the plate, constantly clearing nearby adds. Use Xenophage or a sniper to eliminate Boomers as soon as they appear. Identify and quickly kill the Heretical Knight when it spawns. Grab the Void Orb. Immediately step back onto the plate to reset the Totem timer. Use invisibility or careful movement to reach the dunk spot. Dunk the orb. Return rapidly to the plate. Repeat six times.
The demanding nature of this encounter, with its overlapping high-stakes mechanics, functions as an effective gatekeeper. It forces players to refine their builds, coordinate tightly, or execute solo strategies with precision, implicitly guiding them towards powerful tools like Xenophage or high-survivability subclasses.
Troubleshooting
The most common failure is leaving the plate unattended, triggering the Totem wipe. Being overwhelmed by Boomer Knights or ground adds is also frequent. Dying while carrying an orb can cause it to despawn, potentially hindering progress. Glitches like Knights flying onto the plate or grenades phasing through cover have also been reported.
The Harrow: A Treacherous Descent
After the intense pressure cooker of the Chamber of Suffering, the Pit shifts focus back towards environmental traversal, presenting a perilous jumping puzzle known as The Harrow.
The Jumping Puzzle
Guardians emerge onto a precipice overlooking a vast, dark abyss. The descent involves navigating a treacherous series of narrow ledges, floating platforms, and precarious outcrops winding down the chasm walls. Compounding the platforming challenge are deadly environmental traps – large, spinning cylinders or fans adorned with spikes that patrol certain sections, capable of instantly killing any Guardian they strike. Platforming errors are a primary cause of death in this section.
Objective: Finding Symbols and Wizards
The objective echoes the Necropolis encounter but operates in reverse. Upon entering The Harrow, three specific Hive symbols are displayed on the wall near the entrance. Guardians must:
- Identify Symbols: Note the three target symbols shown at the start.
- Traverse and Locate: Carefully navigate the treacherous platforms and ledges of the abyss, avoiding traps, while searching for small alcoves or structures marked with these specific Hive symbols. Using the radar can sometimes help pinpoint the location of the Wizards guarding these symbols.
- Defeat Wizards: At each location marked by one of the target symbols, a powerful Hive Wizard known as a Malevolent Ritualist will be present, often accompanied by lesser Hive. These Wizards possess significant damage output and must be defeated. Weapons effective at range, like Sniper Rifles, Linear Fusion Rifles, or Xenophage, are highly recommended for dealing with them safely.
Encounter Completion
Once the Malevolent Ritualist Wizards at all three designated symbol locations have been eliminated, the runes protecting the way forward will shatter. A large doorway, often glowing red, will open in the central structure at the bottom of the abyss, granting passage to the final confrontation.
Secret Chest Location 1 (The Harrow)
This section houses one of the dungeon's hidden chests, rewarding exploration off the main path:
- Location: Found after completing the Chamber of Suffering, during the descent through The Harrow. The chest resides within the mouth of a colossal, skeletal Hive Worm carcass embedded in the chasm wall. Reaching it requires a specific sequence of jumps along ledges leading up towards the worm's skull. Guardians must follow the pathways carefully and make precise jumps to access the chest inside the mouth.
Secret Chest Location 2 (Tunnels of Despair)
The other hidden chest is located back in the Tunnels of Despair encounter area:
- Location: This chest is situated in a hidden side tunnel located beneath the platform where the secret Xenophage boss, Volmâr, is fought. Accessing it requires initiating the Xenophage quest steps in the Tunnels (activating the plate on the left cliffside) but then finding a separate, lower tunnel entrance near that area, rather than proceeding to Volmâr's door.
The placement of these secrets rewards meticulous exploration and mastery of Destiny 2's movement mechanics, offering extra objectives for dedicated players.
Troubleshooting
The primary dangers in The Harrow are environmental. Falling to one's death due to misjudged jumps or being hit by the spinning traps is common. The Malevolent Ritualist Wizards also pose a significant threat due to their high damage output. Utilizing movement-enhancing Exotics (like St0mp-EE5, Transversive Steps, Lion Rampants) or abilities (Strand Grapple, Warlock's Icarus Dash, Titan's Catapult Lift) can greatly aid in navigating the platforms safely and efficiently.
Zulmak, Instrument of Torment: Cradle of Damnation
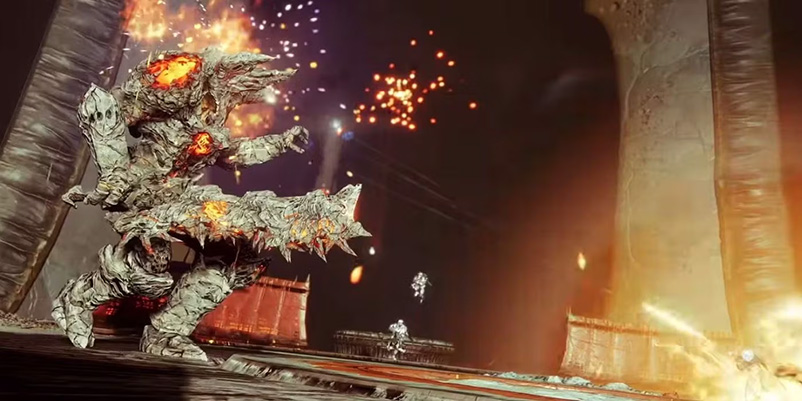
At the nadir of the Pit lies the Cradle of Damnation, the final arena where Guardians confront Zulmak, Instrument of Torment. This climactic battle serves as a final examination, demanding the application of all mechanics learned throughout the descent, particularly the mastery of the Hive Cleaver demonstrated in the Necropolis.
The Final Arena
The encounter takes place in a large, circular arena featuring a prominent central crystal or pedestal, surrounded by three elevated platforms or towers. This layout deliberately mirrors the Necropolis, signaling the return of its core mechanics. Zulmak, a towering Hive Knight, presides over the arena but remains immune to damage initially.
Repeating the Cycle: Activating DPS
To render Zulmak vulnerable, Guardians must precisely reenact the ritual from the first encounter:
- Obtain Sword: Defeat Accursed Swordbearer Knights that spawn in the central ring of the arena to acquire a Hive Cleaver relic sword.
- Identify Disciples: Locate the three Disciples of the Broken Blade positioned in the three outer towers/platforms. These will be the same three types encountered in the Necropolis: a Knight (Might), a Wizard (Omen), and a Shrieker (Oracle). They are often accompanied by Acolyte support enemies.
- Execute Sword Mechanics: Using the Hive Cleaver, defeat each Disciple with its corresponding required technique: light melee attacks for the Knight, the ranged heavy attack for the Wizard, and blocking/reflecting projectiles for the Shrieker. Failure to use the correct attack will prevent damage to the Disciple.
- Collect Orbs: Each defeated Disciple drops a Void Orb (Void Charge).
- Dunk Orbs: Carry the Void Orb to the central area and dunk it into one of the three receptacles surrounding the main crystal/pedestal.
- Initiate DPS: Once all three Void Orbs (one originating from each type of Disciple) have been successfully dunked, Zulmak will kneel and become vulnerable, initiating the damage phase. The order of defeating Disciples and dunking orbs does not matter; fireteams can tackle them simultaneously.
This explicit repetition reinforces the Necropolis encounter as essential training; failure to learn the sword mechanics there guarantees failure here.
Damage Phase (DPS)
Once Zulmak is vulnerable:
- Damage Aura: Guardians must stand within the glowing green aura that appears on the floor around the central crystal/pedestal to inflict damage upon the boss. Stepping outside this aura renders attacks ineffective.
- Add Control: During the DPS phase, waves of adds, including numerous highly dangerous Cursed Thrall, will spawn and converge on the central damage area. Effectively managing these adds, especially the Cursed Thrall, is critical to prevent wipes during the damage phase.
- Boss Attacks: Zulmak's primary attack is a potent fire breath projected in a straight line, leaving persistent, damaging flames on the ground. Avoiding these fire pools is crucial. This attack has considerable range and can even scorch areas near the outer towers if Guardians are positioned poorly during the setup phase.
The requirement to stand in a specific, exposed central location for DPS creates a high-risk environment, forcing players to balance damage output against add management and boss attacks.
Wipe Mechanic
After a set duration of vulnerability, Zulmak will perform a distinct animation: he will kneel and plunge his massive sword into the ground or the central crystal, which begins to glow intensely. This is the critical signal for all Guardians to immediately evacuate the central green damage aura. Remaining within the aura when Zulmak completes this charging animation results in an instant, lethal blast of energy. Survival is typically achieved by simply jumping off the central platform or moving behind cover outside the aura's radius. A Sentinel Titan's Ward of Dawn bubble can potentially block the wipe mechanic if positioned correctly.
Repeating the Encounter
Following the wipe mechanic (or the end of the damage window), Zulmak becomes immune again. The encounter cycle then resets: Swordbearers spawn, Disciples reappear in the towers, and Guardians must repeat the process of obtaining a sword, killing the three Disciples with correct mechanics, collecting and dunking the three Void Orbs to initiate the next damage phase. This loop continues until Zulmak's health is fully depleted.
Strategy and Loadouts
Team Strategy:
Efficiency comes from assigning players to specific towers during the orb-gathering phase. Coordinate dunking to start DPS quickly. Utilize damage-boosting Supers like Well of Radiance or Ward of Dawn placed within the green aura. High-damage Heavy weapons (Swords like The Lament, Falling Guillotine; Linear Fusion Rifles; Rocket Launchers) and Special weapons are key for maximizing DPS windows.
Solo Strategy:
This requires high efficiency and survivability.
Utilize cover effectively when dealing with Disciples. Dropping the sword temporarily behind the tower structures while clearing adds can be a safe tactic. Dunk orbs at receptacles with fewer surrounding adds. Titans can use Ward of Dawn for protection and weapon buffs. For DPS, focus on high burst damage weapons like Linear Fusion Rifles, Rocket Launchers, or Lament.
Warlocks utilizing Well of Radiance can attempt the difficult but relatively safe tactic of perching atop the central crystal using Heat Rises grenade charging or specific jumps. This position can provide safety from ground adds while maintaining damage on Zulmak. Witherhoard combined with a Linear Fusion Rifle offers excellent DPS potential.
Hunters often rely on high burst damage Supers (Golden Gun with Celestial Nighthawk, Blade Barrage with Star-Eater Scales) or use Tether to control the dangerous Cursed Thrall during DPS. Maintaining invisibility between phases offers critical safety when moving between platforms or dunking orbs.
Loadout: Strong DPS Exotics like Lament, Witherhoard, Anarchy, Xenophage, Dragon's Breath, or powerful Legendary options (Fusions, Rockets) are essential.
Pacing: Prioritize survival over speed. Do not risk death trying to dunk an orb if overwhelmed. Aiming for a consistent two or three-phase kill strategy is often safer and more reliable than attempting a risky one-phase. Player-discovered tactics like the crystal perch demonstrate adaptation to mitigate the encounter's designed risks.
Troubleshooting
Attempting to duplicate Void Orbs at Zulmak can lead to unpredictable glitches, such as the boss performing his wipe mechanic repeatedly outside of the DPS phase or spawning hyper-aggressive Knights. Dropped orbs may despawn momentarily but should reappear. Failure to manage Cursed Thrall during DPS is a very common cause of wipes. Be mindful of the extended range of Zulmak's fire breath attack.
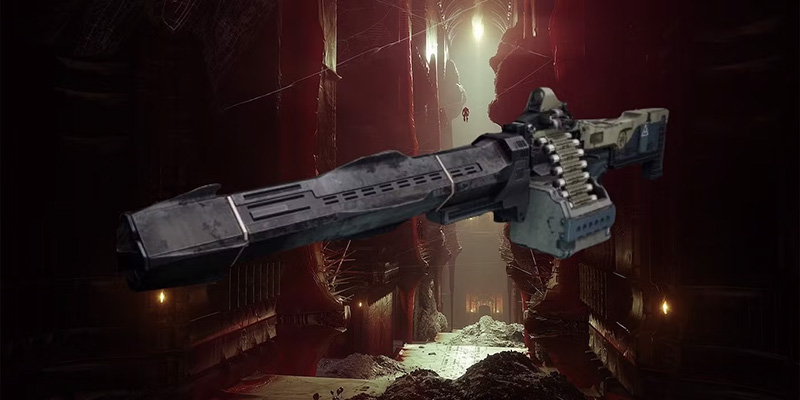
The Path of the Worm: Xenophage Quest

Woven into the fabric of the Pit of Heresy is a significant portion of the questline for the Exotic Machine Gun, Xenophage. Guardians seeking this potent weapon must divert from the main dungeon path to undertake specific hidden steps. This section details only those steps occurring within the Pit of Heresy dungeon. It assumes prior completion of the quest's initial steps outside the dungeon (statue activation near Eris's overlook, the Anchor of Light fiery orb puzzle, and the four K1 Lost Sector rune puzzles).
Step: Path Uncovered (Necropolis Exit)
- Location: This step takes place in the "Wall of Doors" transition area immediately following the completion of the Necropolis encounter.
- Action: Scan the numerous doorways. Identify the specific doorway located on the upper-left side of the wall that is conspicuously missing the usual hanging Hive rune symbol above it. Use the surrounding architecture (pillars, ledges) to carefully platform up and reach this unique door. Inside, interact with a hidden switch or rune to progress the quest step.
Step: Locate Path's End (Tunnels of Despair)
- Location: This multi-part step occurs within the Tunnels of Despair encounter (the Ogre maze).
- Action 1 (Find Plate): Proceed into the Tunnels and navigate towards the leftmost main tunnel that runs along the open cliff edge. Search below the main path along the cliff face for a hidden ledge containing a plate inscribed with Hive runes.
- Action 2 (Activate Platforms): Interact with this plate. Doing so will summon a sequence of small, temporary platforms extending out over the chasm.
- Action 3 (Collect Orb): Carefully jump across these platforms to reach the end, where a fiery orb of light can be collected.
- Action 4 (Return and Navigate): Carry the fiery orb back across the platforms. Then, navigate through the Tunnels of Despair maze, avoiding the invincible Ogres, towards the far right side of the encounter area.
- Action 5 (Light Lanterns): In the rightmost section of the maze, locate a specific, previously locked door flanked by two unlit Hive lanterns or bowl-like dishes. Use the single fiery orb collected from the platforms to interact with and ignite both of these lanterns. This opens the door.
Step: Slay Volmâr, the Tempted (Secret Boss)
- Location: Proceed through the door unlocked in the previous step. This hidden path leads to a secret boss arena containing Volmâr, the Tempted. Note that this encounter originally had a higher Power Level recommendation.
- Pre-Boss Room Symbols: Before entering the final boss room, take note of an antechamber displaying four distinct Hive runes, each associated with an elemental orb/effect: Void (often described as 'A'-shaped), Arc ('V'-shaped), Solar ('W' or 'X'-shaped), and Kinetic ('I'-shaped). Memorizing or capturing these symbol-element associations is crucial for the fight.
- Boss Mechanic - Elemental Attunement: The fight against Volmâr revolves around matching elemental damage to a rotating buff/debuff applied to the player. Players will periodically receive one of four "Dread" debuffs: Abyssal Dread (Void), Thunderous Dread (Arc), Fiery Dread (Solar), or Neutral Dread (Kinetic).
Activating Damage: To damage Volmâr, players must:
- Check their current "Dread" debuff on the bottom left of the screen (e.g., Thunderous Dread).
- Identify the Hive rune symbol associated with that element from the pre-boss room (e.g., the 'V' shape for Arc).
- Grab a fiery orb that spawns in the center of Volmâr's arena.
- Locate the dunking plate within the arena marked with the corresponding Hive rune symbol. There will be four plates, one for each element/symbol.
- Dunk the fiery orb onto the correct plate.
Damage Window: Successfully dunking the orb on the correct plate removes the "Dread" debuff and grants a corresponding "Vengeance" buff (e.g., Thunderous Vengeance) for approximately 25-30 seconds. During this window, Volmâr can only be damaged by weapons and abilities matching the Vengeance buff's element (e.g., Arc damage for Thunderous Vengeance).
Repeat Cycle: Once the Vengeance buff expires, Volmâr becomes immune again, and the player will receive a new "Dread" debuff (potentially the same or different). Repeat the cycle of checking the buff, identifying the symbol, grabbing the central orb, dunking it on the correct plate, and dealing matching elemental damage until Volmâr is defeated. This mechanic tests observation, memory, execution under pressure, and loadout flexibility.
Final Step (Outside Dungeon)
After successfully slaying Volmâr, the Tempted, Guardians must return to Eris Morn on the Moon (typically at her usual spot in Sanctuary) to present the Hive "bug" obtained from the boss and finally claim the Xenophage Exotic Machine Gun.
The integration of this elaborate questline transforms sections of the Pit from standard dungeon fare into unique puzzle and combat spaces, significantly enhancing replay value and rewarding thorough exploration.
Secrets of the Pit: Chests and Runes
Beyond the main encounters and the Xenophage quest, the Pit of Heresy conceals additional secrets for observant Guardians.
Hidden Chests
Two secret chests containing dungeon loot can be found by venturing off the beaten path:
- Chest 1 (Tunnels of Despair): This chest is hidden within the Tunnels of Despair encounter area. It requires accessing the hidden pathway used for the Xenophage quest (platforms off the left cliff edge). Instead of proceeding towards Volmâr's door on the right side, search for a lower side tunnel or hole near the Xenophage platform area. This passage leads down to the hidden chest, located beneath the platform where Volmâr is fought.
- Chest 2 (The Harrow): This chest is found during the treacherous descent through The Harrow, after the Chamber of Suffering. It is located inside the gaping mouth of a giant, skeletal Hive Worm embedded in the chasm walls. Reaching it necessitates careful platforming along specific ledges that lead up and into the worm's skull structure.
Hive Rune Chests
Guardians familiar with the Moon's surface will know of locked chests requiring a sequence of nearby Hive runes to be shot in the correct order. These chests are scattered across Luna's patrol zones.
| Rune Visual Description | Common Name |
|---|---|
| Resembles capital 'A' | The A Rune |
| Circle with two downward prongs/legs | The Bowl Rune |
| Three vertical lines crossed by horizontal | The Prison Rune |
| Looks like a 'T' or cross | The Cross Rune |
| Resembles an 'H' | The Gate Rune |
| Square or diamond shape with internal line | The Diamond Rune |
| Vertical line with branching top | The Tree Rune |
| Looks like a downward-pointing arrow | The Arrow Rune |
| Resembles a sideways 'E' or pitchfork | The Trident Rune |
| Double horizontal lines ('equals') | The Equals Rune |
However, despite the thematic presence of Hive runes within the Pit of Heresy (used in Necropolis, The Harrow, and the Xenophage quest, and seen as environmental details), current information does not indicate the existence of unique, interactable Hive rune puzzle chests specific to the Pit of Heresy dungeon itself that function like the surface chests. The runes within the Pit appear integrated into mandatory encounter mechanics or the exotic quest, rather than gating optional chests.
Lore Objects
The Pit also contains hidden lore objects, primarily Dead Ghosts, which contribute to the game's narrative and can unlock triumphs or collectibles like the Lunar Memoriam emblem. One such Ghost, required for the emblem, is typically found in the Tunnels of Despair encounter, often on a ledge overlooking the chasm on the far left side, near the Xenophage platforming area. Accessing these may require having progressed Eris Morn's associated Memory or Ghost quests first. Other lore objects have been reported in locations like a crevice past the far-right tower in Necropolis, on a high ledge above the exit chest after Necropolis, and on ledges before the final drop after the Chamber of Suffering.
| Weapon Name | Type | Element | Ammo Type | Encounter Source(s) | Notes |
|---|---|---|---|---|---|
| Premonition | Pulse Rifle | Void | Primary | Any Encounter | Dungeon Exclusive |
| A Fine Memorial | Machine Gun | Arc | Heavy | Any Encounter | Moon Weapon |
| Every Waking Moment | Submachine Gun | Void | Primary | Any Encounter | Moon Weapon |
| Love and Death | Grenade Launcher | Solar | Heavy | Any Encounter | Moon Weapon (Also Lectern Quest) |
| One Small Step | Shotgun | Kinetic | Special | Any Encounter | Moon Weapon |
| Tranquility | Sniper Rifle | Kinetic | Special | Any Encounter | Moon Weapon |
| Arc Logic | Auto Rifle | Arc | Primary | Any Encounter | Moon Weapon (Also Lectern Quest) |
| Dream Breaker | Fusion Rifle | Solar | Special | Any Encounter | Moon Weapon |
| Night Terror | Sword | Arc | Heavy | Any Encounter | Moon Weapon |
| Apostate | Sniper Rifle | Arc | Special | Necropolis / Chamber (w/ Hymn) | Altars of Sorrow Weapon |
| Blasphemer | Shotgun | Kinetic | Special | Necropolis / Chamber (w/ Hymn) | Altars of Sorrow Weapon |
| Heretic | Rocket Launcher | Arc | Heavy | Necropolis / Chamber (w/ Hymn) | Altars of Sorrow Weapon |
| Loud Lullaby | Hand Cannon | Kinetic | Primary | Necropolis / Chamber (w/ Hymn) | Moon Weapon (Also Lectern Quest) / Altars Weapon? |
| Principle | Implementation |
|---|---|
| Patience | Take encounters slowly and deliberately. There are few strict time limits outside of specific mechanics (like the Chamber Totem). Rushing leads to mistakes. |
| Threat Assessment | Identify and neutralize the most dangerous enemies first – Boomer Knights in the Chamber, Ogres in the Tunnels, Wizards in the Harrow, Cursed Thrall during Zulmak DPS. |
| Environmental Awareness | Know the layouts, especially the Tunnels maze. Understand cover locations and escape routes. |
| Resource Management | Conserve Heavy and Special ammo for crucial targets. Manage ability cooldowns effectively, especially those providing healing or invisibility. |
Solar (Sunbreaker): Widely considered one of the strongest choices due to easy access to Restoration x1 and x2 via Healing Grenades and Sol Invictus sunspots. Towering Barricade provides crucial cover, especially in the Chamber. Hammer of Sol offers safe ranged super damage and can act as a panic button. Recommended Exotics include Precious Scars for healing on matching weapon kills, the potent (though nerfed) Loreley Splendor Helm for emergency sunspots, or Synthoceps for enhanced melee/Super damage. Actium War Rig pairs well with Xenophage for sustained fire.
Void (Sentinel): Ward of Dawn (Bubble) provides essential protection and a damage buff for Zulmak DPS phases. Offensive Bulwark and Bastion aspects enhance survivability. Doom Fang Pauldrons can extend Super duration.
Void (Voidwalker): Access to Devour through the Feed the Void aspect grants substantial healing on kills, significantly boosting survivability, especially in add-dense encounters like the Chamber. Paired with Exotics like Nezarec's Sin (if using Void weapons), Contraverse Hold (for grenade uptime), or Karnstein Armlets, Devour can make the Warlock incredibly resilient.
Solar (Dawnblade): Well of Radiance offers unparalleled survivability during DPS phases or difficult moments. The ability to perch safely atop Zulmak's crystal using Heat Rises and Touch of Flame grenade interactions is a popular, though tricky, solo tactic. Exotics like Sunbracers (for ad clear) or Phoenix Protocol (Super regen in Well) can be beneficial. Apotheosis Veil combined with burst damage weapons like Parasite or Dragon's Breath can enable quick boss phases.
Void (Nightstalker): Invisibility is an extremely powerful tool for solo Pit runs. Vanish in Smoke (Bottom Tree) or Trapper's Ambush (Aspect) allows Hunters to bypass enemies, safely reposition, revive (if not flawless), or dunk orbs in the Chamber without drawing aggro. Exotics like Wormhusk Crown provide healing on dodge, Graviton Forfeit extends invisibility duration, Omnioculus grants damage resistance and melee energy while invisible, and Gyrfalcon's Hauberk offers volatile rounds after emerging from invisibility.
Arc (Arcstrider): The Combination Blow melee loop (Aspect: Lethal Current) provides substantial melee damage, healing on kill, and generates Orbs of Power, making it strong for aggressive ad clear and even boss damage with the right setup. Requires specific Exotics like Assassin's Cowl (invisibility and healing on powered melee final blows) or Liar's Handshake (enhanced counter-punch damage).
Solar (Gunslinger): Offers high burst damage potential for boss phases using Golden Gun with Celestial Nighthawk or Blade Barrage with Star-Eater Scales, potentially shortening encounters but often sacrificing some neutral game survivability compared to Void.
- Armor Stats: Prioritize 100 Resilience. High Recovery and Discipline are also generally beneficial.
- Damage Resistance: Equip appropriate Elemental Resistance mods on the chest piece based on the primary threats (Arc for Knights/Boomers, Solar for Wizard fire, Void for Shriekers/Ogres). Melee Damage Resistance can be useful against Thrall. Concussive Dampener reduces AoE damage.
- Ability Regeneration/Orbs: Utilize mods like Heavy Handed (Orbs on powered melee kill), Firepower (Orbs on grenade kill), Harmonic Siphon (Orbs on matching subclass weapon kills) to fuel abilities and armor charges. Mods like Innervation/Invigoration/Absolution grant ability energy on Orb pickup.
- Combat Style Mods: Leverage Armor Charge mods like Weapon Surges matching your DPS weapon, Font mods for stat boosts, or utility mods like Time Dilation. Protective Light (pre-rework) was highly valued; current equivalents focus on Woven Mail, Restoration, or Overshields triggered by Orbs or Finishers.
- Artifact Mods: Always leverage powerful seasonal artifact mods that synergize with your chosen subclass and weapons (e.g., Solar-focused mods like Flint Striker, Kindling Trigger, or general damage perks like Solo Operative when available).
- Hive Mods: If available from older raids or Menagerie, Hive Barrier provides potent damage reduction.
| Encounter | Solo Strategy |
|---|---|
| Necropolis | Patience is key. Clear adds thoroughly before engaging Disciples. Use cover effectively. Utilize safe spots behind the Disciple towers to drop the sword if needed to handle adds or recover health. |
| Tunnels | Consult a map. Move cautiously, listening for Ogre footsteps and eye blasts. Use invisibility or Eager Edge skating for quick escapes or bypassing Ogres. Clear side caves completely before killing the Heretical Knight to avoid losing the orb to adds. |
| Chamber | The major hurdle. Master the loop: Plate -> Boomers -> Adds -> Knight -> Orb -> Plate Reset -> Dunk -> Plate. Constant movement and target prioritization are essential. Use Supers defensively or for quick Boomer kills. Invisibility makes dunking much safer. Orb duping cheese significantly reduces the difficulty but carries glitch risks. |
| Harrow | Prioritize safe platforming above all else. Eliminate the Wizards quickly from a distance using Xenophage or other long-range weapons. Don't take unnecessary risks near traps. |
| Zulmak | Manage the setup phase carefully. Clear adds in Disciple towers before focusing the main target. Drop the sword behind cover if needed. During DPS, prioritize killing Cursed Thrall immediately as they spawn; Supers or weapons like Trinity Ghoul can help. Evacuate the DPS zone before the wipe mechanic fully charges. Don't get greedy. Utilize safe DPS spots if applicable (Warlock crystal perch). Aim for consistent, safe damage phases rather than rushing. |
- Obtain Checkpoint: On an alternate character (Character A), play through the dungeon or join someone else to acquire the checkpoint right before the Zulmak encounter. Start the encounter and immediately wipe (die) to ensure the checkpoint is saved.
- Load and Invite: Load into the dungeon using Character A with the saved Zulmak checkpoint. Invite two other players (friends or LFG recruits) to the fireteam. Specify in LFG posts that it is an armor farm requiring multiple runs.
- Character Swap: Once the invited players are loading in or have joined, Character A leaves the fireteam and quickly switches to their main character (Character B) that they wish to farm armor on. A useful trick is to press F1 (or the console equivalent for character screen) and then Escape twice during the initial fly-in sequence to access the character select screen faster.
- Rejoin and Kill: Character B rejoins the fireteam (joining the session held open by the invited players). The team then completes the Zulmak encounter. Character B receives the high-stat armor drop.
- Repeat: Character B leaves the fireteam. Character A (still holding the checkpoint) loads back into the dungeon, invites Character B (or the other players swap to their farming characters), and the kill is repeated. This cycle allows for rapid, consecutive Zulmak kills (~5 minutes per run) focused solely on obtaining the armor reward.
- Chamber of Suffering Orb Duping: As mentioned previously, the orb duplication glitch in the Chamber of Suffering drastically shortens this notoriously long and difficult encounter. While effective for speed, it relies on exploiting a bug.
- Zulmak Orb Duping: While technically possible to dupe orbs at the final boss, it is generally discouraged for farming. It frequently causes bugs, such as Zulmak entering glitched states or infinite wipe loops, which can negate any time saved and potentially force a restart. A clean, multi-phase kill is often faster and more reliable for farming.
Troubleshooting: The most reliable workaround is to temporarily cap the game's framerate to 30 or 60 FPS and potentially lower the screen resolution before passing through these specific loading zones. Some players suggest jumping during the transition may also help, though results vary. Remember to uncap the framerate afterward. The persistence of this bug years after launch suggests a potentially deep-seated engine issue that significantly impacts high-stakes flawless attempts.
Troubleshooting: Avoid holding the sword while riding elevators if possible. Try standing directly on the central pole of the elevator platform, which should still lift the player without causing damage. Capping framerate might also mitigate this issue.
Troubleshooting: Handle orbs with care, especially in solo runs. Use orb duplication glitches cautiously, understanding they might break the encounter.
Troubleshooting: Adapt positioning quickly and prioritize eliminating glitching enemies.
Troubleshooting: Maintain awareness of the boss's facing even when dealing with Disciples in the towers.
| Connection Type | Details |
|---|---|
| Shadowkeep & Moon Activities | It serves as a narrative and thematic culmination of the Shadowkeep campaign, directly involving Eris Morn, the lunar Pyramid, Hive heresy, and the Scarlet Keep. Access requires the expansion and completion of "The Deeping Wake" quest tied to Altars of Sorrow. The loot pool shares Dreambane armor and Moon weapons available elsewhere on Luna. The Hymn of Desecration consumable links dungeon farming back to Altars of Sorrow participation. This tight integration makes the Pit feel like an essential part of the Shadowkeep experience. |
| Xenophage Quest | The dungeon hosts several mandatory and unique steps for obtaining the Xenophage Exotic Machine Gun, making it a required destination for players seeking that weapon. |
| Harbinger Title | Achieving the "Harbinger" Seal and Title associated with the Moon requires completing several Triumphs within the Pit of Heresy, most notably the challenging solo flawless completion ("Savior of the Deep" / "Eternal Heretic"). |
"The Pit of Heresy remains a compelling and relevant piece of Destiny 2 content years after its introduction. It serves as a dark reflection of the Shadowkeep expansion's core themes – confronting past traumas, the insidious influence of the Darkness, and the desperate measures taken by the Hive in the wake of their god-king's demise."Mechanically, it offers a varied challenge, testing relic proficiency, navigation under pressure, intense survival skills, and culminating in a final boss fight that demands mastery of previously learned techniques. While its standard weapon loot pool may be largely composed of reissued Moon gear, the dungeon's enduring appeal lies significantly in two key areas: the integrated Xenophage quest, which draws players into its hidden depths for a powerful Exotic reward, and more prominently, the unique high-stat, focused armor farm available from its final encounter. This targeted armor source keeps the Pit of Heresy firmly lodged in the endgame farming rotation for dedicated buildcrafters, offering a predictable and efficient path to optimization unmatched by many newer activities. Whether delving into its shadows for the first time, chasing the elusive Xenophage, seeking the perfect armor roll, or steeling oneself for the ultimate challenge of a solo flawless run, the Pit of Heresy stands as a testament to intricate dungeon design, narrative integration, and enduring reward structures within the vast universe of Destiny 2. Tread carefully, Guardian, for the whispers in the deep are patient, and the heresy within awaits.