
Salvation's Edge, released on June 7, 2024, with Destiny 2's The Final Shape expansion, represents the climactic 6-player raid activity that concludes the long-arching Light and Darkness saga. This encounter system places Guardians in direct opposition to The Witness, the paramount antagonist within the Destiny narrative. The entirety of the raid unfolds within the colossal, sentient structure of The Witness's Monolith, which has breached the interior of the Traveler. This unique environmental context introduces reality-distorting mechanics and culminates in an encounter designed to be a defining moment for the game's overarching story. The very architecture of the raid is, in essence, the physical form of The Witness, creating an unparalleled level of narrative and environmental immersion. This design choice signifies a notable evolution in Destiny's raid philosophy, aiming to fuse the gameplay space with profound thematic resonance, making the environment an active participant in the narrative rather than a mere backdrop for combat.
Guardians undertaking Salvation's Edge should anticipate an exceptionally challenging and mechanics-intensive experience. The raid's complexity has been observed to test even highly experienced fireteams. Success hinges on meticulous coordination, precise mechanical execution, and a comprehensive understanding of novel gameplay systems unique to this activity. A pervasive feature across nearly all encounters is a wipe timer, often designated as "Final Shape Looming," which applies continuous pressure on the fireteam to perform efficiently and correctly. Unlike some prior raid designs that might have allowed for more passive roles, Salvation's Edge mandates active participation in mechanics from all six fireteam members; the traditional "add clear" (enemy management) role is intrinsically linked to mechanical progression and is not a position of disengagement. This emphasis on shared responsibility and universal engagement suggests a design direction that elevates the baseline skill and awareness required from each participant, potentially influencing how fireteams are formed and how teaching runs are approached, given the increased burden on every individual to comprehend and execute complex tasks.
Preparing for Salvation's Edge
Successful navigation of Salvation's Edge necessitates meticulous preparation in terms of game progression, power level, equipment, and team coordination.
Access Requirements
To initiate the Salvation's Edge raid, the designated fireteam leader is required to have completed the main campaign of The Final Shape expansion and the subsequent "Wild Card" Exotic quest. This prerequisite for the leader may indicate that the "Wild Card" quest introduces a narrative element or a mechanical understanding that is foundational for accessing or contextualizing the raid. While it is strongly recommended by the developers that all participating Guardians complete the campaign to avoid narrative spoilers and ensure a cohesive story experience, the specific burden of the Exotic quest completion falls upon the leader.
Recommended Power Levels
The recommended Power Level for Salvation's Edge varies based on the active mode:
- Contest Mode: During the initial 48 hours following the raid's launch, Contest Mode was active, capping player Power Level at 1965. Any Power advantages beyond this cap were nullified, ensuring a standardized challenge for all teams competing for World First completion.
- Normal Mode: Subsequent to the Contest Mode period, the recommended Power Level for Normal Mode is 1950.
Adherence to these Power Level recommendations is critical for player survivability and the ability to inflict effective damage upon antagonists within the raid.
Essential Pre-Raid Checklist
A comprehensive pre-raid checklist should address gear, communication protocols, shared terminology, and time allocation.
General Gear Recommendations
Guardians should enter Salvation's Edge with a versatile arsenal of well-upgraded legendary and exotic weapons and armor; substandard equipment (e.g., blue or green rarity items) is strongly discouraged. Loadouts should be adaptable, with options for:
- Add Clear: Weapons effective at dispatching large numbers of weaker enemies, such as submachine guns, auto rifles, and wave-frame grenade launchers.
- Single-Target DPS: Weapons optimized for dealing high damage to bosses and resilient targets, including sniper rifles, linear fusion rifles, and rocket launchers. Specific exotic weapons frequently cited for general raid utility include Divinity, Gjallarhorn, Outbreak Perfected, Witherhoard, and Izanagi's Burden. For Salvation's Edge, weapons such as Microcosm 13, Still Hunt 13, and swords like Lament or Falling Guillotine have been noted.
- Champion Stunning: The Repository encounter features Unstoppable Champions, requiring appropriate anti-champion modifications or abilities.
Exotic armor pieces that augment Super ability damage or accelerate ability regeneration are highly valuable. Consider equipping Celestial Nighthawk or Star-Eater Scales to maximize DPS potential during boss phases.
Lunafaction Boots, Sunbracers, or Cenotaph Mask provide significant benefits for team support and DPS phases. Well of Radiance remains a cornerstone super ability for raid success.
Synthoceps or Pyrogale Gauntlets significantly enhance your offensive capabilities. Focus on builds that provide team buffs while maintaining solid personal damage output.
All character subclasses and their associated abilities should be fully unlocked to maximize strategic options.
Communication
Effective communication is paramount in Salvation's Edge, arguably more so than in many previous raids due to its mechanical density.
- The use of microphones is strongly advised. While not strictly indispensable if the entire fireteam concurs on alternative communication methods, clear and concise verbal callouts significantly enhance coordination and reaction times.
- Prior to commencing the raid, the fireteam should establish a common lexicon for symbols, locations, and critical mechanics to prevent ambiguity during high-pressure situations.
Understanding Key Destiny 2 Raid Terminology
A shared understanding of common raiding terms is essential for efficient communication:
| Term | Definition |
|---|---|
| Adds | General, non-boss enemy units. |
| Add-clear | The role or action of eliminating adds. |
| Buff/Debuff | A temporary beneficial (buff) or detrimental (debuff) status effect applied to players or enemies, often integral to encounter mechanics. |
| DPS | An acronym for "Damage Per Second," referring to the rate of damage output. It is also commonly used to denote a specific phase in an encounter where the primary objective is to inflict maximal damage on a boss. |
| Wipe | A scenario where the entire fireteam is defeated, resulting in a reset of the current encounter to the last checkpoint. |
| KWTD | An abbreviation for "Know What To Do," frequently employed in Looking For Group (LFG) postings to signify a preference for players already familiar with the raid's mechanics. |
| LFG | An abbreviation for "Looking For Group," referring to platforms or communities used to find other players for activities. |
| Callouts | Verbal cues used by players to communicate critical information rapidly (e.g., "Left plate requires Spherical Resonance," "Tormentor has spawned in the central chamber"). These should be standardized within the team. |
| Resonance | A fundamental collectible and mechanical element in Salvation's Edge, appearing in various forms: Pyramidal (triangle), Spherical (circle), and Cubed/Hexahedral (square). |
Time Commitment
Salvation's Edge is a lengthy and complex raid. Initial completions, particularly for teams learning the mechanics, can extend over several hours. It is advisable to allocate a substantial, uninterrupted block of time for the activity. Prematurely departing from a raid session places a considerable burden on the remaining fireteam members.
The demanding nature of this raid, with its emphasis on universal mechanical participation, suggests that teaching runs ("Sherpa runs") will be particularly arduous and time-intensive. This could potentially lead to a reduced availability of Sherpas or more stringent expectations from those willing to guide inexperienced players through this specific content.
Encounter 1: Substratum
The Substratum is the inaugural encounter of the Salvation's Edge raid, introducing fireteams to the core mechanics of Resonance manipulation and the persistent threat of a wipe timer. The primary objective involves charging a series of plates distributed across a multi-room arena, collecting the resultant Pyramidal Resonance, and depositing these into a central Resonant Altar to extend the "Final Shape Looming" timer, which, if depleted, results in a full team wipe. The encounter space is characterized as a 9x9 grid of interconnected rooms, with orange energy conduits linking the plates to Resonance Conduit pillars.
Detailed Stage-by-Stage Walkthrough
The encounter progresses through distinct stages of enemy clearance, plate activation, Resonance collection, and deposition.
Initiation:
The encounter commences when a fireteam member picks up an initial Pyramidal Triangle object located in the main room and deposits it into a designated "Deposit Resonance" receptacle. This action activates the "Final Shape Looming" wipe timer and unseals two doorways, from which explosive Supplicant enemies will emerge.
Stage One – Powering the Plates (Enemy Cycle):
The fireteam must divide into two sub-teams of three, each proceeding through one of the opened doorways. A specific sequence of enemy eliminations must be followed, repeated twice per side, to activate the plates:
- In a side room, defeat a Quantum Minotaur. This will cause a Keeper of the Monolith (a Hydra-type enemy) to spawn on the opposite side of the arena complex.
- Eliminate this Hydra. Its defeat will open further doorways on the opposite side from where the Hydra was located.
- Through these new openings, locate and defeat an Overload Champion. This Champion's demise will trigger the appearance of a Threshold Sentinel Tormentor in the large, central room of the encounter area. A system message, "You are being beckoned back to the center," will cue this phase.
- Both sub-teams must then converge in the central room to defeat the Threshold Sentinel Tormentor. Successfully eliminating the Tormentor opens additional doors and, crucially, energizes a plate in the room where the preceding Overload Champion was defeated. The message "Energy flows into the architecture" signifies plate activation.
This entire cycle—Minotaur, then opposite-side Hydra, then opposite-side Overload, then central Tormentor—must be completed twice, resulting in two energized plates, one on each main path from the central room.
Throughout this stage, The Witness's hand, visible in the central chamber, will periodically project damaging triangular zones on the floor that players must avoid.
The optimization of this enemy elimination cycle is paramount; faster kills directly translate to quicker plate activation, affording more time for subsequent Resonance mechanics and alleviating pressure from the main encounter timer.
Stage Two – Collect Pyramidal Resonance:
Once two Tormentors have been defeated and a plate on each side of the arena is glowing, the fireteam reconfigures into three pairs. For each pair, one player positions near the initially glowing plate (the "sending" plate), while the other locates a room where a Resonance Conductor pillar is also glowing—this indicates the position of the second plate in their sequence (the "receiving" plate).
Plate Bouncing Mechanic:
- The player at the sending plate steps onto it, which transmits a visible energy current along the orange conduits to the receiving plate.
- The receiving plate will then glow briefly, followed by the appearance of a shrinking circle on its surface.
- The second player must step onto this receiving plate while the circle is visible.
- Successful execution spawns one Pyramidal Resonance (a small, luminous triangle) at a random location within that room.
This "bouncing" of energy must be repeated between the two plates until three Pyramidal Resonance triangles have been generated for that pair of plates. The system message "All resonance has been pulled forth" will confirm this.
Each player should endeavor to collect three stacks of Pyramidal Resonance. Acquiring more than three stacks of any given Resonance type is lethal. Resonance pickups have an individual timer, but this timer can be reset by collecting another Resonance stack.
Failure Condition:
If the plate bouncing sequence is mistimed (e.g., stepping on a plate too early or too late relative to the energy pulse or circle appearance, or if both players occupy their respective plates simultaneously), the chain will break. This spawns an Omen of the Witness (a Subjugator-type enemy) and causes any uncollected Pyramidal Resonance to despawn. The Subjugator must be defeated to reset the plates and allow another attempt at Resonance generation. Strand-affiliated Dread enemies are also present and can forcibly displace players from plates using their abilities, disrupting the sequence.
The plate bouncing mechanic serves as a foundational skill. Its emphasis on precise timing and inter-player coordination is a theme that will be revisited and amplified with additional variables, such as more Resonance types and complex wiring, in subsequent encounters like Repository. Mastering this system in Substratum is therefore critical for the fireteam's overall success in Salvation's Edge.
Stage Three – Closing Conduits & Depositing Resonance:
When players have amassed their Pyramidal Resonance (ideally three stacks each), or when the "Final Shape Looming" timer is critically low (approximately 40 seconds remaining), two Resonance Conductors must be closed.
- To close a Resonance Conductor, a player who currently possesses Pyramidal Resonance must shoot the triangular symbol on the target Conductor pillar before stepping onto the associated plate at the correct time in the energy transfer sequence. This action consumes one stack of that player's Pyramidal Resonance.
- Successfully closing two Resonance Conductors triggers the spawn of a Harbinger of the Witness (another Subjugator variant) in the main central room.
- This Harbinger must be defeated swiftly. Its elimination will cause all side doors to close and a new Resonant Altar to materialize in the central chamber.
- Players must then deposit their collected Pyramidal Resonance into this Altar. Each successful deposit extends the "Final Shape Looming" timer by 20 seconds.
This entire three-stage cycle—powering plates, collecting Resonance, closing conduits, killing the Harbinger, and depositing Resonance—must be repeated a total of three times to complete the Substratum encounter. Notably, on the final repetition, only a single Resonance deposit may be necessary to trigger completion.
Enemy Prioritization
Effective threat management involves prioritizing specific enemy types based on their mechanical importance or immediate danger:
| Enemy Type | Priority | Notes |
|---|---|---|
| Sequence Majors | High | Quantum Minotaurs, Keepers of the Monolith (Hydras), Overload Champions, and Threshold Sentinel Tormentors must be eliminated in their prescribed order to activate the plates. |
| Harbinger of the Witness | Critical | Spawns after two conduits are closed. Must be defeated to enable Resonance deposition. |
| Omen of the Witness | High | Spawns if the plate bouncing mechanic fails. Must be defeated to retry Resonance generation. |
| Weavers | High | These Dread combatants utilize Dusk Grenades, which can severely impair movement and visibility, posing a significant threat, especially to players engaged in plate mechanics. They should be a high-priority target for add clear. |
| Supplicants | Medium | Explosive Vex units that emerge from newly opened doors and can quickly overwhelm unprepared players. |
Role Assignments & Responsibilities
Clear role delineation is crucial for the synchronized execution required in Substratum:
- Initial Clearing Teams (Two teams of three): Responsible for progressing through the side rooms, eliminating the sequenced major enemies (Minotaur, Hydra, Overload) to trigger Tormentor spawns. One team typically manages the left progression path, the other the right.
- Plate Activation Teams (Three teams of two): Formed after initial plates are active.
- Plate Activators/Senders: Players who step on the initially energized plate to send the current.
- Plate Receivers/Conduit Closers: Players who step on the second plate in the sequence to spawn Resonance. Later, these players (or designated individuals) will be responsible for shooting the conduit symbol and stepping on the plate to close it.
- Resonance Collectors: All fireteam members are responsible for collecting Pyramidal Resonance.
- Add Clear: A continuous responsibility for all players, particularly those not directly operating the plates at a given moment. Focus should be on high-threat targets like Weavers or any enemies endangering plate operators.
Common Callouts
Standardized callouts facilitate efficient coordination:
// Common callouts for Substratum encounter
"Minotaur down, Hydra spawning."
"Overload down, Tormentor spawning mid."
"Tormentor defeated, plate is now active."
"[Location] plate sending current." / "[Location] plate receiving, stepping now."
"Resonance spawned [General location if needed, e.g., 'near pillar']."
"Closing conduit."
"Harbinger has spawned in mid."
"Depositing Pyramidal Resonance."
"Timer at [X] seconds!"
Challenge Modes
Substratum features two distinct challenge modes: "Touch and Go" and "Scenic Route."
This challenge mandates that the encounter be completed without any player acquiring a second stack of Pyramidal Resonance until every member of the fireteam has acquired at least one stack.
Strategy:
This requires exceptional coordination during the Resonance collection phase. A common approach involves plate operators remaining in their respective rooms while designated "runners" (typically the players not directly on the plates) collect Resonance from the central area or easily accessible points. After the initial energy bounce that spawns the first set of Resonance, all six players must prioritize obtaining their first stack.
Plate operators, in particular, must quickly locate and secure their Resonance to be ready for the next bounce. The core difficulty lies in resisting the urge for rapid individual collection in favor of synchronized team-wide acquisition. This challenge can create a tension between the natural desire for speed (to beat the main encounter timer) and the methodical, patient collection required by the challenge rules. Fireteams must adapt their mindset to prioritize this synchronized collection, or develop a highly optimized strategy that achieves both speed and compliance.
Failure Condition:
Any player collecting a second stack of Resonance before all other five players have obtained their first stack will invalidate the challenge for that attempt.
For this challenge, the fireteam that first encounters an Overload Champion during the plate-powering phase must not eliminate it. Instead, this team should focus on defeating their spawned Hydra, which will open the progression path for the second team. The second team, upon reaching their Overload Champion, must then defeat it. This sequence must be adhered to for every Overload Champion spawn cycle throughout the encounter.
Strategy:
Strict communication and tracking are essential to identify which team is designated as "first" for each Overload Champion that appears. The roles may alternate or be dynamically assigned based on progression.
Failure Condition:
Eliminating the incorrect Overload Champion (i.e., the "first" team killing their Overload, or the "second" team failing to kill theirs when required) will cause the challenge to fail.
Beginner Tips: Easiest Roles, Safe Spots, and Recovery
Easiest Roles:
For players new to the encounter, a dedicated add clear role within one of the initial three-person clearing teams can be a good starting point. This allows familiarization with enemy types and room layouts while under less direct mechanical pressure. During the plate activation phase, being a Resonance collector who is not one of the two primary plate operators can also be less demanding, though constant awareness of the "Touch and Go" challenge parameters is still vital if attempting it.
Safe Spots/Recovery:
Most side rooms offer some form of cover using pillars or environmental geometry. During the central Tormentor engagements, utilize the larger structural elements for protection. There are no specific invulnerable "safe spots" due to the roaming nature of enemies and the pervasive threat of The Witness's hand attacks in the central chamber.
Recovery relies on standard Destiny 2 survival tactics: disengage from immediate threats, find cover to allow health regeneration, and utilize healing abilities. A key aspect of survival is prioritizing the elimination of Weavers, as their Dusk Grenades can severely restrict movement and create hazardous zones, hindering recovery efforts.
| Team Action (Example Path) | Result for Opposite Team / Central Room | Consequence |
|---|---|---|
| Team A kills Quantum Minotaur (Left) | Keeper of the Monolith (Hydra) spawns for Team B (Right) | Path for Team B to their Hydra may open. |
| Team B kills Keeper of the Monolith (Hydra) (Right) | Doors open for Team A (Left) to find Overload Champion | Team A can progress to Overload Champion. |
| Team A kills Overload Champion (Left) | Threshold Sentinel Tormentor spawns in Central Room | Message: "You are being beckoned back to the center." Both teams converge. |
| Both Teams kill Threshold Sentinel Tormentor (Central) | Plate in Team A's Overload room (Left) becomes active | Message: "Energy flows into the architecture." Doors to side rooms open. |
| Repeat for Team B's Minotaur start | Symmetrical progression on the opposite side | Second plate becomes active. |
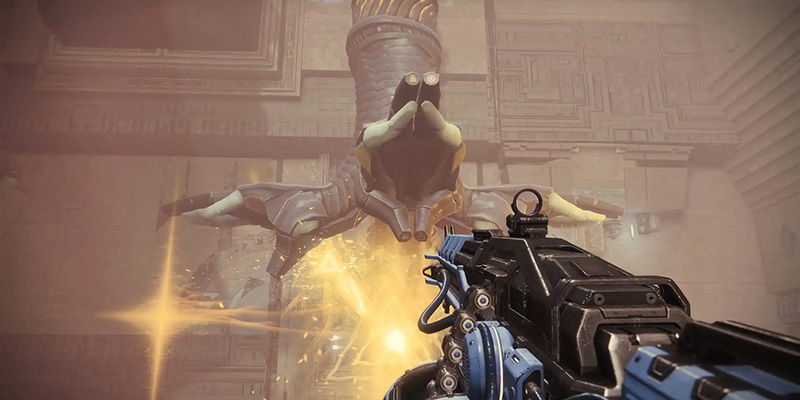
Encounter 2: Dissipation (Herald of Finality - First Boss)
The Dissipation encounter introduces the first major boss of Salvation's Edge: the Herald of Finality, a formidable Taken Captain-like entity. This encounter builds upon the Resonance mechanics from Substratum, incorporating a new Resonance type (Spherical) and a critical buff management system ("Stolen Valor/Favor") necessary for deciphering conduit requirements. The arena is a broad, open space featuring a central rectangular field where the boss primarily resides, and three Resonance Conduit pillars—Left, Right, and Middle (or "Close" relative to spawn)—each equipped with an upper (sending) and lower (receiving) plate. The "Final Shape Looming" wipe timer remains a constant pressure.

Detailed Stage-by-Stage Walkthrough
The encounter unfolds in phases involving buff acquisition, Resonance generation, conduit closure, and boss damage.
Initiation & Setup:
To commence the encounter, a fireteam member must shoot a prominent Taken blight located in the center of the arena. The fireteam should organize into three pairs, with each pair assigned to one of the three Resonance Conduit pillars (Left, Middle, Right).
Stage One – Obtain Stolen Valor/Favor:
- Upon initiation, the Herald of Finality will spawn, accompanied by an array of Taken and Dread enemies. Notably, yellow-bar Taken Knights (referred to as Trammels, with specific types like Wizard, Phalanx, or Ogre potentially tied to locations, or generically as "Trammel of enemy type") will appear at each pillar section. It is critical to prevent these Knights from stepping onto the plates, as this will trigger an immediate team wipe.
- At each pillar, the team must eliminate three of these yellow-bar enemies. Their defeat will cause three Taken blights to manifest near that pillar's plate system.
- A distinct audio cue (a gong sound) will signal that one player from each of the three pairs has received the "Beckoned to Fight" buff.
- Players with the "Beckoned to Fight" buff must destroy the nearby Taken blights (though any player can contribute to their destruction) and, in doing so, will acquire the "Call for Reckoning" buff.
- Subsequently, a new, smaller Taken Blight will materialize above the Herald of Finality in the central arena. Players holding the "Call for Reckoning" buff must proceed to the center and shoot this smaller Blight. This action transforms their "Call for Reckoning" buff into "Stolen Favor".
- The "Stolen Favor" buff is crucial, as it allows the possessing player to perceive the type of Resonance (Pyramidal/triangle or Spherical/circle) required to close their assigned Resonance Conduit pillar. Without this buff, the symbols indicating the required Resonance type are indecipherable. If a player with "Call for Reckoning" remains in the main pillar area for too long without converting it by shooting the boss's blight, the encounter may reset.
- While the "Beckoned" players are engaged in the central arena, the players remaining at the pillars must locate and destroy a large Taken orb that spawns in their vicinity.
- The message "Energy flows into the architecture" will appear after the Trammel enemy at a section is defeated, signifying that the plates for that section are now active and can be used for Resonance generation.
This "Stolen Favor" mechanic represents an escalation in individual responsibility compared to the first encounter. It requires a player to navigate a hazardous central zone, execute a specific action under pressure, and return with vital information, testing their awareness and communication skills.
Stage Two – Generate Resonance & Close Conduits:
Two primary strategies exist for this phase, largely differing in their timing relative to Stolen Favor acquisition:
After Stolen Favor is acquired and the required Resonance type is identified by the buffed player, the pair at each pillar passes energy between their upper (sending) and lower (receiving) plates three times. This generates both Pyramidal and Spherical Resonance orbs, which are then collected according to the callout.
- Before any player attempts to acquire the Stolen Favor buff (i.e., before "Beckoned" players go to the center): After the initial wave of adds and the Trammel Majors at each pillar are defeated, each pair of players activates their plates. They ping-pong the energy circuit twice (meaning both the top and bottom plate operators step on their respective plates two times). Crucially, no Resonance orbs should be picked up at this stage. Picking up Resonance is believed to start an individual timer that can lead to death if the Resonance is not deposited in time.
- After two successful ping-pongs, all six Resonance orbs (three of each type) for that pillar section will have spawned. The team then intentionally fails the third ping-pong attempt (e.g., the top plate operator does not step on the plate). This intentional failure will cause the Trammel Major for that section to respawn.
- Defeat this respawned Trammel Major. According to this strategy, no further adds will spawn at this pillar until after the Stolen Favor mechanic is completed.
- Now, the designated players proceed to the center to acquire the Stolen Favor buff as described in Stage One.
- Once Stolen Favor is obtained and players return to their pillars, they kill the first wave of newly spawned enemies. Then, the player on the lower/receiving plate collects the three Resonance orbs they need (ensuring the last one collected matches the type called out for their pillar). The player on the upper/sending plate collects the remaining three orbs.
- The upper plate is activated, and the lower plate player immediately shoots the conduit symbol and steps onto their plate to close it.
This "Fail Plates" method aims to minimize enemy interference during the actual Resonance collection and conduit closing process by front-loading Resonance generation into a phase with fewer active threats. This sophisticated manipulation of encounter scripting, by deliberately failing a mechanic to control enemy spawns, illustrates a high-level understanding of the raid's internal logic.
Regardless of the generation strategy, to close a conduit, the player holding the correct type of Resonance must shoot the corresponding symbol on the conduit (triangle for Pyramidal, sphere for Spherical) before stepping onto the receiving plate at the correct moment in the energy transfer. A player's entire stack of held Resonance will convert to the type they pick up last, preventing a single player from holding both types simultaneously to close multiple, differently-attuned pillars. If the plate-charging chain breaks during this phase, an orange-bar enemy will spawn; defeating it allows another attempt, time permitting.
Stage Three: Damage and Final Stand:
- Once all three Resonance Conduit pillars have been successfully closed, a Resonance deposit box will materialize in the central boss arena.
- All fireteam members should converge on this box and deposit their collected Resonance stacks. Each stack deposited adds time to the "Final Shape Looming" timer.
- When the deposit box vanishes (or after a set duration), the Herald of Finality's shield will lower, initiating the DPS (damage per second) phase.
- Effective DPS strategies often involve the use of a Well of Radiance for damage amplification and healing, combined with high-damage swords such as The Lament or Falling Guillotine.
- This cycle of buff acquisition, Resonance management, conduit closing, and DPS is repeated until the Herald of Finality reaches its Final Stand phase. During Final Stand, an increased number of Ogre-type enemies will spawn, intensifying the challenge. The boss must be defeated before the "Final Shape Looming" timer expires.
Boss Abilities & Attack Patterns
The Herald of Finality employs aggressive Taken Captain attacks within the central arena. Additionally, throughout the encounter, one of The Witness's hands will be visible, launching projectile attacks that target circular areas on the ground. These are telegraphed and can be avoided with situational awareness.
Enemy Prioritization
Successful execution demands prioritization of key enemy units:
| Enemy Type | Priority | Notes |
|---|---|---|
| Trammel Majors | High | Their elimination is integral to progressing the Stolen Favor buff mechanic. |
| Taken Blights | High | Destroying these is essential for the Stolen Favor buff acquisition chain. |
| Large Taken Orbs | Medium | These spawn near pillars while "Beckoned" players are in the central arena and must be destroyed by the players remaining at the pillars. |
| General Adds | Medium | These pose a constant threat and can quickly overwhelm the fireteam if not consistently managed. Rocket sidearms, Witherhoard, and area-denial grenade launchers are recommended for controlling add spawns. Blinding grenade launchers can be particularly effective as they can also destroy blights in a single shot. |
Role Assignments & Responsibilities
Each of the three pillar teams (pairs) has shared and specific responsibilities:
- Stolen Favor Acquirer: One player per pair will typically focus on obtaining the "Beckoned to Fight" buff, progressing it to "Call for Reckoning," and finally to "Stolen Favor" by engaging the boss in the central arena. This player is then responsible for reading the Resonance requirement at their pillar.
- Pillar Partner: This player focuses on add clear at the pillar, assists with plate mechanics, helps destroy the large Taken orb, collects Resonance once the type is called out, and aids in closing the conduit.
- Strong communication and coordination within each pair are vital for managing adds, mechanics, and Resonance effectively.
- All players contribute to add clear, especially during the initial phase and while the Stolen Favor acquirer is in the central arena.
Common Callouts
// Common callouts for Dissipation encounter
"[Player Name] is Beckoned / has Call for Reckoning."
"Small blight is up on the boss!"
"[Player Name] has Stolen Favor."
"[Location] pillar requires [Resonance Type]."
"Sending plate." / "Receiving plate, preparing to close conduit."
"All conduits closed, moving to center for deposit."
"Depositing Resonance now."
"DPS phase initiated!"
Challenge Modes
Dissipation features two challenge modes: "Changing Tactics" and "At Capacity."
This challenge requires the fireteam to complete the encounter using only Resonance sourced from alternate wings of the arena to charge the conductors.
Strategy:
Players responsible for closing a specific conductor must collect the necessary Resonance from a different wing than their own. For instance, if the Left pillar's conductor needs closing, the Resonance used must originate from the Middle or Right pillar areas.
A common tactic involves players designated as "closers" rotating clockwise to the next team's pillar area, collecting the Resonance type needed for their original pillar, and then returning to their original pillar to close its conduit. Alternatively, after obtaining Stolen Favor, closers rotate clockwise, pick up the Resonance required for the pillar they are now at, and close that pillar.
The "failed charge" strategy (passing the signal four times – two per plate – then letting it fail to spawn a major near the conductor, which is then killed to make all Resonance pickups available without add interference) can facilitate this. Conductor players would then grab the symbol needed for the wing to their left and rotate clockwise. This challenge places a heavy emphasis on precise communication and movement.
Failure Condition:
Using Resonance collected from the same wing as the conductor being closed will invalidate the challenge.
This challenge mandates that players may only deposit Resonance into the central box (which initiates the DPS phase) if they are holding exactly three stacks of Resonance.
Strategy:
The players designated as "conductor closers" (those who shoot the conduit symbol and step on the plate) should only collect a single stack of the required Resonance. Their partners (the "senders" on the upper plates) should collect the maximum of three stacks of their respective Resonance type.
When a closer uses their single stack to close the conduit, they will have no Resonance left. This leaves the three "sending" players, each holding three stacks of Resonance, to deposit a total of nine stacks into the central box. This quantity is sufficient to grant the maximum bonus time (150 seconds) for the DPS phase.
Failure Condition:
Any player depositing Resonance with one or two stacks, or if more than three players in total deposit Resonance, the challenge will fail.
Beginner Tips: Easiest Roles, Safe Spots, Recovery, and DPS
Easiest Roles:
The role of the pillar partner to the "Stolen Favor" acquirer can be less mechanically demanding. This player primarily focuses on add clear at their assigned pillar, assisting with plate bounces, and collecting the correct Resonance type once it's called out. This role has less direct pressure compared to navigating the central arena for the buff or making the crucial Resonance type callout.
Safe Spots/Recovery:
Cover is notably limited in this open arena. Players should utilize the Conduit pillars themselves and any sparse environmental geometry for protection. The Right side of the arena is often cited as being comparatively easier due to better cover options and less verticality in its terrain. Survival is paramount; dying consumes significantly more time than playing cautiously and methodically. The use of a glaive with its guarding capability can allow a player in the central arena to withstand some of the boss's direct attacks.
DPS Strategies:
A commonly effective and relatively straightforward DPS strategy involves deploying a Well of Radiance and having the team use high-damage swords (e.g., The Lament, Falling Guillotine, Bequest, Ergo Sum with Perfect Fifth perk). The primary focus for beginners should be on consistently executing mechanics to reach the DPS phase and then surviving the boss's attacks during that phase. A highly optimized damage loadout is less critical than consistent survival if the team is struggling.
One-Phase Kills:
While theoretically possible with highly optimized teams, specific damage surges, and flawless execution, achieving a one-phase kill of the Herald of Finality is not a realistic objective for beginner or learning teams. The focus should be on achieving consistent two or three-phase clears by mastering the mechanics and survival.
| Player Action | Result | Buff Gained/Player Role | Next Step |
|---|---|---|---|
| Kill 3 Yellow-Bar Enemies at Pillar | 3 Taken Blights Spawn Near Plate | Player from pair gets "Beckoned to Fight" buff. | |
| "Beckoned to Fight" Player Destroys Taken Blights | Player is imbued with energy | Gains "Call for Reckoning" buff | Proceed to central arena; locate small Blight above boss. |
| "Call for Reckoning" Player Shoots Blight on Boss | "Call for Reckoning" is consumed | Gains "Stolen Favor" buff | Return to assigned pillar; can now read Resonance type on the Conduit. |
| Player(s) at Pillar Destroy Large Taken Orb | Threat neutralized | Pillar section secured for Stolen Favor player's return. |
Encounter 3: Repository (Carve a Path)
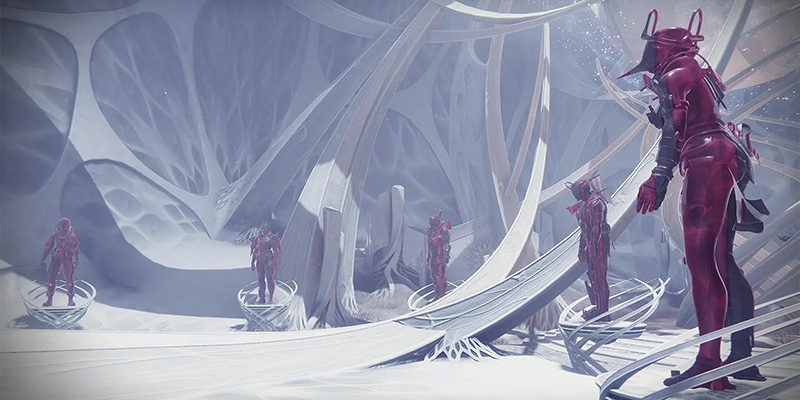
The Repository encounter, also known as "Carve a Path," functions as a high-intensity gauntlet across three vertically-ascending floors, presenting a significant escalation in mechanical complexity and enemy pressure without a traditional boss fight. It re-employs and expands upon the plate-based Resonance generation and conduit-closing mechanics observed in the preceding encounters. A third Resonance type, Square (or Hexahedron) Resonance, is introduced here, joining the existing Pyramidal and Spherical types. The "Stolen Favor" buff returns, granted to the player who lands the final blow on specific Tormentor enemies, enabling them to discern the required Resonance types for each conduit. This encounter also features Unstoppable Champions, demanding appropriate countermeasures from the fireteam.
Detailed Stage-by-Stage Walkthrough (per floor)
The core loop of killing Tormentors, generating Resonance, closing conduits, depositing Resonance, and clearing a final wave of enemies is repeated on each of the three floors.
- Initiation (Each Floor): The encounter on each floor begins with the fireteam, typically divided into three pairs, confronting Tormentor enemies near each of the three Resonance Conduits. The player who secures the final blow on a Tormentor is granted the "Stolen Favor" buff. The defeat of these Tormentors activates the plate systems for Resonance generation but also triggers the spawn of numerous, highly dangerous Scorpious Turrets throughout the room.
- Resonance Generation & Conduit Closing:
- The immediate priority after Tormentor elimination is to neutralize all active Scorpious Turrets, as their sustained fire can quickly lead to a team wipe.
- Once the turrets are managed, teams utilize the activated plates to generate Pyramidal, Spherical, and Square/Hexahedral Resonance by bouncing an energy beam between connected plates, mirroring the mechanic from previous encounters. Precise timing is crucial; errors in the sequence will spawn a Subjugator enemy, consuming valuable time.
- The player(s) holding the "Stolen Favor" buff must identify and communicate the specific type of Resonance required to close each of the three conduits on that floor.
- Players then collect the necessary Resonance stacks and proceed to close their assigned conduits by shooting the correct symbol on the conduit while possessing the matching Resonance type and stepping on the plate at the opportune moment.
- Depositing Resonance & Progression to Next Floor:
- If a conduit is not successfully closed in a timely manner, a Harbinger of the Witness (Subjugator) will spawn, adding further complications. However, if all three conduits are correctly closed, a glowing Resonant Altar (or chest) will materialize in a central location on the current floor.
- Fireteam members deposit their collected Resonance stacks into this altar/chest.
- Upon successful deposition, a wave of standard enemy reinforcements will appear, accompanied by a formidable Unstoppable Champion (specifically an Unstoppable Incendior, according to some sources). This contingent must be rapidly eliminated.
- The defeat of all these enemies, including the Unstoppable Champion, will unseal the door leading to the subsequent floor.
- Repeating for Floors 2 & 3:
- The fundamental mechanics remain consistent for the second and third floors.
- Floor 2 Specifics: Increased vigilance is required regarding Tormentor attacks, particularly their dive maneuvers, which can easily knock players off the edges of the platforms to their death. Additionally, the energy conduits (wires) connecting the plates may begin to intersect on this floor, demanding greater spatial awareness and careful identification of plate pairings.
- Floor 3 Specifics: The third floor is characterized by a more open layout. After depositing Resonance and defeating the Unstoppable Champion on this final floor, the Repository encounter is successfully completed.
The Repository encounter serves as a significant test of endurance and sustained execution. It takes the established mechanics of plate activation, Resonance management, and buff utilization, layering them with a third Resonance type, more aggressive enemy compositions (Scorpious Turrets, Unstoppable Champions), and environmental hazards. The three-floor structure demands unwavering focus and efficient teamwork throughout its duration.
Enemy Prioritization
Strategic target prioritization is critical for navigating Repository:
| Enemy Type | Priority | Notes |
|---|---|---|
| Tormentors | High | Initial high-priority targets on each floor. Their defeat is necessary to activate plate mechanics and grant the "Stolen Favor" buff. |
| Scorpious Turrets | Critical | Extremely dangerous static emplacements that spawn after Tormentors are killed. They possess high damage output and range and must be neutralized immediately to prevent rapid team wipes. Add clear in this encounter is not merely a background task but a critical mechanic in itself; failure to control these turrets directly leads to failure. |
| Unstoppable Champions | High | These appear after Resonance deposition on each floor and must be defeated to unlock progression to the next level. |
| Subjugators | Medium | These enemies manifest as a consequence of failed plate mechanics or if a conduit is not closed properly. They must be dealt with to reset the mechanic or allow progression. |
Role Assignments & Responsibilities
While the fireteam generally operates in three pairs, flexibility and shared responsibility are key:
- Tormentor Killer / Stolen Favor Holder: Ideally, one player per pair (or a designated single player for the "Singular Torment" challenge) secures the final blow on their section's Tormentor to acquire the "Stolen Favor" buff. This player is then responsible for reading their conduit's Resonance requirement.
- Plate Operators / Resonance Collectors: Both players within each pair will typically engage with the plate mechanics and collect Resonance.
- Add Clear / Turret Control: A continuous and crucial responsibility for all fireteam members. Given the lethality of Scorpious Turrets, immediate and coordinated fire is necessary.
- Unstoppable Champion Duty: At least one player per pair, or designated "floater" players with appropriate anti-Champion loadouts, should be prepared to stun and eliminate Unstoppable Champions.
Common Callouts
// Common callouts for Repository encounter
"Tormentor down, [Player Name] has Stolen Favor."
"Turrets are active! Focus fire [Call out specific turret locations if needed]."
"[Location] conduit requires [Resonance Type]."
"Closing conduit."
"All conduits closed, depositing Resonance."
"Unstoppable Champion has spawned!"
Challenge Modes
This challenge stipulates that only one designated player is permitted to kill Tormentors throughout the entire encounter.
Strategy:
A single player must be assigned the role of Tormentor eliminator for all three floors. The remaining five fireteam members can assist by weakening the Tormentors but must ensure the final blow is delivered by the designated player. This player will consequently be the sole recipient of the "Stolen Favor" buff and will need to either read all three conduits (requiring rapid movement) or have an effective system for relaying information if they can only view one conduit at a time from their position.
This challenge fundamentally alters the team's dynamic for acquiring Stolen Favor, making the designated player's survival and efficiency absolutely critical and increasing the burden on the rest of the team for add control and support for this key individual.
Failure Condition:
If any player other than the designated individual lands the killing blow on any Tormentor, the challenge is voided for that attempt.
This challenge requires that no player pick up the same type of Resonance twice consecutively. This restriction persists across all three rooms/floors of the encounter.
Strategy:
Each player must meticulously track the type of Resonance they last collected. A common and effective strategy to satisfy this condition is for each player to collect one of each of the three available Resonance types (Pyramidal, Spherical, Square/Hexahedron) in a sequence, ensuring that the final Resonance type collected is the one needed for their assigned conduit.
For example, if a player needs Square Resonance to close their conduit, they might collect Pyramidal, then Spherical, and finally Square. When moving to the next floor or generating new Resonance, the first symbol they collect cannot be Square.
Failure Condition:
Any instance of a player collecting the same Resonance type twice in a row, even if between different rooms or after depositing, will fail the challenge.
Beginner Tips: Easiest Roles, Safe Spots, and Recovery
Easiest Roles:
For players new to Repository, focusing on dedicated add clear and Scorpious Turret elimination can be a valuable contribution. This allows familiarization with enemy spawn patterns and the general flow of the encounter without the immediate pressure of executing plate mechanics or holding the "Stolen Favor" buff. Partnering with an experienced player who can guide Resonance collection can also ease the learning process.
Safe Spots/Recovery:
The encounter is highly mobile, offering few static safe positions. Players should utilize the existing level geometry—pillars, crates, and indentations—for temporary cover, especially when dealing with Scorpious Turrets. On the second floor, extreme caution is advised near platform edges during Tormentor engagements due to their knockback attacks. Rapid elimination of Scorpious Turrets is a primary factor in team survival and recovery.
If running behind on the encounter timer, particularly on the final floor, it is not strictly necessary for every player to collect a full three stacks of Resonance; acquiring enough to close conduits and manage the timer for the Unstoppable Champion phase is sufficient.
| Resonance Shape Name | Visual Description | Encounter Introduced |
|---|---|---|
| Pyramidal Resonance | Triangle | Substratum (Encounter 1) |
| Spherical Resonance | Circle / Sphere | Dissipation (Encounter 2) |
| Square / Hexahedron Resonance | Square / Cube | Repository (Encounter 3) |
"The Final Shape looms... but we stand together against the darkness."
The Ultimate Salvation's Edge Raid Guide - Part 2
Master the final encounters of Destiny 2's pinnacle raid with our comprehensive walkthrough!
Encounter 4: Verity (See Beyond)
Navigate the complex puzzle mechanics of shape manipulation in this challenging encounter
The Verity encounter stands as a uniquely intricate puzzle within Salvation's Edge, demanding exceptional communication, spatial reasoning, and coordinated execution from the entire fireteam. It revolves around the manipulation and matching of two-dimensional (2D) and three-dimensional (3D) shapes via interactions with a series of statues. The arena is bifurcated: an "outside" or main room containing six large, Guardian-like statues, and three isolated "inside" or solo rooms, each housing a single, smaller statue. At the start of each cycle, three fireteam members are randomly teleported into these solo rooms, while the other three remain in the outside area. The encounter involves several distinct phases, including symbol collection and manipulation by inside players, statue "dissection" by outside players to create target 3D shapes, and a complex resurrection mechanic involving the collection and correct placement of player Ghosts. Successful completion requires three full cycles of these mechanics. The cognitive load and communication demands of Verity are substantial, often making it a significant progression barrier for many teams.
Symbol Explanations & 2D to 3D Shape Combinations
A fundamental understanding of the shapes involved is crucial for all participants.
- 2D Shapes: These are the basic building blocks, collected from defeated Splintered Curator Knights or observed on statues and wall shadows. They are: Triangle, Circle, and Square.
- 3D Shapes: These are formed on the larger, outside statues by combining two 2D shapes. The goal for inside players is to ultimately embody one of these 3D shapes (as an aura) to escape their solo rooms.
Verity - 2D to 3D Shape Conversion Chart
| 2D Shape 1 | + | 2D Shape 2 | = | Resulting 3D Shape | Common Callout(s) |
|---|---|---|---|---|---|
| Circle | + | Circle | = | Sphere | Sphere |
| Square | + | Square | = | Cube | Cube |
| Triangle | + | Triangle | = | D4 / Prism | D4, Prism, Tetrahedron |
| Circle | + | Square | = | Cylinder | Cylinder |
| Circle | + | Triangle | = | Cone | Cone |
| Square | + | Triangle | = | Pyramid | Pyramid, Square Pyramid |
Some sources use "Prism" interchangeably with "D4" or "Pyramid" for Triangle + Triangle or Square + Triangle respectively. For clarity, this guide will primarily use D4 for Triangle + Triangle, and Pyramid for Square + Triangle, aligning with the most frequent descriptions.
Detailed Stage-by-Stage Walkthrough
The encounter proceeds through a repeating cycle of symbol manipulation, statue dissection, and resurrection.
Initiation & Setup:
It is highly recommended that all fireteam members equip visually distinct armor sets and Ghost shells. This greatly aids in identifying players during the resurrection phases where downed players' Ghosts must be matched to their corresponding statues.
The encounter is initiated when one player interacts with one of the six statues in the outside room, selecting the "Free Guardian" prompt. This action teleports three randomly selected players into the three separate "inside" solo rooms. The remaining three players constitute the "outside" team in the main room. There are anecdotal reports that player positioning at the start (e.g., two players near the statues, four near the spawn point) might influence who is teleported.
Inside Player Mechanics (Solo Rooms):
Each inside player operates independently within their room but must coordinate their findings and actions with the outside team and, indirectly, with the other inside players.
- Initial Callout: Upon arrival in their solo room, each inside player must identify the 2D shape (Triangle, Circle, or Square) that their individual statue is holding. They must also observe a projection or shadow on the far wall of their room, which will typically cycle between two different 2D shapes, or loop a single shape. The sequence of 2D shapes held by the statues in the inside rooms (from left to right, as perceived by the team) must be clearly communicated to the outside team.
-
Phase 1 – Symbol Exchange & Wall Shadow Manipulation (Shadow Dispelling):
- The primary objective for an inside player is to manipulate the shapes on their wall shadow and ultimately acquire the correct 2D shapes to form a "key" (a 3D shape aura) to escape. This involves killing Splintered Curator Knights that spawn in their room, which drop 2D shapes corresponding to those displayed on their wall shadow. If Knights cease to spawn, an Ogre will appear; defeating this Ogre will spawn more Knights.
- A crucial, though sometimes poorly explained, mechanic is that inside players must exchange shapes. They cannot simply use the shapes that drop in their own room for their own escape key if those shapes were their starting ones; shapes must be "passed". To do this, an inside player collects a 2D shape dropped by a Knight and deposits it at one of the other two inside players' statues (accessible via interact points in their room). Depositing a shape into another player's statue influences the symbols appearing on that recipient player's wall shadow.
- The immediate goal is often described as making the shapes on their wall shadow display two instances of the same 2D shape that their statue is currently holding (e.g., if their statue holds a Circle, their wall should show two Circles). However, alternative interpretations suggest the goal is for the wall to show two shapes that are not the one their statue is holding. The "exchange" rule implies that the specific wall pattern is less important than the act of giving and receiving shapes.
-
Phase 2 – Preparing for Escape:
- Ultimately, for an inside player to escape, their wall shadow should display two different 2D shapes, neither of which matches the shape their own statue is currently holding. For example, if their statue holds a Triangle, their wall might need to show a Circle and a Square.
- To escape, the inside player must kill two Knights and simultaneously pick up the two specific 2D shapes displayed on their wall shadow. This combination grants them a 3D shape aura (their "key") that allows them to pass through the previously impermeable glass wall at the back of their solo room and rejoin the outside team. The 3D shape aura they form must correspond to the 3D shape constructed on their respective statue in the outside room by the outside team.
Outside Player Mechanics (Main Room):
The three players in the outside room are responsible for add control, managing their own Knight and Ogre spawns, and, most critically, "dissecting" the main statues.
-
Statue Dissection:
- The outside team listens to the initial callout from the inside players regarding the 2D shapes held by the L, M, R inside statues.
- The primary goal of dissection is to alter the 3D composition of the three central statues in the outside room so that each one corresponds to the escape requirements of the inside player in the matching position (Left, Middle, Right). Specifically, the 3D shape on an outside statue (e.g., Outside Left) must be composed of the two 2D shapes that are not the 2D shape currently held by the corresponding inside player's statue (e.g., Inside Left). For instance, if the Inside Left player's statue is holding a Triangle, the Outside Left statue must be manipulated to become a Cylinder (formed by Circle + Square).
- To dissect a statue, an outside player kills a Knight in their area to obtain a 2D shape. They then approach one of the large statues and interact with it ("Dissect" prompt) while holding the 2D shape. This action "dunks" the held shape into the statue, effectively removing one of the 2D components of the statue's current 3D form and replacing it with the dunked shape, thereby altering the 3D object it represents. If a player attempts to dunk a shape that is not a component of the target statue's current 3D form, the offering will be rejected.
- Typically, one or two players are designated as "Dissectors," while the remaining outside player(s) focus on add clear and protecting the Dissectors.
Combined Mechanics & Resurrection Cycle:
The encounter features two distinct resurrection phases per full cycle.
- Witness Intervenes (Inside Player "Death"): At a certain point, often after some symbol exchanges or dissection progress, a message "The Witness notices your efforts..." will appear. Shortly thereafter, The Witness will "kill" all three inside players. These are not true deaths; they do not consume revive tokens or trigger a wipe timer. The "dead" inside players appear as statues with glowing cracks.
- Resurrection (Part 1 - Outside Revives Inside): The outside team must rescue the downed inside players. They do this by finding the three distinct Ghost shells of the "dead" inside players (which appear near their static bodies). Each Ghost must be picked up and deposited at the correct, now invisible, statue pedestal in the outside room that corresponds to the revived player's original inside position (Left, Middle, or Right). The "dead" inside players can often see one of the statue locations illuminated from their perspective and must call this out to guide the outside team. Depositing a Ghost in the correct pedestal revives the corresponding inside player. Depositing a Ghost in an incorrect pedestal results in the death of the player who made the deposit.
- Inside Players Escape: Once the inside players are revived and the outside statues have been correctly dissected to match their escape requirements, the inside players can kill their Knights, simultaneously pick up their two designated 2D shapes to form their 3D "key" aura, and pass through the glass wall to rejoin the outside team.
- Witness Intervenes (Team "Death"): After all three inside players have successfully escaped to the outside room and the 3D shapes on the outside statues are confirmed correct, The Witness will "kill" five of the six fireteam members, leaving only one player alive.
- Resurrection (Part 2 - Full Team Revive): The sole surviving player is responsible for reviving the other five. The "dead" players will each see a specific statue location highlighted, corresponding to another downed player's Ghost. They must call out which player's Ghost they see at which statue location (e.g., "Player X's Ghost is at the Left statue"). The living player collects the indicated Ghost (found in front of the downed player's body) and dunks it at the called-out statue pedestal to revive that player. Revived players can then assist in reviving others. This entire team resurrection must be completed within a 60-second time limit.
- Repeat Cycle: Once all six players are revived in the outside room, one full cycle of the Verity encounter is complete. The entire process—teleportation, inside symbol manipulation, outside statue dissection, and both resurrection phases—must be successfully executed three times to complete the Verity encounter.
The often-unclear "hidden requirement" that inside players must actively exchange shapes they initially possess, rather than simply using shapes that drop for them if they match their escape criteria, can be a major source of confusion and wipes. Teams must ensure that shapes are genuinely passed between the inside players for the glass wall to break.
Enemy Prioritization
Managing enemy spawns is crucial for both inside and outside teams:
- Splintered Curator Knights: These Hive Knights are the source of the 2D shapes required for all mechanical interactions. They are a constant high-priority target for both inside and outside players.
- Ogres: These larger enemies appear to control the respawn waves of Knights. If shape-dropping Knights are needed, Ogres must be defeated. On Master difficulty, Ogres in the solo rooms become Unstoppable Champions, adding significant threat.
- Unstoppable Champions (Outside): These typically spawn in the outside room after the full team resurrection phase, before the next cycle begins.
- General Adds (Outside): The outside team must continuously manage waves of standard enemies to protect the Dissector(s) and maintain control of the area.
Role Assignments & Responsibilities
Clearly defined roles are essential due to the split nature of the team and the high volume of information flow:
Inside Players (3 individuals):
Each is responsible for accurately identifying their statue's shape and wall shadow patterns, killing Knights for 2D shapes, correctly depositing shapes into other inside players' statues, clearly communicating their status and needs to the outside team, and ultimately collecting the correct 2D shapes to form their 3D escape key. This role carries high individual mechanical responsibility.
Outside Players (3 individuals):
- Dissector(s) (1 or 2 recommended): This player (or pair) must listen intently to callouts from all three inside players, kill Knights in the outside area for 2D shapes, and then skillfully dissect the large statues to create the 3D forms required by the inside team. This role demands a strong understanding of the 2D-to-3D shape combinations and excellent spatial reasoning. Many successful strategies advocate for a single, proficient Dissector to minimize confusion.
- Add Clear / Support (1 or 2 players): These players are responsible for protecting the Dissector(s), managing Ogre spawns, eliminating Unstoppable Champions, and generally controlling the enemy population in the outside room.
- Revivers: All outside players participate in the Ghost collection and deposition for reviving the inside players. The final lone survivor after the team "death" initiates the full team resurrection sequence.
Common Callouts
Precise, constant, and unambiguous communication is the lifeblood of the Verity encounter. Standardized callouts are critical:
Inside Player Callouts
| Initial: | "Inside statues are [Left], [Middle], [Right]." |
| Personal Status: | "My statue (e.g., Left) is holding a [shape]." "My wall shadow is showing [shape 1] and [shape 2]." |
| Needs: | "I need [shape 1] and [shape 2] on my wall to form my escape key." (Or, "My outside statue needs to be a [3D shape].") |
| Actions: | "Depositing [shape] at [position] statue." "Knights down, Ogre is up." "Glass has broken, I am exiting!" |
Outside Player Callouts
| Dissection: | "Dissecting [position] statue. I need a [shape] pickup." "Making the [position] statue a [3D shape]." |
| Resurrection (Part 1): | "Collecting Ghosts for inside players." "[Dead Inside Player Name]'s Ghost needs to go to the [position] pedestal." |
| Resurrection (Part 2): | "[Downed Player A Name], I see [Player B]'s Ghost at the [position] statue!" |
Challenge Modes
Verity includes two challenging Triumphs: "Equal Distribution" and "Varied Geometry."
Equal Distribution (Always Active Challenge)
This challenge requires that the fireteam complete the encounter without any player depositing a shape into the same statue twice in a row. This rule applies to all deposits: inside players depositing 2D shapes into other inside players' statues, and outside players depositing 2D shapes to dissect the main statues. The restriction also persists between phases and full rounds of the encounter.
Strategy: This demands meticulous tracking by every player of the last statue they (and potentially others, depending on interpretation) interacted with for a deposit. Inside players must coordinate their shape distributions to avoid consecutive deposits on the same statue. Outside Dissectors must ensure their dissection dunks do not immediately follow an inside player's deposit on that same statue, nor immediately follow their own previous dunk on that statue. Detailed rotational strategies and "mutex" (mutual exclusion) systems for dunking have been developed by the community to manage this.
Failure Condition: Any player depositing any shape (2D for transfer or dissection) onto the same statue twice consecutively, even if these deposits are by different players or for different mechanical purposes within the encounter's rules, will fail the challenge.
Varied Geometry (Weekly Rotational Challenge for "Ignited Light" Triumph)
This challenge dictates that each of the three full rounds of the encounter cannot be "solved" (i.e., allowing the inside players to escape) using the same set of three 3D shapes that were used in a previous round.
Strategy: The most widely adopted strategy to manage this is to categorize the 3D shapes into "complex" (Cone, Cylinder, Pyramid/Prism) and "simple" or "perfect" (Sphere, Cube, D4/Pyramid from identical 2D shapes). The team then aims to use complex 3D shapes for the escape keys in rounds 1 and 3, and exclusively simple/perfect 3D shapes for escape in round 2. This requires specific coordination: in round 2, inside players must aim to have two of the same 2D shape appear on their wall shadow (e.g., two Circles to make a Sphere key). The outside team must then ensure the corresponding large statues are dissected into these simple/perfect 3D forms.
Failure Condition: Reusing the exact same combination of three 3D shapes (e.g., Cone, Cylinder, Pyramid in round 1, and then Cone, Cylinder, Pyramid again in round 2 or 3) to facilitate the escape of the inside players will cause the challenge to fail.
Beginner Tips: Easiest Roles and Understanding Core Logic
Easiest Roles (Outside Team)
For players new to Verity, the most accessible initial role is dedicated add clear on the outside team. This allows a player to observe the encounter flow, listen to callouts, and understand the timing of phases without the immediate pressure of complex symbol manipulation (inside) or 3D shape dissection (outside).
Understanding Core Logic:
- Inside Players' Goal: Your fundamental objective is to acquire the two 2D shapes on your wall shadow that are different from the 2D shape your statue was initially holding. You achieve this by killing Knights and strategically giving away the shapes you collect (including your initial ones) to the other two inside players, and receiving shapes from them in return.
- Outside Players' Goal: Your primary task is to ensure the three large 3D statues in your room are transformed to match what the inside players require for their escape. If an inside player (e.g., the one corresponding to the Left statue) started with a Triangle on their statue, your goal for the main Left 3D statue is to make it a Cylinder (which is formed by Circle + Square, the two shapes not a Triangle).
Aids for Learning: Utilizing community-created cheat sheets, visual guides, or online solver tools can be beneficial during initial learning phases, particularly for grasping the 3D shape compositions or complex dissection sequences. However, the long-term goal should be to internalize the underlying logic rather than relying solely on external tools.
Visual Distinction: Emphasize the importance of unique armor and Ghost shell appearances for all team members to simplify and expedite the Ghost callouts during resurrection phases.
The Verity encounter's design, with its heavy reliance on abstract puzzle-solving, cognitive load management (tracking multiple shape states, player positions, and a high volume of callouts), and intricate communication, marks it as a unique challenge in Destiny's raid history. Its complexity can serve as a significant gatekeeper for LFG (Looking For Group) teams and players less accustomed to such intense, non-combat-focused mechanics, likely contributing disproportionately to raid attempt failures.
Encounter 5: Zenith (The Witness - Final Boss)
Face The Witness in the ultimate confrontation that concludes the Light and Darkness saga
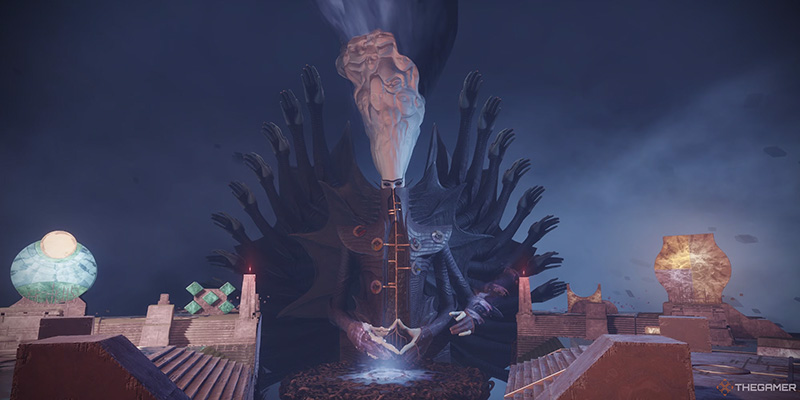
The Zenith encounter represents the ultimate confrontation with The Witness, serving as the dramatic conclusion to the Salvation's Edge raid and the Light and Darkness saga. This multi-phase battle takes place on a distinctive V-shaped platform, with The Witness positioned at the far end. Success demands mastery over several interconnected mechanics, including the acquisition of the "Glyphbreaker" buff through specific Resonance collection, the destruction of glyphs on The Witness's chest, survival during a "Witness Test" pillar-shooting phase, and sustained damage output during DPS windows, all while under the pressure of a "Final Shape timer".
Detailed Stage-by-Stage Walkthrough
The encounter cycles through buff acquisition, glyph breaking, potential tests, and damage phases.
Phase One – Acquiring Glyphbreaker & Breaking Glyphs:
-
Resonance Spawning Hand Attacks: The encounter begins with three of The Witness's colossal hands spawning on each side of the arena. These hands execute distinct attacks, each corresponding to a specific type of Resonance and color:
- Pyramidal (Green) Resonance: Generated by pulsing triangular energy fields on the floor, often associated with hands descending from the sky.
- Spherical (Yellow) Resonance: Generated by swirling orb-like projectiles ("bees"), often associated with hands emerging from the floor like a flower.
- Hexahedron (Red) Resonance: Generated by horizontal beams or lasers, often associated with hands appearing from the walls.
- Collecting Resonance: Designated players, typically 2-3 "runners" or "Glyphbreakers", must intentionally stand within these hazardous attack zones to acquire a corresponding x1 Resonance buff. Accumulating more than three stacks of a single Resonance type is lethal. Resonance stacks can be removed by successfully breaking a glyph on The Witness's chest or by standing in close proximity to a teammate who does so.
- Revealing Wristband Symbol & Color: While under the effect of a specific hand's attack, a player must shoot the wristband or bracelet on that same attacking hand. This action reveals a symbol on the hand's wrist and a colored band around it (Yellow for Spherical, Red for Hexahedron, Green for Pyramidal). It is crucial that the player is within the hand's corresponding attack area to be able to damage the wristband.
- Acquiring Glyphbreaker Buff: A player who possesses the Resonance buff type that matches the revealed colored band on the hand must then shoot that colored band on the same hand again. This destroys the hand segment and grants that player the "Glyphbreaker" buff. This mechanic functions even if the player cannot visually discern the color of the band due to visual clutter, as long as they have the correct matching Resonance.
- Breaking Glyphs on The Witness's Chest: The player with the Glyphbreaker buff must proceed to a small island platform near The Witness, which houses a Well of Light. From this vantage point, they must shoot one of the six glowing glyphs (or "buttons") on The Witness's chest that matches the symbol previously seen on the destroyed hand's wrist. Successfully shooting the correct glyph removes both the Glyphbreaker and Resonance buffs from the player. Each glyph broken will trigger the spawn of Subjugator enemies (typically one on each side of the main platform, or simply referred to as multiple Subjugators). These Subjugators must be eliminated quickly.
- Repeat: This process of collecting Resonance, revealing hand symbols, acquiring Glyphbreaker, and breaking chest glyphs is repeated until all six glyphs on The Witness's chest are destroyed. The destruction of all six glyphs typically ends the "Final Shape timer" and initiates the damage phase.
- Hand Despawning & Flexibility: If a targeted hand is not broken quickly enough, it may despawn and be replaced by another. The player might still possess the correct Resonance buff for the new hand by chance (a 50/50 probability is anecdotally reported), or they may need to acquire a different Resonance type. If multiple hands of the same attack type spawn, runners must diligently note the specific location of the hand they are targeting. Effective communication allows for flexibility; for instance, a runner can request a teammate who already has the correct Resonance type to shoot the wristband they are currently working on, saving time. Runners may also need to "overwrite" their current Resonance buff by intentionally taking damage from a different hand attack if their required color/type is not spawning favorably.
The Witness Test (Intermittent Mechanic):
This mechanic can trigger after a random glyph is broken or, according to some observations, if a hand glows with a golden aura upon its destruction. The appearance of the system message "The Witness tests you" signals its initiation.
- Regroup: The entire fireteam must quickly converge at the initial spawn point of the arena.
- Pillar Configuration: A formation of Resonance pillars will materialize in the air. Players must selectively shoot and destroy certain pillars to leave a specific geometric pattern (Triangle, Circle, or Square/Diamond) formed by the remaining unshot, faded pillars.
-
Pattern Determination: The required geometric pattern is dictated by the type of Witness hand that was last broken to grant a player the Glyphbreaker buff:
- Up Arm (Floor-to-ceiling hand, typically associated with Yellow/Spherical attack): Requires a Circle pattern. This is achieved by shooting the four corner crystals and the two uppermost center crystals, leaving a vaguely diamond or circular arrangement.
- Side Arm (Horizontal hand, typically associated with Red/Hexahedron attack): Requires a Square pattern.
- Down Arm (Hand attack creating floor triangles, typically associated with Green/Pyramidal attack): Requires a Triangle pattern.
- Survival: After a short duration, The Witness's eyes will flash, telegraphing an imminent arena-wide wipe attack. All players must execute a well-timed jump to avoid this attack. Successfully completing the pillar pattern and surviving the jump cancels the wipe. Failure to correctly form the pattern or to jump in time results in a team wipe.
Phase Two – Damage:
- Once all six glyphs on The Witness's chest are broken (and any Subjugators from the final glyph break are eliminated), the central platform will rise, and a large critical damage spot will open on The Witness's chest.
-
The fireteam must maximize damage output on this critical spot while actively evading The Witness's attacks:
- Diagonal Beam Attacks: These can often be sidestepped or jumped over.
- Frontal Attacks: These are telegraphed by a distinct flash from The Witness and must be jumped over.
- Horizontal Sweeps: The Witness may perform sweeping attacks across specific sections of the platform (e.g., top left, then bottom right).
- Platform-Wide Sweep: Similar to the Witness Test, an attack telegraphed by glowing eyes and a characteristic "swishing" sound requires all players on the DPS platform to jump to avoid lethal damage.
- Platform Retraction: After a set duration of DPS, or when The Witness draws back its hand or straightens its posture, the DPS platform will begin to lower. Players must quickly jump back to the main arena to avoid falling to their death.
- The cycle of Phase One (Glyphbreaker acquisition and glyph breaking) and Phase Two (Damage) is repeated until The Witness reaches its Final Stand health threshold.
Final Stand:
- This phase typically initiates when The Witness's health is reduced to approximately 10%. Players should wait for its chest to glow yellow, signaling vulnerability.
- During Final Stand, The Witness attacks with increased speed and frequency, often almost continuously.
- The fireteam must unleash all available damage (Supers, heavy ammunition, abilities) to defeat The Witness before a final wipe mechanic occurs or the encounter timer expires.
The Zenith encounter serves as a comprehensive test of all skills developed throughout Salvation's Edge, demanding mastery of Resonance collection, symbol recognition (glyphs and Test patterns), multi-player coordination for a central objective, and high-stakes survival under relentless boss attacks and timer pressure.
Boss Abilities & Attack Patterns
The Witness employs a diverse and lethal set of abilities:
- Hand Attacks (Phase 1): As detailed above, these generate Pyramidal (pulsing triangles), Spherical (swirling orbs/bees), and Hexahedron (horizontal beams/lasers) Resonance, which are hazardous if not intentionally collected for the mechanic.
- Witness Test: The pillar-shooting puzzle culminating in a synchronized jump to avoid a wipe.
- DPS Phase Attacks: A barrage of diagonal beams, telegraphed frontal assaults, horizontal sweeps, and a platform-wide attack requiring a jump. Recognizing the subtle telegraphs for each attack is crucial for survival on the confined DPS platform.
Enemy Prioritization
Effective management of additional threats is key:
- Subjugators: These formidable enemies spawn each time a glyph is broken on The Witness's chest. They must be eliminated rapidly, especially before transitioning to a DPS phase, as they can severely disrupt damage efforts or overwhelm the team. The Subjugator on the left side is often designated as a priority target.
- General Adds (Phase 1): While less mechanically critical than Subjugators, standard enemies must be controlled during Phase 1 to ensure the safety and efficiency of the Glyphbreaker runners.
Role Assignments & Responsibilities
Clear roles facilitate the complex interplay of mechanics:
Glyphbreaker Runners (2-3 players):
These individuals are responsible for collecting the correct Resonance types from hand attacks, shooting the hand bracelets to reveal symbols and colors, acquiring the Glyphbreaker buff, and then shooting the corresponding glyphs on The Witness's chest. This role demands excellent movement skills, acute situational awareness to locate active hand attacks, and precise communication. Runners may be assigned to focus on specific hand types (Up, Side, Down) to streamline coordination.
Add Clear / Support (3-4 players):
This group focuses on controlling standard enemy spawns, protecting the runners, assisting with or primarily handling Subjugator elimination, participating fully in the Witness Test (pillar shooting and jumping), and contributing to boss DPS.
Backup Runner:
It is advisable for at least one player from the add clear contingent to be familiar with the runner mechanics and prepared to take over if a primary runner is downed.
Witness Test Participants:
The entire fireteam must participate in the Witness Test, accurately shooting pillars and executing the synchronized jump.
Common Callouts
High-tempo, precise communication is essential:
Zenith Encounter Callouts
| Resonance Acquisition: | "Left/Right side, [hand type] hand active, attack is [color]!" "Wristband is [symbol] for [color]!" |
| Glyphbreaker Status: | "[Player Name] has [color] Resonance." "[Player Name] has Glyphbreaker, heading to platform for [symbol] glyph!" |
| Enemy Alerts: | "Subjugators spawning Left/Right!" |
| Witness Test: | "Witness Test incoming! Last hand broken was [type] - we need to make a [shape] pattern!" "Shooting pillars for [shape]!" "Eyes are flashing, JUMP NOW!" |
| DPS Phase: | "DPS phase active! Watch for [attack type]!" "Platform is lowering, get off to main!" |
Challenge Modes
Zenith includes two challenging Triumphs: "Careful Calculation" and "Coordinated Efforts."
Careful Calculation (Always Active Challenge)
This challenge requires the fireteam to complete the encounter without any player ever exceeding two stacks of any single type of resonant energy.
Strategy: Players, especially runners, must be extremely cautious when stepping into hand attacks to collect Resonance, only acquiring the necessary single stack. If a player inadvertently acquires two stacks of an undesired Resonance type, they can attempt to "cleanse" these stacks by standing on the central glyph-breaking platform while another player successfully breaks a glyph on The Witness's chest. Breaking the hand bracelets swiftly to reveal the required Resonance type can also help minimize accidental stack acquisition.
Failure Condition: Any player accumulating three or more stacks of any single Resonance type (Pyramidal, Spherical, or Hexahedron) at any point will fail the challenge.
Coordinated Efforts (Weekly Rotational Challenge for "Ignited Light" Triumph)
This challenge mandates that all six of The Witness's chest glyphs must be broken nearly simultaneously, typically within a tight window of approximately five seconds from the first glyph breaking to the last.
Strategy: To achieve this, all six fireteam members must acquire the Glyphbreaker buff. This usually involves the initial set of runners (2-3 players) obtaining their buffs, and then potentially swapping roles with add clear players so they too can become Glyphbreakers. Once all six players possess the Glyphbreaker buff, each player is assigned one of the six specific glyphs on The Witness's chest. On a coordinated countdown, all six players shoot their assigned glyph at roughly the same moment. The Master difficulty challenge for this encounter, which also requires simultaneous glyph breaks, is often cited as the optimal strategy for normal mode as well, as it minimizes the number of Subjugator waves the team must face.
Failure Condition: If the six glyphs are not all broken within the short, near-simultaneous timeframe after the first glyph is destroyed, the challenge is failed.
Beginner Tips: Easiest Roles, DPS Phase Survival, and Attack Telegraphs
Easiest Roles
For players new to the Zenith encounter, a dedicated add clear role is generally the most accessible. This role is less mechanically intensive than being a Glyphbreaker runner but still requires full participation in the Witness Test and DPS phases. The primary focus should be on staying alive, managing enemy spawns to keep areas clear for runners, and assisting with Subjugator takedowns.
DPS Phase Survival
The DPS platform is relatively small and exposed, making survival heavily reliant on movement and awareness.
- A Well of Radiance should be placed strategically, often slightly back from the absolute center of the platform, to allow some players to avoid initial attacks without needing to reposition.
- Players must learn to sidestep or jump over diagonal beam attacks, and decisively jump over frontal attacks (telegraphed by a flash) and the major platform-wide sweep attacks (telegraphed by The Witness's eyes glowing).
- Equipping Solar resistance armor mods and a Concussive Dampener mod can provide a crucial buffer, potentially allowing a player to survive a hit from some of The Witness's attacks.
- The general consensus is that safe, consistent DPS is preferable to risky, optimal DPS if survival is a concern.
Understanding Attack Telegraphs
- Witness Hand Attacks (Phase 1): Learn to associate the visual appearance of each hand attack (pulsing floor triangles, swirling "bees," horizontal lasers) with the type of Resonance it grants (Pyramidal, Spherical, Hexahedron).
- Witness Test Wipe: The Witness's eyes flashing brightly is the primary indicator for the synchronized jump needed to survive the wipe mechanic during the Test.
- DPS Phase Attacks: Pay close attention to The Witness's body language and visual cues. A flash often precedes a frontal attack requiring a jump. Sweeping motions indicate beam attacks. The "eyes glowing" cue for the platform-wide jump is critical.
Zenith - Witness Hand Attacks & Resonance Guide
| Hand Appearance / Attack Type | Visual Cue / Color Association | Resonance Granted | Wristband Color | Shape for Witness Test |
|---|---|---|---|---|
| Hand descends, creates pulsing triangles on floor | Green aura | Pyramidal | Green | Triangle |
| Hand emerges from floor ("flower"), emits "bees"/orbs | Yellow aura | Spherical | Yellow | Circle |
| Hand appears from wall, emits horizontal beams/lasers | Red aura | Hexahedron | Red | Square |
Salvation's Edge Loot & Rewards
Discover the powerful weapons, exotic gear, and cosmetic items you can earn from the raid
Salvation's Edge offers a unique suite of Exotic and Legendary rewards, including weapons, armor sets, cosmetic items, and a new raid Memento. Understanding the loot pool and acquisition methods is a primary motivator for many Guardians.
Detailed Loot Table
The raid features one Exotic weapon, six Legendary weapons (all craftable), class-specific armor sets, an Exotic Sparrow, an Exotic Ghost Shell, shaders, and emblems.
Exotic Weapon:
- Euphony: A Strand Linear Fusion Rifle that drops exclusively from the final boss, The Witness, in the Zenith encounter. The drop chance can be increased by completing specific Triumphs associated with the raid. Its Exotic traits are "Unwound" (sustained damage spawns Threadlings at the target's location) and "Spindle" (damage dealt by these Threadlings increases Euphony's damage). This weapon uses Special ammo.
Legendary Weapons:
All Legendary weapons from Salvation's Edge are craftable and feature the "Collective Purpose" Origin Trait, which grants increased range and handling when teammates are nearby. Many also feature the potent "Chaos Reshaped" perk.
Salvation's Edge Legendary Weapons
| Weapon Name | Type | Element | Notable Perks |
|---|---|---|---|
| Nullify | Pulse Rifle (Heavy Burst) | Solar | Firefly + Incandescent, Heal Clip + Chaos Reshaped |
| Imminence | Submachine Gun | Strand | Chaos Reshaped, Slice, Demolitionist |
| Non-Denouement | Combat Bow (Precision Frame) | Arc | Voltshot, Dragonfly, Archer's Tempo |
| Critical Anomaly | Sniper Rifle (Aggressive Frame) | Stasis | Chill Clip (in third column), Chaos Reshaped |
| Forthcoming Deviance | Glaive (Lightweight Frame) | Void | Reconstruction + Chaos Reshaped, Disruption Break + Close to Melee |
| Summum Bonum | Sword (Wave-Frame) | Arc | Relentless Strikes, Attrition Orbs, Surrounded, Chaos Reshaped, Tireless Blade + Chain Reaction |

Class-Specific Legendary Armor Sets:
Titan: Promised Reunion set
Hunter: Promised Reign set
Warlock: Promised Victory set
Other Cosmetic Rewards:
- Turmoil Engine (Exotic Sparrow): Awarded for completing the "Ignited Light" Triumph, which requires finishing all Master difficulty encounter challenges.
- Timeless Bond (Exotic Ghost Shell): Awarded for completing the Salvation's Edge raid on Master difficulty.
- Weapon Shaders: Examples include "Resonant Cellweave," awarded for the "Fragmented Truths" Triumph (looting all hidden chests).
- Emblems:
- Edification: Complete any version of the Salvation's Edge raid.
- Hunker Down: Complete the raid during Contest Mode.
- Fates Intertwined: Guide ten Guardians through their first Salvation's Edge completion (via Bungie Rewards, may not always be available).
- Twitch Drops (typically time-limited around launch): "Stand in Salvation," "Roots Remain," "Wrest the Heart".
Encounter-Specific Loot Table
The following table details the specific weapon and armor drops associated with each encounter in Salvation's Edge, based on community compilations. This information is invaluable for players targeting specific items.
Salvation's Edge Encounter-Specific Loot Drops
| Encounter | Weapon Drops (Name, Type, Element) | Armor Drops (Class, Slot) |
|---|---|---|
| 1. Substratum | Nullify (Pulse, Solar), Non-Denouement (Bow, Arc), Imminence (SMG, Strand) | Titan Arms (Promised Reunion Gauntlets), Hunter Chest (Promised Reign Vest) |
| 2. Dissipation (Herald of Finality) | Non-Denouement (Bow, Arc), Imminence (SMG, Strand), Summum Bonum (Sword, Arc), Forthcoming Deviance (Glaive, Void) | Warlock Helmet (Promised Victory Hood), All Class Items (Promised Reunion Mark, Promised Reign Cloak, Promised Victory Bond) |
| 3. Repository | Nullify (Pulse, Solar), Forthcoming Deviance (Glaive, Void), Critical Anomaly (Sniper, Stasis) | Hunter Arms (Promised Reign Grips) |
| 4. Verity | Non-Denouement (Bow, Arc), Imminence (SMG, Strand), Summum Bonum (Sword, Arc) | Warlock Legs (Promised Victory Boots) |
| 5. Zenith (The Witness) | Exotic: Euphony (Linear Fusion Rifle, Strand) Nullify (Pulse, Solar), Summum Bonum (Sword, Arc) |
Warlock Helmet (Promised Victory Hood), Titan Legs (Promised Reunion Greaves) |
Adept Weapons
Adept versions of the Salvation's Edge Legendary weapons are typically obtainable by completing encounters on Master difficulty, or potentially through completing specific Master encounter challenges. Adept weapons offer minor statistical advantages over their standard counterparts and can equip powerful Adept mods. Notably, Adept swords can utilize the Adept Impact mod, providing a free increase to their impact stat.
Raid Memento & Merchandise
- A unique Memento can be acquired for completing the raid without any "hard wipes" (full team death to orbit), though this has reportedly been bugged for some fireteams.
- Time-limited real-world merchandise, such as a Salvation's Edge Raid Jacket, Sling Bag, and Pin, are often made available via Bungie Rewards to players who complete the raid by specified dates. An Iconoclast Title Pin is also typically offered for those who earn the raid's associated Seal.
Farming Salvation's Edge for Loot
Players looking to acquire all weapon patterns (Deepsight Resonance versions) or complete their armor sets can farm Salvation's Edge through several methods:
- Weekly Featured Raid: When Salvation's Edge is the designated weekly featured raid, all encounters become fully farmable, allowing multiple completions on the same character within the week for loot drops.
- Spoils of Conquest: After defeating the final boss (The Witness), a special chest named the "Cache of the Salvation" appears. Players can spend 20 Spoils of Conquest at this cache to purchase specific weapons or armor pieces they have previously unlocked from the raid.
- Guaranteed Deepsight Weapon: A player can purchase one guaranteed Deepsight (red-border) version of a previously acquired raid weapon per week from this final cache.
- Weekly Challenges: Completing the active weekly challenge for an encounter typically rewards an additional chest, which can increase the chances of obtaining rare weapon drops and may also boost the drop rate of the Exotic weapon, Euphony.
Hidden Chests
Salvation's Edge contains two standard hidden chests that can be looted once per character per week. These chests typically drop raid mods and gear pieces that the player has already acquired from encounters.
- First Hidden Chest: Located in the jumping puzzle section between the second encounter (Dissipation) and the third encounter (Repository). More specifically, after climbing the large red gravity lift post-Dissipation, players navigate through an area with large greenish-blue cubes. The chest is found by looking for a hole in some yellow crystals in a chamber off the main path, often near Grim enemies and a Strand Subjugator. One description places it in a back-left corner room of a long orange hallway with orange cubes, requiring a crouch jump onto a ledge to find a back room.
- Second Hidden Chest: Found right before the final boss fight with The Witness, after the Verity (fourth) encounter. As players follow the path of large black roots spiraling up towards The Witness's arena, about three-quarters of the way to the top, a series of floating platforms can be seen leading towards the center, underneath the main boss platform. Jumping across these and into gaps/hand-holds in cube and rectangle formations leads to a secret room containing the chest.
Red Border Chest Puzzle
Additionally, Salvation's Edge features a more complex Red Border Chest Puzzle. This puzzle guarantees a Deepsight Resonance weapon upon raid completion if solved correctly.
Initiation: The puzzle begins in the very first enclosed chamber upon entering the Monolith, before the Substratum encounter. On a wall with eight columns of symbols (typically up a double staircase), the third column from the left is key; its symbols change weekly or with each new raid instance. These symbols, read from bottom to top, correspond to five hidden rooms containing plate/Resonance Conduit mechanisms.
Hidden Rooms & Activation: There are five potential hidden rooms scattered throughout the raid's traversal sections. Each week, only three of these rooms will be "active"; attempting to interact with an inactive room's mechanism will result in a rejection message. Players must identify the active rooms and, using the symbols from the third column on the initial wall (bottom symbol for Room 1, second from bottom for Room 2, etc.), activate the Resonance Conduit in each active room with the correct corresponding symbol.
- Room 1 (Bottom Symbol): In the jumping puzzle immediately after the symbol wall, near the start. Requires crouching to enter an alcove.
- Room 2 (2nd from Bottom Symbol): Towards the end of the first jumping puzzle, before the Substratum encounter door, left of where Subjugators spawn.
- Room 3 (3rd from Bottom Symbol): After Substratum. Ascend the red elevator, climb green blocks to front-left, pass through a grate on the right.
- Room 4 (4th from Bottom Symbol): After Dissipation. Past a grid room with many cube-spewing portals and two bridges with similar portals. Instead of turning right towards Repository, it's in a left-wall alcove.
- Room 5 (Top Symbol): Just before Repository, in an area with tree branches over orange blocks. Look up-left upon entering, climb blocks.
Confirmation & Reward: Correctly activating a conduit with the right symbol yields the message "Energy flows deeper into the monolith..." Incorrect activation says "Energy retreats from your grasp..." and voids the puzzle for that run (no mistakes allowed). After all three active conduits are correctly charged, "A boon will be granted..." appears. Completing the raid after this message spawns the red border chest.
The prevalence of the "Chaos Reshaped" perk on many raid weapons, alongside the "Collective Purpose" Origin Trait, suggests a design focus on rewarding coordinated team play and sustained engagement, offering tangible benefits for fireteams that fight in close proximity and maintain damage uptime. This aligns with the overall mechanical philosophy of the raid, which heavily emphasizes teamwork.
Advanced Strategies & Optimizations
Take your raid performance to the next level with these expert tips and optimizations
While the core mechanics of each encounter form the basis of a successful clear, advanced strategies and optimizations can significantly improve efficiency, speed, and consistency, particularly for experienced teams or those attempting Master difficulty or specific challenges. These often revolve around fine-tuned role execution, specific loadout synergies, and a deeper understanding of encounter scripting.
For the Zenith (The Witness) encounter, several advanced tactics have emerged:
Master Challenge as Optimal Strategy
The Master difficulty challenge for The Witness, which requires all six glyphs on its chest to be broken simultaneously, is also considered the most efficient general strategy for normal clears. This approach involves all six players acquiring the Glyphbreaker buff and then coordinating a simultaneous burst on the glyphs. The primary benefit is minimizing the number of Subjugator waves that spawn, as Subjugators are believed to trigger only after a glyph is broken. This makes the subsequent DPS phase cleaner and safer.
Subjugator Management
If not employing the simultaneous break, Subjugators must be dealt with swiftly. Prioritizing the left-side Subjugator is a common tactic. Microcosm is noted for its effectiveness against Subjugators post-DPS. Some teams assign a specific player (e.g., a Hunter) to eliminate the Strand Subjugator during the DPS phase itself.
Well of Radiance Placement & Loadouts
For Well of Radiance Warlocks, positioning the Well slightly back from the center of the DPS platform (approximately one-third of the way towards the rally flag position) can allow half the team to avoid moving during The Witness's first attack wave. After deploying the Well, the Warlock can swap to Sanguine Alchemy with specific elemental weapon pairings (e.g., Arc with Bitter/Sweet, Stasis with Chill Inhibitor, Strand with Euphony, Void with Edge Transit) to maximize utility or personal damage.
DPS Weapon Choices & Techniques
- Rockets/Snipers or Heavy Grenade Launchers/Snipers: Preferred for teams comfortable with high mobility and precision during DPS.
- Microcosm: A consistent and ammo-efficient option, especially beneficial for players who need to focus on movement and survival. It receives a damage buff for 20 seconds after the user casts their Super.
- Grand Overture: With appropriate artifact mods enhancing blind-inflicted damage, this can be an easy-to-use and consistent DPS weapon, allowing for hip-fire while dodging.
- Still Hunt: A popular choice for Hunters, often paired with Celestial Nighthawk for massive burst damage.
- Whisper of the Worm: Potentially the highest DPS if players can maintain Whispered Breathing by consistently single-jumping over wipe attacks, though this requires significant skill.
- Solar Resistance Mods: Equipping two Solar resist mods paired with a Concussive Dampener mod can allow players to survive at least one of The Witness's diagonal beam attacks during DPS, providing a crucial margin for error.
Witness Attack Patterns during DPS
The Witness attacks in three waves during a DPS cycle. Two of these waves will feature the team-wipe jump mechanic, and these two jump-mechanic waves always occur back-to-back. Understanding this pattern (e.g., if wave 1 has a jump, wave 2 will also, but wave 3 will not) can help teams anticipate and prepare.
Pre-Breaking (Highly Advanced/Risky)
Some teams have explored methods to "pre-break" The Witness's ripples using specific weapons (e.g., Two-Tailed Fox) before the encounter officially starts, aiming to skip directly to the first DPS phase. However, this technique is complex and will instantly fail the Master challenge.
Across other encounters, optimizations often involve:
- Substratum/Repository Plate Mechanics: Understanding that players can step on the receiving plate as soon as the energy pulse visually enters the plate, rather than waiting for the circle to fully appear, can save a few seconds per bounce.
- Dissipation "Fail Plates" Strategy: As detailed in Encounter 2, intentionally failing the plate ping-pong before obtaining Stolen Favor can create a safer window for Resonance collection by controlling add spawns. This demonstrates a nuanced manipulation of encounter triggers.
- Verity Dissection: Designating a single, highly proficient Dissector for the outside statues can streamline communication and reduce errors compared to multiple players attempting to manipulate shapes simultaneously.
- Time Savers for Challenges: For challenges like "At Capacity" in Dissipation, optimizing Resonance collection (e.g., closers taking only one stack, senders taking three) ensures maximum timer extension while adhering to challenge rules. On final DPS rounds where a kill is imminent, teams might not need to maximize Resonance stacks for the timer, allowing for faster conduit closing.
These advanced strategies highlight that mastery of Salvation's Edge extends beyond simply knowing the mechanics to understanding how to manipulate encounter pacing, enemy spawns, and buff/debuff windows to the team's advantage.
Common Failure Points & Overlooked Optimizations
Identify and overcome the most frequent roadblocks to raid success
Despite detailed guides, fireteams often encounter recurring issues in Salvation's Edge. Understanding these common pitfalls and potential optimizations can significantly reduce wipes and improve clear times.
General Raid-Wide Issues:
Timer Mismanagement
Nearly every encounter features a strict wipe timer ("Final Shape Looming" or similar). Failing to extend this timer by correctly and promptly depositing Resonance (Encounters 1, 2, 3) or by progressing mechanics efficiently (Encounters 4, 5) is a primary cause of wipes.
Solution/Optimization: Prioritize mechanics that extend the timer. In encounters with Resonance deposits, ensure maximum collection and timely banking. Optimize add clear to speed up access to mechanical phases.
Communication Breakdown
Given the complexity and split-team nature of many mechanics (especially Verity and Zenith runner assignments), unclear, incorrect, or delayed callouts lead to cascading errors.
Solution/Optimization: Establish clear, concise callouts before starting. Designate primary callers for specific information. Encourage players to confirm they've heard critical information.
Add Control Neglect
Underestimating the threat posed by standard enemies, particularly specialized units like Weavers (Dusk Grenades), Scorpious Turrets (Repository), or Subjugators (Zenith), can quickly overwhelm teams trying to focus on mechanics.
Solution/Optimization: Assign dedicated add clear roles if necessary, but all players should be responsible for their immediate vicinity. Prioritize high-threat adds. Utilize crowd control abilities and weapons.
Resonance Stacking Errors
Picking up more than three stacks of a single Resonance type is lethal in Zenith. Forgetting to cleanse unwanted Resonance stacks or mismanaging stacks for challenges like "Careful Calculation" can lead to deaths or challenge failures.
Solution/Optimization: Players must be mindful of their Resonance stack counts. Call out if nearing the cap or if needing to cleanse.
Encounter-Specific Failure Points & Optimizations:
Encounter 1: Substratum
Plate Bouncing Errors
Mistiming steps on plates (too early/late) spawns an Omen Subjugator and despawns Resonance. Players stepping on plates simultaneously also causes this. Strand Dread enemies pulling players off plates is also a common issue.
Optimization: Practice the timing. The receiving player can step on as soon as the energy pulse enters the plate, not necessarily waiting for the full circle animation. Ensure clear communication ("sending," "receiving"). Prioritize Dread enemies near plates.
Incorrect Conduit Closing
Not having Pyramidal Resonance when shooting the conduit, or incorrect timing, prevents closure and wastes time.
"Touch and Go" Challenge
Players picking up a second Resonance stack before everyone has one.
Optimization: Methodical, patient collection. Plate players stay in their rooms; runners grab from middle. Confirm everyone has one stack before anyone takes a second.
Encounter 2: Dissipation (Herald of Finality)
Knights on Plates
Allowing Taken Knights (Trammels) to step on plates causes an instant wipe.
Optimization: Aggressively target Trammels as soon as they spawn.
Add Overwhelm During Plate Mechanics
The standard strategy can lead to adds spawning while players are trying to manage plates and Resonance.
Optimization: The "Fail Plates" strategy: Generate all Resonance before Stolen Favor by intentionally failing the third plate bounce, then kill the respawned Trammel. This creates a window with fewer adds for Stolen Favor acquisition and subsequent Resonance collection/conduit closing.
Stolen Favor Player Death/Error
If the player with "Call for Reckoning" dies or fails to convert it to "Stolen Favor," the team cannot read conduit requirements.
Optimization: Protect the Stolen Favor player. Ensure they know the path and mechanic. Stolen Favor persists through death if acquired.
"Changing Tactics" Challenge
Using Resonance from the same wing to close a conductor.
Optimization: Strict clockwise rotation for closers, or "fail plates" strategy combined with grabbing Resonance from the wing to the left before rotating.
Encounter 3: Repository
Scorpious Turrets
These are a major wipe cause if not dealt with immediately after Tormentors die.
Optimization: Assign players to immediately scan for and destroy turrets upon Tormentor death. Use long-range weapons.
Tormentor Knock-offs (Floor 2)
Tormentor dive attacks near edges can easily kill players.
Optimization: Maintain awareness of positioning relative to edges when fighting Tormentors on Floor 2.
"Singular Torment" Challenge
Anyone other than the one designated player killing a Tormentor.
Optimization: Team weakens Tormentors; designated player gets all final blows. This player needs efficient routes to read all conduits or clear communication.
"Balanced Diet" Challenge
Picking up the same Resonance type twice in a row.
Optimization: Players grab one of each symbol type, ending with the one needed for their conductor.
Encounter 4: Verity
Incorrect Shape Dissection/Interpretation
Misunderstanding 2D to 3D conversions or what the inside players need leads to incorrect outside statues.
Optimization: Use a clear 2D-to-3D conversion chart (Table 4). Designate one experienced Dissector. Inside players clearly state what 2D shapes their statue is not holding (as those are the components of the required 3D escape shape).
Inside Player Shape Exchange ("Hidden Mechanic")
Inside players not properly exchanging their initial shapes, even if they acquire the "correct" ones for escape, can prevent the glass from breaking.
Optimization: Ensure inside players actively pass their starting shapes to other inside statues and receive the shapes they need from others. No "self-solving."
Resurrection Errors
Depositing a Ghost on the wrong statue pedestal kills the depositor. Slow resurrections during the final team revive can hit the timer.
Optimization: Unique player armor/Ghost shells for easy identification. Clear calls from dead players about who they see where. Prioritize reviving players who can quickly assist with further revives.
"Equal Distribution" Challenge
Depositing on the same statue twice in a row (applies to inside and outside deposits).
Optimization: Meticulous tracking and turn-based depositing. Outside Dissector waits for inside players to finish their deposit sequence before starting, and avoids the last-used statue.
"Varied Geometry" Challenge
Reusing the same set of three 3D escape shapes in a subsequent round.
Optimization: Use "complex" 3D shapes (Cone, Cylinder, Pyramid) for rounds 1 & 3, and "simple" 3D shapes (Sphere, Cube, D4) for round 2.
Encounter 5: Zenith (The Witness)
Incorrect Resonance for Glyphbreaker
Player attempts to shoot hand bracelet with mismatched Resonance, or wrong player shoots.
Optimization: Clear assignment of runners to hand types/Resonance colors. Flexible communication if a needed Resonance type isn't spawning (runners can overwrite buffs or ask for help from another runner with the correct type).
Witness Test Errors
Incorrectly shooting pillars or failing the jump leads to a wipe.
Optimization: Clear callout of the last hand broken (Up, Side, Down) to determine the required shape (Circle, Square, Triangle). All players focus on the pattern and jump cue (eyes flashing).
DPS Phase Deaths
The Witness's attacks on the small platform are highly lethal.
Optimization: Prioritize survival over raw DPS if struggling. Use resist mods. Learn attack telegraphs. Well of Radiance slightly offset from center.
Subjugator Overwhelm
Subjugators spawning after glyph breaks can disrupt momentum or kill players if not dealt with.
Optimization: Kill Subjugators immediately. The "simultaneous glyph break" strategy (for "Coordinated Efforts" challenge or general efficiency) minimizes Subjugator waves.
"Careful Calculation" Challenge
Player exceeding x2 stacks of any Resonance.
Optimization: Quick, deliberate dips into hand attacks for Resonance. Cleanse unwanted stacks on the central plate if possible.
"Coordinated Efforts" Challenge
Glyphs not breaking near-simultaneously.
Optimization: All six players get Glyphbreaker. Assign glyphs. Countdown for simultaneous shot.
Many overlooked optimizations stem from a deeper understanding of spawn triggers (like the "Fail Plates" strat in Dissipation) or precise timing (stepping on Substratum plates as energy enters). Recognizing that add clear is not just for survival but directly impacts timer progression by speeding up access to mechanics is also crucial. Finally, for complex puzzles like Verity, simplifying the problem by focusing on what a shape is not rather than what it is can sometimes aid dissection logic.
Conclusion
Master the ultimate challenges of Destiny 2's Light and Darkness saga
The Salvation's Edge raid stands as a formidable and intricate capstone to Destiny 2's Light and Darkness saga. Its design philosophy marks a significant step towards demanding universal mechanical competency from all fireteam members, largely abandoning the concept of passive roles. The pervasive wipe timers across encounters underscore the necessity for efficient execution and clear, constant communication.
The raid iteratively introduces and then escalates core mechanics, primarily centered around the collection and strategic use of various "Resonance" types (Pyramidal, Spherical, and Hexahedral/Square). From the foundational plate-bouncing and conduit-closing of Substratum, players progress to managing multiple Resonance types and crucial buffs like "Stolen Favor" in Dissipation and Repository, the latter also introducing Unstoppable Champions and significant environmental threats like Scorpious Turrets.
The Verity encounter represents a pinnacle of non-combat puzzle complexity within the Destiny raid landscape, requiring intense cognitive load management for its 2D-to-3D shape manipulation, statue dissection, and multi-stage resurrection mechanics. Its reliance on abstract logic and flawless communication makes it a notable gatekeeper. Finally, the Zenith encounter against The Witness masterfully synthesizes many of these established themes—Resonance collection, symbol matching, coordinated multi-person actions, and high-stakes survival—into a climactic and challenging final boss fight.
Successful navigation of Salvation's Edge hinges not only on individual skill but profoundly on a team's ability to prepare meticulously, communicate with precision, and adapt to complex, often overlapping, mechanical demands. The loot system, featuring craftable Legendary weapons with unique perks like "Chaos Reshaped" and the coveted "Euphony" Exotic, provides strong incentives for repeated clears. However, the raid's inherent difficulty, particularly encounters like Verity, suggests that it will remain a significant undertaking, pushing the boundaries of teamwork and problem-solving for the Destiny 2 player base. The emphasis on every player contributing to mechanics signifies a potential direction for future endgame PvE content, valuing comprehensive engagement over specialized roles.