
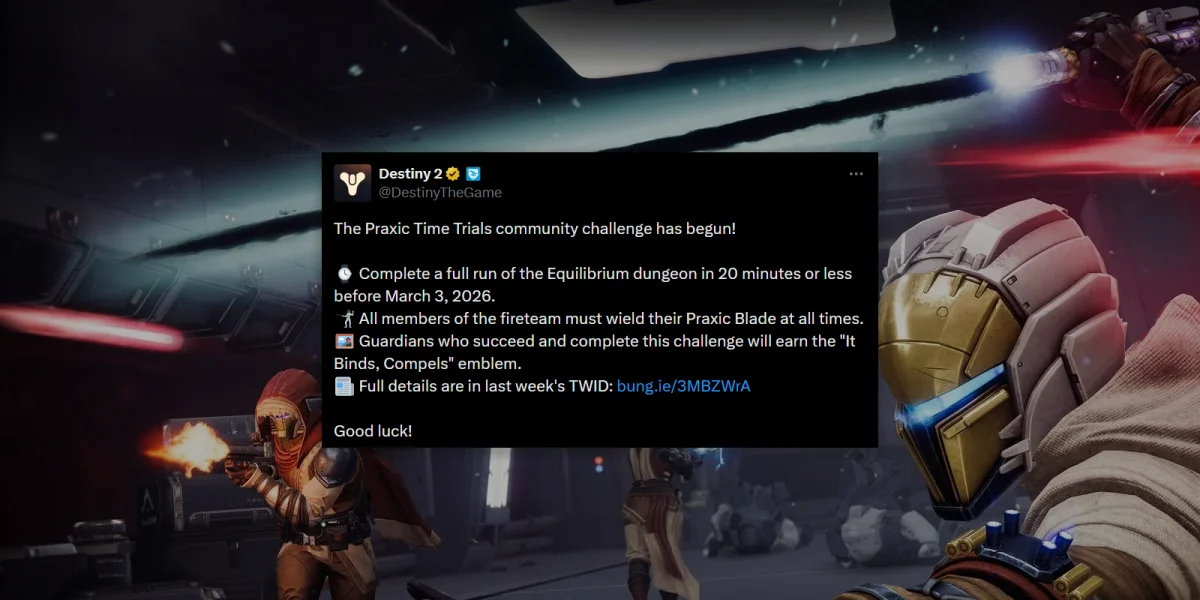
The Praxic Time Trials are Destiny 2's latest Community Challenge. Your fireteam needs to clear the Equilibrium dungeon in under 20 minutes while every player keeps the Praxic Blade equipped. It follows the Dark Age Hunt (where players cleared Warlord's Ruin with Bows, Glaives, and Swords) and shifts the focus from pure loadout restrictions to timed, coordination-heavy play.
This guide covers every rule, builds for all three classes, encounter-by-encounter strategy, and the mistakes that actually cost fireteams their clears.
Challenge Rules and Requirements
Before you dive into builds and strategy, you need to understand exactly what Bungie allows and prohibits. Some of these rules have nuances that are easy to miss.
Activity and Difficulty
The challenge takes place in the Equilibrium dungeon on Normal difficulty. No feats are required. Bungie recommends a full fireteam of three, though they've explicitly encouraged duos and solo players to attempt it as well.
The Time Limit
Your fireteam must complete the entire Equilibrium dungeon, every encounter with no skips, in 20 minutes or less. The timer starts the moment the dungeon begins.
Loadout Restriction: Praxic Blade
Every member of the fireteam must have the Praxic Blade equipped for the entire dungeon. This is the non-negotiable core restriction. You can use other weapons while the Praxic Blade is equipped; you don't need to exclusively attack with it. It just has to stay in its weapon slot at all times. Unequipping it at any point invalidates your run.
If you don't already own the Praxic Blade, you'll need to acquire it before the challenge window closes.
Fireteam Rules
All players must be present for the entire dungeon from start to finish. Nobody can leave and rejoin the activity. All three fireteam members must be in the same arena when an encounter completes, so you can't have someone run ahead while others finish a fight.
| Allowed | Prohibited |
|---|---|
| Pulling allies at the start of an encounter (joining allies in progress) | Unequipping the Praxic Blade from its weapon slot at any point during the run |
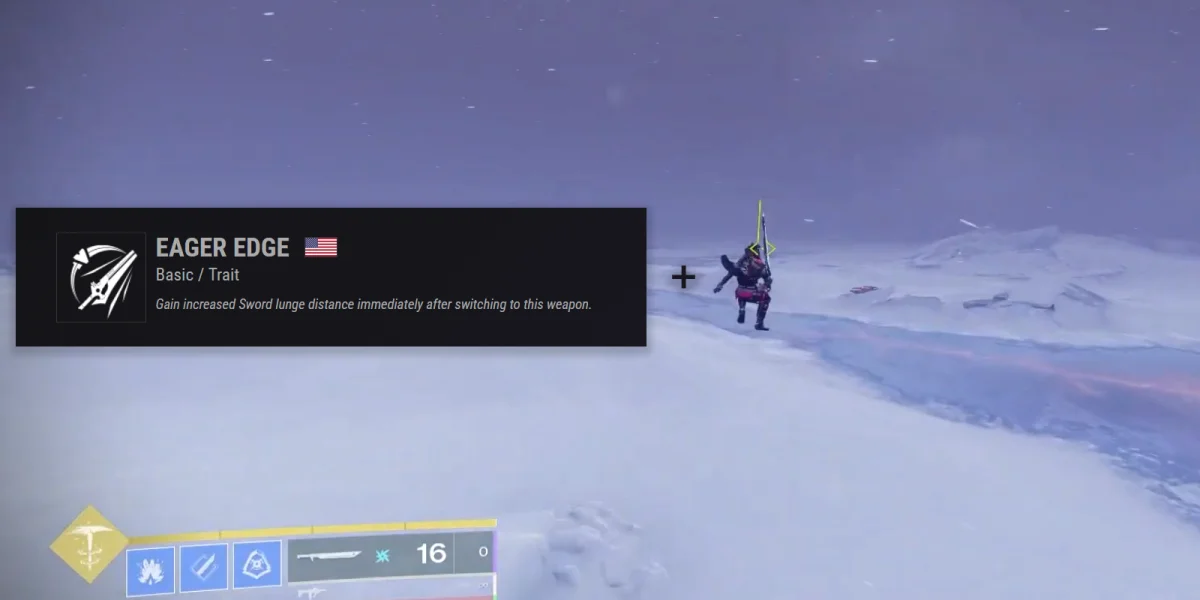
| Eager Edge movement using Swords with the Eager Edge perk for faster traversal | Skipping encounters - you cannot skip ahead of or pass any dungeon encounter without completing it |
| Ability skating in any form | Splitting up at encounter completion - all three fireteam members must be in the same arena when an encounter ends |
| Rocket jumping with Micro Missile Frame Grenade Launchers |
Rewards
Every Guardian who completes the Praxic Time Trials earns the It Binds, Compels emblem. Bungie's Analytics Team tracks completions on their end, so there's no manual submission required. The emblem gets granted no later than 30 days after the challenge period ends.
Team Composition and Role Assignment
The challenge doesn't enforce specific classes or subclasses, but a well-rounded fireteam covering multiple damage types will have the smoothest runs. A strong composition looks something like:
- Arc Titan running Thundercrash with Cuirass of the Falling Star for burst DPS on bosses.
- Void Warlock running Contraverse Hold with Nova Bomb for boss damage plus full Weaken uptime through charged grenades and Praxic Blade.
- Solar Titan running Pyrogale Gauntlets with Burning Maul for sustained high DPS through the fire tornado and ignitions.
This covers Arc, Solar, and Void across the fireteam for broad elemental coverage. You could also swap one Titan for a Prismatic Grapple Hunter if you want access to massive melee burst damage and fast traversal.
Role Considerations
When planning your fireteam, figure out who handles:
- Weaken uptime. At least one player should keep Weaken applied to bosses. Contraverse Hold Warlocks handle this naturally through charged grenades, or any player can apply it through the Praxic Blade.
- Primary DPS. Your hardest-hitting players should focus on maximizing super and weapon damage during boss phases.
- Rally Banner priority. Make sure everyone gets the banner before encounters begin. If a player misses the Rally Banner, the resulting ammo shortage cascades through the entire fight and into the next traversal section.
Solar Titan with Pyrogale Gauntlets
This build deals massive damage on Equilibrium bosses and is built around Burning Maul modified by Pyrogale Gauntlets, turning what many players overlook into one of the highest-damage supers available for this challenge.
Pyrogale Gauntlets turn Burning Maul into a single massive hammer slam that generates a fire tornado. The fire tornado accounts for most of the total damage, and because both Equilibrium bosses (Harrow and Dredgen Sere) tend to stay relatively stationary when you're in their face, you can land the full duration consistently.
At full power, this super's damage output is comparable to a Prismatic Thundercrash with Cuirass of the Falling Star. It genuinely competes with one of the game's most popular burst damage options while also providing sustained damage through the tornado's lingering effect.
Aspects
- Sol Invictus provides healing through Sunspot generation. This is your survivability backbone. When you're pushing through encounters at speed, passive healing keeps you alive without slowing down for recovery.
- Roaring Flames is the damage engine. At max stacks, Roaring Flames gives you a 73% damage buff on your Pyrogale Burning Maul super. You build stacks by getting Solar ability kills, which in practice means throwing your hammer at enemies before activating your super.
Fragments
- Ember of Ashes increases Scorch application, leading to more frequent ignitions. Combined with the Praxic Blade's Impact Core Power Core, you get two ignitions per combo for significant bonus damage.
- Ember of Torches grants the Radiant buff when you hit enemies with your hammer throw. Since you're already throwing hammers to build Roaring Flames, this comes naturally.
- Ember of Solace extends Radiant duration, giving you a wider window of boosted damage heading into DPS phases.
- Ember of Beams provides additional super stat, which translates to more super energy generation and more super damage across the dungeon.
Armor and Stats
The armor set bonus for this build is Swordmaster's, picked for its defensive synergy with the sword-heavy playstyle. The two-piece bonus (Balestra) exhausts targets when you damage them with a Sword, Glaive, or any melee attack, causing exhausted enemies to deal reduced damage. The four-piece bonus (Stesso Tempo) grants a short period of damage resistance after you block attacks with a Sword or Glaive and drop your guard. Together, these give you a survivability layer without sacrificing an Exotic armor slot. If you don't have Swordmaster's pieces with good stat rolls, prioritize hitting the stat targets over the set bonus.
Armor Mods
In order of importance:
- Super Surge x2 provides +40 to your Super stat. This is how you reach the ~160 Super target.
- Heavy Handed x2 supports the melee-focused gameplay loop with ammo and energy returns.
- Kinetic Surge x3 boosts Kinetic weapon damage. Important note: damage type surges always outperform weapon-type surges in terms of raw damage. Skip the +20 weapon stat mod and go for Kinetic Surge instead.
Artifact Mods
- Kinetic Synthesis for ammo generation. Critical when you're burning through ammo on the Praxic Blade across multiple encounters.
- Combination Argent Blade for increased Praxic Blade damage.
- Sword Storm Combo for additional damage that synergizes with the sword-focused playstyle.
How to Play the Build
The loop is straightforward but requires discipline:
- Before each boss encounter, throw your hammer at nearby enemies to build Roaring Flames to max stacks and gain the Radiant buff.
- Once stacked, activate Burning Maul and get into close range with the boss.
- Land the Pyrogale slam directly on the boss so the fire tornado stays on target for its full duration.
- Between supers, use the Praxic Blade and other weapons for sustained damage while throwing hammers to maintain Roaring Flames and Radiant.
The build's damage drops noticeably if you miss part of the fire tornado or fail to build full Roaring Flames stacks before popping your super. Even missing one wave of the tornado results in a significant damage loss, so stacking properly before each DPS window is what separates good runs from great ones.
Contraverse Hold Void Warlock
If your fireteam needs a Warlock who can handle ad-clear and boss damage while keeping Weaken on everything, the Contraverse Hold Void build is one of the strongest options in Renegades. It revolves around spamming charged Void grenades that deal devastating damage and regenerate themselves almost instantly.
Contraverse Hold got significant buffs heading into Renegades, gaining a built-in Weaken effect on charged grenades and an extra grenade charge. The exotic's core perk, Chaotic Exchanger, gives you damage resistance while charging your Void grenade with Chaos Accelerant, and charged grenades return grenade energy on hit. With Magnetic Grenades specifically, the charged detonation hits hard enough to chunk majors and bosses in a single throw with minimal downtime between casts.
Subclass Setup
Aspects:
- Chaos Accelerant lets you hold your grenade to charge it, increasing its size, damage, and duration. While charging, you gain 20% damage resistance. After landing a hit, your grenade regeneration rate spikes dramatically for a short window. If the grenade connects on both the initial and final burst (common against tankier enemies), the regeneration can trigger twice.
- Feed the Void grants Devour on Void ability kills. Devour continuously regenerates health and grenade energy on kills, creating a self-sustaining loop where grenade kills fund more grenades while keeping you alive.
Fragments:
- Echo of Persistence extends the duration of Devour, Overshield, and Invisibility buffs.
- Echo of Reprisal grants Super energy when you're surrounded by combatants, helping you get Nova Bomb back faster.
- Echo of Starvation gives you Devour when you pick up an Orb of Power or a Void Breach, adding another way to trigger the effect beyond ability kills.
- Echo of Undermining makes your Void grenades Weaken targets, stacking with Contraverse Hold's built-in Weaken for reliable debuff uptime on bosses.
Super: Nova Bomb: Cataclysm for burst DPS during boss damage phases.
Abilities: Healing Rift, Pocket Singularity, Magnetic Grenade (or Axion Bolt for tracking projectile coverage at range).
Stat Priority: Grenade first, since everything in this build scales off grenade uptime and damage. After that, Weapons and Class.
Praxic Blade Synergy
The Praxic Blade fits naturally here. Its deflection mechanic provides extra survivability, and for Prismatic variants of this setup, the blade builds Transcendence rapidly through Facet of Grace. For the pure Void version, the Praxic Blade serves as your required equipped weapon while the grenades do most of the work. The Weaken from both your charged grenades and the Praxic Blade ensures near-permanent debuff uptime on bosses, which benefits your entire fireteam's damage.
How to Play It
Hold your grenade to charge it, throw it at a group of enemies or a boss, and watch the energy come flooding back. Devour from Feed the Void keeps you healthy through kills, and Contraverse Hold's grenade regeneration means your next charged grenade is ready almost immediately. During boss encounters in Equilibrium, throw charged Magnetic Grenades for consistent damage between Nova Bomb casts. You're debuffing for the team while still putting up strong personal damage, making this build an excellent support-DPS hybrid.
Prismatic Grapple Hunter
Hunters have a strong option in the Prismatic Combination Blow Grapple build. This build stacks melee damage to absurd levels and uses the Grapple grenade's melee attack for massive burst against both trash mobs and bosses. It's aggressive, fast-paced, and rewards players who are comfortable staying in close range.
Combination Blow stacks melee damage up to three times when you get melee kills. At x3 stacks, your Grapple melee (the area-damage attack you perform during and shortly after grappling) deals enormous damage. Layer on Liar's Handshake's Cross Counter perk, which makes your next melee after a powered melee hit deal massively increased damage and heal you, and you become a close-range wrecking ball that's surprisingly hard to kill.
Exotic Armor
Liar's Handshake is the accessible option. Cross Counter triggers after you land a powered melee or get hit by an enemy melee, boosting your follow-up melee damage by 200% and healing you. This synergizes perfectly with Combination Blow since you're constantly punching things.
If you have access to the Relativism exotic class item, rolling Spirit of the Liar with Spirit of Caliban is the dream setup. Spirit of Caliban causes your Combination Blow final blows to trigger Ignitions, adding massive AoE Solar damage to every melee kill. This combination turns the build from strong to genuinely overpowered, letting you clear entire rooms with chained melee explosions.
Subclass Setup
Aspects:
- Stylish Executioner grants Invisibility and Truesight when you defeat a target affected by any elemental debuff. Your next melee attack while invisible Weakens targets. This gives you both survivability through on-demand invisibility and a damage debuff you can apply before big hits.
- Winter's Shroud slows nearby targets when you dodge, and slowing targets briefly increases your class ability regeneration. This pairs with Gambler's Dodge to keep the melee loop running while adding crowd control. Ascension can replace this for more aerial mobility and AoE, though it makes the melee combo slightly harder to pull off.
Fragments:
- Facet of Purpose grants Void Overshield when you pick up an Orb of Power, adding survivability while you're in melee range.
- Facet of Protection gives damage resistance when you're surrounded by enemies, which is exactly where you'll be.
- Facet of Hope increases class ability regeneration while you have an active Light buff, keeping Gambler's Dodge available more often.
- Facet of Courage increases Combination Blow damage against targets affected by Slow or Freeze, synergizing with Winter's Shroud.
Abilities: Golden Gun (Super), Grapple (Grenade), Combination Blow (Melee), Gambler's Dodge (Class Ability).
Stat Priority: Grenade, then Melee, then Super.
Weapons
A shotgun with One-Two Punch is highly recommended. Shooting an enemy at close range with One-Two Punch before following up with a melee amplifies your damage further. The Navigator with its catalyst is the premium pick for boss damage. The catalyst creates grapple points above bosses, letting you repeatedly Grapple and deliver the area-damage melee attack over and over for sustained DPS.
How to Play It
The gameplay loop chains three abilities in a cycle:
- Kill an enemy with Combination Blow to gain a damage stack (up to x3) and fully refill your Gambler's Dodge energy.
- Dodge near enemies (Gambler's Dodge) to recharge Combination Blow and slow nearby targets through Winter's Shroud.
- Repeat. Each melee kill resets your dodge, and each dodge resets your melee. The cycle is infinite as long as enemies are nearby.
For boss damage, the rotation changes: build Combination Blow to x3 on nearby adds, then use The Navigator to create a grapple point above the boss. Grapple to it, deliver the empowered melee, and repeat. Work a One-Two Punch shotgun into the rotation and the single-target damage becomes high enough to handle dungeon bosses comfortably.
The build can feel awkward to set up initially since you need to reach x3 Combination Blow before your damage really comes online. Once rolling, though, the loop is self-sustaining and deals ridiculous damage in both ad-clear and boss scenarios.
If you're a Titan who normally runs Stronghold for survivability, the Pyrogale build deliberately swaps it out because timed challenges demand offensive output over defensive safety. Stronghold is excellent for raids, contest-mode content, and situations where staying alive is the main concern, but when you're racing a clock, every super needs to hit as hard as possible. A Stronghold-based Solar Titan with permanent Restoration x2 uptime exists as a separate setup. It's just not the right tool for a speed challenge.
Dungeon Walkthrough: Equilibrium
This section covers the dungeon encounter by encounter with strategy and callouts for speed.
Opening and Traversal
The dungeon starts with a traversal section that includes Sparrow riding. Use Eager Edge swords and any available movement tech to cover ground as fast as possible. Players with faster load times will naturally pull ahead. Push forward, but remember that all players must be present when encounters complete.
Eager Edge, ability skating, and rocket jumping with Micro Missile Frame Grenade Launchers are all sanctioned by Bungie and should be used aggressively during traversal. Be careful with Eager Edge ammo, though. Using it during encounters means you might not have it for traversal, forcing you to move at normal speed and costing significant time.
First Encounter
A clean first encounter should take approximately 3 minutes. Key points:
- The encounter involves locating and killing specific marked targets. Finding these enemies quickly is the biggest time factor.
- Split roles: one player opens the second door while the other two collect buffs. Parallel progression is faster than moving as a single group.
- Watch out for the boss getting stuck on a ledge, which causes it to behave erratically and cancel attacks. Keep the boss on flat ground for predictable, fast kills.
Mid-Dungeon Traversal
Between the first encounter and Harrow, there are traversal and puzzle sections. Faster players should push ahead to start puzzles while slower players catch up during the solving phase, since puzzles have inherent wait times that naturally let the team regroup. Assign puzzle duty to whoever arrives first so everyone's time is productive.
Get familiar with the traversal route beforehand. Wrong turns, missed jumps, and hesitation on routing add up fast when every second counts.
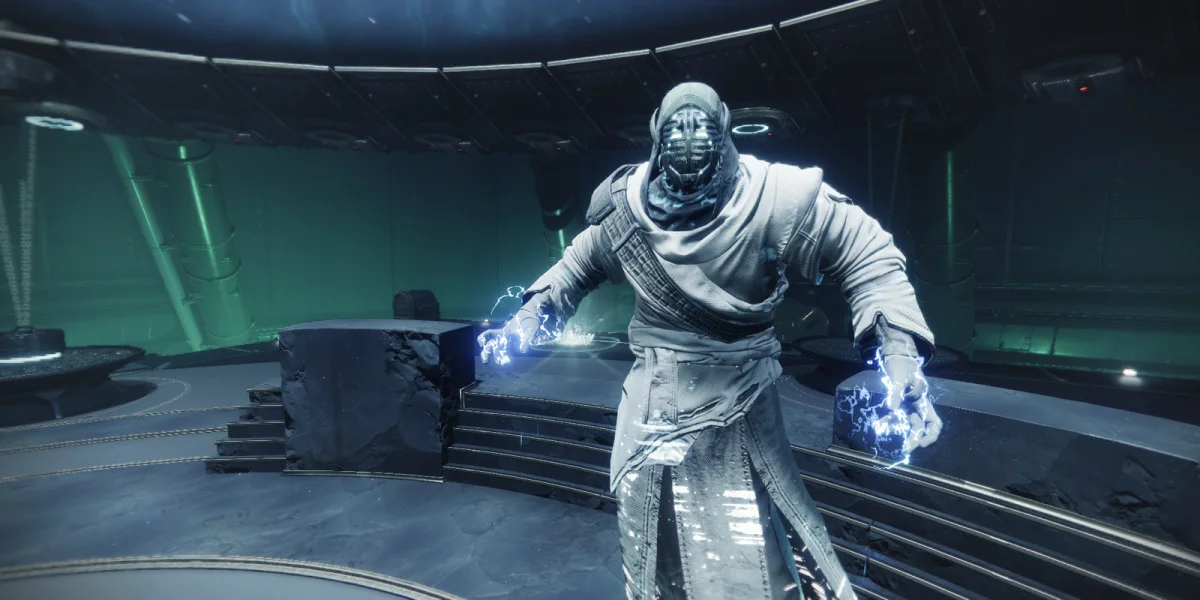
Harrow Encounter
Harrow is the dungeon's mid-boss (followed by Dredgen Sere as the final boss).
- The encounter involves room-clearing mechanics where players split to handle different rooms (left, middle, right). Call out when your room is done so the team can converge quickly.
- Coordinate who clears which enemies to avoid stealing buff-granting targets from teammates. If one player kills an enemy another needed for their buff, it wastes time repositioning.
- There's a speedrunner technique where standing near the back door causes the boss to despawn early, accelerating the encounter transition.
- On Normal difficulty, a well-coordinated fireteam can clear Harrow in a single damage phase. Even with limited Praxic Blade ammo, combined team DPS should be sufficient.
- After the encounter, the Dredgen-Apprentice buff may not immediately grant to players standing in the expected location. This can happen when overlapping ground effects interfere. If you experience a delay, reposition slightly and wait a few seconds.
Traversal to Dredgen Sere
The section between Harrow and Dredgen Sere includes more traversal and enemies to clear. By this point, you should be at approximately 13-14 minutes on the timer, meaning you need to reach Dredgen Sere within about 4-5 minutes to leave enough time for the final boss.
Two enemies near Dredgen Sere's arena need to be killed before the encounter can begin. Save supers (Nova Bomb, Burning Maul, etc.) specifically for these targets to clear them instantly.
Dredgen Sere Encounter (Final Boss)
Dredgen Sere is the final encounter and the make-or-break moment for your time. You should have approximately 5 minutes remaining when you reach this fight.
Encounter Mechanics:
- The encounter involves a dog-killing mechanic where enemies called "dogs" spawn and must be killed to progress.
- There's a Compelling mechanic where players need to compel specific targets at designated locations (mid, top, etc.) as part of the encounter progression.
- Divide Compelling duties: one player handles mid while another goes top.
- After enough cycles of killing dogs and compelling targets, the DPS phase begins.
DPS Strategy:
- One player should stand further back from the boss to spawn-kill dogs as they appear. This prevents them from interfering with the DPS players and keeps the encounter clean.
- During the final cycle, deliberately do not kill the dogs to prevent an additional spawn wave, making the transition to final DPS smoother.
- Thundercrash players should use their super immediately rather than saving it. You might get a second cast if the fight goes long enough.
- Solar Titans should build Roaring Flames stacks before the DPS window opens, then hit Dredgen Sere with Pyrogale Burning Maul for maximum damage.
Expected Completion: A well-executed run should clear the entire dungeon in approximately 18-19 minutes, leaving a comfortable buffer within the 20-minute limit.
Tips That Save Runs
These are drawn from common mistakes and hard-learned lessons in Equilibrium speed runs:
Rally Banner discipline. Every player must hit the Rally Banner before encounters. Missing it causes a cascading ammo crisis that affects performance across multiple encounters and traversal sections. Don't rush past it.
Don't waste Eager Edge ammo during encounters. Eager Edge is your primary movement tool for traversal sections. Using it during combat means you might not have it when you need to cover ground quickly. Budget your sword ammo accordingly.
Coordinate buff and enemy kills. In encounters with buff-granting enemies, don't kill targets that another player needs. Call out which enemies you're engaging and which room or area you're handling.
Stack your buffs before every DPS window. Whatever build you're running, take a few seconds before boss damage phases to prepare. Solar Titans need Roaring Flames stacks from hammer throws before popping Burning Maul. Contraverse Warlocks should have Devour active and a charged grenade ready. Grapple Hunters need Combination Blow at x3 before committing to the boss. Rushing into DPS without your buffs online is the fastest way to waste a damage phase.
Damage type surges over weapon surges. When modding your armor, always choose the damage type surge (like Kinetic Surge) over the +20 weapon stat alternatives. The damage increase is strictly better.
Practice the traversal route. Several seconds can be lost to wrong turns, missed jumps, and hesitation on routing. Traversal sections are where most time savings (or losses) come from, since encounter clear times are relatively fixed once your DPS is sufficient.
Assign encounter roles before starting. Know who's opening doors, who's clearing which room, who's on banner duty, and who's handling dog management before you zone in. Mid-encounter discussions about roles cost time you don't have.
Don't push bosses toward ledges. In the first encounter, the boss can get stuck on ledges and behave unpredictably, canceling its attack animations. Keep the boss on flat ground for consistent behavior.
Submitting Your Run
For the It Binds, Compels emblem, you don't need to submit anything. Bungie's Analytics Team tracks completions automatically and will grant the emblem within 30 days of the challenge period ending.