
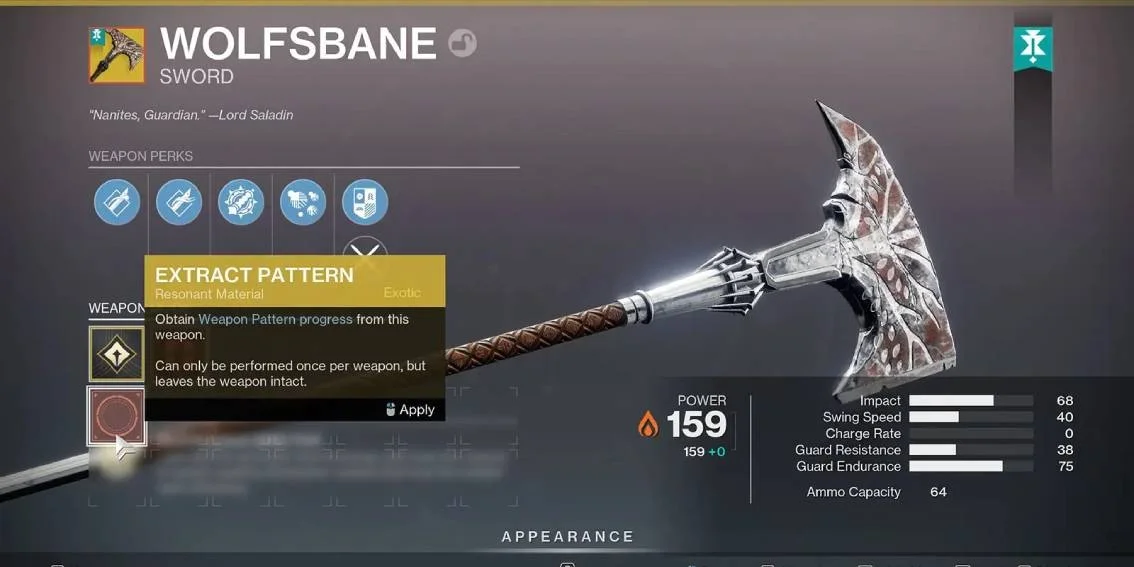
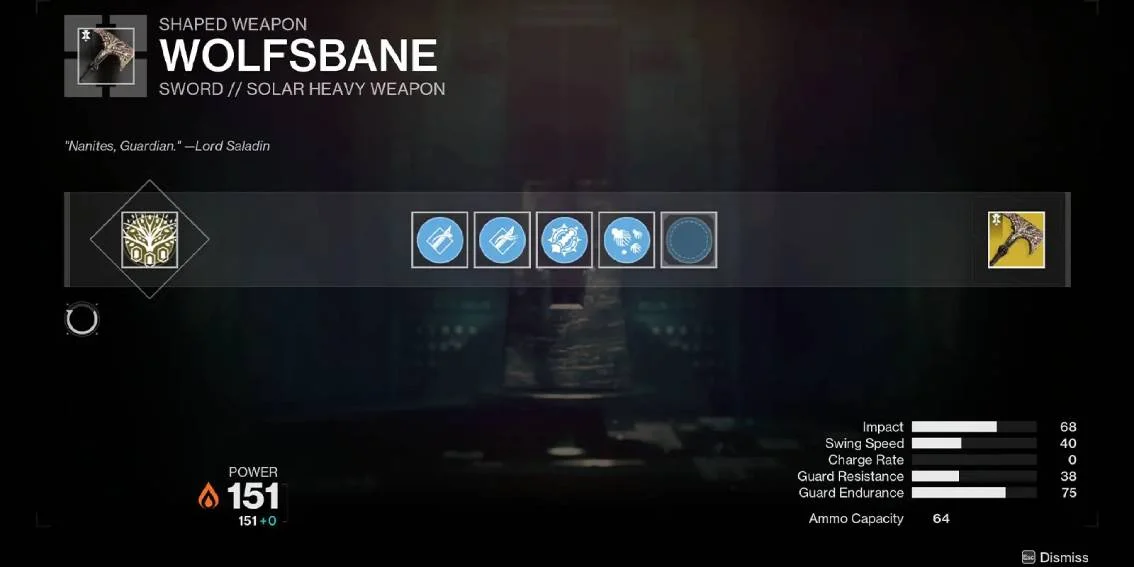
The Heliostat Exotic Mission arrived with the Ash & Iron update, taking players back to the Plaguelands where Maya is attempting to launch a Warsat. This mission rewards one of the most unique Exotics in Destiny 2: Wolfsbane. While the game classifies it as a sword, Wolfsbane functions as a two-handed axe similar to those wielded by the Iron Lords, complete with attack animations reminiscent of the Solar Scythe relic.
This guide covers everything you need to complete the Heliostat mission, unlock all Wolfsbane intrinsics and catalysts, and maximize the weapon's potential.
Quick Reference
| Detail | Information |
|---|---|
| Mission Location | Pinnacle Ops section of The Portal |
| Completion Time | Approximately 10-15 minutes (varies with fireteam size) |
| Reward | Wolfsbane Exotic Sword |
| First Run Difficulty | Fixed at lower difficulty with set modifiers |
| Subsequent Runs | Customizable difficulty, modifiers, and boons |
How to Launch the Heliostat Mission
The Heliostat mission is located in the Pinnacle Ops section of The Portal. Unlike other new content, there is no dedicated director location or special callout for this mission. Navigate to Pinnacle Ops and locate Heliostat in the activity list: it may not appear first despite being new content.
Understanding the Psion Allies
Three types of Psion allies assist you throughout the mission. You summon them by standing in white circle indicators on the ground (similar to rally flag circles). Understanding each Psion's function is essential for progression.
Shielding Psion
Quicksilver Psion
Hacking Psion

Complete Mission Walkthrough
Opening Section
Upon loading into the mission, you face a small group of Cabal and Vex enemies outside the main facility. Clear these enemies to proceed.
Your path forward is blocked by orange radiation. Locate the first white circle and summon a Shielding Psion to gain Psionic Protection. Progress through the opening area, summoning additional Shielding Psions at rally points as needed to maintain your radiation immunity.
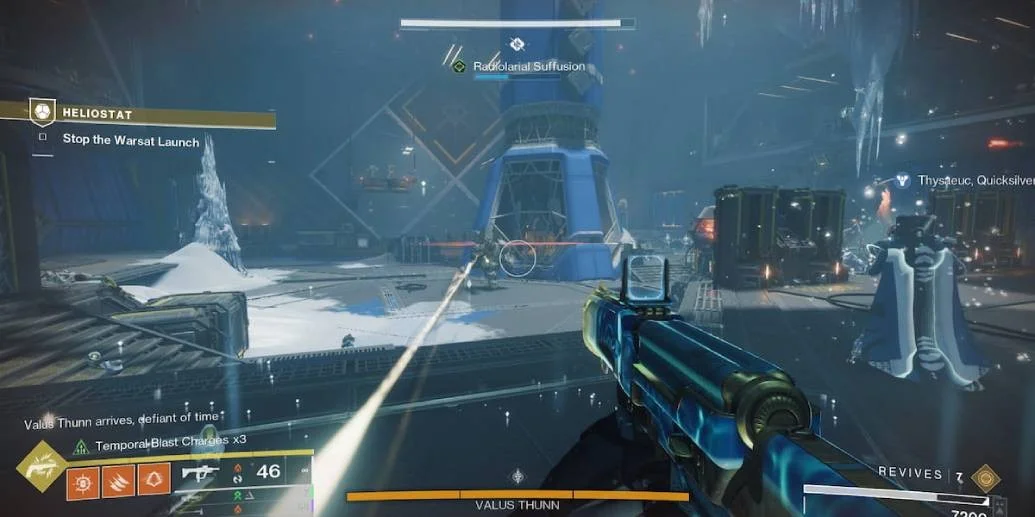
Security Node Activation
You enter a room where you meet your second Psion type - the Quicksilver Psion (named Thysaeuc). This encounter requires you to destroy four security nodes to progress.
- Locate and shoot the first security node in the center of the room. These nodes appear as blue glowing diamonds, identical to those found in the Spire of the Watcher dungeon.
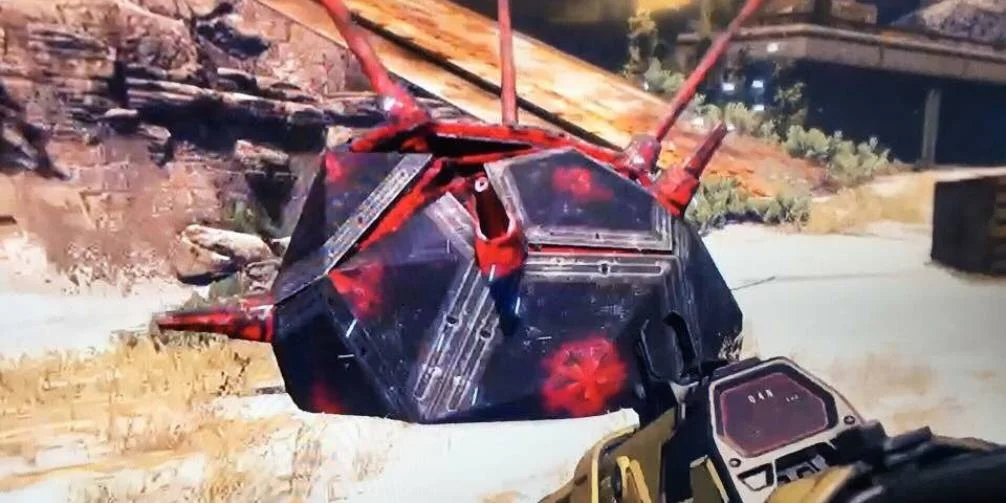
- Enemies spawn, including a Radiolaria Nexus Minotaur. Defeat this enemy to create a Vex pool on the ground.
- Stand in the Vex pool to accumulate the "Radiolarial Suffusion" buff. Watch the meter at the top of your screen: it must fill completely to become "Radiolarial Saturation."
- Once you have Radiolarial Saturation, the Quicksilver Psion moves toward one of three barriers in the room. Follow the Psion to whichever barrier it approaches.
- Stand next to the barrier and hold your interact key to help the Psion dissolve it.
- Enter the now-accessible room, clear any enemies, and destroy the security node inside (located at the top of the room).
- Return to the main room and repeat this process for the remaining two barriers and their security nodes.
After destroying all four nodes, the floor in the center of the room opens, allowing you to drop down.
The Door Puzzle
This section features numerous doors, many of which contain lethal electric traps that kill almost instantly. The safe doors are marked by a white or blue light in the entryway.
Navigation Path:
- Drop down on the same side as the Psion and turn right. Locate and interact with a console to open the correct door.
- The correct door is in the back right corner (when facing the terminal). Enter this door.
- In the narrow hallway with doors on both sides, take the farthest door on the top left side.
- Continue forward and take the far right door to return to the main hall.
- Jump across to the next door.
- Turn left. Do NOT proceed to the very end of this corridor (the door there will kill you).
- Look for a small cubby/hole on the left side before reaching the end. Drop down through this opening.
Hacking Psion Introduction
You emerge in an area with a summoning circle for the Hacking Psion. This section teaches you the partner hack mechanic.
First Hack:
- Summon the Hacking Psion
- Interact with the terminal beside you to assign the Psion
- Go to the opposite side of the room
- Execute the partner hack at the corresponding terminal
- A door opens in the center
Second Hack (Symbol Matching):
- Enter the new room containing three terminals on one side and one terminal at the far end
- Check the symbol displayed on the terminal at the far end (note which symbol it shows)
- Go to the opposite side and assign the Hacking Psion to that terminal
- Return to the three terminals and interact with the one matching the symbol you noted
Failure Consequence: Radiation spawns in the room, potentially causing a wipe
Elevator Descent
The floor opens to reveal a descending elevator surrounded by electric barriers. These barriers will kill you instantly on contact.
How to Navigate:
- You can either ride the elevator down or slide down the slope (sliding sometimes provides better visibility of the nodes)
- Watch for glowing Vex nodes along the descent: there are four total
- Shoot each node as you approach it to temporarily deactivate the corresponding electric barrier
- The nodes only become targetable when you get close to them
Central Observation Security Code
After the elevator, clear the enemies ahead to open the door into a blue facility structure with four sections: a central room, left room, right room, and back room.
Objective: Input a three-symbol security code by executing partner hacks in the correct order.
- Enter the central room and summon the Hacking Psion
- Locate the monitors displaying three symbols in sequence (all three sides show the same symbols in the same order). Note the symbols from left to right: this is your security code.
- Identify which side room contains your FIRST symbol by looking through the glass at the three symbols in each room
- Once you find the correct room, assign the Hacking Psion to the terminal outside that room
- Locate the destructible vents (either on floors or walls) and shoot them to create a path
- Navigate through the vents to reach the other side of the room
- Shoot another set of vents and enter the terminal room
- Clear enemies and interact with the terminal matching your first symbol
Failure Consequence: Orange-bar Gladiators spawn that you must kill
Return to the central room (you can either backtrack or jump up through the opening in the ceiling above the terminal room, which drops you over a Warmind-style structure back into the center). Repeat this process for the second and third symbols in order.
After entering all three symbols correctly, a large wave of enemies spawns in the central area. Defeat them all, then interact with the panel to activate the elevators. A chest spawns here, though it does not contain Tier 5 gear, as completion rewards are saved for mission end.
Gravlift Override
Exit the blue facility to find two active elevators in a large area resembling the Spire of the Watcher dungeon aesthetic. This section has radiation pillars throughout, so summon Shielding Psions at available rally points.
Objective: Activate terminals at the end of two separate pathways to unlock the final gravlift.
Path Navigation:
- Take either elevator up and follow the floating platforms
- Look for a corridor/catwalk extending outward - the entrance may be on the side or underneath the platform, depending on which path you take
- At the end of each corridor, locate and interact with the green terminal
- Use the red/orange portal to return to the center
- Complete the same process for the opposite side
Once both terminals are activated, the gravlift unlocks. Take the portal to the gravlift and ascend to the final encounter.
Valus Thunn Boss Fight
This encounter brings together all three Psion types. The boss, Valus Thunn (possibly the same Valus from the Tree of Probabilities strike), features health gates that trigger immunity phases.
Phase 1 - Opening the Side Rooms
- Kill the Radiolaria Nexus Minotaur to get Radiolarial Saturation (same as the first encounter)
- Follow the Quicksilver Psion to a barrier and help dissolve it
- The Hacking Psion follows you automatically. Head upstairs, clear enemies
- Assign the Hacking Psion to the terminal and execute the partner hack
- Return to the main arena and repeat for the second side room
Damage Phase and Immunity Mechanics
- The boss has health gates at each third of his health bar
- When reaching a health gate, the boss becomes immune and radiation floods the arena
- Your Psion allies become trapped/disrupted during this phase
- A yellow-bar Wyvern called a "Warden" spawns
Breaking Immunity
- Locate and kill the Warden Wyvern as quickly as possible
- Killing the Warden frees your Psion allies and removes the boss's immunity shield
- With allies freed, you can obtain Psionic Protection from the Shielding Psion at the back of the room
Repeat the damage and immunity break cycle until Valus Thunn is defeated.
Mission Completion
- Summon all three Psions one final time
- Shoot the panel on the Warsat in front of you to break it open
- Interact with the blue glowing orb inside the Warsat
- After a brief prompt from Ikora, the mission completes and you receive Wolfsbane
Wolfsbane Exotic Sword Breakdown
Exotic Traits
Light attacks generate Sword energy and have a chance to spawn seeking Quicksilver nanites that heal the wielder upon attaching.
Quicksilver nanites that attach to the wielder charge the blade. Use [Alternate Weapon Action] when fully charged to overclock the attached nanites, enhancing offensive capabilities: Light attacks deal increased damage to targets; Fully charged Heavy attacks create a flaming Quicksilver swarm-nado.
Understanding the Core Mechanic
Wolfsbane requires building stacks of Nano-Assault through light attacks and attached nanites. Once fully charged (indicated by your axe lighting up), activate the Alternate Weapon Action to enter an enhanced damage state. In this form:
- Perform light attacks for increased damage
- Execute fully charged heavy attacks for the devastating swarm-nado effect
Synergy with Outbreak Perfected
Wolfsbane's nanite mechanics synergize with Outbreak Perfected. The SIVA nanites from Outbreak allow faster accumulation of Nano-Assault stacks. For fireteam optimization, have one player use Outbreak Perfected while others focus on Wolfsbane attacks.

Intrinsic Perks (Unlockable)
| Perk | Effect |
|---|---|
| Stability | Improved weapon stability |
| Ammo Generation x2 | Increased ammo generation |
| Handles | One of the ammo generation options |
| Secondary Blades | One of the ammo generation options |
Selectable Perks (Unlockable)
| Catalyst | Effect |
|---|---|
| Attrition Orbs | Dealing sustained damage creates Orbs of Power |
| Relentless Strikes | Landing three light-attack hits within a short time grants Sword ammo |
| Burning Ambition | Solar kills boost damage temporarily |
| Subroutine: ~Recursion | Quicksilver nanites grant more health the greater your stacks of Nano-Assault. Taking damage while Nano-Assault is active has a chance to generate nanites nearby. |
Unlock All Wolfsbane Intrinsics
Wolfsbane is a craftable Exotic with intrinsic upgrades unlocked by destroying Vex nodes throughout the mission. There are nine total nodes divided into three sets of three.
- You must complete the mission once and obtain Wolfsbane before attempting intrinsic unlocks
- You MUST destroy the nodes using Wolfsbane! No other weapon works
- Progress does not appear to be shared with fireteam members (each player must hit their own nodes)
Set 1: First Traversal Area (After First Encounter)
Set 2: Second Traversal Area (Jumping Puzzle Before Boss)
This area resembles the Spire of the Watcher dungeon's jumping puzzle section. All three nodes are found while navigating through this area.

Set 3: Final Boss Arena
Attrition Orbs Catalyst
The first available catalyst is Attrition Orbs. Additional catalysts appear to be time-gated for future weeks (following the pattern of previous craftable Exotics like Choir).
How to Obtain Attrition Orbs Catalyst
- Find the Data Pad: Located near the very beginning of the mission. After clearing the initial enemies and rounding the first corner, look to your right to find the interactable data pad.
- Insert the Data Pad: Locate a nearby terminal and insert the data pad.
- Complete the Mission: Finish the entire Heliostat mission.
- Receive the Refit: Upon mission completion, you receive the Attrition Orbs refit.
- Apply at the Enclave: Return to the Enclave and slot the catalyst into Wolfsbane.
Attrition Orbs Performance
This catalyst excels at generating Orbs of Power, particularly when using Wolfsbane's Alternate Weapon Action form. The enhanced orb generation supports ability-focused builds and team support.
Tips and Strategies
- Normal difficulty is significantly easier than subsequent customizable runs: use your first clear to learn mechanics
- The mission environment draws from SIVA technology aesthetics and features areas reminiscent of the Plaguelands
- White/blue lights consistently mark safe doors throughout traversal sections
- Symbol sequences in the Central Observation encounter display identically on all sides, which means you only need to read one monitor
- Prioritize killing Radiolaria Nexus Minotaurs quickly to maintain access to Radiolarial Saturation
- During the final boss fight, corner positioning provides natural radiation protection during immunity phases
- Kill Warden Wyverns as your top priority during boss immunity phases
Wolfsbane Optimization
- Build Nano-Assault stacks through consistent light attacks before activating Alternate Weapon Action
- Pair with Outbreak Perfected in fireteam content for faster nanite stacking
- Use the heavy-light-light attack rotation during enhanced state for optimal damage
Intrinsic Farming
- Equip Wolfsbane before entering node areas
- Solo runs may be more efficient for node hunting due to lack of shared progress
- Complete all nine nodes to guarantee all intrinsic unlocks regardless of potential bugs
Summary
The Heliostat Exotic Mission offers a straightforward path to one of Destiny 2's most unique weapons. While the mission itself follows familiar mechanics (summoning allies, symbol matching, partner hacks), the reward, Wolfsbane, brings fresh gameplay with its nanite-based axe mechanics and craftable upgrade system.
Complete the mission once to unlock difficulty customization, hunt all nine Vex nodes for intrinsic perks, and collect weekly catalysts as they become available to fully maximize this Iron Lord-inspired Exotic.