
What Is The Sieve Event?
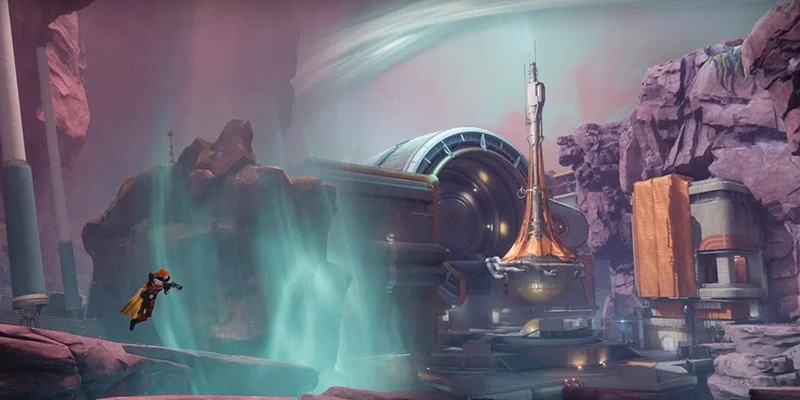
The Sieve is a new limited-time activity that dropped with Destiny 2: The Edge of Fate expansion. You'll need a three-person fireteam to tackle this cooperative event, which takes place in and around the Caldera hub area on Kepler. Unlike regular Destiny activities, The Sieve runs on a strict timer that makes it feel more like catching a rare spawn than queuing up for strikes.
This activity centers around the Drifter's mining operation, where you're helping extract dark matter from Kepler's environment. If you've played the Exotic-granting events on Neomuna, you'll recognize the format. Random timing, valuable rewards, and mechanics that require some patience to master.
The Sieve Timer System
When it goes live, you'll see a specific icon pop up on the Kepler map. That's your cue to launch in through matchmaking. Miss the window and you're waiting until the next rotation.
This timing makes every opportunity count, especially considering the loot you can walk away with. Plan your sessions around these windows if you're serious about farming The Sieve.
Prerequisites and Requirements
Graviton Spike Quest Connection
If you're chasing the Graviton Spike Exotic hand cannon, The Sieve isn't optional. This Arc-Stasis weapon requires you to complete exploration steps throughout Kepler first, then finish at least one full Sieve round to unlock the final quest step.
The weapon's worth the effort, but you'll need to be patient with the timing restrictions to get there.
Fireteam Composition
The Sieve uses automatic matchmaking to pair you with two other players when you launch. Solo players can jump right in without coordination.
Features unique Arc-Stasis damage capabilities with enhanced precision damage
Phase Breakdown
Phase 1: Mining Operation Setup
Your first job is getting the Drifter's mining rig operational. This means placing beacons around the Caldera to mark extraction points for dark matter. All three fireteam members need to coordinate here, as proper beacon placement sets the foundation for everything that follows.
You're not just dropping beacons and moving on though. Enemy waves start hitting almost immediately, so expect to multitask between setup and combat from the start.
Phase 2: Matterspark Collection and Buff Building
The Sieve's unique mechanics kick in here. You'll see illuminated pylons scattered around the activity area. Your goal is simple: use Matterspark to activate as many as possible. Each pylon activation builds toward a critical buff called the extraction buff.
Here's how it works:
- Find the lit pylons throughout the arena
- Use Matterspark to activate each one
- Keep activating until you hit the threshold
- Receive the extraction buff
- Move to enemy elimination while the buff's active
Phase 3: Enemy Elimination and Progress Tracking
Once you've got the extraction buff, it's time to start clearing enemies. You'll see a progress counter in the upper left corner that tracks your advancement. Your goal is filling that circular indicator completely.
The difficulty ramps up as you get closer to completion. Tougher enemies spawn in waves, testing both individual skill and team coordination. The early waves feel manageable, but that changes fast.
Phase 4: Banking and Blocker Management
The Sieve borrows the banking concept from Gambit, complete with blocker enemies that can seriously slow your progress. These enemies spawn near the bank and will completely halt your advancement if you ignore them.
Drop everything when blockers appear. Focus fire on these priority targets immediately, then get back to regular enemy clearing. The longer you let blockers stick around, the more time you're wasting in an already time-limited activity.
Phase 5: Loot and Boss Transition
Completing the mining and elimination phases drops your first batch of loot. The Sieve immediately transitions into a major boss encounter that requires a completely different approach from the crowd control you've been doing.
Boss Encounter Mechanics
Boss Health and Shield System
The Sieve boss uses a segmented health system that alternates between damage phases and complete immunity. You'll see large health chunks that let you deal damage, followed by smaller segments that trigger shield activation.
During shield phases, the boss takes zero damage no matter what you throw at it. Save your heavy ammo and supers for the damage windows, because you'll be waiting around doing nothing during shield phases anyway.
Drone Shield Mechanics
When the boss shields up, five drones spawn around the arena perimeter. These drones generate the protective barrier, so you need to eliminate all five before you can damage the boss again.
The process:
- Locate the five drones around the arena
- Use Matterspark to decloak each drone
- Shoot each revealed drone
- Clear all five to drop the boss shield
- Resume DPS once the shield's down
Boss Damage Phases
Between shield activations, you get windows to deal serious damage. Coordinate your heaviest attacks during these phases. Pop supers, burn heavy ammo, and use your most damaging abilities while the boss is vulnerable.
Successful boss elimination drops more loot and potentially opens up additional activity rounds if you still have time in the 30-minute window.
Special Encounter: Mote Banking Super Round
Sometimes The Sieve throws a curveball with a special encounter that completely changes the format. This round combines elements from Dares of Eternity and Gambit, focusing on enemy elimination and resource collection rather than mining operations.
The mechanics are straightforward:
- Kill enemies throughout the arena
- Pick up motes they drop
- Bank those motes at designated locations
- Try to bank as many as possible before time runs out
The super round appears randomly and can't be triggered intentionally. When it shows up, prioritize completion over everything else.
Reward Structure
Standard Completion Rewards
The Sieve is generous with loot even for basic completion. You'll see multiple drops throughout each phase, with reward frequency that beats most standard Destiny activities. Expect materials, weapons, and armor suitable for character progression at any level.
Exotic Equipment Opportunities
The Sieve offers three separate paths to Exotic gear:
Graviton Spike Quest Progress
The Sieve serves as the mandatory final step for Graviton Spike acquisition. Complete the preliminary exploration phases around Kepler, then finish one successful Sieve run to unlock this Arc-Stasis hand cannon.
Strategy and Tips
Multiple Round Participation
The Sieve lets fireteams chain multiple consecutive rounds during a single 30-minute activation period. You can bounce back and forth between mining operations and boss encounters for several iterations, maximizing your loot haul within the time limit.
Focus on efficiency over perfection. Complete each phase quickly enough to squeeze in extra rounds, but don't rush so much that you fail and waste the entire opportunity.
Fireteam Coordination
Success depends heavily on communication across all mechanics:
Essential Callouts
Assign someone to watch for blockers, designate a Matterspark specialist for drone phases, and coordinate heavy DPS timing during boss damage windows.
Time Management
With only 30 minutes to work with, every second counts. Cut downtime between phases, prioritize high-value targets during enemy clearing, and maintain awareness of the activity timer throughout your run.
Sometimes it's better to wrap up a round and start fresh rather than risk losing progress to the timer.
Common Challenges and Solutions
- Multiple Exotic acquisition paths
- Generous loot drops throughout phases
- Required for Graviton Spike quest
- Chainable rounds for maximum efficiency
- Strict 30-minute time windows
- 1 hour 44 minute cooldown periods
- Complex Matterspark mechanics
- Escalating enemy difficulty
Timing Conflicts
The fixed schedule creates availability issues, especially for players in different time zones or with limited gaming windows. Track activation times to predict future windows, coordinate with clan members for group participation, and plan gaming sessions around known activation periods.
Difficulty Scaling
Enemy difficulty ramps up significantly throughout each phase, potentially overwhelming unprepared players. Make sure you're at appropriate power level before jumping in, set up loadouts for both crowd control and single-target damage, and practice Matterspark mechanics in other Kepler activities before your first Sieve run.
Drone Phase Confusion
The drone elimination mechanic trips up players unfamiliar with Matterspark decloaking. Practice the mechanic in other activities first, communicate drone locations clearly with your fireteam, focus on one drone at a time to avoid confusion, and remember that decloaking always comes before damage dealing.
Final Thoughts
The Sieve stands out as one of Destiny 2's most rewarding limited-time activities. The combination of multiple Exotic acquisition paths, quest progression for Graviton Spike, and genuinely chaotic gameplay makes it worth planning your gaming sessions around.
Yes, the restrictive timing requires patience and coordination. But the substantial rewards justify the effort, especially if you're hunting Exotic gear or need to complete the Graviton Spike questline. When The Sieve goes live on Kepler, drop what you're doing and jump in. You won't regret it.