
Guardians, get ready! The legendary Khvostov, the very first rifle many held in Destiny, has made its triumphant return in The Final Shape as the Khvostov 7G-0X exotic auto rifle. This isn't just a nostalgia trip; this weapon packs a punch with unique perks. This guide will provide a straight-to-the-point walkthrough to claim both the legendary Khvostov 7G-02 and its exotic counterpart, the Khvostov 7G-0X. Essential steps, collectible locations, and pro tips are all here to help Guardians acquire this piece of Destiny history—fast.
Pre-Quest Checklist
Before embarking on the hunt for Khvostov, there are a few essential prerequisites. Completing these steps ensures access to the necessary areas and quests.
Complete The Final Shape Campaign
First and foremost, Guardians must complete the main story of The Final Shape expansion. This is a non-negotiable step, as finishing the campaign unlocks the Pale Heart as a patrol destination, the new explorable zone where the entire Khvostov quest unfolds. Without access to the Pale Heart, obtaining the rifle is impossible.
Essential Preliminary Quests
With the campaign concluded, a sequence of introductory quests must be undertaken to pave the way:
- "Destined Heroes" Quest: Immediately after the campaign, this quest should be acquired from the player's Ghost while in the Lost City.
- "Queens, Part 1" Quest: This quest is part of the "Destined Heroes" questline. Completing "Queens, Part 1" is a critical step as it unlocks Micah-10's terminal located in the old Vanguard War Room.
- "Alone in the Dark" Quest: After unlocking the terminal, interact with Micah-10 to receive the "Alone in the Dark" quest. This quest is vital, as it grants access to the Cyst activities scattered across the Pale Heart, which are necessary for obtaining the legendary version of Khvostov. It's important to note that "Alone in the Dark" will need to be completed multiple times to unlock all six Cysts.
Getting the Legendary Khvostov 7G-02
The first major phase in acquiring the exotic is to obtain its legendary predecessor, the Khvostov 7G-02. It's important to clarify that this weapon is designated as the "7G-02" in game data and by the community. It is not "crafted" using a traditional weapon pattern. Instead, Guardians will collect components to form a key that unlocks a specific chest containing the rifle.
Collecting 15 Lost Encryption Bits
To get the Khvostov 7G-02, Guardians must first collect 15 "Lost Encryption Bits." These are found in two ways: 9 from Pale Heart Region Chests and 6 from "Piles of Rubble" located within Cyst activities. Once all 15 bits are gathered, they will automatically combine in the inventory to form a "Lost Encryption Code".
Pale Heart Region Chests (9 Bits Total - 3 per zone)
These chests are marked on the Pale Heart map with a distinctive cross symbol, making them somewhat easier to track. Each of the three main patrol zones—The Landing, The Blooming, and The Impasse—contains three Region Chests.
- Chest 1: Located to the east of the area, along a bridge spanning a chasm. Underneath this bridge, a waterfall is visible. Guardians should jump through the waterfall to find a small hidden cave containing the chest.
- Chest 2: Near the central pool of water in The Landing, there is a cave that passes through the large cliff in the middle of the area. Inside this cave, there's a gap. Jump down to the lower of two ledges to find the chest.
- Chest 3: Close to the spawn point in The Landing. To the right, a large waterfall is present. About halfway up this waterfall, a gap in the buildings can be seen. To reach it, players need to jump up the nearby cliff edges and trees along the wall where the building is embedded.
- Chest 1: From the spawn-in cliff in The Blooming, jump down and look at the base of the cliff for a cave emanating purple light (often with a large purple crystal in the ceiling). Follow the path through this cave; after emerging, head around the left of the large column ahead. To the left, a pile of rocks will have the region chest on it.
- Chest 2: Return to the spawn point after landing and jump to the small, raised cliff in front, often with a curved tree. Climb this tree to its top to find the region chest.
- Chest 3: From the previous chest, head towards the other curved tree, located near the large red hand statue at the very edge of the map. The chest is tucked into a corner at the base of the cliff.
- Chest 1: Found directly next to the spawn-in location. Look to the left to see some cliffs leading downward. At the bottom of these cliffs, a small cave houses the chest.
- Chest 2: Located near the path that leads towards The Transgression, amidst The Black Fleet structures. In the center of this area, a large, white-bricked structure can be found. Climb this structure to locate the chest.
- Chest 3: This chest is in a cave near the large Cosmodrome wall. Head towards the Lost Sector icon in The Impasse. When red metal plates embedded in the cliff are visible, take a right. Just to the left as one walks towards these plates, there is a raised cave entrance that can be jumped to. The chest is inside.
Cyst "Piles of Rubble" (6 Bits Total - 1 per Cyst)
As mentioned, completing the "Alone in the Dark" quest multiple times (likely six times) is necessary to unlock patrol access to all six Cysts. Once unlocked, Guardians can switch between the two Cysts available in each major zone (The Landing, The Blooming, The Impasse) by interacting with a bird made of light found outside the Cyst entrances. Each of these six Cysts contains a "Pile of Rubble" (also referred to as "Piles of Rubbish" or "old tech") that awards one Lost Encryption Bit.
- Sword Dance (The Landing): After fighting the second Ogre encountered on a staircase midway through this Cyst, instead of taking the upper path forward through a gap high in the wall, look for a lower gap. Head through this lower path and destroy a destructible wall (a sword is typically provided in this Cyst) to find the pile of junk behind it.
- Moth-Infested Cavern (The Landing): Early in the mission, after unlocking a door with Hive runes, an Ogre will be fought. Jump down beneath where the Ogre was standing and head into one of the caves to find the Encryption Bit in the junk pile.
- Searing Light (The Blooming): At the end of the mission, after defeating the boss, a cave illuminated by purple light will be visible in the boss room. The Encryption Bit is inside this cave, in a small drop-down area beneath some rocks that can be platformed across.
- Slayer (The Blooming): Upon defeating the Ogre boss at the end of this mission, look for a cave in the boss room that has a prominent tree trunk in front of it. The Pile of Rubble is located within this cave.
- Smothering Darkness (The Impasse): After defeating the boss at the end of this Cyst, look across the cave from where the boss was located to find another cave lit with purple light. The pile of junk containing the Encryption Bit is in here.
- Aerial Ace (The Impasse): At the end of this mission, in the boss room, a path leads out from under a cliff. Follow the lava flow until reaching a small rock before another pool of lava. Just to the right, before crossing this lava, a small crevice in the wall can be accessed. The junk pile is inside this crevice.
Claiming Your Khvostov 7G-02
Once all 15 Lost Encryption Bits have been collected, they will automatically consolidate into the "Lost Encryption Code" in the player's inventory. With this code in hand, it's time to claim the legendary rifle.
- Travel to The Impasse in the Pale Heart.
- From The Impasse, head to the right, passing through the large Cosmodrome wall structure. This path leads into The Divide area. Some recall crossing a rusted car bridge to find a small door leading into The Divide.
- Follow the corridors within The Divide. The path will eventually become icy. Just to the right after the first corridor where the ground begins to turn icy, a room with a golden chest resting on a box will be found.
- Interact with this golden chest and use the Lost Encryption Code to open it. The Legendary Khvostov 7G-02 will be awarded.
| Item Type | Specific Location | Collected |
|---|---|---|
| Region Chest | The Landing - Waterfall Chest (East, under bridge) | ☐ |
| Region Chest | The Landing - Central Cave Chest (Lower ledge) | ☐ |
| Region Chest | The Landing - SW Wall Building Chest (Waterfall gap) | ☐ |
| Region Chest | The Blooming - Purple Light Cave Chest (Near spawn) | ☐ |
| Region Chest | The Blooming - Curved Tree Chest (Near spawn) | ☐ |
| Region Chest | The Blooming - NW Edge Cliff Chest (Near red hand) | ☐ |
| Region Chest | The Impasse - SW Cliff Cave Chest (Near spawn) | ☐ |
| Region Chest | The Impasse - White Structure Chest (To Transgression) | ☐ |
| Region Chest | The Impasse - Raised Cave Chest (Near Lost Sector) | ☐ |
| Cyst Rubble | Sword Dance Cyst (The Landing) | ☐ |
| Cyst Rubble | Moth-Infested Cavern Cyst (The Landing) | ☐ |
| Cyst Rubble | Searing Light Cyst (The Blooming) | ☐ |
| Cyst Rubble | Slayer Cyst (The Blooming) | ☐ |
| Cyst Rubble | Smothering Darkness Cyst (The Impasse) | ☐ |
| Cyst Rubble | Aerial Ace Cyst (The Impasse) | ☐ |
Upgrading to the Khvostov 7G-0X
With the legendary Khvostov 7G-02 secured, the next phase is to upgrade it to the exotic Khvostov 7G-0X. This transformation requires the collection of 17 Motes of Light.
Collecting 17 Motes of Light
It is crucial to understand how these 17 Motes are acquired. They come from two distinct sources: 8 Motes are obtained by collecting "Visions of the Traveler," and the remaining 9 Motes are dropped by unique Overthrow bosses in the Pale Heart. Once all 17 Motes of Light are gathered, they will automatically convert into a single exotic item called the "Mote of Primordial Light".
Visions of the Traveler (8 Motes Total - 1 per Vision)
Visions of the Traveler are small, luminous orbs found hidden in specific locations throughout the Pale Heart. Each one collected grants a single Mote of Light. The community has diligently mapped these out, and the following locations are based on detailed player experiences.
- The Lost City: Head towards Micah-10's conduit in the Tower. To the left, a small entrance leads into a familiar path. Follow it until exiting into an area with Hive. Jump onto the platform to the right, continue along this path until a waterfall is reached. Jump into this waterfall; the Vision is hidden inside. Another described route involves leaving the Tower via the side door near Micah-10, dropping into the initial campaign area, and using color-coded rooftops (specifically the red path) to reach a gap across which a pool with a waterfall (and the Vision) is visible.
- The Landing: Upon spawning at the transmat zone, immediately turn left and look down towards a pool of water with a waterfall at the edge of the area. Drop down into this pool; the Vision is next to the waterfall.
- The Blooming: From the spawn point, head towards the easternmost path that leads out of The Blooming towards The Seclusion. As the orange crystal marking the path to The Seclusion comes into view, look up into the large, dead trees. The Vision is nestled in the branches of the tree closest to this exit. Climbing nearby rocks may be necessary to reach it.
- The Impasse: From the spawn point, turn around and head to the left. The Vision is located among the large, Pyramid-like structures, specifically inside a prominent ringed or circular sculpture to the far left of this area, often near a staircase.
- The Refraction: Travel from The Landing's transmat zone into The Refraction. Proceed into the crystalline caves. One path involves finding a gate resembling Dreaming City architecture, passing through it to a room that often contains a Prismatic chest. A downward passage on the left side of this room leads to an area with a Shrieker. After defeating it and jumping across to the left, turn around to spot a platform below the ledge. Descend to this platform and find the Vision in a small cave. Alternatively, from the crystalline caves, look down over an edge to see an opening in the cliff where a creek spills out. Jump down using roots and enter the gap to find the Vision in the pool.
- The Seclusion (Searing Light Cyst Area): Access to this Vision requires unlocking the Searing Light Cyst, typically through Micah-10's "Alone in the Dark" questline. The Searing Light Cyst icon will appear in The Seclusion on the map. From The Blooming, head to Zavala's Homestead in The Seclusion. Turn left upon entering the homestead area to find a creek formed by a waterfall. Pass behind this waterfall to find a Hive-rune-locked forcefield—the Cyst entrance. Shoot the runes in the order they appear on the forcefield to open it. Proceed into the Cyst. Instead of going into the large cavern ahead, after passing a gnarled tree, go around a column to the right (effectively turning 180 degrees). A shadowy opening in the rocks here leads to the Vision. Another description places the Vision on a platform to the right inside the Searing Light Cyst after clearing Taken thrall, before exiting the main cave. The key is accessing the Searing Light Cyst.
- The Divide: Travel to The Divide (from The Impasse or The Blooming). The goal is the summit of the large frozen mountain/structure. Using the "Frozen Skirmish Pathfinder Objective" on the map can provide a helpful waypoint. As players reach the top area with buildings, a large satellite dish structure will be on the left. Jump up and behind this satellite dish to find the Vision. Some report it behind boxes near an entrance with antennas at the top.
- The Transgression: Head to The Transgression from The Impasse transmat zone, moving east. This Vision is deep within the area. Look for a large dead tree on the left side as one enters one of the further stormy/Darkness-filled sections, often near Pyramid columns. The Vision is behind this large tree or a large tree branch. Tracking a Pathfinder objective in this zone can aid navigation.
Overthrow Bosses (9 Motes Total - 1 per unique boss)
The remaining nine Motes of Light are obtained by defeating the nine unique bosses that can spawn during the Overthrow public event in the Pale Heart. Each of the three main zones (The Landing, The Blooming, The Impasse) has three distinct Overthrow bosses.
- Summoning Bosses: To make an Overthrow boss appear, Guardians must participate in and complete objectives within the Overthrow activity in a specific zone until its completion level reaches Level 4.
- Crucial Detail: The Mote of Light is dropped directly by the defeated boss and must be picked up from the ground. It is not awarded from the Overthrow completion chest.
- Rotation Tip: If an Overthrow activity at Level 4 spawns a boss from whom a Mote has already been collected, the most efficient strategy is to leave the Pale Heart (return to orbit) and then fly back into the zone. This will often reset the boss rotation, providing another chance to encounter a needed boss. It has been reported that the in-game Triumph tracker for these bosses may not always be accurate, so keeping a personal checklist is advisable.
| Zone | Boss Name | Type |
|---|---|---|
| The Landing | Ir Okmarr, Devoted to Savathun | Hive |
| The Landing | Nolakh, Star-Eater | Hive |
| The Landing | Mharuk, Sky-Stealer | Hive |
| The Blooming | Voxelos, Taken by the Witness | Taken |
| The Blooming | Kholon, Taken by the Witness | Taken |
| The Blooming | Koftiks, Taken by the Witness | Taken |
| The Impasse | Rhuna, Subjugator of Chasms | Dread |
| The Impasse | Rhaska, Subjugator of Thresholds | Dread |
| The Impasse | Araaxen, Reverent of the Witness | Dread |
Claiming Your Khvostov 7G-0X
With all 17 Motes of Light collected and transformed into the "Mote of Primordial Light", the final step to claim the exotic Khvostov 7G-0X is at hand.
- Return to The Lost City. Specifically, go to the old Speaker's room—the same location where Cayde-6 was encountered at the beginning of The Final Shape campaign.
- Inside this room, eight pedestals will be visible. Interact with these pedestals to place the eight Visions of the Traveler that were collected.
- Once all eight Visions are placed, a chest will materialize in the center of the room.
- Use the Mote of Primordial Light to open this chest, and the exotic Khvostov 7G-0X will be awarded.
| Mote Source Type | Specific Location/Boss Name | Collected |
|---|---|---|
| Vision | The Lost City (Waterfall/Rooftop Path) | ☐ |
| Vision | The Landing (Waterfall Pool) | ☐ |
| Vision | The Blooming (Tree near Seclusion Path) | ☐ |
| Vision | The Impasse (Ringed Structure) | ☐ |
| Vision | The Refraction (Cave Waterfall/Crystal Cave) | ☐ |
| Vision | The Seclusion (Searing Light Cyst Area) | ☐ |
| Vision | The Divide (Top of Mountain/Satellite Dish) | ☐ |
| Vision | The Transgression (Dead Tree in Stormy Area) | ☐ |
| Overthrow Boss | The Landing - Ir Okmarr, Devoted to Savathun | ☐ |
| Overthrow Boss | The Landing - Nolakh, Star-Eater | ☐ |
| Overthrow Boss | The Landing - Mharuk, Sky-Stealer | ☐ |
| Overthrow Boss | The Blooming - Voxelos, Taken by the Witness | ☐ |
| Overthrow Boss | The Blooming - Kholon, Taken by the Witness | ☐ |
| Overthrow Boss | The Blooming - Koftiks, Taken by the Witness | ☐ |
| Overthrow Boss | The Impasse - Rhuna, Subjugator of Chasms | ☐ |
| Overthrow Boss | The Impasse - Rhaska, Subjugator of Thresholds | ☐ |
| Overthrow Boss | The Impasse - Araaxen, Reverent of the Witness | ☐ |
Khvostov 7G-0X Catalyst
Acquiring the Khvostov 7G-0X is a significant achievement, but many Guardians will also seek its catalyst for enhanced performance.
How to Get the Catalyst
Based on information available shortly after The Final Shape's release, the precise method for obtaining or unlocking the Khvostov 7G-0X catalyst was not clearly detailed in initial guides and community findings. Some sources explicitly stated that information regarding its acquisition was unknown or not available at that time.
This lack of immediate information is not uncommon for exotic catalysts in Destiny 2. Often, their discovery is a community effort, with unlock methods tied to specific Triumphs, hidden quest steps, or even as random drops from particular activities that become apparent after the weapon itself has been widely obtained.
What Is Known (or Can Be Inferred)
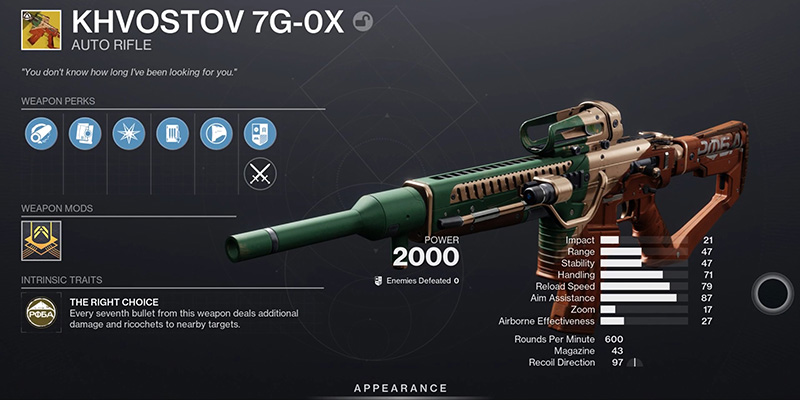
The Khvostov 7G-0X boasts exotic perks like "The Right Choice," where every seventh bullet deals additional damage and ricochets to nearby targets, and "Eyes Up, Guardian" (or a similarly named perk, as "Shoot to Loot" also synergizes by allowing Orb of Power collection to empower ricochets), where collecting Orbs of Power strengthens the subsequent ricochet shots, increasing damage and bounce capability. A catalyst would typically augment these intrinsic traits or add a complementary benefit. One source mentioned a perk named "Dealer's Choice," granting super energy on final blows, but its direct connection as the Khvostov 7G-0X catalyst perk was not definitively confirmed in the initial information wave. Player discussions often express hopes for extensive customization options or multiple catalysts, reflecting the original Khvostov's modularity, but these remain speculative.
- In-Game Collections: Check the "Patterns and Catalysts" section under the Collections tab. Sometimes, hints or the catalyst objective itself will appear here once the base exotic weapon is acquired.
- Community Hubs: Destiny 2 community platforms such as the r/DestinyTheGame and r/raidsecrets subreddits, along with dedicated Destiny content creators on platforms like YouTube and Twitch, are often the first to uncover and disseminate information about hidden quests and catalyst sources.
- Triumphs: Examine any new Triumphs added with The Final Shape or related seasonal content, particularly those associated with the Pale Heart or the Khvostov 7G-0X itself, as catalysts are frequently linked to their completion.
Pro-Tips for Quick Acquisition
To streamline the entire process of acquiring the Khvostov 7G-0X, consider these quick tips:
- Plan Your Route: Before heading into a zone for Region Chests or Visions of the Traveler, open the map and mark their approximate locations. This minimizes aimless wandering and saves considerable time.
- Cyst Swapping: Remember the bird made of light outside Cyst entrances. Interacting with it allows switching between the two Cysts available in that zone if the required one for an Encryption Bit is not currently active.
- Inventory Check: Critically, ensure both the legendary Khvostov 7G-02 and the Mote of Primordial Light are in the active character's inventory (not the vault) before attempting to open the final chest in the Speaker's room.
- Overthrow Efficiency: If a Level 4 Overthrow spawns a boss from whom a Mote of Light has already been collected (before all nine unique Motes are obtained), fast travel out of the Pale Heart (e.g., to orbit) and then reload the zone. This often resets the boss cycle, providing a fresh chance for a needed boss to appear.
- Full Inventory: Although the bug causing Lost Encryption Bits to vanish from a full inventory was reportedly fixed, it's always prudent to maintain a few open inventory slots when collecting crucial quest items.
- Solo Grinding: While this entire questline is achievable solo, activities like Overthrow and some of the more combat-heavy Cysts can be completed faster and more easily with a fireteam.
- Ignoring Perks: Once the exotic Khvostov 7G-0X is acquired, remember its intrinsic "Shoot to Loot" perk (or its synergy with "Eyes Up, Guardian"). Shooting Orbs of Power will collect them and empower the weapon's ricochet shots, while shooting ammo bricks will pick them up and reload all equipped weapons.
"All the necessary intelligence to reclaim this iconic weapon is now at hand. By following these steps, navigating the Pale Heart's secrets, and overcoming its challenges, the Khvostov 7G-0X can be added to any Guardian's arsenal."
Enjoy wielding a piece of Destiny's past, reforged for its future.