
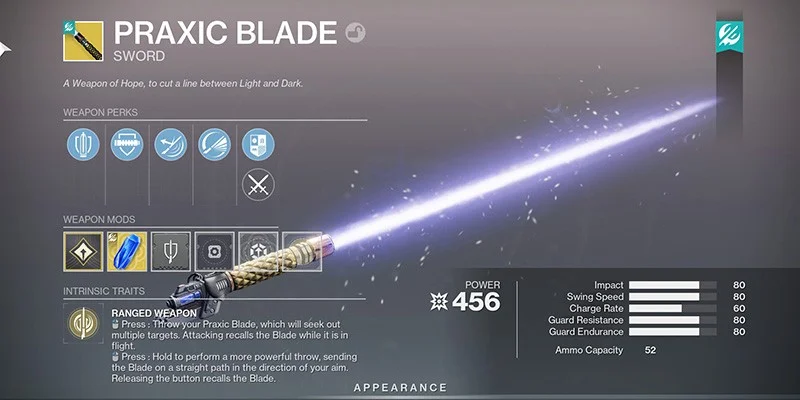
Praxic Blade is the signature exotic sword from Destiny 2: Renegades, and it's basically a lightsaber. You can throw it, recall it, and reflect incoming projectiles like a proper space knight. The sword drops after you complete the Fire and Ice exotic mission in the Praxic Vault during the Renegades campaign. Run through the mission once and it's yours.
But like most exotics in Destiny 2, Praxic Blade doesn't stop at the base weapon. Four exotic catalysts add new perks and utility on top of what's already there. This guide covers every catalyst, where each one comes from, and the exact steps you need to unlock them.
Before You Start
Three catalysts come from the Fire and Ice exotic mission. The fourth drops from the Equilibrium dungeon.
All Praxic Blade Exotic Catalysts
Praxic Blade has four catalysts total:
| Catalyst | Effect |
|---|---|
| Echoing Blade | Increases the number of targets your thrown sword can hit |
| Upper Hand | Boosts damage on thrown attacks and reflected shots when standing higher than your target |
| Hyperblade | Reflected shots grant amplified and give the sword extra lunge distance on your next swing |
| Energy Conduit | Grants health regen based on how many targets your thrown sword hits |
Fire and Ice Mechanics
Before jumping into catalyst steps, you need to understand how the mission's core mechanics work. These same mechanics show up in both normal mission completion and the hidden catalyst routes.
Hoops and Energy Balls
Combat arenas in Fire and Ice feature floating hoops. Two are white (light) and two are black (dark). Your job is to throw the right color energy balls into matching hoops to progress through encounters.
How to Spawn Energy Balls
Energy balls come from killing specific enemies in a two-step process.
| Energy Type | How to Spawn |
|---|---|
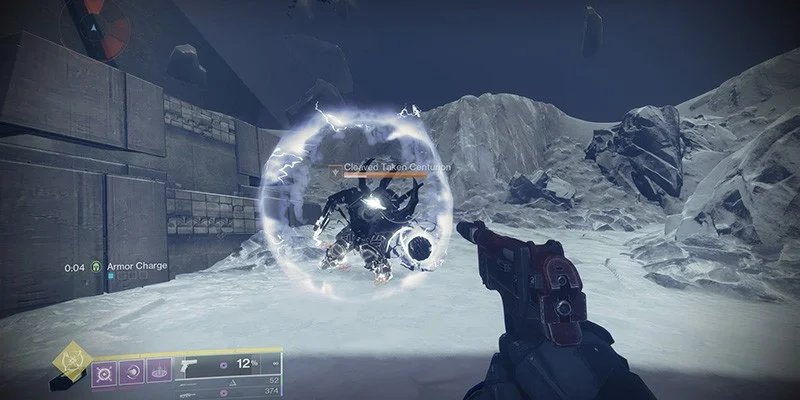
| Paired Energy (light/white balls) | Kill the same enemy type as your buff. Taken buff + Taken Centurion kill = light energy |
| Opposite Energy (dark/black balls) | Kill the opposite enemy type. Taken buff + Barant kill = dark energy |
Normal Play: Keep Things Balanced
During regular mission runs, you want to fill hoops gradually and evenly. When four energy balls drop, put two in one hoop of that color and two in the other. Dumping all four into a single hoop triggers an "imbalanced" penalty and the game removes your progress.
This imbalanced mechanic matters for catalyst hunting because you'll intentionally trigger it later.
Echoing Blade Catalyst
The Echoing Blade catalyst requires you to destroy seven hidden Taken Blights called "oddities" scattered through Fire and Ice. All seven appear in the first half of the mission, before you hit the main combat arenas.
Subclass and Gear Tips
Strand with Grapple makes the platforming much easier. A sword with Eager Edge helps with some of the longer jumps. Neither is required, but both make life simpler.
Oddity 1
Load into Fire and Ice and push forward until you reach the Praxic Temple room. Find the hidden hole on top of the big central pillar and start dropping down. Instead of going all the way to the bottom like normal, jump to the ledge in the bottom right corner. Follow the path forward and jump across the small diamond-shaped ledges.
Keep going until you hit a long corridor with a Special ammo crate at the end. Make sure Praxic Blade is equipped and grab ammo from the crate so you can throw the sword.
Walk onto the narrow ledge next to the ammo box. In the room beside you, there's a line of blocks with symbols on them. These are vanishing blocks that disappear when you touch them. Walk along the ledge and clear every block.
Once they're all gone, return to the ammo crate and look down the hallway. Throw Praxic Blade straight down the corridor. Your throw travels through the now-clear line of sight and destroys Blight #1 at the end.
Oddity 2
From the central pillar at the start, drop all the way down like you normally would. Follow the path until you'd usually turn left. Stop and look right instead. You'll see a vanishing block with a symbol on it.
Touch the block to make it disappear, opening up a room behind it. The second Taken Blight is inside. Hit it with Praxic Blade.
Oddity 3
Progress into the section with small ledges along a big wall. These ledges knock you off when you run past them. You'll eventually land on a tower structure at the end of this area.
From that giant rock, look to your right instead of jumping across to the next area. You'll spot smaller ledges. Jump across them to find the third Taken Blight sitting on top.
Oddity 4
Continue through the room with the fake door loop, then into the room full of climbable blocks. The fourth blight hides in here.
You'll pass through some low spaces requiring you to crouch. The room has a tilted orientation with lights on the ceiling. Look up and you'll notice a ledge above you that you can reach with a jump.
From that ledge, you need to cross a gap into a hidden space. Use a light sword swing mid-air to carry yourself across, or time your jump and spam your jump input. It might take a few tries. Once you make it across, follow the path to find the fourth blight.
Oddity 5
Push into the disappearing floor puzzle and navigate through normally until you reach the end. Instead of moving forward, start climbing along the ceiling-level routes around the top of the room.
Follow this high path and you'll find a pillar hanging from the ceiling that you can jump into. Get inside the pillar and look up. There's a vanishing block above you. Touch it, jump into the secret room it reveals, and you'll find the fifth blight outside. Throw your sword through the narrow opening to destroy it.
Oddity 6
Progress into the open jumping puzzle area with giant Taken blights and floating platforms everywhere. Vex Hobgoblins also spawn in this section.
Navigate normally but look for a rock ledge in the far middle of the area. A Taken Phalanx usually stands near it. That Phalanx marks where you need to go.
Climb onto the rock. The blight floats deep below the edge, suspended in the air, and it's hard to see from most angles. Stand at the edge and throw Praxic Blade downward. Get the angle right and your throw travels below the rock to destroy blight number six.
Oddity 7
Stay in the same area and find the tall tower next to that dark rock from Oddity 6. It's a huge structure rising up through the space.
Climb the tower using whatever ledges and jumps you can find until you reach the top. You'll find another ammo crate and a small structure built into the platform.
Stand on the edge, look into the small structure, and throw your sword. The seventh and final blight hides inside, and your throw destroys it.
Upper Hand and Hyperblade Catalysts
Upper Hand and Hyperblade both come from a single hidden route in Fire and Ice. Testing suggests you need to grab both in the same run. Trying to get them separately hasn't worked reliably.
The route involves breaking the normal energy ball mechanics on purpose and completing several hidden objectives throughout one mission clear.
Step 1: Kill Both Imbalanced Wardens
When you load into Fire and Ice, don't rush down the main path. Two yellow-bar enemies called Imbalanced Wardens spawn in the opening area.
The first Warden is far off to the right on a side platform. The second is to the left inside a cave-like area.
Find and kill both before moving on. A message pops up on screen when they're dead. If you miss one, nothing else in this route will work.
Step 2: Start the Timer
Head to the first room with the Darkness splinter. Before dropping down, shoot the four Resonant diamonds in the room.
This starts a 30-minute background timer. The timer seems necessary for everything else to connect properly. Thirty minutes is plenty of time to finish, especially with a team on comms.
Step 3: Overload the Hoops
Navigate to the first combat encounter with four floating blights (two light, two dark hoops). This is where you stop playing normally.
Instead of balancing energy, you're going to overload each hoop on purpose:
- Build up four energy balls of any type using the Centurion mechanics
- Throw all four into a single hoop
- The game gets mad, calls the energy imbalanced, and spawns a Warden
- Kill the Warden
- Repeat for each hoop
Overload every hoop once for a total of four Wardens killed.
Step 4: Kill the Blights and the Ogre
When the fourth Warden dies, small blights spawn in the center of the arena. Destroy them with Praxic Blade.
Once they're gone, a boss Ogre spawns. Kill it and you should see: "Something shifts within the Praxic Vault."
That message means you did everything right.
Step 5: Finish the Encounter Normally
After the confirmation message, go back to playing the encounter the regular way. Use the standard light and dark orb mechanics to fill hoops properly and complete the encounter. No more overloading needed.
Step 6: Flip the Realm and Backtrack
Go through the portal when the encounter ends. Outside, interact with the node to flip the Ascendant Realm like normal.
Now turn around and backtrack toward the start of the mission. Go back to both spots where you killed the Imbalanced Wardens earlier.
If everything worked, a small Taken blight now sits at each old Warden location. Destroy both blights and you'll see another confirmation message.
Head back to the portal and continue toward the final encounter.
Step 7: Fill the White Hoops First
Fight the final boss normally until its health drops to about 25%. At that point, two white hoops appear underneath the floor you're standing on. This only happens if you completed all the earlier steps in this same run.
Activate the Darkness splinter node above the boss in the center of the arena to spawn more Centurions. Use the same Barant/Taken buff mechanics to create energy balls for the white hoops.
Step 8: Finish the Mission
Once the white hoops are done, complete the encounter normally. Break the remaining immunity phases, kill the boss, and finish Fire and Ice.
If you hit every step in one clear (both Imbalanced Wardens at the start, four Resonant diamonds and the timer, overloaded hoops with four Warden kills, central blights and Ogre, new blights at old Warden spots after flipping the realm, and white hoops at 25% boss health), you get both Upper Hand and Hyperblade at the end.
Energy Conduit Catalyst
Energy Conduit, the fourth Praxic Blade catalyst, comes from the Equilibrium dungeon. The dungeon isn't available yet as of this writing. We'll update this section with full steps once it launches and the community figures out the unlock requirements.
Tips for Your Runs
- Take your time with throws. Some need very specific angles.
- Strand Grapple makes several platforming sections trivial.
- Eager Edge on a sword gives you extra distance for tricky jumps.
- The catalyst only drops after you beat the final boss, so don't leave early.
- Team communication speeds things up significantly.
- The 30-minute timer is generous. Don't rush and make mistakes.
- Track your Warden kills during the overload phase.
- When white hoops appear at the final boss, prioritize them immediately.
Quick Reference
| Catalyst | Source | What You Need to Do |
|---|---|---|
| Echoing Blade | Fire and Ice | Destroy 7 hidden oddities, complete the mission |
| Upper Hand | Fire and Ice | Complete the full secret route in one run |
| Hyperblade | Fire and Ice | Complete the full secret route in one run (same as Upper Hand) |
| Energy Conduit | Equilibrium Dungeon | Not yet available |
Praxic Blade's catalysts turn an already versatile weapon into something even stronger. Boosted throwing attacks, high-ground damage bonuses, amplification from reflects, health regen during combat: there's a catalyst for pretty much any playstyle.
If you're still working on getting the base weapon, run through the Renegades campaign and complete Fire and Ice once. After that, the exotic mission becomes replayable and you can come back for catalysts whenever you're ready.