
So, You Want to Master Deadlock? Let's Get Started!
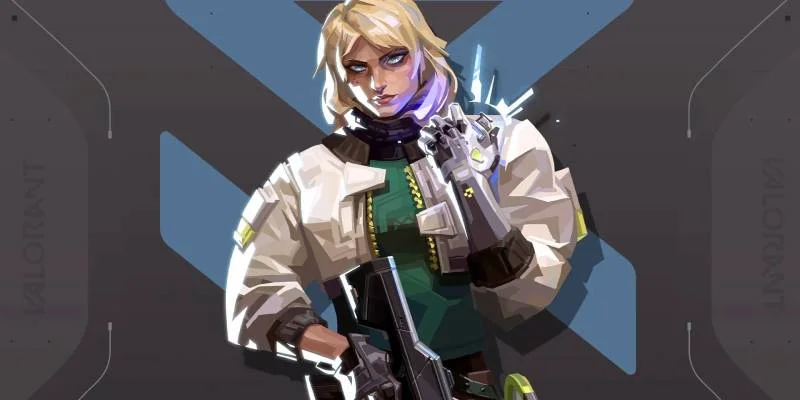
The Aggressive Sentinel
Alright, let's get one thing straight right from the jump: if you're picking Deadlock thinking you're going to play like a traditional Sentinel—setting up your gear, kicking back with a cup of coffee, and waiting for an enemy to wander into your web—you're in for a rough time. Deadlock isn't your typical defensive expert. She's not a passive information-gatherer like Cypher, nor is she a set-it-and-forget-it lockdown specialist like Killjoy.1 Deadlock is an entirely different beast. She is an active, fight-oriented Sentinel, a provocateur who gets in the enemy's face and dictates the flow of battle by force.1
Hailing from Norway, this elite operative from the Ståljeger unit is a survivor. Her backstory involves a mission gone horribly wrong, a rampaging Radiant bear, and the loss of an arm—a testament to her resilience and ferocity.4 That same unyielding spirit is baked into her kit. You don't play Deadlock to watch flanks; you play her to be the flank, to slam the door shut on an enemy push, and to turn the tables with perfectly timed, aggressive utility.
When she first hit the scene, many players wrote her off as weak.3 This was largely because the community tried to cram her into the existing Sentinel mold. They used her sound-based sensors to watch for silent lurkers and were surprised when they failed.5 But as players, including pros, began to understand her true nature, her viability skyrocketed.3 Her power isn't in passive setups; it's in proactive, mid-round plays that seize control of physical space. Mastering Deadlock means unlearning old Sentinel habits and embracing a new philosophy: you don't wait for the enemy to make a mistake; you force them into one.
The initial struggle players had with Deadlock reveals a fundamental truth about her design. She was not created to be a simple substitute for Cypher or Killjoy. Traditional Sentinels excel at creating a persistent, information-based threat across the map. A Cypher can place a tripwire on one side of the map and play on the other, knowing his flank is secure against a standard push.2 This playstyle encourages a pre-round setup followed by passive observation.
Deadlock's kit directly challenges this paradigm. Her Sonic Sensors are useless against silent players, making them poor tools for watching a quiet flank—a core function of her Sentinel peers.1 Her Barrier Mesh is temporary, and her GravNet is a reactive, single-use grenade.9 Players who approached her with a "set and forget" mentality found her abilities lacking because they were using the wrong tool for the job.
Her rise in the meta was not just due to balance changes, but a collective shift in understanding. Players realized her strength lies in active area denial and fight preparation.11 She shines when she uses her utility in the heat of the moment to disrupt an enemy execute, isolate a target, or secure a post-plant scenario. She rewards players who can read the flow of a round and react with decisive, space-controlling abilities. Therefore, learning Deadlock is less about memorizing static setups and more about developing the game sense to know the perfect moment to say "no" to the enemy team.
The Nanowire Arsenal: Your Toolkit Breakdown
Before we dive deep, here's a quick-reference cheat sheet for your entire kit. Think of this as the back of the box for your new favorite toy.
| Ability | Key | Cost | Charges | TL;DR: What It Does |
|---|---|---|---|---|
| GravNet | C | 200 Credits | 1 | Throws a net that forces enemies to sit down and think about their life choices. |
| Sonic Sensor | Q | 200 Credits | 2 | Your personal noise complaint department; stuns anyone who makes a ruckus. |
| Barrier Mesh | E | Free | 1 (Recharges) | A transparent "you shall not pass" wall that stops bodies but not bullets. |
| Annihilation | X | 7 Ult Points | 1 | The ultimate clutch button that wraps someone in a death cocoon. |
GravNet (C): The Ultimate Party Stopper
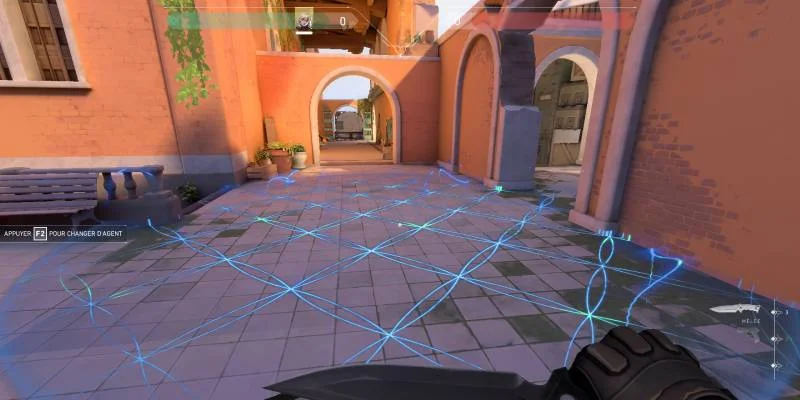
This is your bread-and-butter ability for shutting down aggression. You get one charge for 200 credits, and it's a throwable grenade that detonates on landing.13 Anyone caught in its radius is immediately forced into a crouch and slowed down for six seconds.4 Think of it as a tantrum grenade that makes hyper-aggressive duelists like Jett and Raze instantly regret their life choices.14 An enemy can remove the net by holding their interact key, but doing so creates a distinct sound cue, giving you a heads-up that they're trying to break free.3 Best of all, the net's effect can even pierce through thin walls, catching enemies who think they're safe.1
Sonic Sensor (Q): Your Personal Noise Complaint Dept.
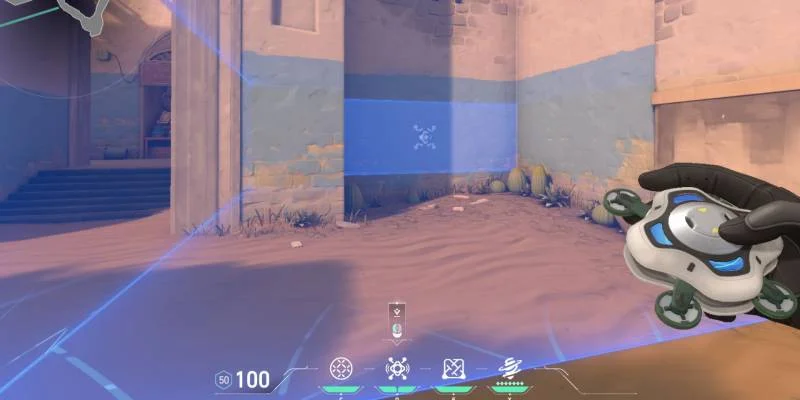
You get two of these bad boys for 200 credits each.9 You throw a sensor that sticks to a surface and becomes invisible to enemies until they get close.3 It listens for significant noise—running, shooting, reloading, planting, or defusing the spike. When it hears something, it unleashes a powerful concussive blast in the area, stunning enemies for 3.5 seconds.1
Strategic Use - The Ambush Tool
This is the most misunderstood part of Deadlock's kit, so listen up. DO NOT USE SONIC SENSORS TO WATCH FOR SILENT FLANKS. A good player will simply walk past them, and you'll get stabbed in the back wondering why your trap didn't go off.5 Instead, you need to place them where noise is either unavoidable or can be forced.
Unavoidable Noise Spots: These are your money-makers. Place a sensor right under a drop where enemies have to make a landing sound, like the drop from Hookah on Bind's B site or the A site drop on Fracture.1 Another god-tier placement is right on top of the spike after you've planted. The moment an enemy starts defusing, the sound triggers the sensor, stunning them mid-defuse for an easy kill.3
Forcing Noise: This is the 200 IQ play. Place a sensor near a common angle. Jiggle-peek the corner or fire a few shots through a wall to bait the enemy into shooting back. Their gunfire will trigger your sensor, and you can swing on them while they're concussed.14 This turns a passive trap into an aggressive, fight-winning tool.
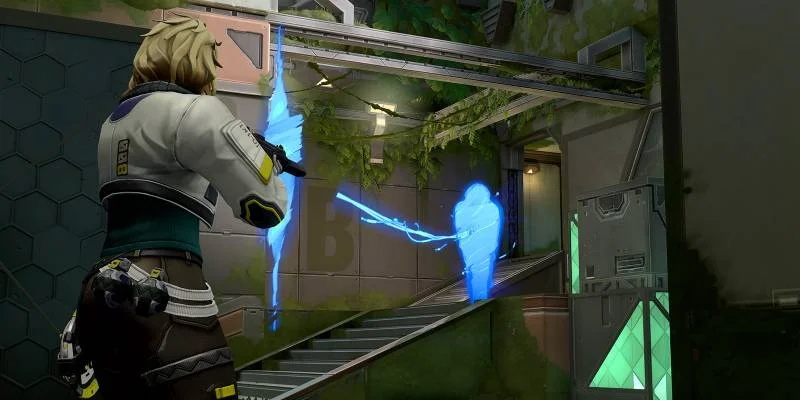
Barrier Mesh (E): The Ultimate "You Shall Not Pass"
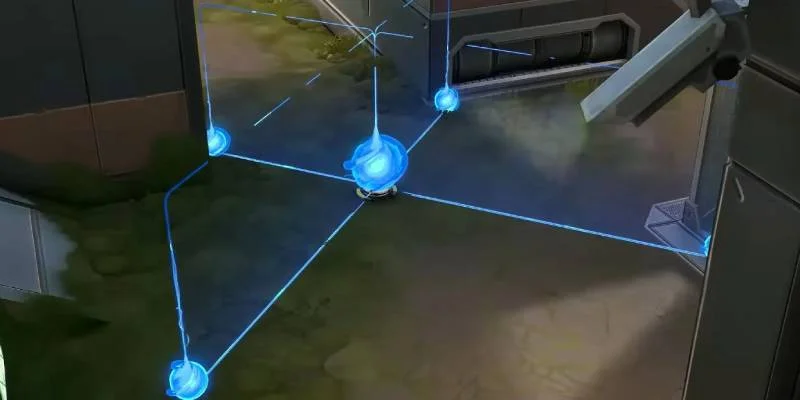
This is your signature ability, and it's free every round.13 You throw a disc that, upon landing, generates a large, cross-shaped barrier from a central core.1 This barrier is transparent, meaning you and your enemies can see and shoot through it, but it completely blocks character movement.1 It also blocks agent abilities that travel on the ground, like Sova's Owl Drone, Skye's Trailblazer, and Gekko's Prowlers.1 The barrier is made of a central orb and four smaller ones at the points of the "X." Destroying any of these orbs will break the connecting walls.1 The barrier lasts for 30 seconds before decaying.9
Strategic Use - Isolate and Annihilate
While it's fantastic for stalling a push on defense or blocking a retake path on attack, its most devastating use is to isolate enemies.14 See a group of enemies pushing through a choke? Throw your Barrier Mesh right into the middle of them. This instantly splits their push, turning a coordinated 5-man execute into a chaotic mess of separated players. You can turn a 2v2 into two much more manageable 1v1s, giving your team a massive advantage.
Bounce Shots: You don't always have to peek to place a perfect barrier. You can bounce the disc off a wall or ceiling to land it in a specific spot without exposing yourself to enemy fire.14 This is perfect for walling off an angle from complete safety.
Barrier Boost: This is a slightly tricky but game-changing maneuver. If you throw the barrier next to a box or ledge, you can jump onto the edge of the barrier's arm for a split second, giving you the boost needed to get on top of the high ground.1 It takes practice, but pulling it off can give you an unexpected off-angle that enemies will never see coming.
Annihilation (X): The Instant Round-Winner
This is it. Your 7-point ultimate and the reason enemies will have nightmares about you.13 You fire a pulse of nanowires that can bounce once off a surface.3 The first enemy it hits gets wrapped in a 600 HP cocoon and is pulled along a nanowire path back to where you fired it from.1 If they reach the end of the path, they die. Instantly. No questions asked. Their teammates can shoot the cocoon to free them, but this takes time and a lot of bullets.3
Strategic Use - The Clutch Machine
This ultimate is your ace in the hole, especially in 1v1s or post-plant scenarios where the clock is ticking.6 The goal is to create an unwinnable dilemma for the enemy. Do they try to save their friend, exposing themselves to you? Or do they try to fight you, letting their teammate get dragged to their doom?
The Ricochet Shot: If you take one thing away from this guide, let it be this: always try to bounce your ultimate. The initial beam is a thin, straight line that is relatively easy to sidestep. However, after it bounces, it explodes into a much wider sphere, making it incredibly difficult to dodge.13 Aiming at a wall or the floor next to your target instead of directly at them will dramatically increase your chances of catching someone.
The Mind Game: Annihilation is as much a psychological weapon as it is a physical one.4 When you cocoon an enemy, their teammates will often panic. They'll stop everything they're doing and start frantically spraying at the cocoon.16 This is your moment. While they are distracted, you can swing out and get a free kill on the rescuer. By the time they realize what's happened, their cocooned friend is already dead. You've just turned a 1v2 into a round win.
Dominating on Attack and Defense
Attacking with Deadlock: The Post-Plant Nightmare
On attack, your job isn't to be the first one in. Your time to shine comes after the spike is planted. You are the master of post-plant security, turning a freshly taken site into an impenetrable fortress.18
- Get the Spike Down: Work with your team to execute onto a site and plant the spike.
- Set Up Your Traps: This is where you go to work. Immediately place a Sonic Sensor on a wall right next to the spike. The sound of the defuse will trigger it, stunning the enemy for an easy kill.3 Use your GravNet on common hiding spots or chokepoints where defenders will try to peek from during the retake.14
- Cut Off the Retake: Use your Barrier Mesh to completely block the primary path defenders will use to re-enter the site. For example, on Haven's A site, a well-placed barrier in the CT spawn entrance forces the entire enemy team to either waste precious seconds and ammo breaking it or take a long, predictable rotation through A Link or Garage.6
- Play for the Win: Find a safe angle and listen. Your utility will tell you everything you need to know. If you have your ultimate in a 1v1 or 1v2 post-plant, it's practically a free round win. Wait for the tap on the spike, then unleash Annihilation.6
Defending with Deadlock: The On-Site Bouncer
On defense, you are the ultimate anti-aggression tool. Your primary objective is to shut down a fast, coordinated enemy rush and buy your team critical time to rotate and support you.4
The Initial Push: The moment you hear the enemy team stampeding toward your site, it's go-time. Don't hesitate.
- Throw your GravNet directly into the chokepoint they are pushing through. This will catch the first players, especially aggressive duelists like Jett or Neon who think they can dash in for free.14
- Immediately follow up with your Barrier Mesh across that same chokepoint. This traps the netted players on your side of the wall, separating them from their teammates and creating absolute chaos for the enemy team.11 They are now isolated and easy targets for you and your rotating allies.
Site Anchoring: Place your Sonic Sensors in high-traffic areas just inside the site entrance. Think about where a Jett will dash to or where players will run to take cover after entering. You want the sensor to trigger when they are already committed and exposed.5 Stay close enough that when you hear the stun go off, you can immediately swing out and capitalize on the free kill.10

Your Path to Radiant
Best Maps for Deadlock
Deadlock thrives on maps with tight corridors, narrow chokepoints, and enclosed sites where her utility is nearly impossible to dodge. The less space the enemy has to maneuver, the deadlier you become.3
- Split: A defender's dream. The narrow entrances to A Main and B Garage are perfect for your Barrier Mesh and GravNet combos. Her kit is invaluable for stalling pushes into the critical Mid area.3
- Bind: With no mid lane, pushes are highly predictable. Your Sonic Sensors are absolutely lethal when placed under the Hookah drop on B site, as enemies have to make noise when they land.1
- Lotus: On a map with three sites, defenders are stretched thin. Deadlock's ability to completely lock down one approach with a Barrier Mesh is incredibly powerful, forcing attackers into predictable paths.3
- Ascent: A strong, flexible map for Deadlock. The tight rooms and predictable chokepoints make her utility extremely effective.1
- Breeze: Wide open spaces reduce the effectiveness of your utility
- Pearl: Long sightlines favor other agents
- Icebox: Vertical angles can bypass your barriers
- Fracture: Complex layout with many flanking routes
Perfect Agent Synergies
Deadlock is the ultimate setup agent. She excels when paired with agents who can follow up on her crowd control with high-impact damage or information.1 The game plan is simple: You stop them, your teammate blows them up.
Agents Who Counter You
Deadlock's primary weakness lies in agents who can either disable her utility entirely or simply bypass her movement-blocking abilities.1
KAY/O: He is your number one enemy. His ZERO/POINT suppression knife and NULL/CMD ultimate will disable all of your abilities, turning you into a sitting duck.1
How to Fight Back: Be unpredictable. Don't always place your traps in the most obvious, default locations. Try to bait out his knife before you commit your most important utility, like your Barrier Mesh or ultimate.
High-Mobility Duelists (Jett, Yoru, Raze): These agents can use their movement abilities to go straight over or through your Barrier Mesh, making it feel useless.1
How to Fight Back: It's all about timing. Your goal is to use your GravNet to catch them before they have a chance to use their mobility. Alternatively, wait for them to use their dash or teleport, and then throw your Barrier Mesh to block their path and punish their aggression.
Big Brain Strats to Win More Games
The Art of Unpredictability
The single most important skill to develop as a Deadlock player is unpredictability.25 A Deadlock who uses the same setup every round becomes easy to counter. Mix it up. One round, lurk on the other side of the map. The next round, play aggressively with your team for a fast site take. The round after that, play a deep post-plant from spawn with your ultimate. Your greatest strength is keeping the enemy team on their toes, constantly guessing where your next trap will spring.
Advanced Utility as Bait
The Fake Flash: In a high-stakes duel, you can throw your GravNet or Sonic Sensor against a nearby wall. The sudden visual and audio cue can make an enemy player flinch their crosshair, thinking it's a flashbang. This split-second hesitation can give you the peeker's advantage you need to win the fight.25 It's a niche, high-level mind game that can win you crucial duels.
Forcing the Trigger: As mentioned before, the best Deadlock players don't just hope their Sonic Sensors get triggered; they force it. Baiting an enemy into shooting by jiggle-peeking or wall-banging is a signature move of a proactive, intelligent Deadlock player who is actively controlling the engagement.14
Mastering Annihilation
Post-Plant Lineups: Your ultimate is not just a clutch tool; it's a calculated round-winner. Go into a custom game and learn specific, safe lineups for your ultimate on each map. Find spots where you can aim your ult to land perfectly on the default plant spot, allowing you to kill a defuser without ever exposing yourself.6
The 2-for-1 Play: Remember the psychological power of your ultimate. Often, the best strategy isn't just to cocoon one player; it's to use the cocooned player as bait to kill their teammate.16 When an enemy is trapped, their allies will often panic and rush to save them, exposing themselves completely. Secure the kill on the rescuer first, and then let your ultimate finish the job on the original target. This "2-for-1" play can single-handedly shatter an enemy team's numbers and morale.
The Anchor Mindset
Finally, remember your role. Your job isn't always to get the first kill. It's to stay alive and use your powerful utility to win the round for your team.3 A Deadlock who dies early is a Deadlock who has wasted her potential. Be patient. Play smart. A living Deadlock in a post-plant situation is one of the most feared sights in Valorant.
Go Get 'Em
You now have the playbook. You understand the mindset. Deadlock is not about passive setups; she's about active, aggressive control. She is the ultimate puppet master, weaving a web of nanowires that forces the enemy to dance to her tune. Take these strategies, jump into a match, and start experimenting. Be creative, be unpredictable, and most importantly, have fun locking down those ranks. Now go get 'em.