
Introduction: Light the Fuse! Welcome to the Mayhem, Mate!
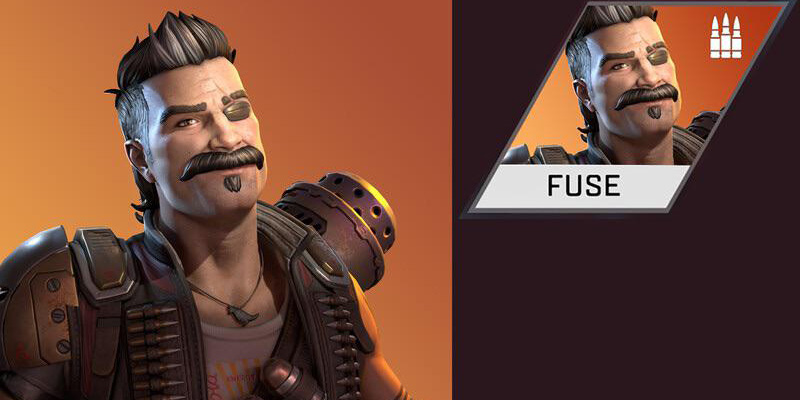
"Ready to blow the bloody doors off?" - Meet Walter "Fuse" Fitzroy!
First things first, let's get acquainted with the man, the myth, the legend himself: Walter "Fuse" Fitzroy Jr., Salvo's most beloved explosives enthusiast and a one-man wrecking crew. This bloke is a "ladies' man, man's man, and all-round manly man" who exudes pure joy when things are going kaboom. He's not one for complex plans; he's more of a "blow-up-first ask-questions-later kinda guy" who's always itching for a good scrap. Born on the brutal planet Salvo, ruled by misfit warlords and a love for mayhem, Fusey's affinity for explosives is practically in his blood. He cut his teeth as a mercenary alongside his childhood mate, Maggie, but while she craved power, Fuse felt the pull of the arena, eventually becoming the most charismatic gladiator in Salvo's Bonecage.
His very personality, this love for immediate, explosive action, isn't just for show; it directly informs how he should be played. This isn't a legend for lurking in the shadows or overthinking things. Fuse's design encourages a proactive, often aggressive, approach. To play him passively is to deny his very nature. He's built to initiate, to force the action, to make the enemy dance to the rhythm of his detonations. His dramatic entrance into the Apex Games, a result of a fiery falling out with Mad Maggie that literally cost him an arm and sparked her rampage against the Syndicate, perfectly encapsulates his gameplay impact: loud, disruptive, and impossible to ignore. He changes the battlefield the moment he arrives.
Why Play Fuse? More Bang, More Fun!
So, why pick Fuse? Simple: if you enjoy being the catalyst for chaos, the master of area denial, and the purveyor of relentless pressure, then Fuse is your legend. As an Assault Class legend, he's kitted out to bring the pain and keep it coming. This guide ain't just about learning his abilities; it's about transforming you into that "one man wrecking crew," a true connoisseur of kabooms who can control the battlefield with an iron (and often flaming) fist.
What You're Gonna Learn, Ya Mongrels!
Strap yourselves in, because we're going on a wild ride through Fuse's entire arsenal. We'll cover his Passive, Tactical, and Ultimate abilities in glorious detail. Then, we'll dive into an ordnance masterclass, teaching you how to make every grenade sing. After that, it's all about area denial, offensive positioning, and gearing up with the right loadout for maximum explosive efficiency. We'll even get into who Fuse parties best with in the current meta and cap it all off with some pro tips and common blunders to avoid. By the end of this, you'll be painting the Outlands red... and orange... and probably a bit black from all the scorch marks.
Fuse's Toolkit: Your Keys to the Boom-Boom Kingdom!
Now for the good stuff: the tools that make Fuse the undisputed king of kaboom. Understanding these abilities inside and out is the first step to explosive domination.
Passive: Grenadier – "Got a prezzie for ya!"
More 'Nades Than You Can Shake a Stick At:
The most straightforward benefit is that Fuse can stack an extra grenade per inventory slot. This means two Frag Grenades, two Arc Stars, or two Thermite Grenades can fit where other Legends can only carry one. This simple change has a massive impact on how much explosive power he can bring to any fight.
Furthermore, as an Assault Class Legend, Fuse benefits from an additional two dedicated grenade-only inventory slots. This combination solidifies his role as the team's primary ordnance carrier, often referred to as the "pack mule" for grenades, allowing teammates to focus their inventory on ammo and healing items. This team-wide inventory optimization is a strategic advantage that often goes overlooked but can be crucial in prolonged engagements or loot-scarce situations.
Launch 'Em Like You Mean It!
Fuse doesn't just carry more grenades; he launches them with his mechanical right arm, making them fly farther, faster (a significant 70% increase), and more accurately than a standard throw. This enhanced launch turns grenades from mid-range tools into potential long-range threats.
Crucially, players can toggle between this enhanced arm launch (defaulted to 'fire') and a standard, manual throw by pressing the utility action button (H on PC, D-Pad Down on controllers) while holding a grenade. The arm launch is ideal for distance and speed, while the standard throw offers more finesse for close-range lobs, "sky nades," or dropping grenades precisely over high cover. Mastering this toggle is essential, as the default "fire" mode can easily cause players to overshoot targets in close quarters if they're not mindful. This toggle introduces a distinct skill gap, rewarding players who can adapt their throw type to the specific situation.
Impact on Your Backpack & Looting:
Grenadier fundamentally changes Fuse's looting priorities. Grenades become prime pickups, often taking precedence over other items if backpack space is tight. This passive also has a unique interaction with Loba's Black Market Boutique: Fuse can pull two grenades (if available) using only a single charge of her ultimate, further enhancing his ordnance acquisition.
Tactical: Knuckle Cluster – "Here comes the biff!"
Launch a cluster bomb that continuously expels airburst explosives on impact
The Nitty Gritty of the Cluster:
The Knuckle Cluster launches a bomb that sticks to any surface or, even better, directly to an enemy. After a brief delay of about 1.5 seconds, it expels a series of mini-explosions over its duration. Fuse comes equipped with two charges of this ability, each with a 20-second cooldown.
Damage-wise, if the initial cluster sticks to an enemy, it deals 10 damage on impact. The subsequent mini-explosions can deal up to approximately 50-60 additional damage if an enemy remains in the full effect for its 6-second duration. While it can damage Fuse himself, it thankfully doesn't harm his teammates.
The dual-charge system is a critical aspect. It encourages a strategy of sustained pressure rather than a single burst. Experienced players will stagger the use of their Knuckle Clusters, ensuring one is almost always available due to the 20-second cooldown and 6-second duration of each charge. Firing both back-to-back leaves Fuse without his tactical for a longer period, reducing his ability to continuously harass and control enemy movement.
What's It Good For? (Hint: Lots!)
The Knuckle Cluster is incredibly versatile:
- Pressure & Flushing: Its primary use is to force enemies out of cover, off high ground, or away from objectives. The constant explosions make holding a position untenable. The psychological impact here is often more significant than the raw damage; enemies rarely sit in the full barrage, leading to predictable escape attempts that can be exploited. It's less about maximizing damage ticks and more about dictating enemy behavior.
- Chip Damage: Excellent for softening targets before a push or finishing off already weakened opponents.
- Breaching: A single Knuckle Cluster can destroy doors, creating instant openings into fortified buildings.
- Utility Destruction: It's a fantastic tool for clearing out enemy deployables like Rampart's Amped Cover, Loba's Black Market Boutique, and Revenant's Death Totem. It can also trigger Caustic's Nox Gas Traps.
- Interrupting: Perfect for stopping enemy revives or healing attempts, forcing them to move or take damage.
- Audio Cover/Pseudo Recon: The noise of the explosions can mask the sound of your team's advance or revives. Furthermore, landing a hit on an unseen enemy provides valuable intel on their location.
Knucklehead Interactions & Counters:
Ultimate: The Motherlode – "Time to give the ring a hug!"
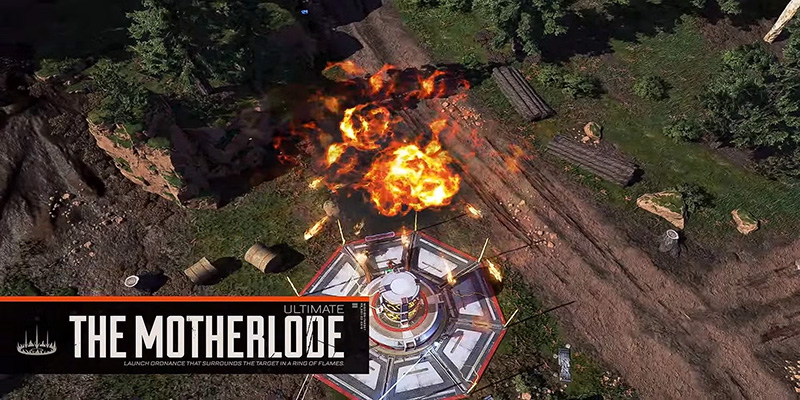
Bringing the Big BOOM:
The Motherlode is launched into the air, where it explodes and splits into multiple firebombs that rain down, creating a ring of fire on the ground. This ultimate can be fired up to 200 meters away, and aiming down sights (ADS) before launching provides a 3x zoom for better targeting.
Enemies who touch the ring of fire take an initial 35-37 damage, are slowed, and are set ablaze for 5 seconds, taking 8 damage per second (or 12 damage per second if they remain standing directly in the flames). This can total around 75-95 damage from a single interaction with the flames. The fire itself lasts for a significant 17 seconds, and the ultimate has a 2-minute cooldown.
Like his Knuckle Cluster, The Motherlode will damage Fuse if he steps into it, but it won't harm teammates, though they will be slowed if they pass through the flames.
Strategic Applications: More Than Just a Pretty Fire:
The Motherlode is a versatile tool with numerous strategic uses:
- Area Denial & Zoning: Its most common use is to block off large areas, chokepoints, or escape routes, effectively controlling enemy movement and preventing pushes.
- Trapping Opponents: Encircling enemies with the wall of fire sets them up perfectly for follow-up attacks from your team or more explosives from Fuse.
- Offensive Pushes: The ring can force enemies into predictable escape paths or flush them out of strong defensive positions, creating openings for your team to push.
- Defensive Cover (Situational): In a pinch, The Motherlode can be used to create temporary visual cover or deter enemies from rushing a revive, especially when combined with abilities like Gibraltar's Dome Shield.
- Third-Partying: Dropping The Motherlode onto an ongoing fight between two other squads is a classic Fuse maneuver, adding immense pressure and chaos to an already hectic situation.
Motherlode Placement - Aim for the Sky, Land the Fire:
Effective Motherlode placement is an art form and requires a good understanding of map geometry and enemy tendencies. Firing it too high can result in a ring that's too wide and easy to escape, while firing it too low or in confined indoor spaces can lead to self-damage or an ineffective spread.
- Height Advantage: Aiming higher generally creates a wider spread, which can be useful for zoning larger areas. Launching it onto evac towers or other tall structures can catch enemies off guard or cover a significant portion of a POI.
- Building Exits: A prime tactic is to use The Motherlode to cover the exits of buildings, trapping enemies inside or forcing them through flames to escape.
- Indoor Use Caution: Generally, avoid using The Motherlode indoors unless the building is very large with high ceilings. The flames can easily hit the ceiling and rain down on Fuse or simply not deploy effectively.
- Map Geometry Interaction: The shape of the ring of fire can be warped by terrain and map geometry, which can sometimes be used to an advantage or lead to unexpected gaps. Anticipating these interactions and predicting enemy movement is key to maximizing the ultimate's effectiveness. This makes map knowledge and player prediction more critical for The Motherlode than for many other ultimates.
Motherlode Interactions & Counters:
Like his tactical, Wattson's Interception Pylon can destroy The Motherlode's projectiles before they form the ring of fire. It cannot penetrate Gibraltar's Dome of Protection, but this can be used defensively by placing the Dome within your Motherlode ring to create a safe haven. Against a Catalyst wall, Fuse's ultimate can be strategically placed along it to deny that space, and critically, its scan effect will still highlight enemies through her Dark Veil.
Legend Upgrades: Fine-Tuning Your Mayhem (Season 20+)
The introduction of Legend Upgrades in Season 20 gave Fuse some powerful new ways to customize his explosive mayhem, offering choices that can significantly alter his playstyle, particularly in the late game. These choices often present a trade-off between strategic team utility and raw aggressive power.
Level 2 Upgrades (Unlocked at 450 EVO):
- Ringmaster: This upgrade grants Fuse access to Ring Consoles, allowing him and his team to predict the next ring location.
- Strategic Implication: This adds a significant layer of strategic depth to Fuse's kit. Knowing the next ring early allows for better rotations, securing advantageous positions, or setting up devastating gatekeeps with his area denial abilities. It synergizes well with his inherent ability to control space.
- Scar Tissue: A game-changer for aggressive Fuse players. Walking through his own Motherlode no longer slows Fuse, deals a reduced flat 20 damage (down from 37), and inflicts no afterburn effect.
- Strategic Implication: This perk dramatically reduces the self-punishment of using The Motherlode in close quarters. Fuse can now confidently drop his ultimate on his own position or push through his flames to surprise enemies, turning a personal hazard into a minor inconvenience. This fundamentally alters the risk-reward calculation for close-range ultimate usage.
Level 3 Upgrades (Unlocked at 1700 EVO):
- Knuckle Hustler: Fuse gains a 2-second speed boost whenever his Knuckle Cluster successfully hits an enemy. Importantly, multiple hits from a single Knuckle Cluster can trigger multiple speed boosts.
- Strategic Implication: This enhances Fuse's ability to be aggressive after landing his tactical. The speed boost can be used to quickly close the distance on a damaged enemy, reposition to a better angle, or even make a swift escape.
- Wreckless: Fuse takes 50% less damage from all explosives (an increase from a previous 25%). This includes enemy grenades, enemy abilities like Bangalore's and Gibraltar's ultimates, and his own Knuckle Clusters and Motherlode. However, it's crucial to note that this perk does not apply to Thermite Grenade damage, and Fuse can still be stunned by explosions.
- Strategic Implication: This perk transforms Fuse into an "explosive tank". The significant damage reduction allows for incredibly bold, almost reckless, explosive plays in close quarters that would have been suicidal previously. He can absorb far more punishment from the chaotic bombardments he creates.
The combination of "Scar Tissue" and "Wreckless" makes Fuse exceptionally resilient in explosive-heavy engagements, allowing him to dictate fights in a way previously too risky. This shift enables a hyper-aggressive brawling style. Conversely, the "Ringmaster" and "Knuckle Hustler" path offers more strategic and mobility-focused advantages, better suited for teams prioritizing positioning and controlled aggression. The choice between these upgrade paths allows players to tailor Fuse to their preferred playstyle and the team's overall strategy.
Ordnance Masterclass: Makin' Things Go Boom, Beautifully!
Fuse isn't just good with his explosives; he's a maestro with all explosives. His Grenadier passive elevates every grenade in the game to a new level of lethality in his hands.
Your Trusty 'Nades: Frags, Arcs, & Thermites – Fuse Style!
Understanding the base mechanics of each grenade type is crucial before layering on Fuse's enhancements.
General Grenade Mechanics (A Quick Refresher):
| Grenade Type | Fuse Time | Max Damage | Special Effects |
|---|---|---|---|
| Frag Grenade | 4 seconds | 100 damage (2.4m inner radius) | Knockback, destroys doors, 10 blunt damage on direct hit |
| Arc Star | 2.8 seconds | 75 health damage + strips shields | 10 stick damage, vision blur, movement slow (5 sec) |
| Thermite Grenade | On impact | 8 damage/sec + 25 afterburn | 6m horizontal firewall (8 sec duration), damages doors |
How "Grenadier" Makes You a God Tier 'Nadier:
Fuse's passive ability, Grenadier, fundamentally changes the utility and threat level of these standard ordnance types:
- Increased Range & Speed: Launching grenades 70% faster with his arm cannon means they travel with less arc, reach targets quicker, and are significantly harder for enemies to dodge. This turns Arc Stars into near-hitscan projectiles at considerable distances, making sticks much more reliable.
- Frag Bounces: The visible trajectory line provided for Frag Grenades when using the arm launcher is a massive advantage. It allows for precise, calculated bank shots off walls, ceilings, and other cover, enabling Fuse to hit enemies in seemingly safe positions. This is a high-skill technique that requires practice but offers incredible offensive potential.
- Volume of Fire: Being able to carry double the number of grenades per slot means Fuse can afford to use them more liberally for consistent pressure, flushing enemies, area denial, and direct damage. This allows him to initiate fights with an explosive barrage that other legends simply cannot match. For most legends, grenades are supplementary; for Fuse, they can be a primary method of engagement.
The constant threat of a well-stocked Fuse, capable of launching accurate, high-velocity ordnance from unexpected angles, creates significant psychological pressure on opponents. They may become hesitant to hold strong cover, over-rotate to avoid potential barrages, or waste their own utility preemptively, giving Fuse and his team a subtle but powerful advantage even before the explosions start.
Advanced Grenade Tactics for the Discerning Demolitionist:
Beyond simply throwing more, Fuse can employ sophisticated tactics:
- Cooking Frags: Essential for precise timing, especially when accounting for Fuse's faster launch speed. A well-cooked frag, launched with precision, can detonate exactly where and when needed.
- Arc Star Slows for Setups: The slowing and disorienting effect of an Arc Star makes enemies vulnerable targets for follow-up shots from Fuse or his teammates, or for subsequent explosive abilities. Sticking a downed player with an Arc Star is a particularly nasty (and effective) way to deter revives and punish their team.
- Thermite Walls of Denial: Thermites are exceptionally versatile for Fuse. He can use them to block doorways and sightlines, damage enemies through doors, force movement out of cover, or even create temporary visual screens for revives or healing.
- The "Nade Sandwich": A classic tactic where Fuse throws grenades to multiple sides of an enemy's cover, forcing them into a predictable escape path, often straight into the waiting sights of his team or another explosion.
- Sky Nades: By toggling to the standard throw (off his arm launcher), Fuse can execute high-arcing "sky nades" that can drop down on unsuspecting enemies who believe they are safe behind tall cover.
- Ordnance on Downed Enemies: A liberal application of any grenade type on downed enemies can finish them off, prevent revives, or bait their remaining teammates into a disadvantageous fight.
Explosive Combos: Orchestrating Your Symphony of Destruction!
Fuse truly shines when he starts layering his explosives, creating devastating chain reactions that leave enemies with nowhere to run. Effective combos often rely on forcing enemy movement with one ability and then punishing that movement with another.
The Classic Flush & Boom
Execution: Initiate by firing a Knuckle Cluster directly at enemy cover or into a confined space where enemies are hiding. This is designed to force them to move. As they predictably scatter or attempt to reposition, follow up immediately with a well-aimed Frag Grenade or Arc Star to catch them in the open or along their anticipated escape route.
Why it Works: This combo exploits the predictable human reaction to flee from the continuous explosions of the Knuckle Cluster. The initial cluster dictates their movement, and the follow-up grenade punishes it. This requires Fuse players to think one step ahead, anticipating the enemy's egress.
Ring of Pain Overload:
Execution: First, trap one or more enemies within The Motherlode's fiery embrace. Once they are encircled (and ideally highlighted by the ultimate's scan), unleash a barrage into the interior. This includes both charges of your Knuckle Cluster and any remaining grenades. Prioritize Frags for burst damage, Thermites to further restrict movement and obscure vision within the ring, and Arc Stars to slow any attempts to dash through the flames.
Why it Works: This combo overwhelms enemies trapped in a confined, damaging space. It limits their escape options and maximizes damage potential. The visual and audio chaos from multiple explosions and the roaring firewall adds a significant psychological pressure, often leading to panic and poor decisions.
The Door Breach Blitz:
Execution: Use a Knuckle Cluster to instantly destroy a door that enemies are holding or hiding behind. Immediately follow this breach with a Frag Grenade for quick damage to anyone near the doorway, or a Thermite Grenade to block the now-open passage with fire and burn those inside. If enemies are visibly damaged or disoriented by the initial breach, a coordinated team push can follow.
Why it Works: This creates an unexpected opening and punishes teams relying too heavily on door cover for defense. It's a fast, aggressive way to initiate a CQC engagement on Fuse's terms.
The Vertical Assault:
Execution: If enemies are occupying high ground, such as a rooftop or a cliff edge, use The Motherlode to encircle their elevated position. Follow this by precisely aimed Knuckle Clusters (using the trajectory indicator for accuracy) and grenades (using the standard throw toggle for high arcs if necessary) lobbed directly onto their perch.
Why it Works: This tactic makes the high ground untenable. Enemies are forced to either drop down into your team's waiting guns or sustain significant damage from the continuous bombardment.
Advanced Combo: "The Caustic Oven" (Team Synergy):
Execution: This requires a Caustic teammate. Fuse first traps enemies with The Motherlode. Caustic then throws his Nox Gas Grenade ultimate directly into the center of the fiery ring.
Why it Works: This creates an inescapable deathtrap. Enemies are forced to choose between burning in Fuse's flames or choking on Caustic's toxic gas – a truly horrifying (and effective) combination, sometimes affectionately dubbed the "fart pie".
Advanced Combo: "The Black Hole Barrage" (Team Synergy):
Execution: This relies on a Horizon teammate. Horizon deploys her Black Hole ultimate, pulling nearby enemies into a tight cluster. Fuse then unleashes his full arsenal – Knuckle Clusters, multiple grenades, and potentially The Motherlode – directly into the singularity.
Why it Works: Horizon's ultimate groups and immobilizes targets, making them exceptionally vulnerable to Fuse's area-of-effect damage. This is one of the most devastating offensive combos in the game, capable of wiping squads very quickly.
The most potent Fuse combos often involve abilities from teammates that either group enemies (like Horizon's Black Hole) or further restrict their movement (like Caustic's gas), creating a "kill box" where Fuse's AoE damage can wreak maximum havoc. This highlights his strength not just as a solo damage dealer, but as a powerful force multiplier in a coordinated team.
Blowin' Up The Battlefield: Area Denial & Offensive Mayhem
Fuse isn't just about direct damage; he's a master of controlling space. Whether you're locking down an area or spearheading a push, his explosives are your best friends.
Controllin' the Chaos: Fuse's Area Denial Playbook – "They ain't goin' nowhere!"
Fuse excels at making sections of the battlefield temporarily uninhabitable for his foes. This area denial is most effective when used proactively to dictate where engagements happen, rather than reactively to escape them. While his abilities can be used defensively, such as using The Motherlode for revive cover, his kit truly shines when he's setting the terms of the fight from the outset.
Knuckle Cluster Control:
The Knuckle Cluster is a versatile tool for localized area denial:
- Chokepoints & Doorways: Sticking a Knuckle Cluster in a narrow passage, on a doorway, or at the end of a zipline effectively deters enemy pushes or buys valuable time for your team to heal or reposition. It can be particularly useful defensively when you need to pop a heal.
- Cover Denial: Firing Knuckle Clusters onto common pieces of cover (rocks, boxes, low walls) makes those positions unusable for enemies, forcing them into the open or into less advantageous spots.
- Interrupting Actions: A well-placed Knuckle Cluster can halt enemy revives, healing, or interactions with objectives like respawn beacons or survey beacons. This creates a win-win: either the enemy stops their action and repositions, or they tank the damage and reveal their commitment.
The visual and audio "noise" from the Knuckle Cluster's constant explosions also contributes significantly to its area denial effect. It creates confusion, masks the sounds of your team's movements, and can overload the enemy's sensory input, making it harder for them to make clear decisions or pinpoint your squad's location.
Motherlode Mastery for Area Lockdown:
The Motherlode is Fuse's ultimate tool for large-scale area denial:
- Large-Scale Zoning: Use The Motherlode to deny significant portions of the battlefield, especially in open areas, around objectives, or during final ring closures.
- Cutting Off Rotations/Escapes: Strategically placing The Motherlode can block enemy retreat paths, prevent them from rotating to a new position, or cut them off from reaching the safety of the next ring.
- Securing Buildings/Positions: Encircling a building that your team holds can deter third parties. Conversely, trapping defenders inside a building you are pushing creates immense pressure.
- Defensive Motherlode: In desperate situations, The Motherlode can be deployed around your team to create a temporary fiery barrier, deterring immediate enemy rushes while your team revives or heals. This is particularly effective when combined with Gibraltar's Dome Shield placed inside the ring of fire.
Kickin' Down the Door: Offensive Positioning & Pushes – "Let's get this party started!"
Fuse is an offensive powerhouse, designed to break stalemates and spearhead aggressive pushes. His strength lies in creating an uneven playing field with his explosives before direct gunfights fully commence.
Finding Your Sweet Spot: Engagement Ranges:
Fuse excels at initiating fights from mid-to-long range with his explosives, using his Grenadier passive and Knuckle Clusters to poke, pressure, and soften targets. However, he needs to be close enough to follow up on any damage dealt; explosives from too far away give enemies ample time to heal.
Breaching and Entering: Using Explosives to Initiate:
Fuse is a master at cracking open defenses:
- Opening Salvo: Start engagements with a barrage of Knuckle Clusters or grenades to break enemy shields, deal initial chip damage, or force enemies out of advantageous cover.
- Motherlode Trap & Push: Use The Motherlode to trap and isolate key targets or an entire squad, then coordinate a push with your team to capitalize on their compromised position and the information provided by the ultimate's scan.
- Instant Door Breach: As mentioned, Knuckle Clusters destroy doors instantly, creating immediate openings for a surprise attack or to flush out campers.
Positional Warfare: Playing Cover & High Ground:
Smart positioning amplifies Fuse's offensive capabilities:
- Forcing Enemies from Cover: Use explosives to make enemy cover positions untenable, forcing them to move into the open where they are vulnerable to gunfire from you and your squad.
- High Ground Dominance: Securing high ground provides Fuse with superior angles to aim and deploy The Motherlode and Knuckle Clusters effectively over a wider area. His abilities are described as "most reliable from the high ground".
- Team Positioning: Fuse often plays from the middle to the back of his team formation, allowing him to safely lay down suppressive fire with his weapons and launch a continuous stream of grenades and Knuckle Clusters to control the battlefield and support his teammates' pushes.
Effective offensive play as Fuse requires strong communication and coordination with teammates. He can create numerous openings and sow widespread chaos, but his team needs to be ready to capitalize on these opportunities. A solo Fuse might struggle to maximize his impact without a squad that understands how to play around his explosive tempo and follow up on the pressure he generates.
Loadout for Destruction: Guns, Grenades, & Gear – "Time to go shopping, ladies!"
A true demolition expert needs the right tools for the job. Fuse's loadout should complement his explosive abilities and his role as an aggressive area-control specialist.
Weapons of Mass Demolition: Best Guns for Fuse – "This'll do nicely!"
Fuse's weapon choices should allow him to capitalize on enemies flushed out by his explosives or trapped by his ultimate.
Mid-Range Mayhem:
These weapons are excellent for engaging enemies that Fuse has forced out of cover or is pressuring from a distance.
- Assault Rifles (R-301 Carbine, VK-47 Flatline, Hemlok Burst AR): These offer a good balance of damage, accuracy, and range, making them reliable for follow-up shots after an explosive barrage. The R-301 is often cited for its ease of use and consistency. The Flatline or Spitfire can also serve well if Fuse is playing a more anchored, suppressive fire role.
- Marksman Weapons (G7 Scout, 30-30 Repeater, Triple Take): These are great for poking at enemies from a distance and capitalizing on those forced into the open by Knuckle Clusters or The Motherlode. The G7 Scout, when paired with a close-range weapon like the R-99, was a top-tier combination in Season 25. The 30-30 Repeater is also a strong contender, especially with a Skullpiercer Hop-Up.
Close-Quarters Finishers:
Once enemies are weakened, trapped, or flushed into close range, these weapons help Fuse finish the job.
- Shotguns (Mastiff Shotgun, Peacekeeper, EVA-8 Auto): Shotguns provide devastating burst damage, perfect for eliminating enemies who have taken damage from explosives or are caught inside The Motherlode. The Mastiff is a frequently recommended option.
- SMGs (R-99 SMG, C.A.R. SMG, Volt SMG): Fast-firing SMGs are excellent for aggressive pushes into areas affected by Fuse's abilities, allowing for quick takedowns of disoriented or damaged opponents. The R-99, paired with a G7 Scout, offers a high-skill, high-reward loadout.
- Alternative Close-Range Options: Some players find success with the Alternator SMG or even the L-Star EMG, with the L-Star's advantage being that it technically never needs to reload, allowing for sustained fire during chaotic pushes.
The Explosive Bocek Bow - A True Fusey Special?
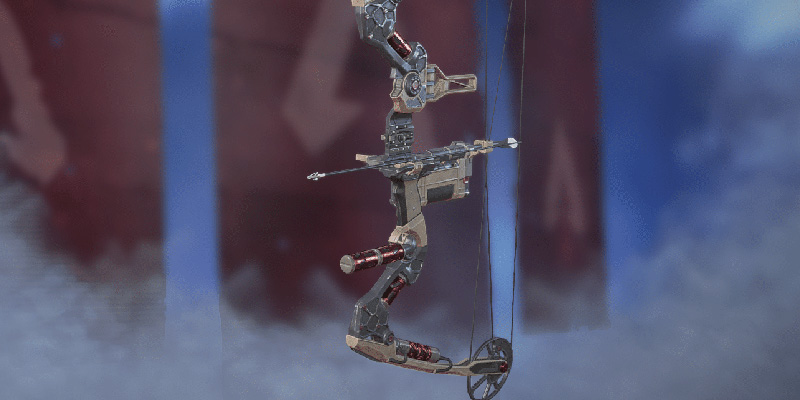
The Bocek Compound Bow, particularly with its explosive arrow interaction, presents an interesting, if debated, option for Fuse.
- Interaction: Frag Grenades can be used to energize the Bocek, allowing it to fire explosive arrows. As of a May 2025 patch, max charge damage for the Bocek was increased to 65, with explosive arrow impact damage at 55 (up from 40). These explosive arrows also deal 25 area-of-effect damage in a 5-meter radius after a 2-second delay.
- Tactics: The primary appeal for Fuse is the ability to deliver explosive poke damage from long range without expending a grenade from his inventory after the initial Frag Grenade is used to energize the bow. It's good for attrition damage, hitting multiple targets or enemy deployables, or even "nading" enemies behind cover with missed shots that still explode.
- Viability: Opinions on the Bocek's overall effectiveness are mixed. Some players find it underwhelming compared to other marksman rifles due to its limited ammo reserve (a base of 40 arrows, retrievable from misses or death boxes but not found as floor loot) and potentially slower time-to-kill (TTK). Others appreciate its utility for hot drops (no immediate need for ammo), its unique explosive pressure, or simply find it fun to use. It's generally considered a weapon for long-range pressure rather than close-quarters combat. The key trade-off is its unique explosive utility versus the ammo constraints and potentially lower DPS compared to other marksman options.
Table: Fuse's Recommended Loadouts
For a quick reference, here are some solid loadout combinations tailored to Fuse's explosive strengths:
| Primary Weapon | Secondary Weapon | Grenade Priority | Playstyle Focus |
|---|---|---|---|
| R-301 Carbine | Mastiff Shotgun | Arc Stars / Frags | Versatile Mid-Range Control & CQC Finishing |
| 30-30 Repeater | Peacekeeper | Thermites / Frags | Long-Range Harassment & Breaching |
| G7 Scout | R-99 SMG | Arc Stars | High Skill Poke & Aggressive Flanking |
| Bocek (Explosive) | EVA-8 Auto Shotgun | Frags (for Bocek) / Thermites | Unique Explosive Pressure & CQC Support |
| VK-47 Flatline | Volt SMG | Frags / Thermites | Sustained Mid-Range Fire & Aggressive Pushing |
These loadouts aim to provide Fuse with options to engage at optimal ranges, capitalize on openings created by his explosives, and finish fights decisively. The grenade priority reflects the types of situations each loadout might excel in.
Backpack Management: How Many 'Nades is TOO Many 'Nades? (Spoiler: Almost Never Enough!)
Thanks to his Grenadier passive and Assault Class perks, Fuse can carry an arsenal of explosives that would make other Legends blush.
The Art of Stacking:
Fuse should always prioritize picking up a variety of grenades – Frags, Arc Stars, and Thermites – as each serves a different tactical purpose. Having a mix makes him unpredictable and adaptable to any situation.
Spam vs. Conserve: Know When to Hold 'Em, Know When to Throw 'Em!
While Fuse can carry a lot of grenades, mindless spamming is rarely the most effective strategy. Knowing when to unleash a barrage versus when to use a single, precise explosive is key to high-level Fuse play. This decision-making is heavily influenced by intel and the specific tactical situation.
- Breaking Fortified Positions: When enemies are heavily dug in, especially multiple opponents in a confined space, a sustained explosive barrage can overwhelm their defenses.
- Third-Partying: Entering an ongoing fight with a volley of grenades maximizes chaos and damage on already weakened or distracted teams.
- Denying Critical Actions: If you have a clear advantage and need to stop a crucial revive or heal, don't hesitate to use multiple explosives to ensure the interruption.
- Endgame Scenarios: In the final rings where space is extremely limited, grenade spam can be incredibly effective at forcing enemies out of the little remaining cover or into the storm.
- Early Game: When resources are scarce for everyone, conserve your valuable grenades.
- Specific Objectives: If you anticipate needing grenades for a critical final push or to counter a specific enemy legend's ability later in the game.
- Wattson Pylon Active: Continuously throwing grenades into an active Interception Pylon is a waste of resources. Identify and destroy the pylon first, or reposition.
- Low on Ammo/Heals: If your personal supplies of ammunition or healing items are critically low, and your team cannot supplement them, it might be wiser to conserve grenade slots for these essentials. The advice is clear: "your inventory management shouldn't sacrifice meds or ammo for them".
- Poke and Utility with Knuckle Clusters: Use your recharging Knuckle Clusters for general poking, flushing, or utility destruction to save your consumable grenades for moments requiring their higher burst damage or specific effects.
Fuse's optimal resource management involves a dynamic balance. He should be an "ordnance battery" for his team, but not at the cost of his own ability to fight effectively. If he has plenty of grenades but no ammo to follow up or heals to sustain himself, his explosive potential is wasted.
Team Ordnance Economy:
When Fuse is on the team, it can indeed alter the grenade-carrying strategy for his squadmates. With Fuse capable of carrying so many explosives, teammates can often afford to carry significantly fewer grenades themselves. This frees up valuable inventory space for them to stock up on more ammunition, healing items, or other utility like Mobile Respawn Beacons or Heat Shields. This "grenade mule" role for Fuse enhances the entire team's resource efficiency. However, the team should be mindful that if Fuse is eliminated early, their overall explosive capacity might be diminished if they've relied too heavily on him.
The Demolition Crew: Meta Team Comps & Synergies – "Time to make some new mates... and some new craters!"
Fuse's explosive talents are amplified when he's paired with Legends whose abilities complement his chaotic, area-denial playstyle. A well-coordinated team built around Fuse's strengths can be an absolute nightmare for opponents.
Fuse's Best Mates: Legends Who Love Explosions (And a Bit of Chaos!)
Scan Legends (Bloodhound, Seer): "Nowhere to hide, rats!"
- Synergy: These Legends are invaluable for Fuse. Their scanning abilities can reveal enemies hidden by Fuse's fire, the smoke from Thermites or Bangalore (if she's also on the team), and the general visual clutter of his explosions. This allows for precise follow-up shots, more accurate Knuckle Cluster placements, and better targeting for The Motherlode. The Motherlode's own enemy-highlighting feature also synergizes well, providing an additional layer of intel.
- Execution: Ideally, a scan should be deployed just before or as Fuse unleashes The Motherlode or a barrage of Knuckle Clusters to maximize their impact on revealed targets. Seer's Focus of Attention tactical can interrupt the heals of enemies flushed out by Fuse's explosives, preventing them from recovering. Bloodhound's Eye of the Allfather, especially during Beast of the Hunt, can keep targets painted through the chaos.
- Timing Cues: The best time for a scan is often when Fuse audibly announces he's using his ultimate ("Droppin' the Motherlode!") or when the initial explosions of a Knuckle Cluster are heard. Visually, as soon as enemies begin to scatter from Fuse's initial ordnance, a scan can catch them in vulnerable positions.
Area Control Legends (Caustic, Catalyst): "Let's make this place a living hell!"
- Caustic: The combination of Fuse's Motherlode and Caustic's Nox Gas Grenade is famously deadly, often called the "Caustic Oven" or "Fart Pie". Enemies trapped in the ring of fire are then choked by gas, leaving them with no good options. Caustic's Nox Gas Traps can further restrict movement within Fuse's fiery zones, making escape even harder.
- Catalyst: This is a more nuanced synergy. Fuse is a strong counter to Catalyst's defensive abilities; his Knuckle Clusters can break her reinforced doors, and his Motherlode can scan enemies through her Dark Veil and be placed to deny space along it. However, for this to be a synergistic pairing rather than a counter-productive one (e.g., Catalyst's wall blocking Fuse's line of sight), careful coordination is required. A well-placed Dark Veil could funnel enemies into Fuse's explosives, or Fuse could use his abilities to break an enemy Catalyst's setup, allowing his Catalyst teammate to take control of the area.
Aggressive/Push Legends (Mad Maggie, Octane, Ash, Wraith): "Follow my lead, and let's give 'em what for!"
- Mad Maggie: As a fellow Salvonian, Maggie's kit has natural synergy with Fuse's. Her Riot Drill complements his Knuckle Clusters for breaching fortified positions and burning enemies out of cover. Her Wrecking Ball ultimate can create chaos, stun enemies, and provide speed boosts for the team to push aggressively after Fuse has initiated with his bombardment or flushed enemies out. Both Legends excel at forcing enemies from cover and maintaining relentless pressure. An aggressive push might involve Fuse initiating with Knuckle Clusters to break doors or force enemies from cover, Maggie using her Riot Drill on remaining cover, followed by her Wrecking Ball to close distance and stun, with Fuse then dropping The Motherlode to trap any survivors or cut off escape.
- Octane: His Launch Pad can be used to propel the team (including Fuse) onto enemies trapped within The Motherlode, or to quickly gain high ground for Fuse to rain down his ordnance. Octane's Stim allows for rapid follow-ups on enemies damaged by Fuse's initial volleys.
- Ash: Her Phase Breach ultimate can reposition the team for better angles to exploit Fuse's explosives or to quickly aggress on a team that Fuse has trapped or disoriented. Her Arc Snare can hold enemies in place, making them easier targets for Fuse's Knuckle Clusters or grenades.
- Wraith: Her Dimensional Rift portal can allow for safe rotations after Fuse has initiated a fight with his explosives, or enable an aggressive push onto a weakened or disorganized team.
Supportive/Defensive Legends (Gibraltar, Bangalore, Horizon): "Cover me, I'm goin' in!"
- Gibraltar: A classic pairing. Gibraltar's Defensive Bombardment ultimate combined with Fuse's Motherlode creates an overwhelming area of explosive damage that few teams can withstand. His Dome of Protection allows Fuse to spam grenades and Knuckle Clusters with relative safety, or it can be placed inside a defensive Motherlode ring to create a safe haven for revives or healing.
- Bangalore: Her Smoke Launcher can provide visual cover for Fuse while he launches his ordnance, or it can be used to obscure enemy positions, making them prime targets for Fuse's area-of-effect abilities. For example, Bangalore can smoke an enemy position, Fuse can then launch Knuckle Clusters into the smoke to force enemies out or deal damage, followed by The Motherlode to trap any who remain or try to flee. Fuse is also a strong counter to enemy Bangalores attempting to use smoke for concealment, as his explosives make hiding futile.
- Horizon: An incredibly potent synergy. Horizon's Gravity Lift can get Fuse to advantageous high ground quickly or lift enemies up, making them vulnerable targets for his explosives. Her Black Hole ultimate, which pulls enemies into a singularity, is the perfect setup for Fuse to unleash his entire kit – Knuckle Clusters, grenades, and The Motherlode – for maximum concentrated damage. For instance, Horizon can use her Gravity Lift to allow Fuse to get a better angle for The Motherlode, then use her Black Hole to pull enemies into the ensuing ring of fire, while Fuse pummels them with Knuckle Clusters and grenades.
Table: Fuse's Key Team Synergies
This table provides a quick reference for building effective teams around Fuse:
| Teammate Legend | Role of Teammate | Key Ability Synergy with Fuse | Tactical Focus |
|---|---|---|---|
| Bloodhound / Seer | Recon | Scans reveal enemies through fire/smoke; target acquisition for explosives; Motherlode synergy | Info-Driven Assault |
| Mad Maggie | Assault | Riot Drill for breaching; Wrecking Ball for push initiation after Fuse's bombardment | Hyper-Aggressive Breaching & Flushing |
| Horizon | Skirmisher | Black Hole groups enemies for Motherlode/KCs; Gravity Lift for positioning Fuse/enemies | Vertical Assault & Combo Damage |
| Caustic | Controller | Nox Gas Grenade + Motherlode ("Caustic Oven"); Traps for further area denial in fire | Extreme Area Denial & Trapping |
| Gibraltar | Support | Defensive Bombardment + Motherlode; Dome Shield for safe explosive spam/revives in fire | Fortified Bombardment |
| Bangalore | Assault | Smoke for cover/obscuring targets; Rolling Thunder + Motherlode for wide area denial | Controlled Chaos & Offensive Pushes |
Fuse in the Current Meta (Season 20+): Still Blowin' Strong, Or a Bit of a Damp Squib?
Fuse's position in the Apex Legends meta has often been a topic of discussion, with his viability fluctuating based on prevailing strategies and the popularity of his counters.
The introduction of Legend Upgrades in Season 20 significantly impacted his potential. Perks like "Scar Tissue" (reducing Motherlode self-damage and removing slow) and "Wreckless" (50% explosive damage reduction) allow for a much more aggressive, brawling playstyle that was previously too risky due to self-inflicted harm. Conversely, "Ringmaster" (access to Ring Consoles) and "Knuckle Hustler" (speed boost on KC hit) offer more strategic and rotational benefits. This choice allows Fuse to adapt to different team needs, potentially increasing his versatility.
As an Assault Legend, Fuse benefits from the class perks of carrying extra ammunition and accessing the secret compartments in Weapon Supply Bins for higher-tier attachments.
Historically, Fuse's pick rate has been moderate, often considered a niche or situational pick, particularly in higher-ranked and competitive play. His viability is often paradoxically linked to the prevalence of his primary counter, Wattson. Her Interception Pylon can neutralize Fuse's entire explosive kit, making him significantly less effective when she is a common sight in lobbies. However, in metas where Wattson is less popular, or in specific scenarios where her pylon can be dealt with, Fuse's stock rises considerably. Some analyses suggest Fuse is a strong counter to a Catalyst-centric meta due to his ability to destroy her fortifications and scan through her ultimate.
Recent weapon changes, such as those to the Bocek Compound Bow making it a floor loot weapon with an explosive arrow mechanic, provide Fuse with another tool that synergizes with his explosive theme, though its overall place in his optimal loadout is still debated among players.
Advanced Pyrotechnics: Pro Tips, Tricks, & Avoiding Blunders – "Don't be a drongo!"
Mastering Fuse goes beyond just knowing his abilities; it's about creative application, smart counters, and avoiding common pitfalls.
Creative Kabooms: Thinkin' Outside the Blast Radius!
Unconventional Knuckle Cluster Uses:
- Bank Shots/Tricky Sticks: With practice in the Firing Range, Knuckle Clusters can be bounced off walls, ceilings, or other map geometry to hit enemies in unexpected locations or around corners where direct line of sight is impossible. Understanding the cluster's trajectory and sticking properties is key.
- Audio Masking: The distinct, continuous explosions of a Knuckle Cluster can be used to mask the sound of footsteps during a push, a revive attempt, or even a reload, providing a tactical sound cover.
- Pseudo-Recon: Firing Knuckle Clusters into suspected hiding spots (e.g., behind rocks, in bushes, around blind corners) can confirm enemy presence if damage numbers appear. This is a quick way to gather intel without exposing oneself.
- Destroying Deployables from Afar: Use the Knuckle Cluster's range to safely destroy enemy deployables like Rampart's Amped Cover, Loba's Black Market Boutique, Revenant's Death Totem, or Caustic's traps from a distance, denying the enemy their utility without putting yourself in immediate danger. One user also noted it can be used to damage Horizon's Black Hole.
Unconventional Motherlode Uses:
- Visual Cover/Screen: While not its primary function, the tall wall of flame created by The Motherlode can serve as temporary visual cover, obscuring line of sight to allow for rotations, revives, or repositioning, especially in open areas. One specific tactic is using it to block doors during a revive.
- Psychological Warfare: The sheer visual and auditory impact of The Motherlode descending can cause panic and force enemies into making poor decisions or predictable movements, even if the flames don't directly hit them. The HUD warning "MORTAR FLARE DETECTED" adds to this pressure.
- Elevated Placement for Wider Coverage: Launching The Motherlode from high ground or aiming it at tall structures like Evac Towers can result in a wider, more effective spread of the flames, covering a larger area or catching enemies on rooftops off guard.
- Forcing Enemies into Zone/Other Hazards: Use The Motherlode strategically to push enemies out of the closing ring, into other environmental hazards, or into the line of fire of a third-partying squad.
- Reconnaissance Tool: Beyond trapping, the ADS 3x zoom while aiming The Motherlode can be used purely for scouting distant areas before committing to the launch.
Countering the Party Poopers: Dealing with Defensive Duds!
Fuse's explosive kit can be potent, but certain defensive Legends can throw a spanner in the works.
Wattson's Interception Pylon:
- Priority Target: If an enemy Wattson has her Interception Pylon active, it must be a priority target. The Pylon will destroy all incoming grenades, Knuckle Clusters, and The Motherlode's projectiles, effectively neutralizing Fuse's entire offensive capability. Focus fire on the Pylon to destroy it.
- Baiting the Pylon: If unsure whether a Pylon is active or if its location is concealed, throw a single, less valuable grenade to test its presence before committing more valuable ordnance like Knuckle Clusters or The Motherlode.
- Playing Around It: If destroying the Pylon isn't immediately feasible, try to reposition the fight outside its effective range or wait for an opportunity when it's down.
- Niche Catalyst Interaction: A friendly Catalyst's Dark Veil can reportedly block line of sight to one side of an enemy Wattson's Pylon, potentially allowing Fuse to lob grenades around the Pylon's interception field from an unexpected angle. This is a highly situational but clever tactic.
Catalyst's Fortifications:
Fuse is actually a strong counter to Catalyst's defensive setups.
- Reinforced Doors (Passive - Barricade): Fuse's Knuckle Clusters and standard grenades make short work of Catalyst's reinforced doors, breaking them down quickly and exposing the defenders inside. If Mad Maggie is on your team, her Riot Drill is also excellent for this purpose.
- Piercing Spikes (Tactical): Knuckle Clusters can be used to damage or destroy Catalyst's Piercing Spikes, clearing paths for your team.
- Dark Veil (Ultimate): The Motherlode is a direct counter. Its scan effect highlights enemies through the Dark Veil, and the flames can be placed along or within the Veil to deny space and damage those attempting to use it for cover. If you have scan legends like Bloodhound or Seer, their abilities will also help see through the Veil.
Mobile Skirmishers (Wraith, Octane, Pathfinder, Horizon, Alter):
These Legends can be tricky targets for Fuse's abilities due to their high mobility and escape tools, making them harder to trap reliably with The Motherlode.
- Focus on Chip Damage & Forcing Cooldowns: Against highly mobile legends, use Knuckle Clusters and grenades primarily for consistent chip damage and to force them to expend their valuable mobility cooldowns. Once their escape options are used, they become much more vulnerable.
- Predict Escape Paths: Try to anticipate where a mobile legend will dash, phase, or grapple to, and aim your explosives accordingly to cut off their escape or catch them as they land.
- Area Denial Over Direct Hits: Sometimes, using The Motherlode to deny a large area or a common escape route is more effective than trying to land a perfect trap on a highly mobile target.
Common Fuse Fails (And How Not to Be That Guy/Gal): "Don't get ya knickers in a twist!"
Even the best demolitionists can have a misfire. Here are some common blunders to avoid:
- Wasting Abilities: Mindlessly spamming both Knuckle Cluster charges back-to-back without staggering them for sustained pressure. Throwing The Motherlode randomly with no clear strategic intent or enemy presence is another common waste.
- Poor Positioning: Getting caught in the open with no cover while winding up to throw a grenade or deploy an ability is a death sentence. Fuse lacks escape tools, so positioning is paramount. Not utilizing available high ground to maximize the effectiveness of his ranged explosives is also a missed opportunity.
- Excessive Self-Damage: Carelessly using Knuckle Clusters or The Motherlode in very tight indoor spaces can lead to significant self-damage, especially if you haven't unlocked the "Scar Tissue" or "Wreckless" perks.
- Ignoring Counters: Repeatedly throwing your entire explosive arsenal into an active Wattson Interception Pylon is a surefire way to contribute nothing to the fight.
- Neglecting Gunplay: Over-relying on abilities and forgetting that firearms are still the primary source of consistent damage can lead to lost fights. Fuse's explosives are there to create advantages for gunfights, not entirely replace them. As one source aptly puts it, "your gun is more important than your abilities".
- Using Knuckle Cluster While Being Actively Shot At: The deployment animation for Knuckle Cluster is relatively slow. Trying to use it mid-gunfight when an enemy has a clear line of sight on you will often result in you taking significant damage or being downed before the cluster even lands. Use it from cover or before the enemy is directly engaging you.
Endgame Explosions: Turning the Final Ring into a Funeral Pyre!
Fuse can be an absolute monster in the final rings of a match, where space is at a premium and his area denial abilities shine brightest.
- Resource Hoarding Pays Off: This is where saving some of those precious grenades and ensuring The Motherlode is ready comes into play. In tight final circles, every explosion counts.
- Motherlode for Ultimate Control: Use The Motherlode to deny the last remaining pieces of safe cover, forcing enemies to move into the closing storm, into your team's line of fire, or through the flames themselves. The psychological pressure this creates is immense.
- Target Prioritization in Chaos: In multi-team final rings, prioritize using your explosives on:
- Teams already engaged in fighting each other (classic third-party advantage).
- Teams attempting critical actions like revives (especially Lifeline) or deploying defensive ultimates (like a Wattson trying to set up a late Pylon).
- Enemies forced into predictable chokepoints by the shrinking ring.
- Relentless Knuckle Cluster Poke: With limited cover available, Knuckle Clusters become incredibly effective for continuous chip damage, preventing enemies from healing and keeping them under constant pressure.
- The "Wreckless" Advantage: In chaotic final rings, which often devolve into a grenade-fest from all remaining teams, Fuse's "Wreckless" upgrade (50% explosive damage reduction) offers a disproportionate survival advantage. He can withstand the explosive spam far better than other Legends, potentially turning the tide.
The psychological aspect of Fuse's kit is significantly amplified in these high-pressure endgame scenarios. The relentless bombardment and the ever-present threat of being trapped in fire can force opponents into panicked, predictable plays, making them easier targets for a composed Fuse and his squad.
Conclusion: Go Forth and Make Some Noise, Ya Bloody Beauties!
Recap: Fuse, the Maestro of Mayhem!
Well, there you have it, legends! Walter "Fuse" Fitzroy is more than just a bloke who likes things that go boom. He's a master of area control, an offensive juggernaut, and a legend capable of turning the tide of any fight with a well-placed explosive (or ten). From his Grenadier passive making him an ordnance-hoarding king, to his Knuckle Clusters constantly harassing foes, and The Motherlode painting the battlefield with fire, Fuse brings unparalleled explosive power to the Apex Games.
Final Words of Wisdom from Your Favorite Explosives Enthusiast:
Playing Fuse is about embracing the chaos, thinking one step ahead of your enemies, and always looking for that perfect opportunity to light the fuse. It takes practice to master his trajectories, his timings, and the art of the explosive combo. Don't be afraid to experiment in the Firing Range – get a feel for how far those 'nades fly, how the Knuckle Cluster sticks, and how The Motherlode blankets an area.
"Don't threaten me with a good time!"
So get out there, sling some grenades, launch those clusters, call down the fire, and make ol' Fusey proud! Let the explosions sing your victory song, and may your enemies always be on the run! Now, who's up for a cold one? Cheers, mates!