
Alright, Bruddahs and Sistahs of the Arena! Gather 'round, because today we're talking about the one, the only, Makoa "Gibraltar" Gibraltar – the Shielded Fortress, the gentle giant with a wild side, and your absolute best friend when the bullets start flying.1 If you're looking to not just survive in the Apex Games, but to dominate, to be the unshakeable rock your team rallies behind, then you've come to the right place. Gibraltar isn't just a Legend; he's a statement. He's the guy who joined the Games to keep his friends safe, and that dedication translates directly into a kit designed for unparalleled protection and surprising offensive power.2
This guide is your all-access pass to mastering Gibraltar. We'll break down his abilities with the enthusiasm they deserve, dive deep into advanced bubble-fighting tactics that'll make enemies weep, and explore rotation strategies that'll have you moving like a fortified hurricane. We're also tackling the Season 25 "From The Rift" meta, looking at how Gibraltar's significant buffs are shaking things up, which team compositions make him shine, and the best loadouts to arm this walking tank. So, strap in, check your gear, because it's time to learn how to tank your way to victory!
Meet the Shielded Fortress: Gibraltar's Abilities Explained with Gusto!
Gibraltar's kit is a masterclass in defensive design, offering layers of protection for himself and his squad. Each ability synergizes with the others, turning him into a true game-changer when used effectively. And with the recent Season 25 updates, he's more formidable than ever!
Passive: Gun Shield – Your Personal Pocket Protector
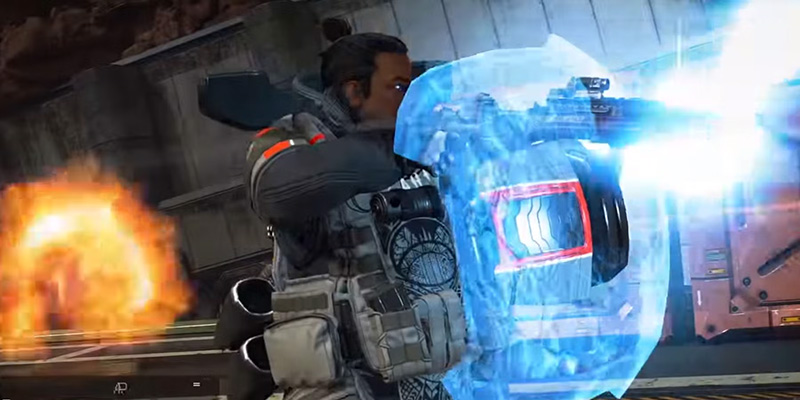
Whenever Gibraltar aims down sights (ADS), he deploys a Gun Shield, an energy barrier attached to his arm that absorbs 50 HP of incoming fire.1 This shield is your first line of defense in any direct firefight. If it breaks, it regenerates after a 9-second cooldown.3
This passive is a cornerstone of what makes Gibraltar a "walking tank." That extra 50 HP, effectively refreshing in every ADS engagement, means enemies have to chew through more health to bring you down.3 Any damage that breaks the shield, and any excess from that shot, will transfer to Gibraltar himself, so it's not total invincibility, but it's a massive advantage.3
- ADS is Life: In most gunfights, especially mid-to-long range, ADSing is crucial to get the Gun Shield's benefit. It might feel counterintuitive in very close quarters, but that extra 50 HP often makes the difference.4
- Crouch for Max Coverage: When ADSing and crouching, the Gun Shield covers a larger portion of Gibraltar's considerable hitbox, making him a much harder target from the front.4 This is especially effective when holding angles or peeking.
- Grenade Catcher Extraordinaire: One of the most underrated aspects of the Gun Shield is its ability to completely nullify incoming Arc Stars and Frag Grenades if Gibraltar is ADSing directly at them. The explosive won't damage Gibraltar, and incredibly, it won't damage the Gun Shield either!3 This can turn a deadly throwable into a harmless dud.
- Glow Stick Warning: The Gun Shield emits a bright orange glow, making Gibraltar highly visible, especially at a distance.5 While you can toggle it off for stealth, it's generally advisable to keep it active during combat unless you're specifically trying to remain unseen before an engagement.6
- Silence is Not Golden: Be aware that Revenant's "Silence" tactical ability can temporarily disable the Gun Shield, leaving you more vulnerable.3
The Gun Shield fundamentally changes how Gibraltar approaches 1v1s. It forces opponents to expend more ammunition, land more precise shots, or risk taking significant damage while trying to break through his initial layer of defense. This "attention tax" can create vital openings for Gibraltar's teammates as enemies become preoccupied with the heavily shielded target in front of them.
Passive: Fortified – Built Different, Bruddah!
As if the Gun Shield wasn't enough, Gibraltar also boasts the Fortified passive perk. This grants him a flat 15% damage reduction from all incoming attacks (though this does not apply to headshots) and, crucially, makes him immune to the slowing effect of being shot by enemy weapons.1
This perk is a direct compensation for his larger hitbox, but its benefits are profound. That 15% reduction often translates to surviving an extra bullet or two in a critical fight.3 When combined with his body shield, the Gun Shield, and his base health, Fortified makes Gibraltar exceptionally resilient.3 The immunity to bullet slow is a massive, often underappreciated, advantage. While other Legends get bogged down when taking fire, Gibraltar can maintain his momentum, allowing him to strafe more effectively, reach cover, or even push through incoming damage when necessary. For a character who is often the primary target, this ability to keep moving under pressure is invaluable.
Tactical: Dome of Protection – The Bubble of Dreams (and Nightmares for Enemies!)
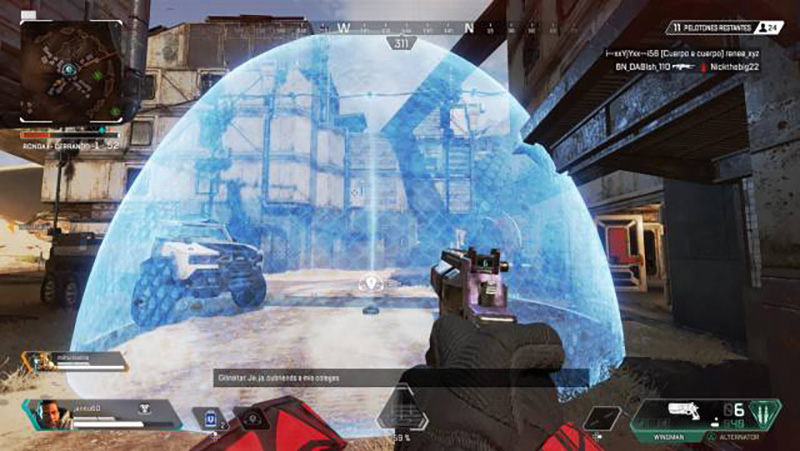
This is Gibraltar's signature ability, the iconic Dome of Protection. When activated, Gibraltar throws a disc that projects a large, energy dome shield with a 6-meter radius.3 For 12 seconds, this dome blocks ALL incoming and outgoing bullets and projectiles, though players (both friendly and enemy) can freely move through it.1
- Cooldown Slashed: The cooldown for the Dome of Protection is now a mere 17 seconds, down from 30 seconds (cooldown begins after the dome expires).1
- Indestructible Fortress: The Dome is no longer destroyed by Crypto's EMP or Mad Maggie's Wrecking Ball.9 This is a monumental shift, removing its hardest counters.
These changes are massive. Previously, the threat of an EMP or a Wrecking Ball could make deploying the Dome a risky proposition against certain team compositions.7 Now, it's a reliable sanctuary. The drastically reduced cooldown means Gibraltar can use his Dome much more frequently, transforming it from a precious, emergency-only tool into a versatile tactical asset for proactive plays.
- Lightning-Fast Revives: Gibraltar revives downed teammates 33% faster while inside the Dome, cutting the revive time from 6 seconds to a swift 4.5 seconds.1 This is often the difference between getting a teammate back in the fight or losing them.
- Enhanced Healing: With the "Recovery Zone" Legend Upgrade, using Syringes inside the Dome provides additional healing, further speeding up resets.3
- The Ultimate Reset Button: The Dome provides invaluable breathing room to heal, reload, or simply regroup when a fight turns sour.3
- Aggressive Pushes & Safe Rotations: Don't just think defensively! Throw the Dome forward to create cover for an aggressive push onto an enemy team or to safely cross dangerous open terrain during rotations.6
- Bait and Control: The Dome can be used to bait enemies into pushing into an unfavorable close-quarters fight or to deny them access to a critical area.
- Beacon of Attention: The Dome is large and glows brightly, instantly giving away your team's position.3 Expect enemies to be aware of its timer and potentially wait to attack as soon as it drops.
- Grenade Magnet: While bullets can't pass, grenades can still be tossed into the Dome, forcing you out or dealing significant damage.3 Always be mindful of your positioning within the bubble to avoid being an easy grenade target.
The Dome of Protection isn't just a shield; it's a temporary arena where Gibraltar dictates the terms of engagement. Its ability to block all gunfire forces any confrontation within or around it into a close-quarters affair, a domain where Gibraltar, armed with a shotgun and his Gun Shield, excels. The Season 25 buffs empower a more dynamic and frequent use of this incredible ability.
Ultimate: Defensive Bombardment – Make it Rain (Pain!)

When Gibraltar needs to clear an area or apply serious pressure, he calls in his Defensive Bombardment. He throws a smoke grenade marker, and a concentrated mortar strike rains down on that position.1 Each shell deals 40 damage upon impact, and the bombardment lasts for 6 seconds, continuously shelling a 24-meter radius around the marker.1 Players caught in the blast are also shell-shocked (concussed), disrupting their aim and movement.1 This powerhouse of an ultimate has a lengthy cooldown of 4.5 minutes (270 seconds), so its use must be strategic.1
- Area Denial & Zoning: This is arguably its strongest function. Use it to force enemies out of strong cover, off high ground, or away from critical chokepoints.4 It's especially potent in the final rings where space is limited.11
- Flushing Opponents: Drive enemies out of hiding and directly into your team's waiting crosshairs.4
- Offensive Initiation: Don't let the "Defensive" in its name fool you. This ult is fantastic for initiating fights, especially if you can catch a team off guard, secure an early knock, or simply sow chaos before your squad pushes.5
- Creating Escape Routes: Throw the bombardment between your team and pursuing enemies to buy precious seconds to heal, revive, or make a tactical retreat.7
- Securing Kills: It's an effective way to finish off downed enemies from a safe distance, preventing revives.3
- Friendly Fire (for Gibby): Defensive Bombardment WILL damage Gibraltar if he's caught in the blast without the protection of his Dome.5
- Wattson's Bane: An enemy Wattson's Interception Pylon will zap your ultimate out of the sky, completely negating it.7 Be aware of Pylon placements.
- Cooldown Management: That 4.5-minute cooldown is no joke. Make each bombardment count; don't waste it on trivial engagements.5
This is where Gibraltar truly becomes a master of battlefield control.
- Safety Under Fire: The most common and effective combo is to call in the Defensive Bombardment and then immediately throw your Dome of Protection over your team.3 This shields your squad from the incoming mortar shells (your ultimate does not damage teammates, though it can shellshock them slightly if they are outside the dome but in the blast radius) while enemies are forced to scatter or take heavy damage.4
- The Deadly Bubble Trap: A more advanced, high-risk/high-reward tactic is to throw the Dome first, then call the bombardment directly onto your Dome.12 Enemies caught inside or those who push in may find themselves trapped as the Dome's 12-second duration might expire before the 6-second bombardment ends. However, timing is critical; one source warns that if the ultimate is thrown after the Dome has fully deployed (made the "womp" sound), the Dome might collapse mid-bombardment, potentially harming your own team if they are still inside.10 This requires precise execution.
Defensive Bombardment is less about guaranteeing kills with every use and more about manipulating the battlefield to your team's advantage. It excels at forcing enemy movement, denying crucial space, and creating windows of opportunity. The displacement and pressure it generates are often more valuable than the raw damage output. Think of it as a tool to control tempo and make space for your team to operate.
| Ability Name | Type | Key Stats | Enthusiastic Description & Core Function |
|---|---|---|---|
| Gun Shield | Passive | 50 HP, deploys on ADS, 9s regen after break 1 | Your personal, always-ready front-line defense! Makes you a walking tank in every gunfight, absorbing those crucial first shots and letting you trade like a champ. |
| Fortified | Passive | 15% damage reduction (not headshots), immune to bullet slow 1 | Built tougher than a two-dollar steak! Shrugs off damage and keeps you moving when others would be stuck in the mud, letting you outlast and outmaneuver. |
| Dome of Protection | Tactical | 12s duration, 6m radius, 17s cooldown (S25), blocks all shots, 33% faster revives 3 | Your portable panic room and fighting arena! Creates instant safety for resets, revives, and turns any spot into a close-quarters battleground where you hold the advantage. Now tougher than ever! |
| Defensive Bombardment | Ultimate | 40 dmg/hit, 6s duration, 24m radius, 4.5 min cooldown 1 | Make it rain destruction! A powerful area denial and zoning tool that forces enemies to scatter, creates chaos, and sets up devastating pushes for your squad. |
Mastering the Bubble: Advanced Dome Fighting Techniques
The Dome of Protection isn't just a shield; it's a dance floor, and with the right moves, Gibraltar leads the tango. "Bubble fighting" is an art form, a close-quarters ballet of aggression and defense that can turn the tide of any engagement.
The Dance Floor: Weaving and Peeking
The core of bubble fighting is the "dance" or "weave" – rapidly moving in and out of the Dome's edge to bait enemy shots, minimize your own exposure, and create split-second firing opportunities.3 The goal is to be an unpredictable target. When you peek to shoot, try to expose only your crosshair and weapon, then immediately duck back into the safety of the bubble or out the other side.15 Incorporating counter-strafes as you shoot can make you an even more elusive target, barely registering on your enemy's screen.15
Weapon of Choice: Shotguns Reign Supreme!
For bubble fights, shotguns are your best friends. Weapons like the Peacekeeper, Mastiff, or a trusty EVA-8 deliver high burst damage, which is exactly what you need for those quick peeks.5 The rhythm is simple but deadly: peek out, blast with your shotgun, and immediately return to cover, either inside or by strafing out the other side of the bubble's edge.8 This hit-and-run tactic maximizes your damage output while minimizing the damage you take.
Reading the Rhythm & Breaking It
Effective bubble fighting is a mind game. You need to anticipate your opponent's actions.15
Wait just inside the edge, aiming down sights with your shotgun. The moment they cross the threshold, hit them hard, then immediately step outside the bubble. They'll likely follow, expecting you to be inside, giving you another chance to punish them as they re-enter or exit.15
You take the initiative. Quickly peek out, deliver a shot, and retreat. Repeat this, varying your timing and the side you peek from.15
A common mistake is falling into a predictable in-and-out rhythm with your opponent. If you notice this happening, break the pattern! Create distance, try a different peek angle, or hold your ground for an extra second to throw off their timing.15
Playing the Edges and Aggressive Placement
Don't just stand in the middle of your bubble. Use its entire circumference. The edge of the Dome is your cover. You can shoot around it, then slide or step back into its protection.15 Try to control the "forward edge" of the bubble relative to the enemy; this gives you a better perspective and control over the engagement timing.15
Don't be afraid to use the Dome offensively. Throwing it directly onto an enemy team can disorient them, cut off their sightlines to their teammates, and force them into an immediate, close-range bubble fight on your terms.10
Dealing with Intruders and Maintaining Patience
If an enemy manages to rush all the way into your bubble, don't panic. A well-placed punch or a burst of hip-fire from your shotgun can create the space you need to reset the engagement or finish them off.4 Bubble fighting often comes down to patience. Pre-aim common entry points, chip away at the enemy's health, and use the bubble wall as constant cover until you secure the win.15
Always be hyper-aware of the Dome's 12-second timer; it can feel like an eternity in a fight, but it drops eventually.3 Also, remember that a glowing bubble is a dinner bell for third parties. Be ready for uninvited guests.
The essence of bubble fighting lies in outsmarting your opponent. It's about prediction, quick reactions, and using the Dome not just as a shield, but as a weaponized arena. The player who better controls the dance, predicts the opponent's steps, and breaks the rhythm will emerge victorious.
Gearing Up: Gibraltar's Perks and Upgrades (Season 25 "From The Rift" Meta)
Apex Legends' Legend Upgrade system allows players to tailor their chosen Legend's abilities mid-match, and Gibraltar's options in Season 25, "From The Rift," have significantly supercharged his kit, leaning into a more proactive and aggressive playstyle.9
Gibraltar's Season 25 Overhaul: A New Era of Dominance
The baseline changes to his Dome of Protection (17s cooldown, indestructible to Crypto EMP & Maggie Wrecking Ball) are already huge, but his new Legend Upgrades amplify his power even further.9
| Upgrade Tier | Perk Name | Effect | Expert Commentary & Strategic Value |
|---|---|---|---|
| Level 2 | Big Bruddah | Increases Defensive Bombardment radius by 20%.9 | Makes your ultimate even more oppressive for area denial and flushing enemies. More coverage means a higher chance of catching multiple opponents or making a wider area unsafe, excellent for controlling final rings or breaking up fortified positions. |
| Level 2 | Fast Shotties | Move faster with shotguns; auto-reload shotguns on knocks.9 | A MUST-PICK for aggressive Gibraltar players. Transforms you into a shotgun-wielding demon in bubble fights. Faster movement helps you dance around enemies, and auto-reload on knock means you're instantly ready for the next threat without missing a beat. Pure offensive power. |
| Level 3 | Baby Bubble | Reduces Dome of Protection cooldown to 12 seconds.9 | Incredible value. Turns your Dome into a highly spammable ability. Enables more aggressive pushes, frequent safe rotations, constant revive opportunities, and near-permanent bubble uptime in prolonged engagements. This perk alone can redefine Gibraltar's tempo and impact on the game. |
The removal of older, less impactful perks like "Fresh Start" and "Shots Shots Shots" makes way for these more synergistic and powerful options.9
While the Season 25 specific upgrades are paramount, some general or previously existing perks might still appear in Gibraltar's selection pool and offer value 3:
- SARAS Protocol: Allows you to throw your Dome of Protection even while downed (though it has a shorter duration). A potential lifesaver for your team if you get caught out.
- Recovery Zone: Using Syringes within your Dome provides an increased healing effect. Synergizes wonderfully with the faster revives for quick team resets.
- Quick Decision: Aiming down sights occurs faster when your Gun Shield is intact. Great for getting the first shot off and maximizing Gun Shield uptime.
- Defensive Supplies: Begin matches with a Shield Battery and a Med Kit. A solid early-game boost.
- Lasting Wounds: Enemies hit by your Defensive Bombardment are temporarily highlighted. Useful for tracking fleeing opponents or confirming hits through the smoke and explosions.
- Burn Proof: Your Dome of Protection will also function as a Heat Shield, protecting against ring damage. Extremely valuable in late-game scenarios where the ring is a major threat.
The Season 25 upgrades, particularly "Fast Shotties" and the supercharged "Baby Bubble," are a clear signal: Gibraltar is meant to be in the thick of it. "Fast Shotties" directly buffs his ideal close-range combat style, making shotguns even more deadly in his hands. "Baby Bubble" allows him to create his fighting arena with unprecedented frequency. These changes encourage a Gibraltar who doesn't just wait for the fight to come to him but actively seeks it, using his Dome to control space and his shotgun to dominate it. This has the potential to significantly elevate his impact in coordinated teams that can capitalize on these frequent, powerful Domes.
Strategic Dominance: Positioning and Rotations with Gibraltar
A masterful Gibraltar understands that his power isn't just in his shields, but in how he positions himself and his team on the battlefield. While he may not be the fastest Legend, his abilities allow for deliberate, protected movement and the fortification of key areas.
General Positioning Principles: The Art of Not Getting Hit
Given Gibraltar's larger hitbox, smart positioning is paramount when his shields are down.4
- Hug That Cover: Always be aware of nearby cover. Use it to minimize your exposure, especially when your Gun Shield is regenerating or your Dome is on cooldown.
- The "Head Glitch" Advantage: Find spots where only the top part of your model (and crucially, your Gun Shield when ADSing) is visible to the enemy.4 This drastically reduces your target profile while allowing you to return fire effectively.
- Sniper's Perch: The Gun Shield makes Gibraltar a surprisingly potent sniper.3 He can absorb a shot or two while lining up his own, giving him an edge in long-range duels.
The Art of Rotation with the Gentle Giant: Slow and Steady Wins the Race
Gibraltar isn't winning any footraces, and his lack of inherent mobility tools can make rotations challenging if not managed correctly.8 However, his kit provides solutions:
- Dome for Safe Passage: This is Gibraltar's primary tool for safer rotations. When caught in the open or needing to cross a dangerous sightline, throwing a Dome forward provides temporary, invaluable cover.6 With the significantly reduced cooldown from Season 25 (especially with the "Baby Bubble" perk), this tactic is more viable and frequent than ever before. You can chain Domes for longer rotations if needed.
- Team Coordination is Non-Negotiable: Gibraltar is not a solo rotator. His teammates must understand his pacing and play with him.17 A common mistake is for faster legends to outpace Gibraltar, leaving him vulnerable. Effective teams move as a unit, using Gibraltar's Dome to protect the squad's advance. An Octane using his jump pad for the whole team, or a Pathfinder setting up a zipline from the safety of a Dome, are examples of good synergy.17
- Proactive Rotations: Don't wait until the ring is closing in to start moving. Use map awareness to predict ring pulls and plan your rotations early.19 Gibraltar's Dome can facilitate these earlier, potentially contested, rotations by providing a safe staging point.
- Leverage Map Mobility: Utilize Evac Towers, Tridents (on Olympus), and natural ziplines whenever possible to augment the team's movement.19
Gibraltar's rotation strategy hinges on deliberate, protected movements. The S25 buffs to his Dome cooldown empower this, allowing for more frequent, shorter bursts of safe passage. It's less about raw speed and more about intelligent use of his abilities in concert with his team.
Conquering Buildings: Indoor Warfare Tactics
Gibraltar can be a menace in building fights:
- Door Denial with the Dome: A well-placed Dome can completely block doorways or create awkward angles for enemies trying to push in, buying crucial time to heal, revive, or set up an ambush.22 Angle the edge of the Dome across the doorway for maximum effect.
- CQC Gun Shield Discipline: Even in tight corridors, remember to ADS to utilize your Gun Shield.22 Every bit of extra health matters.
- Crouching Tank: Crouching while ADSing in hallways or rooms further minimizes your hittable area behind the Gun Shield.22
- The Ult + Dome Combo: If enemies are holed up, consider using your Defensive Bombardment on the building (if the roof is penetrable) or around its exits to flush them out or trap them.4 You can then use your Dome for personal safety or to control an exit point.
Late-Game Supremacy: Owning the Final Circle
This is where a skilled Gibraltar can truly shine and secure victories:
- King of the Hill (or Cover): In the final rings, high ground or the most defensible piece of cover is king.19 Gibraltar excels at taking and holding such positions with his Dome and Ult.23
- Zone Edge Dome Play: A classic and highly effective late-game tactic is to place your Dome of Protection so it straddles the edge of the incoming zone.16 This creates a small, safe pocket for your team to fight from while enemies are forced to push through the damaging ring or into your fortified position.
- Bombardment for Ring Control: As the final circle shrinks, enemies have fewer places to go. Use your Defensive Bombardment to deny them the last remaining safe spots or to punish teams forced to move by the ring.11 This can often lead to easy cleanups and game wins.
In these chaotic final moments, Gibraltar's abilities provide unparalleled control. His Dome creates instant, superior cover where none might exist, and his Ultimate transforms shrinking safe zones into deadly traps for desperate opponents.
The Aggression Dial: When to Push and When to Protect
Gibraltar is often labeled a "defensive" Legend, but the best Gibraltar players know he's a versatile hybrid, capable of anchoring a defense or spearheading a calculated assault.24 Mastering Gibraltar means knowing when to dial up the aggression and when to prioritize protection. The Season 25 buffs, particularly to his Dome and the "Fast Shotties" perk, lean heavily into enabling a more aggressive playstyle.
Reading the Battlefield: Cues for Action
Situational awareness is key. Learn to identify:
- Advantageous Moments: An enemy caught out of position, a successful shield crack from a teammate's poke, multiple enemies hit by your Defensive Bombardment. These are green lights for a push.
- Unwinnable Fights: Sometimes, discretion is the better part of valor. If your team is low on resources, caught in a bad position, or facing overwhelming numbers, recognize when to deploy defensive abilities to disengage or reset.25
Offensive Gibraltar: Leading the Charge (with Brains, not just Brawn)
While he's no Octane, Gibraltar can absolutely initiate fights and apply immense pressure:
- Gun Shield Entry: Your Gun Shield is an excellent tool for peeking corners or absorbing the initial volley of fire when pushing a known enemy position.5 This allows you to trade favorably and create an opening for your team.
- Aggressive Dome Deployment: Don't just save the Dome for when you're taking damage. Throw it forward, onto an enemy squad or a piece of cover they're holding.5 This closes the gap safely, cuts off their sightlines, and forces a close-range engagement where your shotguns (and "Fast Shotties" perk) can dominate.
- Bombardment as an Opener: Use your ultimate to soften up a fortified team, flush them from high ground, or simply create chaos before your squad makes their move.5 A well-placed ult can secure an early knock or force enemies into disadvantageous positions.
Defensive Gibraltar: The Unbreakable Shield Wall
This is Gibraltar's bread and butter, and often what separates good Gibbys from great ones, especially in high-stakes ranked or competitive play 26:
- Team Survival First: Your primary defensive role is to keep your teammates alive. Use the Dome for safe revives (now even faster!), to allow teammates to heal, or to shield them from overwhelming fire.3
- Ultimate Deterrent: A well-aimed Defensive Bombardment can halt an aggressive enemy push in its tracks or make third-partying squads think twice before committing.7 It's a powerful "stay away" signal.
Finding the Balance
Apex Legends often rewards calculated aggression.27 For Gibraltar, this means using his defensive toolkit to enable offensive plays. The Gun Shield allows for safer peeks to initiate. The Dome, with its new offensive perks and shorter cooldown, can be a tool to claim space and force engagements. The key is to be proactive. Don't just react to enemy pressure; use your abilities to dictate the flow of the fight. Clear communication with your team is vital to coordinate these aggressive pushes or defensive stands. The Season 25 enhancements strongly encourage a Gibraltar who uses his "defensive" abilities to create and exploit offensive advantages.
Team Synergy: Gibraltar in the Current Meta (2025 / Season 25 "From The Rift")
Gibraltar's place in the Apex Legends meta has seen its ebbs and flows. He was once a near-mandatory pick in professional play due to his unparalleled defensive utility.29 However, shifts towards faster-paced, mobility-focused metas, the rise of counters (which are now less effective post-S25), and changes in weapon meta (like a temporary decline in shotgun popularity) saw his general pick rate dip.29 Some recent tier lists even placed him in lower tiers prior to the full impact of Season 25 changes being felt.31
However, the Season 25 "From The Rift" buffs are a potential game-changer for Gibraltar's viability.9 The Dome of Protection's significantly reduced cooldown and its newfound indestructibility against Crypto's EMP and Mad Maggie's Wrecking Ball are massive. These changes address his biggest vulnerabilities and allow for much more frequent and reliable use of his core ability. Combined with offensive-oriented perks like "Fast Shotties," Gibraltar is poised for a resurgence, especially in coordinated team environments where his abilities can be fully leveraged.29 He remains a strong pick for squad-based ranked play and possesses a high skill ceiling.34
Strong Team Compositions for Gibraltar
Gibraltar thrives in team compositions that can either complement his defensive strengths or leverage the openings his abilities create.
- Gibraltar + Bangalore: This duo is a classic for a reason. Combining their ultimates (Rolling Thunder and Defensive Bombardment) creates an overwhelming area of denial and damage, forcing enemies to scatter or take massive hits.6 Bangalore's Smoke Launcher also provides excellent cover for Gibraltar to reposition, revive, or push.
- Gibraltar + Caustic: A nightmare for teams trying to hold buildings or tight spaces. Caustic's Nox Gas can flush enemies out of cover and into Gibraltar's Defensive Bombardment, or Gibraltar's Dome can provide a safe haven for his team to fight from within Caustic's gas, punishing any enemies who dare enter.6
- Gibraltar + Valkyrie: Valkyrie's Skyward Dive ultimate provides the team with much-needed rotational mobility, which is Gibraltar's main weakness.6 Gibraltar can use his Dome on landing to ensure a safe arrival if the new position is hot.
- Gibraltar + Alter + Pathfinder: This composition, highlighted for its "unparalleled movement options" and "outstanding map control," pairs the high mobility of Alter and Pathfinder with Gibraltar's defensive backbone.36 Alter and Pathfinder can initiate aggressive plays or scout ahead, while Gibraltar provides the Dome for safe pushes, crucial resets, and his ultimate for battlefield control. His more frequent Domes in S25 make supporting these fast-moving legends even more feasible.
- Legends with Crowd Control: Combining Gibraltar's Ultimate with abilities like Horizon's Black Hole can create devastating traps, pulling enemies together for the bombardment.6
- Recon Legends (e.g., Bloodhound, Sparrow): Information is power. Knowing enemy positions allows for more precise Defensive Bombardments and safer, more effective Dome placements during pushes or defensive setups.
Playing Around (Former) Counters
The Season 25 update making his Dome immune to Crypto's EMP and Mad Maggie's Wrecking Ball is a massive boon.9 These were previously his hardest counters. While grenade spam into the bubble remains a viable tactic for enemies, Gibraltar's increased ability to reposition the bubble more frequently (due to lower cooldown) can help mitigate this. His large hitbox will always be a factor, so continued emphasis on smart positioning and cover usage is vital.
The Season 25 changes position Gibraltar as a potent answer to ability-heavy metas. His Dome now offers a truly reliable sanctuary. His synergy with mobile and aggressive legends is amplified because he can support their daring plays more consistently and safely. While general pick rates in public matches 32 may take time to reflect his renewed strength, his potential in high-level, coordinated play has been significantly boosted.
Arming the Tank: Best Loadouts for Gibraltar (Season 25)
A well-equipped Gibraltar is a terrifying prospect. His abilities allow him to dictate engagement ranges, making versatile loadouts essential. He needs tools for poking at mid-to-long range from behind his Gun Shield and devastating close-quarters weapons for the inevitable bubble fights.16 The Season 25 "Fast Shotties" perk further incentivizes carrying a shotgun.9
General Loadout Philosophy for Gibraltar
- Shotgun Staple: For bubble fights, a shotgun is practically mandatory. The "Fast Shotties" perk (faster movement with shotguns, auto-reload on knock) makes them even more potent in his hands.5
- Mid-to-Long Range Firepower: To complement the shotgun, a weapon capable of dealing consistent damage at range is crucial. This allows Gibraltar to utilize his Gun Shield for poke battles, softening up enemies before closing the distance or DOME-ing in.12
Season 25 Meta Loadouts & How They Fit Gibraltar
Based on current meta discussions and Gibraltar's kit 38:
| Loadout Style | Primary Weapon | Secondary Weapon | Key Attachments/Hop-Ups | Why it Works for Gibraltar |
|---|---|---|---|---|
| Bubble Dominator | EVA-8 Auto / Mastiff Shotgun | G7 Scout / 30-30 Repeater | Shotgun Bolt (Epic), Double Tap (EVA-8 if meta), Skullpiercer (30-30) | Maximizes "Fast Shotties" perk for superior CQC. Shotgun for bubble fights, Marksman for poke from Gun Shield cover. EVA-8 for forgiveness, Mastiff for high damage. |
| Versatile Poker | G7 Scout / Hemlok Burst AR | R-99 SMG / CAR SMG | 2x-4x Optic (Primary), Laser Sight (SMG) | Balanced approach. Poke effectively with Gun Shield using G7/Hemlok. SMG provides high TTK for aggressive Dome pushes or defending against them. R-99 for speed, CAR for versatility. |
| Heavy Pressure | Devotion LMG | Peacekeeper / P2020s | Turbocharger (Devo), Shotgun Bolt (PK) / Hammerpoints (P20) | Devotion offers immense suppressive fire and damage output in Domes. PK provides burst for peeking, P2020s for quick finishes. Good for holding space and overwhelming opponents. |
| Calculated Sniper | Sentinel / Longbow DMR | EVA-8 Auto / Volt SMG | Sniper Stock/Optic, Deadeye's Tempo (Sentinel if meta) | For players who excel at long-range engagements using Gun Shield. Sniper for opening damage, then use Dome to push with EVA-8/Volt or for defensive resets. "Fast Shotties" still benefits EVA-8. Volt offers reliable CQC backup. |
- G7 Scout: An excellent marksman rifle for mid-to-long range engagements. Gibraltar can effectively use his Gun Shield while poking with the G7.38 Its decent hip-fire also provides a last resort up close.
- R-99 SMG: A close-range shredder. Its high rate of fire and good strafe speed make it deadly inside the Dome of Protection.38
- Gibraltar Fit: This loadout offers fantastic versatility. Poke and pressure with the G7, then use an aggressive Dome placement to push and clean up with the R-99.
When choosing your loadout, consider your team composition and preferred engagement style. However, for a Gibraltar looking to maximize his Season 25 potential, incorporating a powerful shotgun to benefit from "Fast Shotties," paired with a reliable mid-to-long-range weapon, is highly recommended. This allows him to control fights at all distances, apply pressure, and then decisively win those crucial close-quarters engagements within his Dome of Protection.
Conclusion: Be the Rock, Be the Wrecking Ball!
Makoa Gibraltar is far more than just a defensive legend; he is the beating heart of a resilient squad, an unshakeable fortress that can turn the tide of any battle. His ability to provide unparalleled team protection with his Dome of Protection, reset fights, control vast swathes of the battlefield with his Defensive Bombardment, and stand his ground with his personal Gun Shield makes him a true force of nature in the Apex Games.
The Season 25 "From The Rift" updates have breathed new life into the Shielded Fortress, significantly buffing his core tactical ability and introducing perks that encourage a more proactive, aggressive, and ultimately, more impactful playstyle. His Dome is now a more reliable and frequent sanctuary, and his potential in close-quarters combat, especially with shotguns, is higher than ever.
Mastering Gibraltar is a journey of understanding not just what his abilities do, but why and when to use them. It's about reading the battlefield, coordinating with your team, and knowing when to be the immovable object and when to be the unstoppable force. He has a high skill ceiling, demanding smart decision-making and excellent situational awareness, but the rewards are immense.29 A skilled Gibraltar doesn't just protect his team; he empowers them, creates opportunities, and dictates the terms of engagement.
So, embrace the gentle giant, learn the rhythm of the bubble, and perfect the art of the bombardment. Now go out there, Bruddah, and show the Outlands what a true fortress, a true defensive legend, can do! Tank your way to victory, and let your shield—and your presence—be legendary.