
The Headwinds update brought two new Epic Augments to Arc Raiders as part of the Escalation expansion: the Tactical Mk. 3 (Revival) and the Looting Mk. 3 (Safekeeper). One gives you passive healing and an integrated Defibrillator. The other lets you protect your best weapons from death with a universal Safe Pocket. Both fill real gaps in the Augment lineup, though they're more situational picks than straight upgrades.
This guide breaks down both new Augments, compares them to what's already available, and walks you through the best methods for farming their blueprints. If you just want to know where to look, skip ahead to the blueprint sections. If you want the full picture of how these Augments stack up, read on.
What Are Augments?
For anyone still learning the system, Augments are equippable gear pieces that control your backpack capacity, item slots, and shield compatibility each run. They're one of the biggest loadout decisions you'll make since they directly determine how much loot you can haul, what items you can access fast in a fight, and how much protection you can wear.
Every Augment provides a mix of these stats:
The three Augment categories each have a clear identity. Combat Augments give you strong shield options and combat perks but smaller inventories. Looting Augments maximize carry capacity and weight limits, usually at the cost of lighter shields. Tactical Augments pack the most Quick Use Slots for active item use but have the smallest backpacks and middling shield options.
You'll want one of each type crafted eventually so you can swap based on your run goals: pure looting, PvP, ARC fights, or a mix.
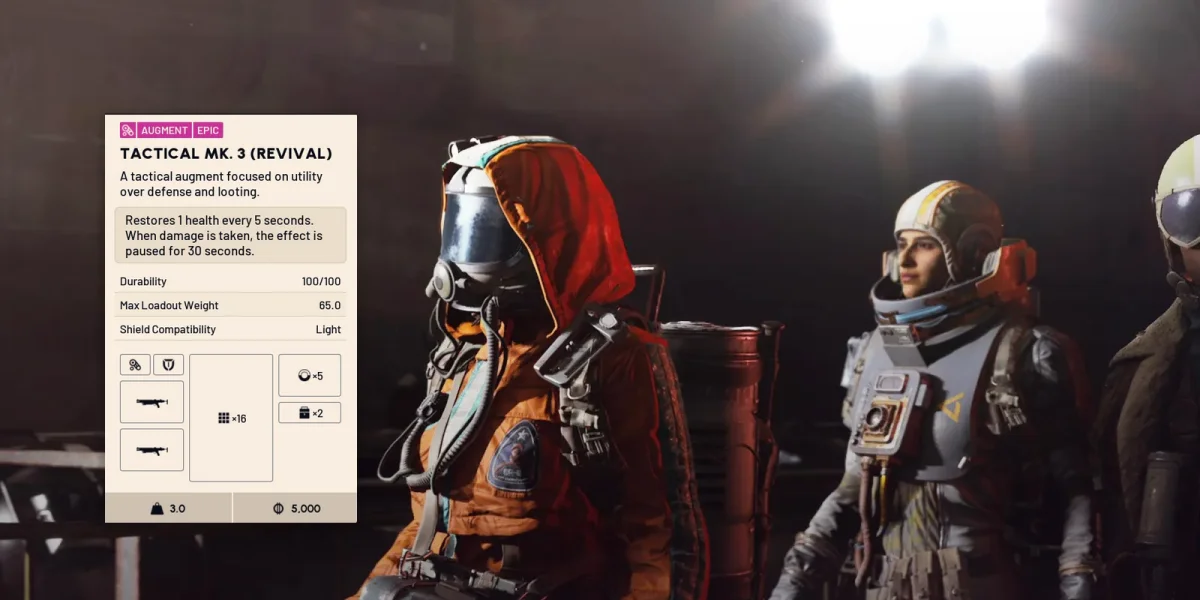
Tactical Mk. 3 (Revival)
The Revival is a Tactical Augment focused on utility. On paper it looks like a support pick, and that's mostly accurate, though its toolkit mixes passive sustain with emergency revival in a way that's a bit more flexible than you'd expect.
Stats
Perk: Passive Health Regeneration
The Revival restores 1 health every 5 seconds. You can top off after chip damage without burning bandages or meds, just keep moving and let the regen tick. Any damage you take pauses the effect for 30 seconds though, so it's strictly a recovery tool for between fights. Don't count on it saving you during a gunfight.
Integrated Defibrillator
The more interesting feature is the Defibrillator that comes with the Augment. It works just like a normal Defibrillator item, letting you revive downed teammates, but it runs on a 240 second (4 minute) cooldown instead of consuming an inventory item. You can still carry a separate Defibrillator if you want, but having one baked into the Augment frees up a Quick Use Slot for something else. For squad play, this turns you into the team medic without costing you a slot.
The Revival has a rough time competing with established Augments, and the problems start with storage. At only 16 Backpack Slots, it's one of the smallest options in the game. The Tactical Mk. 3 (Defensive) gives you 20, and the Looting Mk. 3 (Survivor) also offers 20 with a much higher 80 Weight Limit.
Two Safe Pocket Slots are decent on their own, but both the Tactical Mk. 3 (Healing) and the Survivor come with 3. The Survivor in particular pairs its 3 Safe Pockets with 5 Quick Use Slots and 20 Backpack Slots, making it the stronger generalist by a wide margin.
Shield compatibility is where it falls apart. The Revival only supports Light Shields, which is a strange limitation for an Augment centered on healing and revival. The Defensive runs Light, Medium, and Heavy. Even the Healing supports Light and Medium. Being locked to Light Shields cuts your survivability hard in any run where you're taking real heat.
A 65 Weight Limit isn't the lowest in the game, but it doesn't stand out either. Compared to the Survivor's 80 or even the Safekeeper's 65, there's no advantage here.
- Passive healing saves bandages between fights
- Integrated Defibrillator frees up a Quick Use Slot in squads
- 5 Quick Use Slots for active item use
- 2 Safe Pocket Slots for item protection
- Only 16 Backpack Slots - one of the smallest in the game
- Light Shields only - severely limits survivability
- 65 Weight Limit is unremarkable
- Outperformed by Survivor and Defensive in most scenarios
Verdict
It's a niche pick. The passive healing is convenient, and the integrated Defibrillator has genuine value in squads. But 16 Backpack Slots, Light only shields, and a middling Weight Limit make it hard to pick over the Survivor or Defensive in most scenarios. If you specifically want to play a squad support role without giving up Quick Use Slots, the Revival has a purpose. For most players, the Survivor does the job better.
Looting Mk. 3 (Safekeeper)
The Safekeeper introduces something actually new to Arc Raiders: a Safe Pocket that stores any item, including weapons. Until now, Safe Pockets couldn't hold guns, so dying always meant losing whatever weapon you had equipped. The Safekeeper changes that.
Stats
Perk: Universal Safe Pocket
The Safekeeper's single Safe Pocket accepts any item type, weapons included. Normally you'd lose any gun you're carrying when you go down. With the Safekeeper, you can stash a valuable weapon in that pocket and guarantee you'll extract with it regardless of what happens during the run.
Where It Shines
This perk creates some practical scenarios that didn't exist before.
Queen Events are the obvious one. Bring an Equalizer to strip the Queen's armor, then stow it in your Safe Pocket once the armor breaks. Finish the Queen Core with a cheaper weapon while your Equalizer stays safe from other players who might rat you out for it.
PvP runs also benefit. Say you're bringing a Bobcat but you're not sure when you'll need it. Keep it in the Safe Pocket until you're ready to commit to a fight. If someone catches you off guard before that, you won't lose the gun.
Looted weapons are the third big use case. Say you kill a player carrying a Rank 4 Ventor with attachments. Stuff it in your Safe Pocket immediately and it's yours no matter what.
How It Stacks Up
The Safekeeper has clear strengths and clear weaknesses.
On the plus side, this is the first Looting Augment to support Light, Medium, and Heavy Shields. Players who want heavier protection during PvP or boss encounters without giving up a looting Augment finally have an option.
Storage sits at 18 Backpack Slots, which beats the Revival's 16 but can't touch the Survivor's 20 or the Cautious's 24. For raw hauling capacity, it's not the top pick.
You only get 4 Quick Use Slots (the Survivor gives you 5), and the single Safe Pocket, while universal, is only one slot. The Survivor offers 3 Safe Pockets (no weapons allowed, but three slots beats one for general item preservation).
Both Augmented Slots are locked to Trinkets, which is less useful than what other Augments provide. Compare that to the Survivor's Utility Slot, where you could equip a Deadline or a Zip Line. Most players running loot builds would rather have Grenade or Med slots.
Stacking it directly against the Tactical Mk. 3 (Defensive) for pure looting: the Defensive has 20 Backpack Slots, 5 Quick Use Slots, 1 Safe Pocket, an Integrated Shield Recharger, and full shield compatibility. It pulls ahead on raw loot capacity. The Safekeeper's only advantage is the universal Safe Pocket.
- Universal Safe Pocket protects any item, including weapons
- First Looting Augment with full shield compatibility (Light, Medium, Heavy)
- Ideal for Queen Events, PvP hotspots, and high-risk runs
- 18 Backpack Slots is a solid middle ground
- Only 1 Safe Pocket total (Survivor has 3)
- 4 Quick Use Slots (Survivor gives 5)
- Both Augmented Slots locked to Trinkets
- 65 Weight Limit can't match the Survivor's 80
Verdict
The Safekeeper earns its spot when you're running expensive weapons into risky situations. Queen Events, PvP hotspots, and dangerous ARC encounters all become less punishing when you know your best gun is protected. Full shield compatibility adds even more flexibility. For standard loot runs where filling your backpack is the priority, the Survivor and Defensive come out ahead thanks to more slots, more pockets, and better Quick Use counts.

Complete Augment Reference
Here's every Augment in Arc Raiders with full stats, so you can see exactly where the new options land in the overall lineup.
Combat Augments
| Augment | Weight | Backpack | Quick Use | Safe Pockets | Shields | Perk |
|---|---|---|---|---|---|---|
| Combat Mk. 1 | 45 | 16 | 4 | 1 | Light, Medium | None |
| Combat Mk. 2 | 55 | 18 | 4 | 1 | Light, Medium, Heavy | 1 HP/5s regen (30s pause on damage). 1 Grenade Slot. |
| Combat Mk. 3 (Aggressive) | 65 | 18 | 4 | 1 | Light, Medium, Heavy | 2 HP/5s regen (30s pause on damage). 2 Grenade Slots. |
| Combat Mk. 3 (Flanking) | 60 | 20 | 5 | 2 | Light only | Stowed Pistols/Hand Cannons 33% faster to equip. 3 Utility Slots. |
Looting Augments
| Augment | Weight | Backpack | Quick Use | Safe Pockets | Shields | Perk |
|---|---|---|---|---|---|---|
| Looting Mk. 1 | 50 | 18 | 4 | 1 | Light only | None |
| Looting Mk. 2 | 60 | 22 | 4 | 2 | Light only | Auto-throw Ticks after 1s. 3 Trinket Slots. |
| Looting Mk. 3 (Cautious) | 70 | 24 | 5 | 2 | Light only | Weak Adrenaline Shot on Shield break. Integrated Binoculars. |
| Looting Mk. 3 (Safekeeper) NEW | 65 | 18 | 4 | 1 (universal) | Light, Medium, Heavy | Universal Safe Pocket (stores weapons). 2 Trinket Slots. |
| Looting Mk. 3 (Survivor) | 80 | 20 | 5 | 3 | Light, Medium | Downed health regen up to 75%. 1 Utility Slot. |
Tactical Augments
| Augment | Weight | Backpack | Quick Use | Safe Pockets | Shields | Perk |
|---|---|---|---|---|---|---|
| Tactical Mk. 1 | 40 | 15 | 5 | 1 | Light, Medium | None |
| Tactical Mk. 2 | 45 | 17 | 5 | 1 | Light, Medium | Smoke grenade on Shield break. 1 Utility Slot. |
| Tactical Mk. 3 (Defensive) | 60 | 20 | 5 | 1 | Light, Medium, Heavy | Shield Rechargers usable while running. Integrated Shield Recharger. |
| Tactical Mk. 3 (Healing) | 55 | 16 | 4 | 3 | Light, Medium | Healing cloud on revive (20 HP/10s, 30s CD). 3 Heal Slots. |
| Tactical Mk. 3 (Revival) NEW | 65 | 16 | 5 | 2 | Light only | 1 HP/5s regen (30s pause on damage). Integrated Defibrillator. |
Free Loadout Augment
If you go in with a free loadout, you're stuck with a barebones Augment: 35 Weight Limit, 14 Backpack Slots, 4 Quick Use Slots, no Safe Pockets, no perk, and no Augmented Slots. You can't remove or swap it during the run either, so it's strictly a last resort when you've got nothing else.
Blueprint Spawn Locations
Both the Revival and Safekeeper blueprints work like every other Augment blueprint in the game. You find them through looting, learn them, then craft the Augments at your workbench. The total blueprint count in Arc Raiders now sits at 77, though three are still unobtainable. The Revival and Safekeeper are both available to find.
The new blueprints share the same loot pool as every existing Augment blueprint, so they spawn in the same containers and the same locations.
Medical Containers are the primary source. They're scattered across every map, not just the popular farming spots. Here are the locations with the highest concentrations:
| Location | Key Areas | Notes |
|---|---|---|
| Stella Montis | Lobby, Business Center, Medical Research | Widely considered the fastest farming spot due to dense container packing. |
| Bluegate | Reinforced Reception | Medical containers that can drop blueprints. |
| Hospital (Buried City) | Throughout the building | A large number of medical containers spread across the area. |
| Space Travel and Research | Cluster of medical containers | Worth hitting if you're in the area. |
| Spaceport | Departure Building, Launch Towers | Some medical containers, though numbers are lower. |
| Dam Battlegrounds | Testing Annex, Research, Administration | Medical containers with extras scattered around the map. |
Since the Cold Snap update, Augment blueprints can also drop from other containers, including industrial ones. The rate seems much lower, but it does mean you might stumble into a blueprint during a normal run without specifically farming for one.
Fallen Players: You can loot Augment blueprints (or crafted Augments) off players you've killed. Not a reliable farming method, but worth knowing.
The RNG Problem
What makes blueprint farming frustrating is simple: the two new blueprints sit in the same loot pool as all existing Augment blueprints. Every time a blueprint drops from a container, it could be any of the available options, not just the new ones. With more blueprints competing for each drop, your odds of finding a specific one are lower than they used to be.
Expect to pick up plenty of duplicates for Augments you've already unlocked. Dedicated farming focused purely on Augment containers can take upwards of 7 hours to land both new blueprints, and that's with efficient looting routes.
If you've already collected every previously available blueprint, brace yourself. Every duplicate drop is dead weight, and there's no way to target specific blueprints.
Best Key Rooms
A handful of locked Key Rooms pack enough medical or Augment containers to be worth saving your keys for. If you find one of these keys during a normal run, consider holding onto it for a dedicated blueprint farming session.
| Key Room | Map | Why It's Worth It |
|---|---|---|
| Lobby Checkpoint Security Key | Stella Montis | Single best room for Augment blueprints. High density of containers in one spot. |
| Archives Key | Sandbox | Medical containers that can drop blueprints. |
| Confiscation Key | Bluegate (under Security Wing) | A couple of Augment containers. |
| Hospital Key Rooms | Buried City | Access to medical containers through locked hospital rooms. |
| Testing Annex Key Rooms | Dam Battlegrounds | Medical containers with blueprint potential. |
| Raiders Refuge / Ancient Fort | Blue Gate | Security boxes and medical boxes. Worth opening if nearby. |
Speedrunning Stella Montis
Stella Montis is the favorite farming location for a good reason. It packs dedicated Augment containers into three main areas (Lobby, Business Center, and Medical Research), and every spawn point on the map has a relatively fast route to at least one of those clusters.
The problem is that everyone else knows this. Farming blueprints on Stella Montis is a race against other players who all spawn in at the same time and rush the same spots. Route knowledge and shortcuts are the only edge you've got.
When you're racing other players, this trick saves real time on Augment containers specifically. Open the container and count the items before you loot anything.
3 or fewer items: Almost certainly no blueprint inside. Skip it and move to the next one.
4 or more items: Good chance a blueprint is in there. Take the time to check.
This only applies to the dedicated Augment containers, not regular loot containers.
There's also a more aggressive approach for busy lobbies. Open every container you can reach without stopping to loot, then circle back to the ones with 4+ items. Other players rarely bother checking containers that are already open, so you're effectively claiming them while everyone else runs past.
Spawn Routes and Shortcuts
Fast Stella Montis farming comes down to knowing the quickest path from each spawn point to the container clusters.
- Atrium Spawn: Run along the Cafeteria side, follow the corridor, and open the door toward the Lobby container room. A ladder to the right takes you up to the first set of Augment containers. This is one of the closer spawns.
- Lobby Metro Station Spawn: Run along the tunnel wall and grab the zipline. It takes you up to the Lobby container area. Some players will spawn closer to the containers than you, so expect competition.
- Western Tunnel Spawn: One of the farthest spawns from the action. Go through the door, take the zipline up to the top of Cargo Dock, then work your way into the Atrium and toward the Lobby containers. It's a longer path, but still doable if you move fast.
- Medical Spawn: Drop down to the lower platform and head straight into the Medical Research room, which has its own set of containers. This is actually a great spawn since players from other starting points take longer to get here. Once you've looted Medical Research, you can reach the Lobby area by dropping down (yes, you'll take fall damage, but speed matters more) and climbing up using a metal bracket on the wall.
- Seed Vault Spawn (Facing Zipline): Turn around from the zipline, head through the door, and move toward Business Center. If you spawn right next to Business Center, just run straight to the container room. A zipline from there connects to the Lobby area where the main clusters are.
Putting It Together
The most efficient approach treats each Stella Montis run as a quick in and out:
- Identify your spawn immediately.
- Take the fastest route to the nearest container cluster using the paths above.
- Check containers using the item count method.
- If nothing drops in the first couple minutes, bail and restart for fresh containers and a new spawn.
- Repeat.
Competition from other players is constant. Route knowledge gives you an edge, but RNG still controls when the blueprints actually show up. If you find duplicates along the way, you can always drop them near spawn for other players or just toss them.
Are They Worth Farming?
Neither new Augment replaces the existing top picks, but both carve out roles that didn't exist before.
The Survivor is still the best generalist Augment. Its 80 Weight Limit, 20 Backpack Slots, 5 Quick Use Slots, and 3 Safe Pockets make it the default pick for players who only want to run one Augment.
The Defensive remains the favorite for Heavy Shield users who also want strong loot capacity, with 20 Backpack Slots, 5 Quick Use Slots, and full shield compatibility.
The Safekeeper earns its slot if you regularly bring expensive weapons into dangerous runs. No other Augment lets you protect a gun from death, and the full shield compatibility gives it extra flexibility. It's a specialized tool, but a good one.
The Revival is the toughest sell. Passive healing and an integrated Defibrillator are nice in squads, but 16 Backpack Slots, Light only shields, and an unremarkable Weight Limit hold it back. The Survivor or Defensive will serve you better in almost every situation.
More Augment variety is a good thing for the game, and both new options will find their players. Just be ready for the grind if you're chasing the blueprints, because more entries in the loot pool means longer waits for any specific drop.