
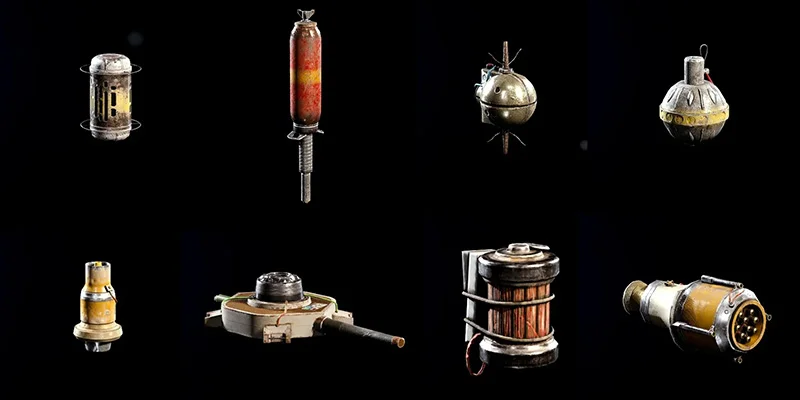
Grenades in Arc Raiders do a lot more than blow stuff up. With ARC machines blocking your path to extraction, you'll find that stuns, distractions, smoke cover, and area denial matter just as much as raw damage. This guide covers every grenade and explosive in the game, breaking down stats, crafting costs, best use cases, and tier rankings so you can pick the right tools for any situation.
Grenade Categories
Before diving into specifics, here's how throwables break down by function:
Damage Grenades deal direct health damage to Raiders and ARCs. The Trigger 'Nade, Heavy Fuze Grenade, Shrapnel Grenade, and Wolfpack all fit this category.
Area Denial grenades create hazardous zones that stick around, forcing enemies to move or take continuous damage. Blaze Grenades and Trailblazers work this way.
Stun/Crowd Control options incapacitate targets without dealing much damage. The Showstopper, Jolt Mine, and Hornet Driver shine here. Stun effects last way longer on ARC machines (usually 10 seconds) than on Raiders (2-4 seconds).
Utility grenades provide tactical advantages without combat effects. Smoke Grenades block vision, Lure Grenades pull ARC attention, and Tagging Grenades reveal enemy positions.
Traps are deployable grenade variants that trigger when enemies cross a tripwire laser or step into proximity range. Mines and grenade trap variants fall here.
Stamina Drain throwables use gas to drain stamina instead of health, making it harder for enemy Raiders to sprint or escape.
High-Damage Grenades
Trigger 'Nade
The Trigger 'Nade sits at the top of the food chain for PvP. This sticky explosive attaches to any surface or ARC, then lets you detonate it whenever you want.
| Stat | Value |
|---|---|
| Damage | 90 |
| Radius | 7.5m |
| Stun | None |
- Highest player-controlled damage among standard grenades
- You decide exactly when it goes off
- Throwing multiple Trigger 'Nades means they all detonate together when you hit the button
- Two of these will fully down an enemy Raider
- Works as both a thrown weapon and a placeable trap
Crafting: Recipe info varies between sources, so check the in-game Explosives Station for current requirements.
Wolfpack
The Wolfpack is an absolute ARC-killer. It deploys 12 homing missiles that seek out nearby ARC targets. Against Raiders, though, it does basically nothing.
| Stat | Value |
|---|---|
| Damage | 166 per missile (×12 missiles) |
| Maximum Total Damage | 1,992 |
| Radius | 100m (targeting range) |
- Ridiculous damage potential against large ARCs
- Homing missiles let you throw from safety and watch them work
- Top-tier pick for killing Leapers, Bombardiers, and Rocketeers
- Almost no skill required since missiles track automatically
Crafting: Explosives Station III with Explosive Compounds (×3) and ARC Motion Cores (×2).
Bison Driver
The Bison Driver creates a violent singularity and deals the highest single-hit damage of any grenade in the game.
| Stat | Value |
|---|---|
| Damage | 100 |
| Radius | 10m |
This is loot-only and can't be crafted. When you find one, it's great for finishing off large ARCs with that burst damage.
Heavy Fuze Grenade
Your standard timed grenade. It detonates after a short delay and deals solid blast damage across a decent radius.
| Stat | Value |
|---|---|
| Damage | 80 |
| Radius | 7.5m |
| Fuse Timer | 3 seconds |
- Reliable damage with good coverage
- Works well against both Raiders and ARCs
- Solid PvP choice, especially in tight spaces
- Reasonable crafting cost
Crafting: Explosives Station II with Explosive Compound (×1) and Canister (×2).
Apollo Shop Price: 1,920
Snap Blast Grenade
This sticky grenade attaches to whatever it hits, including enemy Raiders or ARCs, then detonates after a short delay.
| Stat | Value |
|---|---|
| Damage | 70 |
| Radius | 7.5m |
- Sticking to targets guarantees damage even on fast-moving enemies
- Slightly weaker than the Heavy Fuze but more consistent
- Particularly good against ARCs since attachment is guaranteed
- Great when enemies might dodge traditional grenades
Crafting: Explosives Station II with Chemicals (×7) and Magnet (×1).
Apollo Shop Price: 1,920
Shrapnel Grenade
A frag grenade that bursts into razor-sharp fragments. The damage is reduced against ARC armor, so this one's mainly for PvP.
| Stat | Value |
|---|---|
| Damage | 60 |
| Radius | 6m |
- Hits enemy Raiders hard, especially in enclosed spaces
- Shreds Raider shields effectively
- Affordable to craft
- Clears rooms well
Crafting: Explosives Station II with Crude Explosives (×1) and Steel Spring (×2).
Light Impact Grenade
A basic impact grenade that explodes the moment it hits any surface. No cooking or timing needed.
| Stat | Value |
|---|---|
| Damage | 30 |
| Radius | 2.5m |
- Instant detonation means no escape window
- Good for tagging Raiders behind cover
- Very cheap to craft
- Clears angles without peeking
- Low damage compared to other options
- Small radius limits effectiveness
- Weak against ARCs
Crafting: Basic Bench or Explosives Station I with Plastic (×1) and Chemicals (×3).
Apollo Shop Price: 810
Synthesized Fuel
A throwable fuel canister that only explodes when you shoot it. Also works as crafting material.
| Stat | Value |
|---|---|
| Damage | 80 |
| Radius | 7.5m |
- Free grenades if you find them while looting (common on Stella Monstus)
- Place them as traps and shoot when enemies get close
- Solid damage when you actually detonate them
- You have to shoot it to detonate, adding complexity
- Limited throw range
- Timing takes practice
This is loot-only, not craftable.
Wasp Driver
Another throwable that needs to be shot to explode. You can also recycle it for ARC Alloy.
| Stat | Value |
|---|---|
| Damage | 80 |
| Radius | 5m |
The Downsides: Extremely hard to shoot mid-air because of its small size. Much harder to hit than Synthesized Fuel. Most players just sell these for ARC Alloy.
Loot-only, drops from certain ARCs.
Fireball Burner
Creates small scattered fires on impact, dealing damage over time in a limited area.
| Stat | Value |
|---|---|
| Damage | 5 per second |
| Radius | 2m |
| Duration | 10 seconds |
| Maximum Potential Damage | 50 |
This is basically a worse Blaze Grenade. You get them from fire-type ARCs (the flamethrower variants). Fine if you find one, but not worth hunting for.
Area Denial Grenades
Blaze Grenade
Think of this as Arc Raiders' molotov. It detonates on impact and covers the area in fire, burning anything that stands in the flames.
| Stat | Value |
|---|---|
| Damage | 5 per second |
| Radius | 10m |
| Duration | 10 seconds |
| Maximum Potential Damage | 50 |
- A direct hit instantly strips shields from enemy Raiders
- Great for area denial against other players
- Strong against Leapers and other ARCs weak to fire
- Damage adds up fast if enemies stay in the zone
Crafting: Explosives Station III with Oil (×2) and Metal Parts (×7).
Some sources list Explosives Station II with Oil (×2) and Crude Explosives (×1). Check in-game for current recipe.
Trailblazer Grenade
A weird but powerful grenade that leaves a trail of flammable gas as it travels, then ignites the entire path in a rapid chain of explosions.
| Stat | Value |
|---|---|
| Damage | 20 per explosion in the trail |
- Covers a wide linear area with damage
- Can strip a Raider's shield and chunk their health in one throw if multiple explosions connect
- Devastating in tight corridors where enemies can't sidestep the trail
This grenade has a learning curve because of its unusual mechanics. Your damage depends entirely on how many explosions actually connect with the target.
Stun and Crowd Control
Showstopper
A delayed stun grenade built primarily for locking down ARCs. It doesn't deal damage but freezes enemies in place temporarily.
| Stat | Value |
|---|---|
| Damage | None |
| Stun (Raider) | 2 seconds |
| Stun (ARC) | 10 seconds |
| Radius | 6m |
- 10-second ARC stun is incredibly powerful
- Makes Matriarch and Queen fights way more manageable
- Creates huge windows to unload damage on large ARCs
- Can turn bad PvE situations around
- Only 2-second stun on Raiders limits PvP value
- Some players report inconsistent detonation (occasionally fails to explode despite close proximity)
Jolt Mine
A proximity mine that pops up and stuns anything nearby. No damage, just incapacitation.
| Stat | Value |
|---|---|
| Damage | None |
| Stun (Raider) | 4 seconds |
| Stun (ARC) | 10 seconds |
| Radius | 5m |
- 4-second Raider stun is double what the Showstopper gives you
- Great for locking down entry points
- Harder to spot than tripwire traps
- Minimal noise compared to other mines
- Dominates 1v1 fights when placed correctly
How to Use It: Plant at tower entrances when you're camping to defend against pushes. Combine with other traps to keep enemies in danger zones longer. A must-have for defensive playstyles.
Crafting: Explosives Station II with Electrical Component (×1) and Battery (×1).
Apollo Shop Price: 1,920
Hornet Driver
Stuns ARCs for a long time but does almost nothing to Raiders. Can be recycled for ARC Alloy.
| Stat | Value |
|---|---|
| Damage | None |
| Stun (Raider) | 0.5 seconds |
| Stun (ARC) | 10 seconds |
| Radius | 6m |
- Long ARC stun duration
- Lets you stun machines and then destroy them
- Can be recycled for ARC Alloy if you don't need the stun
- Useless against Raiders (0.5-second stun is nothing)
- PvE-only item
Good for stunning multiple ARCs before finishing them off, but most players sell these for the Alloy.
Pulse Mine
A proximity mine that staggers and knocks enemies back several feet without dealing direct damage.
| Stat | Value |
|---|---|
| Damage | None |
| Effect | Knockback/stagger |
- Can knock Raiders off high ledges
- Staggers enemies for 3-4 seconds
- Combine with other traps for extended danger time
- Good for defending high-ground positions
How to Use It: Place at the top of ladders or vertical ziplines to knock climbing enemies back down.
Utility Grenades
Smoke Grenade
Creates a large, long-lasting smoke cloud that blocks vision for Raiders and ARCs alike.
| Stat | Value |
|---|---|
| Damage | None |
| Radius | 7.5m |
| Duration | 20 seconds |
- Makes extractions far safer
- Much harder for enemies to target you
- Blocks ARC sightlines
- Long duration gives you extended cover
- One of the best utility items you can bring
Crafting: Utility Station I with Chemicals (×7) and Canister (×1).
Some sources list Chemicals (×14). Check in-game for current recipe.
Apollo Shop Price: 1,920
Li'l Smoke Grenade
A smaller, shorter version of the standard Smoke Grenade.
| Stat | Value |
|---|---|
| Damage | None |
| Radius | 2.5m |
| Duration | 6 seconds |
- Very cheap to craft
- Good for quick cover while looting
- Works as emergency concealment
- Better than nothing when you can't afford full smoke grenades
Crafting: Utility Station I with Chemicals (×5) and Plastic Parts (×1).
Despite the shorter duration and smaller radius, the low cost makes these solid budget utility items.
Lure Grenade
A noise device that attracts ARC attention, pulling machines away from your position.
| Stat | Value |
|---|---|
| Damage | None |
| Attraction Radius | 50m |
| Duration | 15 seconds |
- Distracts ARCs from your position
- Throw at enemy Raiders to make ARCs attack them instead
- Might cause friendly-fire damage if one ARC shoots another while targeting the lure
- Doesn't reliably remove aggro if ARCs are already targeting you
- Results can be inconsistent since ARCs sometimes lose interest quickly
- Limited against bosses (Queen, Matriarch)
Crafting: Utility Bench II with Speaker Component (×2) and Plastic Parts (×2).
Some sources list Speaker Component (×1) and Plastic Parts (×2). Check in-game for current recipe.
Tagging Grenade
Explodes after a brief delay and tags any Raiders or ARCs caught in the radius, revealing their position for 30 seconds.
| Stat | Value |
|---|---|
| Damage | None |
| Radius | 6m |
| Tag Duration | 30 seconds |
- Reveals enemy positions through walls and cover
- 30 seconds of constant tracking
- Knowing exactly where enemies are can swing fights
Crafting: Utility Bench III with Plastic (×4) and Sensors (×2).
No damage, but constant position awareness provides solid tactical value.
Seeker Grenade
A smaller version of the Wolfpack that sends a single homing missile at the nearest ARC.
| Stat | Value |
|---|---|
| Damage | 50 |
- Guaranteed hit thanks to homing
- Great for quickly killing small flying ARCs (Hornets, Wasps)
- Respectable damage for what it is
- Decent chip damage on larger ARCs
Keep a few around for dealing with annoying flying ARCs that are tough to hit with normal weapons.
Snitch Scanner
A throwable that calls ARC units to your location.
- Necessary for farming ARCs
- Used for completing trials that require ARC kills
- Spawns two Wasp-type ARCs
- Completely useless outside of intentional ARC farming
- Calling ARCs to yourself is obviously dangerous
Only bring these when you're specifically farming ARCs for trials or leaderboard points.
Trap Variants
Explosive Mine
A proximity mine that pops up and detonates when enemies get close.
| Stat | Value |
|---|---|
| Damage | 40 |
- Catches players off-guard in unexpected spots
- Good area denial
- Harder to spot than tripwire traps
Where to Place Them: Behind closed doors, at the top of ziplines, near high-traffic loot areas.
Crafting: Explosives Station I with Explosive Compound (×1) and Sensors (×1).
Gas Mine
A proximity mine that deploys a stamina-draining gas cloud when triggered.
| Stat | Value |
|---|---|
| Effect | Stamina drain |
| Activation Radius | A few meters |
- Place on floors or walls
- Makes it harder for enemy Raiders to run away
- No health damage
- Less threatening than damage mines
More of a harassment tool than a kill option.
Deadline Mine
An extremely powerful timed mine with massive damage. The timer starts the moment you place it.
| Stat | Value |
|---|---|
| Damage | 1,000 |
| Radius | 10m |
| Timer | 6 seconds |
- Massive damage that one-shots Bombardiers and most other ARCs
- Devastating against Matriarch and Queen when you hit weak points
- That's 33 Light Impact Grenades worth of damage in one explosion
- 6-second timer gives Raiders time to escape if they're not trapped
- You can only buy one at a time (nerfed from three)
- Expensive
This works best against large ARCs that can't easily escape, or in confined areas where enemy Raiders have nowhere to go.
Blaze Grenade Trap
A tripwire version of the Blaze Grenade that ignites the area when triggered.
The Downsides: Easy to spot because of the visible laser beam. Less effective than just throwing Blaze Grenades manually when you need them.
Crafting: Workbench I with Blaze Grenade (×1) and Wires (×1).
Gas Grenade Trap
A tripwire version of the Gas Grenade.
Crafting: Workbench I (specific materials not confirmed in sources).
Less popular than the Gas Grenade or Gas Mine because of the visible tripwire.
Smoke Grenade Trap
A tripwire version of the Smoke Grenade.
Crafting: Workbench I with Smoke Grenade (×1) and Wires (×1).
Most players consider this a waste of a good Smoke Grenade. Deploying it manually when you actually need it provides way more value than hoping someone trips it.
Lure Grenade Trap
A tripwire that deploys a Lure Grenade when triggered.
Crafting: Workbench I with Wires (×1) and Lure Grenade (×1).
How to Use It: The loud noise can alert you to enemy Raiders approaching.
Stamina Drain
Gas Grenade
Creates a toxic cloud that rapidly drains stamina from Raiders standing in it.
| Stat | Value |
|---|---|
| Health Damage | None |
| Stamina Drain | 25 per second |
| Radius | 7.5m |
| Duration | 20 seconds |
- Stops enemy Raiders from sprinting or escaping
- Cheap to craft
- Large radius
- Long duration for zone control
- No health damage
- Most players want direct damage instead
- Support/area denial role rather than kills
Crafting: Explosives Station I with Chemicals (×4) and Rubber Parts (×2).
Apollo Shop Price: 810
While it won't kill anyone directly, stamina control can be valuable for stopping enemy Raiders from disengaging.
Gadgets and Equipment
Barricade Kit
A deployable wall that creates instant cover.
- Cover on demand anywhere with enough space
- Blocks shots from Queen and Matriarch
- Extremely versatile for offense and defense
- Dirt cheap to craft
- Most players don't use these nearly enough
How to Use It: Block angles during firefights. Create safe zones for boss farming. Instant cover in open areas.
One of the most underrated items in the game. Creating cover anywhere at low cost gives you a ton of flexibility.
Zipline
Creates a traversal line for rapid movement across gaps or to elevated positions.
- Top-tier mobility tool
- Reach places you can't get to normally
- Create shortcuts and escape routes
- Great for gaining high ground
- Fast team rotations
How to Use It: Access elevated positions for Queen/Matriarch farming. Create one-way advantages by ziplining somewhere others can't reach. Quick rotates during fights.
Snap Hook (Grappling Hook)
A portable grappling hook for quick movement.
| Stat | Value |
|---|---|
| Maximum Range | 20m |
- Fast vertical mobility
- Quick access to rooftops and elevated spots
- Fun, dynamic movement
- Has a usage meter that depletes (about 2 uses before empty)
- Needs recharge time between uses
- 20m range limits long-distance grapples
- Expensive to craft
While the movement is fun, the cost and limited uses make this more of a luxury than a necessity.
Photoelectric Cloak
When you hold this out and activate it, ARC machines can't see you at all.
- Complete invisibility to ARCs while active
- Great for escaping bad ARC encounters
- Must be held and activated manually
- You move slowly while using it
- Experienced players usually don't need it once they learn ARC patterns
Smoke Grenades do similar work for much less, making this somewhat redundant as you get better at the game.
Door Blocker
Prevents doors from opening normally. Enemies have to breach, which takes time and makes noise.
- Alerts you to incoming enemies
- Buys time to prepare for a fight
- Cheap early warning system
- Only works on doors (Barricades go anywhere)
- Doesn't completely stop entry
Barricades are more flexible, but Door Blockers have their place for holding specific spots.
Noisemaker
A deployable device that activates and makes loud continuous noise when enemies approach.
Why It's Useful: Alerts you to enemy Raiders in the area. Works as an early warning system.
Some exploits with this item have been patched. Its main use now is as an alarm.
Binoculars
Gives you a zoomed first-person view of distant objects.
Generally considered one of the most useless items in the game. Sometimes helpful for scouting, but most players groan when they get one in a free loadout kit.
Flame Spray
A short-range flamethrower that requires getting very close to targets.
- Good against Leapers in close quarters
- Melts ARCs stuck in tight spaces quickly
- Awful in PvP because of the short range
- You have to get dangerously close
- Very niche use case
If you find a Leaper stuck in a tight spot, the Flame Spray can melt it fast. Beyond that, this item has very limited applications.
Recorder
A musical instrument you can play.
This is a meme item. Playing the Recorder is widely recognized as a sign you're friendly and just messing around. Many players have an unwritten rule against shooting anyone playing one.
Remote Raider Flare
A placeable device that fires a fake distress flare into the sky when activated.
- Mimics the flare from downed Raiders
- Can bait enemy teams expecting free loot
- Set up ambushes by deploying multiple flares
Success depends on other Raiders actually taking the bait. Situational, but fun for creative plays.
Raider Hatch Key
Unlocks Raider Hatches for instant extraction without calling for evac.
- Immediate extraction option
- Saves time versus calling for evac
- Great for quick escapes with valuable loot
Limitation: Doesn't work during Night Raids.
Consider bringing one for high-value runs like Matriarch hunts.
Light Sticks (Blue, Green, Red, Yellow)
Glow sticks that cast colored light in a 7m radius for 40 seconds.
Mostly cosmetic. Some players use them for fun or to mark locations, but they have minimal practical use.
How to Use Grenades
Equipping Grenades
Before heading topside, drag grenades into your loadout. You can get grenades through:
- Crafting at workbenches and stations
- Looting from caches and defeated ARCs
- Purchasing from Apollo (the in-game shop)
Throwing Grenades
From Inventory:
- Open your inventory bag
- Equip the grenade you want
- Hold the fire button to cook/aim
- Release to throw
Quick Use Slot (Better Method):
- Drag grenades to your quick use slot before the raid
- During the raid, hold 'Q'
- Select the throwable from the radial menu
- Hold fire to cook, release to throw
After throwing, grenades detonate based on type. Impact grenades explode immediately, fuse grenades wait for their timer, and remote-detonated grenades wait for your command.
Grenade Tier Rankings
Based on extensive analysis across PvE and PvP, here's where everything lands:
SSS Tier (Best in Game)
Trigger 'Nade: The best grenade overall. Highest damage, remote detonation control, and works as both a thrown weapon and trap. Two of these guarantee a Raider kill.
Jolt Mine: The best mine in the game. That 4-second Raider stun (double the Showstopper) combined with 10-second ARC stun makes this invaluable for defense and 1v1 dominance.
Barricade Kit: Extremely underrated. Creating cover anywhere, blocking boss attacks, and controlling sightlines at dirt-cheap cost makes this a must-have.
S Tier (Excellent)
A Tier (Very Good)
B Tier (Situationally Good)
C Tier (Limited Use)
Useless Tier
Gas Grenade Trap: Visible tripwire and no damage make this ineffective.
Smoke Grenade Trap: Wastes a good Smoke Grenade on a tripwire when manual deployment works far better.
Binoculars: Almost never worth the inventory slot.
Light Sticks: Roleplay items only.
Wasp Driver: Too hard to shoot and minimal damage for the effort.
Recorder: A meme, not a tool.
Situational Recommendations
Best Grenades for PvP
- Trigger 'Nade: Remote detonation and high damage make it the king of PvP grenades
- Heavy Fuze Grenade: Reliable damage in a good radius
- Shrapnel Grenade: Shield-shredding effectiveness
- Blaze Grenade: Instant shield removal on direct hits
- Jolt Mine: 4-second stun gives you guaranteed advantage in 1v1s
Best Grenades for PvE (General ARCs)
- Wolfpack: Homing missiles devastate groups of ARCs
- Showstopper: 10-second stun creates massive damage windows
- Deadline Mine: One-shots most ARCs
- Blaze Grenade: Effective against fire-weak enemies
- Seeker Grenade: Guarantees hits on annoying flying ARCs
Best Grenades for Boss Fights (Queen, Matriarch)
- Deadline Mine: Massive damage to cores
- Showstopper: Multiple 10-second stun windows
- Barricade Kit: Blocks boss attacks for safe farming
- Zipline: Access elevated positions for safer damage dealing
- Wolfpack: Heavy damage output
Best Budget Options
- Light Impact Grenade: Cheap crafting cost, instant detonation
- Li'l Smoke Grenade: Very cheap utility
- Barricade Kit: Extremely cost-effective for the value
- Gas Grenade: Inexpensive area control
Wrapping Up
Grenades and explosives in Arc Raiders offer way more than just damage. Knowing when to throw a stun versus a damage grenade, when to pop smoke for extraction versus drop a barricade for cover, and how to trap areas effectively can dramatically improve your survival rate.
If you're newer, focus on a few reliable options first: Heavy Fuze Grenades for damage, Smoke Grenades for utility, and Barricade Kits for defensive flexibility. As you get more comfortable, work in specialized tools like Trigger 'Nades for PvP dominance and Wolfpacks for efficient ARC elimination.
Match your grenade selection to what you're actually doing. A Matriarch hunt needs different tools than a quick loot run, and PvP-focused gameplay requires different prep than ARC farming. Build your loadout with purpose, and grenades will carry a lot of weight throughout your Arc Raiders runs.